MOLEBIO LAB #2: Gel Electrophoresis
|
|
|
- Eric Hutchinson
- 5 years ago
- Views:
Transcription
1 MOLEBIO LAB #2: Gel Electrophoresis Introduction: Electrophoresis is the movement of charged molecules under the influence of an electric field. Because amino acids, proteins, and nucleic acids are charged molecules, they migrate in an electric field. In the most common form of electrophoresis, the sample is applied to a stabilizing medium, which serves as a matrix for the buffer in which the ample molecules travel. The agarose gel is frequently used in the electrophoretic separation of molecules since low percentage gels (i.e. 1% agarose) form a sponge-like network which serves as a medium for the buffer, but has pores large enough to allow even the largest proteins to pass unimpeded. However, changing the concentration of agarose can affect how molecules move through the matrix. A higher percentage agarose gel would increase resistance and therefore slow the overall migration of molecules. The molecules will move according to relative size and charge in a certain ph. If charge is not a factor, then smaller molecules can migrate through the gel faster than larger molecules. The agarose gel, containing preformed sample wells, is submerged in a buffer, which is contained within the electrophoretic chamber. Virtually all in vitro biochemical experiments involving purified biomolecules, cell extracts, or intact cells are preformed in the presence of a suitable buffer so that a stable ph value can be maintained. Buffers with a variety of pk a values are available (see Table 1). Some commonly used buffers are naturally occurring compounds. For example, acetic acid and sodium acetate can be used of the ph range from 4 to 6, and mixtures of KH 2 PO 4 and K 2 HOP 4 can be used in the ph range from 6 to 8. Some other commonly used buffers are synthetic amines, such as MES, PIPES, HEPES, and Tris. The structures of some of these can be seen in Figure 1. The primary amine Tris was one of the earliest synthetic buffers for the ph range from 7 to 9. Its pk a value is lowered by the inductive effect of the three OH groups. Tris is still widely used, although it can react with aldehydes and ketones and is toxic to some cells. HEPES is also popular because it is an effective buffer at physiological ph and is less reactive and less toxic than Tris. Table 1: pk a values of some commonly used buffers BUFFER pk a at 25 ºC Phospate (pk 1 ) 2.2 Acetate 4.8 MES 6.1 Citrate (pk 3 ) 6.4 PIPES 6.8 Phosphate (pk 2 ) HEPES Tris 8.1 Glycylglycine 8.2 Glycine (pk 2 ) 9.8 Page 1 of 8
 to determine how much buffer at add to DI H 2 O to obtain a 1X solution: C 1 V 1 = C 2 V 2 After preparing the agarose gel, samples that are to be separated are")
2 Figure 1 All buffers are used at a final concentration of 1X. When you are preparing stock solutions of buffers, often this is done in high concentrations to conserve space in the lab. Rely on the standard formula (below) to determine how much buffer at add to DI H 2 O to obtain a 1X solution: C 1 V 1 = C 2 V 2 After preparing the agarose gel, samples that are to be separated are then loaded into the sample wells. Current from the power supply travels to the negative electrode, supplying electrons to the conductive buffer solution, gel, and positive electrode, thus completing the circuit. Changing the current in the electrophoresis chamber will affect the migration speed and resolution of the separating bands. Figure 2: Gel Electrophoresis SAFETY WHEN ATTACHING ELECTRODES TO YOUR GEL BOX, BE SURE THE POWER SUPPLY IS TURNED OFF. CONNECT BLACK TO BLACK AND RED TO RED. Micklos, David A. Freyer, Greg A. DNA Science. 2 nd edition. Cold Spring Harbor, NY: Cold Spring Harbor Laboratory Press, Print. Moran, Laurence A. Scrimgeour, K. Gray. Horton, H. Robert. Ochs, Raymond S. Rawn, J. David. Biochemistry. Second edition. Englewood Cliffs, HJ: Neil Patterson Publishers Prentice Hall, Print. Voet, Donald. Voet, Judith G. Pratt, Charlotte W. Fundamentals of Biochemistry. 2 nd edition. John Wiley & Sons, Inc., Print. Page 2 of 8
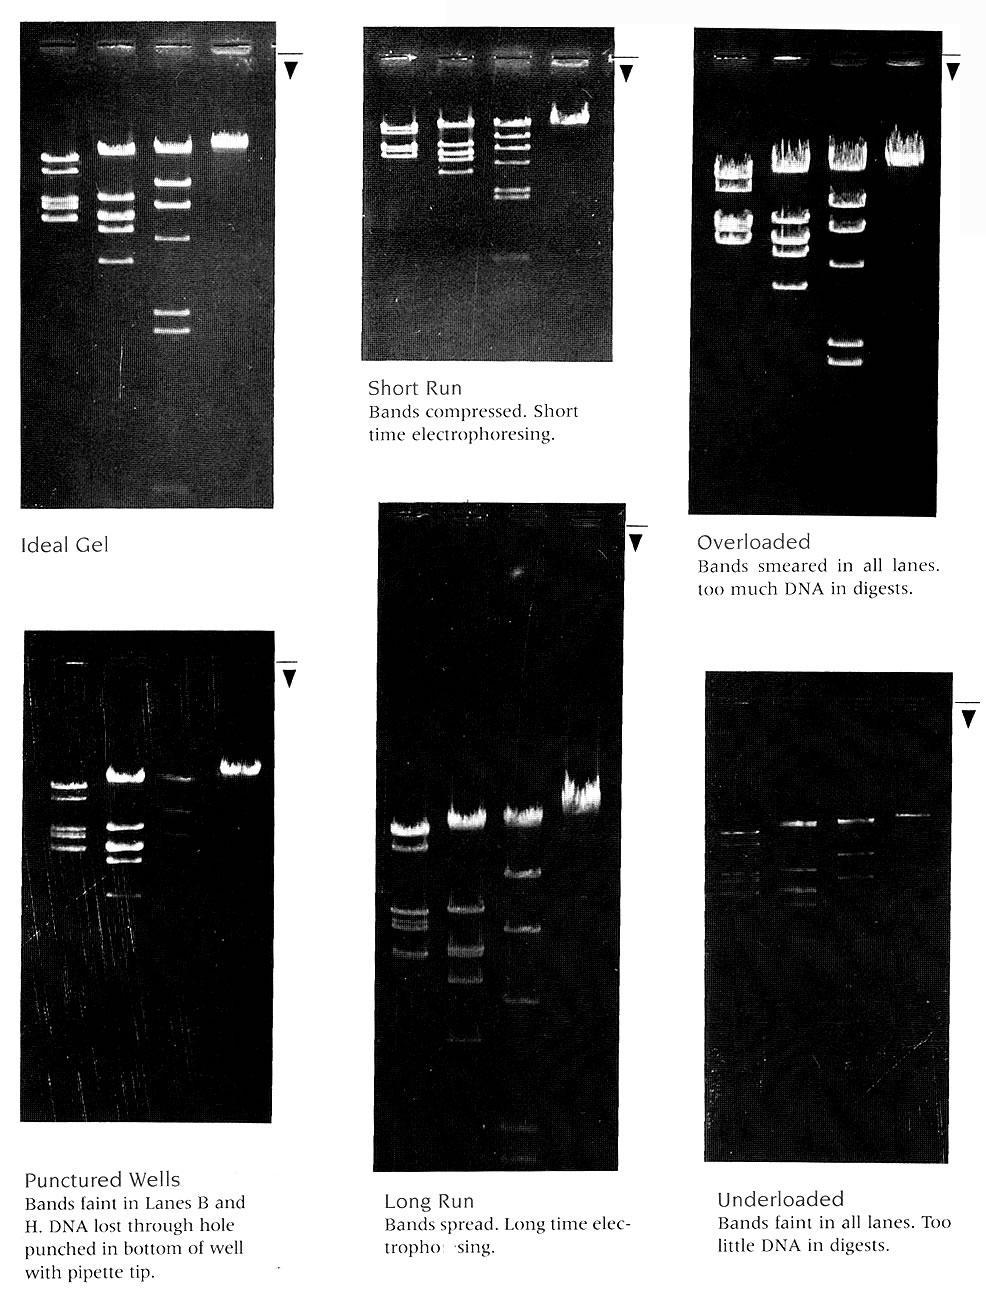

3 Figure 3: Explanations of Poor Gels Page 3 of 8
4 Procedure: DILTUION OF 50X BUFFER 1. We will use a concentrated 50X Tris/Acetate/EDTA (TAE) electrophoresis buffer stock and dilute this to run at 1X (which is ~ ph 8.0). Show your calculations on the Lab Questions Section. PREAPARATION OF 0.8% AGAROSE 2. Add 0.8 g of agarose for every 100 ml (this makes it 0.8% w/v) of 1X TBE electrophoresis buffer into a 500 ml Erlenmeyer flask. BE CAREFUL NOT TO FILL ANY FLASK MORE THAN ONE-THIRD TO ONE-HALF FULL WITH BUFFER! The scalding hot agarose/buffer mixture can boil over in the microwave. Check with the instructor to determine how much agarose you will need to prepare. Show your calculations on the Lab Questions Section. 3. Stir to suspend the agarose. 4. Heat uncovered in a microwave oven at high setting until all agarose is dissolved. Do this at 1- minute intervals. The agarose will go into solution as the liquid begins to boil. Do not allow the solution to boil for more than a few seconds as this will alter the final concentration. Check between heating cycles and carefully swirl solution to make sure that all agarose has dissolved. 5. If prepared well before using, cover with foil and hold in a hot-water bath at ~60 ºC. Remove any skin or solidified agarose from surface prior to using. CASTING THE AGAROSE GEL 6. Seal the ends of the gel-casting tray with masking tape and insert comb in the middle position. 7. Carefully pour enough agarose solution at approximately 50 ºC into the casting tray to fill to a depth of about 4 mm. The gel should cover only about 1/3 of the height of the comb teeth (approximately 0.5 cm). Thin gels yield dramatically better results than thick gels, so case gels thick enough to contain the volume of DNA that will be loaded. 8. Do not move or jostle the casting tray while agarose is solidifying. As it polymerizes about 5-10 minutes the agarose will change from clear to opaque. 9. When agarose is set, unseal ends of casting tray. Play tray on platform of the gel box, so that the black and red bands match up with their respective-colored dots. 10. Fill the box with 1X TBE buffer, to a level that just covers the entire surface of the gel. 11. Gently remove the comb, taking care not to rip the gel. 12. Make certain that well holes left by the comb are completely submerged. If you notice dimples around the wells, slowly add buffer until they disappear. 13. Continue to slowly fill the electrophoresis chamber with buffer until the gel is covered with a 2 3 mm layer of buffer. LOADING THE AGAROSE GEL 14. Load 10 L of each of the seven colored solutions/stains into wells 1 through 7 on your gel (remember which is which). See Figure 4 for proper hand positioning in loading the gel. Page 4 of 8
5 Figure 4: Hand Positions for Loading an Agarose Gel 15. Plug your gel boxes into the power source (black to black and red to red). Turn on the power source and apply 100V (check with instructor if this is correct time is an issue). 16. Electrophorese for 10 minutes, and then turn off and disconnect the power supply. 17. Remove the lid of the electrophoresis unit and note the relative position of the four solutions as compared to their point of application at the sample wells. 18. Slide the gel into a shallow plastic staining tray. Label the tray with masking tape. 19. Photograph (if you have the ability to) and/or also draw a diagram of your gel. 20. Measure the distance of the bands (in mm) from the sample origin. A GOOD SCIENCE EXPERIMENT IS ALWAYS REPEATABLE! 21. Now, we might repeat steps 2 20 of this protocol. However, your group will be given specific agarose concentrations to prepare and voltages to run under. Page 5 of 8
6 1. Show your work for the dilution of concentrated stock TAE to make 500 ml of 1X TAE for our first electrophoretic run. 2. Show your calculations (of ingredients) for preparing your assigned amount of 0.8% agarose. 3. Sketch the gel below. Include positive and negative ends. Include measurements taken from the actual gel. Page 6 of 8
7 4. What can you infer from the results? What shouldn t you assume? Remember, you do not know that actual molecular structure of each of these molecules 5. Describe two ways that you could do that would influence the migration speed of the molecules. Include the effect that each change on the protocol would have on the results. Page 7 of 8
8 6. Indicate what your concentration of agarose was for RUN #2:. 7. Sketch the gel below for RUN #2. Include positive and negative ends. Include measurements taken from the actual gel. How did the colored solutions move compared to the control RUN #1? 8. Indicate what voltage was used for RUN #3:. 9. Sketch the gels below for RUN #3. Include positive and negative ends. Include measurements taken from the actual gel. How did the colored solutions move compared to the control RUN #1? Page 8 of 8