Techniques for Biotechnology!
|
|
|
- Bryan Ross
- 5 years ago
- Views:
Transcription

1 Techniques for Biotechnology!

2 Quantities for Molecular Biology: unlike other labs where we might measure volume in milliliters and mass in grams, in molecular biology / biotech labs, we use MUCH smaller amounts

3 Quantities for Molecular Biology: VOLUME: microliter, μl 1 μl = ml = L or 1 L = 1000 ml = 1,000,000 μl
 1 μg = 0.000001 g (10-6 g) and 1 ng = 0.")
4 Quantities for Molecular Biology: MASS: microgram (μg) or nanogram (ng) 1 μg = g (10-6 g) and 1 ng = g (10-9 g)

5 Why such small amounts? cost of materials difficult in obtaining materials (most are produced within living organisms, like bacteria, and then must be purified and separated from all other cellular substances)
6
7 MICROPIPETTING: used to dispense small volumes of liquids we will use the P-20 -measures volumes between 2 and 20 μl -turn the dial to adjust volume **this is a high quality, precision instrument that MUST be used properly! It is VERY expensive and fragile.
8
 (2-20 μl; 20-200 μl; 200-1000 μl) 2) Use a new tip for each liquid you pipette into; also, switch tips if you accidentally touch the tip to anything other than the liquid; 3) Always be")
9 MICROPIPETTING DOs : DO: 1) Check before using do you have the right pipette set to the right volume? (and within the min/max range of the pipette?) (2-20 μl; μl; μl) 2) Use a new tip for each liquid you pipette into; also, switch tips if you accidentally touch the tip to anything other than the liquid; 3) Always be careful!! ($300 per pipette) 4) READ DIRECTIONS!!!
10 MICROPIPETTING DON Ts : DON T: 1) Don t use without a TIP (never do this!) 2) Don t set the pipette past its minimum or maximum volume (will damage the internal mechanism!) 3) Don t turn it upside down with liquid in the tip 4) Don t allow the plunger to snap back after withdrawing or ejecting fluid.
11
12 Reading a Micropipette: P
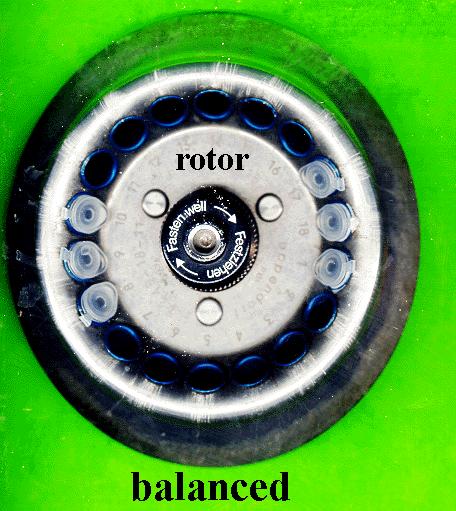
13 Reading a Micropipette: P μl 1 5
14 Reading a Micropipette: P
15 Reading a Micropipette: P μl 5 7
16 Reading a Micropipette: P
17 Reading a Micropipette: P μl 0 0
18 Reading a Micropipette: P
19 Reading a Micropipette: P μl 2 0
20 Using a Micropipette: 1) Push pipette firmly down onto tip. 2) Filling: depress with thumb to FIRST stop only! 3) Emptying: depress with thumb to SECOND stop! 4) Discharge tip into waste tip container.
21


22 Using a Microcentrifuge: sometimes we need to spin our test tubes to mix or pool the liquids inside for this we use a microcentrifuge
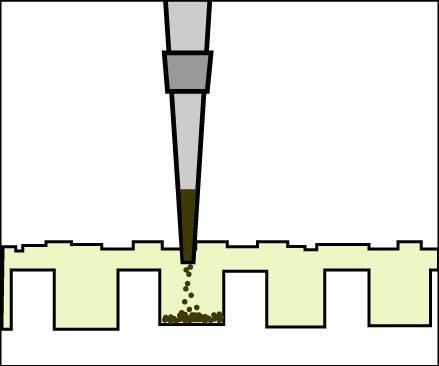
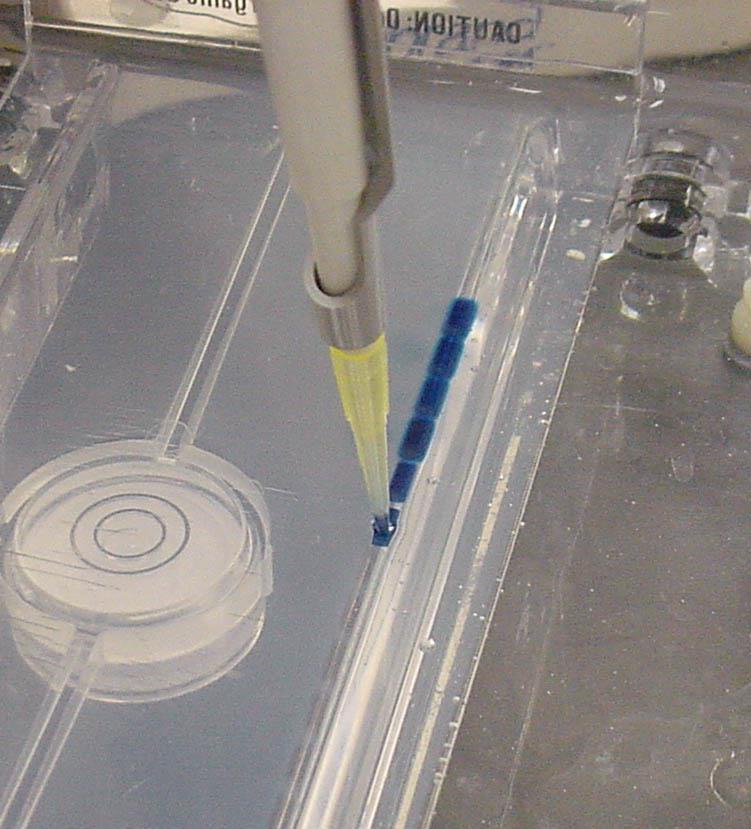
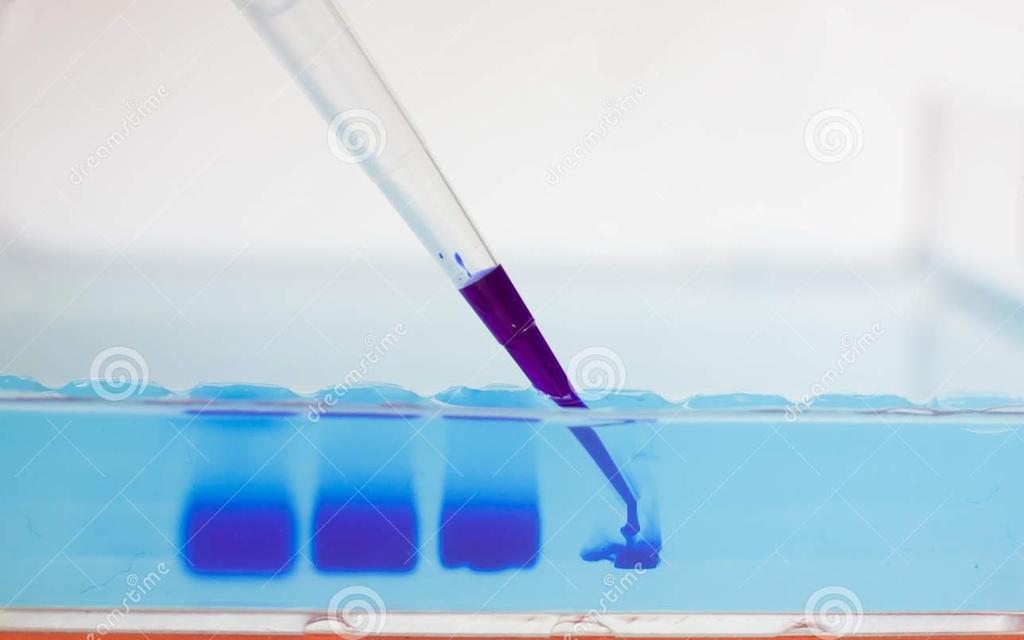
23 Using a Microcentrifuge: When using a microcentrifuge: 1) Close the caps on all the tubes; 2) Place tubes in the centrifuge so that the rotor is BALANCED (unbalanced rotors could damage the mechanism); 3) Close the lid of the centrifuge and spin; 4) Wait for the rotor to stop spinning to open the lid and remove the tubes.

24
25
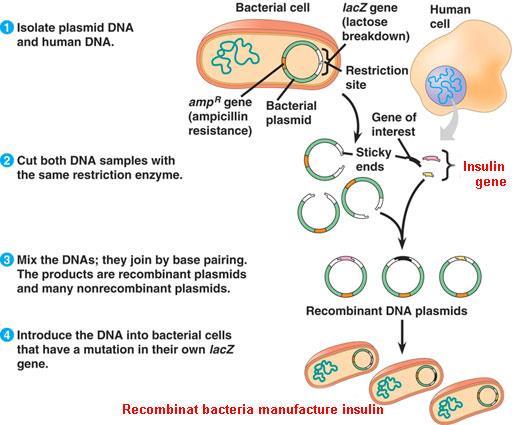
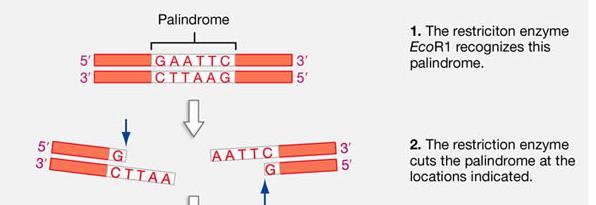
26 RESTRICTION ENZYMES: enzymes that recognize and cut DNA at specific sequences many restriction enzymes cut the DNA in an uneven or staggered pattern, which creates sticky ends the result is a collection of DNA fragments of different sizes
27
28
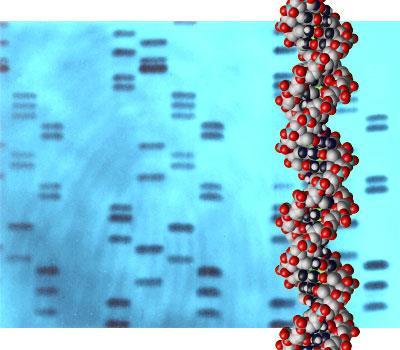
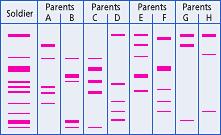
29 GEL ELECTROPHORESIS: to separate a sample of different-sized DNA fragments, we use a technique called ELECTROPHORESIS. the DNA sample is loaded into a well of an agarose gel (jello-like substance) an electric current is applied which moves the negatively-charged DNA fragments toward the positive end small fragments move faster than large fragments
30

31
32 LOADING A GEL: use a micropipette to draw up your DNA sample insert tip of pipette into gel box so that it is under the buffer level and just over the well carefully push down on the plunger to dispense your DNA into the well

33
34
35
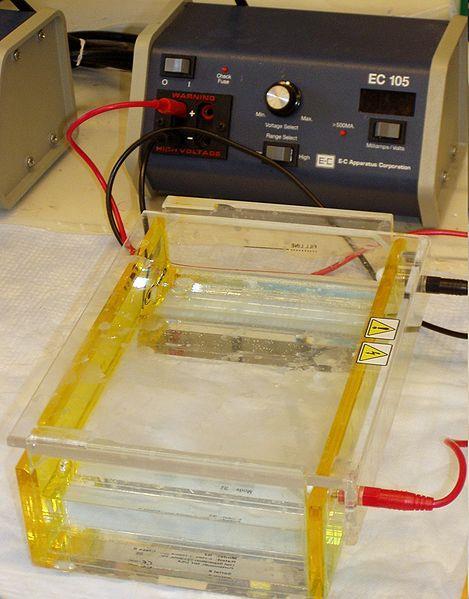
36 RUNNING A GEL: once all of the wells are loaded, close the gel box attach the red and black leads to the power supply (red with red; black with black) turn on the power supply and watch the sample start running through the gel STOP (turn the power supply OFF) when the front end of the colored sample is almost to the end of the gel don t let the DNA run off the gel!!!
37
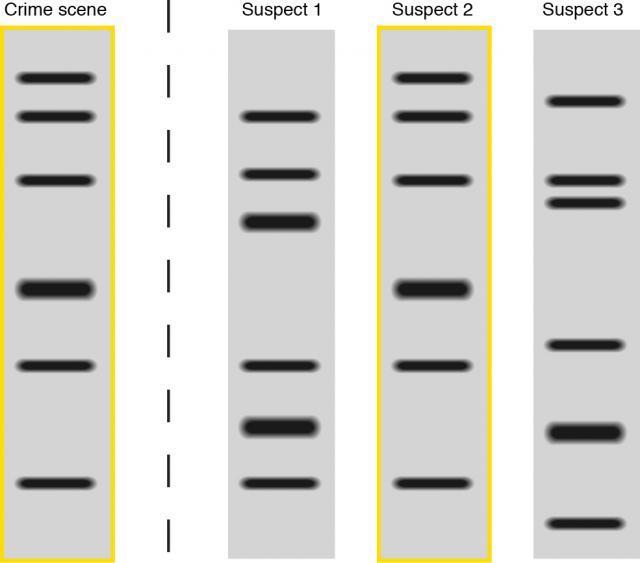
38 ANALYZING THE GEL: the gel can be stored for later or analyzed right away; to analyze the gel, we first stain it so that the DNA is visible; the DNA fragments will have created a bar code this can either be photographed or drawn / copied to preserve the results; if this is a crime-scene analysis, bar-codes from different suspects can then be compared
39

40
41
42