NOTE: Close any security window that pops up (McAfee, MalwareBytes, etc.)
|
|
|
- Todd Barton
- 5 years ago
- Views:
Transcription
1 Table of Contents Cashier Start-of-Day Process... 2 Logging in as a cashier and Opening the Terminal... 2 Turn the computer on and log in... 2 Cashier Instructions for Sales Events... 7 Checkout Process... 7 Selling Items... 8 How to Handle a Bad Scan... 8 Payment Screen Payment with Cash Payment with Check Payment with Credit Card Payment with Gift Certificate Selling a Gift Certificate Voiding a Sale Returning Items Cashier End-of-Day Close Out Process NOTE: Close any security window that pops up (McAfee, MalwareBytes, etc.) 1 Updated 11/22/2016

2 Cashier Start-of-Day Process Note: For information about using the touch screen and the virtual keyboard, see separate document Using the POS system touch screen. Logging in as a cashier and Opening the Terminal Turn the computer on and log in 1. Push the round power button on the back of the computer/monitor to turn it on. As you are looking at the screen, it is behind the upper right hand corner. 2. When the rainbow screen appears (after 15 seconds or so), put your finger on the screen and drag the rainbow screen up. This will bring you to a new sign-in screen. 3. Touch or click the password field, and use the keyboard to enter lacssales (all lowercase) for Terminal 1 or LACSsales for Terminal 2. Touch or click the arrow key by the gray password field and the Start screen will appear. 4. At the Start screen, touch or click the square with Simple Consign in it. The Firefox internet browser starts up and displays the Simple Consign login page after around 15 seconds. 2 Updated 11/22/2016
3 5. Touch or click the Login ID field. 6. Enter T33324 for Terminal 1 or T74854 for Terminal Touch or click the Password field to gain focus and enter the password with the Virtual Keyboard. The password is terminal1 (all lower case) for Terminal 1 or terminal2 for Terminal 2. Touch or click the Login button. The PIN login screen is displayed: 8. On the Terminal Login screen, touch or click the PIN field. Enter your PIN. If you don t know yours, you should be able to find it on the list in the cashier login folder. Simple Consign will now start up. 9. The first cashier of the day will need to open the terminal. If it is needed after login, the screen will look like this: 3 Updated 11/22/2016
4 4 Updated 11/22/2016

5 As the displayed instructions indicate, touch the Admin tab. This screen is displayed: Touch or click Open Terminal. This screen is displayed: Touch or click the Starting Balance field and enter the Cash Starting Balance calculated on the Cash Register Start-up Tally Sheet. Then touch or click Open Terminal. The Checkout tab is displayed: 5 Updated 11/22/2016

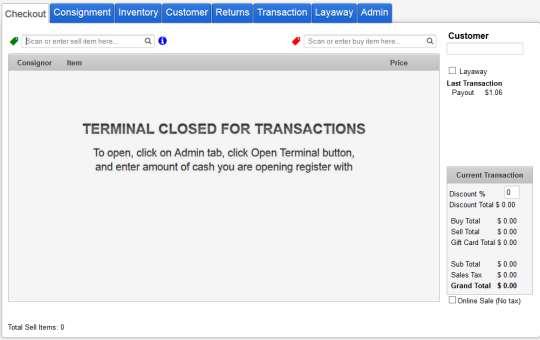
6 Checkout and other Cashier Functions begin on the page following this one. When your shift is over and another cashier is taking over for you, click on the Change Pin/Logout button in the upper right hand corner. The Terminal Login screen is displayed: The new cashier can enter their PIN to login on the Terminal Login screen. 6 Updated 11/22/2016
7 Cashier Instructions for Sales Events Checkout Process Log into the computer using your Cashier PIN. The Checkout screen should be displayed: If not, touch/click the Checkout tab (the first tab on the left). You are now ready to enter a sale. 7 Updated 11/22/2016
, the item will be shown as: The SKU is shown in the Name field.")

8 Selling Items Hold the scanner over the item s bar code and scan the item. After each item is scanned, make sure the item appears on the screen. Repeat for each item being sold to this customer. How to Handle a Bad Scan If the scan does not recognize the item, or if the item is not available (perhaps returned or sold), the item will be shown as: The SKU is shown in the Name field. Verify that the SKU shown matches the label because sometimes the scanner does not pick up the full 6 characters of the SKU. a. If the SKU on the screen shows less than 6 characters or it shows the wrong 6 characters, then touch/click Remove and rescan a second time or third time to see if the scan succeeds. If it does, then you are all set and can scan the next item. 8 Updated 11/22/2016
. b. If the SKU on the screen shows all 6 correct characters, then do the following: Category: Use the down arrow to select the correct one (including Food).")

9 If the second scan still does not show 6 characters, then touch/click Remove, using the search field at the top left, and key in the SKU located on the label under the bar code (and you can use small letters instead of caps). b. If the SKU on the screen shows all 6 correct characters, then do the following: Category: Use the down arrow to select the correct one (including Food). If it is Needle Arts or Weavers and the item is clothing, select the Tax Exempt version. Consignor ID: Start to enter the Consignor ID from the label. Once you have entered several letters, you can select from the displayed subset: Name: Append the item description per the label to the end of the existing SKU that s already in the field. Retail: Enter the price from the label. When you have finished entering the information, touch/click Close. 9 Updated 11/22/2016

10 Payment Screen When all items to be sold have been entered, touch/click Complete Transaction (in the bottom left of the screen). The Payment Information screen will be displayed: Notes on using the Payment Information screen: The buttons on the right side of the screen can be used to enter cash amounts. Alternatively you can use the keyboard. To enter a whole dollar amount (as an example, $53.00), touch/click the $50 button once and the $1 button three times ($50 plus $3). If you are entering dollars and cents (e.g. $53.20) you will need to use the keyboard. Enter the total dollar and cents amount. 10 Updated 11/22/2016
11 Ask the customer how they wish to pay: Cash, Check, Credit Card, and/or Gift Certificate. Payment with Cash 1. Take cash from the customer. 2. Touch/click within the Cash field to gain focus and enter the amount received from the customer. Review the screen for Amount Tendered. 3. Touch/click Complete Transaction. 4. The Cash drawer opens and the Receipt printer will print a receipt. 5. Give the change shown in the Balance field to the customer. 6. Hand them the receipt and close drawer. Payment with Check 1. Take check from the customer. 2. Ask customer for identification, and check that the name on the check is same as the name on the ID. 3. Write customer s telephone number on check if it is not already there. 4. Touch/click within the Check field to gain focus and enter the check amount using the keyboard. Review the screen for Amount Tendered. 5. Touch/click Complete Transaction. 6. Cash drawer opens. Put check in drawer. 7. Receipt printer will print receipt. Hand customer the receipt. 8. Close drawer. Payment with Credit Card 1. Check the credit card to see if it is signed. If not, then ASK for ID. 2. Touch/click Add Credit Card. 3. Screen displays Ready for credit card swipe. 4. Swipe the card through the card reader. If the card will not swipe, then touch/click Enter Manually. Enter the following fields: a. Customer name b. Card number c. Expiration month/year selected from the dropdown list d. CVV2 the 3-digit security code on the back of the card. 5. Once the swipe has been confirmed by showing the total tendered with a $0.00 balance, click Complete Transaction. 6. Cash drawer opens and two receipts print out. Hand the first copy to customer to sign. 7. Once signature is confirmed, hand second copy to customer. 8. Put signed copy in cash drawer. 11 Updated 11/22/2016

. \ If the balance due is zero, then proceed with the sale.")
12 Payment with Gift Certificate 1. Touch/click Redeem Gift Card and the Scan Gift Card screen will display: 2. Enter the ID of the gift certificate and click Lookup Gift Card. 3. The system looks up the gift certificate and enters either the full amount due or the amount left on the gift card. (In the example below, $31.80 is due but only $8.75 remains). \ If the balance due is zero, then proceed with the sale. Otherwise ask the customer whether the balance will be cash, credit card or check. Proceed accordingly. 12 Updated 11/22/2016

13 Note that the system will keep track of any remaining balance on the gift certificate. If the entire remaining balance is used for the transaction, keep the gift certificate and put it in the cash drawer. Otherwise mark the gift certificate with the date and amount spent. Selling a Gift Certificate To sell a gift certificate, go to the Checkout tab and click the "Sell Gift Card" button: This will add a new item to the transaction that looks like this: The "Amount" field is the amount that is the denomination of the gift certificate ($10, $15, $25, $50, and $100) and is also the selling price. The "Scan Barcode / Unique Gift Card Id" field is for entry of the unique ID of the specific gift certificate so its balance can be tracked. DO NOT ENTER THE LEADING ZEROS OF THE CERTIFICATE NUMBER. Press the CLOSE Button on the left to complete, or REMOVE on the right to cancel the entry. Gift cards are not taxed and are not considered sales until they are redeemed. From there you can complete the transaction as usual. Removing an item from the sale transaction (while it is being processed) If you have scanned an incorrect item, touch/click the row of the item. This displays the item details. Touch/click the red Remove button. If you have scanned the same tag twice, the item is preceded by a red triangle. Again, touch the item to display its details, and then touch/click the red Remove button. 13 Updated 11/22/2016

14 If a SOLD Item is Accidentally Rescanned The Checkout screen will look like this: Note that no price is shown. In this situation, touch/click the Remove button to remove the item from the current sale. 14 Updated 11/22/2016

15 Voiding a Sale This happens when a sale has already been done, but the customer has not yet left the building. 1. Obtain the receipt, which has an invoice number on it. 2. Touch/click the Transaction tab. 3. Touch/click the target invoice which corresponds to the number on the receipt. 4. An invoice displays. Verify it is the correct one. 5. Touch/click the red Void Transaction button. 6. Enter the reason for the void using the virtual keyboard. 7. Click OK. 8. The Invoice window closes and the cash drawer opens. Void receipt prints. 9. Staple customer s original receipt to signed credit card receipt in drawer. 10. Write voided on signed copy. 11. Give customer voided receipt. It is the one with VOIDED on the top. 15 Updated 11/22/2016
16 Returning Items -- HMP ONLY (All other sales events are final sale) This is when a customer has bought an item at HMP and now wants to return it. This could happen on the same day or some day in the future, but any returns must be during HMP. To start the Return, first verify that the item is in good condition. The customer must present you with the sales receipt and should have the item tag. 1. Check the method of payment from the Sales Receipt. 2. Touch the Returns tab on the computer and then scan the bar code on the receipt. The list of items from that sales transaction are displayed: 3. Using the checkboxes on the right of each row, select the item(s) to be returned. 4. Touch/click the Return button at the bottom right. The Payment Information screen displays and appropriate fields are shown based on the original method of payment (the credit card field only shows for a credit card sale). 16 Updated 11/22/2016

17 5. If the sale was made with: a. Credit card: Enter the payout amount in the credit card field (VISA in the above screenshot). b. Cash or Check: Enter the payout amount in the CASH field. 6. Click/touch the Complete Transaction button and the cash drawer opens and a receipt prints out. 7. On the original sales receipt, circle the returned item(s) and write Returned with the date of return and your initials, and give to the customer. 8. Have the customer sign the Return receipt. 9. If it is a Cash sale and there is enough cash in the drawer, refund their money. Otherwise: a. Tell the customer that the money will be refunded via a check that will be mailed to them in a week or so. b. On the Return receipt, write the customer s name, address, and phone number so a refund check can be mailed. Circle the amount owed and initial. 10. Put the Return receipt in the cash drawer. 11. Return the item to the floor after making sure the tag is (re-)attached. 17 Updated 11/22/2016
18 Cashier End-of-Day Close Out Process Cashier-on-Duty and Wrapper work together to close-out the cash drawer. Wait to be sure all customers are finished shopping before closing the terminal. Locate the Endof-day Close Out Tally Sheet. 1. When the sale day has finished, touch/click the Admin tab to start the End of Day process. This screen is displayed: 18 Updated 11/22/2016


19 2. Touch/click Close Terminal. The cash drawer opens. The Cash Out screen displays: 3. Add up the checks and enter the sum in the Check Total field and on the paper tally sheet. 4. Do not count credit card slips or separate out the start-up cash. 5. Touch/click Bill Count. The Bills and Coin Count screen displays: 6. Count the bills and fill in each bill field. 7. Count the coins and fill in each coin field. 19 Updated 11/22/2016

20 8. Touch/click Count Me!. This screen closes and the Cash Out screen redisplays, showing the total bills and coins in the first field. Write the total cash on the paper tally sheet. 9. Touch/click Close Terminal. The Checkout screen with Terminal Closed message displays: 10. Touch/click the Change Pin/Logout button at the top right. The Terminal Login screen displays: 20 Updated 11/22/2016
21 11. Place all contents of the Cash Register drawer in large manila envelope. This includes: Money Checks Credit Receipts Gift Certificates, etc. Completed paper tally sheet 12. Put the manila envelope through the mail slot in the Office door. 21 Updated 11/22/2016