Checking Pay History Your pay stub is available through the employee portal on each pay day. It remains available through your Pay History tab.
|
|
|
- Judith Foster
- 5 years ago
- Views:
Transcription

1 Using the Employee Portal Log in to the employee portal, employees.tiu11.org ID: first initial full last name last two digits of SSN, all lower case letters, no spaces Initial Password: last four digits of your SSN You must change your password the first time you login and it must meet strong password requirements (at least 8 characters, upper and lower case, alpha- numeric, and special character). You will be taken to the My Account page to do this. You must enter address on the My Account page. Select one of the password help questions and enter an answer. Be sure to save the screen. Checking Pay History Your pay stub is available through the employee portal on each pay day. It remains available through your Pay History tab.
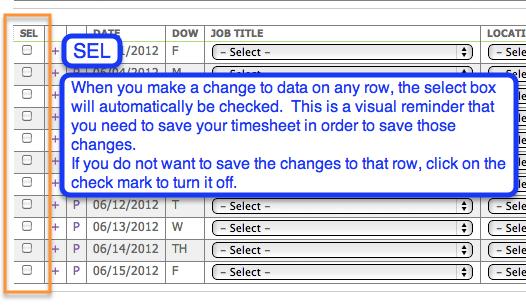
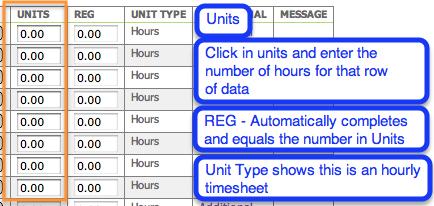
2 Completing and Submitting Timesheets Employees with one Job Title Step By Step Summary 1. Log in to the employee portal employees.tiu11.org 2. Select Employee tab 3. Select Timesheets tab 4. Select Pay Date for timesheet you need 5. Click in Units column for the date you want triple click should highlight the field so you can just type in your hours or you can click and drag to highlight the field 6. Enter the number of hours worked repeat steps 4 and 5 if you need to enter hours for more than one day 7. IF Needed, click on the + sign to create an extra row for the same date 8. Click Save you may log out and log back in later to add more work hours the Pay Period Totals will be calculated automatically 9. If you have completed your timesheet for the pay period click Submit your timesheet must be submitted prior to the lock date shown on the timesheet screen. You may review the images in the following, more detailed, instructions to see what the various screens look like.
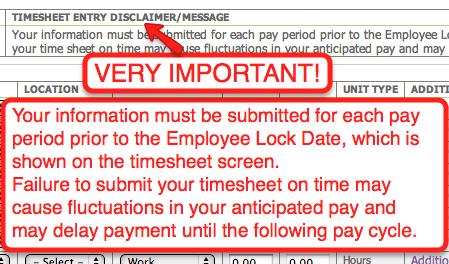
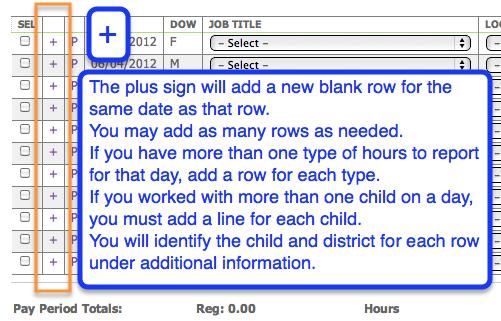
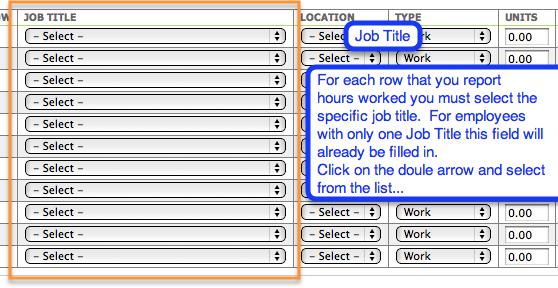
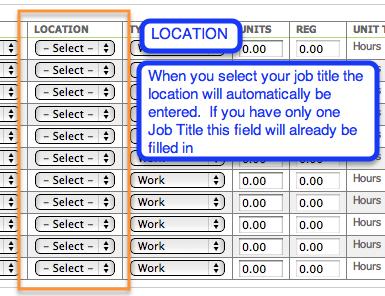
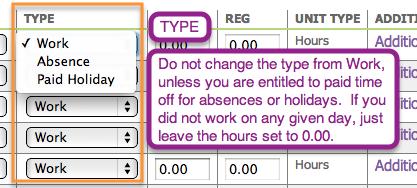
3 Completing and Submitting Timesheets Employees with Multiple Job Titles - Step By Step Summary 1. Log in to the employee portal employees.tiu11.org 2. Select Employee tab 3. Select Timesheets tab 4. Select Pay Date for timesheet you need 5. Click on Job Title arrows to pick from list for the date needed Only pick a job title that is paid based on the hours worked, do not include hours worked for a salaried position (one that you get the same pay for in each pay check) 6. Select type of hours you are reporting IF and only if you are eligible for paid time off 6. Click in Units column for that row triple click should highlight the field so you can just type in your hours or you can click and drag to highlight the field 7. Enter the number of hours worked 8. Click on Additional if needed (if you selected Absence under type you must pick they Absence code on this screen. This DOES NOT replace the portal absence request process for absence approval.) 9. Enter additional information 10. Save Additional Information Screen 11. Use + sign to create extra rows for the same date if needed repeat steps 4 to 11 as needed for each day 12. Click Save on timesheet screen you may log out and log back in later to add more work hours the Pay Period Totals will be calculated automatically 13. If you have completed your timesheet for the pay period click Submit your timesheet must be submitted prior to the lock date shown on the timesheet screen. You may review the images in the following, more detailed, instructions to see what the various screens look like.


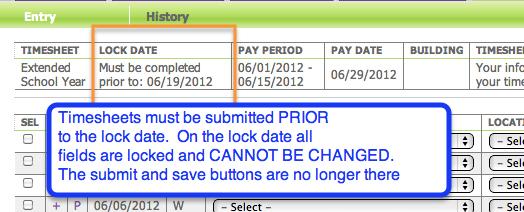
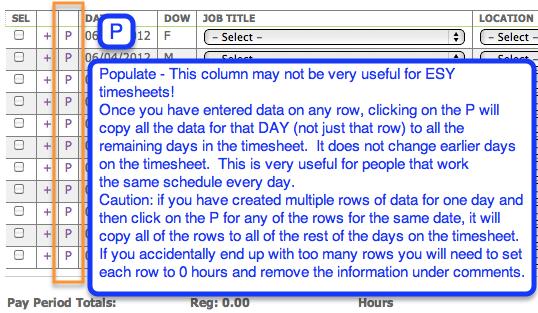
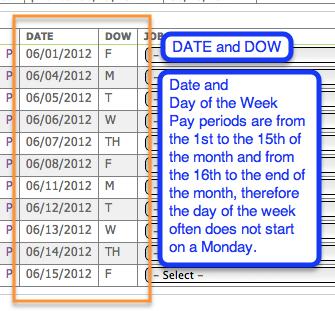
4 Completing and Submitting Your Timesheet Click on Employee tab, then click on Timesheets tab to get to the Timesheet Entry pick list. The timesheet selection list will show currently available timesheets. Usually there will be two on the list. Timesheets are added to the list on the first day of a pay period and stay on the list until the pay date. There will be a period of time, from the lock date on, when a timesheet can be viewed or printed only, not edited. More on the lock date later. Here (following image) is an overall view of what a timesheet looks like. Over the next several images we ll look at each piece of the timesheet.
5
6
7


8 hourly jobs on the same day This timesheet has had multiple lines added: Notice the check marks that indicate there is data on those rows that have not been saved.
9


10 When you click on the Additional link on any row, it opens a pop- up screen to allow you to enter more information. The options on the additional screen vary, depending on the settings for the type of timesheet you are completing. Most timesheets have a place to select an absence code if you are selecting to be paid for absence time (you may see this option even if you are not eligible for absence pay do not select absence under type if you are not eligible!) Most, also, have a field or two for comments or information that may be required for your job.


11 Always remember to save your changes. You can update your timesheet as often as you like, but be sure to save it before you close or log out. Also, be sure you save after you add information on the Additional Information screen. You have to save that screen and then also save the timesheet. When you have completed and double checked your timesheet you should save it and then click to submit. Wait for the system to complete processing before you close the window or logout, please. Successfully submitted timesheets should automatically close and take you back to the Timesheet Pick List, showing that timesheet as submitted instead of active! Timesheets must be submitted prior to the lock date!. Selecting print will open a new window where you can pick the file type you want. When finished or if you change your mind, just click Close Window. You do not have to print the file it creates, you can save it on your computer. You can create a local file, if you choose, so that you can access your timesheets without being online. The system retains your history, so as long as you have access to the employee portal you can create the print files. This is also true for your pay history.

12 Here s an example of a pdf view: