YOUR GUIDE TO USING THE ASTUTE PAYROLL PORTAL FOR TEMPORARY EMPLOYEES & CONTRACTORS AUSTRALIA
|
|
|
- Marjory Lawrence
- 5 years ago
- Views:
Transcription

1 YOUR GUIDE TO USING THE ASTUTE PAYROLL PORTAL FOR TEMPORARY EMPLOYEES & CONTRACTORS AUSTRALIA
2 CONTENTS Overview Getting Started Your Dashboard Your Profile Timesheets Expenses News & Documents Resetting Your Password Automated Reminders Employee Availability Contact Us

3 ASTUTE PAYROLL OVERVIEW
4 OVERVIEW The Astute Payroll Portal is a web based program that represents a significant and exciting technology update from Kelly and will ensure that your Timesheet/Expense entry, the Approvals and Payment functions are simple and efficient. The Portal enables you to update your details on an ongoing basis, to review information about your job (s) and to access documents and news/updates from Kelly at a simple CLICK!. The Dashboard is your Home Page and provides a snap shot of your Timesheet/Expense summary and your Profile details. The following User Guide to the Astute Payroll portal will provide simple yet detailed instructions on how to navigate through the new system. The Astute Payroll portal will transform the ease and efficiently with which you engage with Kelly.
5 SYSTEM OVERVIEW Section Description Location of Function Important News, Policies and Documents Enables you to review and sign off on all important policies and documentation Important news, policies and documents will be presented to you when you login. You must agree to the terms before you will be able to proceed into the system. If you have any questions with any terms, please contact Kelly. You can view all compliance documents that you have signed in the Profile Tab. Induction Employee Self-Service Enables you to maintain your personal and banking details so that your pay can be processed correctly. Enables you to update your details on an ongoing basis, to review information about your job(s), You can also access documents and news from Kelly Services. Managed through the Profile Tab If any information is missing you will be taken to this section when you login and missing information will be highlighted. Range of places on the system: Dashboard: News; Downloads Profile Tab: personal/banking details; job history Timesheet Tab: historic timesheets
6 SYSTEM OVERVIEW Section Description Location of Function Timesheets Enables you to submit timesheets for On the Dashboard: click on Log Time or the relevant approval and payment. timesheet in the timesheet Summary Expenses Enables you to submit Expense reports with attached receipts. NOTE: this function will only be available if the job you are on allows/requires you to submit Expenses. You can also access all timesheets, including future and archived timesheets, via the timesheet tab On the Dashboard: click on Log Expense or the relevant Expense in the Expense Summary You can also access all Expenses via the Expenses Tab Availability Leave Management Enables you to confirm any timeperiods where you are not available to work Enables you to submit leave through the astute portal Indicate the time periods for each day of the week and your consultant Indicate any time when you are not available for work for longer periods Click on the Leave Tab and submit you leave through here.
7 GETTING STARTED

8 GETTING STARTED Kelly will set up your access on the system. You will automatically receive an with your login details. If you have not received this please contact Kelly Candidate Care Team on AU: / candidate_query@kellyservices.com.au, or reach out directly to your Kelly Consultant. The new user will provide you with your username and password. It will also direct you to the relevant link (URL). Logging In 1. You will see a login screen that looks like the image below. If you forget your Username or Password, select Forgot Password You can then enter your username or address and your details will be sent to your registered address. 2. When logging in you may be presented with Terms & Conditions or any communication updates that Kelly require you to review and acknowledge. 3. Once logged in, you can change your password in the Profile Section. You are not able to change your username.
9 YOUR DASHBOARD
10 DASHBOARD The Dashboard is the home page of the system, and provides a snapshot of what is happening on the system and a way to quickly access commonly used tasks. The table below describes the functions of the Dashboard. Function Timesheet Summary Expenses Summary Your Profile News Downloads Description Provides a summary of recent Timesheet activity. Click on the link to be taken to the relevant Timesheet. Provides a summary of recent Expenses activity. Click on the link to be taken to the relevant Expense. Displays the more commonly used functions in your profile click on a function to view or edit these details. Displays notices and news items. This is designed to be a regularly updated snapshot of Kelly s news. This is a document library compiled by Kelly for your reference eg Working Relationship Overview
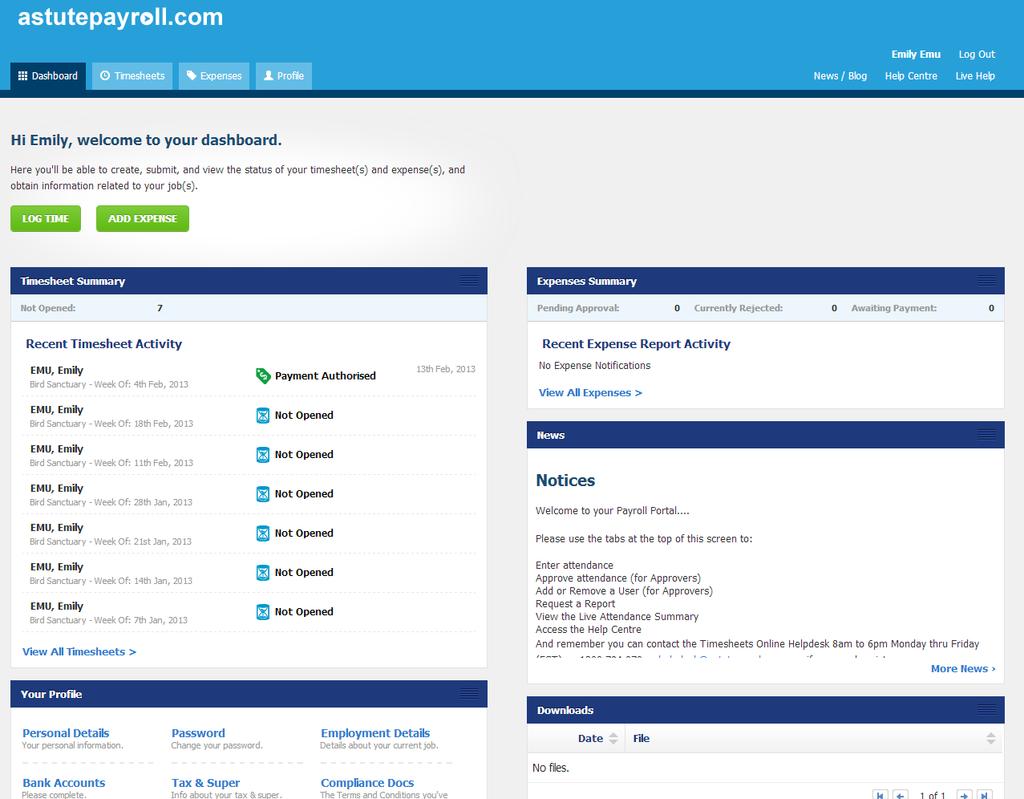
11 DASHBOARD
12 YOUR PROFILE
13 PROFILE The Profile Tab is the section where your personal and employment details are kept. When you first log in, you will be taken to your Profile page if there is any outstanding documentation to be completed. Please complete all fields that are flagged to help ensure your profile is complete and you can be paid correctly. For ease of reference, your profile is separated into the following Tabs: Menu Personal details Password Employment details Bank accounts Tax and super Payslips Compliance docs Active Jobs Description Name, birth date, address and contact details as well as Emergency Contact information. You can change your password from here. Details your employment status with Kelly eg PAYG/PAYE or Independent Contractor Please ensure your account details are correct to receive your pay. Enter your Tax details and details of your superannuation fund. Displays your payslips for you to download. Details any compliance documentation which you have read and acknowledged. Lists each of your active jobs and provides details, including: Start/finish dates Pay rates Designated Approvers; and Timesheets and Expenses submitted. Inactive Jobs Lists each of your inactive (previous or future) jobs and provides details, including: Start/finish dates Pay rates Designated Approvers; and Timesheets and Expenses submitted.

14 PROFILE Mandatory Red Exclamations require specific details completed.
15 PROFILE Bank Account Details

16 PROFILE Superannuation Fund If you have your own superfund this is where you can specify the details, please ensure you have a copy of your Superannuation Fund Member Statement to complete the necessary details. If you are unsure of the details, you can select to have contributions made to the default Superannuation Fund nominated by Kelly Services.
17 TIMESHEETS
18 TIMESHEETS You will be required to submit Timesheets on a frequency set by Kelly. Typically this will be a Monday to Sunday Timesheet with a submission deadline of 9am Monday morning. This allows for your approving manager to complete their review and approval process by 4pm Monday. Timesheet Status Function Description Action Required Not Opened You have yet to enter any information into the Timesheet Fill in and submit your Timesheet by the deadline Pending Submission You have yet to submit the Timesheet for approval Fill in and submit your Timesheet by the deadline Pending Approval Your submitted Timesheet is awaiting approval Follow up with your Approver to ensure the Timesheet is approved on time Rejected Your Timesheet has been queried and not approved Review reason provided for rejection, update Timesheet and resubmit Ready for Interpretation Payment Authorised Your Timesheet has been approved and is awaiting payroll processing Your Timesheet has been processed through payroll and is ready to be paid No action required No action required
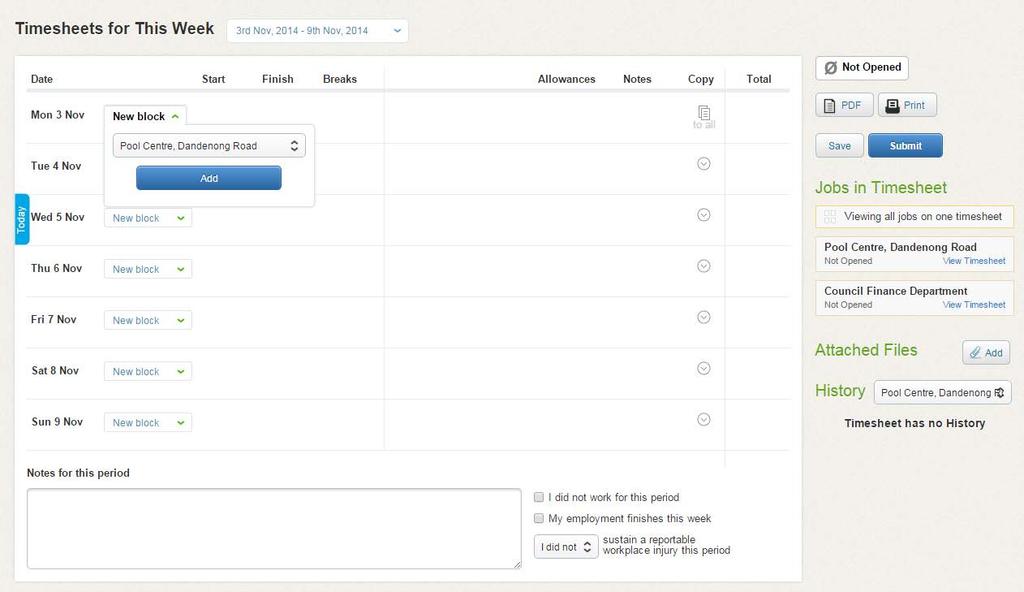
19 TIMESHEETS Submitting Timesheets There are three ways in which you can submit Timesheets on the system: Dashboard: click on Log Time Entering Hours on a Timesheet When you open a Timesheet, you will note that each day offers the ability to add a new Time Block. A time block allows you to allocate your hours worked against specific jobs, pay rates or projects. For example, you could allocate a time block of 9am 12pm to a specific job, against a specific project and at a specific pay rate. Then you could allocate another time block of 12pm 5pm against a different job, project and pay rate. Click on New Time Block against a day and depending on how your job profile is configured, you will have several options to choose from.
20 TIMESHEETS 1. Job: if you are working in multiple jobs, you will be able to select the relevant job from this drop down list. Select the relevant job (if you have multiple jobs in the one period).
21 TIMESHEETS 2. Project: If projects are enabled on your job, you will be able to select a project component from this list. Select the relevant job (if you have multiple jobs in the one period).
22 TIMESHEETS You now have the option to add: - Start time (e.g. 9:00am) - Finish time (e.g. 5:00pm) - Breaks (e.g. 45 minutes) - Leave (if assigned to you select the category and then applicable time taken) - Allowances (if assigned to you select the allowance type) - Notes (any notes you need your recruiter or approver to see) You can also press Copy Down which copies all of the information from that Time Block onto the other days of the week. If you need to add more time to the same day, you can press New Time Block and enter in information for that time block. Otherwise, you can add in time blocks for the rest of the week. Adding Timesheet Attachments You can add attachments to a timesheet (manual timesheet or km s form etc.) by clicking on the Attached Files Add button.
23 TIMESHEETS
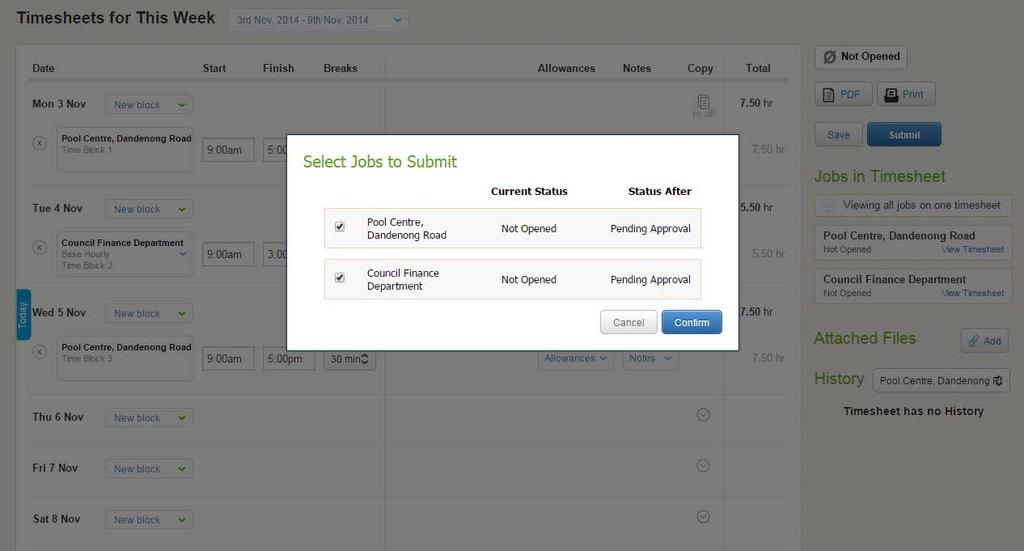
24 TIMESHEETS Submitting Timesheets Submitting a timesheet is very simple. If you haven t worked for that week, rather than not submitting the Timesheet, you can tick the I did not work for this period check box. This will prevent any further Timesheet reminders being sent to your address. You can also advise Kelly via the Timesheet if your employment finishes by ticking the My employment finishes this week check box. Before submitting your Timesheet, if you have sustained a reportable workplace injury for this period, you should notate this on your Timesheet. The Timesheet defaults to I did not sustain a reportable injury this period, however if you did sustain a reportable injury, select I did from the dropdown list. This should be completed in conjunction with any OH & S processes of Kelly. If you have entered in hours on one Timesheet for on job, pressing Submit will send your Timesheet to your approver via to be approved. If you have entered in hours on one Timesheet for multiple jobs, pressing Submit will bring up a list of the jobs contained on that timesheet. Select the jobs you would like to submit the Timesheets for and press Confirm. If you only submit one timesheet out of multiple, the remaining timesheets will be saved and retain a status of Pending Submission.
25 TIMESHEETS
26 TIMESHEETS Missing Timesheets If you are unable to see a Timesheet for your current week, it is likely that the finish date for your job has lapsed and Timesheets will no longer be presented. Please contact Kelly to extend the finish date of your job. Once a job has finished and all Timesheets completed, you will no longer be able to access active Timesheets. You will still be able to access information and the Timesheet archive for the job in your Profile > Job Profiles > Inactive Jobs. Resetting a Timesheet Once you have submitted a Timesheet you will no longer be able to edit it. If the Timesheet is Pending Approval you can ask your Approver to reject the Timesheet. Once the timesheet has been approved, it can only be reset by a Portal Administrator at Kelly Services. Please contact the Kelly Candidate Care Team on AU: / candidate_query@kellyservices.com.au, to arrange for this to be actioned.
27 TIMESHEETS Automated Reminders You will receive the following reminders related to your Timesheets: 1. Friday afternoon First submission reminder: please remember to complete your Timesheet for the week. Needs to be submitted by 9am Monday morning. 2. Monday 9am Final submission reminder: if your Timesheet isn t submitted by 10am you will miss the payroll deadline and your pay may be delayed. 3. Monday 12.30pm Approval Reminder: your Approver will be reminded of any outstanding approvals. 4. Monday 12.30pm Approval Reminder: you will be notified if your submitted Timesheet has not been approved (speak with your Approver) 5. Timesheet Approved/Rejected: you will be notified 6. If a Timesheet has not been actioned by 12.30pm Monday, the Primary Approver will receive a system generated reminder. If a Primary Approver has not actioned a Timesheet by 2.00pm Monday, the Secondary Approver will receive a system generated reminder.
28 EXPENSES
 2.")
29 EXPENSES Expenses An Expense claim is very simple to complete and submit: 1. Select New Expense Report a box will appear requesting a name for your Expense Report (eg January 2018) 2. Insert the name for your Expense Report (eg July Expenses) and click Save

30 EXPENSES 3. Select the Expense Report name to open it and select New Expense to add your Expenses.

31 EXPENSES 4. Complete the details in each field and click Save. You can then: Attach a copy of your invoice or receipt Add additional Expenses by selecting New Expense and click Save Click <Back if your Expense Report is incomplete or you don t yet wish to submit for approval Click Submit Report to submit your Expense claim for approval. Add any notes relating to the expense claim. Once an Expense is approved, it will be ready for payroll. If an Expense is rejected, it will be returned to you for correction and resubmission. Automated reminders are not issued for expenses. Expense claims are limited to certain jobs. Please check with your consultant if required.
32 NEWS & DOCUMENTS
33 NEWS & DOCUMENTS When logging into the portal for the first time, you may be presented with important policies and documents relating to your Employment that must be read and accepted before you enter your timesheets. From time to time, Kelly Services may add new documents that you need to read and accept, these may be things such as an updated policy or procedure, or a company notice that needs to be acknowledged. Unless these documents are signed off, you will not be able to proceed any further into the portal. If you have any queries relating to your documents, please contact the Kelly Candidate Care Team on AU: / candidate_query@kellyservices.com.au. If you have trouble viewing the file or would like to keep a copy for your records, you can download it by clicking on the corresponding link in the document title. To acknowledge that you have read and accepted the document/s, tick the checkbox underneath each of the documents. When you get to the bottom of the page, click Agree.

34 NEWS & DOCUMENTS
35 RESETTING YOUR PASSWORD

36 RESETTING YOUR PASSWORD If you forget your Username or Password, select Forgot Password. You can then enter your username or address and your details will be sent to your registered address.
37 EMPLOYEE AVAILABILITY

38 EMPLOYEE AVAILABILIITY Kelly Employees will be able to see an Availability tab on the dashboard. The Employee Availability screen contains two main sections the employee s Standard Availability and Details of any exceptions to Availability. The following actions can be performed at this screen: View/change standard availability Create a new exception to the availability for a specific period View/delete recorded exceptions to availability
39 STANDARD AVAILABILITY This section shows the shifts (Morning, Afternoon and Night) for each day of the week that is available to work in general. Selecting a checkbox that corresponds to a shift indicates that you are available for that specified day and shift each week. If your availability information has not been recorded so far, all the checkboxes will remain unselected. In the example below, you will see availability for morning and afternoon shifts from Monday through Sunday.
40 EXCEPTIONS Exceptions This section shows details of the specific periods when you are not available. New Exception A New Exception allows you to record non-availability by creating exceptions to the standard availability.
41 EXCEPTIONS Current Exceptions This section displays the list of exceptions recorded by the yourself. Any exceptions with current or future ending dates are displayed along with details such as: the start and end dates of exception the reason for the exception additional comments (if noted during creation of the exception).
42 CHANGE STANDARD AVAILABLILTY You can change the standard availability by deselecting shifts that you are not available to work and selecting other shifts that you are available to work.: To change the availability: Select or deselect the checkbox against the relevant shift and day. Click Submit. In the example below, your availability will be changed to morning and afternoon shifts on Mon, Tues,,Wed and Fri. A confirmation message is displayed to the you once the availability has been successfully updated.
43 CREATE NEW EXCEPTION You can specify the period of non-availability by creating an exception. To create a new exception: Select a From date Select a To date Select a Reason from the dropdown Click Create You can also make additional notes in the Comment box if required.
44 CREATE NEW EXCEPTION A confirmation is displayed to you once the exception has been successfully created. The newly created exception will be added to the list of exceptions displayed under Current Exceptions.
45 DELETE EXCEPTION You can delete a previously recorded exception from the Current Exceptions list by clicking on the delete button. To delete an exception: Click against the exception Confirm deletion by clicking Yes - Remove the Exception

46 DELETE EXCEPTION
47 DELETE EXCEPTION A confirmation message is displayed to you once the exception has been successfully deleted. The deleted exception will no longer be listed under Current Exceptions.

48 Max Term Contractors Only (not for Temp/Casual Employees) Leave Management Should you wish to apply for any of the following leave categories, please follow the simple steps below. Sick Leave Annual Leave Bereavement Leave Select New Leave Request use the drop down list to select which leave type you are requesting. 1. Set the period you are requesting to take as leave. 2. Tick I am taking full days off if you are taking a whole day. Untick if you are only taking part day leave. 3. Once you have completed each detail then select Next

49 Max Term Contractors Only (not for Temp/Casual Employees) Leave Management 4. If you are taking part days of leave, enter the specific times in the start and finish fields. Once the leave request is finalised, click submit. 5. Once the leave request is finalised, click submit. 6. If you need to cancel the leave request, go to the Leave Tab, Choose Leave Request and then click Cancel.

50 Max Term Contractors Only (not for Temp/Casual Employees) Leave Management Once leave is applied for, it will be evaluated by Kelly Services to ensure there is leave entitlement prior to approval and payment. Once the request has been through the approval process you will receive a notification of approval or rejection via the portal and by . Leave requests are your responsibility and no payment will be made without an approved application. Please note that should you wish to submit a leave request and do not have a leave tab, you will need to contact Kelly Services to have this function enabled.

51 Contact Us: If you require assistance with any aspect of the above information, please contact the Kelly Candidate Care Team on AU: / candidate_query@kellyservices.com.au, or reach out directly to your Kelly Consultant. QUESTIONS?