GlassShop Systems Version 9.2 Quick Start Manual Everything you need to get going today! This does NOT replace your user manual.
|
|
|
- Beverly Arnold
- 5 years ago
- Views:
Transcription


1 GlassShop Systems Version 9.2 Everything you need to get going today! This does NOT replace your user manual. July 2008 Fargo, North Dakota Setting up this shop You will need your Data Tranz codes sheet. If you do not have one, contact Data Tranz immediately or you will just rename the existing demo company, Specialized Glass LLC, instead of upgrading it to a full functioning system. Changing Shop Information Go to Admin/ General Setup/ This Shop s Particulars Change all left-hand column entries to match your shop Shop information: name, address, phone, etc. must exactly match the information on your Data Tranz codes sheet. Check: spacing, capitalization, punctuation and wording Site: change SG to two letters of your choice - Usually the first letters of shop name Tax Labor? / Tax WS Repair?: a checkmark in the box means tax is applied to these items EDI Account (from Data Tranz): this is the 6-digit account number found on your code sheet Safelite ID: your Safelite Parent ID Number. Contact your Safelite Regional Manager for this information. Save the information and close the window

2 Access Codes To unlock the demo you need to enter the codes you received from Data Tranz Go to Help/ Access Codes Type in the codes from your Data Tranz codes sheet Save If you entered all of your information accurately it will ask you to select a department For GlassShop Deluxe choose Department 72, for GlassShop Pro choose 82 2

 2.")
3 Sequence Numbers Go to Admin/ Features/ Sequence numbers Change the starting numbers to numbers of your choice Save changes and the window will close Tax Information Go to Admin/ General Setup/ Tax Rates and Groups Set up a new tax group 1. Select Add New from the first drop down window (number 1) 2. Name the group and save 3


4 Set up a new tax item for your group 1. Select Add New from the second drop down window (number 2) 2. Name the item with the corresponding tax rate 3. Enter in the corresponding tax rate and Vendor Name 4. Save Click on the Add button to add the tax item to your tax group If you have any other tax items to include in your group, create an additional tax item the same way and add it to your group. Click OK Account Setup You can have as many accounts as you want. We suggest that you edit the accounts that are already in the demo. It is important to set up each account accurately so your EDI is linked to your glass shop. Go to Names/ Accounts/ Account Setup Lynx account After you edit the existing Lynx account, you can use that one account for all of your Lynx invoices 4

5 Click on the box with three dots below Name Select LYNX SERVICES OF PPG Change the following information Tax ID Number: your tax number (not required) Tax Group: select the tax group you created earlier or leave none if there is no tax Windshield Repairs: one should be the price charged for one chip repair, two is the total price charged for two, three is the total price for three (NOTE: you can edit these in your invoice later if needed) **Make sure the Lynx Account checkbox is checked or you will be unable to send via EDI with this account Save your changes Safelite Accounts Safelite is somewhat different from Lynx in that you need a separate Safelite account for each insurance company sent to Safelite. For each insurance company complete the following steps: Go to Names/ Accounts/ Account Setup Account Type drop down list: choose Insurance 5
6 Name: Insurance Co name (please type carefully you cannot edit the name later) Tax ID Number: your tax number (not required) EDI Account Checkbox: check Safelite EDI Program ID: Safelite s insurance company code unique for each insurance company (For a list of these, click on the box with the three dots next to the Safelite Program ID field) Windshield Repairs: one should be the price charged for one chip repair, two is the total price charged for two, three is the total price for three (NOTE: you can edit these in your invoice later if needed) Save then change any tax information Tax Group: select the tax group you created earlier or leave none if there is no tax Save and select again then save one final time **Make sure that the EDI Program ID matches the insurance company or your invoices will be rejected Making an invoice When entering an insurance invoice, it is important to enter the information exactly as it appears on the authorization sheet Lynx or Safelite faxed to you. 1. Click on Orders / New Quote 2. Choose Account button on upper right choose one of the accounts you have set up or choose QUOTE MASTER for any jobs not associated with an insurance company 3. Use the drop down menus to select the vehicle information 4. For a Replacement Invoice Select a glass part and click on Add to attach it to the invoice Mouldings appear once a glass part has been selected --OR-- For a Repair Invoice Choose the number of repairs from the drop down list If prices are incorrect, click the $ sign next to the list and edit prices then choose the number of repairs again 5. Enter in any other cost such as the kit price and labor price 6. Enter a deductable according to insurance information 6

7 7. Complete the following information on the right side: VIN AUTH: Lynx dispatch number or Safelite authorization number DOL: month, day, year Customer information 8. Choose invoice and save Sending EDI From the main screen go to EDI/ Send invoices via EDI 7

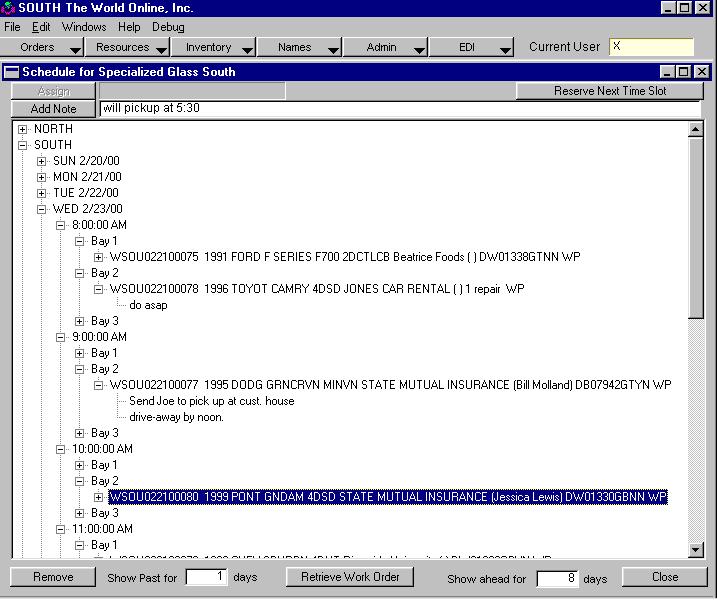
8 All your unsent invoices will appear in the window Click Process Lynx Invoices and/or Process for Safelite Transmission If you have an account and it is open and connected to the internet, you can click Internet to send your invoices Otherwise, you can use FTP to send invoices. Please see the users manual for indepth information on these choices. Call Centers: Work Order Scheduling One of the most versatile functions of the GlassShop system arrives from the recent implementation of the Work Order Scheduler. Conceptually, the Work Order Scheduler is a window independent of the order entry screen that allows the user to save a new work order, apply an existing work order, or re-schedule an existing work order onto a specific technician or bay at a specific location, time-slot and day. As users save work orders, they can see when other jobs are scheduled and schedule subsequent jobs accordingly. The work order scheduler is fully configurable to your business. It is set to run on a continual, weekly basis. 8
9 About the Scheduler: You can have multiple jobs on the same time slot. You do not have to schedule all of your locations. Jobs can be moved from slot to slot on the scheduler. Use the names that fit your business for the person or bay that will do the work. Work Orders for a specific site or location can be set up to always print to a specific printer. Notes applied to a job on the schedule are not the same as the notes that are applied to the work order. Setting-Up the Scheduler The schedule setup is a single screen routine window that sets up how the schedule will look and open up to your users on the schedule. It can be changed any time. Be advised that currently scheduled orders will no longer show on the scheduler if you delete their time slot. You must have the scheduler completely set up before you can apply a job to a time and technician / bay slot. Choose a Location Select the location or site that you want to appear on the scheduler. You may have some location set-up that you may not want to see on the scheduler. For these locations, click on the box in the oval that says Don t schedule and this location will not appear on the schedule. You can always go back and uncheck the box. Setting up Times and Dates Once a location has been chosen, you can now click on the box with the days of the week. If no times appear on the timeslot window, you can enter a start date and a stop date, then indicate the time period between scheduled times. Remember that you can have multiple jobs on the same time slot. We suggest that you use as broad a time slot as possible, as it makes the scheduler easier to read. Specific times can be indicated on a note. After you indicate the time increment, press TAB so the window will refresh. You can now use the buttons at the bottom to further customize the schedule by adding or deleting times. Once the day is configured acceptably, you can press Save this Day and the day will save. The current start and stop times will remain on the window, and you can then choose the next day of the week and increment and re-do the process. 9

10 Technician / Bay For each location, indicate the technicians or bays or even vehicles that will perform the work. You can add and remove technician / bays at any time. Job Status Job status can be an important tool to indicate within your business the disposition of a job. When a job is first saved in the schedule, it is given a default job status code of WP as Work Pending. We expect that you will have your users change the status of the job depending upon various dispositions that can be applied to a job. Since the job status is always indicated at the end of the scheduled job s line, it can be a useful tool for your representatives to determine if a job is underway or if there happens to be an opening. For example, you may want to make it policy for a technician to always open up a work order on the computer when they bring the vehicle in the shop and change the job status to IS or In Shop. Subsequently, you may want to indicate a NS for No Show. These lettering codes are fully configurable by simply adding to the list on the Schedule Setup window. Job status is a company-wide field and not specific to a location or site. 10
11 Using the Scheduler Your users will find they are using the scheduler more and more and relying upon it for accurate information. It can not only be used to assign orders to a specific time slot, but it can also be used to retrieve work orders into the main order entry screen. One of the best ways to describe the use of the scheduler is to annotate a scenario: 1. Your Customer Service Representative (CSR) receives a call from a company requesting a quote for a windshield replacement. 2. The CSR opens up the main order entry screen and chooses an appropriate account and generates a total. 3. At this point, the CSR, before even saving anything, presses the Schedule Button on the main order entry screen. 4. Independent of the currently logged on location, the CSR can open up any location or site, choose a time, and then choose a tech or bay. 5. The, once the tech / bay is determined, the CSR simply highlights the tech / bay and clicks on ASSIGN on the schedule window. The Work Order will automatically be saved and the new order will appear on the window. 6. The CSR will be able to highlight the order, and on the line above the schedule box, type in a note(s) which can be assigned to the order. 7. The CSR can then go back to the original order entry screen, which now has a saved work order by pressing the Retrieve Work Order button at the bottom of the schedule window and they will subsequently be brought back to the main order screen. 8. The CSR presses print, and a printed copy of the work order will be printed out at the location where the work is to be performed. 9. If the work order was not scheduled, and needs to be scheduled, it can be retrieved to the main order screen through the order lookup screen, and schedule can be pressed and the order can be assigned as in steps Work orders can be moved about the schedule by simply highlighting the order on the schedule, pressing REMOVE and then pressing ASSIGN when the required time slot is highlighted. Interpreting the Scheduler Information Six elements make up the line of a job on the scheduler. 1. Work order number: Starts with W 2. The vehicle, if one is chosen, as abbreviated by NAGS. 3. The Account for Bill To. 4. Always in brackets, this is the insured or ship to name. 5. For glass replacement, this will be the piece of glass that is being replaced. Molding is not indicated. 1 repair and so on will be used to indicate the number of repairs to be done on the windshield. 6. Two letter code for the job status. 11
12 12

13 Scheduled Work Orders The Scheduled Work Orders window simply shows a listing of jobs that are currently scheduled. It is from this window that you can choose a date increment and print out the schedules. This window is a browse only window, so general access is company-wide. You can indicate how you want to sort the window. 13

14 Paying Invoices Glass Shop will allow you to pay an invoice using cash, check, or credit card. All orders must be saved as an invoice before you can make a payment. You can keep track of unpaid invoices by using the Unpaid Invoices feature under the Orders Menu. The pay button is located on the order entry screen directly under the save button. After you click on the pay button you will need to choose your Pay Method. After selecting your payment type you will need to enter in the amount paid in the Tendered field. After you have entered in the amount tendered click the Add button and then save your payment. 14

15 Making Statements You can create monthly statements for any account in GlassShop that is set to print periodic statements. This option is located in the account setup screen in the upper right corner of the Account Setup window. After you have set your account to Print Periodic Statements you can create your Statements by going to Admin > Accounts Receivable > Make Statements. 15

16 Once in the Periodic Statement window choose which accounts you would like to print statements for and add them to the Accounts to Print list. Then select your date range you would like to print statements for and then click Print. 16

17 The Daily Deposit Report Now that you can pay invoice you will want to generate a report at the end of the day to help keep track of the amount of money you took in a day. You can now print that a report that will show the total amount you received in a day and it will break it down for you by payment type. The Daily Deposit Report is can be found under Admin > Accounts Receivable > Daily Deposits. 17
18 Getting Further Help Our web site has a wealth of information to help you. On the Suport Home page you will be able to access a searchable database of support questions, manuals, downloadable support documents, program and data updates, and info on hot conflicts/issues such as choosing an internet provider. Visit us at Also, now available, live technical support from our qualified staff. Under Support, click on Support Home, then on the picture of the operator. The GlassShop Systems User Manual includes in depth information about the various program components. It is a valuable resource when using the system. We have a knowlegable staff ready to help you. Call toll free Monday through Friday 8-5 CST. Otherwise us and we will be happy to get back to you. Call us at support@datatranz.com 18