Printed Documentation
|
|
|
- Andrea Riley
- 5 years ago
- Views:
Transcription
1 Printed Documentation
2
3 Table Of Contents Welcome to TimeLive... 9 Installation For On-Premises Version...11 TimeLive Installation Types:...11 System requirements (On-Premises version):...11 Server Requirements...12 Operating System (Any)...12 Minimum Hardware Requirement:...12 Recommended Hardware:...12 Software (higher is better)...12 Web Server requirements for different OS:...12 Database Requirements:...13 Client Requirements:...13 Operating System (Any one) :...13 Minimum Hardware Requirement (Higher is better):...14 Software (Latest is better):...14 Installing Web Server (IIS)...14 Installing Web Server (IIS) on Windows XP:...14 Installing Web Server (IIS) on Windows Vista:...15 Installing Web Server (IIS) on Windows Server 2003 (32 bit & 64bit):...17 Installing Web Server (IIS) on Windows Server 2008 (32 bit & 64bit)...19 Installing TimeLive on local server:...22 Upgrading TimeLive on local server...27 TimeLive Database Setup:...27 Database setup parameter definition:...28 TimeLive System Settings...29 Specifying System parameters:...29 Defining System parameters:...29 Understanding TimeLive Website URL:...30 TimeLive License Activation Guide:...30 Installation on Shared Hosting Introduction Installation and Setup Upgrading TimeLive on shared hosting...31 Getting Started...33 What you can do in TimeLive?...33 What you can do in TimeLive?...34 Launching TimeLive (First Time):...35 Creating new TimeLive Account:...35 Account Information:...35 First time login in TimeLive:...36 Steps of login:...36 TimeLive Dashboard is by default set as home page:...37 Using Menus:...38 Quick Basic Setup Creating employees: (Click to launch detail help of adding Employees) Creating of Clients: (Click to launch detail help of adding Clients) Creating of Projects: (Click to launch detail help of adding Clients) Creating of Tasks: (Click to launch detail help of adding Clients)...41 Dashboard Settings...41 Timesheet Setup...45 Client Setup:...45 Client Information fields:...46 Adding new Client:...46 Deleting Client:...47 Editing Client:...47 Project Setup:...47
4 Working with Projects List Page...47 Project Fields:...48 Adding new Project:...48 Deleting Project:...49 Editing Project:...49 Editing Project Team...49 Task Setup...49 Task Fields: Task Information Assign To Estimates...50 List of Task (two options)...50 Adding New task [Standard Employee]...53 Updating Task:...53 Adding Task Comments:...53 Attaching document with any task:...54 Working Day Types...54 My Tasks...58 My Projects...59 Project Preferences :...60 Work Type Setup...60 Work Type in TimeLive:...60 Default Work Types in TimeLive:...61 Time Entry Day View with [Work Type] field:...63 Time Entry Week View with [Work Type] field:...63 Timesheet...65 Time Entry...65 Timesheet formats:...65 Time Entry - Day View...67 Features of Time Entry - Day View:...67 Adding of Time entry record using Day View:...68 Deleting of time entry record:...68 Updating time entry record:...68 Submitting time entry record:...68 Time Entry - Period View...69 Features of Time Entry - Period View:...69 Adding of Time entry record using Period View:...71 Deleting of time entry record:...71 Updating time entry record:...71 Submitting time entry record:...72 Submitting a Timesheet...72 Timesheet Approval...73 Launching Timesheet Approval:...74 Approving timesheet records:...74 To review a time sheet record:...74 To Reject a time sheet record:...75 Approval Types (Workflows)...75 Approval Paths:...76 Approver types:...76 Simultaneous / Alternate Approvals...76 More About Attendance Module:...76 Attendance through Employee Profile...76 Attendance through Time Entry Day View How to add new attendance record:...80 How to enter employee leave record:...80 How to modify attendance record:...80 How to delete attendance record:...80 Timesheet Audit in My Timsheet:...81 Expense Sheet Setup...83
5 Expense Types setup...83 Adding new Expense type:...83 Deleting Expense Type:...83 Editing Expense Type:...84 Expenses Code Setup...84 Setting up Expenses:...84 Adding new expenses:...84 Deleting Expense:...85 Editing Expense:...85 Payment Methods...85 Renaming "Default payment method":...85 Adding new payment method:...85 Deleting Department:...86 Editing Payment Method:...86 Tax Code Setup...86 Renaming "Default tax code":...86 Adding new tax code:...86 Deleting Department:...87 Editing Tax Code:...87 Expenses...89 Expense Entry...89 More about Expense sheet list :...89 Add new Expense sheet :...89 Adding expense entry :...90 Attaching documents expense entry :...91 Deleting Expense Entry:...91 Editing Expense Entry:...91 Submitting expense sheet:...91 Expense Approval...91 Launching Expense Approval:...91 Approving expense records:...91 To review expense sheet:...92 To Approve a expense sheet records:...92 To Reject a expense sheet record:...92 Time Off...95 Time Off Overview...95 Features Of Time Off Module in TimeLive:...95 Time Off Types:...95 Adding New Time Off Type:...96 Deleting Time Off Type:...96 Editing Time Off Type:...96 Time Off Policies...96 Time Off Request...98 Adding New Time Off Request:...98 Viewing Time Off Request:...99 Editing of Time Off Request:...99 Deleting of Time Off Request: Time Off Approval To Approve a time off record: To reject a time off request: Billing Rate Setup TimeLive billing rates concepts Employee Own Billing Rate Billing Rate History link in employee edit page: Project Roles Billing Rate Project based employee billing rate: Invoicing About Invoicing Manage Invoices
6 Time Billing Worksheet Expense Billing Worksheet Project Management Notifications And Alerts Notifications and Alerts settings System Setup Launching Admin Options: System settings which can be configured using Admin Options: Branches / locations setup Adding new locations: Deleting Location: Editing Location: Departments setup Renaming "Default Department": Adding new department: Deleting Department: Editing Department: Roles setup Adding new Roles: Deleting Role: Editing Role: Task Type setup Adding new task type: Deleting Task type: Editing Task Type: Priorities setup Adding new priority: Deleting priority: Editing priority: Role Permissions setup Pre-defined roles: Updating permission of role: Billing Types setup Adding new billing type: Deleting billing type: Editing billing type: Absence Type Setup Adding new Absence type: Deleting Absence Type: Editing Absence Type: Project Types Setup Adding new Project type: Deleting Project Type: Editing Project Type: Status Types setup Adding new Status: Deleting Status: Editing Status: Employee setup Employee Information field: Personal Fields: Login Information fields: Billing Fields Adding new employee: Deleting Employee: Editing Employee: External Users setup Adding new External User:
7 Deleting External User: Editing External User: Preferences Organization : General Preferences : Invoice Setup : Task Setup : Project Setup : Time Off Setup : Expense Setup : Timesheet Setup : Security : Holiday Setup: Adding Holiday Type: Deleting Holiday Type: Editing Holiday Type: Manage Terminology Defining new Manage Terminology: Custom Fields: Currencies: Timesheet Period View: Project Template: Reports Understanding Reports Report Home Page : Parts of report: Running a Report Exporting a Report Printing a Report System Reports Understanding Report Designer Report Data-source: Report Designer Steps: Understanding Formula Columns Formula Column Syntax Integration Importing / Exporting Raw Data QuickBooks Integration Using TimeLive QuickBooks Integration Tool Exporting Time to QuickBooks QuickBooks Online Integration Configuring Active Directory Authentication TimeLive Active Directory integration concepts: Step by step: Active Directory integration: Step1: Changes required in Active Directory: Step 2: Changes required in TimeLive: Note: Migrating from standard authentication to Active Directory authentication: Active Directory authentication with TimeLive On-Cloud Configuring LDAP Authentication Mobile Apps Introduction to TimeLive Mobile App Download TimeLive Mobile Time Tracking For Android & iphone TimeLive Android App Entries: F.A.Q Disabling Pop-Up Blockers Settings required on Internet Explorer Instructions required to be done in IE7: Frequently Logout Issue By Users
8
9 Welcome to TimeLive The Industry Standard in Web based Timesheet management tools About TimeLive: TimeLive is a web-based, timesheet management application that provides Timesheet Control and Project Management for workgroups of any size or complexity. With TimeLive you can record time and expenses quickly and easily at any time, from anywhere with Internet access. Once submitted, Timesheets and Expenses are automatically forwarded to the appropriate supervisor or manager for approval. Additionally, reports can be generated to track data such as project costs, client billing, utilization, and time off. Unlike traditional PC applications or client-server applications, the only software that is required on each user's PC is a standard Javascript-enabled web browser. Notices: Copyright 2006, Livetecs. All Rights Reserved. Livetecs, the Livetecs logo, TimeLive Timesheet, and the other graphics, logos, and service names are trademarks and service marks of Livetecs. All other product names, service names and company names are the property and/or trademarks of their respective owners. All rights, title and interest in and to the Software, and any Updates or New Releases thereto or derivative works thereof, including without limitation all intellectual property and other industrial and proprietary rights, at all times remain the exclusive property of Livetecs or Livetecs s licensors. The license granted does not constitute a sale of the Software, or any portion or copy thereof. Livetecs provides this document "as is" and without warranty of any kind, whether express or implied, to the full extent permitted under applicable law, the company specifically disclaims the implied warranties of merchantability, fitness for a particular purpose, title, and infringement. Livetecs does not guarantee the accuracy, timeliness, or completeness of any information in this document or the results of your use of this document.
10
11 Installation For On-Premises Version TimeLive Installation Types: TimeLive is available from Livetecs in a variety of installations: On-Demand/Cloud-Based (Hosted) implementation: The Cloud version of TimeLive is implemented on servers managed by Livetecs. The application is available to users through the Internet, using a web address provided by Livetecs or through the Customer Login section of the TimeLive website which can be access any place of the world with internet access. By signing up for the Cloud version, you are saved from overhead of purchasing and maintaining application and database servers. For more details, Please Click Here. 1. Free Version up to 3 users with 3 Projects: The Hosted Free Version is designed to assist user in evaluating the application as well as it is ideal for small companies to benefit from this powerful robust application. It is limited to 3 users and 3 Projects but enables unlimited use. Any data entered in the Free Version can be migrated to the full version. For Trial & Free Cloud-based Version, Click Here. 2. Full Version: The full Cloud-based version is provided when user are ready to purchase and implement TimeLive for use in organization. It supports unlimited number of users (depending on Purchase Plan), Projects and tasks. For Pricing, please Click Here. To Sign up Click Here. On-Premises installation: With standard installer, Administrator can install and manage the TimeLive application and database within the organization. It is installed using a file provided by Livetecs and Application is available for users through network. For more details, please Click Here. There are two types of standard installations available: 1. Free Version up to 3 users with 3 Projects: The free version is designed to assist user in evaluating the application as well as it is ideal for small companies to benefit from this powerful, robust application. The simplified installation process allows user to install it on their local computer. It is limited to 3 users and 3 Projects but enables unlimited use. Any data entered in the Free Version can be migrated to the full version any time. For Free On-Premises Application, Click Here. 2. Full Version: The full version is provided when user is ready to purchase and implement TimeLive for use in the organization. It is installed on a local server. It supports unlimited number of users (depending on Purchase Plan), Projects and tasks. For Pricing, please Click Here. To download On-Premises Application, Click Here. For information on evaluating or purchasing either type of TimeLive Application, visit our website at Livetecs.com, contact us through Live Chat or us on sales@livetecs.com System requirements (On-Premises version):
12 The sections that follow provide the system requirements for each type of TimeLive installation. Standard Full Version: Below are the requirements for the full version of the standard (non-hosted) installation, which requires an application server, a database platform, and client machines. Server Requirements The server on which TimeLive is installed must meet the following requirements. Operating System (Any) Windows 2000 with Service Pack 4 Windows XP Professional with Service Pack 2 or higher (32bit / 64bit) Windows Server 2003 (32bit / 64bit) Windows Vista (32bit / 64bit) Windows Server 2008 Windows 7 (service pack 1) Windows Server 2012 (R1/R2) Windows 8.1 (32bit / 64bit) Windows 10 (32bit / 64bit) Minimum Hardware Requirement: Pentium III, 800 MHz Processor 512 MB of RAM 1 GB of hard disk free space SMTP-compliant server Recommended Hardware: Pentium IV, 1.4 GHz Processor or higher 2 GB of RAM or more 10 GB of hard disk space or more SMTP-compliant Server Software (higher is better) Microsoft Windows Installer 3.1 (Built-in) Microsoft.NET Framework 4.0 (Built-in) Microsoft Data Access Components (MDAC) 2.8 (Built-in) Microsoft SQL Server 2008 Express Edition (Built-in) Optional: Microsoft Internet Information Services (IIS) 5.0 (built-in in operating system). TimeLive setup automatically install TimeLive internal web server (Cassini), in case if IIS will not available on system where TimeLive is being installed. Web Server requirements for different OS:
13 Operating System Web Server Windows 10 (32 bit and 64 bit) Microsoft IIS 7.0 Windows 7 (32 bit and 64 bit) Microsoft IIS 7.0 Windows Vista (32 bit and 64 bit) Microsoft IIS 7.0 Windows Server 2003 (32 bit and 64 bit) Microsoft IIS 6.0 Windows Server 2008 (R1,R2) (32 bit and 64 bit) Microsoft IIS 7.0 Windows XP Professional (32 bit and 64 bit) Microsoft IIS 5.1 Windows 2000 (32 bit and 64 bit) Microsoft IIS 5.0 Database Requirements: TimeLive requires any of the following database platforms be installed, either on the TimeLive server or on a server accessible by TimeLive. Microsoft SQL Server 2012 Microsoft SQL Server 2008 Microsoft SQL Server 2005 Microsoft SQL Server 2008 Express Edition (included in TimeLive Installer). It can be disabled by selecting [Custom] installation during installation. Microsoft SQL Server 2000 (MSDE and Server both) Client Requirements: Each computer being used to access the TimeLive system must have Operating System (Any one) : Windows 9x Windows NT Windows 2000 Windows XP Windows 2003 Windows Vista Windows 7 Windows 8.1
14 Windows 10 Macintosh OS X Linux workstations and UNIX terminals running X Windows Windows Server 2008 Windows Server 2012 Minimum Hardware Requirement (Higher is better): Pentium III, 450 MHz processor 256 MB RAM Monitor resolution (1024 x 768) Software (Latest is better): On Windows-based systems, Application may require any one of the following, Microsoft Edge Google Chrome (Version 31.0) Safari (Version 7.1) Microsoft Internet Explorer (Version 7.0) Mozilla Firefox (Version 33.0) Installing Web Server (IIS) Installing Web Server (IIS) on Windows XP: Installing IIS on Windows XP Pro: 1. If you are running Windows XP Professional on your computer you can install Microsoft's web server, Internet Information Server 5.1 (IIS) for free from the Windows XP Pro installation CD and configure it to run on your system by following the instructions below: - 2. Place the Windows XP Professional CD-Rom into your CD-Rom Drive. 3. Open 'Add/Remove Windows Components' found in 'Add/Remove Programs' in the 'Control Panel' 4. Place a tick in the check box for 'Internet Information Services (IIS)' leaving all the default installation settings intact.

15 4. Click OK to start IIS installation. Installing Web Server (IIS) on Windows Vista: Installing IIS on Windows Vista: 1. In Windows Vista, open Control Panel and then click Programs and Features. 2. In the right pane, click Turn Windows features on or off.
 Web Management Tools, double-click IIS 6 Management Compatibility, and then select the IIS 6 Metabase and IIS 6 Configuration Compatibility check box. 6. Double-click (or expand) World Wide Web Services, double-click Application Development Features, and then select the ASP.")
16 3. The Windows Features dialog box opens. 4. Select the Internet Information Services check box. 5. Double-click (or expand) Web Management Tools, double-click IIS 6 Management Compatibility, and then select the IIS 6 Metabase and IIS 6 Configuration Compatibility check box. 6. Double-click (or expand) World Wide Web Services, double-click Application Development Features, and then select the ASP.NET check box. The related options that are necessary for Web application development will automatically be selected. 7. Click OK to start the ASP.NET installation process.

17 Installing Web Server (IIS) on Windows Server 2003 (32 bit & 64bit): Installing IIS on Windows Server 2003: Click Start, point to Settings, and click Control Panel Double-click Add or Remove Programs. Click Add/Remove Windows Components. Double-click Application Server. Check if ASP.NET check box is selected. If not selected, select it.
: Click Start, point to Settings-> Control Panel, double-click the Administrative Tools and then double-click the Internet Information Services Manager.")
18 Enabling Web Server Extensions for ASP.Net 2-Windows Server 2003 (32 bit and 64 bit): Click Start, point to Settings-> Control Panel, double-click the Administrative Tools and then double-click the Internet Information Services Manager. The Internet Information Services window is displayed Expand Web service Extensions. If ASP.NET is enabled, 'ASP.NET v ' appears on right side. If the status is 'Prohibited' then select 'ASP.NET v ' and click on 'Allow' button. Without these changes, the application will not work as desired.

19 Installing Web Server (IIS) on Windows Server 2008 (32 bit & 64bit) IIS on Windows Server 2008: IIS 7.0 is one of the Windows Server 2008 Server Roles. IIS can be installed through the GUI using the new Server Manager interface after the Windows Server 2008 OS is installed. Server Manager provides a single dashboard to install or uninstall Server Roles and Features. It also gives an overview of all currently installed Roles and Features. When IIS 7.0 is chosen from the Server Manager, the basic components and services needed for IIS are automatically selected. Installing IIS 7.0 on Windows Server 2008 is a little different from installing IIS 6.0, but it s still pretty straightforward using Server Manager. You can install IIS via Server Manager found in: Start Menu Server Manager (it can also be found under: Start Menu Administrative Tools Server Manager) Select the r;add Roles under Roles

20 Select r;web Server (IIS) on the Server Roles page: Choose the IIS Services to be installed. In this case ASP.NET is to be installed. Select the services required by your applications:


21 When choosing the above services, you might be prompted with a warning to install some required services for the selection above, if the services are not already installed: IIS 7.0 is now installed with a default configuration for hosting ASP.NET on your Windows Server 2008:
![Installing TimeLive on local server: To install the local version of TimeLive: 1. TimeLive installer automatically install [SQL Server 2008 Express Database] engine during standard installation.](/docs-images/84/89281295/images/22-0.jpg "SQL Server 20")
22 Installing TimeLive on local server: To install the local version of TimeLive: 1. TimeLive installer automatically install [SQL Server 2008 Express Database] engine during standard installation. SQL Server 2008 Express can be remove from installation by choosing "Custom" installation in feature selection dialog box. 2. If [SQL Express 2008 Express Database] is not selected in installation, TimeLive then first show a "TimeLive database setup page" which allows to create and setup TimeLive database on any standard SQL Server 2000, 2005, 2008 server which are already running in organization. This setup page creates new TimeLive database with all necessary tables and default data. 3. TimeLive automatically install its own internal web server (Cassini), if there is no IIS already available on system where TimeLive is being installed. 4. Download the free version of TimeLive from Livetecs website, and save it to your local computer. 5. Double click on TimeLive installation file to launch TimeLive Setup Wizard. When the TimeLiveWeb - Installshield Wizard window displays, select the [Next] button.


23 . 3. Read the license agreement. If you agree to its terms, select the [I accept the terms of the license agreement] radio button, and then select the Next button.

24 4. The installation program checks for the presence of Microsoft Windows Installer, Microsoft.NET Framework 2. If these necessary components are not present, the following window displays. 5. Enter your name and your organization name, and then select the Next button. 6. Select [Custom] if SQL Express engine is not required in installation. Select the [Complete] radio button, and then select the [Next] button.
![7. Now click on [Next] button to start](/docs-images/84/89281295/images/25-0.jpg "TimeLive installation 8.")

25 7. Now click on [Next] button to start TimeLive installation 8. A status showing that TimeLive is first installing "Microsoft SQL Server 2008 Express" on machine.


26 8. A Setup Status window displays that tracks the progress of the installation. TimeLive requires that Microsoft Data Access Components (MDAC) be installed on your machine. At this point, the installation program will check for the presence of MDAC and
27 automatically install it if it is absent. This may take a few minutes Once MDAC is installed, the computer may need to be restarted. Installation will automatically resume after the computer is restarted. 9. The InstallShield Wizard Complete window displays to indicate that installation was successful. To exit the installation program, click on [Finish] button. 10. TimeLive install SQL Server 2008 Express engine with instance name "TimeLive". This instance can be remove from system using add/remove program in your control panel. 11. Please continue reading to "Launching TimeLive (First Time)" in order to launch TimeLive. 12. In case of installation without SQL Server 2008 Express engine, TimeLive first open database setup page when launch first time. Using database setup page, new database can be created as well as already existing database can pointed to TimeLive application. Please continue reading to "TimeLive database setup" for setting up TimeLive database. Upgrading TimeLive on local server To upgrade local installed version of TimeLive: a. Take backup of TimeLive folder and database before upgrade. b. Uninstall existing TimeLive version from add/remove program in control panel. Uninstall will not remove TimeLive configuration files and database files. Do not delete any files manually from TimeLive installation folder. c. Install TimeLive new version. d. Launch TimeLive. On first launch, TimeLive will first upgrade existing database with new changes and then will reach to login page after upgrade. This process will take about 1 or 2 minutes. e. User can now login in TimeLive as usual with their existing TimeLive login and password. TimeLive Database Setup:
![At first launch of TimeLive, system administration should create and setup TimeLive database, if [SQL Server 2008 Express] engine is excluded in feature selection dialog box.](/docs-images/84/89281295/images/28-0.jpg "In this case, system administrator can setup TimeLive database by providing these parameters.")
28 At first launch of TimeLive, system administration should create and setup TimeLive database, if [SQL Server 2008 Express] engine is excluded in feature selection dialog box. In this case, system administrator can setup TimeLive database by providing these parameters. Using this setup page, system administrator can create TimeLive database on any local or remote SQL server instance. SQL Server instance can be either SQL Server 2000, 2005 or This utility can be launch separately also by opening below mentioned URL in your browser: Using database setup page, administrator can perform following database related functionalities. 1. Create new database and populate schema: (for setting up new database) This option creates a new database, new database user and populate tables and default data in it. This also updates TimeLive configuration file (web.config) with this newly defined database connection settings. 2. Populate schema only (For shared hosting): This button creates database tables, objects and default data in already created blank TimeLive database. This is useful for users who are setting up TimeLive database on a shared hosting environment where there are separate tool available for creating database. This also updates TimeLive configuration file (web.config) with this newly defined database connection settings. 3. Use existing database: This option will allow administrator to configure TimeLive with an existing TimeLive database. Database setup parameter definition: Server Name: Instance Name: Authentication Type: SA Login: SA Password: Database Name: TimeLive Username: SQL Server database server name or IP address where SQL Server is installed. It can be any SQL Server 2000, 2005 or 2008 server address. (Optional) SQL Server instance name, if SQL Server is setup with some named instance. SQL Server authentication type. TimeLive recommended authentication type is [SQL Server Authentication], but system administrator can configure TimeLive database on windows authentication also. As this utility create a new TimeLive database and a new timelive database user, only sql server user with [System Administrator] can create new database on sql server. Password of "sa" or any system administrator equivalent login. Database name which is required to be created on SQL Server. Name of user which will be created automatically by this utility for

29 accessing TimeLive database by TimeLive application. TimeLive DB Users' password: Creates TimeLive DB user with this password. TimeLive System Settings Specifying System parameters: System configuration page can be launch from [Start --> All Programs --> TimeLive --> System Configuration] on system where TimeLive is installed. System setting can be open directly by opening this URL in your browser. Defining System parameters: Authentication Type System Admin Password SMTP Server SMTP Username SMTP Server Password SMTP Port Number Application URL Connection String TimeLive supports two types of authentication. One is default database based authentication. Using default authentication, user can login in TimeLive using their own username and password defined in TimeLive application by Administrator. Second is [Active Directory Authentication] where user can login in TimeLive using their corporate Active Directory username and password. TimeLive allows only system administrator user for accessing system configuration page. System administrator username is "SysAdmin". Administrator can access system configuration area by entering username as "SysAdmin" and its password. SMTP Server name which you are using in your organization for sending s. Username of SMTP server if any (optional) Password of SMTP server (optional) SMTP default port is 25. You can change it to some other port if smtp server is configured on some other port other than 25. URL of TimeLive application which is accessible from your organization or from users from internet. It can be either local computer name of system where TimeLive is installed or it can be IP address of server or it can be full domain name. This is SQL Server connection string. By default, timelive
30 installation always install SQL Server 2008 Express edition on local server. Understanding TimeLive Website URL: TimeLive's website URL depends on the type of server you are using, and has the following format: Server type Cassini WebServer IIS ASP (Hosted version) URL Format or or (login form of hosted version of TimeLive) Once the application is installed, administrators should distribute the site's URL, together with login information, to all users so they can access TimeLive via their web browser. TimeLive License Activation Guide: By default, TimeLive downloadable version comes with 30 days pre-activated trial license key. This pre-activated trial license key supports unlimited users up to 30 days. After 30 days, it converts to 5 users free TimeLive. To ensure that TimeLive is secure and is only registered by authorised users, we have a systematic activation procedure in place to safeguard the software s use. There are two types of license activation available in TimeLive. One is online activation and second is manual activation. Online activation is a process of activating TimeLive by using license key, received by customer in TimeLive order . Unfortunately this online activation process can be blocked by either a firewall or the proxy server settings on your system. In case of failure of online activation, customer can use manual activation, in order to activate TimeLive even without using of internet. Automatic Activation: 1. Navigate to [Admin Options]-->[Preferences] while login as an admin user. 2. Enter your license keys in [License Key] field. 3. Just make sure that [Online Activation] is selected. 4. Click on [Activate] button to activate TimeLive. 5. You will receive a message "License Activated Successfully" in case of successful license activation. 6. You may receive message "Unable to activate license", if TimeLive will not able to communicate with TimeLive license activation server. You can then try manual activation using instructions mentioned below. Manual Activation: 1. There are two major steps of manual activation. First is to request your manual license activation key by sending an to [sales@livetecs.com] with [machine name] of system, where TimeLive is installed and order reference number. TimeLive machine name can be found in [Machine Name] field available in [Admin Options]--[Preferences]. 2. Once received manual license key, navigate to [Admin Options]-->[Preferences] while login as admin user. 3. Select your activation type to [Manual Activation]. 4. Enter manual license keys in [Machine Key] field. 5. Click on [Activate] button to activate TimeLive.
31 6. You will receive a message "License Activated Successfully" in case of successful license activation. Installation on Shared Hosting 1. Introduction 2. Installation and Setup 3. Upgrading TimeLive on shared hosting 1. Introduction TimeLive Edition is a timesheet and expense management system based on current Microsoft Technologies. It is designed to run on an IIS 5.0 or 6.0 or 7.0 web server that has ASP.Net 4.0 installed. In addition, the software is designed to work with Microsoft SQL Server, Microsoft SQL Server Express Edition. TimeLive can be setup on ASP.Net/SQL Server supported shared hosting. 2. Installation and Setup TimeLive require "Full Trust" permissions on your shared hosting. Download the manual installer file from Unzip the software to a folder on your computer's hard drive. Create a new (Domain or Website) from your hosting control panel for TimeLive. Upload, copy or FTP the entire TimeLive folder to your web server, including ALL the folders and files inside it. Do not change the file and folder structure. You would typically place the TimeLive folder in your web server's wwwroot directory, but it can also be copied to any subdirectory under a web site's root directory, as long as it is marked as an application starting point. You may have to ask you host for information about how to perform these steps. <<Your web server must have the Microsoft.Net Framework 4.0 installed before TimeLive will function.>> The following directories and files of the uploaded TimeLive installation need to have read, write, delete, and modify permissions in the file system: /web.config (file) /Uploads (folder) /Log (folder) /App_data (folder) The following directories need to have "execute" and "read" permissions in the file system /bin Create a new SQL Server database with name "TimeLive" from your hosting control panel. After creating database, note down the physical database name created using control panel. Create a new SQL Server database user from your hosting control panel with name "timelivedbuser" and assign this user to newly created "TimeLive" database. Launch "TimeLive Database Setup" page and setup TimeLive database on your shared hosting SQL Server. Now open " page where TimeLive URL should be URL pointing to TimeLive folder in your file system. This will launch TimeLive account add page where administrator can define their organization and administrator information. 3. Upgrading TimeLive on shared hosting Download the manual installer file from
32 Unzip the software to a folder on your computer's hard drive. Delete all files from TimeLive folder except /web.config (file) /Uploads (folder) /Templates (folder) Upload, copy or FTP the entire TimeLive folder to your web server, including ALL the folders and files inside it except /web.config (file) /Uploads (folder) /Templates (folder) Now open " page where TimeLive URL should be URL pointing to TimeLive folder in your file system. This will launch TimeLive login page after taking a while in executing database upgrade script on existing database.
33 Getting Started What you can do in TimeLive? TimeLive Timesheet Suite is integrated suite for managing project life cycle including projects, tasks, timesheet, expense and attendance etc. TimeLive tools: These are the top level tools of TimeLive timesheet suite: 1. Employee Timesheet Management 1. Time entry using two format: Daily and weekly 2. Timesheet and expense approval (customizable timesheet approval path by defining work-flow path) 3. Allow external users (client) to approve their own project timesheet entered by employees. 2. Billing management Three different types of billing rate types configurable at project level. Billing rate can be define with its applicable date range with complete history. Timesheet then pick billing rate based on time entry date from billing rate history defined at employee level, project role level or project employee level. Different billing rate options: Employee own billing rate (System should pick employee own billing rate) Project based employee billing rate (System pick employee billing rate defined for each project separately) Role based billing rate (System pick billing rate of employee based on role wise billing rate defined for each project separately) Task based billing rate (System pick billing rate of time entry which is defined in task's billing rate) 3. Employee Attendance 1. Punch in / punch out 2. Leave records (sick leave, casual leave etc) 4. Expense Entry Multi currency expense entry tracking with currency conversion. Defining of exchange rate history for each currency. Tax calculation with customizable formulas. Expense reimbursement management and tracking. 5. Task Management 1. Project manager, team leads, employee can create tasks for their project and can assign those tasks to multiple users. And then whole team which is assigned in that particular task can do these task management activities. can add their own comments. can attach files at task level can change status
34 6. Project Management Tool 7. Overtime hours tracking: 8. Reporting 1. Billing manager can define separate billing rate for different type of work type like overtime, travel etc. Employee can enter time entry for different work types like standard, overtime etc in time entry. 1. Timesheet reports for time sheet and time billing. 2. Expense report for expense reporting to client. 3. Attendance reports with yearly leave days summaries. What you can do in TimeLive? TimeLive Timesheet Suite is integrated suite for managing project life cycle including projects, tasks, timesheet, expense and attendance etc. TimeLive tools: These are the top level tools of TimeLive timesheet suite: 1. Employee Timesheet Management 1. Time entry using two format: Daily and weekly 2. Timesheet and expense approval (customizable timesheet approval path by defining work-flow path) 3. Allow external users (client) to approve their own project timesheet entered by employees. 2. Billing management Three different types of billing rate types configurable at project level. Billing rate can be define with its applicable date range with complete history. Timesheet then pick billing rate based on time entry date from billing rate history defined at employee level, project role level or project employee level. Different billing rate options: Employee own billing rate (System should pick employee own billing rate) 3. Employee Attendance Project based employee billing rate (System pick employee billing rate defined for each project separately) Role based billing rate (System pick billing rate of employee based on role wise billing rate defined for each project separately) Task based billing rate (System pick billing rate of time entry which is defined in task's billing rate) 1. Punch in / punch out 2. Leave records (sick leave, casual leave etc) 4. Expense Entry Multi currency expense entry tracking with currency conversion. Defining of exchange rate history for each currency. Tax calculation with customizable formulas.
35 Expense reimbursement management and tracking. 5. Task Management 1. Project manager, team leads, employee can create tasks for their project and can assign those tasks to multiple users. And then whole team which is assigned in that particular task can do these task management activities. can add their own comments. can attach files at task level can change status 6. Project Management Tool 7. Overtime hours tracking: 8. Reporting 1. Billing manager can define separate billing rate for different type of work type like overtime, travel etc. Employee can enter time entry for different work types like standard, overtime etc in time entry. 1. Timesheet reports for time sheet and time billing. 2. Expense report for expense reporting to client. 3. Attendance reports with yearly leave days summaries. Launching TimeLive (First Time): Before starting TimeLive, Administrator should create a new TimeLive account. TimeLive can be launch using two way. 1. By double clicking on TimeLive shortcut on server desktop. 2. Or by typing whole URL of TimeLive URL in your web browser. URL can be enter using these different way: or Creating new TimeLive Account: Creating TimeLive Account: Before starting TimeLive, Administrator should create a new TimeLive account. If TimeLive is being launched for the first time, it will automatically redirect to account add form where System Administrator can create new TimeLive Account. Account Information: There are two types of information which are required to be entered on new account Add Form. First, organization information and second is personal along with login information of TimeLive System Administrator. After sign up, Administrator receive a notification containing Login / Password of TimeLive account.
 Language according to your preference 4.")
36 First time login in TimeLive: After new Account Add, system administrator can login in TimeLive system using login and password. Steps of login: 1. Enter your Login address 2. Enter your password 3. Select UI (User Interface) Language according to your preference 4. Click on Login button to login in the TimeLive Application

37 5. On successful login, user will get access to home page. TimeLive Dashboard is by default set as home page:
38 Using Menus: You can use the TimeLive left side menu bar at the left of the page and top menus to navigate through the application based on the type of work you are doing. Each item is only available to a user if they have been given access to the features within that menu, based on their role based permissions. Contact your system administrator if you do not know your organization s TimeLive URL. This URL is dependent upon your server type and name, and the server s port number. Those using the ASP (hosted) implementation can access TimeLive through the Employee Login section of To ensure full functionality of the application, you should allow pop-ups for the TimeLive website. Types of Menus: There are three types of menus and options available in TimeLive: 1. Top navigation menu: My Area Tasks Projects Timesheet Expenses Reports
39 2. Left hand side navigation menus (hierarchy) Home My Area (My area options include all employees own daily routine options like adding tasks, timesheet entry, expense entry, profile, personal reports etc) My Tasks (To add and list of employee own task. Employee can then search other employee task also using this page) My Profile (To change profile, password and other personal information) My Projects (Show only those projects in which you are assigned) My Timesheet (Show daily timesheet of a employee. You can switch week view of timesheet by clicking on WeekView of timesheet) My Expense Entries (Show daily expense entries. It allow allow to add new expense entry records) My Reports (Show main reporting page) Project Management (Project management area includes different project management pages like approval of timesheet and expenses) Timesheet Approval (Timesheet approval page) Expense Approval (expense approval page) Administration (All system administration options) Admin options (This page will launch main administration page). Admin options further have these sub options to manage and configure TimeSheet solution. Organization Setup Locations (To manage locations (branches) of your organization. Departments (To manage departments of your organization) Roles (To manage organization roles of your organization) Working Days (Setting up working days in your organization) Task Type (Setting and customizing task types) Priorities (setting and customizing priorities of tasks) Role based permission (setting of access rules of application features on application roles) Timesheet / Project / Billing Setup Billing types (billing types setup) Absence types (configure types of absence in your organization) Project types (configure types of project in your organization) Preferences (Timesheet, organization, billing, internationalization preferences) External Users (Configuring external users through which you can allow client to approve their own project timesheet using TimeLive system). External Users (Configuring external users through which you can allow client to approve their own project timesheet using TimeLive system) Expenses Setup Expense Types (configure types of expenses) Expenses (configure expense code as per your organization needs) Currencies (configure currencies and exchange rates) Tax Code (configure tax code and their calculation formulas)
 Import / Export Import / Export (CSV) (Importing and exporting of all types of TimeLive data to CSV files) Clients (To manage clients of your organization) Employees (To manage employees of")
40 Payment Method (configure payment method and define your own custom payment method) Archive Time Entry Archive (Archive of all timesheet records) Expense Entry Archive (Archive of all expense entry records) Import / Export Import / Export (CSV) (Importing and exporting of all types of TimeLive data to CSV files) Clients (To manage clients of your organization) Employees (To manage employees of your organization) Projects (To manage projects of your organization) If you have problems accessing Web TimeSheet from outside your network, contact your system administrator. Quick Basic Setup In order to prepare Timesheet solution for time entry, expense entry, task management, administrator should follow these setup steps in sequence. Understanding the Workflow: The following diagram explains the general flow of work in TimeLive. 1. Create projects and tasks and assign project teams, rates and billing options to allow users to enter billable and non-billable time and expenses. You will be able to track all time and expenses to calculate project costs and ensure accurate client billing. 2. Create generalized tasks with [All Employee Task] and [All Project Task] checked. Generalized tasks doesn't require any assignment. Generalized tasks appear for all projects in time entry. 3. Employee complete their timesheets by entering time against projects or time off codes. Users can enter time only for those tasks for which they are part of the task team. All time is either billable or non-billable. Once completed, users submit their timesheets for approval. 4. Once submitted, users timesheets are sent to the appropriate project leaders, clients, and supervisors for approval. Approvers can approve or reject the timesheets. Approved timesheets are closed so the data can be processed. 5. Any user with report access can generate reports to review data in the system including project status, timesheet status, billing, time off, and utilization. How to perform quick setup steps: Following are 4 steps process which will allow you to get started using TimeLive. For more detail information for each of the setup, click on their corresponding link to open its detail help.
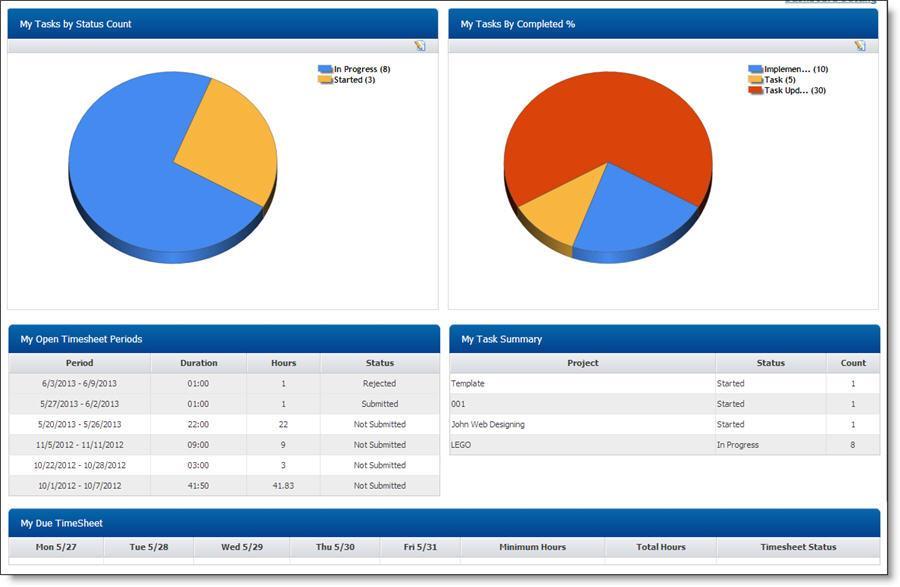
41 1. Creating employees: (Click to launch detail help of adding Employees) After creating of employee record by administrator, employees can login in TimeLive and can do their activities 2. Creating of Clients: (Click to launch detail help of adding Clients) Timesheet setup required project setup before performing any thing in TimeLive. For creating project, client of those projects should be created first. 3. Creating of Projects: (Click to launch detail help of adding Clients) Time entry and expense entry can only be entered for a project tasks. So you must have project setup before adding any task for your projects. You should also assign your project team in order to allow your team to enter time entry record of a particular project. 4. Creating of Tasks: (Click to launch detail help of adding Clients) You can add tasks in your project and you can assign those tasks to employee. Only tasks which are assigned to an employee will be appear in time entry page for entering time entry record Dashboard Settings A dashboard is a user interface that organizes and presents information in ra way that is easy to read.

42 User can customize and select the data / graphs to be appeared on the Dashboard using Dashboard Settings. To customize, click on Dashboard Settings at right top of the screen. It will give the user ability to select or deselect the data / graphs appears on Dashboard. Make your required changes and click on Update.
43
44

45 Timesheet Setup Client Setup: About Client: Clients are customers of your organization to whom you bill time or costs for projects. Clients can be external customers or departments within your organization. You should define your clients before setting up projects to eliminate the need to go back and assign the projects to the appropriate client. System administrator can setup clients using [Left hand side menu] --> [Clients] (under Administration) Client Setup
46 Client Information fields: These are the fields which are required to be input for adding new client in TimeLive system. Client Name Client Nick (short name of client) Address Address Country State City Zip Code Telephone Fax Default Currency (for billing purpose) Default billing rate Website Notes Adding new Client: To add new client, follow these instructions. 1. Enter client information in [client information form].
47 2. Click on [Add] to add this client. Deleting Client: 1. In [Client List], click on [Delete] link of record which you want to delete. 2. Click on [Yes] on delete confirmation dialog Editing Client: 1. In [Client List], click on [Edit] link of record which you want to modify. 2. Update your required modification in [Client Information] form. 3. Click on [Update] button to update this record. Project Setup: A project is a framework (structure) used to organize work-group tasks. Projects identify the body of work to be completed by a team within your organization. Projects can have multiple levels and complexities, depending on the needs of your organization. How Project Work: The TimeLive allows you to define projects to enter time and expenses against, as follows: 1. A project manager adds a project to TimeLive, specifying the client the project is being completed for, if applicable. 2. The project manager specifies who will be working on the project. 3. If the project is being billed to a client, the project manager sets the billing rates for the project. 4. The project manager creates tasks within the project and enters estimates. 5. The project manager specifies which expenses can be claimed under the project. 6. When entering time on their timesheet, users working on the project allocate their time against the project and task. Users also select the project when entering expenses. 7. The costs and billing charges associated with the time and expenses are automatically calculated by the system. 8. Time and expenses can be exported for client billing. Additionally, the project manager can periodically review the actual costs against the estimates, to ensure the project is on track. Management of Projects is located under (<Left Navigation Menu>--><Administration>-- ><Projects>). The system allows you to create an unlimited number of projects for users to log their time, expenses, and mileage against. The system uses a hierarchical tasks structure and allows unlimited levels of tasks under any parent project. The main Project screen serves as the master control panel for all project creation, modification, and deletion. Working with Projects List Page The Projects page provides a list of projects defined within TimeLive. Projects can be added, edited, or deleted from this page. The Project setup is divided into the following sections: Project Information Team Lead / project manager information Billing type / billing rates Project Team
 Client Project Billing Type (Per hour / fixed bid etc).")
48 Project Fields: Project Template allows user to add Predefined Project Template for this Project (See Project Template). Project Type (you can add / remove project types from admin options --> Project Types) Client Project Billing Type (Per hour / fixed bid etc). You can add / remove new billing type from admin options --> Billing types.) Project Code (short project code) Project Name Project Description Start Date Deadline Project "Team Lead" Project "Project Manager" Timesheet Approval Path (Approval path of timesheet and expense entries) Expense Approval Path (Approval path of expense entry) Default billing rate / per hour of employees Project billing rate type (Four types of billing rate options) 1. (Use employee own billing rate) Billing rate should be picked from employee own billing rate 2. (Use project roles billing rate) Billing rate should be picked from role wise billing rate of that project. 3. (Use project based employee billing rate) Billing rate should be picked from project based employee's billing rate) 4. (Use task based employee billing rate) Billing rate should be picked from billing rate defined for every separate task) Adding new Project: One of the first actions that should be performed on any new installation of TimeLive is the creation of the various projects that your organization will be using for time, expense and task management. To add new project, follow these instructions. 1. Enter project information in client project form. 2. Click on [Add] to add this project.
![Deleting Project: 1. In [Project List], click on [Delete] link of record which you want to delete. 2. Click on "Yes" on delete confirmation dialog Editing Project: 1.](/docs-images/84/89281295/images/49-0.jpg "In [Project List], click on [Edit] link of record which you want to modify. 2. Update your required modification in [Client Information] form. 3. Click on [Update] button to update this record.")
49 Deleting Project: 1. In [Project List], click on [Delete] link of record which you want to delete. 2. Click on "Yes" on delete confirmation dialog Editing Project: 1. In [Project List], click on [Edit] link of record which you want to modify. 2. Update your required modification in [Client Information] form. 3. Click on [Update] button to update this record. Editing Project Team On project add, TimeLive automatically redirect to project team page where administrator can select employees which he wants to be in this particular project team. To edit project team, click on edit project link of project whose team you want to modify and then click on "Project Employees" button to open project team page. Adding Task into the Project: Please see Task Setup. Task Setup Projects can contain many tasks and up to ten hierarchical levels. Every employee who is assigned to a project can create task of that particular project. Administrator can customize task add permission using [Role Permission] option available in admin options. More about task:
50 1. Task is the main source of project time sheet. Time entry can only be entered for a task of any project. [Administrator] should create projects and define project manager and team lead of projects. 2. [Administrator] or [Project Manager] or [Team Lead] can then define "Project Team". 3. [Project Manager] and [Team Lead] then can create project tasks and assign them to project team in order to allow employees to enter time entry for that task. 4. Only user who is part of project team can add new task in a project. 5. A task can be created using [All Employee Task] checked. All employee tasks appear in time entry of all team members of project. 6. A task can be created using [All Project Task] checked. All project task appear in time entry of all projects. 7. A task can be created using both [All Employee Task] and [All Project Task] checked. Those task then will be appeared for all projects and in all employees time entry. 8. Every task has their own status, priority, completed %, completed fields to monitor task progress for team collaboration purpose. 9. Every task has two fields Estimated Cost and Estimated Time spent for budgeting purpose. 10. Project manager can categorize their project tasks in different milestones (phases) for easier monitoring of individual milestones (phases) and then at project at root level. Task Fields: Tasks are divided into three sections 1. Task Information Project Parent task (parent task if you want add this task under a parent task) Milestone Task Name Task Description Task Type (category of task. It depends upon usage to usage of TimeLive in different environments. Administrator can create new task types as per their organization needs from Admin options --> task types). Duration Completed % Deadline Task Status Priority All Employee task (Check this field, if you want this task to be appeared in time entry of all employee. General routine tasks for which you don't want to add in all projects.) All Project Task (Check this field, if you want this task to be appeared in time entry of all projects. General routine tasks for which you don't want to add in all project). Parent task (check this field, if you want this field to be add as parent field. This field will then come in parent task dropdown during task add) 2. Assign To 3. Estimates Select employees which you want to be assigned in this task. Employee assigned in task will only enter time entry of a task. Assign to is not require if a task is defined as [All Employee Task]. Estimated Cost Estimated Time spent List of Task (two options)
 1.")
51 Task can be viewed these four different option. 1. My Task (Only task which are assigned to logged in employee) 1. My Area (Task that are either assigned to logged in employee or task which are reported by logged in employee)


52 1. Project --> Tasks (Hierarchical view of all task for administration purpose). Administrator can add, edit and delete any task from there.
53 1. My Projects --> Tasks (Hierarchical view of all task for administration purpose) Adding New task [Standard Employee] Logged-in employee can add new task in TimeLive and can assign this task to any other employee. To add task: Click on [My Task]. Fill all task information in [Task information Form]. Click on add to add this task. Task will be then appear in [My task] of employee who is assigned to any task. Employee can see their own reported task from [My Area] Updating Task: Logged-in employee can modify any task by clicking on any task in [My task] task list. Employee can update task title, task comments, task status, completed, completed % in task modification form. Adding Task Comments:

54 Task Comments are the history of comments from different task related users in order to communicate different issues / updates / comments for that particular task between team. Task comments cannot be deleted once it entered. To enter task comments: Open task by clicking on task either from [My Task], [My Area] or [Project--Tasks]. In task comment form, enter comments title and comment description. Click on [Add] to add that task comments. Attaching document with any task: To attach document with any task: Open task by clicking on task either from [My Task], [My Area] or [Project--Tasks]. In task attachment form, enter name of document which you want to attach with this task Click on browse button to locate your file on your local system. And click on open after selecting your desired file in file selection dialog box. Click on [Add] to attach that document. Working Day Types

55 Working Day Type is the set of different kind of validations, configuration settings & policies which applies on Timesheet. These sets of Working Day Type can be assigned to every individual employee on Employee profile option. Administrator can create or modify Working Days Types using [Admin Options] --> [Working Days]. Each of the settings/configuration options are explained below.

56
57 Working Day Type Available Options. Field Name Description Working Day Type Specify the name to be called for this Working Day Type. Hours Per Day Minimum Hours Per Day Maximum Hours Per Day Minimum Hours Per Period Maximum Hours Per Period Minimum Percentage Per Day Maximum Percentage Per Day Minimum Percentage Per Period Maximum Percentage Per Period Timesheet Overdue A numerical value which specifies the duty hours per day for that specific Working Day Type. This value will be used to convert days into hours and hours into days. A numerical value which specifies the minimum allowed working hours per day. System will validate the hour entered in Timesheet is not less than the minimum specified. A numerical value which specifies the maximum allowed working hours per day. System will validate the hour entered in Timesheet does not exceeds than the maximum specified. A numerical value which specifies the minimum allowed working hours per Period. System will validate the hour entered in Timesheet is not less than the minimum specified. [Option can be changed via Admin Option - Preferences - Timesheet Setup] A numerical value which specifies the maximum allowed working hours per Period. System will validate the hour entered in Timesheet does not exceed than the maximum specified. [Option can be changed via Admin Option - Preferences - Timesheet Setup] A numerical value which specifies the minimum allowed working hours percentage per day. System will validate the hour entered in Timesheet is not less than the minimum specified. [Option can be changed via Admin Option - Preferences - Timesheet Setup] A numerical value which specifies the maximum allowed working hours percentage per day. System will validate the hour entered in Timesheet is not less than the maximum specified. [Option can be changed via Admin Option - Preferences - Timesheet Setup] A numerical value which specifies the minimum allowed working hours Percentage per Period. System will validate the percentage entered in Timesheet is not less than the minimum specified. [Option can be changed via Admin Option - Preferences - Timesheet Setup] A numerical value which specifies the Maximum allowed working hours Percentage per Period. System will validate the percentage entered in Timesheet does not exceeds than the Maximum specified. [Option can be changed via Admin Option - Preferences - Timesheet Setup] Option can be used to inform employee that Timesheet is pending. It can be set manually for number of days. Empty or Zero is by default on Due Date. Lock Previous Timesheet Periods Lock Next Timesheet Periods This option is used when to restrict employees edit the previous Timesheet Periods. Empty or Zero is by default. This option is used when to restrict employees edit the Next Timesheet Periods. Empty or Zero is by default. Lock All Periods Except Previous This option is used when to allow employees to only edit the Previous Timesheet Periods. Empty or Zero is by default.
58 Lock All Periods Except Next Lock Previous/Next Timesheet On Timesheet Period Type Week Start Day Show Clock Start/End Lock All Previous Timesheets Lock All Next Timesheets Enable Balance Validation for Time Off Working Days & Selection Disable This option is used when to allow employees to only edit the Next Timesheet Periods. Empty or Zero is by default. This option is used when to restrict employees to edit Timesheet on any specific date of the month. Empty or Zero is by default. This is a drop box option used to assign employee Timesheet entry Daily/Weekly/Biweekly/Semi-Monthly/Monthly. This is a drop box option used to identify the 1st working day of the week. This check box allow user to enter work start and end time in Time Entry. It is a check-box option through which All previous Timesheets can be locked. It is a check-box option through which All next Timesheets can be locked. It is a check-box option through which user can see the Time Off balance while entering Time Off. Administrator can select working days for each Working days type. It is a check box appear in Edit mode to allow administrator to disable specific Working Day Type. My Tasks About My Tasks [My Tasks] page provides list of all tasks assigned to logged in user. User can then change it search critera to see other tasks also assigned to other employees. User can also add new task for assigned project and he can assign those task to my self as well as other team members of project. By default, [My Tasks] page only show uncompleted tasks which are assigned to currently logged in user. User can do search on other tasks also from here by clicking on [Search] link. In [Search] parameters, user can enter search parameters and can see other tasks also other then assigned to current user Clicking will launch [Task information] page where user can modify different task status, title, body. In task information page, user can also add "Task comments" for this task. In task information page, user can also attach different relevant documents which they want to share between project team for this task. User can also add new task by filling [Add Task] form on [My Tasks] page.


59 My Projects
![About [My Projects] [My Projects] page show all projects in which current logged in user is assigned.](/docs-images/84/89281295/images/60-0.jpg "[My Projects] page will show only those projects in which he is assigned using [Project Team] option in Project. User can change his own email preferences by clicking on [Preferences] icon.")
![User can open [Tasks] page by clicking on task link. Tasks link will only be available available for projects in which current employee is either Team Lead or Project Manager.](/docs-images/84/89281295/images/60-1.jpg "User can click on [Manage] icon to open [Edit Project] page. [Manage] icon will only be available for those projects in which current user is either Project Manager or Team Lead.")
60 About [My Projects] [My Projects] page show all projects in which current logged in user is assigned. [My Projects] page will show only those projects in which he is assigned using [Project Team] option in Project. User can change his own preferences by clicking on [Preferences] icon. User can open [Tasks] page by clicking on task link. Tasks link will only be available available for projects in which current employee is either Team Lead or Project Manager. User can click on [Manage] icon to open [Edit Project] page. [Manage] icon will only be available for those projects in which current user is either Project Manager or Team Lead. Project Preferences : Through project preferences page, user can configure different project based preferences. Work Type Setup About Work Type: TimeLive work types implementation allow project manager and administrator to define separate billing rate and employee rate of every separate work type. Work type is something one level higher classification of time entry. A typical case for separate billing rate for separate [work type] is Employee Billing Rate (Standard) : 80 per hour Employee Billing Rate (Overtime) : 100 per hour Employee Billing Rate (Travel) : 60 per hour. Work Type in TimeLive: 1. System administrator can define separate billing rate for each separate work type in all types of billing rate defination.
![2. System Administrator can then enable [Work Type] field using TimeLive application preferences. 3. Employee / contractor can then select [Work Type] in time entry view. 4.](/docs-images/84/89281295/images/61-0.jpg "TimeLive then pick billing rate for selected work typed defined separately in billing rate definition. Default Work Types in TimeLive: TimeLive by defaults come with 3 types of [work types]. 1.")
![Standard 2. Overtime 3. Travel How to define separate employee and billing rate for different [work types]: 1.](/docs-images/84/89281295/images/61-1.jpg "In [Employee Own Billing Rate]: Just select your required [Work Type] in [Employee Form] and then define your billing rate and employee rate for that particular work type. 2.")
61 2. System Administrator can then enable [Work Type] field using TimeLive application preferences. 3. Employee / contractor can then select [Work Type] in time entry view. 4. TimeLive then pick billing rate for selected work typed defined separately in billing rate definition. Default Work Types in TimeLive: TimeLive by defaults come with 3 types of [work types]. 1. Standard 2. Overtime 3. Travel How to define separate employee and billing rate for different [work types]: 1. In [Employee Own Billing Rate]: Just select your required [Work Type] in [Employee Form] and then define your billing rate and employee rate for that particular work type. 2. In [Project based Employee Billing Rate]: Just select your required [Work Type] in [Work Type] drop-down and then define your billing rate and employee rate for that particular work type.
![3. In [Role based billing rate] case Just select your](/docs-images/84/89281295/images/62-0.jpg "required [Work Type] in [Work Type] drop-down and then")

![In [Task Based Billing Rate] case Just select your](/docs-images/84/89281295/images/62-2.jpg "particular work type.")
62 3. In [Role based billing rate] case Just select your required [Work Type] in [Work Type] drop-down and then define your billing rate and employee rate for that particular work type. 4. In [Task Based Billing Rate] case Just select your required [Work Type] in [Work Type] drop-down and then define your billing rate and employee rate for that particular work type.
![How to enable [Work Type] field in Time Entry [Day View] and [Week View]: Steps: 1. Navigate to [Admin Options]-->[Preferences] 2.](/docs-images/84/89281295/images/63-1.jpg "Click on [Show Work Type In Timesheet] to check this field. 3. Click on [update] to update these changes.")
63 How to enable [Work Type] field in Time Entry [Day View] and [Week View]: Steps: 1. Navigate to [Admin Options]-->[Preferences] 2. Click on [Show Work Type In Timesheet] to check this field. 3. Click on [update] to update these changes. Time Entry Day View with [Work Type] field: Time Entry Week View with [Work Type] field:
64
65 Timesheet Time Entry After you have completed the setup process, users can begin entering billable and non-billable time and expenses and tracking when they start and stop work. You will be able to track project costs and client billing, timesheet submission status, time off usage, and available vacation. This topic will explains the actions involved in daily usage of timelive, including: Entering, saving time record using time entry day view. Submit is only available in week view. Entering, saving, and submitting time record using time entry week view. More about TimeLive timesheet entry: 1. Timesheets are used to enter time against specific projects and tasks or activities and time off using either day-view or week-view. 2. Users complete and submit their timesheets from week-view to supervisors, project leaders, and/or clients for approval. 3. The timesheets are then reviewed and either approved. When all items are approved, the time information is saved to the database. 4. Once a timesheet is submitted, the data can be analyzed by project leaders and supervisors to determine project status and costs, and to make more efficient resource planning decisions. 5. Billing detail can be generated after submitting of timesheet. Timesheet formats: TimeLive provides two timesheet formats for enterting time entry record in TimeLive. Standard Timesheet (just with total time of a time entry record. It is useful in organization where only TotalTime information is required for billing and analyzing)
66 Time entry with Start time and End time (additional start time / end time field with standard total time field)
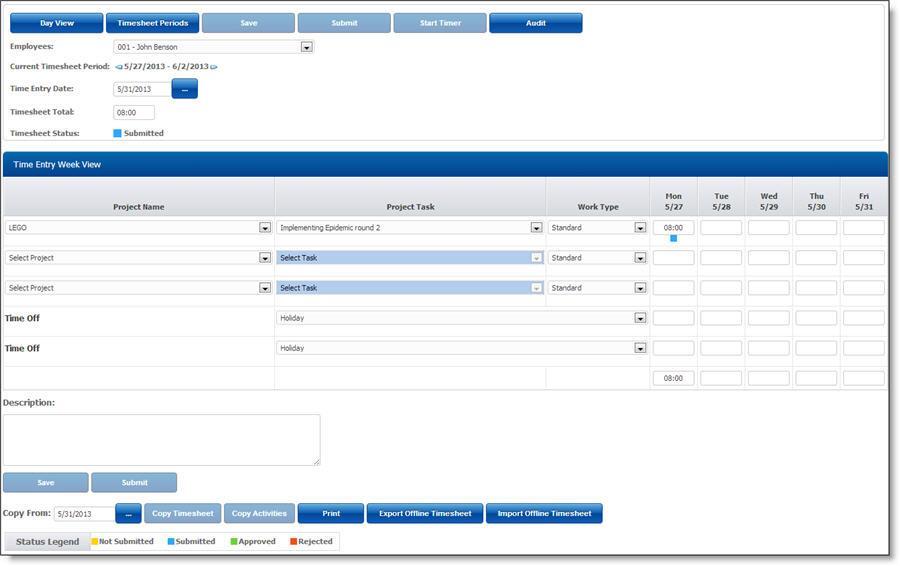
67 Time Entry - Day View About Day View: Using day view of time entry, employee can enter daily timesheet with full view of whole day. Employee can submit these time entries for approval by clicking on [Submit] button. Time entry day view can be access using <My Area> -- <My Timesheet> from main menu. Features of Time Entry - Day View: 1. Easy single format of entering whole day time entries for different project and task in single save. 2. Day view of time entry also supports both two types of format. You can customize this option using Admin option --> Preferences (Show Clock Start/End] option. Standard timesheet (just with total time of a time entry record) Time entry with Start time and End time (additional start time / end time field with standard total time field)

68 Adding of Time entry record using Day View: 1. By default, timelive always give two blank rows in day view to enter new timesheet record. 2. On save, timelive will give additional 2 rows for entering more time entries 3. Select project in blank row of day view 4. Select task of that selected project in that same row 5. Enter Start time (Time In / Time Out mode only) 6. Enter End time (Time In / Time Out mode only) 7. Enter Total Time You can continue on adding new row in time entry record from next row. If you want to add more row, save it first and then timelive system will give additional 2 rows for entering more records. Deleting of time entry record: 1. Click on [Delete] button of record which you want to delete. 2. Click on [Yes] to confirm this delete. Updating time entry record: Navigate to field which you want to change. Change your content in that field. Click on update to save this update. Submitting time entry record: Submitting time entry can be done only from week-view. Just navigate to week-view and click on submit button to submit that whole week.
69 Time Entry - Period View About Period View: Using [Period View] of time entry, employee can enter daily time sheet with full view of whole week. Employee can submit these time entries for approval by clicking on [Submit] button. Time entry week view can be access using <My Area> -- <My Timesheet> --> <Period View> from main menu. Features of Time Entry - Period View: 1. Easy single format of entering whole week time entries for different project and task in single save. 2. Period View can be configured using [Admin Options]-->[Working Days] for following configuration. Changing of period type (Daily, Weekly, Bi-Weekly, Semi-Month, Monthly) for period view. Week Start Day. Week working days. Validation of hours for time entry (Minimum Hours / Maximum Hours per day and per period). 3. Period view of time entry also supports both two types of format (standard and with start time and end time). You can customize this option using Admin option --> Preferences (Show Clock Start/End] option. 4. A client selection dropdown can also be enabled in Time Entry using Admin Options-- >Preferences option name [Show Client In Timesheet]. 5. Standard timesheet (just with total time of a time entry record)

70 Time entry with Start time and End time (additional start time / end time field with standard total time field)

71 Adding of Time entry record using Period View: 1. By default, Timelive always give two blank rows in week view to enter new timesheet record. 2. On save, Timelive will give additional 2 rows for entering more time entries 3. Select project in blank row of week view for which you want to enter time entry record. 4. Select task of that selected project in that same row 5. Enter Start time (Time In / Time Out mode only) 6. Enter End time (Time In / Time Out mode only) 7. Enter Total Time You can continue on adding new row in time entry record from next row. If you want to add more row, save it first and then Timelive system will give additional 2 rows for entering more records. Deleting of time entry record: 1. Navigate to Total Time field either using mouse or using keyboard. 2. Remove information in [Total Time] field which is already entered. 3. Click on [Save] to save this delete. Updating time entry record:
![Navigate to field which you want to change. Change your content in that field. Click on [update] to save this update.](/docs-images/84/89281295/images/72-0.jpg "Submitting time entry record: Click on [Submit] button to submit time entries for approvals. After submit, all time entry will become read-only for users.")
72 Navigate to field which you want to change. Change your content in that field. Click on [update] to save this update. Submitting time entry record: Click on [Submit] button to submit time entries for approvals. After submit, all time entry will become read-only for users. After submit, time entry show submit and approval status in bottom of week view. Copy Timesheet, Copy Activities, Export Offline Timesheet, Import Offline Timesheet: In Timesheet Period View, below the Save and Submit button, there are very useful options through which lot of time can be saved. Copy Timesheet : While on any Timesheet period, user can copy any existing Timesheet period by using Copy from Date. Through this option, all Project, Tasks and hours will be copied from given period date to current period. Copy Activities : This option will copy only Project, Tasks to current Timesheet period. Hours will not be copied. Export Offline Timesheet : This option will save a CSV file of the current Timesheet period on your computer. Import Offline Timesheet : This option will upload saved CSV Timesheet file from computer. Submitting a Timesheet When a period ends, users submit their timesheets for approval. The approval process ensures that time is entered correctly for more efficient and accurate analysis. TimeLive automatically submits users timesheets to all necessary supervisors, project leaders, and clients based on both the system configuration set up by the administrator and the approval type defined at project level. Submit button is only available in Week-View of time entry. Submit your timesheet for approval: a. Click on [My Timesheet] link in left hand side menu. b. Select the [Submit] button.

73 c. After submit, time entry records will become read-only for users. (Administrator can disable time entry locking after submit by un-checking on preferences option "Lock Submitted Records". d. After submit, time entry show submit and approval status in bottom of week view. Unsubmitting and Reopening Timesheets: TimeLive Administrator can un-submit or unapprove user's time entries using [Time Entry Archive] option available in [Admin Options]. Unsubmitting/Unapproving a single record will open whole week of time entry of that particular user. User can update his time entry by login-in using his own username and password and can update any entry in whole week. He can then re-submit this whole week for approval. Using [Time Entry Archive], administrator can search records which he want to change using different filter options available. Click on [Edit] on record on which administrator wants to change approval or submitted flag of a time entry. Uncheck [Approved] or [Submitted] flag as per your requirements in that time entry row. Click on [Update] link for that time entry archive record to update this record. This will remove that same approved or submitted flag in whole week. Rejected Timesheets: If a supervisor, project leader, or client rejects your timesheet, TimeLive will notify you by displaying a rejection notification in your timesheet. You can then review the approval details, correct errors, and resubmit your timesheet for approval. Timesheet Approval The approval process ensures that time is entered correctly for more efficient and accurate project and time off analysis. TimeLive provides a default approval process that you may customize for your organization. More about Timesheet Approval: 1. If you choose to customize this process, you should change the approval settings before creating projects and allowing users to enter timesheets/expenses. 2. Approver types identify the individuals who will be approving users' timesheets and expenses. You can setup many different approver types, each of which will have a specific approval function within the approval path. 3. Simultaneous / Alternate Approvals. Multiple approvers can receive and approve the same item concurrently. For example, if you have defined two approval types named Supervisor and Administrator, you can assign them both 1st position in the approval sequence, and they will both receive approval items simultaneously.

74 4. Users complete their timesheets by entering time against projects or time off codes. Users can enter time only for those projects for which they are part of the project team. All time is either billable or non-billable. Once completed, users submit their timesheets for approval. 5. Once submitted, users timesheets are sent to the appropriate project leaders, clients, and supervisors for approval. Approvers can approve or reject the timesheets. Approved timesheets are closed so the data can be processed. 6. Timelive sends notifications (if enabled) to inform approvers when timesheets/expenses are waiting for approval, or to inform users when timesheets and expenses have been rejected. Launching Timesheet Approval: To launch timesheet approval, click on <Project Management> --> <Timesheet Approval> option in left side navigation menu. Approving timesheet records: Timesheet Approval page shows four possible timesheet approval tables depend upon logged in employee role in different project and timesheet approval path defined for those projects. These are the possible types of timesheet approval tables available in timesheet approval page. 1. My Team Time Entry Approvals (Will be showed if a project's teamlead timeentries are due to be approved) 2. My Projects Time Entry Approvals (Will be showed if a project's project manager timeentries are due to be approved) 3. Client Time Entry Approvals (Will be showed if a project's external client timeentries are due to be approved) 4. Administrator Time Entry Approvals (Will be showed if system administrator timeentries are due to be approved) To review a time sheet record: 1. Approver can see whole period timesheet by clicking on employee name link. This will launch read-only view of employee time-sheet period.
![To Approve a time sheet record: 1. Select [Approved] checkbox on time entry record which you want to approve. 2. Enter your comments in "Approver's Comments". 3.](/docs-images/84/89281295/images/75-0.jpg "Click on [Update Time Entry Approvals] button to confirm these approvals. To Reject a time sheet record: 1. Select [Rejected] checkbox on time entry record which you want to reject. 2.")
![Enter your comments in "Approver's Comments". 3. Click on [Update Time Entry Approvals] button to confirm these changes.](/docs-images/84/89281295/images/75-1.jpg "Approval Types (Workflows) Approval types identify the individuals who will be approving users' timesheets and expenses.")
75 To Approve a time sheet record: 1. Select [Approved] checkbox on time entry record which you want to approve. 2. Enter your comments in "Approver's Comments". 3. Click on [Update Time Entry Approvals] button to confirm these approvals. To Reject a time sheet record: 1. Select [Rejected] checkbox on time entry record which you want to reject. 2. Enter your comments in "Approver's Comments". 3. Click on [Update Time Entry Approvals] button to confirm these changes. Approval Types (Workflows) Approval types identify the individuals who will be approving users' timesheets and expenses. You can setup many different approver types, each of which will have a specific approval function within the approval path. Workflows establish which manager(s) must approve an employee s time or expense submissions before those entries can be processed for project costs, billing, payroll, reports, etc. When multiple approvals are required for the same submission (e.g., first the Project Manager and then the HR Manager), the workflow also controls which manager approves first, second, and so on. A workflow is first created in the [Approval Types] view and then assigned to individual projects. When the employee submits a time or expense entry, the designated manager then approves the time and expenses using the Time & Expense approval view. When signing on, an approving manager is notified when submitted entries are awaiting approval. System administrator can setup [Approval Types] name using [Admin Options] --> [Approval Types]

76 Approval Paths: Approval paths define the approval process for the users in your organization. You can include five different types of approver in your approval path definition. You can define approval sequence for each of the approval path in your approval paths definition. Approver types: There are five type of approver types in timelive which you can define in approval paths. 1. Team Lead 2. Project Manager 3. Specific Employee (if you want your timesheet / expenses to be approved by some specific employee) 4. Specific External User (if you want your timesheet / expenses to be approved by some specific external user (client) 5. Employee Manager (Employee own manager defined in employee form). Simultaneous / Alternate Approvals Multiple approvers can receive and approve the same item concurrently. For example, if you have defined two approval types named Supervisor and Administrator, you can assign them both 1st position in the approval sequence, and they will both receive approval items simultaneously. More About Attendance Module: Attendance through Employee Profile In some companies, Users only require to punch-in Time and punch-out Time for their presence verification. TimeLive allow user to Time In/Time Out in the most simple and basic way as soon as user login to his/her account. To Achieve this, user first need to enable this feature from his/her profile. > Login to your TimeLive Account. > Click on your Profile.


77 > Enable check "Enable Time In/Out Option" and click Update. > Time In and Time Out buttons will now show besides the User Profile. > Click on Time In button to input Login Time and Time Out button to input Logout Time. TimeLive will automatically record System Time.


78 Attendance through Time Entry Day View. Attendance is punch in / punch out of employees in order to track actual physical availability on work. Employee attendance and time entry are two different option to track two different things. Attendance list and its form is available at [Time entry day view] which can be launch using [My timesheet] menu option

 Work start on a project task from 8:30 AM to 12:30")

79 A time entry record is an employee activity on a project for a particular duration. This is useful for calculating employee actual employee time spent on project task. Time In represent time when employee enter an organization and Time Out represents when employee finish his day work. A case can be 8:00 AM (Employee TimeIn through employee attendance) Work start on a project task from 8:30 AM to 12:30 PM. This is a case of timesheet record of recording employee activities on project. At 12:30 PM, Employee took a break of lunch for an hour. Then start working again from 1:30 PM. Perform a task from 1:30 PM to 4 PM (will be record in timesheet) 4:00 PM (Out) (Employee leave with attendance record of "Out : 4:00 PM)
80 This is very typical case of attendance through which we can record one time in record when employee arrive and one time out record when employee leave. Attendance module of TimeLive also allow employees to enter their Paid Time Off (PTO) leave and Holiday. How to add new attendance record: 1. Click on [My Timesheet] to launch time entry day view. 2. In employee attendance form, select "In" in ["In / Out"] drop-down. Select "Out", if you are recording time out of employee. 3. In Time field, select time of employee time in. 4. Select "Present" in [Absence] drop-down. 5. Click on [Add] to add this [Time In] entry. How to enter employee leave record: 1. Click on [My Timesheet] to launch time entry day view. In employee attendance form, leave ["In / Out"] drop-down as blank. 2. Leave time field empty. 3. Select your required leave type in [Absence] drop-down. 4. Click on [Add] to add this [LEAVE] entry. How to modify attendance record: 1. In employee attendance list, click on [Edit] on record which you want to modify. 2. Update this record with your required modification in [Employee Attendance Information] form. 3. Click on [update] button to update this record. How to delete attendance record: 1. In [Employee Attendance List], click on [Delete] link of record which you want to delete. 2. Click on [Ok] to confirm this delete on confirmation dialog box.
 to view the period Activity.")

81 Timesheet Audit in My Timsheet: In My Timesheet User/Administrator (depends on Role Permission) can view Period Timesheet Audit. Timesheet Audit button is visible for Users (depends on Role Permission) to view the period Activity. This Audit will show any changes done by user and approval process in detail. In the above image and under 1st Audit Grid, date and time of Submission, Rejection and approval Date and Time along with Approver Name and submitter Name are shown along with old and new status of the Timesheet Period. In the 2nd Audit Grid it shows that there are 5 entries in total in this particular period along with their old and new values when submitted by Submitter Name.
82

83 Expense Sheet Setup Expense Types setup Expense types are the different categories of expenses. Application administrator can create different expense types according to their organization needs. Expense Type also allow administrator to define either that expense types require quantity input in expense entry. In case of "Car Mileage" where users are required to enter "Miles/Kilometer" in expense entry, administrator can enable quantity field with its own defined caption in expense type. System administrator can setup Expense Types [Admin Options] --> [Expense Types] Adding new Expense type: To add new expense type: 1. Enter expense type in "Expense Type Information" form which you want to add. 2. Select Tax Code (Tax codes define different types of tax, that can be applied to the expense codes defined in your system. Administrator can create regional based taxes in order to support tax calculation based on user own region.) 3. Check on "Show Quantity" checkbox, if administrator wants input of quantity in expense entry for this particular expense type. Example of quantity field is "Car Mileage" where users are required to enter "Miles/Kilometer" in expense entry 4. Enter Quantity Caption in case if this expense type is quantity based. 5. Click on [Add] to add this expense type in timelive system. Deleting Expense Type:
![1. In [Expense Type List], click on [Delete] link of record which you want to delete. 2. Click on "Yes" on delete confirmation dialog Editing Expense Type: 1.](/docs-images/84/89281295/images/84-0.jpg "In [Expense Type List], click on [Edit] link of record which you want to modify. 2. Update your required modification in [Expense Type Information] form. 3.")
84 1. In [Expense Type List], click on [Delete] link of record which you want to delete. 2. Click on "Yes" on delete confirmation dialog Editing Expense Type: 1. In [Expense Type List], click on [Edit] link of record which you want to modify. 2. Update your required modification in [Expense Type Information] form. 3. Click on [Update] button to update this record. Expenses Code Setup Expense codes define the different costs incurred for business activities and purchases. You can create your required expense codes using Expenses option of administration. Adding expense codes will allow you to identify the types of expenses that may be entered against specific projects. Expense codes will also allow you to track the kinds of expenses being recorded by TimeLive users. System administrator can setup expenses name using [Admin Options] --> [Expenses] Setting up Expenses: Adding new expenses: To add new expense, follow these instructions. 1. Enter new expense name which you want to add in "Expense Information" form. 2. Select expense type in expense type dropdown. 3. Enter default expense rate for expense codes which are quantity based. Example of default expense rate is mileage rate for expense "Car Mileage". Administrator can define rate for that expense here. 4. Check on "Disabled Editing Of Rate", if administrator don't want user to change rates in expense entry. Administrator can disable milage rate editing in expense entry by users, by checking on this checkbox.
![5. Click on [Add] to add this expense code. Deleting Expense: 1. In [Expense List], click on [Delete] link of record which you want to delete. 2.](/docs-images/84/89281295/images/85-0.jpg "Click on \"Yes\" on delete confirmation dialog Editing Expense: 1. In [Expense List], click on [Edit] link of record which you want to modify. 2.")
85 5. Click on [Add] to add this expense code. Deleting Expense: 1. In [Expense List], click on [Delete] link of record which you want to delete. 2. Click on "Yes" on delete confirmation dialog Editing Expense: 1. In [Expense List], click on [Edit] link of record which you want to modify. 2. Update your required modification in [Expense Information] form. 3. Click on [Update] button to update this record. Payment Methods Payment methods specify how expenses were paid. TimeLive includes a set of predefined payment methods that you can edit to meet the needs of your organization. You can also create new payment methods. System administrator can setup organization departments using [Admin Options] --> [Payment Methods] Setting up Payment Methods: By default, four default payment methods are available in TimeLive with name "American Express,Cash, Master Card,Visa". Administrator can rename these payment methods and can also add new payment methods. Renaming "Default payment method": 1. Click on [Edit] link on default payment method record. 2. Enter new payment method name of default payment method. 3. Click on [Update] to update this change. Adding new payment method: To add new payment method, follow these instructions. 1. Enter new payment method code and name in "Payment Method Information" form.
![2. Click on [Add] to add this payment method. Deleting Department: 1. In [Payment Method List], click on [Delete] link of record which you want to delete. 2.](/docs-images/84/89281295/images/86-0.jpg "Click on [Yes] on delete confirmation dialog Editing Payment Method: 1. In [Payment Method List], click on [Edit] link of record which you want to modify. 2.")
86 2. Click on [Add] to add this payment method. Deleting Department: 1. In [Payment Method List], click on [Delete] link of record which you want to delete. 2. Click on [Yes] on delete confirmation dialog Editing Payment Method: 1. In [Payment Method List], click on [Edit] link of record which you want to modify. 2. Update your required modification in [Payment Method Information] form. 3. Click on [Update] button to update this record. Tax Code Setup Tax codes define different types of tax, that can be applied to the expense codes defined in your system. When you add a tax code, you will be required to enter its tax formula. This formula, which is based on the net amount of the expense, determines how TimeLive calculates the tax. System administrator can setup organization departments using [Admin Options] --> [Tax Codes] Setting up Tax Codes: Renaming "Default tax code": 1. Click on [Edit] link on default tax code record. 2. Enter new tax code name of default tax code. 3. Click on [Update] to update this change. Adding new tax code: To add new tax code, follow these instructions. 1. Enter new tax code code and name in "Tax Code Information" form.
87 2. Click on [Add] to add this tax code. Deleting Department: 1. In [Tax Code List], click on [Delete] link of record which you want to delete. 2. Click on [Yes] on delete confirmation dialog Editing Tax Code: 1. In [Tax Code List], click on [Edit] link of record which you want to modify. 2. Update your required modification in [Tax Code Information] form. 3. Click on [Update] button to update this record.
88

89 Expenses Expense Entry An expense is cost incurred from work-related tasks and/or purchases (travel, meals, office supplies, etc.). Expenses may be non-billable or billable, the latter applying to expenses for a project funded by a specific client. Users complete and submit their expense sheets to team lead, project manager, and/or clients for approval. The expense sheets are then reviewed and either approved or rejected. When the expense sheet is approved, the expense information is saved to the database. Once an expense sheet is submitted, the data can be analyzed by project leaders and administrator to determine project costs and client billing. More about Expense sheet: 1. A single expense sheet allows user to submit multiple expenses. 2. A user fills out and submits an expense sheet, uploading any available receipts. 3. The user can choose which project each expense was associated with. 4. User can print an expense sheet for signature purpose. 5. The expense sheet is automatically sent to one or more approvers. 6. The approvers approve the expense sheet. 7. The finance department can reimburse the user based on the approved expense sheets. 8. The expenses can be exported for client billing or reviewed against project estimates. 9. Expense sheets screen can be access using <My Area> -- <My Expense Sheet> from main menu. Or from top menu [EXPENSES]. More about Expense sheet list : 1. User can add a new expense sheet by clicking on [Add New Expense Sheet] button. 2. User can filter all expense sheets using approval status and date range. 3. User can edit any expense sheet by clicking on [Edit] link of that expense sheet. 4. User can duplicate any existing expense sheet by clicking on [Copy] link of that expense sheet. 5. User can delete an expense sheet by clicking on [Delete] icon of that expense sheet. Add new Expense sheet :
![To add new expense sheet from expense sheet list: 1. Click on [Add New Expense Sheet] button in expense sheet list. 2. Enter expense description on top. 1. Select your reimbursement currency 2.](/docs-images/84/89281295/images/90-0.jpg "Click on [...] to open date picker for expense entry date and select your expense sheet date. 3.")
90 To add new expense sheet from expense sheet list: 1. Click on [Add New Expense Sheet] button in expense sheet list. 2. Enter expense description on top. 1. Select your reimbursement currency 2. Click on [...] to open date picker for expense entry date and select your expense sheet date. 3. After adding expense sheet information, user should enter expense entries records using instructions mentioned below. Adding expense entry : 1. In [Expense Entry Information] form, enter project name whose expense entry you want to enter. 2. Select your required [Expense Type]. 3. Enter description of expense entry. 4. Select [Reimburse] check box if you paid for the expense and require reimbursement. 5. Select different available payment methods like Cash, Credit Card etc. 6. Select currency of your expense.
91 7. Select quantity field (if this expense is configured to get input of quantity field). 8. Rate (if this expense is configured to get input of quantity field). 9. Amount (will be automatically calculated if this is a quantity field) 10. Tax Amount (will be appear only if this expense is configured as a tax able expense). 11. Net Amount (automatically calculate) 12. Enter amount of expense entry. 13. Click on [Add] button to add this expense entry. Attaching documents expense entry : 1. Click on [Attachments] link on expense entry to open attachment page for that particular expense entry. 2. You can then upload receipts and other expense related documents at this page. Deleting Expense Entry: 1. In [Expense Entry List], click on [Delete] link of record which you want to delete. 2. Click on "Yes" on delete confirmation dialog Editing Expense Entry: 1. In [Expense Entry List], click on [Edit] link of record which you want to modify. 2. Update your required modification in [Expense Entry Information] form. 3. Click on [Update] button to update this record. Submitting expense sheet: Click on [Submit] button to submit expense entries for approvals. Expense Approval Launching Expense Approval: To launch expense approval, click on <Project Management> --> <Expense Approval> option in left side navigation menu. Approving expense records: Expense Approval page shows four possible expense approval tables depend upon logged in employee role in different projects and expense approval path defined for those projects. These are the possible types of expense approval tables available in expense approval page. 1. My Team Expense Entry Approvals (Will be showed if a project's team lead expense entries are due to be approved) 2. My Projects Expense Entry Approvals (Will be showed if a project's project manager expense entries are due to be approved) 3. Client Expense Entry Approvals (Will be showed if a project's external client expense entries are due to be approved)


92 4. Administrator Expense Entry Approvals (Will be showed if system administrator expense entries are due to be approved) To review expense sheet: 1. To view whole expense sheet before approval, an approver can click on "Employee Link" to open read-only view of expense sheet submitted by a user. 2. Approver can see attachments of expense entry records by click on attachment links. To Approve a expense sheet records: 1. Select [Approved] checkbox on expense sheet record which you want to approve. 2. Enter your comments in "Approver's Comments". 3. Click on [Update Expense Entry Approvals] button to confirm these approvals. To Reject a expense sheet record:
93 1. Select [Rejected] checkbox on expense sheet record which you want to reject. 2. Enter your comments in "Approver's Comments". 3. Click on [Update Expense Entry Approvals] button to confirm these changes.
94
95 Time Off Time Off Overview Using Time Off feature, employees can check available time off, make a request, get manager approval. TimeLive time off and absence management provides a comprehensive time off and absence management solution unmatched in industry today. Features Of Time Off Module in TimeLive: Time off requests, approvals and scheduling. Users can see how much time off is entitled and request time off accordingly. Automated notifications: requests, approvals, rejections, approver notices. Unlimited time off types and balances Set up accrual rules that are automatically applied. Time off accruals engine. Multiple holiday schedules by country, country groups, or locales. Approvers can approve time off based on how much is entitled and how much has been requested. Multi-level Approval Paths for time off configurable at employee level You may record time off against any enabled [Time Off] type. Some [Time Off Types] may require [Time Off Request], while others may not, as determined by your administrator If request is required for [Time Off Type], you must submit [Time Off Request] for a time off type using the [My Time Off] page. Booked time off will automatically display in your timesheet. If "Request" is not required for a [Time Off Type], you may enter it directly in your timesheet. User can see all [Time Off Types] balances while submitting [Time Off Request]. Administrator can check the Time Off status of each employee by clicking on [Time Off] link on r;employee page. Time Off Types:

96 Time off types are categories that employees use to request or enter time off against. Commonly used time off types include vacation time, sick time, jury duty, or banked time. TimeLive provide few pre-defined Time off Types. Administrator can create their own Time off Type based on their own organization needs. Times off Types are of two types. 1. Time Off Types with "Request Required" enabled. User will be required to submit [Time Off Request] for these [Time Off Types]. 2. Time Off Types with "Request Required" disabled. User will be required to enter time off entries in timesheet directly for these [Time Off Types]. Adding New Time Off Type: To add new Time off type: 1. Enter new Time off type in [Time off Types Information] form which you want to add. 2. Click on [Add] to add this Time off Type in time live system. Deleting Time Off Type: 1. In [Time off Type List], click on [Delete] link of record which you want to delete. 2. Click on [Yes] on delete confirmation dialog Editing Time Off Type: 1. In [Time off Type List], click on [Edit] link of record which you want to modify. 2. Update your required modification in [Time off Type Information] form. 3. Click on [Update] button to update this record. Time Off Policies Time off accrues is based on the accrual settings configured using [Time Off Policies] available in [Admin Options] --> [Time off Policies]. Administrator can create "Time off Policies" with different configurations and can assign these types separately to each individual employee. Following settings can be configured using time off policy option. By default, TimeLive comes with one pre-populated time off policy name "Standard". Administrator can rename this time off policy and can also add new time off policies. To setup Time off Policies according to organization rules & regulations, go to [Admin Options]-- >[Time off Policy] option while login with Administrator user.
![Time off policy allow Administrator to setup different policy configuration for each "Time Off Type" defined in [Admin Options]-->[Time off Types]. In Time off Policy there are several fields.](/docs-images/84/89281295/images/97-0.jpg "Every field has its own work. Following are the fields of Time off Policy. 1.")
97 Time off policy allow Administrator to setup different policy configuration for each "Time Off Type" defined in [Admin Options]-->[Time off Types]. In Time off Policy there are several fields. Every field has its own work. Following are the fields of Time off Policy. 1. INITIAL HOURS: Time Off Available balance will be set to this "Initial Hours" when Time Off policy will be first executed by "Time Off Accrual Engine" 2. EARNED HOURS: Total hours which will be earned after finish of every "Earned Period" (Weekly, Monthly, Yearly, Employee Anniversary Period). 3. EARNED PERIOD: TimeLive provide few pre-defined Earned Period which are. Never: When "Never" is use, the time off policy does not works. Each Week: When Administrator use this option, user will get earn hours after every week by Time Off Policy scheduler. Each Month: When Administrator uses this option, user will get earn hours after every month by Time Off Policy scheduler. Each Year: When Administrator uses this option, user will get earn hours on every year by Time Off Policy scheduler. Each Year Anniversary: When Administrator uses this option, user will get earn hours on each year anniversary according to hired date of user. 4. RESET AT: There are four pre-defined Reset At which are. Never: When Never is selected, reset hours will not be set. Every Year: In this option, employee available balance will be set to "Reset Hours" value, every year by Time Off Policy scheduler. Every Week:In this option, employee available balance will be set to "Reset Hours" value, every week by Time Off Policy scheduler.. Every Month: In this option, employee available balance will be set to "Reset Hours" value by Time Off Policy scheduler. Each Year Anniversary: In this option, employee available balance will be set to "Reset Hours" value at every anniversary date of employee, according to hired date defined in employee form. 5. RESET HOURS: In this field, you can define your "Reset Hours" value which will be set to employee available balance at end of every "Reset At" period. 6. MAXIMUM AVAILABLE: Available balance of an employee cannot be increased more than maximum available hours, defined in [Time Off Policy]. How to reset Policy:

98 Reset button available in "Employee Time Off Page" allow administrator to reset all current period earned hours back to 0. And then at end of "Earned Period", TimeLive Time Off scheduler automatically add new earned hours based on policy defined for that particular employee. Time Off Request Time Off Request in advance allows your supervisors to schedule around time when you will be away. Time off request will automatically display in your timesheet under the heading "Time Off" (even before it has been approved) (with its current approval status indicated by color coding). Adding New Time Off Request: 1. Employee can submit [Time Off Request] from [My Time Off] page. Time off request can be make only for those "Time Off Types" in which request is enable. 2. Administrator can configure [Time Off Types] from [Admin Options]-->[Time Off Types] 3. To add new request, click on [My Time Off] menu option available in left hand side menu. 4. Click on [Add Time off Request] button to add Time off request. 5. Select [Time Off Type] from dropdown in [Time off Request Information] form.
. 3. Enter Hours off for Time Off. (After enter Hours off, Date range and Days off will set automatically). 4.")
99 1. Select Begin date and End date for Time Off. (After setting the dates, Days off and Hours off will be calculated automatically). 2. Enter Days off for Time Off. (After enter the Days off, Date range and Hours off will set automatically). 3. Enter Hours off for Time Off. (After enter Hours off, Date range and Days off will set automatically). 4. Select project (Optional) for which you want to enter Time Off record. (A project selection dropdown can be enabled for Time Off Entry using [Admin Options]-->[Preferences] option name [Show Project for Time Off].) 5. Click on [Submit] button, to save the changes and submit it for approval. 6. Once approved, "Available Balance" of that particular time off type will be decreased with number of hours requested in [Time Off Request]. In case of no approval require, available balance will be decreased immediately after submit. Viewing Time Off Request: You can view: 1. All details of your personal time off requests with their approval status, in your [My Time Off] page. 2. User can find available balances of their assigned [Time Off Types] with their "Earned" in current period, "Consumed" in current period and "Available Balance" in [My Time Off Page] page. Editing of Time Off Request: 1. In [My Time Off Page], click on [Edit] link of record which you want to modify. 2. Update your required modification in [Time off Request Information] form. 3. Click on [Update] button to update this record.
100 Deleting of Time Off Request: 1. In [My Time Off Page], click on [Delete] link of record which you want to delete. 2. Click on [Yes] on delete confirmation dialog. Time Off Approval Depending on how your time off types are configured, time off entered against some or all time off types may require "Time Off Request". To submit time off request, users must complete a time off request form, and then submit it for approval. If approval is required, TimeLive sends each submitted [Time Off Request] through the sequence of approvers that comprise the user's time off approval path for review. Each approver can either approve or reject the request. If a [Time Off Type] does not require request, users enter time against that type directly into their timesheets. To Approve a time off record: 1. [Time Off Request] approval type can be created from [Admin Options]-->[Approvals]. Approvals type should have [Is Time Off Approval] checkbox checked. 2. Administrator can then set that [Approval Type] in employee [Time Off Approval Type] dropdown, while editing of employee information. 3. Time Off Request records can be approved or rejected from [Manage] -> [Time Off Approval]. 4. To Approve a time off record, select [Approved] checkbox on Time Off record which you want to approve. 5. Enter your comments in Comments textbox. 6. Click on [Update Time Off Approvals] button to confirm these approvals. To reject a time off request: 1. Select [Rejected] checkbox on "Time Off Request Record" record which you want to reject. 2. Enter your comments in Comments textbox. 3. Click on [Update Time Entry Approvals] button to confirm these approvals.
101 Billing Rate Setup TimeLive billing rates concepts Rate and Billing There are four different types of billing rate types configurable at project level. Billing rate can be define with its applicable date range with complete history. Timesheet then pick billing rate based on timeentry date from billing rate history defined at employee level, project role level or project employee level. When you set up a project, you will do the following in addition to setting the basic project characteristics. Select type of billing rate pick option in [Project] from one of these options 1. [Use employee own billing rate] TimeEntry will pick employee own billing rate defined in [Employee] form. 2. [Use Project Roles billing rate] TimeEntry will pick role based billing rate defined in [Project Roles] configuration. 3. [Use Project employee billing rate] TimeEntry will pick project based team member billing rate defined in [Project Team] 4. [Use Task based billing rate] TimeEntry will pick billing rate defined in individual project tasks. Define the rates to be used for the project Assign a [Project team] and associate rates with each team member Specify [Billable] during adding of new task in order to separate billing and non-billing time recording for billing purpose. The Relationship Between Rates, Billing & Timesheet It is very important that you understand the relationship between project rates, project billing options, and users timesheets. Because the billing amount for a project is calculated based on the project rates and the time entered against the project by each member of the project team, you want to make sure that you set up the project effectively. Remember that when you set up a project, you define the rates to be used for the project. You also assign a project team, associate rates with each team member, and specify billable and non-billable for each of the task. Employee Own Billing Rate Administrator can launch billing rate history of individual employees by clicking on "Employees-- >Edit-->Billing Rate History" link. Billing Rate History link in employee edit page:

102 More about Employee own billing Rate: Using employee billing rate history, administrator can add new billing record with its applicable data and he can also modify any of existing record also by clicking on [Edit] link. Administrator can delete any of these billiing history record by clicking on [Delete] link. Billing history should be configure before entering timesheet record. Otherwise time entry will not pick billing rate defined after recording time entry. In case if Administrator want to modify time entry records which are already entered by other users, he can just add / edit billing rate record in history with selection of checkbox [Update all records within time range]. It will update existing time entry records also with this new updated billing rate in specified date range.
103 Project Roles Billing Rate System administrator can define [Billing Rate Type] as [Project Roles Billing Rate] to setup role wise billing rate for project. There are three steps for setting up role wise billing rate of project. Setting up Role based billing rate: 1. Define [Project Roles Billing Rate] in [Billing Rate Type] when adding new project in TimeLive.
![2. On click on [Add] button, TimeLive will open a [Project Role]](/docs-images/84/89281295/images/104-0.jpg "definition page where use can setup number of resources required for each")

104 2. On click on [Add] button, TimeLive will open a [Project Role] definition page where use can setup number of resources required for each role and billing rate of every role. Just select your required [Roles] for which you want to define billing rate including its number of resources requirements.
![3. On clicking on [Update] button, timelive will open employee role mapping page where system administrator can define employee for each of the role requirement defined in [Number of Resources] for](/docs-images/84/89281295/images/105-0.jpg "every role. Just map your required employee for each of the role and check on [Selected] checkbox. After completing this role employee mapping, click on [Update] to update these changes.")
105 3. On clicking on [Update] button, timelive will open employee role mapping page where system administrator can define employee for each of the role requirement defined in [Number of Resources] for every role. Just map your required employee for each of the role and check on [Selected] checkbox. After completing this role employee mapping, click on [Update] to update these changes. Launching billing rate history page of Role billing rate: Using role billing rate history, administrator can add new billing record with its applicable date and he can also modify any of existing record also by clicking on [Edit] link. Administrator can delete any of these billing history record by clicking on [Delete] link. Billing history should be configure for in all area before entering timesheet record. Otherwise time entry will not pick billing rate defined after recording time entry. In case if Administrator wants to modify billing rate of exiting time entry records, he can just add / edit billing rate record in history with selection of checkbox [Update all records within time range]. It will update existing time entry records also with this new updated billing rate in specified date range. To launch billing rate history page, just click on [History] link of any role selected for current project.
![Project based employee billing rate: System administrator can define [Billing Rate Type] as [Use Project Employee Billing Rate] to setup project based employee billing rate.](/docs-images/84/89281295/images/106-0.jpg "Project based employee billing rate is useful for projects where employee billing rate is different for every different project.")
106 Project based employee billing rate: System administrator can define [Billing Rate Type] as [Use Project Employee Billing Rate] to setup project based employee billing rate. Project based employee billing rate is useful for projects where employee billing rate is different for every different project. There are two steps for setting up project based billing rate in a project. Setting up Project based employee billing rate: 1. Define [Use Project Employee Billing Rate] in [Billing Rate Type] when adding new project in TimeLive.
![2. On click on [Add] button, TimeLive will open a [Project Team] definition page](/docs-images/84/89281295/images/107-0.jpg "where user can select project team required for this project with their billing")
107 2. On click on [Add] button, TimeLive will open a [Project Team] definition page where user can select project team required for this project with their billing rate.
![3. After selecting employees which are required to assigned in this project,, click on [Update] to update these changes.](/docs-images/84/89281295/images/108-0.jpg "Launching billing rate history page of Project based employee rate: Using billing rate history, administrator can add new billing record with its applicable date and he can also modify any of")
108 3. After selecting employees which are required to assigned in this project,, click on [Update] to update these changes. Launching billing rate history page of Project based employee rate: Using billing rate history, administrator can add new billing record with its applicable date and he can also modify any of existing record also by clicking on [Edit] link. Administrator can delete any of these billing history record by clicking on [Delete] link. Billing history should be configure before entering timesheet record. Otherwise time entry will not pick billing rate defined after recording time entry. In case if Administrator wants to modify billing rate of exiting time entry records, he can just add / edit billing rate record in history with selection of checkbox [Update all records within time range]. It will update existing time entry records also with this new updated billing rate in specified date range. To launch billing rate history page, just click on [History] link of any role selected for current project.

109 Invoicing About Invoicing Invoice is made for a client. It is a receipt which shows client name, invoice number, invoice date, billing rate, bill hour, timesheet description and amount. Generated invoices are stored in the database along with your time logs and expense and can be viewed or edited at any time. Invoices can be created based on the existing time entries and expenses or alternatively, new records can be added as you re working on the invoice. As you keep saving more invoices, you can view statistics including total due to be paid, total taxes collected. Billing managers can create invoices and can also check the previous records of the invoice by navigating to [Billing]-->[Invoice Management] menu on the left side menu. Invoice can then [Print] or [Generate PDF] for sending it to customer. Invoice use company logo which is uploaded in [Admin Options]-->[Preferences]. Manage Invoices Billing managers can create invoices and can also check the previous records of the invoice by navigating to [Billing]-->[Invoice Management] menu on the left side menu. Adding New Invoice: To add new invoice: 1. Click on [Billing] in left hand side menu. 2. Click on [Invoice Management]. 3. Click on [Add] button to add new Invoice. 4. Select the [Client Name] from the list (to whom you want to make the invoice). 5. In order to create invoice for a single project, select [Project] from the list. Keep it as "All" if you want to create invoice for all projects for a client. 6. Enter the date range in [Billing Cycle Start Date] and [Billing Cycle End Date] (period to be billed). 7. Click on the [Populate Un-billed Records] to populate all un-billed time and expense entries in invoice for the given date range. 8. Click on [Update] button to update the record. 9. Click on [Update Time Entry and Expense Entry as Billed] once you finished creating your invoice. This will update all time and expense entries as "Billed" in database in order to avoid duplicate invoicing of same data.
![Editing Invoice: 1. In [Time Expense Invoice List], click on [Edit] link of record which you want to modify. 2.](/docs-images/84/89281295/images/110-0.jpg "Update your required modification in [Invoice information] form. 3. Click on [Update] to update this record.")
110 Editing Invoice: 1. In [Time Expense Invoice List], click on [Edit] link of record which you want to modify. 2. Update your required modification in [Invoice information] form. 3. Click on [Update] to update this record. Deleting Invoice:
![1. In [Time Expense Invoice List], click on [Delete] link of record which you want to delete. 2. Click on [Yes] on delete confirmation dialog. Printing Invoice: 1.](/docs-images/84/89281295/images/111-0.jpg "Click on [Print] link to print your invoice. Invoice can be exported to PDF or XLS on print page using export option available. 2.")
111 1. In [Time Expense Invoice List], click on [Delete] link of record which you want to delete. 2. Click on [Yes] on delete confirmation dialog. Printing Invoice: 1. Click on [Print] link to print your invoice. Invoice can be exported to PDF or XLS on print page using export option available. 2. Invoice use company logo which is uploaded in [Admin Options]-->[Preferences]. Updating Time and Expense Records as Billed: At the end of finalizing the invoice, you need to mark r;billed for the time & expense records included in the current invoice to prevent double invoicing of already billed entries. 1. Navigate to [Invoice Management]. 2. Click on [Edit] link of record which you want to modify. 3. Click on [Update Time Entry and Expense Entry Records As Billed] to make all time & expense entries Billed. 4. [Billed] status of time entry records and expense entry records can be changed from [Billing]--[Time Billing Worksheet] and [Billing]-->[Expense Entry Worksheet]. Time Billing Worksheet Time billing worksheet allow accountant to manage and track all billable time entries with their billing status and invoice number. It contains all billable time entries. Time billing worksheet contains all the invoices with total billing time, billing rate and all other invoice related information. You can change the status of invoices and marked them as "Billed" / "Un-billed". To easily search for your required records using filters available there. To delete all invoices, use the option "Check All" and then click on [Delete Selected Item] to delete all checked entries. Expense Billing Worksheet

112 Expense billing worksheet allow accountant to manage and track all billable expense entries with their billing status and invoice number. It contains all billable expense entries and expense sheets. Expense billing worksheet contains all the invoices with total billing expense, amount and all other invoice related information.


113 Project Management Gantt Chart for Project Tasks Viewing tasks in black and white cannot give that much info at a glance but viewing Tasks through Gantt chart is way better for understanding and task allocation. Through Gantt, User can add new tasks, allocate resource, its utilization and can make changes on the existing tasks. It will automatically update the tasks and its changed details including Task Team. Changing Task Start / End Date: Click on Start/End Date in the required Task and change it to required date.


114 Resource Allocation: Double Click on the required task. Task Editing Window will pop-up. You can Add/Remove new resource and allocate hours for the same in this window.
115 Notifications And Alerts Notifications and Alerts OVERVIEW A variety of notifications and alerts can be configured to be automatically sent to employees and managers when managers and employees are required to perform certain duties such as submitting or approving time and expenses. Available Notifications include: Send to approving managers when time/expenses are awaiting their approval. To help with getting time and expenses approved in a timely manner, you can setup notifications so the approving managers are sent an whenever time/expenses are awaiting their approval. Configure notifications to send one daily (batch) containing summary information for all sheets awaiting their approval. Send to employees when time/expenses have been rejected by their manager. When a manager rejects time or expenses submitted by employees, there is usually a need to have the issue quickly resolved. By instantly sending s to the employees, that alert them to the rejected time/expenses, both parties (approving managers and employees) can resolve any problems in an effective manner. Send to employees detailing their project assignments. Assignment notifications inform the selected users about the projects and tasks that are assigned to them. Send to employees when their timesheet are incomplete Incomplete Timesheet Notifications alert the selected users when their timesheet is incomplete based on a specified number of hours. settings Following settings are required to setup notifications from TimeLive, if you are using self-hosted TimeLive version. a. Defining of [SMTP Server], [SMTP Username] and [SMTP user's password] in system setting page. (Click to launch detail help about TimeLive System Settings)
116 b. Download this free SMTP test utility and test your SMTP Settings using this utility on same server where you have TimeLive installed. c. Updating of [Application URL] with correct TimeLive self hosted version URL in system setting page. (Click to launch detail help about TimeLive System Settings) d. Updating of [From address] and [From address display name] in [Admin Options]-->[Preferences] while logged-in using admin user in TimeLive.
117 System Setup Launching Admin Options: System administrator can launch administration page by clicking on [Admin Options]. Through [Admin Options], administrator can setup these things of TimeLive. System settings which can be configured using Admin Options: 1. Organization branches / locations 2. Departments 3. Employee Setup 4. External Users 5. Roles 6. Manage Terminology 7. Working Days 8. Security Roles / permissions 9. Billing Type 10. Custom Fields 11. Expense Types & Expenses 12. Currencies 13. Tax Code 14. Payment Method 15. Application Preferences 16. Project Templates 17. Holidays 18. Notification Preferences 19. External Users 20. Approvals Workflow Setup 21. Time Entry Archive 22. Expense Entry Archive 23. CSV Import / Export of TimeLive data 24. Cost Center Management 25. Work Types 26. Disable Account.
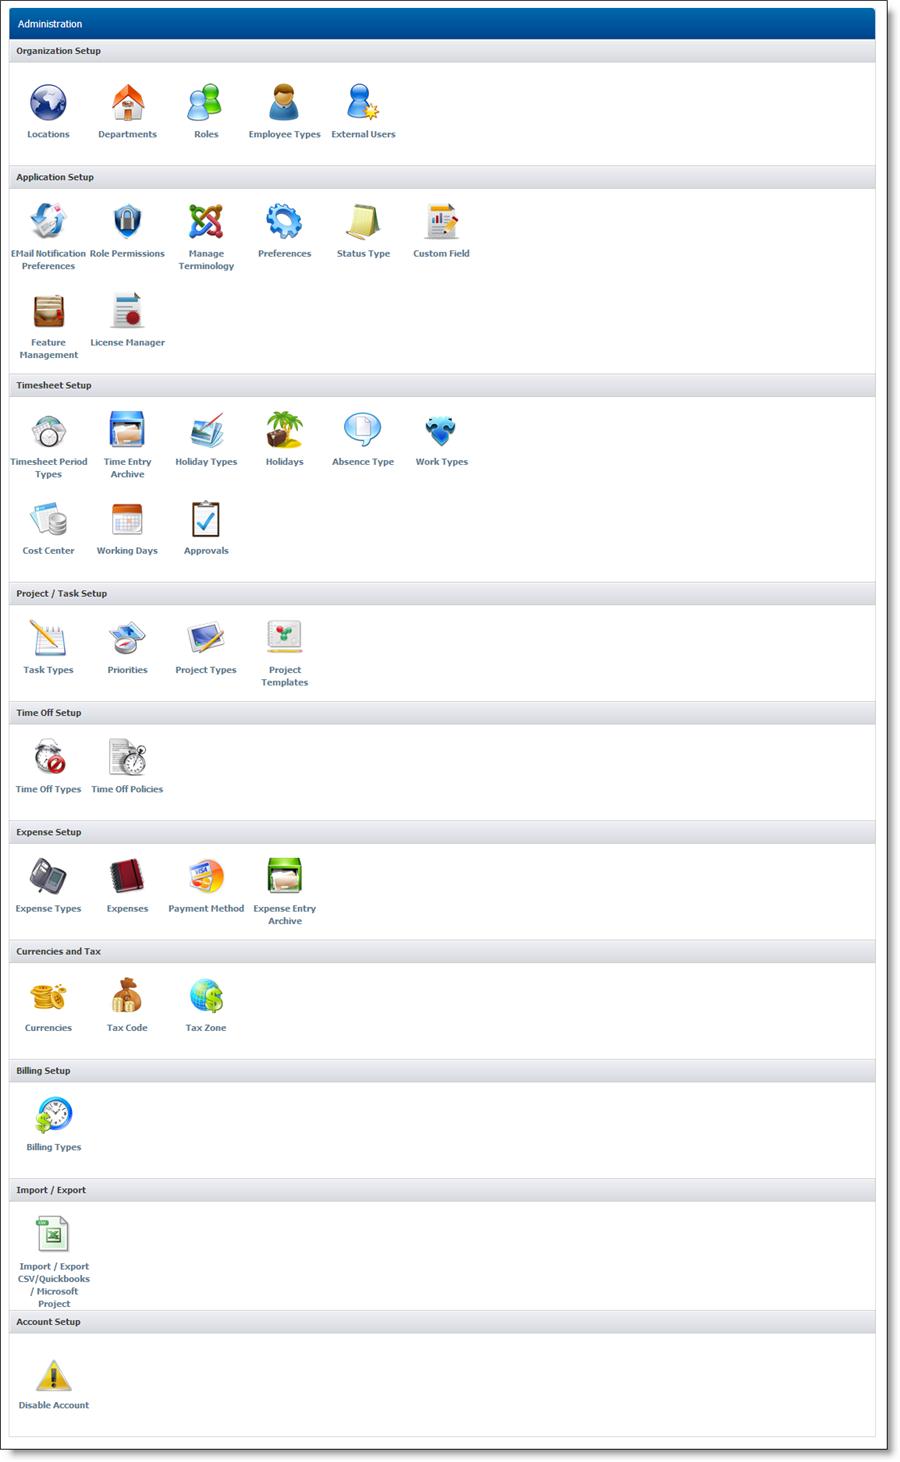
118
![Branches / locations setup System administrator can setup organization branches / location using [Admin Options] --> [Locations] Setting up locations: By default, a default location with name](/docs-images/84/89281295/images/119-0.jpg "\"Default Location\" on new account add. Administrator can rename this default location and can also add new locations. Renaming \"Default Locations\": 1. Click on [Edit] link on default location record.")
119 Branches / locations setup System administrator can setup organization branches / location using [Admin Options] --> [Locations] Setting up locations: By default, a default location with name "Default Location" on new account add. Administrator can rename this default location and can also add new locations. Renaming "Default Locations": 1. Click on [Edit] link on default location record. 2. Enter new name of default location. 3. Click on [Update] to update this change. Adding new locations: To add new location, follow these instructions. 1. Enter new location name in location in "Location Information" form. 2. Click on [Add] to add this location. Deleting Location: 1. In [Location List], click on [Delete] link of record which you want to delete. 2. Click on [Yes] on delete confirmation dialog Editing Location: 1. In [Location List], click on [Edit] link of record which you want to modify. 2. Update your required modification in [Location Information] form. 3. Click on [Update] button to update this record. Departments setup Department is a division of employees that may define the hierarchical structure, geographic regions, or functional groups within your organization. If you plan to implement departments, you should define your departments before setting up your employees, allowing you to add an employee and assign the employee a department in one easy step. System administrator can setup organization departments using [Admin Options] --> [Departments]

120 Setting up Departments: By default, a default department name "Default Department" on new account add. Administrator can rename this default department and can also add new departments. Renaming "Default Department": 1. Click on [Edit] link on default department record. 2. Enter new department name and department code of default department. 3. Click on [Update] to update this change. Adding new department: To add new department, follow these instructions. 1. Enter new department code and name in "Department Information" form. 2. Click on [Add] to add this department. Deleting Department: 1. In [Department List], click on [Delete] link of record which you want to delete. 2. Click on [Yes] on delete confirmation dialog Editing Department: 1. In [Department List], click on [Edit] link of record which you want to modify. 2. Update your required modification in [Department Information] form. 3. Click on [Update] button to update this record. Roles setup Roles are used to identify types of work that are charged at specific rates. A role can describe a specific action/function or a level of expertise within the project team. Roles are initially created outside of the project, and then assigned to the project and appropriate team members. System administrator can setup application roles using [Admin Options] --> [Roles]. Setting up Roles:

121 By default, TimeLive application creates 4 default roles which TimeLive application used internally for its different functions. Administrator can add new roles based on their own organization requirements. Adding new Roles: To add new role, follow these instructions. 1. Enter new role name in "Role Information" form. 2. Click on [Add] to add this role. Deleting Role: 1. In [Role List], click on [Delete] link of record which you want to delete. 2. Click on [Yes] on delete confirmation dialog Editing Role: 1. In [Role List], click on [Edit] link of record which you want to modify. 2. Update your required modification in [Role Information] form. 3. Click on [Update] button to update this record. Task Type setup Task types is an identity of a task representing of particular task group. It can be different for different industries and organizations. TimeLive provides few pre-defined tasks with option of adding your own required task types in system. System administrator can setup task type using [Admin Options] --> [Task Types]
![Adding new task type: To add new task type: 1. Enter new task type in "Task Type Information" form. 2. Click on [Add] to add this department. Deleting Task type: 1.](/docs-images/84/89281295/images/122-0.jpg "In [Task Type List], click on [Delete] link of record which you want to delete. 2. Click on \"Yes\" on delete confirmation dialog Editing Task Type: 1.")
![In [Task Type List], click on [Edit] link of record which you want to modify. 2. Update your required modification in [Task Type Information] form. 3. Click on [Update] button to update this record.](/docs-images/84/89281295/images/122-1.jpg "Priorities setup Priorities setup allow system administrator to create own custom priorities of tasks.")
122 Adding new task type: To add new task type: 1. Enter new task type in "Task Type Information" form. 2. Click on [Add] to add this department. Deleting Task type: 1. In [Task Type List], click on [Delete] link of record which you want to delete. 2. Click on "Yes" on delete confirmation dialog Editing Task Type: 1. In [Task Type List], click on [Edit] link of record which you want to modify. 2. Update your required modification in [Task Type Information] form. 3. Click on [Update] button to update this record. Priorities setup Priorities setup allow system administrator to create own custom priorities of tasks. TimeLive provide few pre-defined priorities which can be rename or edited according to organization needs. System administrator can setup priorities using [Admin Options] --> [Priorities]
![Adding new priority: To add new task type: 1. Enter new priority in "Priority Information" form which you want to add. 2. Click on [Add] to add this priority in timelive system. Deleting priority: 1.](/docs-images/84/89281295/images/123-0.jpg "In [Priorities List], click on [Delete] link of record which you want to delete. 2. Click on \"Yes\" on delete confirmation dialog Editing priority: 1.")
123 Adding new priority: To add new task type: 1. Enter new priority in "Priority Information" form which you want to add. 2. Click on [Add] to add this priority in timelive system. Deleting priority: 1. In [Priorities List], click on [Delete] link of record which you want to delete. 2. Click on "Yes" on delete confirmation dialog Editing priority: 1. In [Priorities List], click on [Edit] link of record which you want to modify. 2. Update your required modification in [Priority Information] form. 3. Click on [Update] button to update this record. Role Permissions setup Role Permission are used to define the activities and features users can access. Each role has a name and list of actions. The administrator assigns roles to each user when adding new employee. Role permissions allow you to restrict or expand a user s access to TimeLive system. Consider each role carefully before assigning actions to that role. TimeLive provide 4 pre-defined security roles which can be customized through role permission. Also administrator can create their own custom roles and can assign their own required permissions. Pre-defined roles: 1. Administrator 2. User 3. Project Manager 4. Team Lead
124 Each TimeLive functionality can be customize using 4 level of access permissions. 1. List / View (Only view permission) 2. Add (Add permission) 3. Edit (Edit permission) 4. Delete (Delete permission) Updating permission of role: To update permission of a specific role, 1. select that role in role dropdown. And then modify your required permission sets for that particular role. 2. Click on [update] to update these settings. Billing Types setup Billing types are system configurable billing types which you can definebilling Types setup allow system administrator to create own billing types. TimeLive provide few pre-defined billing types which can be rename or edited according to organization needs. There are two types of billing category which you can setup using billing type setup. 1. Employee Bill Types Hourly Monthly 2. Project / Client Per Hour Fixed Bid System administrator can setup billing types using [Admin Options] --> [Billing Types] Adding new billing type: To add new billing type: 1. Enter new billing type in "Billing Type" form which you want to add. 2. Select billing category (select Employee if you are defining billing type of employee billing. Select Project/Client if you want to add billing type for project. 3. Click on [Add] to add this billing in timelive system.
125 Deleting billing type: 1. In [Billing type List], click on [Delete] link of record which you want to delete. 2. Click on "Yes" on delete confirmation dialog Editing billing type: 1. In [Billing Type List], click on [Edit] link of record which you want to modify. 2. Update your required modification in [Billing Type Information] form. 3. Click on [Update] button to update this record. Absence Type Setup Absence types are the different type of employee absence reasons, which can be configure using timelive absence type setup. TimeLive provide few pre-defined absence types. Administrator can create their own absence type based on their own organization needs. System administrator can setup absence types using [Admin Options] --> [Absence Types] Adding new Absence type: To add new absence type: 1. Enter new absence type in "Absence Type Information" form which you want to add. 2. Click on [Add] to add this absence type in timelive system. Deleting Absence Type: 1. In [Absence Type List], click on [Delete] link of record which you want to delete. 2. Click on "Yes" on delete confirmation dialog Editing Absence Type: 1. In [Absence Type List], click on [Edit] link of record which you want to modify. 2. Update your required modification in [Absence Type Information] form. 3. Click on [Update] button to update this record. Project Types Setup
126 Project types are the different categories of projects which an organization is executing. This depend upon organization to organization. For example, a software consulting company can have different type of projects like "Web Development", "Application Development" etc. System administrator can setup Project Types [Admin Options] --> [Project Types] Adding new Project type: To add new project type: 1. Enter new project type in "Project Type Information" form which you want to add. 2. Click on [Add] to add this project type in TimeLive system. Deleting Project Type: 1. In [Project Type List], click on [Delete] link of record which you want to delete. 2. Click on "Yes" on delete confirmation dialog Editing Project Type: 1. In [Project Type List], click on [Edit] link of record which you want to modify. 2. Update your required modification in [Project Type Information] form. 3. Click on [Update] button to update this record. Status Types setup Status types are different types of status codes which TimeLive users can use to monitory their different types of project or task states from start to finish. Different status type can be "Open", "In Progress", "Closed" etc. There are three type of status types which you can configure in Status Types setup: 1. Task (Status code of project tasks) 2. Project (Status code of projects) 3. Employee (Status code of employee) System administrator can setup Status using [Admin Options] --> [Status]
 2. Enter new status type in \"Status Information\" form which you want to add. 3. Click on [Add] to add this statusin TimeLive system.")
127 Adding new Status: To add new status: 1. Select status type (select Task, if you are going to add status of a task. Select Project if you want to add status type for project. Select Employee, if you want to add new status for employees) 2. Enter new status type in "Status Information" form which you want to add. 3. Click on [Add] to add this statusin TimeLive system. Deleting Status: 1. In [Status List], click on [Delete] link of record which you want to delete. 2. Click on "Yes" on delete confirmation dialog Editing Status: 1. In [Status List], click on [Edit] link of record which you want to modify. 2. Update your required modification in [Status Information] form. 3. Click on [Update] button to update this record. Employee setup To provide an employee or other person access to TimeLive, you must add them as a Employee in TimeLive. Typically an employee record should be created in TimeLive to allow that employee to enter perform their daily operations through timelive including task management, time entry, expense entry, project management etc. 1. Administrator also define role of every employee through which individual employees get their restricted timelive access according to their role permission defined in Role Permissions. 2. TimeLive also required billing rate of every employee through which timelive calculate project / task cost for billing purpose.

128 3. Administrator also define timelive login password at time of new employee add. Later employee can change their own password by doing login in system using. 4. Employee should be assign in project to execute any activity for that particular project. Employee Information field: These are the fields which are required to be entered for entering new employee. There are three types of fieds available in employee form. 1. Personal Information 2. Login Information 3. Billing Rate information Personal Fields: Name prefix First Name Middle Name Last Name Address Line 1 Address Line 2 State City Zip Country Home phone no Work phone no Time zone Login Information fields: Login address Password / verify password Role (Role specify which features of TimeLive the user can access. Administrator can create new role as well as can customize role security using Role Permission option in Admin Options section is initially available in read-only mode, and displays a list of permissions already assigned to the user.
129 Department (Department field of the user profile indicates which department the user is assigned to) Location (Location field of the user profile indicate which organization location the user is assigned to) Billing Fields Billing Currency Billing Type Billing Rate Billing Rate start date Adding new employee: To add new employee, follow these instructions. 1. Enter employee personal information, login information and billing information in employee information form. 2. Click on [Add] to add this employee. Deleting Employee: 1. In [Employee List], click on [Delete] link of record which you want to delete. 2. Click on "Yes" on delete confirmation dialog Editing Employee: 1. In [Employee List], click on [Edit] link of record which you want to modify. 2. Update your required modification in [Employee Information] form. 3. Click on [Update] button to update this record. External Users setup External users are typically external to the organization and, as a result, are much more limited in their access. External users are often created for those users who are required to approve time information and review report data on behalf of a Client. External users can be assigned as a representative/approver for projects associated with the client. Client approvers can approve timesheets in which time is entered against the client s projects (client approver sees only the lines containing their projects). System administrator can setup [External users] through [Admin Options] --> [External Users]

130 Adding new External User: To add new external user: 1. Enter external user personal information in "Personal Information Section". 2. Select client whose representative/approver is this external employee. 3. Enter [Login information] in login section 4. Enter Role as [External User] 5. Click on [Add] to add this external user in timelive system. Deleting External User: 1. In [External User List], click on [Delete] link of record which you want to delete. 2. Click on "Yes" on delete confirmation dialog Editing External User: 1. In [External Users List], click on [Edit] link of record which you want to modify. 2. Update your required modification in [External User Information] form. 3. Click on [Update] button to update this record. Preferences Preferences option allow Administrator to setup different application level parameters which are required for their organization. Admin Options > Preferences


131 TimeLive preferences section have nine Sub-sections. Organization : Under Organization, Account Information is saved. Administrator can change the data according to the organizational needs along with Time Zone. General Preferences :
132 Options under General Preferences plays pivotal role in setting up account basic settings. Details are as below for each option, Enable Password Complexity Lock Submitted Records This option restrict users to input much secure password than simple ones. Password must consists of 6 digits including 1 numeric and 1 special characters if this check is applied This option lock any submitted records in Timesheet, Time Off and Expense. User cannot edit submitted records if this check is applied Lock In- If this check is applied, all records which are waiting for approval or Approval/Approved already approved cannot be edited by user Records Use Electronic Signature Show Additional Department Information in Employee Show Employee Name with Code Show Disable Employees In Report Password Expiry Period If this check is applied, user can see his/her Electronic signature on approvals and print paper If this check is applied, Department Code will be included in Department column under Employee Grid If this check is applied, All list of employees drop-down will show Employee code along with Employee Name If this check is applied, All report will show disabled employees' list and their records, according to the report Administrator can set the expiry period of employees password. After the expiry period, user must need to change their existing password

133 Scheduled Sent Time Session Out Time Page Size From Display Name From Address Standard and Formats Show Employee Name By Company Own Logo & Show Company Own Logo Through this field, Administrator can schedule sending time. It could be 09:00 or 16:00 Due to security risk, Administrator can set minutes after TimeLive session may expire due to inactivity This drop-down, allow user to view number of Records in one page. (10,20,30,40,50) This field allow administrator to change Automatic sender name according to organization need This field allow administrator to change sender default address according to its organization This drop-down option is crucial as it controls Time, Date and Text format (By default, it is <Auto> which automatically pick culture info from client browser default settings) This drop-down allow administrator to use either First Name and Last Name or Last Name and First Name in TimeLive Through this option, Administrator can upload Company logo to be shown in TimeLive Application and on Prints as well Invoice Setup : In this tab, Options related to Invoice can be modified, Show Project Name In Invoice Report Show Billing Rate In Invoice Report Through this check, Project Name will be shown in the generated Invoice Through this check, Billing Rate of the Project will be shown

134 Show Entry Date In Invoice Report Show Employee Name In Invoice Report Show Work Type In Invoice Description Round-Off Tax Value In Invoice Invoice No Prefix Invoice Billing Type Invoice Footer If this check is applied, Entry date will be shown in the Invoice If this check is applied, Employee name will reflect in the generated Invoice Through this option, Work Type will reflect in Invoice Description Through this option, Tax Value will be Round Off in the generated Invoice With this option, Administrator can set Invoice No. Prefix Through this Drop-Down, Administrator can select between Hours or Days Billing Type In this Text Box, Administrator can input Footer for the generated Invoice. It would be general as it will reflect in all invoices Task Setup : Under Task Setup tab, Administrator can set some options which will reflect in Task Grid, Show Project Name In Task By enabling this check, Project Name will be shown in Task Grid Show Client Name In Task By enabling this check, Client Name will be shown in Task Grid Sort Task By Through this Drop-Down, Administrator have option to sort Task Grid according to Deadline Date or Task ID Project Setup : Under Project Setup tab, Administrator can set some options which will reflect in Project Grid,

135 Auto Generate Project Code Show Completed Project In Project List Show Client Department In Project Include Current Year In Project Code Automatically Include Administrator In Project Team Show Disable Project In Report Project Template Mandatory Project Code Prefix Through this check, Project Code will be generated by System If this check is enabled, Completed projects can be shown in Project Grid By enabling this check, Client Department will appear in Project Grid By enabling this check, TimeLive Application will include current year in Project Code. i.e XXX If this check is enabled, Administrator will be automatically be added in every Project during creation. Note: Projects which are already created prior to this check enabled, will not make administrator as team member Through this check, All Disabled Projects will be shown in Reports and its Drop-Down If this check is enabled, Administrator/User must select Project Template during Project Creation (See Project Template) Through this check, Administrator can assign Project Code Prefix for Project Time Off Setup : Under Time Off Tab, Administrator can manage few settings of Time Off,


136 Show TimeOff in Timesheet Show Project for TimeOff Show Time Off in Days TimeOff Status Edit Mode Show Timeoff Types By Through this check, Time Off will be available in My Timesheet for users to input their Time Off Through this check, Project selection will be possible while submitting Time Off Request Through this check, Time Off will be calculated in days with reference to hours set in Working Days If this check is enabled, user can edit their submitted TimeOff data from Time Off Request Page This drop-down allow administrator to select between Account wise TimeOff type or Employee Wise Expense Setup : Under Expense Setup Tab, Administrator can enable some additional data fields for Expense Sheet,
137 Show Client In Expense Sheet Show Task in Expense Sheet Expense Sheet Print Footer If this check is enabled, user can select Client while creating new Expense Sheet If this check is enabled, user can select Task for which they want to have Expense Sheet This Footer will be visible in every Expense Sheet Print. Administrator can change its data according to organizational need Timesheet Setup : Under this option, Administrator can set many functions which TimeLive is offering which will reflect in My Timesheet of all users,
138 Show Clock Start/End Show Client in Timesheet Show Description in Week View If this check is enabled, TimeLive allow users to input Start Time and End Time against their task. TimeLive will calculate Hours Spent itself Through this check, Client drop-down will be available for users to select prior to project and task Normally, Description is in Day View, but if this check is enabled, Description box will appear after entering End
139 Time/Total Time Show Completed Project in Timesheet Show Work Type in Timesheet Show Cost Center in Timesheet Show Copy Timesheet Button Show Copy Activities Button In Timesheet Enable Offline Timesheet Show "Show All" Check in Approval Show Task Percentage in Timesheet Calculate Task percentage Automatically Auto Adjust Timesheet Number of Blank Rows in Timesheet Timesheet Period Overdue Show Clock Start/End by TimeEntry Hours Format TimeEntry Clock Format Show additional Task Information Type in Timesheet In TimeLive, Completed Projects will not appear in Project Drop-Down for selection but this check allows those project to reflect in the drop-down This feature is very useful. If a user has worked overtime or on Holidays, and have different rates for that, they can select Work type from My Timesheet while entering their Hours Spent Through this check, Cost Center drop-down will be available for users to select This option allow Copy Timesheet Button to be visible in users timesheet (View My Timesheet) This option allow Copy Activities Button to be visible in users timesheet (View My Timesheet) This option allow Offline Timesheet Button to be visible in users timesheet (View My Timesheet) While in Approval, if detail is clicked, Approver can see records which are pertaining to him/her, but if this check is enabled, Approver can view the whole week entry including TimeOffs as well. This will help Approver in monitoring users activities during the week This option allow users to input Percentage along with their time spent in that task. Percentage is linked directly to the task This option automatically calculates task percentage This option will automatically adjust My Timesheet Layout according to enable fields and their width This option allow administrator to control number of lines for TimeEntry. By default it is 2. When both lines are filled and records are saved, 2 extra blank lines will appear for TimeEntry Through this option, Administrator can set number of Overdue period reporting on Overdue notification (See Notifications) This drop-down allow administrator to choose between Account/Employee This drop-down option allow administrator to select between Time format (HH:MM) or Decimal format (1.5 ie. 1 Hour 30 Mins. or 5.75 ie. 5 Hours 45 Mins.) This drop-down option allow administrator to select between 24 Hour format (HH:MM) or 12 Hour format (HH:MM AM/PM) This drop-down option allow administrator to select between some additional task information to be reflected in My Timesheet (Parent Task Name, Parent Task Code, Task Code or Task Type) Administrator can select any
 This drop-down option allows Administrator to select between Day-View or Period View for default")
140 one. Show additional Project Information Type in Timesheet Default Time Entry Mode Sort Timesheet By Show Cost Center In Timesheet by Timesheet Print Footer This drop-down option allow administrator to select between some additional Project information to be reflected in My Timesheet (Project Code) This drop-down option allows Administrator to select between Day-View or Period View for default My Timesheet View. This drop-down option allows administrator to select sorting of My Timesheet according to Client or by Default (Time Entry) This drop-down option allows administrator to select between Account or Employee to show their Cost Center This Footer will be visible in every Timesheet Print. Administrator can change its data according to organizational need. Security : Under this tab, Administrator can Enable Single Sign-On (SSO). This feature allow users to login with their ADFS/SAML ID (for Details view ADFS Integration). Holiday Setup: TimeLive provides few pre-defined holidays type such as US, UK etc. Administrator can define the holidays as per their organization rules & region by creating new [Holiday Type]. Administrator can create [Holiday Types] with different configurations and can assign these types separately to each individual employee. Administrator can also select pre-defined holidays comes by default with TimeLive. Following settings can be configured using Holiday options available in TimeLive. Selecting Pre-defined Holidays Types: TimeLive comes with different pre-defined holidays set. Administrator can select those pre-defined holidays set from [Admin Options]-->[Holidays]. Once selected pre-defined holidays, administrator can fully edit those holidays types in [Admin Options]-->[Holiday Types].


141 Holiday Types Setup: System administrator can setup holiday types policies using [Admin options]----> [Holiday Type]. Adding Holiday Type: To add new Holiday Type: 1. Enter new holiday type in [Holiday Type Information] form which you want to add. 2. Click on [Add] to add this [Holiday Type] in TimeLive system.
![Deleting Holiday Type: 1. In [Holiday Type List], click on [Delete] link of record which you want to delete. 2. Click on [Yes] on delete confirmation dialog. Editing Holiday Type: 1.](/docs-images/84/89281295/images/142-0.jpg "In [Holiday Type List], click on [Edit] link of record which you want to modify. 2. Update your required modification in [Holiday Type Information] form. 3.")
![Click on [Update] button to update this record. Defining Holidays Details: After creating of [Holiday Type], administrator can then define holidays days for that particular [Holiday Type].](/docs-images/84/89281295/images/142-1.jpg "To define holidays days in holiday type: 1. Click on [Holidays] link of [Holiday Type] in which you wish to define holidays. 2.")
142 Deleting Holiday Type: 1. In [Holiday Type List], click on [Delete] link of record which you want to delete. 2. Click on [Yes] on delete confirmation dialog. Editing Holiday Type: 1. In [Holiday Type List], click on [Edit] link of record which you want to modify. 2. Update your required modification in [Holiday Type Information] form. 3. Click on [Update] button to update this record. Defining Holidays Details: After creating of [Holiday Type], administrator can then define holidays days for that particular [Holiday Type]. To define holidays days in holiday type: 1. Click on [Holidays] link of [Holiday Type] in which you wish to define holidays. 2. Use this page to add, edit and delete holidays days of your selected [Holiday Type] Manage Terminology [Manage Terminology] option now allows TimeLive Admin to change Timesheet terms to any of their own custom terminology. Admin can define which "TimeLive" terms they want to modify with their own required name in [Admin Options]-->[Manage Terminology]. After update, TimeLive will then use those terms in everywhere in application including menus, timesheet, forms, reports etc. Defining new Manage Terminology:
143 1. In [Manage Terminology List], enter TimeLive built-in term in [Teminology Name] field. 2. Enter your own custom name in [User Defined Name] which you want to show in place of [TimeLive built-in name]. 3. Click on [Selected] checkbox in same row where you have defined this record. 4. Click on [Update] button to update this terminology. 5. TimeLive now will show this custom term defined above instead of built-in term everywhere. Custom Fields: Different organizations have different requirements which are specific of their own. It helps them to keep their records according to their needs. TimeLive understands that and to cater their specific needs, Custom Field plays key role in achieving this. Navigate to Admin Options > Custom Fields Following picture shows list of Entities under which Custom Fields can be created. Through Manage link against the each entity, Administrator can create custom fields according to organizational needs.


144 There are 4 Data Type through which, Custom Field can be created. Number Text Drop-Down Date In below screenshot, 1 custom field "Date of Birth" is created. which is under Employee Entity. IsRequired check is a validation if this field is mandatory or not. Further, a new custom field is in creation process. Data Type is selected as Drop-Down and list of options will be visible under employee record for custom field selection.

145 Currencies: TimeLive allows multiple currencies for each organization. This feature is under Admin Options > Currencies. Currencies plays very important role in Timesheet and Expense Billing. It also manages rates fluctuations for any length of time under multiple date ranges for each currency.


146 By default, most commonly used currency are predefined in TimeLive, But TimeLive is not limited to these only. User can add/remove any currency according to their need.


147 User can add new Currency by selecting Currency name from the list and define exchange rate with Base Currency. To disable any Currency, click Edit against the currency and select Is Disabled. To manage/update existing Currency rate, click on History link. In the below screenshot, 3 different exchange rates are already added according to their dates. This will allow organizations to control the currency day-to-day fluctuations or contract rates.

148 There are two main issues which should always be on the check that 1. No Date ranges should overlap 2. During updating/managing existing rate, user must enable Update all records within this range check to avoid any miscalculations Timesheet Period View: Timesheet periods determine the length of user Timesheets. They should parallel either your organization's pay periods or billing cycle so that timesheet data is available when needed for generating payroll or for invoicing clients. A System timesheet period is assigned to new users by default. Administrator can use different Timesheet Period for different employees, according to different Working Days. This feature is under Admin Options > Timesheet Period View.

.")
149 Under Timesheet Period Types, there are 5 types of Period view from which 1 can be used in Working Day. It does sound that Bi-weekly and Semi-monthly are similar but there is a difference. In BiWeekly, TimeLive allows user to change start period date according to the organizational need (as per below picture shows). Whereas, in Semi-monthly, periods are fixed from 1st to 15th and 16th to the end of the month date.


150 In Monthly Timesheet Period, TimeLive allows user to set month start date according to the organizational need. Project Template: Some organizations have different projects but have same tasks and same employees' team for those projects. Creating every project with same tasks and team could be frustrating and some data can be missed out easily.


151 In TimeLive, Administrator can create template as per requirement without any limitation to cater such need. Not only the template allows user to create task and team, it also allows to create Milestones and attachments for the same. To access Project Template page navigate to Admin Options > Project Template. Creating new Project Template:
 After creating new project template user can now use this template in creating new project.")
152 Creating a New Project Template is as easy as creating a New Project. All the steps are the same including creating team and tasks.(creating New Project) After creating new project template user can now use this template in creating new project. User will observe that creating Project by using Project Template, Tasks, Team members, Milestones are added automatically (if created in Project Template) into the newly created project.
153 Reports Understanding Reports Reports are helpful for determining how time is utilized throughout your organization and for reviewing project costs and client billing. You can generate reports to review detailed or summarized data. TimeLive allows you to create highly-customized reports to assist with tracking and management of time, expenses, users, and projects. Reports can be viewed within TimeLive or saved to a PDF or Excel (CSV) file. A number of default reports have been installed with TimeLive; refer to Default Reports for a list of these reports and their uses. You can run these reports without modification, or customize these reports.(see Bottom) If you are running a text report with Summary Options selected, choose the Data Display Style: Detailed: each report entry will display in a separate row. Plus, a summary row will display for each row grouping and for the report as a whole. Consolidated: only summary rows will display for each row grouping and for the report as a whole The best way to start learning which reports work best for you is by viewing the report previews and running test reports. Reports can be launched by clicking on [My Reports] link in left-navigation menu. Report Home Page :
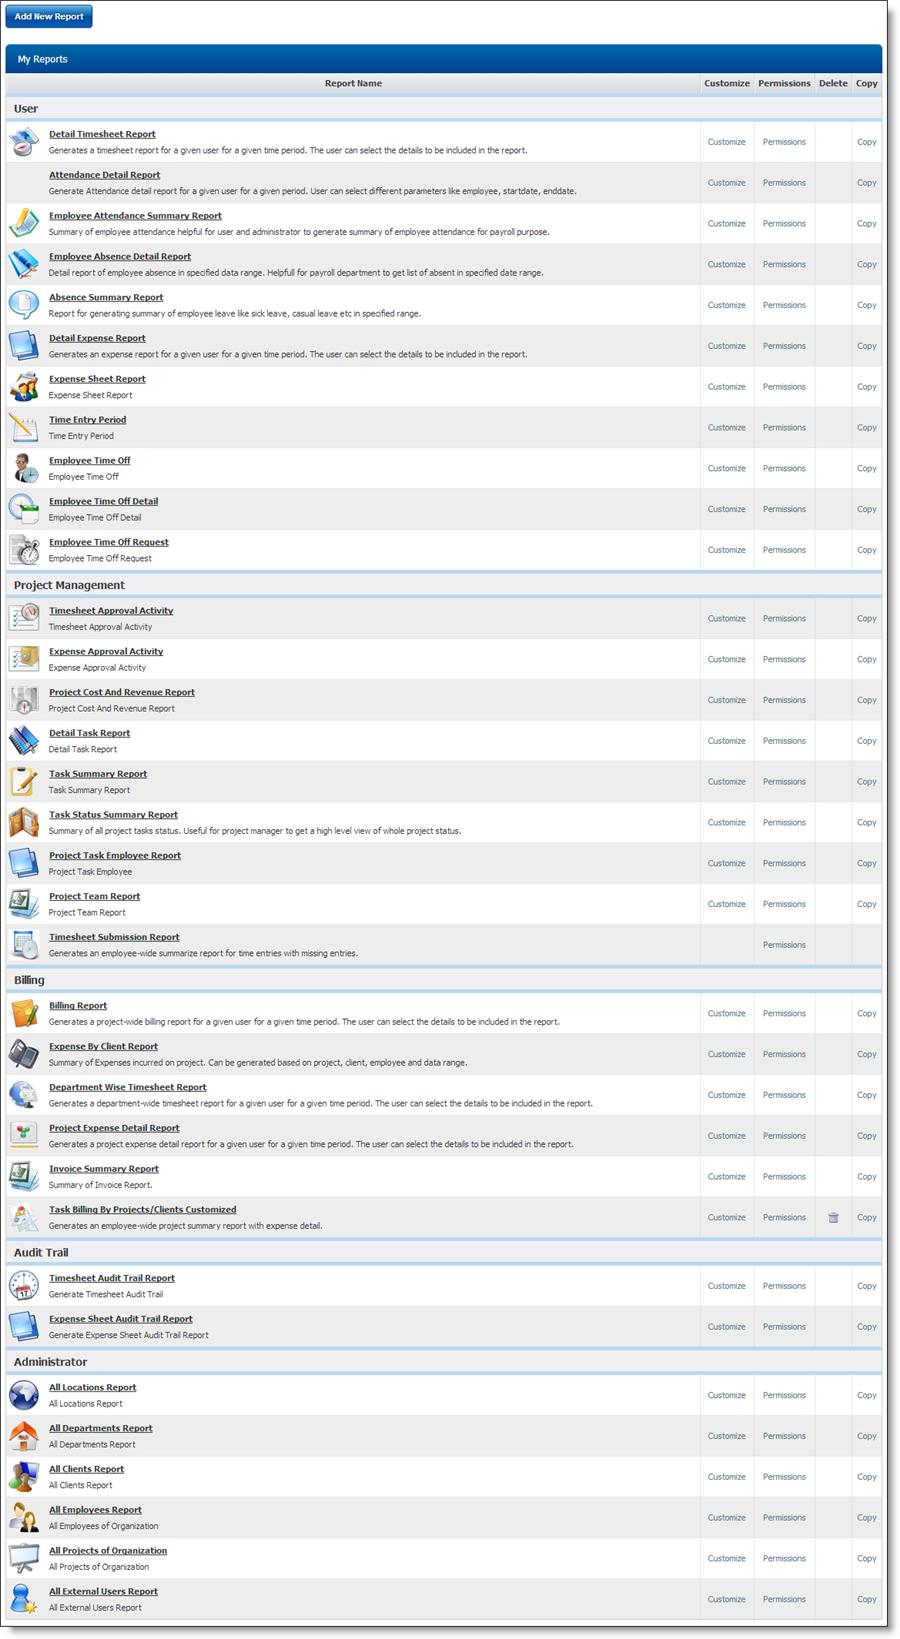
154
155 Parts of report: 1. Filter option of report. These filter option are available in all reports. Just select your required filter and click on [Show] button to get report output. 2. Report toolbar. Report toolbar has options of exporting reports and page navigation buttons. 3. Report output. Actual report output based on selected report filter. Running a Report To run a report: 1. Navigate report home page using either left navigation menu [My Reports] or from top menu [REPORTS]. 2. Select Reports from report page which you want to run. 3. Select the data to be displayed in the report by setting the filters provided on top of report. Exporting a Report To export a report 1. Run report 2. Select your desired exportable format [PDF, HTML, XLS, RTF]. 3. Click on [Export] icon just right on exportable format drop-down. Printing a Report To print a report 1. Run report 2. Click on [Print] icon in report toolbar to print currently selected reports. Report Customization: This feature allow users to edit Name, Fields, grouping and layout of report. Each report can be customized according to organizational needs. To customize any report please click Customize link against required report. For Understanding Report Customization or creating new report, please review Understanding Report Designer. Report Permission: This feature allow users to access and modify reports according to Roles assigned in their profile. Each report has its own set of permissions which can be modified according to organizational/role needs.

156 Report Permission in detail: Show Report : This is basic permission which allow User to see this report in My Reports. If check is not applied, user will not be able to see that particular report in My Report Grid. Allow Customization: This permission give access to the Customization option in My Report for only that particular report (See Understanding Report Designer for Customization). Show Report check is mandatory if this check is enabled. Allow All: This permission gives access to view all employees in the organization. Allow Own Report: This permission gives access to user to view his/her own report. Allow Own Team: This permission gives access to user to view his/her own Team Report. For Example if he/she is the team lead or PM in any project, user can view their teams' report. Allow Own Project: This permission give access to user to view his/her own Project Report. Allow Own Sub-Ordinates: This permission give access to user to view Report of those employees of whom he/she is Employee Manager. System Reports TimeLive includes a large number of default reports. You can use the [Report Datasources] to create your own customized versions of reports. Alternatively, you can use pre-defined default reports, which are based on the [Report Datasources]. You can also customize default reports by modifying their settings. TimeLive currently have following system reports which are available by default: Users Reports: Detail Timesheet Report Detail Expense Report Attendance Detail Report Employee Attendance Summary Report Employee Absence Detail Report Absence Summary Report Detail Expense Report
157 Project Management Reports: Timesheet Approval Activity Expense Approval Activity Attendance Detail Report Project Cost And Revenue Report Detail Task Report Task Summary Report Task Status Summary Report Timesheet Submission Report Project Activity Summary Report Billing Reports: Billing Report Task Billing By Projects/Clients Expense By Client Report Department Wise Timesheet Report Project Expense Detail Report Administrator Reports: All Locations Report All Departments Report All Clients Report All Employees Report All Projects Of Organization All External Users Report Understanding Report Designer TimeLive reports are generating using pre-defined report data-sources. From these data-sources, user can select/deselect columns which they want to be showed in reports. User can also define grouping, different summarized functions and custom formulas on all available Datasource columns. Report Data-source: These are the report Datasource currently available in TimeLive. 1. Absence 2. Attendance 3. Clients 4. Departments 5. Employee Time Off Audit Report 6. Employee Time Off Details 7. Employee Time Off Summary 8. Employees 9. Expense Entry 10. Expense Entry Approval Activity 11. Expense Sheet 12. Expense Sheet Audit Trail 13. External Users 14. Locations 15. Missing Time Entry Period 16. Project Task
158 17. Project Team 18. Projects 19. Tasks 20. Time Entry 21. Time Entry Approval Activity 22. Time Entry Period 23. Time Entry Periodic Submission 24. Time Off Request 25. TimeLive Invoice 26. Timesheet Audit Trail Report Designer Steps: TimeLive Report Designer consist of 3 important wizard steps. Following are the name of steps and a brief description of every steps: Step: 1 - Report Description For defining report name, report icon, report category and report type (detailed or consolidated). Further, Unique Header and Footer can be described for identification of report during View, Export, or in Print. Step: 2 - Report Datasource Selection Different Datasource contains some similar fields but most of unique ones related to its Datasource to generate required report. User can Edit existing Report or can create new report through this Wizard page according to the requirements. Following are the list of activity can be performed in this Wizard Page, Can select/ de-select Datasource column from report as per requirement.
159 Can give different Caption for each field according to organization's terminology. Can Group single or multiple fields to extract complex reports. (EmployeeName is grouped in below screenshot) Can select group summary type (sum, count) etc for each report column. Formula Fields (see Formula Column Syntax) and Custom Fields (if defined under Admin Options > Custom Fields see Custom Fields) can be added to extract more customized report.
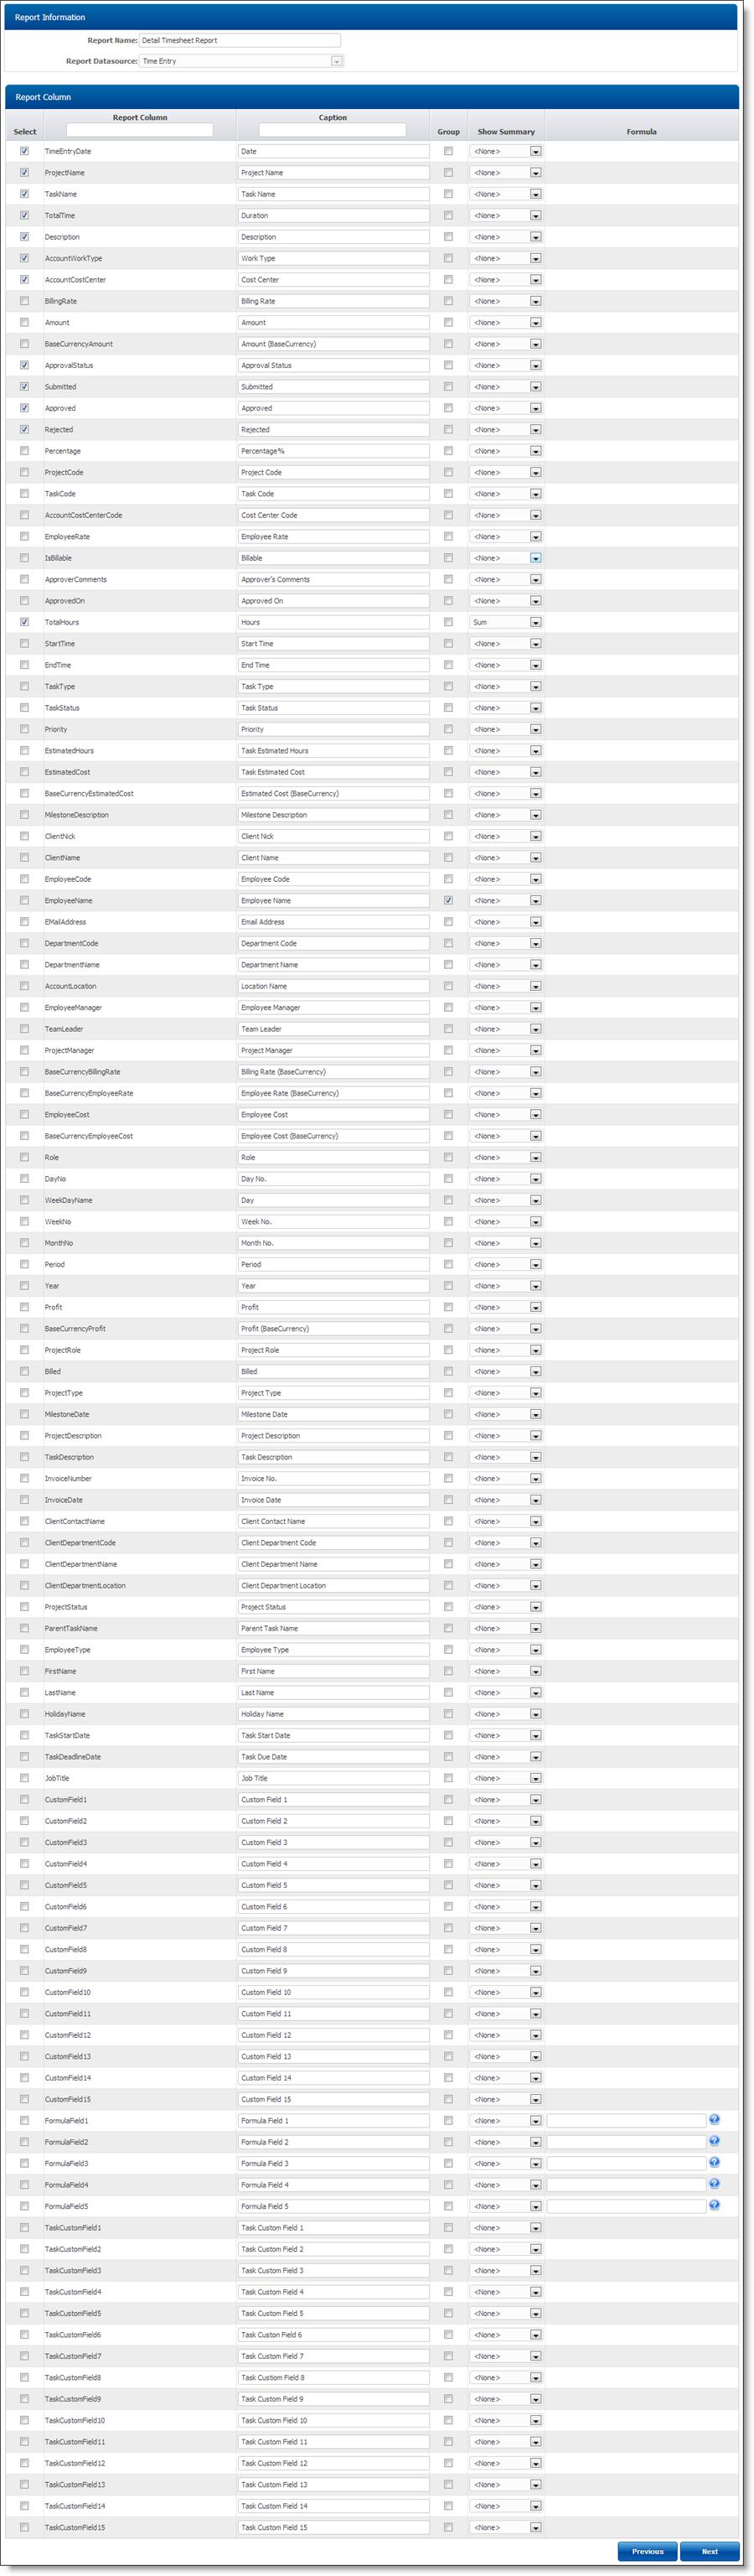
160


161 Step 3: Column and Group Ordering The last page of Report Wizard, there are two tables. Both tables plays crucial part in generating the report according to the requirements. Column Order : Allows user to set the order of fields in which report view is required. Top most field will be first column of the report and the last Field in the order will be the last column of the report. Group Order : If in the second page, Group check is enabled in any field, those fields will be visible in this table. That too can be sorted according to the requirement. In below screenshot, Employee Name was grouped to view Report according to Employee name then the date which is the first field of Column order. Understanding Formula Columns TimeLive allows 5 formula fields in every report datasource. User can enter their own custom formula for these columns. And they can perform other reports functions like grouping, calculations (sum etc) and showing in reports. A typical case for Formula Columns: Billing departments wants to submit client billing reports with 10% extra overhead charges. TimeLive administrator then decided to [customize] [Task Billing By Projects/Clients] in [Billing Reports] category.
![Report before customized: Here are the steps required to be followed for customizing [Task Billing By Projects/Client] report: 1. Click on [My Reports] to launch [My Reports] page. 2.](/docs-images/84/89281295/images/162-0.jpg "Click on [Customize] link of report [Task Billing By Projects/Clients] in [Billing Reports] category. 1. Click on [Next] in [Report Definition Information] wizard step. 2.")
![In [Report Data Selection] wizard step: follow these steps to customize [Task Billing By Project/Clients] reports to achieve above mentioned requirements. a. Check on [FormulaField1] and update its caption to [Overhead Charges].](/docs-images/84/89281295/images/162-1.jpg "b. Select [Sum] in [Show Summary] dropdown of [FormulaField1]. c. Enter formula for calculating 10% of Amount: Amount * 10 / 100. d. Check on [FormulaField2] and update its caption to [Net Billing Amount].")
162 Report before customized: Here are the steps required to be followed for customizing [Task Billing By Projects/Client] report: 1. Click on [My Reports] to launch [My Reports] page. 2. Click on [Customize] link of report [Task Billing By Projects/Clients] in [Billing Reports] category. 1. Click on [Next] in [Report Definition Information] wizard step. 2. In [Report Data Selection] wizard step: follow these steps to customize [Task Billing By Project/Clients] reports to achieve above mentioned requirements. a. Check on [FormulaField1] and update its caption to [Overhead Charges]. b. Select [Sum] in [Show Summary] dropdown of [FormulaField1]. c. Enter formula for calculating 10% of Amount: Amount * 10 / 100. d. Check on [FormulaField2] and update its caption to [Net Billing Amount]. e. Select [Sum] in [Show Summary] dropdown of [FormulaField2]. f. Enter formula for sum of original amount field and calculated [Overhead Charges]: Amount + FormulaField1. g. Click on [Next] to update these changes. 2. Click on [Finish] button in final wizard step [Column and Group order]. 3. Now a new report will be created with name [Task Billing By Projects/Clients Customized] 3. Clicking on this report in [My Reports] will show TimeLive customized report with two additional column [Overhead charges] and [Net billing Amount]
![4. Click on [Permissions] link to give this customized reports to your required Roles. Formula Column Syntax Formula columns are derived from user-defined formulas.](/docs-images/84/89281295/images/163-0.jpg "Users create these formulas by combining columns (fields) available in the report. When might I need to create a custom column?")
163 4. Click on [Permissions] link to give this customized reports to your required Roles. Formula Column Syntax Formula columns are derived from user-defined formulas. Users create these formulas by combining columns (fields) available in the report. When might I need to create a custom column? Custom columns are useful for creating such numeric fields as: Values with non-standardized modes of calculation that are therefore not included in TimeLive as default columns (for example, overhead cost etc) Calculations specific to your organization Highly-specialized calculations Numeric Formula Examples: A formula for 10% Overhead cost in the [Detail Timesheet Report]: (Amount * 10 / 100) A formula for calculating profit margin in the [Detail Timesheet Report]. (BillingRate - EmployeeRate) * TotalHours Text Formula Examples: To identify location and their departments in a single field, you could combine both location and department by creating a formula like this: (AccountLocation+'-' DepartmentName)
164 Numeric Operators: Operator Use this operator to specify... + Addition - Subtraction * Multiplication / Division (... ) Parentheses = Two values are equal < Less than > Greater than <= Less than or equal >= Greater than or equal!= Not equal % Modulus Operators follow standard order of operations rules. For example: * 2 = 6, but (2 + 2) * 2 = / 2 = 3, but (2 + 2) / 2 = 2 Functions: Functions Description Syntax Example IIF Gets one of two values Iif ( expr, truepart, depending on the result falsepart ) of a logical expression Iif (billingrate>500,'expensive','dear' ) LEN Gets the length of a LEN ( expression ) Len (EmployeeName) string CONVERT Converts particular value to a specified.net Framework Type. Convert(expression, type) Convert(total, 'System.Int32'), Convert(id,'System.String') SUBSTRING Gets a sub-string of a specified length, starting at a specified point in the string. SUBSTRING (expression, start, length ) SUBSTRING ( phone, 7, 8 )
![Integration Importing / Exporting Raw Data TimeLive's raw data imports/exports allow you to import / export raw [timesheet], [project], and [expense] data to spreadsheets using a CSV file.](/docs-images/84/89281295/images/165-0.jpg "CSV file can be opened in Excel as well as standard way of transferring data from different applications. TimeLive support these types of data in CSV Import / Export: 1. Client 2. Employee 3.")
165 Integration Importing / Exporting Raw Data TimeLive's raw data imports/exports allow you to import / export raw [timesheet], [project], and [expense] data to spreadsheets using a CSV file. CSV file can be opened in Excel as well as standard way of transferring data from different applications. TimeLive support these types of data in CSV Import / Export: 1. Client 2. Employee 3. Department 4. Projects 5. Time Entry 6. Expense Entry 7. Project Tasks 8. Task Users 9. Project Team 10. Project Roles QuickBooks Integration Using TimeLive QuickBooks Integration Tool Using TimeLive's QuickBooks Integration Tool [TimeLive QuickBoooks Integration Manager] provides users the ability to transfer information between TimeLive and QuickBooks. With the ability to transfer time and expense data, the integration module is an ideal solution for those working on projects or tasks that are to be billed to clients. Using TimeLive, you can track the actual time spent working on projects, then transfer the
166 data to QuickBooks, to invoice clients for the work completed. Time data entered by employees can also be transferred for use in generating payroll timesheets in QuickBooks. Plus, expenses incurred against the project can also be entered in TimeLive, and transferred to QuickBooks to reimburse employees, pay vendors and charge clients. Additionally, you can use the integration module to save the time and effort associated with entering the user and project data in both QuickBooks and TimeLive. This duplication can be eliminated by entering the data in one application and transferring to the other using the [TimeLive QuickBooks Integration Manager]. Data Type TimeLive Term QuickBooks Term Employees Employee (ones paid on a regular Employee and on-going basis). Vendors Employees with "IsVendor=Yes in Vendor Employee Types" Customers Clients Customers Jobs/Items Project / Task Job/Item, Job/Sub Job or Item/ Sub Item Time Tracking Timesheet Time Tracking Expense Tracking Expense Sheet Vendor Bills Steps for setting up TimeLive's QuickBooks Integration Tool: 1. Download the module 2. Installing the module 3. Configuring QuickBooks for use with the Module. 4. Launching the Module Downloading the module: TimeLive's QuickBooks integration module can be download from download page from Installing the module Installation of the module is a simple, wizard-guided process. Before beginning installation, ensure that: 1. Your machine meets the integration module's minimum system requirements. 2. You are installing the integration module on the computer where QuickBooks is installed. 3. Your version of QuickBooks is updated to include all available patches (recommended). Configuring QuickBooks for use with the Module Before attempting to integrate with TimeLive, follow the steps below to ensure QuickBooks is properly configured for integration. 1. Launch [QuickBooks] 2. Open a company file. 3. When you integrate with TimeLive, you will transfer data to and from the open QuickBooks company file. 4. If a dialog box displays indicating that TimeLive is attempting to access the QuickBooks company file without a certificate: a. Select the [Yes], [Always] button. This will allows TimeLive to access the company file for data transfer purposes. Launching the Module: 1. To launch the integration module: Double-clicking a shortcut name [TimeLive Quickbooks Integration Manager] created during installation Selecting [TimeLive QuickBooks Integration Manager] from the Windows Start menu.
![2. On login window, enter [TimeLive URL] which you are using to access your TimeLive application, TimeLive username and password. 3. Click on [Login] button to launch Integration tool. 4.](/docs-images/84/89281295/images/167-0.jpg "When a QuickBooks dialog box stating the module is attempting to access the company file displays, enable the check box labeled [Allow] this application to access.")
![This will give TimeLive permission to transfer employee and vendor data to the company file. Select the [Yes] or [Always]. Select [Yes] if asked to confirm.](/docs-images/84/89281295/images/167-1.jpg "The main [TimeLive Integration Manager for QuickBooks] window displays. 5. After login, application will show TimeLive integration main options screen as below.")
167 2. On login window, enter [TimeLive URL] which you are using to access your TimeLive application, TimeLive username and password. 3. Click on [Login] button to launch Integration tool. 4. When a QuickBooks dialog box stating the module is attempting to access the company file displays, enable the check box labeled [Allow] this application to access. This will give TimeLive permission to transfer employee and vendor data to the company file. Select the [Yes] or [Always]. Select [Yes] if asked to confirm. The main [TimeLive Integration Manager for QuickBooks] window displays. 5. After login, application will show TimeLive integration main options screen as below. TimeLive QuickBooks Integration Manager System Requirements Each computer with [TimeLive QuickBooks Integration Tool] must meet the following requirements: 1. Hardware: Pentium 500 MHz CPU or equivalent 512 MB memory
168 50 MB available disk space Screen resolution of 1024 x 768 or higher Operating system: One of the following: Windows Server 2008 (R1/R2) Windows 2003 Windows XP Professional SP2 Windows Vista Windows 7 Software: One of the following: QuickBooks Pro or Premier U.S. Edition 2006 or later QuickBooks Pro or Premier Canadian Edition 2006 or later QuickBooks Pro or Premier UK Edition 2008 or later QuickBooks Enterprise Solutions U.S. Edition 6.0 or later QuickBooks Premier Canadian Multicurrency Edition or later Defining the Relationship between Data Structures Understanding Project / Task relationship with QuickBooks: Defining the Relationship between Data Structures Before using the integration module to transfer data, you must determine how the data structure in TimeLive relates to the data structure in QuickBooks. Understanding the Relationship between Data Structures When transferring certain data types, you must define how the data structure in TimeLive relates to the data structure in QuickBooks. When transferring [project] data from TimeLive to QuickBooks, the relationship tells the integration module where the projects and tasks should be transferred to in Quick- Books. For example, TimeLive [Projects] can be transferred to QuickBooks as [Jobs] or as [Items]. If the integration module is configured to transfer [Projects] as [Jobs], then TimeLive Tasks can be transferred as [Sub Jobs] or [Items]. Depending on the selection data. Understanding Time Entries relationship with QuickBooks: When transferring [time entries], the integration module will use the specified relationship to locate the projects and tasks selected for the time entries in QuickBooks. For example, if a TimeLive [project] exists in QuickBooks as a [job], you would typically assign a relationship between [Projects] and [Jobs]. When transferring a time entry for that project, the wizard will then attempt to locate the [project] in the QuickBooks [Jobs] list. Once the [project] is found as a job, the time entry can be associated with the [job] and will be successfully transferred Transferring Employees To transfer [Employees records from TimeLive to QuickBooks], just click on [Transfer TimeLive Employees to QuickBooks as Employees] button in main option screen of integration tool.
169 Steps for Transfer: 1. Click on [Transfer TimeLive Employees to QuickBooks as Employee] button 2. After successful, application will show Successful transferred message. Transferring Vendors" To transfer [Vendors records from TimeLive to QuickBooks], just click on [Transfer TimeLive Vendors to QuickBooks as Vendors] button in main option screen of integration tool. You can define an [Employee] as [Vendor] in TimeLive by checking on [Is Vendor] field in [Admin Options]-->[Employee Types]. And then you can assign that [Employee Type] to your user who should be treated as [Vendor]. Steps for Transfer: 1. Click on [Transfer TimeLive Vendors to QuickBooks as Vendor] button 2. After successful, application will show Successful transferred message. Transferring Customers To transfer [Clients/Customers records from TimeLive to QuickBooks], just click on [Transfer TimeLive Clients to QuickBooks as Customers] button in main option screen of integration tool. Steps for Transfer:
![1. Click on [Transfer TimeLive Clients to QuickBooks as Customers] button. 2. After successful, application will show Successful transferred message.](/docs-images/84/89281295/images/170-1.jpg "Transferring Projects/Tasks To transfer [Projects/Tasks records from TimeLive to QuickBooks], just click on [Transfer Project/Tasks to QuickBooks as Jobs/Items] button in main option screen of")
170 1. Click on [Transfer TimeLive Clients to QuickBooks as Customers] button. 2. After successful, application will show Successful transferred message. Transferring Projects/Tasks To transfer [Projects/Tasks records from TimeLive to QuickBooks], just click on [Transfer Project/Tasks to QuickBooks as Jobs/Items] button in main option screen of integration tool. Steps for Transfer: 1. Select any mapping option of TimeLive Project / Tasks to QuickBooks which you want in this transfer. Jobs / Items (Projects Tasks will be transferred as [Jobs/Items] in QuickBooks Jobs / Sub Jobs (Project Tasks will be transferred as [Jobs/Sub Jobs] Items / SubItems (Project will be transferred as [Items/Sub Items] 2. Click on [Transfer TimeLive Project/Tasks to QuickBooks as Jobs/Items] button. 3. After successful, application will show Successful transferred message. Transferring Expense Codes To transfer [Clients/Customers] records from TimeLive to QuickBooks, just click on [Transfer TimeLive Expense Codes to QuickBooks as Accounts] button in main option screen of integration tool. Steps for Transfer:
![1. Click on [Transfer TimeLive Expense Codes to QuickBooks as Accounts] button. 2. After successful, application will show Successful transferred message.](/docs-images/84/89281295/images/171-0.jpg "Transferring Time Entries To transfer [Time Entries] records from TimeLive to QuickBooks, just click on Transfer [TimeLive Time Entries to QuickBooks as Time Entries] button in main option screen of")
![integration tool. Steps for Transfer: 1. Select [Employee Name] if you want to transfer any selected employees timesheet. Just select [All], if you want to select time entries of all employees. 2.](/docs-images/84/89281295/images/171-1.jpg "Select [start date] and [end date] 3.")
171 1. Click on [Transfer TimeLive Expense Codes to QuickBooks as Accounts] button. 2. After successful, application will show Successful transferred message. Transferring Time Entries To transfer [Time Entries] records from TimeLive to QuickBooks, just click on Transfer [TimeLive Time Entries to QuickBooks as Time Entries] button in main option screen of integration tool. Steps for Transfer: 1. Select [Employee Name] if you want to transfer any selected employees timesheet. Just select [All], if you want to select time entries of all employees. 2. Select [start date] and [end date] 3. Select type of mapping for your [Project / Tasks] with QuickBooks which you used while transferring your projects / tasks to QuickBooks Jobs / Items (Projects Tasks will be transferred as "Jobs/Items" in QuickBooks Jobs / Sub Jobs (Project Tasks will be transferred as "Jobs/Sub Jobs" Items / SubItems (Project will be transferred as "Items/Sub Items" 4. Tick on "Transfer time entries to payroll timesheets", if you want to transfer TimeLive time entries with payroll related items. 5. Select mapping of QuickBooks [Class Items] with TimeLive data. You can select either of these option for mapping of Class data. <None> Cost Center Department Employee Type Milestone Work Type
![6. Select mapping of QuickBooks [Payroll Item] mapping with TimeLive data. You can select either of these option for mapping of Payroll Items data.](/docs-images/84/89281295/images/172-0.jpg "<None> Cost Center Department Employee Type Milestone Work Type 7. Select [Wage Type] which you want to be populated with your time entries 8.")
172 6. Select mapping of QuickBooks [Payroll Item] mapping with TimeLive data. You can select either of these option for mapping of Payroll Items data. <None> Cost Center Department Employee Type Milestone Work Type 7. Select [Wage Type] which you want to be populated with your time entries 8. Click on [Transfer TimeLive Expense Codes to QuickBooks as Accounts] button. 9. After successful, application will show Successful transferred message. Transferring of Expense Entries as Vendor Bills To transfer [Expense Entries] records from TimeLive to QuickBooks as [Vendor Bills], just click on [Transfer TimeLive Expense Entries to QuickBooks as Vendor Bills] button in main option screen of integration tool. Steps for Transfer: 1. Select [Vendor Name] if you want to transfer any selected vendor expense sheet. Just select All, if you want to select time entries of all vendors. 2. Select [start date] and [end date] 3. Click on [Transfer TimeLive Expense Entries to QuickBooks as Vendor Bills] button. 4. After successful, application will show Successful transferred message. Exporting Time to QuickBooks Overview: The QuickBooks Pro product has the capability of importing data from an external source. Data can include lists that correspond to QuickBooks' lists, budgets, and individual transactions. We will be utilizing the IIF imports to facilitate the importing of time data into QuickBooks. This is facilitated by creating a comma (or tab) separated file in a format that QuickBooks can understand (the QuickBooks IIF format). This format includes the use of column heading tags (keywords) and row heading tags to help identify the beginning and end of each transaction. IIF File Naming: When you are exporting the data out of TimeLive, in preparation for the import into QuickBooks, the extension given to the file is important. QuickBooks is expecting the file extension to be "IIF" or "iif".
 : a. TimeLive Project Clients --> Quickbooks Customer b.")
173 When on the Export -- Time screen, one of the options is to supply the output filename. You can at this point provide the appropriate the file name with IIF extension. For example, an appropriate file name may look like: june_time.iif TimeLive --> Quickbooks Field Mapping (Time Entry Import) : a. TimeLive Project Clients --> Quickbooks Customer b. TimeLive Employee --> Quickbooks Employee c. TimeLive Billable Task Flag --> Quickbooks Billable Flag d. TimeLive Task Code --> Quickbooks Service Items Preparing Data for input into QuickBooks: The following steps may be followed to: Export Data from TimeLive in a Quickbooks ready format (IIF). Import the exported time data into Quickbooks. Define billing rates for [Items] in Quickbooks. Generate an Invoice in Quickbooks based on imported TimeLive Time data. Step 1: Export Data from TimeLive in a Quickbooks ready format The following steps may be followed to: Navigate to [Admin Options]-->[Import / Export CSV/Quickbooks] in [Import/Export] section. Select [Import/Export] type as "Export" Select [File Type] as "Quickbooks' Select [Data Source] as "Time Entry"


174 Define your data export start date and end date. Select your project whose time entries you want to export. Now click on [Proceed] button. Give some best name for your exported IIF file and note down your IIF file saved location. This is end of exporting time data to Quickbooks IIF File. Step 2: Import the exported time data into Quickbooks. The following steps may be followed to:

![..] Select your exported IIF File](/docs-images/84/89281295/images/175-1.jpg "in File open dialog box and then")
175 Launch Quickbooks Open [File]-->[Import]-->[IIF Files...] Select your exported IIF File in File open dialog box and then click on [Open].

![Open [Customers]-->[Item List] in Quickbooks.](/docs-images/84/89281295/images/176-1.jpg "Double click on all imported [Items] and define their [Account] and [Rate]")
176 Quickbooks will show completed messaged after import. Step 3: Define billing rates for [Items] in Quickbooks. Open [Customers]-->[Item List] in Quickbooks. Double click on all imported [Items] and define their [Account] and [Rate] Define item's [Billing Rate] and [Account] in Quickbooks. Click on [OK] when done.

![[Customers]-->[Create Invoices] in Quickbooks.](/docs-images/84/89281295/images/177-1.jpg "Select your customer whose Invoice you want to create in [Customer:Job] dropdown.")
177 Define billing rate and Account of all TimeLive imported items. Step 4: Generate an Invoice in Quickbooks based on imported TimeLive Time data Open [Customers]-->[Create Invoices] in Quickbooks. Select your customer whose Invoice you want to create in [Customer:Job] dropdown. Quickbooks will prompt for importing all pending time and cost items.
![Click on [OK] to import all outstanding billable time and cost](/docs-images/84/89281295/images/178-0.jpg "in Quickbooks Invoice.")

178 Click on [OK] to import all outstanding billable time and cost in Quickbooks Invoice. Quickbooks now show all outstanding billing items. Just click on [Select All] to select all time entries. Click on [OK] to import all selected time records in Quickbooks.

179 Quickbooks will import all time records in Customer Invoice. Accountant can then proceed this invoice as per their own defined organization policies. QuickBooks Online Integration TimeLive Hosted Account can easily be integrated with QuickBooks online. To Integrate TimeLive with QuickBooks, Administrator must have existing TimeLive Hosted Account and QuickBooks Intuit Account. Setup: Setting up TimeLive require few simple steps. which are mentioned below, 1. Login to TimeLive Hosted Account.


180 2. Navigate to Admin Options -- QuickBooks Online Integration

181 3. Click on "Connect to QuickBooks" Button 4. Login to QuickBooks Intuit Account 5. Click Authorize Button to Integrate both TimeLive and QuickBooks Account


182 Now, you are able to Import/Export your data between both accounts. Administrator can export Time Entries of Specific Employee to QuickBooks with Date Range. See below image.

183 During Import, Administrator can select option of Job / Sub-Job or Item / Sub-Item

184 Configuring Active Directory Authentication You can configure TimeLive to authenticate the requester login with the active directory (AD). This provides you an advantage of not having to remember too many passwords. For this, you should configure AD authentication, then any password change that is made in the AD will also reflect in TimeLive. So the requesters can login using the login name and password of the system. TimeLive Active Directory integration concepts: TimeLive supports two types of active directory authentication.
185 1. First option is automated way through which user will be automatically add as employee in TimeLive, if that particular user is member of corresponding mapped group in Active Directory. Using role management in admin options, you can configure TimeLive role mapping with Active Directory group. User will automatically assigned in that role in TimeLive if he is member of corresponding group member in active directory. For example, if an employee is member of TimeLive User group in [Active Directory], he will be automatically add as employee in timelive on first login with [User] role in TimeLive. By default, TimeLive come with two TimeLive roles with their active directory corresponding roles mapping. You can define your AD Group in TimeLive Roles management page. 1. AD Group [TimeLiveAdministrator] --> map to TimeLive [Administrator] role. 2. AD Group [TimeLiveUser] --> map to TimeLive [User] role. 2. Second way is to add all your employee manually in TimeLive. Administrator can define active directory username of employees during new employee creation. After adding employee with their active directory username, they can login in TimeLive using their active directory username and password. Step by step: Active Directory integration: TimeLive active directory integration required setup on two places. One is in active directory and second is defining server parameters in system configuration pages. Step1: Changes required in Active Directory: Here are the steps which are required to be done on active directory side. 1. IT Administrator should decide first, exactly which Active Directory username will work as TimeLive Administrator. In this help section, we have assume one AD user with username [LivetecsIT] 2. Create a new [TimeLive Service User]. TimeLive APIs will use this username and password to communicate to Active Directory. Create a service user with name "timeliveserviceuser".

![never expires] should be checked and [User](/docs-images/84/89281295/images/186-1.jpg "must change password at next logon] should")
186 3. Define some password for "TimeLive Service User" and make sure that [Password never expires] should be checked and [User must change password at next logon] should be unchecked.
![4. Create a new security group [TimeLiveAdministrator] in Active Directory. 5.](/docs-images/84/89281295/images/187-0.jpg "Now assign your user which you want to work as TimeLive Administrator, in [TimeLiveAdministrator] group. This user will become [Administrator] in TimeLive.")
187 4. Create a new security group [TimeLiveAdministrator] in Active Directory. 5. Now assign your user which you want to work as TimeLive Administrator, in [TimeLiveAdministrator] group. This user will become [Administrator] in TimeLive. Make sure that this user should have [First Name], [Last Name] and [ Address] information are filled in Active Directory.

188 Step 2: Changes required in TimeLive: 1. On first time execution, after database setup, TimeLive first open [Account Add] page where user can enter their organization and administrator user information. Do not fill this form if you are going to setup on [Active Directory] integration. 2. Open [System Configuration] page ( where you can define system level parameters like active directory integration, database connectionstring and smtp server. [More about system setting page] 3. Select [Active Directory Authentication] checkbox to select your authentication mode as Active Directory. 4. Enter "LDAP://YourServerName" in [Active Directory Connection String]. Yourservername should be replaced with physical server name where Active directory is installed. Please see below screenshots to get an exact idea of which value will appear where.
![5. Enter domain name in [Active Directory Domain Name] field. Domain name should be pre-windows 2000 server name instead of actual domain name. 6.](/docs-images/84/89281295/images/189-0.jpg "Enter your [TimeLive Service User] username in [Active Directory Username] field. Username should be in exact same case which is in Active Directory.")
189 5. Enter domain name in [Active Directory Domain Name] field. Domain name should be pre-windows 2000 server name instead of actual domain name. 6. Enter your [TimeLive Service User] username in [Active Directory Username] field. Username should be in exact same case which is in Active Directory. Make sure that your (pre-windows 2000) username and your actual user name are same. 7. Enter [TimeLive Service User] user's password in [Active Directory Password] field. 8. Click on [Update] to update these changes.

190 9. After update, TimeLive will open new account add page. 10. Enter your organization information in top portion. 11. Enter [TimeLive Administrator username] which you earlier assigned in [TimeLiveAdministrator] group in Active Directory. TimeLive will automatically populate FirstName, LastName and address from Active Directory. 12. Enter Active Directory password and verify password of [TimeLive Administrator user]. This should be active directory password of TimeLive administrator user. 13. Enter First Name, Middle Name and Last Name. 14. Click on [Signup] to complete Active directory integration steps. 15. This administrator can now sign-in in TimeLive using his [TimeLive Admin] (LivetecsIT in above case) active directory username and password. 16. Now administrator can add other employees using [Administration]-->[Employees] option by specifying AD user name in [User name] field. 17. New employee will be automatically add if they are member AD Group whose mapping is defined with TimeLive roles. Note: Migrating from standard authentication to Active Directory authentication:
191 1. In case, if Active Directory is being setup for switching from already setup standard authentication to Active Directory authentication, system will redirect to login page directly instead of account add page. Administrator can login with TimeLive admin user created using instructions mentioned above. 2. Just make sure that address of TimeLiveAdministrator user should not be already defined to some other user. 3. This administrator can now login in TimeLive using his [TimeLive Admin] (LivetecsIT in above case) active directory username and password. 4. After login, administrator should edit every employee which are already defined in TimeLive and change value of "username" field from their address to Active Directory login id. 5. After having Active Directory login id in username field in employee form, employee then will be able to login using their Active Directory username and Active Directory password with their data, which they already have in TimeLive. Active Directory authentication with TimeLive On-Cloud TimeLive supports single sign-on (SSO) logins through SAML 2.0/W-Federation if you're on the Professional or Enterprise plans. A SAML 2.0/W-Federation identity provider (IDP) can take many forms, one of which is a self-hosted Active Directory Federation Services (ADFS) server. ADFS is a service provided by Microsoft as a standard role for Windows Server that provides a web login using existing Active Directory credentials. Requirements To use ADFS to log in to your TimeLive instance, you need the following components: o o o o o An Active Directory instance where all users have an address attribute. A TimeLive instance with Hosted plans. A server running Microsoft Server 2012 or This guide uses screenshots from Server 2012R2, but similar steps should be possible on other versions. A SSL certificate to sign your ADFS login page and the fingerprint for that certificate. If you're using host mapping in your TimeLive instance, an installed certificate for hosted SSL. After you meet these basic requirements, you need to install ADFS on your server. Configuring and installing ADFS is beyond the scope of this guide, but is detailed in a Microsoft KB article. When you have a fully installed ADFS installation, note down the value for the 'SAML 2.0/W- Federation' URL in the ADFS Endpoints section. If you chose the defaults for the installation, this will be '/adfs/ls/'. Step 1 - Adding a Relying Party Trust At this point you should be ready to set up the ADFS connection with your TimeLive instance. The connection between ADFS and TimeLive is defined using a Relying Party Trust (RPT). Select the Relying Party Trusts folder from AD FS Management, and add a new Standard Relying Party Trust from the Actions sidebar. This starts the configuration wizard for a new trust.

192 1. In the Select Data Source screen, select the last option, Enter Data About the Party Manually.

193 2. On the next screen, enter a Display name that you'll recognize in the future, and any notes you want to make.

194 3. On the next screen, select the ADFS FS profile radio button.

195 4. On the next screen, leave the certificate settings at their defaults.

196 5. On the next screen, check the box labeled Enable Support for the WS-Federation Passive Protocol. The service URL will be replacing {subdomain} with your TimeLive's subdomain. Note that there's no trailing slash at the end of the URL.


197 6. On the next screen, add a Relying party trust identifier of subdomain.livetecs.com, replacing subdomain with your TimeLive subdomain.

198 7. On the next screen, you may configure multi-factor authentication but this is beyond the scope of this guide. 8. On the next screen, select the Permit all users to access this relying party radio button.

199 9. On the next two screens, the wizard will display an overview of your settings. On the final screen use the Close button to exit and open the Claim Rules editor.

200 Step 2 - Creating claim rules Once the relying party trust has been created, you can create the claim rules and update the RPT with minor changes that aren't set by the wizard. By default the claim rule editor opens once you created the trust. If you want to map additional values beyond authentication

201 1. To create a new rule, click on Add Rule. Create a Send LDAP Attributes as Claims rule.

202 2. On the next screen, using Active Directory as your attribute store, do the following: 1. In 1st row, under the LDAP Attribute column and Outgoing Claim Type, select Addresses from Drop-down list. 2. In 2nd row, select Given-Name from Drop-down list. 3. In 3rd row, select Surname from Drop-down list.

203 4. Click on Finish to save the new rule. You still need to adjust a few settings on your relying party trust. To access these settings, select Properties from the Actions sidebar while you have the RPT selected. In the Advanced tab, switch from SHA-1 to SHA-256 and click OK.
 2. Last Name is Surname (Mandatory) 3.")
204 Step 3 - Configuring User settings with LDAP In Active Directory, User attributes should be identical to LDAP Attributes, 1. First Name is Given-Name (Mandatory) 2. Last Name is Surname (Mandatory) 3. is -Address (Mandatory)


205 Step 4 - Configuring TimeLive After setting up ADFS, you need to configure your TimeLive instance to authenticate using SAML. You'll use your full ADFS server URL with the SAML endpoint as the SSO URL, and the login endpoint you created as the logout URL. After you're done, the Security page in the TimeLive admin interface (Admin Options > Preferences > Security) should look like this: You need to provide SAML SSO URL Here. You should now have a working ADFS SSO implementation for your TimeLive.

206 LDAP Integration with TimeLive What is LDAP how to use it: LDAP directory service is based on a client-server model. One or more LDAP servers contain the data making up the LDAP directory tree or LDAP backend database. An LDAP client connects to an LDAP server and asks it a question. The server responds with the answer, or with a pointer to where the client can get more information (typically, another LDAP server). No matter what LDAP server a client connects to, it sees the same view of the directory; a name presented to one LDAP server references the same entry it would at another LDAP server. This is an important feature of a global directory service, like LDAP. Configuring LDAP Authentication You can configure TimeLive to authenticate the requester login with the LDAP. This provides you an advantage of not having to remember too many passwords. For this, you should configure LDAP authentication, then any password change that is made in the LDAP will also reflect in TimeLive. So the requesters can login using the login name and password of the system. LDAP Host must be specified exactly the same as Server Name or IP used in LDAP configuration (As shown in above picture) as well as fill LDAP Port with same port used in LDAP configuration and LDAP Base DN should match with Base DN of LDAP configuration. After giving same LDAP username and password, Click update. LDAP Integration is now configured with TimeLive Account. LDAP users can also now login with there already assigned user names and passwords.
207
208
209 Mobile Apps Introduction to TimeLive Mobile App. With the advancement of technology and increase in the use of mobile phones, everyone is looking for ways they can bring the business in their hands. Many of the tasks were performed but building the timesheet for the projects was very difficult. If one is unable to complete the job in the official hours then the maintenance of the extra hours worked outside the office hours was not possible. TimeLive facilitate Timesheet mobile application to overcome this problem and to give the freedom of managing timesheet wherever an employee is. Time tracking using TimeLive Mobile App. Timesheet gives the opportunity to track the time against the projects and Tasks. The updates in the records are circulated in the complete circle of the team involved in the project and notification through the is also sent. Before TimeLive, it was very difficult to coordinate with other members of the project and a rapid change was witnessed with the introduction of the application. Now the timesheet can be updated and managed anywhere by using the mobile application. Download TimeLive Mobile Time Tracking For Android & iphone Capture your time against your clients, projects, and tasks while on the go. 1. Empower employees to work seamlessly across all devices desktop, tablet, and smartphone. 2. Allows your field staff to enter time against jobs that have been assigned to them. 3. Timesheets are updated automatically in TimeLive web and assigned to their associated jobs. 4. Timesheet comments as easy as in the web browser. 5. Easily enter time against the selected projects, tasks and activities. 6. Enter data just once and it reflects on all devices and web timesheet. The application requires downloading (Android / IOS), once done it is connected with the account, and any changing in the entries and records are automatically updated on the account. Then from whichever device the employee login, the updated information. Setup: After the installation of TimeLive App on your mobile, please launch Mobile App and go to Settings (ICON) before attempting to login.

210 Under Settings, Change URL to and change ID, masked characters with your Login Credentials. You can Test Connection for credentials confirmation. Save Settings after Test confirmation. TimeLive Android App Entries: After the successful login to TimeLive App, user will be prompt with 3 options, as shown below.

211 Timesheet Entries: User can easily make time entries and submit Timesheets from mobile.
212 To make new TimeEntry, user need to click Timesheet from Menu and click on "+" Sign. 1. Select Date on first row 2. Select Project from 2nd row Drop-Down 3. Select Task From 3rd row Drop-Down 4. Select Time from analog screen clock
213 5. After filling the last description field, click "Save" button Expense Entries: User can easily input & submit Expense entry from their mobiles. To make new Expense Entry, user need to click Expenses from Menu and click on "+". 1. Select Project from first Drop-Down 2. Select Expense Type from 2nd Drop-Down 3. Fill the Expense Description 4. Select the Expense Date 5. Select the option of Reimburse and Billable 6. Select Mode of Payment from Drop-Down 7. Select Currency in which payment was made 8. Input Amount spent in the next row 9. Extra charges/taxes will be calculated automatically according to expense se parameters 10. After filling the last field, click "Save" Button To submit saved Expense Entry, user need to click on Expense sheet and click Submit Expense Sheet.

214 Timesheet Entries: After the successful login to TimeLive App, user will be prompt with 5 options, as shown below.
215 User can easily input/submit Timesheet & Expense entry from their mobiles. To make new TimeEntry user need to click on "+" Sign under Timesheet. 1. Select Date on first row 2. Select Project from 2nd row Drop-Down 3. Select Task From 3rd row Drop-Down

216 4. Select Time from analog screen clock 5. After filling the last description field, click "Save" button Expense Entries: User can easily input & submit Expense entry from their mobiles. To make new Expense Entry, user need to click Expenses from Menu and click on "+". 1. Select Project from first Drop-Down 2. Select Expense Type from 2nd Drop-Down 3. Fill the Expense Description 4. Select the Expense Date 5. Select the option of Reimburse and Billable 6. Select Mode of Payment from Drop-Down 7. Select Currency in which payment was made 8. Input Amount spent in the next row 9. Extra charges/taxes will be calculated automatically according to expense se parameters 10. After filling the last field, click "Save" Button To submit saved Expense Entry, user need to click on Expense sheet and click Submit Expense Sheet.


217 Timesheet & Expense Approval: User can Approve / Reject Timesheet / Expense of his subordinates from mobile. To do that user needs to click Timesheet / Expense Approval from Main Menu, and click on Approve / Reject after check box selection. Approver can select multiple Timesheets / Expense at a time for Approval / Rejection.
218
219 F.A.Q. Disabling Pop-Up Blockers To ensure full functionality of the application, you should disable pop-up blockers for the TimeLive website. To allow pop-ups for TimeLive website: Microsoft Internet Explorer: a. Select Tools > Pop-up Blocker > Pop-up Blocker Settings. b. Enter the TimeLive URL in the field provided. c. Select the Add button, and then the Close button, and then the OK button. Mozilla Firefox: a. Select Tools > Options. b. Select the Content icon. c. Select the Exceptions button next to the Block pop-up windows check box. d. Enter the TimeLive URL in the field provided. e. Select the Allow button, and then the Close button, and then the OK button Other pop-up blocking application Refer to that application s documentation for information on how to disable pop-up blocking for a specific site. Settings required on Internet Explorer 7 Because of recent security changes in Internet Explorer 7, these settings are required for exporting reports in IE7. Instructions required to be done in IE7: From the [Tools] menu - top right on IE7 - select [Internet Options]. Select the [Security] Tab. Select the [Internet Zone] (click the globe on the left). Hit [Custom Level] button (bottom of dialogue box) Scroll down to the [Downloads] section and find the [Automatic prompting -for file downloads] setting and set it to [Enable], then click on [OK].

220 Frequently Logout Issue By Users SYMPTOMS: TimeLive user's can experience frequently logout. CAUSE: There are many possible causes for this problem. This article addresses one possible cause: session data that is lost because of antivirus software activity. This problem can occur when antivirus software scans the Web application files. During the scanning process, the antivirus software may mark the Global.asax, the Web.config, and/or the Machine.config files as modified. This modification prompts the Microsoft.NET Framework restart the Web application. If the session data is stored in-process, all session data is lost whenever a Web application is restarted. RESOLUTION: To resolve this problem, use following method: Configure your antivirus software so that it does not scan.asax and.config files.
Web TimeSheet INSTALLATION GUIDE. Version 8.9. Project & Billing Edition Time & Attendance Edition
 Web TimeSheet Version 8.9 Project & Billing Edition Time & Attendance Edition INSTALLATION GUIDE Notices 2008-2009 Replicon, Inc. All rights reserved. All parts of this document are the property of Replicon,
Version /2/2017. Offline User Guide
 Version 3.3 11/2/2017 Copyright 2013, 2018, Oracle and/or its affiliates. All rights reserved. This software and related documentation are provided under a license agreement containing restrictions on
Web TimeSheet Integration Manager for Microsoft Project Server. Version 2.6 USER GUIDE
 Web TimeSheet Integration Manager for Microsoft Project Server Version 2.6 USER GUIDE Notices 2004-2006 Replicon, Inc. All rights reserved. All parts of this manual are the property of Replicon Inc. No
ACD MIS Supervisor Manual
 Notice Note that when converting this document from its original format to a.pdf file, some minor font and format changes may occur. When viewing and printing this document, we cannot guarantee that your
1 P age Copyright Lookout Software, LLC.
 1 P age Copyright 2003 2008. Lookout Software, LLC. Contents What is the Office Timesheets Quick Start Guide?... 4 Office Timesheets Overview... 4 Hosted vs. Self Installed... 5 Hosted Version: Office
ACD MIS SUPERVISOR S GUIDE
 Notice Note that when converting this document from its original format to a.pdf file, some minor font and format changes may occur. When viewing and printing this document, we cannot guarantee that your
Enterprise Call Recorder
 Enterprise Call Recorder Installation and Setup Guide Algo ECR Version 2.3 Document #:ECR-SV-02 sales@algosolutions.com support@algosolutions.com www.algosolutions.com About this Manual This User Guide
Deltek Touch Time & Expense for GovCon 1.2. User Guide
 Deltek Touch Time & Expense for GovCon 1.2 User Guide May 19, 2014 While Deltek has attempted to verify that the information in this document is accurate and complete, some typographical or technical errors
Mobile for Android User Guide
 Version 1.7 Copyright 2013, 2017, Oracle and/or its affiliates. All rights reserved. This software and related documentation are provided under a license agreement containing restrictions on use and disclosure
, Pacific Timesheet. Timesheet Help.
 Timesheet Help www.pacifictimesheet.com p1 Table of Contents Introduction 4 System Requirements 5 Setup Quick Start 7 Home 10 Change Password 11 My Account 12 Preferences 13 Announcements 15 My Timesheet
System and Server Requirements
 System and Server Requirements January 2019 For GreeneStep ERP, CRM, Ecommerce, Customer/Supplier Collaboration, Management Dashboards and Web Access Products Suite ON-PREMISE DEPLOYMENT MODEL & HOSTED
ACTAtek Timesheet User Manual
 ACTAtek Timesheet User Manual Version 1.1 30 October 2008 ACTAtek UK Limited Revision History Revision Date Description Author 1.0 7 July 2008 Initial Release Nicola 1.1 16 October 2008 Sage Integration
Deltek Touch Time & Expense for Vision. User Guide
 Deltek Touch Time & Expense for Vision User Guide September 2017 While Deltek has attempted to verify that the information in this document is accurate and complete, some typographical or technical errors
BlackBerry User Guide
 Version 1.0 Copyright 2013, 2017, Oracle and/or its affiliates. All rights reserved. This software and related documentation are provided under a license agreement containing restrictions on use and disclosure
, Pacific Timesheet. Timesheet Help.
 Timesheet Help www.pacifictimesheet.com p1 Table of Contents Introduction 5 System Requirements 6 Setup Quick Start 8 Home 11 Change Password 12 My Account 13 Preferences 14 Announcements 16 My Timesheet
Allied Telesis AlliedView NMS System 12.1 SP1 Installation Guide Issue 2
 Allied Telesis AlliedView NMS System 12.1 SP1 Installation Guide Issue 2 Copyright 2010 Allied Telesis, Inc. All rights reserved Information in this document is subject to change without notice 613-001543
Sage 300 ERP Sage CRM 7.2 Integration Guide
 Sage 300 ERP 2012 Sage CRM 7.2 Integration Guide This is a publication of Sage Software, Inc. Version 2012 Copyright 2013. Sage Software, Inc. All rights reserved. Sage, the Sage logos, and the Sage product
Technical Information SupplyCare Enterprise SCE30B
 TI01228S/00/EN/02.16 71328492 Products Solutions Services Technical Information SupplyCare Enterprise SCE30B Enterprise inventory management platform for transparent information within the supply chain
TimeClock User s Guide
 TimeClock User s Guide Publication No. EL1016 Publication Date: August 2003 This manual contains reference information about software products from Activant Solutions Inc. The software described in this
Copyright...5. Acumatica ERP and Acumatica Framework Installation Guide...6. System Requirements for Acumatica ERP 2017 R2... 7
 Contents 2 Contents Copyright...5 Acumatica ERP and Acumatica Framework Installation Guide...6 System Requirements for Acumatica ERP 2017 R... 7 System Requirements for Acumatica Framework 2017 R... 10
Deltek Touch for Maconomy. Touch 2.2 User Guide
 Deltek Touch for Maconomy Touch 2.2 User Guide July 2017 While Deltek has attempted to verify that the information in this document is accurate and complete, some typographical or technical errors may
, Pacific Timesheet. Timesheet Help.
 Timesheet Help www.pacifictimesheet.com p1 Table of Contents Introduction 5 System Requirements 6 Setup Quick Start 8 Home 11 Change Password 12 My Account 13 Preferences 14 Announcements 16 My Timesheet
MYOB MYSTAFFINFO Release Notes EXO EMPLOYER SERVICES MYOB ENTERPRISE SOLUTIONS
 MYOB MYSTAFFINFO 2012.03 Release Notes EXO EMPLOYER SERVICES MYOB ENTERPRISE SOLUTIONS Important Notices This material is copyright. It is intended only for MYOB Enterprise Solutions Business Partners
Sage HRMS 2014 Sage Employee Self Service Installation and Setup Guide. October 2013
 Sage HRMS 2014 Sage Employee Self Service Installation and Setup Guide October 2013 This is a publication of Sage Software, Inc. Document version: October 17, 2013 Copyright 2013. Sage Software, Inc. All
SAP Business One Administrator's Guide
 Administrator's Guide SAP Business One 9.0 PL04 Document Version: 1.0 2013-04-03 All Countries Typographic Conventions Type Style Example Description Words or characters quoted from the screen. These include
Sage HRMS 2014 Sage Employee Self Service. Installation and Setup Guide. October has been retired. This version of the software
 Sage HRMS 2014 Sage Employee Self Service Installation and Setup Guide October 2013 This version of the software has been retired This is a publication of Sage Software, Inc. Document version: April 17,
CHAPTER 3: REQUIREMENT ANALYSIS
 CHAPTER 3: REQUIREMENT ANALYSIS 3.1 Requirements Gathering At the start of the project, the travel management process handled by the admin department was studied in detail by using the basic requirement
Microsoft Dynamics GP. Personal Data Keeper
 Microsoft Dynamics GP Personal Data Keeper Copyright Copyright 2010 Microsoft. All rights reserved. Limitation of liability This document is provided as-is. Information and views expressed in this document,
Contents OVERVIEW... 3
 Contents OVERVIEW... 3 Feature Summary... 3 CONFIGURATION... 4 System Requirements... 4 ConnectWise Manage Configuration... 4 Configuration of Manage Login... 4 Configuration of GL Accounts... 5 Configuration
Sage 300 ERP Sage CRM 7.1 Integration Upgrade Guide
 Sage 300 ERP 2012 Sage CRM 7.1 Integration Upgrade Guide This is a publication of Sage Software, Inc. Version 2012 Copyright 2012. Sage Software, Inc. All rights reserved. Sage, the Sage logos, and the
Table of Contents. HVAC Remote Manual 2010
 Table of Contents Installation and Upgrades Download of Remote Technician Program Installation of Remote Technician Program Update of Remote Technician Program Using the Update Program Getting Started
FAQs. Introductory. Q. What is Proteus MMX?
 FAQs Introductory Q. What is Proteus MMX? Proteus MMX, a web-based Computerized Maintenance Management System, is a cost effective tool for Facility and Enterprise Asset Management. It reduces costs by
Sage ERP Accpac Online 5.6
 Sage ERP Accpac Online 5.6 Integration Resource Guide for Sage ERP Accpac And Sage CRM (Updated: December 1, 2010) Thank you for choosing Sage ERP Accpac Online. This Resource Guide will provide important
Visual BI Extensions for SAP BusinessObjects Design Studio (VBX) - Installation Guide -
 - Installation Guide -") Visual BI Extensions for SAP BusinessObjects Design Studio (VBX) - Installation Guide - 1 Copyright 3 1.1 Trademark Information 3 1.2 Patent Information 3 1.3 SAP Trademarks 3 2 Introduction 4 2.1 Who
Visual BI Extensions for SAP BusinessObjects Design Studio (VBX) - Installation Guide - 1 Copyright 3 1.1 Trademark Information 3 1.2 Patent Information 3 1.3 SAP Trademarks 3 2 Introduction 4 2.1 Who
Oracle SCM Cloud. Release 11. Getting Started with Your Manufacturing and Supply Chain Management Implementation O C T O B E R
 Oracle SCM Cloud Getting Started with Your Manufacturing and Supply Chain Management Implementation Release 11 O C T O B E R 2 0 1 6 Contents Title and Copyright Information Preface Oracle Applications
Visual BI Extensions for SAP BusinessObjects Design Studio (VBX) - Installation Guide -
 - Installation Guide -") Visual BI Extensions for SAP BusinessObjects Design Studio (VBX) - Installation Guide - 1 Copyright 3 1.1 Trademark Information 3 1.2 Patent Information 3 1.3 SAP Trademarks 3 2 Introduction 4 2.1 Who
Visual BI Extensions for SAP BusinessObjects Design Studio (VBX) - Installation Guide - 1 Copyright 3 1.1 Trademark Information 3 1.2 Patent Information 3 1.3 SAP Trademarks 3 2 Introduction 4 2.1 Who
Contents OVERVIEW... 3 CONFIGURATION... 4
 Contents OVERVIEW... 3 Feature Summary... 3 CONFIGURATION... 4 System Requirements... 4 ConnectWise Manage Configuration... 4 Configuration of Manage Login... 4 Configuration of GL Accounts... 5 Configuration
Welcome to the course on the initial configuration process of the Intercompany Integration solution.
 Welcome to the course on the initial configuration process of the Intercompany Integration solution. In this course, you will see how to: Follow the process of initializing the branch, head office and
Universal Time Clock TM. QuickBooks Plug-in User Guide
 Universal Time Clock TM QuickBooks Plug-in User Guide Table of Contents Table of Contents...2 Chapter 1: Getting Started...3 Support and Troubleshooting... 3 System Requirements... 3 Installing the QuickBooks
Inspector
 Process inspection and analysis software for use with the SKF MARLIN data manager Inspector is a key module in a family of reliability software applications that work together as Monitoring Suite. Enterprise
New World Technologies, Inc Invoice Importer
 New World Technologies, Inc Invoice Importer The Invoice Importer is a tool that allows users of QuickBooks Pro, Premier, Accountant's and Enterprise editions 2010 or greater to import Invoices, Sales
Sage Simply Accounting. Getting Started Guide First Step
 Sage Simply Accounting Getting Started Guide 2012 First Step Sage Simply Accounting Getting Started Guide First Step 2012 Getting Started... 1 Setting Up Your Company... 3 Setting Up Customers and Vendors...
Oracle s Hyperion System 9 Strategic Finance
 Oracle s Hyperion System 9 Strategic Finance June 2007 Light Use... 3 Heavy Use... 3 Client Machine... 3 Server Machine... 3 Client Machine... 3 Server Machine... 3 Data Integration... 3 The Hyperion System
Web TimeSheet Release Notes Version 8.10
 Web TimeSheet Release Notes Version 8.10 Welcome to Version 8.10 of Web TimeSheet. These release notes provide information on: Features and enhancements new to this version How Web TimeSheet data will
Contents OVERVIEW... 3
 Contents OVERVIEW... 3 Feature Summary... 3 CONFIGURATION... 4 System Requirements... 4 ConnectWise Manage Configuration... 4 Configuration of a ConnectWise Manage Login... 4 Configuration of GL Accounts...
QuickBooks Simple Start offers the most basic feature set and the simplest navigation and terminology. Simple Start is designed for businesses that:
 The QuickBooks 2008 Product Line The non-industry specific QuickBooks product line includes three separate software product editions: QuickBooks Simple Start, QuickBooks Pro, and QuickBooks Premier. QuickBooks
Dovico Planning & Timesheet v4 BEST PRACTICES
 Dovico Planning & Timesheet v4 Dovico Planning & Timesheet v4 Audience and Context This document is intended to help clients plan the configuration and use of Dovico Planning & Timesheet. It is to be used
ConnectWise-Sage 50 Accounts User Guide
 ConnectWiseSupport@mobiusworks.com www.mobiusworks.com ConnectWise-Sage 50 Accounts Version 3.0.0.7 September 11, 2015 Table of Contents Table of Contents... 2 INSTALLATION AND CONFIGURATION... 4 Introduction...
RELEASE NOTES. Practice Management. Version 11
 RELEASE NOTES Practice Management Version 11 Author Created and Published by Reckon Limited Level 7, 65 Berry Street North Sydney NSW 2060 Australia ACN 003 348 730 All Rights Reserved Copyright 2015 Reckon
Web TimeSheet Integration Manager for Microsoft Project Standard/Professional. Version 4.2 USER GUIDE
 Web TimeSheet Integration Manager for Microsoft Project Standard/Professional Version 4.2 USER GUIDE Notices 2004-2008 Replicon, Inc. All rights reserved. All parts of this document are the property of
This topic focuses on how to prepare a customer for support, and how to use the SAP support processes to solve your customer s problems.
 This topic focuses on how to prepare a customer for support, and how to use the SAP support processes to solve your customer s problems. 1 On completion of this topic, you will be able to: Explain the
USER MANUAL. MageMob Admin TABLE OF CONTENTS. Version: 1.0.1
 USER MANUAL TABLE OF CONTENTS Introduction...1 Benefits of MageMob Admin...1 Installation & Activation...2 Pre-requisite...2 Installation Steps...2 Extension Activation...3 How it Works?...4 Back End Configuration...4
IMonitorEAM Installation Manual
 IMonitorEAM Installation Manual Thank you for using IMonitor EAM the advanced employees monitoring solution. IMonitor EAM version 5.3 Date Updated: 2011 08 25 IMonitor EAM Installation: First, extract
INTRODUCTION... 1 DCAA REQUIREMENTS... 2 COMPLIANCE SETUP...
 Contents INTRODUCTION... 1 DCAA REQUIREMENTS... 2 COMPLIANCE SETUP... 5 GLOBAL SETTINGS... 6 SECURITY... 8 COMPANY PROFILE... 11 EMPLOYEE PROFILE... 13 USER PREFERENCES... 14 BILLQUICK AGENT... 15 ACTIVITY
IBM Cognos Series 7 to PowerPlay for IBM Cognos 8 Migration Installation and Configuration Checklist
 Guideline IBM Cognos Series 7 to PowerPlay for IBM Cognos 8 Migration Installation and Configuration Checklist Product(s): Cognos 8, Series 7 Migration Area of Interest: Infrastructure 2 Copyright Copyright
Copyright Basware Corporation. All rights reserved.. Vendor Portal User Guide Basware P2P 17.3
 Copyright 1999-2017 Basware Corporation. All rights reserved.. Vendor Portal User Guide Basware P2P 17.3 Table of Contents 1 Vendor Portal Registration... 4 1.1 Register for Vendor Portal...4 2 Vendor
Oracle Fusion Applications
 Oracle Fusion Applications Reporting and Analytics Handbook Release 11.1.6 E41684-01 August 2013 Explains how to use Oracle Fusion Applications to perform current state analysis of business applications.
What s New in Cityworks 2014 SP1
 1 What s New in Cityworks 2014 SP1 Server AMS Server PLL Web Services Designer Storeroom Mobile Other Server AMS Item 5276: Contract and Contractor fields have been added to work order search results.
On-Demand Solution Planning Guide
 On-Demand Solution Planning Guide Powering On-Demand Solutions www.growthclick.com hello@growthclick.com Copyright 2019 GrowthClick Inc. All Rights Reserved. 1 3 Steps to Planning an On-Demand Solution
2005 National Information Services - QuickBill for Easy Dental version 3.0. QuickBill. for Easy Dental. Version 3.0
 QuickBill for Easy Dental Version 3.0 727 E. Utah Valley Dr., Ste. 750 American Fork, UT 84003 Tel: (800) 734-5561 Fax: (801) 847-3800 1 SEPTEMBER 2005 COPYRIGHT 2005 Easy Dental Systems, Inc. and National
TMW Systems, Inc. TMW 3GTMS Integration Service Installation Guide
 TMW Systems, Inc. TMW 3GTMS Integration Service Installation Guide Contact Information TMW Systems, Inc. 6085 Parkland Boulevard Mayfield Heights, Ohio 44124 U.S.A. www.tmwsystems.com Copyright and Trademarks
Financial Services Cloud Installation Guide
 Financial Services Cloud Installation Guide Salesforce, Spring 18 @salesforcedocs Last updated: April 18, 2018 Copyright 2000 2018 salesforce.com, inc. All rights reserved. Salesforce is a registered trademark
Financial Services Cloud Installation Guide
 Financial Services Cloud Installation Guide Salesforce, Spring 18 @salesforcedocs Last updated: April 26, 2018 Copyright 2000 2018 salesforce.com, inc. All rights reserved. Salesforce is a registered trademark
Deltek Vision 6.2 SP1. Custom Reports and Microsoft SQL Server Reporting Services
 Deltek Vision 6.2 SP1 Custom Reports and Microsoft SQL Server Reporting March 30, 2012 While Deltek has attempted to verify that the information in this document is accurate and complete, some typographical
Invoices 3.3 User Guide
 ! Invoices 3.3 User Guide We Make Software - Ecleti.com Invoices 2007-2018 Ecleti - Roberto Panetta all rights reserved Every effort has been made to ensure that the information in this manual is accurate.
QA software. Timesheet Management System USER GUIDE
 QA software Timesheet Management System USER GUIDE 1997-2006 by QA Software Pty Ltd. All rights reserved. No part of this document may be reproduced or transmitted in any form of by any means, electronic
QuickBooks Integration Instructions for Attendance Rx
 Acroprint Time Recorder Company QuickBooks Integration Instructions for Attendance Rx Publication: ATRX-001 Date of Publication: February 18, 2005 Revision: B Introduction QuickBooks Integration from Attendance
One Identity Manager Help Desk Module User Guide
 One Identity Manager 8.0.1 Help Desk Module User Guide Copyright 2018 One Identity LLC. ALL RIGHTS RESERVED. This guide contains proprietary information protected by copyright. The software described in
DOVICO Timesheet v10 USER S GUIDE
 DOVICO Timesheet v10 USER S GUIDE DOVICO Software DOVICO is a company engaged in the business of developing, manufacturing and marketing high technology products dealing with the management of time. Mission
USER MANUAL. MageMob Inventory TABLE OF CONTENTS. Version: 1.0.1
 USER MANUAL TABLE OF CONTENTS Introduction...1 Benefits of MageMob Inventory...1 Installation & Activation...2 Extension Activation...7 How it Works?...8 Back End Configuration...8 Points to Note... 37
Optus Business Corporate Usage Alerts
 Page 1 P a g e 1 Optus Business Corporate Usage Alerts Customer Admin Portal Administrator Guide February 2016 Version 1.2 Page 2 P a g e 2 Contents Contents... 2 Preface... 4 How This Guide Is Organised...
Web TimeSheet Release Notes Version 8.11
 Web TimeSheet Release Notes Version 8.11 Welcome to Version 8.11 of Web TimeSheet. These release notes provide information on: Features and enhancements new to this version How Web TimeSheet data will
System i Navigator family applications
 System i Navigator family applications Rodrigo Villalobos Manzo rodrigov@mx1.ibm.com 2008 IBM Corporation Agenda System i Navigator System i Navigator Tasks for the Web IBM Systems Director Navigator for
Oracle Enterprise Manager
 Oracle Enterprise Manager System Monitoring Plug-in for Oracle Enterprise Manager Ops Center Guide 12c Release 5 (12.1.0.5.0) E38529-08 April 2016 This document describes how to use the Infrastructure
IBM. Mobile Applications User s Guide. IBM Workload Automation. Version 9 Release 4
 IBM Workload Automation IBM Mobile Applications User s Guide Version 9 Release 4 IBM Workload Automation IBM Mobile Applications User s Guide Version 9 Release 4 Note Before using this information and
Productivity. PPS Cart: PulseNet Production Systems. Powerful Tools for Better Performance
 Productivity : PulseNet Production Systems Powerful Tools for Better Performance This page intentionally left blank. I Contents Introduction 1 What is 1 Using this Manual 1 System Setup 2 Open PPS Monitor
Oracle Hospitality Inventory Management Mobile Solutions. Installation and Configuration Guide
 Oracle Hospitality Inventory Management Mobile Solutions Installation and Configuration Guide Release 9.1 E97800-02 August 2018 Oracle Hospitality Inventory Management Mobile Solutions Installation and
We provide security on finger tips
 etimetrack Lite We provide security on finger tips Backend Database Support: Compatible OS: XP sp2, Win7, Win server 2000 or later essl Recommend Computer Configuration to run the etimetracklite Desktop.
This guide which is primarily intended for administrators and supervisors includes the following sections:
 Micro Focus Service Desk - Getting Started May 2017 The Micro Focus Service Desk Getting Started guide gives information about the basic steps that are required to quickly configure Micro Focus Service
AIMS Axcelasia Integrated Management System
 AIMS Axcelasia Integrated Management System Axcelasia Softnex Sdn Bhd AIMS.Net 1 Contents... Error! Bookmark not defined. System Requirement... 3 System Login... 4 Leave Application Management Module...
Supervisor User Guide
 Supervisor User Guide Clockwise by GHG Corporation Software Release: 7.5.3.9_#489 960 Clear Lake City Blvd Document By: Sarah Harmeyer Webster, Texas 77598 Published: September 2018 www.goclockwise.com
Company Profiles. Partner Profile. Promero, Inc
 Company Profiles Partner Profile Promero, Inc Founded in 2001 World s Largest ASP provider of Contact Center Anywhere call center solution and predictive dialer 22 Employees Coverage: Global 52 Call Center
IBM i Version 7.2. Systems management Advanced job scheduler IBM
 IBM i Version 7.2 Systems management Advanced job scheduler IBM IBM i Version 7.2 Systems management Advanced job scheduler IBM Note Before using this information and the product it supports, read the
advancing business remotely access the system streamline the workflow process manage use and track costs connect to external systems
 remotely access the system streamline the workflow process manage use and track costs connect to external systems SOFTWARE SOLUTIONS MANAGE SIMPLIFY CONNECT TRACK advancing business Essential solutions
IBM Configure Rational Insight for Rational Asset Manager
 IBM Configure Rational Insight 1.0.0.2 for Rational Asset Manager Rational Insight and Rational Asset Manager...3 Configure the XML data configuration for Rational Asset Manager...4 Configure the resource
One Identity Manager 8.0. Chargeback Administration Guide
 One Identity Manager 8.0 Chargeback Administration Guide Copyright 2017 One Identity LLC. ALL RIGHTS RESERVED. This guide contains proprietary information protected by copyright. The software described
Integrating IBM Cognos Planning into a SSL enabled Dispatcher
 Proven Practice Integrating IBM Cognos Planning into a SSL enabled Dispatcher Product(s): IBM Cognos Planning 8.4 Area of Interest: Infrastructure Integrating IBM Cognos Planning into a SSL enabled Dispatcher
Sage 200 CRM 2015 Implementation Guide
 Sage 200 CRM 2015 Implementation Guide Copyright statement Sage (UK) Limited and Sage Hibernia Limited, 2015. All rights reserved. If this documentation includes advice or information relating to any matter
INSIGHTS ENTERPRISE, POWERED BY INSIDEVIEW. Installation Guide
 INSIGHTS ENTERPRISE, POWERED BY INSIDEVIEW Installation Guide MARCH, 2017 Table of Contents Chapter 1: Introduction to Insights Enterprise, powered by InsideView...2 What s New in this Release?... 3 Chapter
INSIGHTS ENTERPRISE, POWERED BY INSIDEVIEW. Installation Guide
 INSIGHTS ENTERPRISE, POWERED BY INSIDEVIEW Installation Guide MARCH, 2017 Table of Contents Chapter 1: Introduction to Insights Enterprise, powered by InsideView...2 What s New in this Release?... 3 Chapter
The number of licences available for the company to assign is indicated at the bottom of this page.
 Admin: Organisation Company Details Admin > Organisations > Company Displays the Company Details. Click Tools > Edit to edit the details. Click Tools > Request Hot Folder. This will send a request email
Mobile for iphone User Guide
 Version 2.5 Copyright 2013, 2018, Oracle and/or its affiliates. All rights reserved. This software and related documentation are provided under a license agreement containing restrictions on use and disclosure
DOVICO Planning & Timesheet USER S GUIDE
 DOVICO Planning & Timesheet USER S GUIDE DOVICO Planning & Timesheet User s Guide NOTICE Copyright 1989-2010 DOVICO Software Inc. All rights reserved. DOVICO, DOVICO Planning & Timesheet, DOVICO Timesheet
DATABASICS Time User s Guide v3.1
 DATABASICS Time User s Guide v3.1 A Guide to CALIBRE s Time Reporting Website July 2016 CALIBRE 6354 Walker Lane, Suite 300 Alexandria VA 22310 1 Table of Contents Before You Get Started... 3 Accessing
Business Manager. Enhancements Version January
 Business Manager Enhancements Version 3.39 January 2019 www.farmplan.co.uk 01594 545022 support@farmplan.co.uk Contents Contents... 1 Installation Instructions... 3 Business Manager Enhancements... 4 Making
Microsoft Dynamics GP Business Portal. Project Time and Expense User s Guide Release 3.0
 Microsoft Dynamics GP Business Portal Project Time and Expense User s Guide Release 3.0 Copyright Copyright 2005 Microsoft Corporation. All rights reserved. Complying with all applicable copyright laws
MyBill. DHL MyBill User Guide
 DHL User Guide Content Page DHL MYBILL INTRODUCTION What does offer? Registering via THE SCREENS The Dashboard The Archive, Reports & Download Screens The Search Screen The My Account Screen The Help Screen
Oracle Warehouse Management Cloud. Getting Started Guide Release 8.0 Part No. E
 Oracle Warehouse Management Cloud Getting Started Guide Release 8.0 Part No. E85994-02 June 2017 Oracle Warehouse Management Cloud Getting Started Guide, Release 8.0 Part No. E85994-02 Copyright 2016,
About Configuring BI Publisher for Primavera Unifier. Getting Started with BI Publisher Reports
 Unifier BI Publisher Configuration Guide Version 17 July 2017 Contents About Configuring BI Publisher for Primavera Unifier... 5 Getting Started with BI Publisher Reports... 5 Downloading BI Publisher...
e-invoicing on the e-prior Supplier Portal
 EUROPEAN COMMISSION DIRECTORATE-GENERAL INFORMATICS Information Systems Directorate e-invoicing on the e-prior Supplier Portal User Manual Version 1.42 Date: 29/02/2012 Author: European Commission, Directorate-