MSI Cash Register Version 7.5
|
|
|
- Erik Ryan
- 5 years ago
- Views:
Transcription
 362-2803 Fax: (847) 362-3347 Contents are the exclusive property of")
1 MSI Cash Register Version 7.5 User s Guide Harris Local Government 1850 W. Winchester Road, Ste 209 Libertyville, IL Phone: (847) Fax: (847) Contents are the exclusive property of Harris Local Government. Copyright All Rights Reserved.
2 TABLE OF CONTENTS CASH REGISTER WELCOME/LOGIN SCREEN CASH REGISTER SYSTEM MAIN MENU CASH REGISTER ENTRY BATCH UPDATE MENU CREATE SUB-SYSTEM CASH RECEIPT BATCHES BATCH INQUIRY CASH RECEIPTS EDIT REPORT FILE MAINTENANCE MENU RECEIPT TYPE CODES REGISTER ID CODES BANK ENDORSEMENT CODES PAYMENT TYPE CODES TAX CODES APPLICATION SUPPORT MENU SYSTEM DEFAULTS CREDIT CARD CODES CASHIER CODES DELETE REGISTER BATCH HISTORY APPENDIX A FAQ S APPENDIX B SAMPLE REPORTS APPENDIX C ISSUING A CREDIT VIA LYNK VT... ERROR! BOOKMARK NOT DEFINED. 2

3 CASH REGISTER WELCOME/LOGIN SCREEN Enter your assigned password and click OK. Note: Based on the access rights attached to your password, different menu levels will be made available to you. 3
4 0.00 CASH REGISTER SYSTEM MAIN MENU This is the main menu for the Cash Register system. The user can access each option in the system here and all processing begins with this menu. The following options are available: MAIN MENU Entry This option is used for transaction entry into the Cash Register System. Note: The user must switch on power to all cash register equipment before using this program. Batch Update This option creates cash transaction update files for other MSI programs installed at the user s location. It also allows older Cash register batches to be deleted when no longer needed. Inquiry This option allows the user to make inquiries into cash transactions. It allows the user to view the information, but no change can be made to the data from the inquiry programs. Reports This option creates a printed report that may be used to balance the cash register, or to track specific data. 4
5 Maintenance This menu can be used to create and maintain information (files) used throughout the Cash Register system. This menu can also be used to create and maintain information for each person who uses the cash register. Support This menu option is used to set the cash register defaults. Help This selection offers different methods for contacting Municipal Software, Inc. and contains important program information. 5

6 1.00 CASH REGISTER ENTRY WHAT IS CASH REGISTER ENTRY? Cash Register entry is used to enter payments received from customers for item such as utility bills, animal licenses, vehicle stickers, etc. Note: The user must switch on power to all cash register equipment before using this program. HOW DO I ENTER A CASH RECEIPT? From the Cash Register System Main Menu, click on Entry. This will take the user to the Cash Register entry screen. The following fields are used for cash entry. After each field is input, press tab or click on the next field to accept the information and proceed to the next field for entry. 6

7 Batch Number This field is used as an identifier for a group of receipts and will default a batch id beginning with the letter C preceded by the current date. Register ID This field identifies which cash drawer has received a payment Entry Date This field identifies the date a batch is entered. Cashier Code This field identifies which cashier has processed a receipt of payment. Once the cashier code is entered, press tab. The user will receive the following box requesting their cashier password to be entered. Once entered correctly, click OK or press tab to highlight the OK button and press enter, the user may now proceed with their receipt entry. Transaction number Identifies a specific receipt within a batch Receipt Type Code Indicates what the payment is for. When entering a multiple line transaction, the Receipt Type Code for each subsequent line item will default to the Receipt Type Code entered for the previous line item. Note: If there is not a General Ledger account number entered against the receipt type code that is interfacing with the General Ledger application, after the amount field, the user will be prompted to manually enter the GL account number. Reference Number The reference number is used as an identifier for the payment, such as a utility bill account number or a vehicle license number. This field also allows the user to enter free-form text. If the user is using a receipt type code that is interfaced with another MSI application, once the reference number is selected, the name and address field will populate according to the assignment from the interfaced application. If a payment is being entered for a Business License and the business id reference number entered has multiple business licenses, the user will be prompted as to whether the payment should be applied to all the outstanding business licenses. Payment Type 7
8 The Type field indicates the type of payment that was received, such as a check or cash. If a payment type is indicated as a check, the next field will display a box to enter a check number, if it is not a check it will take the user to the amount field. Check Number Identifies what check has been issued by the customer for payment Amount Identifies the amount of money the customer has paid. This value will default if the receipt type is interface with another Municipal Software, Inc. application and a balance is owed. It may also be manually keyed. Entering Comments If the user enters a C for the type code, the system allows a comment to be entered. The system will hold the description until the next comment line is keyed and the description field defaults. If the same type code as the previous line is entered, the system will default the description from the previous line. But if a different type code is entered, the system defaults no description. However, the user can default to the previous line s description by pressing the up arrow. Once the line item is complete the user will then click the Add button to move it to the detail information box, or press tab, which highlights the add button, and then press enter. Click Add to add the line item detail and to go on to the next line item. Click Remove if it is necessary to remove a line item from the Cash Transaction. First highlight the line to be deleted and then select this Remove button. Once added to the detail information box another line item entry to the transaction may occur or the user can complete the transaction by performing the following: Field Name Required Default F4 Available Source Batch Number Yes Yes* Yes C + PC date Register ID Yes Yes* Yes Register ID Codes Entry Date Yes Yes* No PC Date Cashier Code Yes No Yes Cashier Codes Password Entry Yes No No Cashier Codes Transaction Number Yes Yes* Yes Next Available Entry Number Yes Yes* No Next Available Receipt Type Yes No Yes Receipt Type Codes Reference Number No No Yes MSI Apps. File Maintenance Payment Type Yes No Yes Payment Type Codes Check Number No No No Customer Check Number Amount Tendered Yes No No Balance due on Transaction * = Will default but can be overridden 8

.")
9 When the transaction has been completed the user will then Summarize that transaction. Summarizing the transaction will total the line items entered and place the balance due in the Amounted Tendered field. If the user has not received the exact balance due, the Amount tendered field may be overwritten whereby the amount of change due will be calculated. Once all of the information is entered, click OK. If the user has entered a cash transaction, their cash drawer will open and their receipt printer will print a receipt (if applicable). If a check transaction was entered, the user will see the prompts below in the Check Transaction section. If a credit card transaction was entered the user will see the prompts below in the Credit Card Transaction section. CHECK TRANSACTION If validations of stubs or check endorsements are required, follow the following procedure. IS THE USER REQUIRED TO VALIDATE A STUB? If so, the following procedures apply: The following message will appear once the summary has been completed. Insert the stub into the receipt printer and click OK. Click OK on the message below and remove the stub. 9

10 The user has now completed a stub validation. If more stubs are required to receive validation, the next message will ask the user if they wish to validate. This process will continue until the user clicks no to let the system know they are done. IS THE USER REQUIRED TO ENDORSE A CHECK? If so, the following procedures apply: The following message will appear once the summary has been activated and all validation has been completed. Insert the check and then click ok. The bank endorsement will be stamped on the back of the check. Once the endorsement is complete the following message will appear. Remove the check and click OK. This message will conclude the endorsement and close the receipt printer to continue receipt entry. 10

11 CREDIT CARD TRANSACTION SECTION Credit card transactions must be approved by a third party vendor. The MSI Cash Register application is capable of interfacing with the Lynk Systems vendor. To process a payment with Lynk, each machine taking credit card payments must have an active, open connection with the Internet. If the village has contracted with Lynk Systems to validate credit card transactions, the following additional prompts will appear and steps need to be taken to validate the credit card transaction. (Set up of Credit Card processing information is in CR Credit Card Vendor Ids program from the Support Menu.) After the OK button is pushed, the Credit Card Entry screen will appear over the Cash Register Entry screen. When the screen appears it is ready for a credit card to be swiped through the magnetic reader. Various readers are available, but MSI has tested the software with keyboards supplied by Cherry, Inc. The instructions that follow assume the use of the Cherry keyboard. When the card is properly swiped, the user will hear two beeps. This indicates that the magnetic strip on the back of the card has been read. Once the card has been successfully swiped, the user should click the Submit button. Once clicked, the credit card information is submitted to Lynk Systems for validation. A processing pop-up window will appear over the top of the screen. 11


12 When the processing is completed one of two things will happen. If the credit card transaction was approved, the transaction is completed and two receipts will be printed. The receipts are labeled, at the top of the receipt, as Merchant Copy and Customer Copy. The user should have the customer sign the Merchant Copy and retain that copy for village records. If the credit card transaction is not approved, a warning screen appears to inform the user of the decline. The user should click OK on this window. It will return the user to the Cash Register Entry screen and the user will be allowed to enter a different payment type to complete the transaction. If, when the transaction is processed, the internet connection on the machine is down, the user will receive an error message telling him/her of the disabled connection. Since credit card transactions require an active internet connection, the cashier should take an alternate form of payment. Manual Entry of Credit Card Information If the user is required to enter the card information manually, they will need to click on the Manual Entry button. When clicked, the swipe message will disappear and the credit card number and expiration date entry fields will become active. The user should then enter the card number and the expiration date in a 12
13 MM/YY format. Once the values have been entered, click the Submit button. Once clicked, the transaction will process the same as if the card was swiped. Manual entry will typically only be required when the magnetic stripe on a card is demagnetized. The user will be able to tell this when they hear one or fewer beeps upon swiping the card. 13
14 Re-entering Credit Card Information At any point during entry of credit card data, either manually or by swiping the card, the screen can be reset by clicking on the Re-Enter Card button. When the button is pushed, all data entered is erased and the window is reset to its initial mode ready to accept swiped card entry. Canceling a Credit Card Transaction The user may return to the Cash Register Entry screen without processing a credit card by pressing the Cancel button. NOTE: Once the Submit button has been pressed, credit card verification will take place. Sample Cash Register Receipt The following page shows a sample receipt created by the automated credit card process when a transaction is approved. Two copies of the receipt are produced; a Merchant Receipt, shown below, and a Customer Receipt. The cashier should have the card holder sign the Merchant Receipt and retain that copy. Village of Anytown *** MERCHANT RECEIPT *** DATE: 11/04/03 TIME: 15:18:45 DESCRIPTION PAY CD AMOUNT ALARM INCOME CRD FIRE ALARM MAINT Credit Card: Merchant ID: Order ID: 100 Account: XXXXXXXXXX7892 Exp Date: 09/04 TOTAL AMOUNT DUE AMOUNT TENDERED CHANGE DUE.00 Sig. TRANS #: 3 CASHIER CODE: MSI BATCH #: C REGISTER ID:
15 HOW DO I DELETE A CASH RECEIPT? Cashiers with proper authority can delete cash receipts from an open batch. The authority to delete cash receipts is granted under the Maintenance menu using the Cashier Codes option. To delete a cash receipt, a cashier must first log on to the open batch as he/she would to enter a new receipt. In the Transaction Number field, the cashier should enter the number of the transaction. This can be done by typing the number in, or using the lookup binoculars located to the left of the field to locate the number. Once the Transaction Number is selected, the cash receipt information is populated on the screen. The cashier can then click the Delete button to remove the transaction. Deleting a Credit Card Transaction To delete a credit card transaction, the user should follow the same process outlined above. Once the Delete button is pressed, the user will be prompted for the credit card to be refunded when the transaction is deleted. The information is entered using the same credit card entry screen used when processing a payment. The user can either swipe or hand enter the card information. Once the data is entered, the user clicks the Submit button to process the credit card refund. A message will be provided to tell the user if the transaction has been completed successfully or not. NOTE: This is the method a user should utilize to refund a credit card, but it is only available for use if the Cash Batch is still open. Once the cash batch has been closed, the user must use the LynkVT web site ( to refund a credit card transaction. Refer to Appendix C for processing a refund via the LynkVT web site. ICONS At the top of the screen are various toolbar icons that can be utilized to assist in processing. OK Saves the transaction Cancel Cancels the transaction Delete Deletes the displayed transaction Exit Exits the CR Entry screen Print - This icon currently doesn't do anything (it's left over from previous versions) Receipt printer on/off - Toggles enable/disable mode for the cash drawer and receipt printer Cash - opens cash drawer Stub - validates a stub on demand Checks - validates checks on demand Customer Service allows quick access to contact Support for assistance on CR Entry 15
16 2.00 BATCH UPDATE MENU This option creates cash transaction update files for other MSI programs installed at the user s location. It also allows older Cash Register batches to be deleted when no longer needed. Create Sub-System Cash Receipt Batches This option creates and sends the individual batches to the appropriate MSI applications. For instance, all the utility billing payments are sent over to the MSI-Utility Billing application so that the payments can be updated to the resident s accounts. The same occurs for any other application for which payments were received. A report will print at the end of the process that advises what batch numbers were created in the various MSI systems along with the details that went over for each batch. 16
17 2.10 CREATE SUB-SYSTEM CASH RECEIPT BATCHES WHAT ARE SUB SYSTEM CASH RECEIPT BATCHES? This feature will create cash transaction update files for other installed MSI programs. It provides a running total of transactions for the day (current batch), and separates each transaction into its proper billing department. HOW DO I CREATE A SUB-SYSTEM BATCH? From the Cash Register toolbar Menu click on Batch Update, the user will receive the following options: Click on Create Sub-System Batches. The following fields are used for sub-system batch creation. After each field is input, press tab to accept the information and proceed to the next field for entry. UPDATE RECEIPTS IN BATCH # This field identifies the group of receipts the user wants to process ENTER DATE TO BE USED FOR UPDATE 17
18 Input the date to be used for the update. This value will default to the current system date, but should be altered to match the date payments were keyed into the batch that is being updated. Note: This date is VERY important if you are sending utility payments over to the MSI-Utility Billing system. Whatever date is input in this field is the date that will reflect on the financial history of the residents for the payments. Meaning, if the payments in the specified Cash Register batch were taken in on 02/15/2004, but the date used in this field is 02/16/2004, then all the payments will appear on the resident s history as if they were taken in on 02/16/2004. CURRENT ACCOUNT PERIOD Indicates the fiscal month for which the user is processing. CURRENT FISCAL YEAR Indicates the fiscal year for which the user is processing. When the appropriate fields have been completed, the user may click OK to accept the entered information and create the sub-system batches. Field Name Required Default F4 Available Source Batch Yes No Yes Cash Register Entry Number Date Yes Yes* No PC Date Fiscal Month Yes Yes* No Installation Menu Fiscal Year Yes Yes* No Installation Menu * = Will default but can be overridden 18
19 This table is shown to indicate which MSI Applications may be affected by the Cash Receipts system once an update is completed. NOTE: These applications will only be affected if there are transactions entered into a batch that needs to be disbursed to one of the below. EXAMPLE: CASH RECEIPTS BATCH ID: C RECEIPT TYPE CODES BATCH ID# GENERATED CREATED IN MSI APPLICATION OPTION NAME AR C Accounts Receivable Post Cash Receipts BL C Business License Post Cash Receipts to General Ledger GL C General Ledger Post a Cash Receipts Journal PK C Parking Tickets Post to General Ledger PT C Permit Tracking Post to General Ledger UB C Utility Billing Post UB Activity to General Ledger VL C Vehicle License Post to General Ledger 19
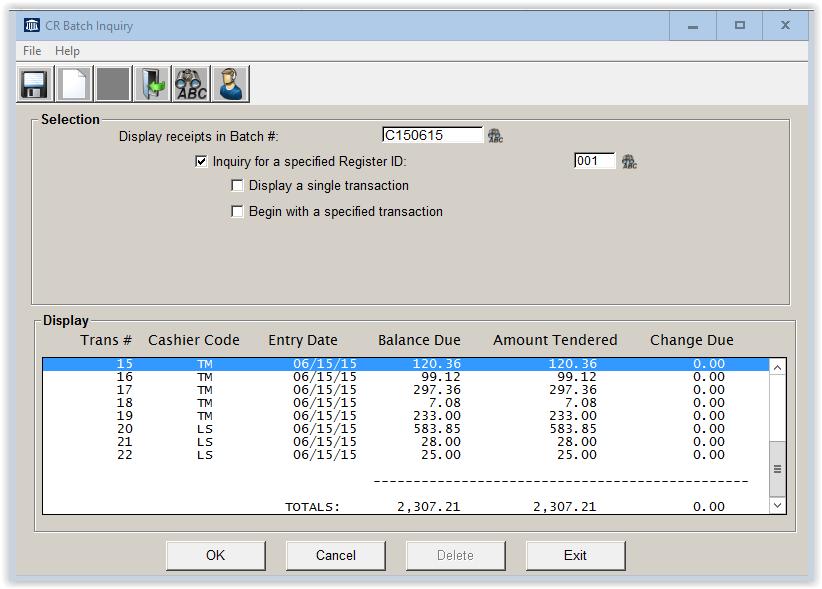
20 3.00 BATCH INQUIRY WHAT IS BATCH INQUIRY? This option allows the user to make inquiries on a specified batch including all transactions within that batch. The user can display the transaction information, but the user cannot change this information from the inquiry screen. HOW DO I INQUIRE ON A BATCH? From the Cash Register toolbar menu, click Inquiry. This will take the user to the Cash Receipts Batch Inquiry screen. The following fields can be used for inquiries. 20
21 Display receipts in Batch # The entered batch number will allow the user to display a group of transactions. By clicking on the following fields, the user can view as much detail as necessary. Specified Register ID Allows the user to inquire on a specific register Display a Single Transaction Allows the user to inquire on one transaction Begin with a specified transaction If there are numerous transactions within a batch, this allows the user to start the inquiry on a line number other than one Specified Cashier Codes Allows the user to inquire on one or more specific cashiers Specified Receipt Types Allow the user to inquire on one or more receipt types Specified Payment Types Allows the user to inquire on one or more payment types Once all the criteria has been selected, click OK to continue. The next available options will vary depending on the criteria selected. 21
22 For instance, when the user selects a batch number and a register id, they will get a listing of all transactions within that batch entered on that register. The user may then select a line item to view the details of that transaction by double clicking on the line. 22
23 Double 23

24 View Details: 24
25 Or, if the user selects a specific batch number, with a register id and transaction number, rather then viewing and selecting all the transactions, the screen will only display the one the user has identified. 25

26 4.00 CASH RECEIPTS EDIT REPORT WHAT IS AN EDIT REPORT? This option creates a printed report that may be used to balance the cash register or to track specific data. It will print all details for the criteria selected. HOW DO I PRINT AND UTILIZE THE EDIT REPORT? From the Cash Register toolbar menu, click on Reports ; the user will receive the following option: Click on Receipt Edit Report. The following fields can be used for report generation. After each field is selected, click OK to generate the report. 26
27 Enter a beginning Batch date Indicates a starting point for the transactions that will be printed on the report Enter a ending Batch date Indicates the ending date for the transactions that will be printed on the report. Specified Register ID Reports on a specific cash register Specified Cashier Codes Reports on one or more specific cashiers Specified Receipt Types Reports on one or more receipt types Specified Payment Types Reports on one or more payment types Print a Specified Batch Reports only on the batch ID entered Totals Only Report Prints and summary and total for each of the following categories: Cashier Code Receipt Type Bank Code Payment Type Bank/Payment Register Summary Note: This report will page break after each Register ID has completed. 27

28 5.00 FILE MAINTENANCE MENU WHAT IS CASH REGISTER FILE MAINTENANCE? This menu is used to create and maintain information (files) for the Cash Register System. The following codes are used throughout the Cash Register System. HOW DO I ENTER FILE MAINTENANCE CODES? From the Cash Register toolbar menu, click on Maintenance ; the following options will appear: Type Codes This code identifies the type of transaction that is being processed. These identifiers are used by other MSI applications within the accounting system when a cash receipts batch is processed for sub-system updating. Register ID Codes This code represents the different registers (or locations) in a system where the Cash Register System is used. This option can also be used to specify what system has a bar code reader for ease of processing. Bank Endorsement Codes This code identifies which banks are used for deposits of receipts and supply check endorsement information. Payment Type Codes This code identifies the different types of payment that can be made. Tax Codes This code identifies the tax rates that may apply to transactions collected at the counter. 28

29 5.10 RECEIPT TYPE CODES WHAT IS A RECEIPT TYPE CODE? This code identifies what type of transaction is being processed. These identifiers are used by other MSI applications within the accounting system when a cash receipts batch is processed for sub-system updating. HOW DO I ENTER A RECEIPT TYPE CODE? From the Cash Register toolbar menu, click on Maintenance ; then click on Type Code. This will take the user to the Receipt Type Codes entry Screen. Enter the following fields and press Tab to proceed to the next field, or click on OK to accept and save the information. Receipt Type Code This is an abbreviation of the type of payment that is being received. Description This field contains a description of the payment being entered. System to Update This is used to identify which MSI application can be affected by the cash receipt being entered 29
30 G/L Revenue Account # (only applicable if interfacing through the General Ledger) This field indicates which General Ledger account number will be affected by this transaction when the batch is posted to the GL of the linked MSI applications. Bank Endorsement Code This field indicates the bank endorsement that will be printed if this code is selected Default Amount This field defines the value which will be automatically placed on the transaction line item Post Summary This will post a summary and description to the General Ledger Receipt Description This is the description that will print on the receipt for the specified code Tax Code 01 (02/03), press enter Identifies what tax rate(s), (if any), should be applied to the transaction Once all appropriate fields have been entered, click OK to accept and save the entry Field Name Required Default F4 Available Source Receipt Type Code Yes No Yes Manual Entry Description No No No Manual Entry System to Update No No Yes Installation Menu G/L Revenue Acct. No No Yes GL Application Bank Endorsement Yes No Yes Bank Endorsement Code Main. Default Amount No No No Manual Entry Post Summary Yes No No Manual Entry Receipt Description No No No Manual Entry Tax Code 01, 02, 03 No No Yes Tax Code Maintenance * = Will default but can be overridden 30
31 5.20 REGISTER ID CODES What are Register ID Codes? This code identifies the type of transaction that is being processed. These identifiers are used by other MSI applications in the accounting system when a cash receipts batch is processed for sub-system updating. How do I enter Register ID Codes? From the Cash Register toolbar menu, click on Maintenance ; then click on Register ID Code. This will take the user to the Register ID Code entry Screen, enter the following fields and press Tab to proceed to the next field or click OK to accept and save the information. Register ID Code This field identifies a register or location where the cash register is being used Description This field describes the code the user is inputting UB Bar Coded? 31

32 This will allow Cash Register Entry to accept all 12 digits of the customer s acct # when scanned BANK ENDORSEMENT CODES WHAT ARE BANK ENDORSEMENT CODES? These codes identify local banks used for deposits of receipts and for check endorsement information. The system requires a minimum of one Bank Endorsement Code. HOW DO I ENTER A BANK ENDORSEMENT CODE? From the Cash Register toolbar menu, click on Maintenance ; then click on Bank Endorsement Code. This will take the user to the Bank Endorsement Code entry Screen, enter the following fields and press tab to proceed to the next field, or click OK to accept and save the information. Bank Endorsement Code Identifier for each bank for which transactions are received Description (located to the right of the Bank Endorsement Code) A verbal descriptor of the bank endorsement code Bank Account Number The account number at the bank being identified 32
33 Endorsement Text A listing of the endorsement verbiage that will print on the back of the check 33
34 5.40 PAYMENT TYPE CODES WHAT ARE PAYMENT TYPE CODES? Payment Type codes identify the different types of payment (cash, check, money order, or charge card) that can be accepted. This also provides for sub totals by payment type on the Cash Receipts Edit Report. HOW DO I ENTER PAYMENT TYPE CODES? From the Cash Register toolbar menu, click on Maintenance ; then click on Payment Type Codes. This will take the user to the Payment Type Code entry Screen. Enter the following fields and press Tab to proceed to the next field or click OK to accept and save the information. Payment Type Identifies what type of payment has been received Description Contains a written descriptor the payment type Check? Select Yes, Check # and Endorsement when you want this payment type code to require both a Check Number to be entered and the check to be endorsed by the system. Select Yes, Check # if you only 34
35 want this payment type code to require a Check Number to be entered. Select No if this payment type code should not require either a Check Number or a Bank Endorsement. Auto Credit Authorization Selecting Yes will identify the payment type as requiring authorization with Lynk Systems. All cash receipts entered on the CR Entry screen that have this value set to YES will be sent to Lynk Systems for authorization. If a client site accepts credit cards but uses a company other than Lynk to process credit cards, this value should be set to NO. 35

36 5.50 TAX CODES WHAT ARE THE TAX CODES? These codes identify tax rates that may apply to transactions. HOW DO I ENTER TAX CODES? From the Cash Register toolbar menu, click on Maintenance ; then click on Tax Codes. This will take the user to the Tax Code entry screen. Enter the following fields and press Tab to proceed to the next field, or click OK to accept and save the information. Tax Code Identifies what tax to apply to a transaction DESCRIPTION (located to the right of the Tax Code) Contains a written description of the tax Tax Rate Indicates what tax rate to apply to a transaction Tax Account Number Identifies what General Ledger account number will be credited for the tax that is applied 36
37 6.00 APPLICATION SUPPORT MENU This menu contains programs that are used less frequently than others, but are important for proper functioning of the Cash Register System. The following options are available: System Defaults This menu is used to enter information about the cash register equipment. These defaults can only be entered after installation has occurred. Credit Card Codes The credit card codes are values supplied by Lynk Systems and stored in the MSI Cash Register system. The MSI Cash Register system utilizes the codes to connect to the Lynk System servers and to authorize all sale and refund transactions. Cashier Codes Cashier codes identify the cashiers who are authorized to use the Cash Register system. They will also identify which cashier has entered each transaction within the Cash Register system. Delete Register Batch History This option deletes cash receipts history identified by the batch number. Cash receipts are usually deleted when they are no longer needed. 37
38 6.10 SYSTEM DEFAULTS WHAT ARE SYSTEM DEFAULTS This option allows the user to enter information about the cash register equipment. Most installations use the Cash Register System with a cash drawer and a receipt printer. Some installations use the Cash Register System without equipment as a standalone system for data entry purposes. HOW DO I ENTER SYSTEM DEFAULTS? From the Cash Register toolbar menu, click on Support ; then click on System Defaults. This will take the user to the System Default entry Screen, enter the following fields and press tab to proceed to the next field, or click OK to accept and save the information. Cashier Code Identifies the cashier to which these settings will apply. Register Equipment Select Yes if this cashier will key in transactions at a register that has equipment installed (i.e. cash drawer and receipt printer). Register Type This option should be set to Terminal. Older versions of the MSI-Cash Register program also had the option of PC, but that option is no longer used. 38
39 39
40 Slip Printer If set to Yes, then the system will prompt with Do you want to validate a stub? (for those users with Ithaca or Star receipt type printers) and Endorse a check? (for the user to be prompted to endorse a check, the option to endorse be selected in the Maintenance > Payment Type Codes program for the payment type specified) during Cash Receipts Entry (see section 1.00). Journal Printer If set to Yes, then the system will print receipts. Cash Drawer Identifies whether or not the receipt printer is interfaced with a cash drawer Printer Type Indicates what printer the user is using: Ithaca, Laser, Star, or Star Thermal 40

41 6.20 CREDIT CARD CODES WHAT ARE CREDIT CARD CODES? The credit card codes are values supplied by Lynk Systems and stored in the MSI Cash Register system. The MSI Cash Register system utilizes the codes to connect to the Lynk System servers and to authorize all sale and refund transactions. Merchant ID This is the merchant ID assigned to a client by Lynk Systems. The value is required when processing credit card payments and refunds. Store ID The Store ID is assigned to a client by Lynk Systems. Currently, the MSI CR system is only capable of storing and using a single Store ID. The value is required when processing credit card payments and refunds. Terminal ID A terminal ID is assigned to a client by Lynk Systems. Currently, the MSI CR system is only capable of storing and using a single Terminal ID. The value is required when processing credit card payments and refunds. Seller ID 41
42 This is the user id assigned to the client site by Lynk Systems to access the LynkVT internet site ( This value is used when processing a credit card refund. 42
43 Seller Pwd The password used by the client when accessing the LynkVT system. This value is used when processing a credit card refund. Server URL This is the URL (internet page address) that credit card transactions need to access to validate a transaction. 43

44 6.30 CASHIER CODES WHAT ARE CASHIER CODES? Cashier codes identify the cashiers who are authorized to use the Cash Register system. They will also identify which cashier has entered each transaction within the Cash Register system. HOW DO I ENTER A CASHIER CODE? From the Cash Register toolbar menu, click on Support ; then click on Cashier Code. This will take the user to the Cashier Code entry Screen. Enter the following fields and press tab to proceed to the next field, or click OK to accept and save the information. Cashier Code Indicates a cashier s log-on ID Description This field lists a description associated with the Cashier Code Cashier Password A log-on password is required to input transactions in the Cash Register for security purposes. This field displays the cashier s password to the Cash Register system. 44

45 Register ID Identifies the register to which this particular cashier has security access. If you want the cashier code to have access to all registers, then leave this field blank. If you do, the system will prompt you with the below warning message: Limit Entry Rights When selected, the Limit Entry Rights checkbox will prevent the cashier from deleting saved transactions. Delete Batch Transaction When selected, the Delete Batch Transaction checkbox will allow the cashier to delete theirs and other cashier s saved transactions. Note: If neither Limit Entry Rights nor Delete Batch Transaction checkbox is selected, then the cashier will not be able to delete any saved transactions. 45

46 6.40 DELETE REGISTER BATCH HISTORY This option deletes cash receipts history identified by the batch number entry. Cash receipts are usually deleted when they are no longer needed. Ask the system administrator for approval to proceed with this deletion process. HOW DO I DELETE BATCH HISTORY? From the MSI-Cash Register toolbar menu, click on Support and select Delete Register Batch History. The following fields are required for batch deletion. After each field is input, click OK to accept the information and delete the batches. The program will display the Batch Numbers of the deleted batches near the bottom of the screen. Enter the from batch number This indicates the first batch number to be deleted Enter the to batch number This indicates the last batch number to be deleted Note: If the from batch number is not the same as the to batch number, any batch that falls between these two numbers will be deleted 46
47 APPENDIX A FAQ s 1. How do I print a second copy of a receipt? To Reprint a Single Receipt 1. Log on to the correct register ID. 2. Select the transaction number you wish to reprint. 3. Summarize (click summarize button) 4. Click OK. The receipt will print. OR To print multiple copies of every transaction. 1. Open the System Defaults screen from the Support Menu 2. Choose the cashier. 3. Set the number of receipts to print to the number of copies desired. 2. "How do I get my Cashier Code to work? I keep getting the message that it is an invalid code. The cashier code entered does not match up with the register id entered. The application administrator should be able to provide the correct cashier code and register id. To allow a cashier to access a register: 1. Open Cashier Codes on the Support Menu. 2. Enter the cashier code (set up in System Defaults). 3. Enter the cashier's name in the Description Field 4. Enter the cashier's password in the Password Field. 5. Enter the register id the cashier is to have access to. If the cashier is to have access to all registers, leave the register id blank. 3. How do I set up the system to automatically process credit card authorizations? The MSI Cash Register can automatically authorize credit card transactions using Lynk Systems, Inc's. verification network. The municipality must set up an account with Lynk Systems, Inc. MSI CR System Set up. A. Enter the Lynk Provided IDs and passwords. 1. Open the Credit Card Codes screen on the Support Menu 2. Enter the Merchant ID, Store ID, and Terminal ID supplied by Lynk Systems in the corresponding fields. 3. Enter the LynkVT.COM user id provided by Lynk Systems in the Seller ID field. 4. Enter the LynkVT.COM user password supplied by Lynk Systems in the Seller Pwd field. If the municipality changes their password this value needs to be updated to reflect the change. 5. Enter the authorization server's URL supplied by Lynk Systems. At the time of this writing the URL is B. Set up a Credit Card Payment Type. 1. Open the Payment Type Codes screen on the Maintenance Menu. 2. Enter a new payment type code. 3. On the new payment type code set "Auto Credit Authorization" to YES and "Check?" to NO. 4. It is advised that all each existing payment type code be modified to set the "Auto Credit Authorization" to NO. 47
48 4. I do not validate bill stubs. How do I stop the system from asking "do you want to validate" with each receipt? This is the result of the Slip Printer option being set in the System Defaults. 1. Open the System Defaults screen on the Support menu. 2. Select a cashier. 3. Change the "Yes/No" button to "No" on the Slip Printer question. 4. Repeat steps 2 and 3 for each cashier. 5. How do I set my cash drawer to open with each receipt entered? 1. Open the System Defaults screen on the Support menu. 2. Select a cashier. 3. Set the "Yes/No" button to "Yes" on the Register Equipment question. 4. Set the Register Type to "Terminal" 5. Repeat steps 2, 3, and 4 for each cashier working on a register with a cash drawer. Trouble Shooting: 1. Make sure the cash drawer is unlocked. 2. Make sure the cable is connected to the cash drawer. 48
49 Municipal Software, Inc. APPENDIX B SAMPLE REPORTS Cash Receipts Edit Report 49
50 Municipal Software, Inc. Register Posting Distribution Report 50
MSI Accounts Payable Version 7.5
 MSI Accounts Payable Version 7.5 User s Guide Harris Local Government 1860 W. Winchester Road, Ste 204 Libertyville, IL 60048 Phone: (847) 362-2803 Fax: (847) 362-3347 Contents are the exclusive property
MSI Purchase Orders Version 4.0
 MSI Purchase Orders Version 4.0 User s Guide Municipal Software, Inc. 1850 W. Winchester Road, Ste 209 Libertyville, IL 60048 Phone: (847) 362-2803 Fax: (847) 362-3347 Contents are the exclusive property
Delaying Count. Totaling the Register THEN
 Login 1. Select the POS icon. 2. Choose your name from the Name list. 3. Select Keyboard on Login screen. 4. Enter password in Password field. 5. Select Enter on Keyboard screen. Open for a Serving Period
Foreword. Sales Associates Managers
 Foreword This book is a pocket guide for using the Register module for the InfoTouch Store Manager. It outlines the basic steps and procedures for processing sales, from the beginning to the end of a day.
Contents OVERVIEW... 3
 Contents OVERVIEW... 3 Feature Summary... 3 CONFIGURATION... 4 System Requirements... 4 ConnectWise Manage Configuration... 4 Configuration of Manage Login... 4 Configuration of GL Accounts... 5 Configuration
TurboCASH Business Class
 TurboCASH Business Class Guide to Point-of-Sales Philip Copeman The following icons have been placed on specific places throughout the documentation: Keyboard access Press the F1 key when focussed on screens
Register App Training Guide
 Register App Training Guide Outline 01 Making an Order: Page 3 02 Editing Order Details: Page 11 03 Using UPC and Barcode Scanner: Page 20 04 Executing a Transaction: Page 23 05 Customer Screen and Receipts:
NOTE: Close any security window that pops up (McAfee, MalwareBytes, etc.)
") Table of Contents Cashier Start-of-Day Process... 2 Logging in as a cashier and Opening the Terminal... 2 Turn the computer on and log in... 2 Cashier Instructions for Sales Events... 7 Checkout Process...
Table of Contents Cashier Start-of-Day Process... 2 Logging in as a cashier and Opening the Terminal... 2 Turn the computer on and log in... 2 Cashier Instructions for Sales Events... 7 Checkout Process...
Credit Card Processing Guide
 Credit Card Processing Guide Detailed Overview of The Reports in The Envision Software I Credit Card Processing Within Envision Cloud Table of Contents Part I Introduction 1 Part II Processing On A Computer
HARBORTOUCH ECHO USER GUIDE HARBORTOUCH SUPPORT LINE:
 HARBORTOUCH ECHO USER GUIDE INDEX EMPLOYEE FUNCTIONS: Clocking In/Logging In Logging Out Calculator, ECR and POS Mode Beginning a Transaction Item Functions Ticket Functions Payment Options Refunding a
MARKET LINE COMPUTERS TOTAL RENTAL USER MANUAL
 MARKET LINE COMPUTERS TOTAL RENTAL USER MANUAL CONTRACT FUNCTIONS... 4 OPENING A NEW RENTAL CONTRACT... 5 CREATING A RENTAL RESERVATION... 6 RESERVATIONS... 7 LONG-TERM CONTRACTS... 8 CREATING A QUOTE...
SCANCO WAREHOUSE TRAINING MANUAL
 UNLOCK THE POTENTIAL OF YOUR AUTOMATED WAREHOUSE SCANCO WAREHOUSE TRAINING MANUAL Scanco Software Rev. 101014 Page 1 of 48 Getting Started 1 Welcome to Scanco Warehouse This manual will guide you through
Quick Service Cashier Manual
 Version: 01/01/2012 Table of Contents Getting Started 3 Post a Credit Card Transaction 8 System Time... 3 Approved 8 Connectivity Indicator Light. 3 Declined 8 Sign-in Pad 3 Credit Unavailable. 8 Clock
onepos Management Console Manual Version 3.4
 onepos Management Console Manual Version 3.4 onepos Manager Console Manual - Version 3.3-1 Copyright (c) 2001-2012, onepos, LLC All rights reserved. Except as permitted under the copyright act of 1976,
Terminal Guide. VeriFone. VX520 with VX820 PIN Pad VX820 Duet VX680 3G
 Terminal Guide VeriFone VX520 with VX820 PIN Pad VX820 Duet VX680 3G Getting Started The VeriFone Terminal Guide will help you set up your terminal, understand your terminal s functionality, and troubleshoot
Revonu Retail Revonu Retail Manual
 Revonu Retail Revonu Retail Manual 2015 Version 2.1 All Rights Reserved 1.Main Screen... 3 A. Revenu Retail...3 a. Creating a New Sale... 4 b. Item Discount & Item Price Change... 4 c. Transaction D/C...
NorthStar Club Management System. Retail Point of Sale (RPOS) Version General Users Guide RPOS
 Version General Users Guide RPOS") Retail Point of Sale (RPOS) Version 2.3.0 RPOS-12052006 December 05, 2006 Copyright Statement Except as otherwise specifically noted, NorthStar Technologies, Inc. reserves the right to change all or part
Retail Point of Sale (RPOS) Version 2.3.0 RPOS-12052006 December 05, 2006 Copyright Statement Except as otherwise specifically noted, NorthStar Technologies, Inc. reserves the right to change all or part
ONE BUSINESS - ONE APP USER MANUAL
 ONE BUSINESS - ONE APP USER MANUAL 1 TABLE OF CONTENTS GETTING STARTED WITH SHOPBOX CREATE A PROFILE 4 CREATE A STORE 5 STARTING PAGE 5 HOW TO CREATE, EDIT AND DELETE CATEGORIES AND PRODUCTS CREATE CATEGORY
W-2 AND 1099-R PROCESSING 2007
 W-2 AND 1099-R PROCESSING 2007 User s Guide Municipal Software, Inc. 1850 W. Winchester Road, Ste 209 Libertyville, IL 60048 Phone: (847) 362-2803 Fax: (847) 362-3347 Contents are the exclusive property
Printed in the USA by: clubsystems group, inc.
 Copyright 2012 All rights reserved. This book is for the use of the clients and customers of clubsystems group, inc. in conjunction with their software. This book may not be duplicated in any way without
Point Of Sales. Below is the step to enable Optimum Point Of Sales module. Step 1. As shown in the figure, click the menu from the ribbon bar.
 Point Of Sales Below is the step to enable Optimum Point Of Sales module. Step 1 As shown in the figure, click the menu from the ribbon bar. Step 2 Select the Modules item form the drop down list. 1 P
ConnectWise-Sage 50 Accounts User Guide
 ConnectWiseSupport@mobiusworks.com www.mobiusworks.com ConnectWise-Sage 50 Accounts Version 3.0.0.7 September 11, 2015 Table of Contents Table of Contents... 2 INSTALLATION AND CONFIGURATION... 4 Introduction...
Contents OVERVIEW... 3
 Contents OVERVIEW... 3 Feature Summary... 3 CONFIGURATION... 4 System Requirements... 4 ConnectWise Manage Configuration... 4 Configuration of a ConnectWise Manage Login... 4 Configuration of GL Accounts...
BillQuick Peachtree Integration
 Time Billing and Business Management Software Built With Your Industry Knowledge BillQuickPeachtree Integration Integration Guide BQE Software, Inc. 2601 Airport Drive Suite 380 Torrance CA 90505 Support:
Connecting Time Matters/Billing Matters and QuickBooks. 35*45 Consulting - Global 7 Second System
 Why Choose QuickBooks... 3 Why Use Billing Matters... 3 Question to Ask... 3 Getting Started in Billing Matters... 4 Getting Started in QuickBooks... 11 Linking Billing Matters and QuickBooks... 14 Using
ArchiOffice QuickBooks Integration
 Office and Project Management Solution ArchiOffice QuickBooks Integration Integration Guide BQE Software, Inc. 2601 Airport Drive Suite 380 Torrance CA 90505 Support: (310) 602-4030 Sales: (888) 245-5669
Poynt Lodging App. Merchant Guide - Version 2.0
 Poynt Lodging App Merchant Guide - Version 2.0 1 Poynt Co 490 South California Ave, Suite 200 Palo Alto, CA 94306 https://poynt.com COPYRIGHT 2017 BY POYNT CO This publication is proprietary to Poynt Co
CDS LOGON SCREEN. ! Type your assigned logon (may be case sensitive) to the Cashier Deposit System (CDS).
 to the Cashier Deposit System (CDS).") TABLE OF CONTENTS Logging into CDS (Cashiers Deposit System)... 1-2 Main Menu... 3 Uploading Files... 4 Deposit Form (Blank)... 5 Entering Information on a Deposit Form... 6-7 Sample with data entered...
TABLE OF CONTENTS Logging into CDS (Cashiers Deposit System)... 1-2 Main Menu... 3 Uploading Files... 4 Deposit Form (Blank)... 5 Entering Information on a Deposit Form... 6-7 Sample with data entered...
Contents OVERVIEW... 3
 Contents OVERVIEW... 3 Feature Summary... 3 CONFIGURATION... 4 System Requirements... 4 ConnectWise Manage Configuration... 4 Configuration of Manage Login... 4 Configuration of GL Accounts... 5 Configuration
HDPOS EASY. Hyper Drive Information Technologies (P) Ltd
 Ltd") HDPOS EASY Chapters 1. Getting Started 1.1. Download & Installation 1.2. Application Registration 2. Database 2.1. Sample database 2.2. Blank Database 2.2.1. Back up database 2.2.2. Restore database 3.
HDPOS EASY Chapters 1. Getting Started 1.1. Download & Installation 1.2. Application Registration 2. Database 2.1. Sample database 2.2. Blank Database 2.2.1. Back up database 2.2.2. Restore database 3.
ipourit, Inc. Point of Sale Manual
 ipourit, Inc. Point of Sale Manual Rev. 10/16/2018 Table of Contents Front-of-House Client Start Up - 2 - Cash Drawer Shift Open...- 3 - Start a New Check...- 4 - Menu Item Types...- 6 - Adding Items to
Penny Lane POS. Basic User s Guide
 Penny Lane POS Basic User s Guide Penny Lane POS Basic User s Guide - Contents PART 1 - Getting Started a) Powering on the Equipment 2 b) Launching the System 2 c) Float In/Float Out 2 d) Assigning Cashier
Bridge. Billing Guide. Version
 Bridge Billing Guide Version 2.5.112 Table of Contents Page i Table of Contents Table Of Contents I Introduction 2 Managing Bill To Parties 3 Creating a New Bill to Party 3 Viewing and Navigating Bill
Contents OVERVIEW... 3 CONFIGURATION... 4
 Contents OVERVIEW... 3 Feature Summary... 3 CONFIGURATION... 4 System Requirements... 4 ConnectWise Manage Configuration... 4 Configuration of Manage Login... 4 Configuration of GL Accounts... 5 Configuration
CashierPRO Retail Systems Inc. Release Note
 Version 4.0.9.3-02/17/16 MAJOR ENHANCEMENTS: Moneris Integration for Home Hardware Stores. Includes processing of Debit and Credit transactions communicating directly with a Moneris Pinpad. Allows for
Managing Point of Sale Sessions
 11 For the most part, Point of Sale is very similar to Order Entry, except that you can perform cash transactions and quick sales in Point of Sale, most often using Cash Sales as your customer rather than
AMI AutoAGENT Shop Floor Manager
 AMI AutoAGENT Shop Floor Manager Contents Introduction... 2 Introduction... 3 What's In This Manual... 4 Symbols and Conventions... 5 Shop Floor Manager Navigation Tips... 6 Part 1: Shop Floor Manager
Accounts Payable PARTICIPANT WORKBOOK
 Accounts Payable PARTICIPANT WORKBOOK INTEGRATED SOFTWARE SERIES Accounts Payable PARTICIPANT WORKBOOK Version 3 Copyright 2005 2009 Interactive Financial Solutions, Inc. All Rights Reserved. Integrated
Quick Start Guide. Taking A Payment & Printing A Receipt
 Quick Start Guide Taking A Payment & Printing A Receipt Table of Contents Key Terms...3 Billing Types... 3 Premium Sent.. 3 Financing.. 3 Agency Fees....3 Taking A Payment.. 4 When Issuing A Policy 4 Agency
ArchiOffice QuickBooks Integration
 Office and Project Management Solution ArchiOffice QuickBooks Integration Advanced Integration Guide BQE Software, Inc. 2601 Airport Drive Suite 380 Torrance CA 90505 Support: (310) 602-4030 Sales: (888)
Proxis Store Manager. for Windows 98, 2000, XP. Quick Start Guide
 Proxis Store Manager for Windows 98, 2000, XP Quick Start Guide Store Manager Point-of-Sale System Overview Store Manager Point-of-Sale for Windows transforms a PC into a powerful point-of-sale cash register
CONVERGE MOBILE User Guide - Android
 How to take payments with the Converge Mobile app? CONVERGE MOBILE User Guide - Android Version 1.4 CONTACT 4576 Yonge Street, Suite 200, Toronto, ON M2N 6N4, Canada DOWNLOAD Google Play 2017 Elavon Canada
Contents OVERVIEW... 3
 Contents OVERVIEW... 3 Feature Summary... 3 CONFIGURATION... 4 System Requirements... 4 ConnectWise Manage Configuration... 4 Configuration of Manage Login... 4 Configuration of GL Accounts... 5 Configuration
Deltek Touch Time & Expense for Vision. User Guide
 Deltek Touch Time & Expense for Vision User Guide September 2017 While Deltek has attempted to verify that the information in this document is accurate and complete, some typographical or technical errors
BillQuick-QuickBooks Advanced Integration Guide 2016
 BillQuick-QuickBooks Advanced Integration Guide 2016 CONTENTS INTRODUCTION 1 HOW TO USE THIS GUIDE 1 SOFTWARE EDITIONS SUPPORTED 2 HOW INTEGRATION WORKS 2 MODES OF SYNCHRONIZATION 3 INTEGRATION RULES 4
BillQuick MYOB Integration
 Time Billing and Business Management Software Built With Your Industry Knowledge BillQuickMYOB Integration Integration Guide BQE Software, Inc. 2601 Airport Drive Suite 380 Torrance CA 90505 Support: (310)
Outline. 01 Terminal Overview: Page The Basics: Page Transactions: Page Settlements: Page Poynt.
 Merchant Overview 1 Outline 01 Terminal Overview: Page 3 02 The Basics: Page 6 03 Transactions: Page 13 04 Settlements: Page 29 05 Poynt.net HQ: Page 34 2 01 Terminal Overview 3 Spec Sheet: Merchant Facing
QUICKBOOKS PRO 2008 WORKSHOP 5: PART A MARS COMPANY
 QUICKBOOKS PRO 2008 WORKSHOP 5: PART A MARS COMPANY Recording Transactions in the Sales, Receive Pay Bills, Purchases, and Pay Bills Journals This workshop adds to QuickBooks skills learned in Workshops
Microsoft Dynamics GP. Personal Data Keeper
 Microsoft Dynamics GP Personal Data Keeper Copyright Copyright 2010 Microsoft. All rights reserved. Limitation of liability This document is provided as-is. Information and views expressed in this document,
Tabs3 Quick Start Guide
 Tabs3 Quick Start Guide Tabs3 Quick Start Guide Copyright 2017 Software Technology, LLC 1621 Cushman Drive Lincoln, NE 68512 (402) 423-1440 Tabs3.com Tabs3, PracticeMaster, and the pinwheel symbol ( )
Retail POS Manual. User Guide - Table of Contents Fall Edition
 2016 - Fall Edition Retail POS Manual User Guide - Table of Contents Overview Use Case(s) Accessing the Tool Opening a Ticket Navigating the POS Screen POS Main Button Functionality Lookup Item Remove
Virtual Terminal User Guide
 Virtual Terminal User Guide Table of Contents Introduction... 4 Features of Virtual Terminal... 4 Getting Started... 4 3.1 Logging in and Changing Your Password 4 3.2 Logging Out 5 3.3 Navigation Basics
Release Notice. Version Release Date: June 18, 2015
 Release Date: June 18, 2015 SedonaOffice 8401 Chagrin Blvd Suite 15-B 45185 Joy Road Chagrin Falls, OH 44023 Canton, MI 48187 440.247.5602 Contents About this Document... 5 Overview... 5 Application Enhancements/Improvements...
RentWorks Version 4.0 Service Pack B5 Release Letter April 2010
 RentWorks Version 4.0 Service Pack B5 Release Letter April 2010 Many improvements have been made. The major areas are: - Rate Shop - Miscellaneous Sales - Dealership / Loaner module - Vehicle Damage on
User Guide Veezi POS. Vista Entertainment Solutions
 User Guide Veezi POS Vista Entertainment Solutions 2016-05-02 Copyright Notice Copyright 1996-2016 Vista Entertainment Solutions Ltd. All rights reserved. Veezi is a Registered Trademark of Vista Entertainment
2005 National Information Services - QuickBill for Easy Dental version 3.0. QuickBill. for Easy Dental. Version 3.0
 QuickBill for Easy Dental Version 3.0 727 E. Utah Valley Dr., Ste. 750 American Fork, UT 84003 Tel: (800) 734-5561 Fax: (801) 847-3800 1 SEPTEMBER 2005 COPYRIGHT 2005 Easy Dental Systems, Inc. and National
TABLE OF CONTENTS (0) P a g e
 P a g e") GREEN 4 TICKETING POS USER GUIDE TABLE OF CONTENTS About this Document... 4 Copyright... 4 Document Control... 4 Contact... 4 Logging In... 5 Booking Screen... 6 Tab Headings... 6 Menu... 7 Shopping Cart...
GREEN 4 TICKETING POS USER GUIDE TABLE OF CONTENTS About this Document... 4 Copyright... 4 Document Control... 4 Contact... 4 Logging In... 5 Booking Screen... 6 Tab Headings... 6 Menu... 7 Shopping Cart...
TERMINAL STRUCTURE YOUR VX520 TERMINAL
 TABLE OF CONTENTS Terminal Structure Your VX520 Terminal... Terminal Structure Your VX680 Terminal... Getting Started... Purchases... Offline Sales Transactions... Refund... Void... 10 Pre-Authorisation...
Configuring FDMS North (Cardnet) Check Processing
 Check Processing") One Blue Hill Plaza, 16th Floor, PO Box 1546 Pearl River, NY 10965 1-800-PC-AMERICA, 1-800-722-6374 (Voice) 845-920-0800 (Fax) 845-920-0880 Configuring FDMS North (Cardnet) Check Processing The following
One Blue Hill Plaza, 16th Floor, PO Box 1546 Pearl River, NY 10965 1-800-PC-AMERICA, 1-800-722-6374 (Voice) 845-920-0800 (Fax) 845-920-0880 Configuring FDMS North (Cardnet) Check Processing The following
PeopleSoft Requisition Manual Using the PeopleSoft Requisition System
 PeopleSoft Requisition Manual Using the PeopleSoft Requisition System V8.9 September 2014 Table of Contents OBJECTIVES... 3 OVERVIEW... 3 CUSTOMIZING SCREEN... 4 MODULE 1: ENTERING A REQUISITION... 5 Navigating
Version 5. Quick Start Guide
 2012 Version 5 Quick Start Guide Sales & Management Software for the Salon & Spa Industry SuperSalon Version 5 Quick Start Guide SuperSalon Quick Start Guide Phone: 888-458-1001: For Support, Paper & Hardware
Then enter your PIN, also created during the enrollment process. After entering this data, select Submit.
 The screens you will see in this guide were made for demo purposes, and may contain unrealistic payment or payee information. If you have questions not addressed in the tutorial, contact your Bill Pay
CASELLE Classic Cash Receipting. User Guide
 CASELLE Classic Cash Receipting User Guide Copyright Copyright 1987-2008 Caselle, Inc. All rights reserved. This manual has been prepared by the Caselle QA documentation team for use by customers and licensees
Using the Commonwealth Bank EFTPOS terminal with QuickPOS
 Q U I C K P O S S U P P L E M E N T Using the Commonwealth Bank EFTPOS terminal with QuickPOS This special supplement shows you how to set up and use QuickPOS with the Commonwealth Bank s EFTPOS terminal.
Creating Requisitions
 Creating Requisitions Users Guide REVISED 1/27/10 DEL MAR COLLEGE, PURCHASING DEPARTMENT TABLE OF CONTENTS TABLE OF CONTENTS... 2 LOGGING INTO DATATEL - COLLEAGUE... 3 PROCESS FLOW... 5 CREATING A NEW
atrievefinance Enhancements
 atrievefinance Enhancements Batch File Inventory Finaliz ed By Audit This report now shows the User ID who finalized the batch as an additional audit measure. Dictionary Additions Future Year Update Page
CYMA IV. Accounting for Windows. Accounts Receivable Training Guide. Training Guide Series
 CYMA IV Accounting for Windows Training Guide Series Accounts Receivable Training Guide December 2015 CYMA Systems, Inc. 2330 West University Drive, Suite 4 Tempe, AZ 85281 (800) 292-2962 Fax: (480) 303-2969
OneOne Infinity Loyalty System
 Arch User Guide ver. 26 Classification: Document History Date Version Changed By Details 2015-08-18 1.0 Michelle Lategan Created Document 2016-02-18 1.1 Michele Lategan Updated Document 2016-03-03 1.2
Enhancements in Spectrum Last Updated: April 5, 2018
 Enhancements in Spectrum 14.24 Last Updated: April 5, 2018 Status: Thunderbirds are GO! AP BI BI BI BI CM JC JC JC MM PO PO PO PR PR PR PS ST ST ST Use Tax Report Supports Work Orders Deep Linking New
Payments - EMV Review. EMV Functionality Inside OpenOne
 Payments - EMV Review EMV Functionality Inside OpenOne A Brief History EMV stands for Europay, MasterCard and Visa. It is a global standard for cards equipped with computer chips and the technology used
Accounts Receivable (AR)
") Accounts Receivable (AR) Contents Configuration... 2 Kroll Configuration... 2 Store Configuration... 3 Creating a New AR Account... 6 The AR Profile Explained... 7 Detail Tab... 8 Invoices Tab... 9 Payments
Accounts Receivable (AR) Contents Configuration... 2 Kroll Configuration... 2 Store Configuration... 3 Creating a New AR Account... 6 The AR Profile Explained... 7 Detail Tab... 8 Invoices Tab... 9 Payments
SAMPLE - Not to be Reproduced. designed by Regina Rexrode
 Images used on the front cover and throughout this book were obtained under license from Shutterstock.com. 2016 Copyright by Armond Dalton Publishers, Inc. Okemos, Michigan All Rights Reserved. No part
Integrated Payment Processing. User Guide V0409
 Integrated Payment Processing User Guide Welcome! Thank you for choosing POMIS and TransFirst Health Services as your complete payment processing solution! We believe the following steps will ensure your
Acumatica Warehouse USER GUIDE FOR HANDHELD & MOBILE DEVICES V
 Acumatica Warehouse USER GUIDE FOR HANDHELD & MOBILE DEVICES V. 18.11.02.1 SCANCO WWW.SCANCO.COM SUPPORT: 330.645.9959 FAX: 330.645.9969 EMAIL: SUPPORT@SCANCO.COM Copyright 2018. All rights reserved. Acumatica,
HARBORTOUCH HOSPITALITY USER GUIDE. Harbortouch Technical Support: or
 HARBORTOUCH HOSPITALITY USER GUIDE INDEX EMPLOYEE FUNCTIONS: Clocking In/Logging In Clocking Out Beginning a Transaction Payment Options Host Mode Customer Database List View Ticket Functions Item Functions
Clarity Accounts Payable Year-end Procedure Guide 2017
 Clarity Accounts Payable Year-end Procedure Guide 2017 Clarity Accounts Payable Year-end Procedure Guide - 2017 Table of Contents Caselle Clarity Accounts Payable Year-end Checklist 2017... 1 Welcome back!...
P O S U S E R G U I D E with I N T E G R A T E D E E E. Magenta Retail Support. Australia New Zealand
 P O S U S E R G U I D E with I N T E G R A T E D E E E Support Australia 1800 111 475 New Zealand 0800 088 475 Contents HINTS & TIPS... 5 PRODUCT SEARCHING... 6 1 st Word Search... 6 Advanced Search...
A/R Billing Invoices
 Overview A/R Billing Invoices DPHS Version 7.0 Accounts Receivable billing invoices are entered and posted in batches. Navigate to Accounts Receivable>Billing Page 1 of 10 B Data Entry The Data Entry menu
POS SETTING TASK TYPES
 CONTENTS POS SETTING... 4 1. TASK TYPES SALES / HOLDING PROCESS... 10 RENTAL MODE / RENTAL MANAGER... 11 LAYAWAY MODE / DEPOSIT... 12 SAVE LAYAWAY/ LAYAWAY PICK-UP... 13 QUOTATION MODE... 14 WORK ORDER
Winzer Corporation 1 Revision: 4.0
 Table of Content Section 1: Getting Started... 2 1.1 Overview... 2 Section 2: Installation Overview... 3 2.1 Install CD / Start.exe... 3 2.2 Welcome Screen... 4 2.3 Device Selection... 4 2.4 Auto or Industrial...
ClubConnect Accounts Payable Understanding Invoice and Check Types for Easy Processing
 ClubConnect Accounts Payable Understanding Invoice and Check Types for Easy Processing Webinar Topics Invoices... 3 Special Invoice Situations... 3 Prepaid Invoices... 3 Reciprocal Club Invoices... 8 Invoices
BillQuick QuickBooks Integration
 Time Billing and Business Management Software Built With Your Industry Knowledge BillQuickQuickBooks Integration Advanced Integration Guide BQE Software, Inc. 2601 Airport Drive Suite 380 Torrance CA 90505
Purchase Correction or Void AEROPLAN TRANSACTIONS...20
 Contents ABOUT THIS GUIDE...1 PROCESSING TRANSACTIONS...3 CREDIT CARD TRANSACTIONS - SWIPE/INSERT/TAP... 3 CREDIT CARD TRANSACTIONS - MANUAL ENTRY ON PIN PAD... 6 CREDIT CARD TRANSACTIONS - MANUAL ENTRY
QuickBooks Integrator for PostalMate VSoftwareTools.com
 Page 1 IMPORTANT Please, carefully read these Instructions fully, BEFORE trying to setup the QuickBooks Integrator (QBI) in PMTools. The QuickBooks Connector (QBC) is a separate program installed on the
Using PAYD Pro Plus for Gift Cards
 Using PAYD Pro Plus for Gift Cards (10/17) For more information and assistance: Web: moneris.com/support-paydproplus-mobile Toll-free: 1-855-423-PAYD (7293) Record your Moneris merchant ID here: Contents
Version MICROSALE. System Documentation. Phone Order Guide
 Version 9 MICROSALE System Documentation Phone Order Guide TABLE OF CONTENTS MicroSale Version 9 - Phone Order Guide 01 Basics of Phone Orders 02 03 Delivery Zone Setup Creating a Driver 04 05 Edit Customer
What s New in WashConnect? System Requirement. New Benefits, Features, and Enhancements. WashConnect Version
 January 11, 2018 What s New in WashConnect? We are pleased to announce the following new benefits, features, and enhancements in the WashConnect management system. New and improved WashConnect features
What s New in WashConnect? System Requirement. New Benefits, Features, and Enhancements. WashConnect Version
 November 12, 2018 What s New in WashConnect? We are pleased to announce the following new benefits, features, and enhancements in the WashConnect management system. New and improved WashConnect features
What s New in WashConnect? System Requirement. New Benefits, Features, and Enhancements. WashConnect Version
 November 21, 2018 What s New in WashConnect? We are pleased to announce the following new benefits, features, and enhancements in the WashConnect management system. New and improved WashConnect features
onepos Management Console Manual Version 5.0
 onepos Management Console Manual Version 5.0 onepos Manager Console Manual - Version 5.0-1 Copyright (c) 2001-2016, onepos, LLC All rights reserved. Except as permitted under the copyright act of 1976,
ENTRY AND INVOICE MASTER ENTRY SCREENS: SEARCHING FOR INVOICES
 AR INVOICE ENTRY ENTRY AND INVOICE MASTER ENTRY SCREENS: SEARCHING FOR INVOICES Select the Invoice Entry screen from the AR menu to: Search for Accounts Receivable invoices. Enter invoice information,
COMMON TRANSACTIONS AND FUNCTIONS
 ENTERING ITEMS MANUAL ENTRY UPC/SKU/Description Select QUANTITIES (+/-) OR ITEMS. Enter UPC, SKU, or item description in ITEM field. Select desired item in window on right of screen. USE HOT KEYS Hot keys
Financials 102. Accounts Payable
 Financials 102 Accounts Payable Introduction to This Guide Copyright Copyright 2010 ACS Technologies Group, Inc. All rights reserved. Reproduction of any part of this publication by mechanical or electronic
PHARMACHOICE LOYALTY REWARD PERKS MARGIN*PLUS POS
 PHARMACHOICE LOYALTY REWARD PERKS MARGIN*PLUS POS Below you will find an overview of the Pharmachoice Loyalty Reward Perks program, including an outline of it s configurations. You will also find the necessary
Aldelo Gift Card Server User Manual
 Aldelo Gift Card Server User Manual Aldelo Gift Card Server User Manual PUBLISHED BY Aldelo, LP 6800 Koll Center Parkway, Suite 310 Pleasanton, CA 94566 Copyright 1997-2014 by Aldelo LP. All rights reserved.
BillQuick QuickBooks Integration
 Time Billing and Business Management Software Built With Your Industry Knowledge BillQuickQuickBooks Integration Integration Guide BQE Software, Inc. 2601 Airport Drive Suite 380 Torrance CA 90505 Support:
Terminal Guide VeriFone VX520 & VX820 Duet Retail Restaurant
 Terminal Guide VeriFone VX520 & VX820 Duet Retail Restaurant This Quick Reference Guide will guide you through understanding your terminal s functionality, and will help you with troubleshooting your payment
International Institute of Tropical Agriculture
 ORACLE FINANCIALS USER GUIDE International Institute of Tropical Agriculture Accounts Payable Author: Oracle Implementation Team Creation Date: October 27, 2001 Last Updated: October 27, 2001 Control Number:
Table of Contents.
 Quick Start Guide Table of Contents Equipment Setup and Break-Down 1 2 Processing a Sale 3 Payment Types 3 Tax Change 3 Scanning Items 4 Price Checks 4 Voids/Returns 4 Reprints 4 Gift Certificates 5 All
HealthEquity Employer Portal Guide HealthEquity All rights reserved.
 HealthEquity Employer Portal Guide 2013-2015 HealthEquity All rights reserved. INTRODUCTION 09 ACCESSING PENDING PAYMENTS 01 LOGIN PROCESS 09 MODIFYING EMPLOYER INFORMATION 01 ADDING INSURANCE INFORMATION