PC GENESIS PAYROLL GASBO FY18. Presented By: Katie Green
|
|
|
- Grant Wilkins
- 5 years ago
- Views:
Transcription


1 PC GENESIS PAYROLL GASBO FY18 Presented By: Katie Green
2 Table of Contents 1.Quick review ( Steps for Setting up a payroll) 2.How to set up a manual Payroll 2. Earning History Adjustment TRS PSERS 3.December Payroll Install Release Update GHI 4.January Payroll Set Up Pay Schedule's
3 Steps for a Payroll Run Payroll Setup Run pre-payroll reports Update employees with current changes Run post update validation reports Calculate payroll and update YTD Print checks and direct deposits Print registers and create NACHA Print final distribution Post to earnings history and financial


4 Check and Direct Deposit Menu

5 How to set up a Manual /Void Check Run


")
6 To set up a Manual/Void Check Run From the Main Menu go to (PF2)
")
 Setup")

7 Payroll System (F2) Payroll Setup Menu (F1) Setup Manual/Void Check Run Only (F2)


8 Enter in the date that you want to print on your checks. If you are not posting leave press enter If you mark Y for leave please see the message then enter
 Payroll Check and Direct Deposit Menu (PF3) Manual Checks & Voids")
9 After setup is complete it will take you back to the setup Menu PF16 back to Master Menu. From the Master Menu Use the PF keys below to get Manual/Void &Direct Deposit Menu Payroll System (PF2) Payroll Check and Direct Deposit Menu (PF3) Manual Checks & Voids From Previous Pay Menu (PF9) Then click on (PF9) Enter Manual Check/Direct Deposit

10 Enter the Employee Name or Employee Number


11 Enter the Check Date Enter the Check number Remove the Direct Deposit bank and account number. You can not process a direct deposit check through this process Change FICA to N Our process type is S Our Pay period is the same as check date We are refunding a deduction so we are going to deduction code 17 and refunding the put in as negative. Employer Ded N Form PF9 Manual/Void Enter F8 to validate 11


12 Example of extra hours came in late
13 PF10) will allow you to view your check After you finish viewing the data FP16 will take you back to Manual/Void &Direct Deposit Menu.


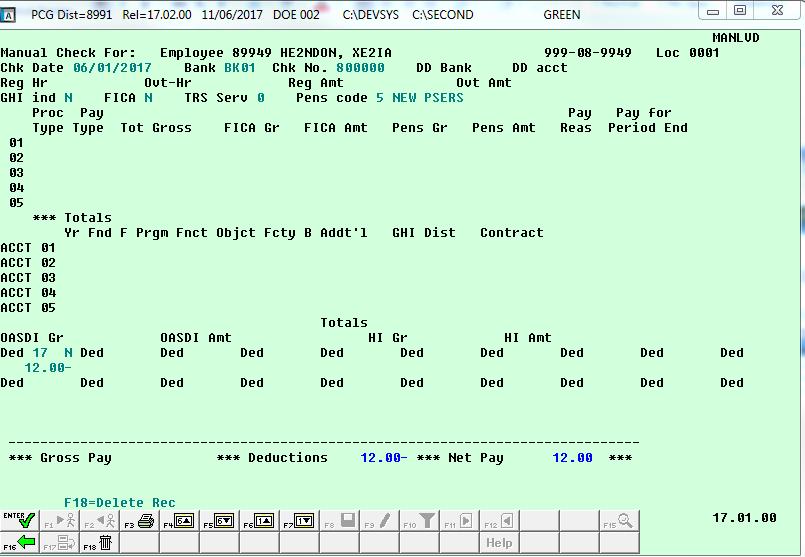
14 Click of PF Key Verify all data is correct

15 To Print Check click on PF13 After you completed entering your check information it will take you back to Manual/Void &Direct Deposit Menu.


16 Click the box to choose the check to print You will receive this Message Click on Yes to print check


17 Yes if checks are inserted Select Printer Have all checks printed Verify last check number


18 Click PF16 to go back to the Check and Direct Deposit Menu After your checks have printed it will take you back to Manual/Void &Direct Deposit Menu.
19 Once you have completed printing your check you will go through The process of closing your payroll like a normal cycle Print Final Payroll Register (F7) Print Deduction Registers and Create Direct Deposit Export File (F8)
20 Print Final Payroll Distribution (F12) Calculates employer paid benefits Creates files to post earnings history and budget
21 Update Earnings History with Current Pay (PF13) Behind the scenes Backup of PAYDATA to PAYDATAQ Backup of SECOND to SECONQ
")

22 Update Budget Files with Current Pay (PF14) Run PF13 and PF14 back to back Payroll is complete
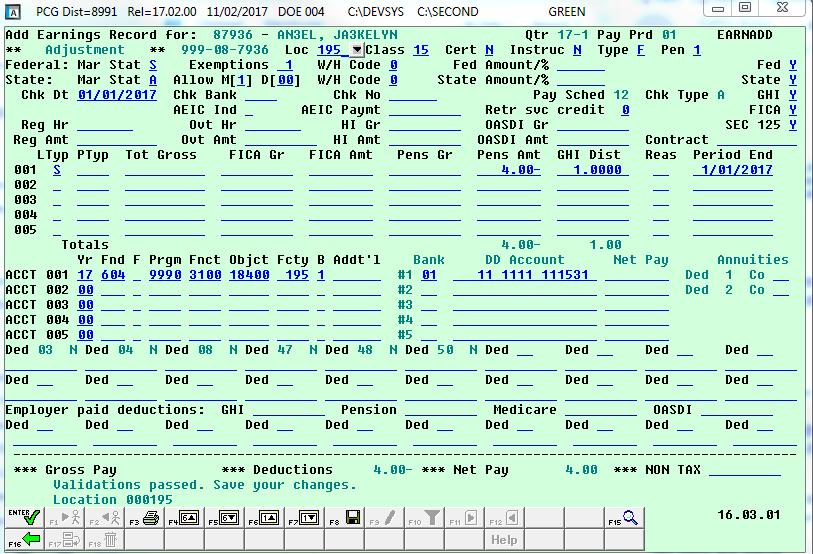
23 Earning History Adjustment
24 From the Main Menu (PF2) Payroll System (PF10) Earning History Menu (PF1) Add Earning History Record

25 Enter an (A) for adjustment Year the quarter and pay period

26 PSERS Earning History Correction
27 From the Main Menu (PF2) Payroll System (PF10) Earning History Menu (PF1) Add Earning History Record
28


29 TRS Earning History Correction

30
31 The Following steps should be taken to prepare for December 2017 Payroll
32 Release will be available 11/30/2017


33 When updating the SHBP deductions amounts for active employee s Run in Trail mode Do not forget to go back and run in again with the Trail mode set to N. 01/01/2018


34 The Following steps should be taken to prepare for January 2018 Payroll


35 Release will be available 12/29/2017
")
36 Setting up pay schedules (PF2) (PF13) (PF1)


37 No of pays for Tax Calc should be 12 if you have one payroll a month
38 The End Katie Green