Point-N-Sell Toodyay Bottlemart
|
|
|
- Hillary Barnett
- 5 years ago
- Views:
Transcription


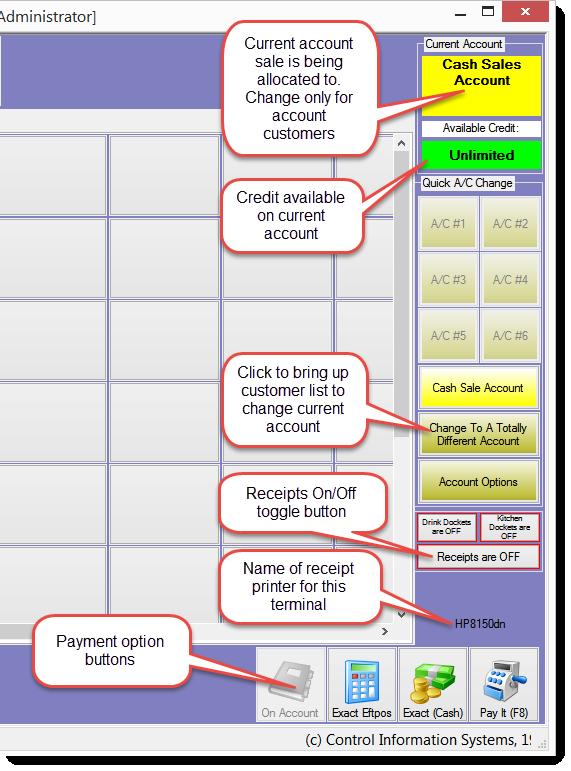
1 Point-N-Sell Toodyay Bottlemart Introduction Before using Point-N-Sell you need to setup your inventory, customers, vendors and users in Control Professional. There is a pdf for each of these modules as well as others to guide you through the setup and maintenance of the system. For a very basic setup you will need to enter your items/services in the inventory module so you have something to sell. Once you have done this you will then add tiles to Point-N-Sell so when you click on them they will add the item to your sale. Open Point-N-Sell by double clicking the icon on your desktop. Generic logon enter 1 and accept. If you have setup users to have their own logon with password then each person enters their unique code. The following screenshots show sections of Point-N-Sell with short explanations.

2


3 While the screenshots above give you a good overview of what is available on your screen below you will find a more detailed explanation and how you can use the system to your best advantage. It is of course based on a general retail situation but further industry specific setups and user instructions will be made available over time. If you have not found your industry or your business is unique let us know and we will work with you to provide further information. Setting up Tabs and Tiles in Point-N-Sell Firstly all products and/or services are setup in Control Professional if you need instructions on how to do this go to our pdf Inventory Module alternately if you have existing data that you want converted into the system call our office on and we will discuss this with you. Once you have completed this task you are ready to setup the tabs and tiles for Point-N-Sell. In Point-N-Sell you can have multiple tabs and they can be used similar to categories ie Dried goods, Frozen etc. In the first image you will see the standard two tabs that are setup at install. In the second you can see I have added one tab and renamed all the tabs. Adding and Editing Tabs Ensure Point-N-Sell is closed and open Control Professional. Click on File Point of Sale (POS) Master files Touchscreen Point-N-Sell Tabs. Using the right mouse click to bring up the add/edit menu either edit an existing tab and rename it or add a new tab. The tab number determines its position. Keep in mind that depending on your screen size you may have to use the scroll bar if you have too many to fit the area. When you reopen Point-N-Sell your new and renamed tabs will be available.


4 Adding Tiles in Point-N-Sell Open Point-N-Sell. On an empty tile right mouse click to bring up the Setup POS Item Tile box. Now click on the box Add Item to bring up the list of all the products/services you have previously entered. To search for an item enter part of the description and press search. Select the item you want to add and click Accept. Now you can choose to change the tile colour. Your new tile is now ready to use. Continue adding tiles for each product/service you will be selling.


5 We also offer a service of setting up your Tabs and Tiles to save you time. If you are interested in this please call our office during business hours. Actions The next image is the Actions box and all you need to do to open it is click on the Actions button at the bottom of the Point-N-Sell screen. The buttons here are quite straight forward but it is knowing when you need to use them that is the key. Starting on the top row left I will detail each action.

6 Cash Summary Action This action opens the Cash Drawer Summary for the computer you are on. If you have multiple POS terminals you will need to do this on each machine. Most business will run this at the end of day but if you have multiple shifts it can be done at the end of each shift to balance for the operator. The Cash Drawer Summary shows the totals for all transaction types, money put in or out and other general information. This is just a screen of the day s activity to print off this information click on the Print Till Sheet button. Your Till Sheet will print to your receipt printer. Now you can balance your cash drawer for the day. Example of daily Till Sheet below.


7 On the Till Sheet example you will see a line Money Put In this was the float used at the start of the day. This brings us to the button on the Cash Drawer Summary called Start of Day. Start of Day This option can be run either first thing in the morning or after you have balanced off your cash drawer at the end of day. Pressing this button will clear the Cash Drawer Summary of all totals ready for a new trading day or next shift. After pressing the Start of Day button you will be prompted by the system to confirm the action. If you proceed it will then bring up a box where you will enter a Put In amount. This amount will be your starting cash float for this cash drawer. The system will then go back to the Cash Drawer Summary screen where you will see this amount now showing as Cash In Drawer. You are now ready for your next trading day or shift. Click the Go Back button to exit this screen. Put Money In As mentioned above this is how you enter your daily cash float but can be used throughout the day if you need to increase the cash in the draw. Take Money Out Just as it says. If you take cash out of the drawer use this button to enter the amount taken. This could be used when reducing the amount of cash in the draw for security reasons or if you need to use cash to make a purchase (i.e.: milk, tea etc). I strongly recommend a note with the reason for taking out the cash be left in the draw, makes balancing at end of day much less stressful when you or someone else could forget the action on a busy day. Setting cash drawer maximum You can set a maximum cash amount for the cash drawer so that a warning message appears in Point-N-Sell screen. With Point-N-Sell closed, open Control Professional. Click on Tools Point of Sale POS Options. In the Setup POS Options box enter the amount you want to have as the maximum amount held in this drawer. Remember anything setup in the Tools Point of Sale section must be done on each POS system for multiple user systems. The warning message is non intrusive so it does not affect your use of the system. The other options in the Actions sections are very much as they seem, reprint a receipt, till sheet and so on. One you may need in daily transactions is the Refund Toggle which will be discussed in the Daily use section below.

. To take payment press F8 on the keyboard or click on the payment buttons in the bottom right corner of the screen. The Enter Payment screen will appear (see below).")
8 Daily use of Point-N-Sell So the setup work is now completed and you are ready to use the system. Above we discussed in detail the Cash Summary Cash Drawer Summary and its uses. Now it s time to do some sales and if the need arises refunds. In Point-N-Sell just click on the item/s you want to add to the sale or use the barcode scanner to scan your item/s (barcodes will have to be added to the items in Control Professional to use this option). To take payment press F8 on the keyboard or click on the payment buttons in the bottom right corner of the screen. The Enter Payment screen will appear (see below). In the Payment screen choose the method of payment then use the exact button or enter paid amount, click Accept to complete. Receipt will print and cash drawer will open. You have completed a sale. See below for details on selling Multi-buys.


9 Selling Multi-Buy Items Once you have multi-buys setup in Control Professional selling them in Point-N-Sell is as easy as choosing the items and quantities that the multi-buy consists of. In the screenshot below the multibuy set up is called Red Wine Bag and is a 6 for $60 deal. As you select or scan an item it will appear in the sales screen with its standard price until you enter the sixth item and then the multi-buy price kicks in. It is a must to remember that the +++Multi button and the +1 More button cannot be used to increase the quantity for Multi-buys. Use on the tiles to click the item (multiple times to add same item) or scan each barcode individually.