User Quickstart Guide
|
|
|
- Jody Townsend
- 5 years ago
- Views:
Transcription


1 User Quickstart Guide November 2015


2 Page 2 The Two Minute Overview


3 Campus User Quick Start Guide for VeriTime provides a full picture time and attendance by placing absences captured in Aesop alongside working time captured in VeriTime, helping school districts better manage staff and ensure accurate pay for hours worked. Logging in on the Web Connecting to Aesop To sign in to VeriTime, navigate to veritime.aesoponline.com in your web browser. Enter your User ID number and PIN, then click Sign In. Can t remember your login info? If you re having trouble logging in, click the Forgot your ID or PIN? at the bottom left for more information. VeriTime makes it easy to connect to Aesop right from the homepage. Click on the Menu Grid in the top left corner, then click the Aesop button. Absences that are entered in Aesop are pulled into VeriTime timesheets. The absent time is then added to the working time captured in VeriTime giving you a complete picture of time and attendance. The People Locator The People Locator is for kiosk users only, but provides real time insight into users who are signed in and on the clock. Check out the Using the People Locator article and video in the Learning Center to find out more about this helpful resource. Finding a User To find a particular VeriTime user, you can look for the user with the search bar at the top of the page or click My Users on the home page to see a list of all VeriTime users in your visibility. Once you click on a user, you can view their working schedule, payroll reports pertaining to them, as well as viewing their timesheet. Reviewing Timesheets Once a timesheet is submitted, the timesheet will need to be reviewed for accuracy. To help to do this, you have several reports at your fingertips including the Work Summary, Work Detail, and Payroll Review. A great resource for quickly reviewing time is the Reviewing and Approving Timesheets article in the Learning Center. Campus User Quick Start Guide for VeriTime Copyright 2015 Frontline Technologies Group, LLC Page 3


4 Campus User Quick Start Guide for Finding Missed Punches This is primarily for kiosk users, but is vital to ensuring time is properly reflected prior to approval. The Clock Exceptions report is how you can see if there are missed punches on a timesheet, if your staff is clocking in on schedule, if staff members are consistently late, and so one. Reading the Using the Clock Exceptions Report article for more details. Editing Timesheets The timesheet is where all working time, absent time, and leave time is stored for a VeriTime user. We suggest you view the Getting to Know the Timesheet article in the Learning Center to familiarize yourself with the look and functionally of the timesheet. The date range tool at the top allows you to select the range of time you would like to edit and the Actions button beside it gives you options for adding timesheets or moving time events. Editing time on a timesheet is as simple as clicking on the IN or OUT box for each day. Approving Timesheets Once timesheets have been reviewed and edited, approving time can be done with a few simple clicks. From the Timesheet Review, select the users that you would like to approve and click Approve, Reject, or Reset Timesheets. Choose Approve Selected from the Actions dropdown, then click Submit. As referenced above, check out the Reviewing and Approving Timesheets article to see more detail. Making Changes After Approval If changes need to be made to timesheets after approval, the timesheet needs to be reset to pending, as a timesheet in approved status cannot be modified. In the Timesheet Review, select the users that need changes and click the Approve, Reject, or Reset Timesheets button once again. Select Reset Selected to Pending from the Actions dropdown, then click Submit. Changing Your PIN Getting Help and Training To change your VeriTime PIN, click on your name at the top of the screen and select Change PIN from the dropdown menu. A page will appear prompting you to enter a new PIN. If you have questions, want to learn more about a certain feature, or need more information about a specific topic, visit the VeriTime Learning Center. Click the Question Mark in the top bar and choose Learning Center from the dropdown. Page 4 Campus User Quick Start Guide for VeriTime Copyright 2015 Frontline Technologies Group, LLC

5 Using the People Locator Watch Video From the side navigation click Reports, then choose People Locator. Viewing Information in the People Locator The People Locator is designed to give you a snapshot of where everyone is in real-time for the current day. The key to learning this information is to focus on the "Status" column. It will tell you the last clock event for someone or if they have scheduled leave. Page 5
6 Use the various filters at the top of the report to specify the info you are looking for. Click the arrow left of the name to see any details that are available. Here you will see related absence information along with a complete schedule and clock activity for the day. Page 6
7 There are four different types of statuses: In/Out Event: A record of the most recent time a user signed in or out. Leave: Planned time away such as an absence for the day or a calendar event. Scheduled: A user is scheduled to work, but the current time is before their scheduled "IN" time. Missing: A user is scheduled to work, but the current time is past their scheduled "IN" time and no clock event has been recorded. Page 7
8 Work Summary Report The Work Summary report provides high level information about Users for a given time period. By default the data is broken down by date range but can be further broken down into the following: day, work week, location, and job type. To access the Work Summary report, click Reports in the side navigation, then choose Work Summary. At the top of the report, you can choose the pay period or date range, filter options, and choose which columns you want included in the report. Page 8
. Users With Time This filter returns only users with time (total time).")
9 Group By: The Group By drop-down menu lets you choose how to group information in your report. For example if you choose Day, the info in the report will be grouped by individual date. Filter By: Net Difference This filter only returns users with a net difference (excludes zeros). Users With Time This filter returns only users with time (total time). To apply options and filters, click the Run Report button. The report itself shows a summary of the data for your employees. By clicking on the user s name, you can access their user profile. You can also click the circle ( ) beside their name and choose Current Timesheet to view their timesheet. To see the user's Work Detail report, click the Work Detail Icon ( ). Page 9

10 You may also access an employee's "Work Detail" report by clicking the side navigation and choosing Work Detail under the "Reports" tab. Page 10
11 Using the Work Detail Report Watch Video The "Work Detail" report provides low-level information about users for a given time period. The data is broken down by work week, then day, then location/job type combination. Running the Report To access the Work Detail report, choose Reports in the side navigation, then click Work Detail. At the top of the report there are a number of filter options including pay period/date range, location, and Job Type. You can search for the employee by typing their name in the Search for User box and clicking the Run Report button. Page 11

12 Using the Report In the report, you will see 3 main sections: Dates (scheduled time), Events (recorded time), and Wages. You'll also see a "Job Summary" at the bottom of the report for each employee that summarizes all events and wages, and splits them into different job types (if the employee works multiple roles). Page 12

13 Master Calendar If a Master Calendar event occurs during that pay period, it will be listed under the "Events" column. For example, in this particular report, you can see the holiday Labor Day is listed as a Master Calendar event. Page 13
14 Accounting Codes/Account Allocations Each time event can have an associated accounting code or account allocation that can be set up automatically or set manually on the timesheet. You can see the different accounts connected to each time event here in the Work Detail Report. Page 14
15 Wage Codes Under the "Wages" section, you can see wage codes for time captured, including regular time, overtime, and paid/unpaid holidays. For example, this particular employee had a paid holiday, and worked more than his weekly scheduled hours (as specified by GAP). Page 15

16 Aesop Absences You can also open Aesop absence details right from the work week summary under the "Events" column. For example, this employee took a personal day on September 9th. A link to the absence details appeared on his work week summary's "Events" column under "Type." Clicking the link takes you to the "Absence Details" page, where you can see all the details for the absence that you would see in Aesop, but without leaving VeriTime! Page 16

17 Exporting and Payroll Summary If you would like to export the report, click the Export button at the top of the report. Page 17

18 To see the user's payroll summary, click the Payroll button in the same row as the user's name. Page 18

19 Using the Payroll Review Report The "Payroll Review" report shows all the different types of wages an employee will receive for a given date range. The default date range is 14 days. If you do not see the Payroll Review report under "Reports", you may not have permission to use it. For more information, please contact your VeriTime Administrator. To access the report, click on the Payroll Review option from the side navigation under "Reports". At the top of the report, you can filter the results by user type, location, job type, and wage code. You can also group the results by wage code or interface ID. Page 19
20 What s the difference between Wage Code and Interface ID? Wage Codes are what determines how hours are paid for the employees. These codes come pre-loaded in VeriTime as the default codes. An Interface ID is a custom code that you can assign to replace the default Wage Codes. These usually are used in order to integrate with a third-party payroll system. Click here to learn more about Wage Codes and Interface IDs. The results of the report will show all the wage codes applied to an employee for the date range given. It will also show the Wage Duration and Total Duration. The most used feature of this report is filtering the results by wage code. In other words, if you don t want to see every wage code on this report you could specify the ones you want to see. For instance, if you only want to see time paid at regular rate, only select the filters that are associated with a regular rate of pay (Regular, Gap, Holiday_Paid, etc.). Click here for definitions of each wage code. Page 20

21 Let s pretend you only want to run this report to show overtime hours for custodians only. The filters would look like this before you ran it: After you click Run Report the results will only show overtime hours for custodians: Page 21
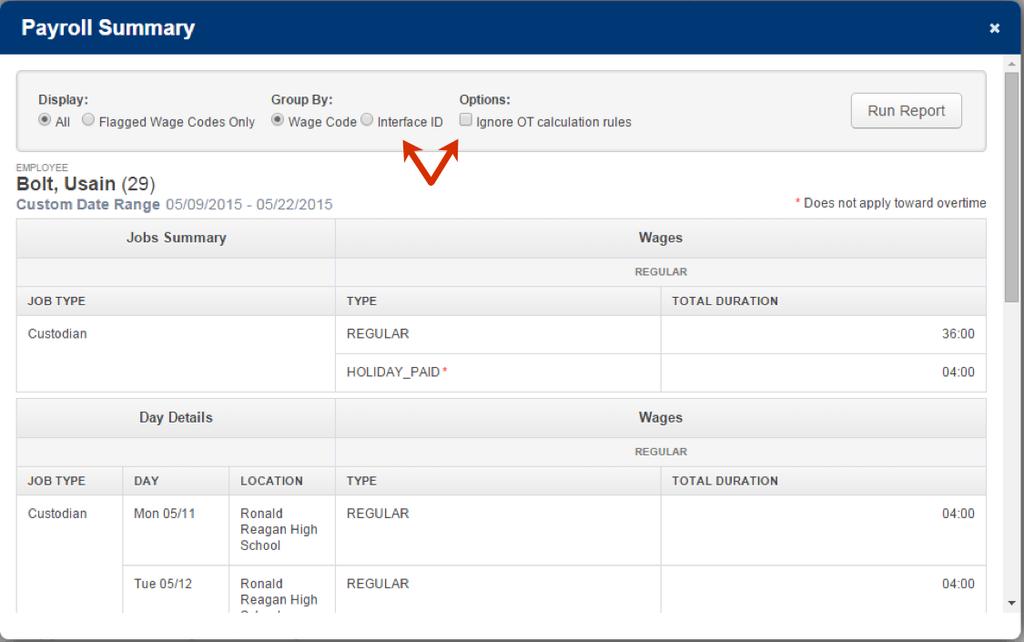
22 Another option is to ignore OT calculation rules: In the staff group, you need to specify whether particular absence reasons or master calendar events count toward an individual s OT calculation for a week. This would apply regardless of whether the time off is paid or unpaid. So even though a day worked and a sick day are both paid at regular time (they share a wage code), on the Payroll Review report they will appear in separate rows because one of them counts toward OT calculation and the other one does not. If you check the Ignore OT calculation rules box, those lines (the durations of hours) will be combined into one row. Let's Look at an Example: nd Usain Bolt has a holiday on Friday, May 22 due to Memorial Day. This will be a paid holiday, however the holiday hours do not count toward his total hours in his week that would give him overtime. If you were to run the Payroll Review report without changing anything (only running the report for Usain), this is what it will show: Page 22
, while the Regular work hours are being included in that")
23 Notice that the Regular and Holiday_Paid wage codes appear on separate rows. The reason those rows have not been combined to show 20 hours total is because the Holiday is not counting toward OT (note the red asterisk), while the Regular work hours are being included in that calculation. So if we want them combined, select Ignore OT calculation rules and they will be combined to reflect 20 hours: Page 23


24 On the left side of the row there are two icons: The first one is the Timesheet icon which will show the timesheets for the date range for which you are running the Payroll Review report. The second icon is for the Payroll Summary report. This report is the same information of the Payroll Review report however it breaks down the data by day so you can see which hours were worked on a specific date. You can also group by Interface ID and ignore OT calculation rules just like in the Payroll Review report. Page 24
25 Page 25
26 Reviewing and Approving Timesheets Watch the Quickly Reviewing Time Video Watch the Reviewing and Approving Timesheets Video To access the Timesheet Review click Reports in the side navigation, then click Timesheet Review. Depending on your permissions setup you may not have access to all the functions you see here. On the "Timesheet Review" page, pick the desired date range. The VeriTime Administrator will have set up the date ranges, but you can also select Custom Range at the top of the drop-down list. You can also use the "Filter" and "Sort" drop-down menus to filter and sort the timesheet accordingly. Filter Options: Outstanding Timesheets - Show only the timesheets that are not completely approved on all levels. Rejected Timesheets - Show only the timesheets in rejected status. Page 26

27 Payroll Exceptions - Show only users who have payroll records that are marked as exceptional in the "Wage Option Assignment" page. Net Difference - Show only users whose timesheets have a net difference. Needs Approval - Show only users whose timesheets are in "Submitted" status For more advanced filtering, click the Advanced Options link. Here, you can change the duration format from "Time" to "Decimal". With the "Time" setting, "7 hours and 15 minutes" would show as 7:15. With the "Decimal" setting, it would show as You can also narrow by user name, locations, job type, and Custom User Groups. To apply the date range and filter options you have selected, click the Search button. The timesheets will display for the date range selected. Each row gives the Total Scheduled, Total Working Time and Paid Leave, Total Time, and Net Difference for the employees for that week. The status of the timesheet is also shown. Page 27
.")

28 Total Scheduled - This is the number of hours based on the recurring schedule. For the date range you have chosen, this is what the person would have worked if all days were typical days (no absences or closed days). Total Paid - This is the total time that the user will be paid for. Total Time - This is the total time for the date range you have selected. Worked hours as well as paid absence durations count toward this time. Admin time is also calculated into this total. Net Difference - The difference between scheduled and total paid time. If the total time is less than scheduled, it shows up as negative. Status - The status of the timesheet will be shown by an icon if you have multiple levels of approval. Clicking on the status brings up the status pop-up. The pop-up will show the last update made to that timesheet record whether it was submitted automatically by the system or if the user submitted it. It will also display comments if any have been entered, and list a time and date stamp for the last update. Also included in the pop-up is the "Status Log" button that will bring up the full status log for that timesheet record. Here is what the Status Log looks like: Page 28


29 To expand a row on the timesheet, click the expand/collapse icon and VeriTime will give you each day s timesheet summary data for that person. To see the actual Timesheet or the Payroll Review, click the corresponding icon next to the user s name. The Timesheet icon is the one with the clock. The Payroll Summary icon is the one with the dollar sign. To take any action on timesheets use the Approve, Reject, or Reset Timesheets button at the top of the Page 29 page. You will get a pop-up window where can choose from the following options.

30 Click Approve, Reject or Reset as appropriate. Once a timesheet is approved, it cannot be edited unless it is reset to submitted or pending. If you reject a timesheet you may be required to select a "Reject Reason" and leave a comment. You should only reject a timesheet if that employee has the permission to edit their own timesheet and make a correction. Page 30
31 Using the Clock Exceptions Report The "Clock Exceptions" report is a quick way for you to search for answers related to Clock Exceptions, such as: Are there timesheets with missed punches? Is my staff clocking in on schedule? Is a staff member trying to get paid for extra time by clocking in early or staying late? Are any staff members consistently late? Are there specific staff members who consistently require supervisors to make corrections? The Clock Exceptions report can help you answer these questions and any more you might have! This report is primarily used for monitoring those who use the web clock/kiosk. To get started, first click on Reports in the side navigation, then click on Clock Exceptions. Page 31
32 At the top of this report you can select a date range, location, job type, and mark the exceptions you want to see. To select a date range, click the text box beside the calendar icon to type in the date range, or click the calendar icon to select the date from a pop-up calendar. You can also search for a specific user s name. Simply click in the text box and type the name. Page 32
33 You can narrow your search by location, job type, or exception. To select an option, check the box beside it by clicking it. To select all options within a category, like "location" for example, check the box beside "All Options". If you are looking exclusively for missed punches, filter your search by only checking the boxes by "Missed In- Adjusted" and "Missed Out-Adjusted" under the "Narrow by Exceptions" column. Page 33
34 To clear your selections, click the Clear button underneath the section you want to deselect. When you are ready, click Run Report. A list of clock exceptions sorted by day, user, location, job type, schedule details, exception details, event details, and comments will appear on the same page. Each user's clock exceptions will be organized by daterange from most recent to oldest. Under the "Schedule Details" column, you can see the scheduled time the user was supposed to work. The IN and OUT times under "Event Details" are the actual times the user signed in and out. Page 34

35 If you would like to export the list, click the Export button at the left upper corner of the report. To see a user's details page, click the user's name. Page 35

36 Getting to Know The Timesheet The VeriTime timesheet can be broken down into three parts: Timesheet Navigation, Timesheet Details, and Timesheet Job Summary. This article shows a brief overview of each part. You can click on the corresponding article in each section to learn how to use each part of the timesheet in greater detail. Page 36
37 Timesheet Navigation (Top of the Timesheet) At the top of the timesheet, you will see the name of the user as well as the Actions Menu, Date Range, Summary of Hours and buttons for Saving, Canceling, Expanding and Collapsing the timesheets. 1. Actions Menu This allows you to preform functions including adding, copying, or moving a timesheet as well as viewing the payroll summary or the change log. 2. Date Range This allows you to view past timesheets by choosing a particular week or selecting a custom date range. 3. Summary of Hours This shows you at a glance both hours accounted for as well as hours that are paid. 4. Saving and Cancelling Buttons - These buttons allow you to save or cancel any changes you make on a timesheet. The buttons will turn grey if no changes have been made. 5. Expanding and Collapsing Buttons These buttons will allow you to expand or collapse all of the timesheets at once. You can also expand a single day by clicking the arrow in the top right corner of that day. To learn how to greater use the Actions Menu, read the Using the Timesheet article. Timesheet Details (Middle of the Timesheet) The Timesheet Details section is the main part of the timesheet. It includes the user s Schedule, Time Events, Admin Time, Leave, and Timesheet Comments. Page 37

38 1. Schedule This is the time a user is expected to work in a given day. 2. Time Events These events are actual time worked. Time events can be recorded from a scan at a kiosk or manually entered directly into the timesheet. If time is manually entered, the time will appear as orange. Additionally, an accounting code or account allocation can be set manually or by default for each time event. 3. Admin Time This is auto-deducted time, typically an unpaid break. 4. Leave This is time deducted due to an absence or a calendar event such as a holiday or calamity day. 5. Timesheet Comments This is a field where optional comments can be left for the approver. To learn how to greater use the Timesheet Details, read the Using the Timesheet article. Page 38

39 Timesheet Job Summary (Bottom of the Timesheet) At the bottom of the timesheet, the total hours for the time period as well as those hours that are paid will be broken down by Location, Job Type, and Event Type. Page 39