FAMIS Desk Reference Manual
|
|
|
- Cornelius Richardson
- 5 years ago
- Views:
Transcription

1 FAMIS Desk Reference Manual 0
2 TABLE OF CONTENTS Overview of Service Request Work Order Workflow in FAMIS... 6 Logging into FAMIS... 7 Logging into FAMIS... 7 Select a Tab... 9 FAMIS Home Screen: Role Selection: Content Window: Folder Forms Reports Shortcut buttons Form navigation Open a form Navigation Bar functions Basic Search Where and when can you perform a search? Start the search function: Enter your criteria Execute your search Go to the next result Advance Search Wildcard search Count the results Definitions Maintenance Types of Service Requests CORRECTIVE ALTERATION PREVENTIVE
3 PM REPAIR SERVICES ADMIN Billing Types Charge No charge Cash No Cost Direct Bill Statuses REQUESTED DECLINED SCHEDULED WAIT APPR APPROVED Priority Crew Service Request Workbench Overview Searching for Service Requests SR Information Request Number Requestor PSID Request Status Speed Type Maintenance Types Location and Date Site ID, building number, floor number, and room number FILTERING YOUR RESULTS Note: Spelling is important Export to Excel
4 Update and Verify Service Request Open an existing Service Request Update Location Update Other SR Information Update and Verify Billing Information Verify or Update Billing Information Update Task List Add Attachments and Notes Create a Service Request Create a new Service Request Convert a Service Request to Work Order Call Center and Work Orders Finding Work Orders Current Schedule Workbench / WO Backlog Current Schedule Workbench / WO Backlog Overview Create custom view Current Schedule Functionalities Assign Work Orders to Employees Mass Closing Work Orders Print Work Order Ticket Work Order Form How to open work order form Searching for Work Orders Searching by entering a Work Order number Wild Card Search Multiple Field Search Workbench Search Work Order Form Overview WO Number Work Order brief description
5 3. Parent WO Equipment Maintenance Type Priority Method Assigned To Work Order Status Dates of Work Order Crew Craft Crew Size Est Hrs/ Current Est Hrs Work Order location (site, building, floor, room) Attachments (Notes, Documents, ) Work Order Ticket Buttons Task List of a Work Order PO s tab Materials Planning Material for a Work Order Inventory Purchase with Shopping Cart feature Time Card Entry Labor Timecard Form details Adding Time for Route Work Orders Supervisor Labor Approval Correct Time Card Entry Work Order Cost Overview of Parts Management Creating Parts Adjusting Quantity and Price Issue Parts to Work Order
6 Overview of Non-inventory purchasing process Create FAMIS Non-Stock Stock Part Create FAMIS Purchase Order (PO) Receiving Item in FAMIS Input an Invoice into FAMIS Return Parts to Vendor (RTV) Recording P-Card Purchases

7 Overview of Service Request Work Order Workflow in FAMIS Figure 1 Work Order Workflow 6

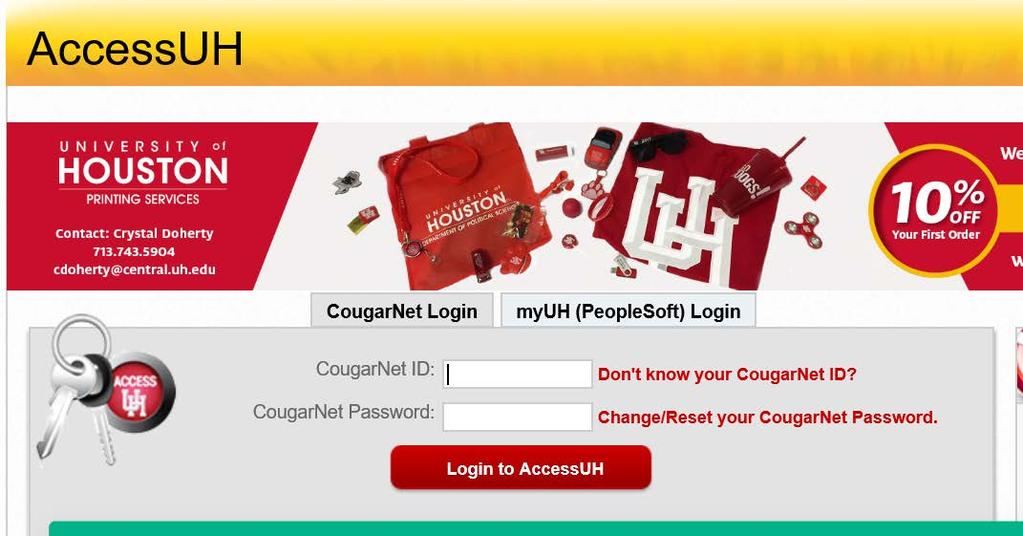
8 Logging into FAMIS Logging into FAMIS 1. Double Click on Internet Explorer 2. Click on the address bar 3. Enter 4. Press Enter to go to AccessUH 5. Log in using your CougarNet credentials. 6. Click on FAMIS icon 7. Click on the Maintenance tab 1 2 &3 7
9

10 If there is a Security Warning pops up: 1. Check on I accept the risk and want to run this application 2. Click Run button 3. Do it again if it continues to ask. Depending on the specific configuration, Internet Explorer may ask to check this box up to 3 times. If you have problem with getting FAMIS to display correctly, please contact FAMIS Support at: famissup@central.uh.edu 1 2 Select a Tab After successfully logging-in, there will be TABS located at the top of the window. 9

11 Depending on the user s role in FAMIS, you will have the specific tabs such as Maintenance, Key Control, Inventory, Reports, Visual Map, etc. Click on one of the tabs to go to FAMIS Home Screen: 10

12 FAMIS Home Screen: FAMIS Home Screen can be identified by FAMIS Xi Home right under the tabs FAMIS Home Screen includes 3 main parts: 1. Role selection 2. Content window 3. Shortcut buttons FAMIS Xi Home Role selection Shortcut buttons Content Window 11

13 Role Selection: Depending on what type of user you are, you will see different roles such as Crew Technician, Project Manager, Maintenance Mgmt Supervisor, Warehouse Coordinator, Business Admin, etc. If you are assigned more than one role in FAMIS, you will see different roles when clicking on the role selection. For each role you choose, the contents in the content window below will be changed. Different roles 12

14 Content Window: Content Window includes 3 main parts: Folder A folder s icon is represented by this symbol. Each folder can be expanded when you click on the plus sign on the left of the yellow icon. Each folder has forms and reports that relate to the folder name. For example, the Work Order folder will include Work Order form, Work Order reports, etc. Forms A form s icon is represented by this symbol. Each form serves a specific purpose and shows different information. For example, the Work Order form help users track and change WO information, task list, crew, job assignment, statuses, etc. Double click to the icon to open the form Reports A report s icon is represented by this symbol. Each report will show information related to the name of the report. Double click to the report to open the report. Work Order folder Work Order form Folder inside the Work Order folder Work Order Cost Est report 13

15 Shortcut buttons Depending on the user s role, the shortcut buttons will appear on the left side. For example, Maintenance Mgmt Supervisor will have shortcut buttons to WO Backlog, Labor Approval, Labor Charges, Work Orders, Work Order Closing, etc. Shortcut buttons help user quickly go to the forms and reports instead of finding them in the content window. Click on a button to go to that form. Shortcut buttons 14

16 Form navigation Open a form You can open a form by either clicking on a Shortcut button or by double clicking on a form in the content window: Click on these shortcut buttons Or double click on the forms here 15
17 Navigation Bar functions Navigation bar can be found at the top of any form in FAMIS. Function Toolbar Icon Keyboard Commands Menu Bar Back File > Back Home File > Home Save/Commit F + 10 File > Save/Commit Screen Print Shift + F8 File > Screen/Print Enter Query F7 Query > Enter Query Execute Query F8 Query > Execute Query Count Hits Shift + F2 Query > Count Hits Cancel Query Ctrl + Q Query > Cancel Insert Record F6 Record > Insert Duplicate Record F4 Record > Duplicate Delete Record Shift + F6 Record > Delete Clear Record Shift + F4 Record > Clear First Record Record > First Previous Record [Up Arrow] Record > Previous Next Record [Down Arrow] Record > Last Last Record Attachments Record > Next Attachments > Attachments Mail Templates Templates 16
18 Basic Search Performing search (or query) is one of the most important skills in FAMIS. The search function in FAMIS is used to retrieve information from the database. Where and when can you perform a search? Search is used to get the information that exists in the system. You can perform a search in forms only. For each employee in a crew, it is important that you are able to search in Work Order Backlog (Work Order Workbench), Work Order, Purchase Requisition, Service Request, Labor Timecard, etc. Basic Search function includes 3 main steps: 1. Start the search function 2. Enter your requests / criteria 3. Execute search / query 4. Go to the next result Examples of basic search are listed in the table below: You give criteria Work Order Number (e.g., WO123456, WO290830) Your peoplesoftid = Start date = MON APR 28, 2014 Crew name = HVAC Building = 0585 Status = OPEN You get Work Order detail information, cost information All work orders assigned to employee that have peoplesoftid = and the start date is MON APR 28, 2014 All work orders that are assigned to HVAC, have the status of OPEN, and locates at that Building 0585 Start the search function: There are two ways to start a search: 1. Click on the icon in the navigation bar 2. Press F7 on the keyboard The fields in form will turn blue after starting a search (when the fields are not in blue, you cannot perform any search): 17
19 18


20 icon The fields turn blue and allow user to input criteria Enter your criteria Enter criteria. It can be one criterion or multiple criteria, depending on your need 19

21 Execute your search There are 2 ways to execute your search: 1. Click the icon on the navigation bar 2. Press F8 on the keyboard icon 20

22 Go to the next result You may get multiple results after executing the search. For example, there might be more than one work order that is assigned to you today. In order to navigate to each result, FAMIS provides 4 navigation buttons on the navigation bar: 1. - go to the first result 2. - go to the previous result 3. - go to the next result 4. - go to the last result Navigation buttons 21

23 Advance Search Wildcard search Sometimes we remember only part of search criteria. For example, we only remember the last four numbers of a work order are 1234, the first name of an employee is Mike, etc. FAMIS provides a special wildcard character - the percent sign: %. The percent sign will replace any leading or ending missing characters. You can put %1234 to search all work orders that have 1234 as its last four numbers are Count the results Before executing the search, FAMIS allows a user to know how many results will come back from the search. Before clicking on the icon to execute the search, you can click on the icon to count how many results return from the search. The number shows up in the status bar: icon Wildcard Search criteria: all WOs that end with 1234 The status bar says that there are 10 WOs that end with
24 Definitions Maintenance Types of Service Requests Maintenance type represents the maintenance activity the work order performs. Here is the list of Maintenance Types available in FAMIS and their definitions. CORRECTIVE refers to the work that brings facility to its original condition. This activity may consist of repair, restoration or replacement of components. ALTERATION refers to the work required to change the interior or physical characteristics of an existing facilities. Alterations may include work referred to as improvement, conversion, rehabilitation, remodeling or modernization. PREVENTIVE refers system-generated preventive maintenance and PM route WOs. PM REPAIR refers to repair needs identified from regular PM inspections/tasks (failure report, etc.). It is those items self-identified (not initiated from a customer complaint) helping us separate and track reactive vs. corrective via the PM Program. SERVICES refers to anything that facility occupants or visitors might need beyond the operational maintenance of the hard assets of the building and its systems. Examples include custodial, event support, waste management, fleet, managing relocations or moves, landscaping, emergency preparedness, and etc. ADMIN refers to standing work orders used to track shop supplies. For more information, refer to Billing Types Every Service Request needs a Billing Type. Charge Applies to work being done on departmental budgets where we are charging time and materials 23
25 No charge For work done on Facilities Management budgets. There is no charge to the customer. Cash Applies to billable works that are pay with cash/check/credit card No Cost Applies to works that are free of charge such as IT and warranty work orders Direct Bill Applies to billable works that are to be invoiced to customers Statuses This section only discusses the statuses of a Service Request. Priority REQUESTED Used to indicate that the Service Request has been entered in FAMIS. DECLINED Used to indicate that the Service Request has been declined SCHEDULED Used to indicate that the Service Request has been converted to a Work Order and sent to the crews. WAIT APPR Used to indicate that the Service Request is waiting for certifying signature to approve or decline. APPROVED Used to indicate that the Service Request is approved and waiting for Call Center employees to process and dispatch to the crews. Priority field defines the priority of the work order. Here is the list of Work Order priorities available in FAMIS and their definitions: 24
26 Priority Code Description When to Use Response Time Due Date 1 EMERGENCY Respond immediately: leak/flood, power outage, gas leak, safety/hazard issue, chemical spill, property damage, critical research, public relations. Immediate Same day 2 URGENT Respond at first convenient break point: unplanned, security related, compliance/safety, could become an emergency, public relations. 2 hours 2 business days from date requested 3 ROUTINE Perform according to normal workbench priority: most corrective work orders, PMs, First-In First-Out 4 SCHEDULED Work must be performed on a set fixed date: events, scheduled project work, planned PM outage, etc. 5 days to assign to technician Within 3 days prior to due date 20 business days or set by supervisor Set by supervisor Crew List of available crews in FAMIS: 25
27 Crew Name AUTO SHOP BMS CUSTODIAL ELECTRICAL ELEVATOR F/CM-IT FIRE ALARM FP&C NCAP GEN_MAINT GROUNDS HVAC INSPECTION LAB SERV LOCK SHOP METROCLEAN MIC MOVES & EV PEST CONTL PLAN MAINT PLANNING PLANT SOLID WAST WARRANTY Description AUTO SHOP BMS CREW CUSTODIAL CREW ELECTRICAL CREW ELEVATOR CREW F/CM-IT CREW FIRE ALARM CREW FPC CREW GENERAL MAINTENANCE CREW GROUNDS CREW MECHANICAL & DISTRIBUTION CREW INSPECTION CREW LAB SERVICES CREW LOCK SHOP CREW METROCLEAN CREW MINOR IN HOUSE CONSTRUCTION MOVES & EVENTS CREW PEST CONTROL CREW PLANNED MAINTENANCE CREW PLANNING CREW CENTRAL PLANT CREW SOLID WASTE CREW WARRANTY SHOP 26

28 Service Request Workbench Overview Service Request Workbench provides you a list of service requests in the system. 27
29 Searching for Service Requests There are various ways to search for service requests or work orders within your department. SR Information One of the ways a user can search for a Service Request (SR) is by entering some specific information about a particular Service Request. The following attributes are some of the criteria that can be used to search for a particular SR or WO: 1. Request Number o Under the Service Request Information Section, enter a SR number in the text box labeled Request Number. o Click Submit. o This will bring up the specified SR. Note: If you are unsure of the exact service request number, you may filter your search using any other attribute listed below. 2. Requestor PSID o You may search for a SR using the PeopleSoft ID of the requestor by entering their PSID in the text box labeled Requestor PSID. Note: This will only display the SRs requested by the particular person with the unique PSID. 3. Request Status current status of the service request or work order 4. Speed Type 5-digit index of the cost center 5. Maintenance Types type of work performed on request o CORRECTIVE refers to the work that brings facility to its original condition. This activity may consist of repair, restoration or replacement of components. o ALTERATION refers to the work required to change the interior or physical characteristics of an existing facility. Alterations may include work referred to as improvement, conversion, rehabilitation, remodeling or modernization. o PREVENTIVE refers to system-generated preventive maintenance and PM route WOs. o PM Repair- refers to repair needs identified from regular PM inspections/tasks (failure report, etc.). It is those items self-identified (not initiated from a 28

30 customer complaint) helping us separate and track reactive vs. corrective via the PM Program. o SERVICES refers to anything that facility occupants or visitors might need beyond the operational maintenance of the hard assets of the building and its systems. Examples include custodial, event support, waste management, fleet, managing relocations or moves, landscaping, emergency preparedness, pest control, IT support for Plant Operations, etc. Note: The more information you enter in this section, the faster and more precise the database will bring up your SR or WO. Location and Date Users can search for multiple SR s at a time by using a more general search criterion such as the location or date. 6. Location location of work a. You may search for a particular SR or WO using the Location section by entering a Site ID, building number, floor number, and room number. 29

31 Note: This section is organized in a hierarchical manner. This means that you MUST first enter a Site ID before you enter a building number. Furthermore, you must enter a building number before you can enter a floor number, etc. 7. Start Date date the service request becomes a work order A user can also search through the database for SR or WOs if they know the general time period that a particular SR or WO was made. The Start Date field of the report is defaulted to pull data for the last three months. To search for work orders older than three months simply clear the date field. a. If you wish to search between specific time frames. Go to the section Start Date. b. Click on the text box labeled From. A calendar will appear, scroll through the dates until you find the start date as desired. c. Next, repeat the step above for the End Date by clicking on the text box labeled To. 30
32 FILTERING YOUR RESULTS Once the database returns a result or set of results, the user can further filter the results in order to find the required SR or WO. The Search Field The search field is a tool that allows users to filter the results in real time. For example, if the user decides to do a general search for SR or WOs in a building, there may be multiple results. However, if the user knows the requestor, they can type the name of the requestor into the search bar to filter on only the WO s that were submitted by that particular user. The information that CAN be entered in the search field includes the following: SR Number Requestor Name (First and Last) Requestor ID (PSID) Department Number Building Number Room Number Request Date SR Status Crew Billing Type Cost Center Description Note: Spelling is important Sorting Ascending and Descending Order The user can also sort the results in the result table by clicking on the arrows located in each of the column headings. Previous and Next Buttons 31


33 Use the Next and Previous Buttons (located at the lower right side of the screen) to navigate through pages of search results. Export to Excel To download the results returned from your search, click on the Export to Excel button. An excel spreadsheet will be downloaded and you may print or save your information. You must have Adobe Flash Player installed to export to excel. 32

34 Update and Verify Service Request The Service Request Workbench gives you the list of Service Requests. This section shows you how to go to individual Service Request and update specific information in it. Open an existing Service Request To view detailed information of the work order or service request, click on the hyperlink. Update Location 1. After clicking on the SR hyperlink, go to the Location Information section, and change the location information using the drop downs. Remember to go in order from site, building, floor, and room. 33


35 Update Other SR Information 1. Find appropriate field to change. 2. Use fields or dropdowns to change. 34
 section. 2. Verify the Billing Type: 3. Verify the account information: 4.")
36 Update and Verify Billing Information Normally Call Center employees do not need to update the Billing Information. However, in some cases, Call Center employees have to do it. Verify or Update Billing Information 1. Go to Billing Type and Cost Center(s) section. 2. Verify the Billing Type: 3. Verify the account information: 4. Verify the total percent of account segment equals to 100% 35

37 Update Task List 1. Go to the Task List section 2. Update the task list in the Add New Comments textbox with details for service request 3. Click Update Service Request Button Add Attachments and Notes 1. Go to Upload Files section. 2. Click browse to find file on computer 3. Click Upload to upload file. 4. Repeat as necessary. 36

38 Create a Service Request Create a new Service Request 1. Go to SR Workbench 2. Click Crew New Request button 3. Enter PSID of requester and click the look-up button 37
39 4. Enter Location Information and Work Order Description section. 5. Enter Billing information. 38
40 Convert a Service Request to Work Order When a Work Order is created, it goes directly to the Crew to complete the tasks. In order to convert a Service Request to a Work Order, change the current status of the Service Request to SCHEDULED Normally, for BILLABLE SR, once the status of the Work Order is APPROVED, Call Center employee changes it to SCHEDULED to convert that SR to a Work Order. Call Center and Work Orders Normally, the Call Center only deals with the Service Requests. Sometimes, however, information about the Work Order may change. In addition, customers may call and ask about the status of a Work Order. Finding Work Orders 1. Go to Work Order Workbench 2. Use Parameters to search for work order 3. Review Service Request Workbench section above for similar search and edit instructions 39

41 Current Schedule Workbench / WO Backlog There are two ways to open Current Schedule / WO Backlog: 1. Click on WO Backlog shortcut button on the left 2. Select Maintenance Mgmt Supervisor or Crew Technician in the role selection, then Double click Current Schedule form under Schedules folder

42 Current Schedule Workbench / WO Backlog Overview The Schedule Workbench lists all work orders that meet predefined criteria. The lists may be different depend on the filters that we set up. It can be the list of all open work orders for your crew, the list of all work orders that are assigned to yourself, etc. Each line in the list gives information about one Work Order. We can see that WO Number, Start Date, Building, Priority, Status, Description, Craft, Maint Type, Crew, Assigned person, Equipment that associates with the Work Order, Due Date, Service Request Number, Scheduled Date, Department, etc. You can change the order of the columns. Click here and choose different predefined views Slide this bar to see the rest columns 41

43 Create custom view To view work orders that meet specific criteria, click Edit 3 42


44 1. Click Filter, select desired criteria; you may choose to view work orders that belong to a certain crew, craft, labor type, building, department etc. You may select more than one criteria 4 2. After selecting criteria, click display, then click duplicate 3. Enter a name for a Filter, click OK 4. Click OK again, work orders that meet criteria will be displayed

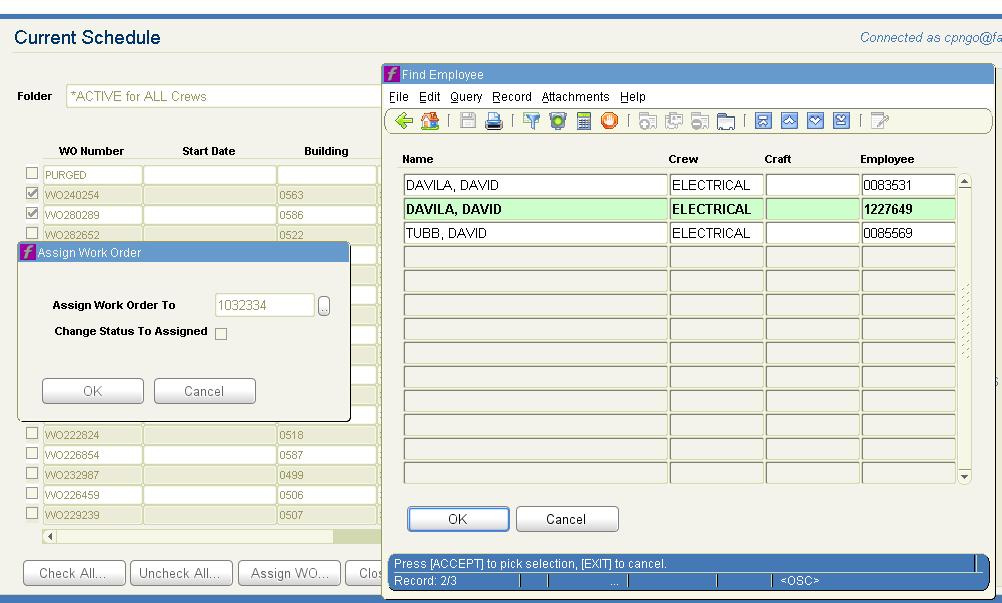
45 Current Schedule Functionalities Assign Work Orders to Employees 1. Put checkmarks on Work Orders that you want to assign 2. Click Assign WO button 3. Enter the employee s PeopleSoft number if you know or click on the button to search for an employee, please refer to Basic Search and Advance Search sections to get more detail information about searching in FAMIS 4. If you click on button in step 3, enter search criteria. It can be Name, Crew, Craft, and/or Employee Number. For example, you can search for any employee with first name of David in ELECTRICAL Crew. Please refer to Basic Search and Advance Search section from page 18 to 22 to get more detail information about search function 4.1. Press F8 or the button to execute the search 4.2. FAMIS may return multiple rows. Click on a row that you want (the row will turn green at that time) 4.3. Click OK button 5. If you also want to change the status of the Work Orders to ASSIGNED, check the box next to Change Status To Assigned 6. Click OK Button 1 3. Enter employee number here if 3. Or click on this button to search for an employee 2 44

46
47 Mass Closing Work Orders This functionality is used to change the status of one or more Work Orders. 1. Put checkmarks on Work Orders that you want to change the status 2. Click on Close WO Button 3. Click on the button next to the Status 4. Click on the status that you want the WOs to have (that status will be highlighted in blue color) 5. Click OK button 6. Click OK button again Here is the list of Work Order statuses available in FAMIS and their definitions. WO Status Active Notification Definition ASSIGNED Y Y Work order has been assigned to a specific employee COMPLETE Y Y Employee has reported to his/her supervisor that the work has been completed OPEN Y Y Work order is active and pending assignment after review by crew supervisor REVIEW Y N Work order requires further review to address some type of issue EST SENT Y N Quotes for work has been sent to customer EST APPRVD Y N Quote has been approved by the customer EST RECVD Y N Quote has been returned back to crew supervisor HOLD Y N Work Order has been delayed for a reason MAT RECVD WAIT MATRL PARENT ONL Y N Material for a work order has been received into the work order. Materials are awaiting pick up from FASTENAL Y N Used to denote a work order cannot move forward until materials are ordered and received into the work order. Y N Used to denote a work order that is used as a parent for holding information on long term work orders RET-SERV Y N Used by AUTO SHOP to denote a vehicle has been returned to service. 46
48 CANCELLED N N Work order is cancelled. Work will not be performed. If the crew or call center cancelled the work order, the customer must be notified with an explanation. CLOSED N Y Supervisor has reviewed the work order for completeness and no further action is required. All billable charges may be released. 47

49

50 Print Work Order Ticket 1. Put checkmarks on Work Orders that you want to print 2. Click Work Order Ticket on the right 3. Click Print button


51 Work Order Form How to open work order form There are 3 main ways to go to Work Order form: 1. Click on Work Orders shortcut button on the left 2. Double click on a Work Order in WO Backlog 3. Double click on Work Orders form in Work Orders folder from the Home Screen Double click on one line to view/modify information on Work Order 50

52 Searching for Work Orders Four ways you can search for a specific Work Order: Searching by entering a Work Order number 1. Press F7 to enter query in the Work Order form; all fields will turn blue 2. Enter the specific WO Number in the blue field 3. Press F8 to run query; F8 will open the specific Work Order 1 51

53 Wild Card Search The Wild Card search option allows you to view all Work Orders that meet a specific criterion. For example, let s view all Work Orders in Building In the Work Order form, press F7 to enter query 2. Once all fields turn blue, enter the specific criteria between 2 percent signs; in this case we will enter %585% to view all work orders in building Press F8 to run query; F8 will open the first Work Order 4. Use the arrow keys to navigate to the next or previous work order that meets the same criteria

54 Multiple Field Search This feature allows you to view all Work Orders that meet more than one specific criterion. For example, let s view all Work Orders in Building 585 and assigned to the PLANT crew 1. In the Work Order form, press F7 to enter query 2. Once all fields turn blue, enter the specific criteria; in this case we will enter PLANT in the crew field and %585% in the building field to view all work orders assigned to the PLANT crew in building Press F8 to run query; F8 will open the first Work Order 4. Use the arrow keys to navigate to the next or previous work order that meets the same criteria 2 53

55 Workbench Search 1. To search for a specific Work Order in the work order workbench, press F7 in the workbench; screen below will be displayed 2. Enter criteria via the Wild Card Search method in any of the blue fields; for example, lets view all OPEN work orders in building


56 2 3. Press F8 to run query and view all Work Orders in the work bench that are OPEN and in building Double click on the specific work order to view Work Order details 3 55

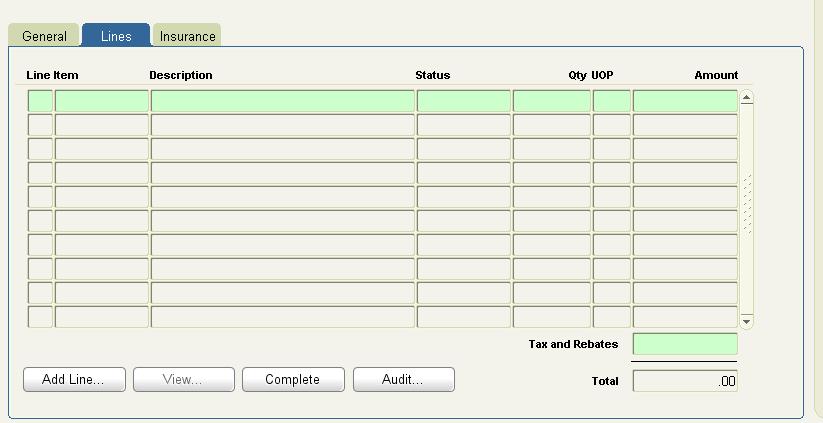
57 Work Order Form Overview Work Order form is where you can see and modify any detail information about a Work Order
58 1. WO Number Unique number assigned to each work order 2. Work Order brief description A brief description of current work order (maximum length is 64 characters) 3. Parent WO Allows you to view/assign the parent work order of the current work order 4. Equipment Allows you to view/edit the piece of equipment that associates with the current work order 5. Maintenance Type Maintenance type represents the maintenance activity the work order performs. Here is the list of Maintenance Types available in FAMIS and their definitions. i. CORRECTIVE refers to the work that brings facility to its original condition. This activity may consist of repair, restoration or replacement of components. ii. ALTERATION refers to the work required to change the interior or physical characteristics of an existing facilities. Alterations may include work referred to as improvement, conversion, rehabilitation, remodeling or modernization. iii. PREVENTIVE refers system-generated preventive maintenance and PM route WOs. iv. SERVICE refers to anything that facility occupants or visitors might need beyond the operational maintenance of the hard assets of the building and its systems. Examples include custodial, event support, waste management, fleet, managing relocations or moves, landscaping, emergency preparedness, and etc. v. ADMIN refers to standing work orders used to track shop supplies. 57
59 6. Priority Priority field defines the priority of the work order. Here is the list of Work Order priorities available in FAMIS and their definitions: Priority Code Description When to Use Response Time Due Date 1 EMERGENCY Respond immediately: leak/flood, power outage, gas leak, safety/hazard issue, chemical spill, property damage, critical research, public relations. Immediate Same day 2 URGENT Respond at first convenient break point: unplanned, security related, compliance/safety, could become an emergency, public relations. 2 hours 2 business days from date requested 3 ROUTINE Perform according to normal workbench priority: most corrective work orders, PMs, First-In First-Out 4 PLANNED Work must be performed on a set fixed date: events, scheduled project work, planned PM outage, etc. 5 days to assign to technician Within 3 days prior to due date 20 business days or set by supervisor Set by supervisor 7. Method Method field allows specifying if the work order is performed: i. In-house indicates work performed by FM Crew ii. Contract indicates work performed by contractor/vendor iii. In-house/Contract indicates work performed by FM crew and contractor 8. Assigned To Assigned To field allows user to view or assign the work order to a specific employee. 58
60 9. Work Order Status Status field allows user to view/change the current work order status. Here is the list of Work Order statuses available in FAMIS and their definitions: WO Status Active Notification Definition ASSIGNED Y Y Work order has been assigned to a specific employee COMPLETE Y Y Employee has reported to his/her supervisor that the work has been completed OPEN Y Y Work order is active and pending assignment after review by crew supervisor REVIEW Y N Work order requires further review to address some type of issue EST SENT Y N Quotes for work has been sent to customer EST APPRVD Y N Quote has been approved by the customer EST RECVD Y N Quote has been returned back to crew supervisor HOLD Y N Work Order has been delayed for a reason MAT RECVD WAIT MATRL PARENT ONL Y N Material for a work order has been received into the work order. Materials are awaiting pick up from FASTENAL Y N Used to denote a work order cannot move forward until materials are ordered and received into the work order. Y N Used to denote a work order that is used as a parent for holding information on long term work orders RET-SERV Y N Used by AUTO SHOP to denote a vehicle has been returned to service. CANCELLED N N Work order is cancelled. Work will not be performed. If the crew or call center cancelled the work order, the customer must be notified with an explanation. 59
61 CLOSED N Y Supervisor has reviewed the work order for completeness and no further action is required. All billable charges may be released. 10. Dates of Work Order Here is the list of Date fields in Work Order form and their definitions: Field Name Start Date Due Date Completed Date Description Date the work is scheduled to begin. Did not change with Priority Code, defaulted to the date the service request is converted to the work order. Can be changed by user. Calculated based off the Priority Code. Date the work is due to be finished. Can be changed by user. Date the actual work was completed. This date will be filled in automatically when Status is set to COMPLETED. 11. Crew Crew allows you to select a crew to perform work order; every work order must have an assigned crew 12. Craft Craft allows you to select a craft or skill required for work order 13. Crew Size Crew Size minimum crew size to perform the work order 14. Est Hrs/ Current Est Hrs Est Hrs/Current Est Hrs - allows you to enter an estimate number of hours needed for crew to perform the work/current Est Hrs allows you to enter up-to-date estimate of hours needed to perform work order 15. Work Order location (site, building, floor, room) Site site work order needs to be performed in Building building the work order needs to be performed in 60
 Notes allow you to view the existing notes or create new notes for the current work order Documents - allow you to view the existing files or attach new files")
62 Floor floor in building Room room in building work order needs to be performed in 16. Attachments (Notes, Documents, ) Notes allow you to view the existing notes or create new notes for the current work order Documents - allow you to view the existing files or attach new files for the current work order. The files could be in Word, Excel, PDF, or images. - allow you to view the existing sent from current work order or send new to users/customer from current work order 17. Work Order Ticket Allows you to print out detail information about the current work order 18. Buttons Library allows you to transfer a procedure library to the work order Request allows you to enter work order requestor information Related WO allows you to view parent and children work orders of current work order Create WO allows you to create a child work order of the current work order Billing allows you to view/enter work order billing information Estimates allows you to view/enter and calculate work order estimates Dates date work order was scheduled Conv. To Project allows you to convert work order to project 19. Task List of a Work Order Tasks Tab allows you to enter list of Work Order tasks and procedures under Tasks List. These details will print with Work Order Report 61
63 62

64 20. PO s tab PO tab in Work Order form help you view/create purchase requisition for the current Work Order 1. Click on PO s tab 2. Click Orders button 4. Choose PREQ line 3. Click here 5. Click view button 63

65 Routing tab displays the routing history of the work order; a record is automatically added to the routing history whenever the status of a work order is changed or the person assigned to the work order a b c d e The routing tab displays: a. Date displays data and time of routing change b. User displays the User ID of the person who made the change c. Assigned To displays the Employee ID of the person now assigned to the work order d. Status displays status of work order at specified date e. Comments enables you to type comments about routing change 64

66 Materials Planning Material for a Work Order This feature allows you to plan and purchase materials required for a Work Order. Open specific Work Order form and navigate to the Parts tab 65

67 Parts Tab allows you to enter list of parts and material required to perform Work Order for planning purposes NOTE: The following manual shows how to add part to a Work Order for planning purposes only. It means that no Purchase Order is made. In order to purchase, please refer to the shopping cart manual right after this section 1. Click to view and select parts 1 66

68 2. The Item Number invokes the window below, allowing you to search, view and select parts in four different ways: i. By Part this tab displays all parts; query to search for specific part a. All parts displayed here i 67

69 ii. By Category in this tab, parts are designated into categories; select specific category and then find part. a. Categories of parts displayed here b. Specific parts displayed here ii i 68

70 iii. By Manufacturer this tab lets you search for a part by its manufacturer a. Click to view list of manufacturers, click OK after selecting a manufacturer b. Press Find button c. Select from newly displayed list of parts i ii iii 69

71 iv. By Vendor this tab allows you to search for a specific part by its vendor a. Click to view list of vendors, click OK after selecting a vendor b. Press Find button c. Select from newly displayed list of parts i ii iii 70

72 Inventory Purchase with Shopping Cart feature To finally purchase parts, select desired parts by checking box on the right and click OK; in this case we have 4 parts selected 71

73 3. Clicking OK returns you back to the Parts tab in the Work Order form; you may use parts for planning purposes or purchasing. i. View button allows you to view additional information about the selected part ii. Parts for planning purposes iii. Parts to be purchased; Pick box checked on the left a. To purchase, check the Pick box, and press Create Cart button; this button invokes a new Shopping Cart window ii i iii a 72


74 4. View details in the Shopping Car, such as the WO Number, Quantity details, Selling Price, name of Requestor, Status; when ready to proceed, press the Check Out button 5. Enter Delivery Instructions and Pickup Date; press Continue button to proceed 6. Review information; Press Edit Cart to make changes if necessary or press Submit to purchase materials/parts 7. Submitted information will reflect in Work Order form in the Parts tab under Shopping Carts. 73

75 Time Card Entry The Labor Timecard form allows you to enter labor transactions that are charged a work order; labor can only be charged to an open work order. To open the labor timecard form, double click Labor Charges under Labor in the main menu 74

76 Labor Timecard Form details a b g c d e f h a. Enter Employee ID, employee name will automatically fill in b. Enter Work Date c. Enter WO Number of work order performed d. Enter Hours worked on work order for the day e. Enter Shift number f. Check Work Done check box All other fields will automatically fill in. g. Labor status has default value of ENTERED" when the labor charges are initially entered. When you Save and Approve, the status will change to E APPROVE. When the Supervisor approves, the status will change to APPROVE. If supervisor rejects timecard, the reason for rejection will be displayed under Labor Status. h. Press Save and Approve button when done, this sends timecard information to supervisor for approval 75


77 Adding Time for Route Work Orders 1. Go to the Labor Timecard form 2. Enter Employee number 3. Enter Work date 4. Click on Route Work Order button 5. Enter the parent WO number of the Route 6. Click Find button 7. Enter total number of hours the employee worked on the route 8. Click OK button &

78 Supervisor Labor Approval This form allows the supervisor to approve Employee Labor Timecard; to open, double click on Supervisor Labor Approval under Labor in the main menu to open form 77

79 a 6.b 1. To approve Employee labor, select Unapproved Timecards 2. Select the date labor was performed 3. Select Supervisor(your) name 4. Click on desired employee from the Employees list 5. Select the employee approved labor; labor status will be E APPROVE 6. Click Go To Approval if information is correct or click Edit to edit employee labor timecard (both buttons will invoke new windows, displayed below): 78
 Go To Approval button on the Supervisor Labor Approval form invokes the")

80 6.a 6.a) Go To Approval button on the Supervisor Labor Approval form invokes the window above. Select Approve or Reject employee labor timecard after reviewing information. 6.b) Edit button invokes the window below. This takes the supervisor to the employee labor timecard and allows to edit it. 6.b 79

81 Correct Time Card Entry Each labor time entry has a status, either E Approve (Employee Approve) or S Approve (Supervisor Approve) If your time entry is in E Approve Status, you can modify it: First, Enter employee id and date of work Then change the time, put a 0 if you want to delete it 80

82 If your time entry is in S Approve Status, you need to add another time entry with a negative value: Add the new line with a negative time entry 81

83 Work Order Cost In order to keep track the cost of work orders, we need to use the Work Order Cost Summary form. There are two ways to access the Work Order Cost Summary: 1. Double click on Work Order Cost Summary form in Work Order folder then search for a Work Order number 2. Right click on a WO Number in Work Order form then choose Cost Summary Double click on Work Order Cost Summary 82

84 Right click on the WO number then choose Cost Summary 83
85 Overview of Parts Management Creating Parts 1. Go under the FIC FORMS folder 2. Go under the Part Management folder 3. Double click on the Part form 4. Fill in yellow required fields. 5. Hit Save. 84

86 Adjusting Quantity and Price 1. Go under the FIC FORMS folder 2. Go under the Part Management folder 85

87 3. Double click on either Price Adjustment or Quantity Adjustment 4. For Price Adjustment Form, enter Part Number, Adj Type, and New Price 5. For Quantity Adjustment Form, enter Part Number, Adj Type, and New quantity 86


88 Issue Parts to Work Order Step 1: Go to the Item Issue form under Stores -> FIC Forms -> Issues & Returns -> Item Issue 87


89 Step 2: Enter the PeopleSoft Number of the employee you are issuing the parts to under the Issued To field. Enter Work Order number in WO Number field, and then click on the Item Code fields. Enter the Part Numbers needed for the Work Order: Enter Work Order Number here Enter PeopleSoft Number here Then click here 88


90 Step 3: enter the quantity issue to the Qty Issue field, then click OK, FAMIS will give the ISSUE number for the Work Order, you can take note it: Enter quantity issue here 89
91 Overview of Non-inventory purchasing process Non Stock FMFA Quote/Materials Request Process Map Shop submits Material Request Form for quote to PDME/FNL PDME/FNL creates and submits quote to Shop for approval If Yes PDME/FNL procures product. See PDME/FNL Work flow YES Shop Reviews, approves, and submits quote for purchase NO If No PDME/FNL notifies requestor and Passes order to FMFA. FMFA Inputs Invoice detail to complete the FAMIS Generated PO FMFA creates FAMIS Non- stock item number FMFA Receives parts from FAMIS PO into Stores Warehouse FMFA create FAMIS PO Business Services & Accounts payable Approves P-SOFT Invoice Voucher FMFA processes order from selected vendor FMFA scans and attaches all supporting documents to FAMIS Purchase Order FMFA Notifies requestor of order status FMFA creates P-SOFT Invoice Voucher & submits to P-SOFT workflow Vendor ships product to UH Stores FMFA notifies requestor of order status & requestor takes possession of materials 90
92 Create FAMIS Non-Stock Stock Part 1. Double Click on Part form under FIC Forms Part Management Part 2. Leave the first field blank and let FAMIS assign a Part number, click on the second field to enter a brief description of the part. This brief description cannot exceed 60 characters 3. Click on button next to Category to choose a Category for the part then click OK button 4. Click on button next to Commodity to choose a Commodity for the part then click OK button 5. Choose a Unit of Measure 6. Choose a Unit of Purchase 7. Click on next to Status and choose ACTIVE then click OK button 8. Click on next to Type and choose Non-Stock then click OK button 9. Enter the long description for the part 10. Click on Accounts tab on the side. Select Part Warehouse Acct Group. Click on the Accounts button. Enter as the Speed Type. Finally, click the OK button. 11. Click Save button then make note of the part number that is created by FAMIS. 1 91


93 10 92
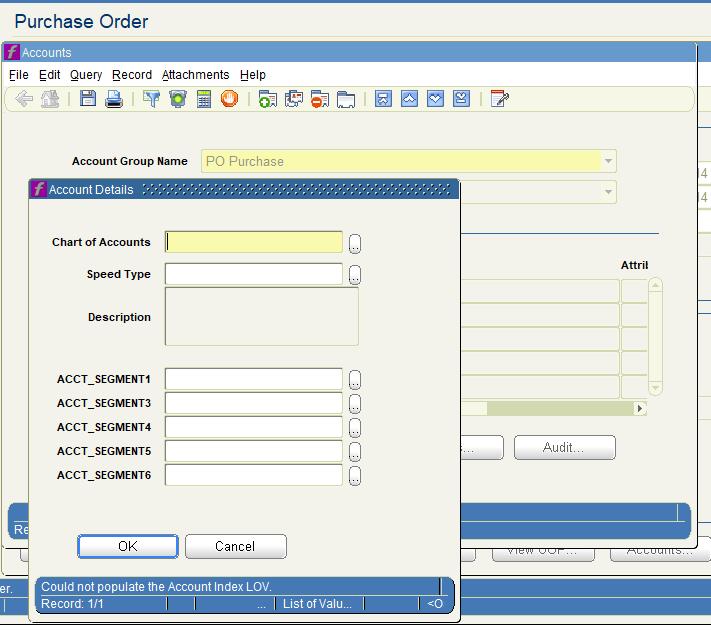
94 Create FAMIS Purchase Order (PO) 1. Double click on Purchase Orders under FIC Forms Purchasing Purchase Order 2. Enter the description for this Purchase Order 3. Click on button next to Supplier, Choose a Supplier then Click OK button 4. Choose NON_INVEN in Purchase Type dropdown box 5. Click on button next to Requester and choose the requester of this PO 6. Click on Lines tab. Make sure the new window title contains the line number. 7. Click on button next to Item field and choose the part number that has just created. 8. Enter the Work Order number 9. Enter quantity 10. Enter Unit Price 11. For Recoverable Crews, click on Accounts tab on the buttom. Select PO Purchase Acct Group. Click on the Accounts button. Enter Crew s Cost Center. Finally, click the OK button. 12. Click OK Button 13. Repeat the step for the next line item if needed. 14. Go back to General Tab 15. Change the Status from OPEN to PLACED 16. Click on Documents under Attachments to Upload any document regarding to the PO a. Click on New b. Enter the Type(Usually PDF), Description, and Browse for the Document. c. Press OK. d. Click the Save button Note: The Filename for the document can only be 20 characters long with no special characters. 17. Click Print to change Line Item(s) to PLACED. Note: Line item status and PO status must be in PLACED before item can be received. 1 93


95
96


97 d 15b 15c 15a 96

98 Receiving Item in FAMIS 1. Double click on Receipt of Item by PO under FIC Forms Receiving & RTV 2. Enter the PO Number 3. Check the All checkboxes 4. Click OK Button 5. Click Print button to Print receipt or click Cancel button
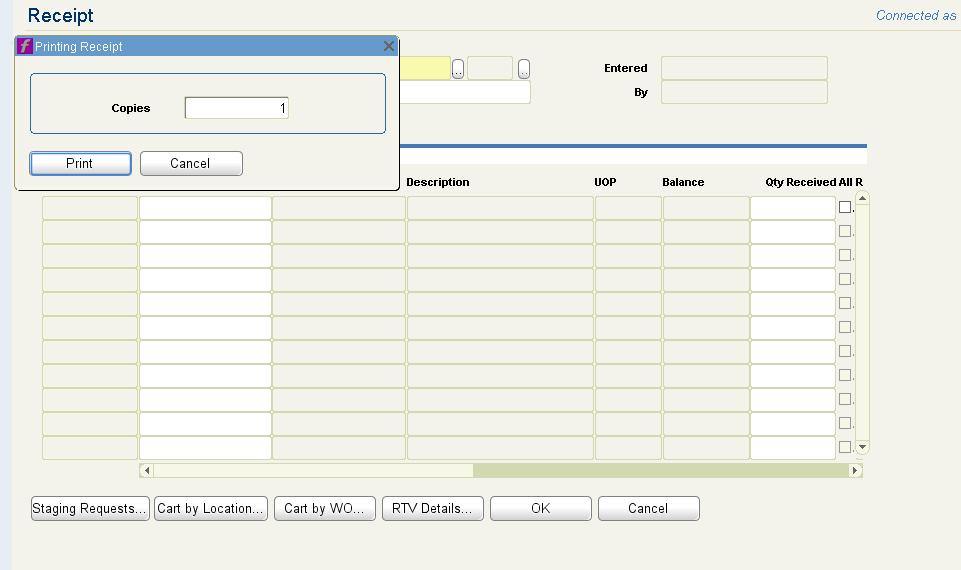
99 5 98
100 Input an Invoice into FAMIS 1. Go to Invoices form under FIC Forms Invoices Invoices 2. Enter the PO number, then press Enter button 3. Enter Voucher number 4. Enter Total Invoice Pre-tax Amount 5. Click Save button 6. Click on Line Items tab 7. Check the Balance to be itemized and make sure it is equal to


101

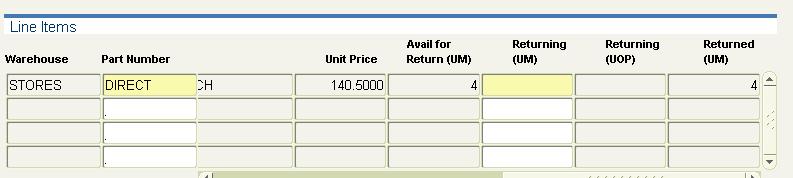
102 Return Parts to Vendor (RTV) Use the Return to Vendor form to return materials to the vendor from which they were received. In most cases, the storeroom personnel will be the ones initiating a return to the vendor. 1. Go to the Return to Vendor form under FIC Forms Receiving & RTV Return to Vendor 2. Enter the PO number 3. Fill out Shipping Information as needed. 4. Fill out Return Information 5. Under Line Items, enter in the part number into the Part Number Field. 6. To return parts, enter the number of items to return under the Returning (UM) field. (May need to scroll to the right to see this information.) 7. Hit the Save button

103
 e. Input invoice number input the month and year for the P-Card purchases being recorded f.")
104 Recording P-Card Purchases a. Open the Credit Card Invoices form b. PO Number select the PO for the P-Card holder (each card holder will have a local and state PO) c. Supplier a. Select the vendor b. If the vendor is not in PeopleSoft, the dummy vendor may be used d. Select the purchase site (typically 1) e. Input invoice number input the month and year for the P-Card purchases being recorded f. Select the crew g. Enter the WO Number for each line h. Enter a description i. Enter the amount j. Press Save k. To verify, view the Work Order Cost Summary form and select the invoices tab 103