INSTALLATION INSTRUCTIONS - Please read before installation
|
|
|
- Iris Craig
- 5 years ago
- Views:
Transcription
1 INSTALLATION INSTRUCTIONS - Please read before installation The floor panels should be transported in a lying down position. Floor panels should be stored in this position in their unopened packages in a dry storage location. Generally, INOVAR Galaxy XL Hybrid SVT Vinyl does not need to be acclimatised unless it is exposed to extreme temperatures (below 5 or over 42 ) 24 hours prior to installation. Then on-site acclimatisation is required at room temperature at between 16 to 28 for a minimum of 24 hours in unopened boxes prior to installation with individual stacks no more than 3 boxes high and space 10cm apart to allow airflow. Temperature after installation must remain at this range 48 hours after installation and relative humidity should be maintained at 30-60% to prevent condensation underneath the floor. Installers are responsible to verify that the product and its accessories are of the right design & quantity as per delivery documents. Inspect each floor panel in good natural lighting for any obvious visual defects before laying. If the product is incorrect or defective/damaged, contact the retailer or INOVAR representative. Complaints on defective materials that is visible or detected during installation but still being used will not be entertained. Unused panels from opened packages should be re-sealed in their original packaging with adhesive tape. The floor panels should be laid as a floating floor system and should not be fixed, in any way, to the subfloor or to any vertical structure. Ensure that proper gaps of at least 6mm from the walls and any vertical structures are maintained during installation. These gaps are to be concealed with suitable skirting or expansion profiles after installation. Extra expansion gap of 10mm and suitable expansion profiles should be used should the floor exceed 20m lengthwise and 15m width wise respectively. For installation that include the floor passing through multiple pinch-points like small passageways to multiple rooms, it is advisable to use transition profiles at these pinchpoints to break up the floor in addition to the 10mm expansion gap along the perimeter of the floor and wall. It is recommended that you use felt pads on furniture legs to prevent unintentional scratching on the floor. Load should not exceed 200kg/object area or greater than 30kg/cm2. INOVAR Galaxy XL Hybrid SVT Vinyl is not suitable for floors with electrical underfloor heating as heating up the floor too fast too soon will cause unusual expansion and gapping. However hydronic radiant underfloor heating is okay to be use if incremental temperature per day does not exceed 2 /day and does not exceed max temperature of 26.
2 Before you start Do not store directly on concrete, allow for air circulation. Do not open the cartons but spread them out and protect corners from damage. Concrete floor must be sufficiently dry in accordance with AS & RH of concrete slab should be under 95%. Subfloor must be level, smooth, dry, clean & free from any surface irregularities Slight variation in colour and structure are designed to enhance natural appearance. Mixing the planks during installation from several packs alternately creates a more visually aesthetic effect. Avoid exposure to direct sunlight for prolonged periods. Prolonged direct sunlight and temperature variation may impact the flooring locking system and may result in discoloration. Install curtains or blinds at these areas. Inspect all planks for damage before installing. Claims will not be accepted for flooring that has been cut to size and/or installed. Load limits and high point loads should be considered as not to restrict floor from floating.
3 The Subfloor Proper preparation of the subfloor is a major part of a successful installation. Roughness or unevenness of the subfloor may telegraph through the new flooring. All subfloors should be smooth and dust free with a flatness tolerance not exceeding more than 3mm in a 2m span. Cracks and holes must be filled with fast setting cement-based polymer or self-levelling compound. Any unevenness over 3mm must be sanded down or levelled. The surface must be clean of dirt, oil, glue residue, etc. Carpet staples or adhesive residue should be removed prior to installation. Voids or humps in the subfloor will damage or prevent the planks from locking properly. Although INOVAR Galaxy XL Hybrid SVT Vinyl click planks are water resistant, they are not to be used as a moisture barrier. Your subfloor should be completely dry prior to installation of INOVAR Galaxy XL Hybrid SVT Vinyl floor. INOVAR Galaxy XL Hybrid SVT Vinyl Floors does not warrant nor is responsible for damage to floor covering due to moisture related issues. If installing over existing timber, plywood & particleboard subfloors, it must be checked for any loose or warped board/panels. These damaged boards must be replaced. INOVAR Galaxy XL Hybrid SVT Vinyl click planks can be installed on existing firm floors (linoleum, PVC) but textile floors must be removed. When laying the floor on tiles, fill the gaps with grout or patch to make the surface smooth. INOVAR Galaxy XL Hybrid SVT Vinyl click planks are already quiet to walk on. Additional noise reduction is only possible using specialised materials.
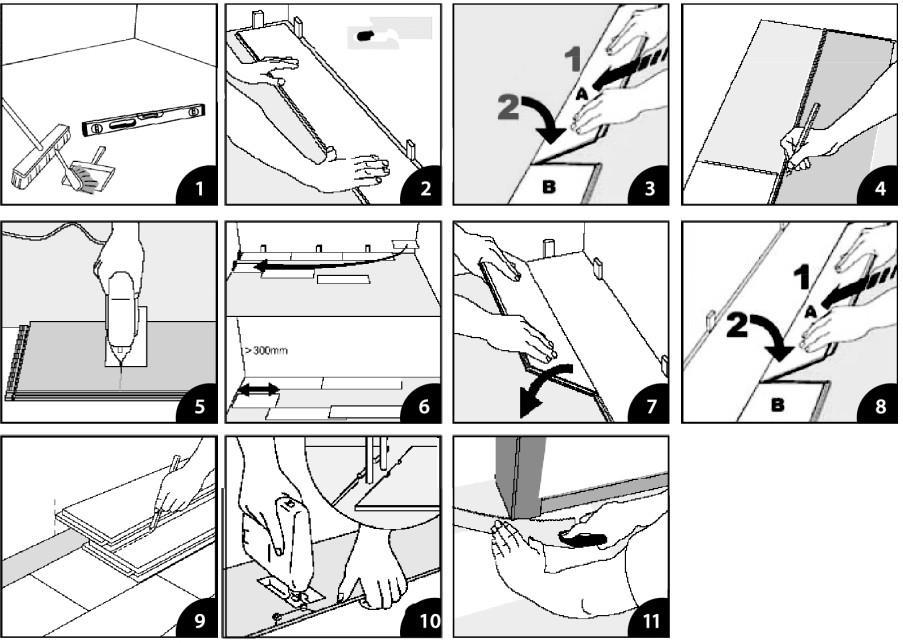
4 INSTALLATION 1. Begin laying planks from the left side of the starting wall and work to the right side. The tongue of the plank should face the starting wall. Plan the direction of the area to be installed, it is best to start along the longest wall. Measure the room and estimate the number or rows required. If the last row is not at least 50mm wide, then the first row should be cut so that first and last rows are similar in width. 2. Place 6-10mm spacers between the short and long side of the planks and the wall. Always position one spacer between the wall and where the planks join. 3. Install the 2 nd plank in the 1 st plank by laying the tongue vertically into the groove of the first plank while ensuring both planks lines up perfectly straight. Lock the planks together by pushing with your thumb or a soft rubber mallet along the edges of 2 nd plank. Make sure the width of both ends of each panel are straight and aligned before engaging the lock. 4. The last plank in the first row will need to be cut. Measure the distance between the wall and the surface of the last full plank. Subtract 6-10mm from this measurement to allow for the spacer. If this measurement is less than 20 cm, the first plank in the row should be cut. The first and last plank in each row should be at least 20 cms in length. Planks are cut using a sharp utility knife and a square. Score the surface of the plank with the knife and snap the plank at the score line. 5. The remaining piece cut off from the last plank in the first row may serve as the first plank in the second row provided it is 20 cm long. Always stagger end joints from row to row a minimum of 20 cms apart. 6. Install the long side of the first plank of the second row. Place a 6-10mm spacer between the wall and the short side of the plank of the 2 nd row. Insert the tongue side into the groove side of the plank from the previous row at a low angle and lower flat to the substrate. 7. Install the second plank of the second row. Position the long side of the plank with the tongue side, fully engage into the receiver of the first row of product. Lower the plank with firm pressure to the floor, ensuring that the end joint is overlapping and perfectly aligned; push the end joint downward till the end of the plank snaps in place. This may require the use of a rubber mallet for it to completely lock in place. Continue installing planks in the second row. It is important to make sure that the first two rows are straight and square as they can affect the entire installation. 8. Continue working from left to right, row by row. Be sure to maintain a 6-10mm space around all walls and vertical objects. To maintain a random appearance, remember to offset end joints a minimum of 20cms. 9. Transition mouldings are required every 20m in any direction and at all doorways. 10 If it is necessary to uninstall your INOVAR Galaxy XL Hybrid SVT Vinyl Floor, separate the whole row first by lifting it up carefully at an angle. Then to separate the planks, leave them flat on the floor and slide them apart carefully in a straight-line movement. If the planks do not separate easily, you can slightly lift the piece on the most right-hand side at an angle of 5 degrees when in the same time sliding them apart. Disengaging the panel vertically will damage the locking system
5
6 Care & Maintenance Do not wax or polish INOVAR Galaxy XL Hybrid SVT Vinyl flooring. For everyday cleaning, use a vacuum cleaner with wand attachment, a sweeping broom or a slightly dampened mop. Do not clean your floors with abrasive cleaners, abrasive scrubbing pads or scouring powdered products. Appropriate mats at entryways are recommended to collect tracked-in dirt, sand and pebbles. Frequently moved furniture should be equipped with felt pads to avoid scratching the floor. Heavy furniture and appliances should be equipped with non-staining large surface floor protectors. Use an office chair mat in areas where office chair with castor wheels is being used. Care must be required whenever furniture is moved, furniture should never be dragged across the floor. Use appropriate moving pads if necessary. Avoid prolonged exposure to direct sunlight by installing curtains/blinds at window area; or utilise UV window tinting at window area. Trim nails of big/heavy pets periodically.