Public Disclosure Authorized. Public Disclosure Authorized. Public Disclosure Authorized. Public Disclosure Authorized
|
|
|
- Sabrina Hampton
- 5 years ago
- Views:
Transcription

1 Public Disclosure Authorized Public Disclosure Authorized Public Disclosure Authorized Public Disclosure Authorized
2
3 I N F R A S T R U C T U R E SETTING OUT - FOUNDATION - CONCRETE WORKS - WALLS - ROOF - FLOOR - SERVICES
4 Author : Ekart Hartmann dan Heinz Unger Editor : Octaviera Herawati Photos by : Ekart Hartmann Published by : World Bank Office, Jakarta PNPM Support Facilities (PSF) Office Jalan Diponegoro No. 72 Jakarta Phone : (62-21) (hunting) Fax : (62-21) Website : All, or any part of this book may be reproduced for training needs For Further information, please contact : Octaviera Herawati Phone : (62-21) Fax : (62-21) oherawati@worldbank.org
5 INTRODUCTION Housing Construction Indonesia has experienced a number of natural disasters in the recent past that have damaged or destroyed large numbers of residential housing. Major reconstruction efforts by local, national and international agencies were initiated, and because of many homeless families, speedy completion was an important factor. The need for speed can sometimes lead to low quality workmanship. However, it has been shown that poor construction techniques waste materials, time and efforts; they may make the house uncomfortable, and at the worst, may cause the structure to be unsafe. Costly repairs and early replacement are serious consequences of poor construction practice. On the other hand, good quality housing makes for happy occupants, and has important economic benefits in terms of a longer lifespan and savings in materials and construction costs. If a house is well built, the owners are also much more likely to make further investments in expanding and improving their basic core houses. A lot has been learned in the many recent reconstruction projects, in terms of both, good and bad examples of house construction. While the bad examples are obvious and speak for themselves, the good examples show how much can be achieved by making serious efforts, using good experience, common sense and some technical training. Considering the above mentioned, this book is made to complete the existing standard manual for housing that have been published by the government or other institution. The book presented is simple and easy to understand because each picture are complimented by simple explanation. It is also hoped that the book will be used not only for disaster reconstruction programs but that housing construction in general will benefit from the good and bad practice examples that are being presented. The book is intended not only for builders, contractors and their technical staff, but should also be perused by bureaucrats, managers, staff of multilateral and bilateral assistance agencies, international and Indonesian NGOs active in the housing and community sectors, and lastly but not least, the beneficiaries themselves. Hence, the book should be distributed widely and should be made available to all who ask for a copy; it could also be adapted for training in house construction. i
6 AKNOWLEDGEMENTS Scott Guggenheim who had the original idea and arranged the funding, Ekart Hartmann (with help from Heinz Unger) who prepared the technical pages, Octaviera Herawati who managed the efforts (including coordination of inputs, management of production until publication, and also the translation into Bahasa Indonesia), the many technical staff who provided reviews and suggestions, such as Saleh Siregar, Purnomo Sutantyo, Eka Hasfi Adha, Festina Lavida. Special thanks to Victor Bottini and Sentot Satria who keep supporting this book. Also the layout artist and printing company, and anybody else, including admin and support staff who may have done a lot of work.. ii
7 Contents INTRODUCTION AKNOWLEDGEMENTS i ii BAD GOOD SETTING OUT Setting out 1 3 FOUNDATION Excavation 7 8 Rock Concrete 19 CONCRETE WORKS Concrete Production 21 Formwork Reinforcement Beams, Columns Slab 82 WALLS Materials Construction Windows & Doors Plaster 105 ROOF Roofing materials Aluminium Wood FLOOR Construction 131 SERVICES Electricity Water & Sanitation
8

9 12 Important Rules


10 12 Important Rules

11 Chapter 01 Setting Out
12

13 Setting out Rubbish and rotting plants not removed Boards without straight edges Clean up site before setting out How can I do it better? It is easier to fix the floor level with straight-edged boards Before starting the excavation the site should be cleaned up Organic material will rot and make a bad foundation Why? Organic material will rot and the ground will settle Waste might be contaminated Chapter 01 Setting Out BAD 1

14 Setting out Dispose of plants and waste first Rotten plants and waste are not a good base for floor construction How can I do it better? The site should be cleaned up before starting the excavation Why? Organic material will rot, and the ground will settle Waste might be contaminated 2 BAD Chapter 01 Setting Out

15 Setting out Setting out work area Clear ground of all plants and rubbish Mark out the boundaries of the construction area Why is it better? Plants and other organic material will rot and cause the ground to settle Set up boards around the building outline and leave a working space of at least 1m Alternative: There is no alternative to setting out properly Chapter 01 Setting Out GOOD 3


16 Setting out Strings fixed with nails on the board Boards set at planned floor level Strings mark the location of foundations Set out the strings according to the design of building Why is it better? Taut strings form a straight line from which all measurements can be made Set the top of the boards level with the finished floor Straight-edged boards help to define the floor level - use a spirit level Alternative: Instead of strings, the lines can be made of chalk, but they would get easily covered up if earth or concrete is dumped on them There is no alternative to setting out the structure properly 4 GOOD Chapter 01 Setting Out


17 Setting out Strings can mark the width of the foundation but strings can also mark centerlines of foundations Intersecting strings show the center of columns The above examples show the importance of strings in marking all important points and lines of the structure Chapter 01 Setting Out GOOD 5
18

19 Chapter 02 Foundation
20

21 Excavation Trench is too shallow No boards for strings Roots of plants not disposed of Bottom of trench has to be levelled How can I do it better? Start with it - Setting out the trench alignment and trench bottom and top with boards on each side of the site start with it Before starting the excavation the site should be free from all organic material and waste For a good foundation a minimum 70cm deep trench is required Why? Organic material will rot and cause the ground to settle A deep trench foundation makes a solid base for the house Chapter 02 Foundation BAD 7

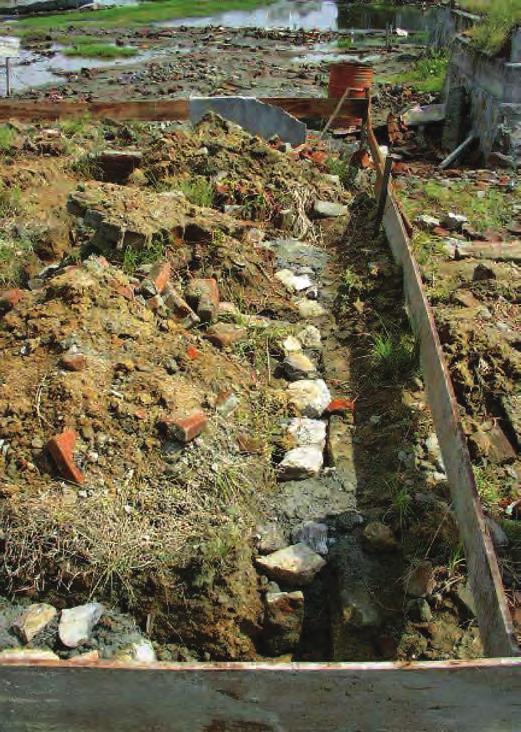
22 Excavation No boards for strings Trench is too shallow Roots of plants not disposed of Trenches that have been excavated for foundations Why is it better? Trench is straight and has slightly sloped walls Trench is deep enough for the subsoil at the site a minimum of 70cm Alternative: There is never an alternative to good and clean excavation 8 GOOD Chapter 02 Foundation


23 Excavation Excavated material can be used under floor Depth depending on soil at the site Boards for setting out strings Trench for foundation Why is it better? Trench is straight with slightly sloped trench walls Trench is deep enough for the subsoil at the site a minimum of 70 cm Alternative: There is never an alternative to a good excavation of the foundations Chapter 02 Foundation GOOD 9

24 Rock Foundation trench is too shallow Not enough concrete between rocks Bottom rock layer not embedded Rock layer of foundation is not embedded in concrete How can I do it better? Deepen the trench to get a better, more solid base for the foundation The rocks have to be embedded in concrete For a good foundation a minimum of 70cm deep trench is required Why? A deep foundation trench makes a solid base for a house 10 BAD Chapter 02 Foundation

25 Rock Bottom rock layer should not be in a straight line Bed for rocks Strings from setting out Foundation trench Bottom rock layer in trench How can I do it better? Rocks are set too much in a straight line they should be placed randomly Why? There is never an alternative to solid foundation material Chapter 02 Foundation BAD 11

26 Rock Foundation trench too shallow Not enough concrete between rocks First rock layer not embedded Rock layer of foundation is not embedded in concrete How can I do it better? Deepen the trench to get a solid base for the foundation The rocks have to be well-embedded in concrete For a solid foundation a minimum of 70cm deep trench is required Why? A deep foundation trench makes a solid base 12 BAD Chapter 02 Foundation
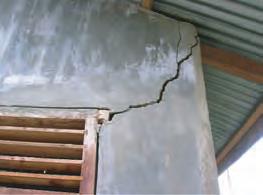
27 Rock Crack caused by settlement of the foundation Movement of foundation A crack is the consequence of poorly compacted subsoil or a poor fundation generally How can I do it better? The excavation of the trench bottom for the foundation and the construction of the foundation itself have to be carried out with great care. Rocks in the foundation have to be well-embedded in concrete Why? A deep foundation trench makes a solid base and reduces the chance of ground settlements. Chapter 02 Foundation BAD 13

28 Rock Movement of foundation Rocks for foundation Why is it better? Rocks have to interlock each other Rocks of different size fill the remaining spaces between big rocks Rocks carry the load of the house Alternative: There s never an alternative to solid foundation material 14 GOOD Chapter 02 Foundation

29 Rock Rough surface for top layer Top layer of concrete levelled Layers of rocks embedded in concrete Sand or lean concrete layer Strings for setting out All phases of foundation construction Why is it better? Sand or lean concrete stabilize the rocks on the trench bottom Rocks are well-embedded in concrete Top layer levels the foundation top Roughen the surface of the top layer for better bond with the concrete of the foundation beam Alternative: There s never an alternative to a solid foundation Chapter 02 Foundation GOOD 15

30 Rock Foundations Space left for setting out the reinforcement of the column Foundation meets foundation Why is it better? Rebars of the column have to set be out before laying the rock foundation There must be enough space for L-shaped bottom end of rebars Alternative: There s never an alternative to solid foundation material 16 GOOD Chapter 02 Foundation

31 Rock Space left for setting out the reinforcement of the columns Height of foundations according to the requirements of the location water, terrain etc Space left in foundation for columns Why is it better? Rebars of the column have to be set out before laying the rocks of the foundation There must be enough space for L-shaped bottom end of rebars The higher the foundation the lower the risk of water damage Alternative: There s never an alternative to solid foundation material Chapter 02 Foundation GOOD 17

32 Rock Water resistant cement for concrete Roughened surface of top layer A well-built stripfoundation Why is it better? Concrete with water-resistant cement avoids moisture in the wall A well-made foundation is the best base for a building Rough surface of top layer enables better bond to beams Alternative: There s never an alternative to solid foundation material 18 GOOD Chapter 02 Foundation

33 Concrete Single concrete foundation Strings of Set Out Foundation trench filled with rocks Single foundations instead of stripfoundation Why is it better? Single foundation for columns are a solid base for elevated floor slabs Alternative: Strip foundation is an alternative There s never an alternative to solid foundation material Chapter 02 Foundation GOOD 19

34 Concrete Rebars have to be supported Filled up with stone masonry Height acc. to requirements Individual foundations Individual foundations for elevated floor slab Why is it better? Individual foundations for columns are a solid base for them The stone masonry supports foundation beams Neat appearance of the masonry work Alternative: Strip foundation is no alternative for elevated floor slabs There s never an alternative to solid foundation 20 GOOD Chapter 02 Foundation

35 Chapter 03 Concrete Works
36


37 Concrete Production Cement Sand Gravel Water Good quality concrete beams Why is it better? The quality of concrete depends on the correct proportions of all ingredients, i.e. cement, sand, aggregates and water. Not enough cement in the mix makes weak, low strength concrete Too much water also makes poor quality concrete It is important to measure and add gravel and sand separately for making dense concrete of good quality Alternative: There is never an alternative to good quality workmanship. Chapter 03 Concrete Works GOOD 21


38 Concrete Production Measure & mix the ingredients with care Let the concrete slip into the formwork Why is it better? Good preparation is essential for good concrete Do not drop the concrete into the formwork from any height, but let it slip Maximum drop of concrete is 5m, otherwise the aggregates get separated Avoid cold joints during pouring - do one section in one lift Alternative: There is never an alternative to good quality workmanship 22 GOOD Chapter 03 Concrete Works
 Use continuous formwork Fix the bottom edge of formwork board to keep it straight Why?")
39 Formwork Cover of 1 2 cm Formwork not parallel to rebars Rebars are in a straight line Watch that concrete cover is the same over entire length How can I do it better? Keep the distance between rebars and formwork constant ( minimal cover 2 cm ) Use continuous formwork Fix the bottom edge of formwork board to keep it straight Why? The strength of reinforced concrete depends on the proper installation of rebars and formwork Chapter 03 Concrete Works BAD 23
 to keep cover distance between rebars and formwork constant ( 2 cm) Support beam formwork every 50 cm Why?")
40 Formwork Distance (cover) of 2 cm Distance of 2 cm Distance of spacer Spacer (blocks) under rebars keep the right distance to the formwork How can I do it better? Use spacer (such as a cement block) to keep cover distance between rebars and formwork constant ( 2 cm) Support beam formwork every 50 cm Why? Spacers are essential for ensuring the correct and constant concrete cover The strength of reinforced concrete depends on the proper installation of rebars and formwork 24 BAD Chapter 03 Concrete Works

41 Formwork Distance from rebars to formwork is too large Rebar touches formwork Spacer (block)on rebars would keep the correct cover distance to formwork How can I do it better? Use spacer blocks to keep distance between rebars and formwork constant from 2 cm Why? There will be no concrete cover, i.e. the steel bars will be exposed, when the rebars touch the formwork Spacers are essential to ensure correct and constant concrete cover The strength of reinforced concrete depends on the proper installation of rebars and formwork Chapter 03 Concrete Works BAD 25

42 Formwork Cut off formwork before concreting There must be a connection between these beams The two concrete beams must be continuous, including the rebars How can I do it better? Cut open the formwork between the two beams so that they are cast as one connected structure Why? Joints are always a weak spot in the concrete Beams up to a length of 5 m can be cast in one pour 26 BAD Chapter 03 Concrete Works

43 Formwork Beam support every 50cm Beam supports are essential before concreting the adjacent section Support roof ridge and formwork for beam first, then start concreting How can I do it better? Support formwork of concrete beams every 50cm until concrete reaches its full strength Support reinforcement before pouring the adjacent section Why? During pouring the rebars must not moved nor vibrated Chapter 03 Concrete Works BAD 27
 place concrete")
44 Formwork Support needed here Pour the beam in one lift Avoid concreting in short sections How can I do it better? Solidly built formwork is the basis for strong concrete structures Support formwork of beams at 50cm intervals until concrete reaches its full strength When casting beams (or columns) place concrete in one lift Why? Avoid cold concrete joints as much as possible Joints are always weak points of any concrete structure Beams up to a length of 5m can be cast in one pour 28 BAD Chapter 03 Concrete Works

 Why?")
45 Formwork 4 sections! Cast all concrete beams and columns always in one lift 3 sections! Avoid pouring concrete in short sections How can I do it better? Solidly built formwork is the basis of good concrete structures Place concrete for all beam (and columns) in one pour (lift) Why? Avoid cold concrete joints as much as possible Joints are always weak points in any concrete structure Beams up to a length of 5m can be cast in one pour Chapter 03 Concrete Works BAD 29
 of the formwork together The spacing between brackets should be between 50 cm and 80 cm Formwork should be at least 2 cm thick Well-built strong formwork")
46 Formwork Distance of brackets to be max. 80 cm Tie brackets Plywood sheet Timber (wooden) supports Formwork for columns should be built like this Why is it better? Brackets tie the plywood sheets (or boards) of the formwork together The spacing between brackets should be between 50 cm and 80 cm Formwork should be at least 2 cm thick Well-built strong formwork keeps its shape when filled with wet concrete Alternative: Plywood is good. It is has a smooth surface, but it is not thick enough. Plywood must be supported by timbers to strengthen the formwork There are no alternatives to well-built formwork The more time you spend on building the formwork, the better the concrete will be 30 GOOD Chapter 03 Concrete Works
 of the formwork together The distance between brackets should be between 50 cm and 80 cm, closer together near the bottom.")
47 Formwork Timber (wooden) supports Distance should not more than 80cm Brackets Plywood sheet A column formwork set up on site Why is it better? Brackets tie the plywood sheets (or boards) of the formwork together The distance between brackets should be between 50 cm and 80 cm, closer together near the bottom. Sheets of formwork are thick enough Strong formwork will keep its shape when filled with wet concrete Alternative: There are no alternatives to well-built formwork The more time you spend on building the formwork, the better the concrete will be Chapter 03 Concrete Works GOOD 31
 of the formwork together Formwork boards are thick enough Formwork for columns is braced from two")
48 Formwork Formwork for the columns Braces hold up formwork Braces hold up formwork for columns Why is it better? Strong formwork will keep its shape when filled with wet concrete Brackets tie the sheets (or boards) of the formwork together Formwork boards are thick enough Formwork for columns is braced from two sides to keep it straight Alternative: There are no alternatives to well-built formwork The more time spent on building formwork, the better the concrete will be 32 GOOD Chapter 03 Concrete Works
49 Formwork Bracing from two directions Brackets bolted together Anchors for wall connections Bracing from two directions is essential for formwork for columns Why is it better? Well-braced formwork will not shift or tilt during pouring Formwork for columns shall not exceed 5m in height because concrete should not be dropped from a great height Height between horizontal beams shall not exceed 3m in order to maintain safety during earthquakes There are holes and wall anchors installed through the formwork The tie brackets can be of different shape but they should tie the boards of the formwork together Alternative: Wet concrete shall not be dropped more than 5m, otherwise the aggregates will separate There is no alternative to good workmanship Chapter 03 Concrete Works GOOD 33

50 Formwork Additional bracing on top Anchor for brick walls Bracing Brackets Horizontal bracing provides more stability to the column formwork Why is it better? Bracing provides more stability to the formwork, so it cannot shift or tilt when the wet concrete is placed Leave holes in the formwork for the wall anchors Alternative: Concrete shall not be dropped more than 5m, otherwise the aggregates will separate There is no alternative to good workmanship 34 GOOD Chapter 03 Concrete Works

51 Formwork Maximum height is 5m Bracing at right angles to each other Bracing at right angles Formwork from two sides is essential for vertical columns Why is it better? The formwork cannot move during concrete placement The formwork for columns shall not exceed 5m in height Height between horizontal beams shall not exceed 3m to make sure the structure is earthquake-proof Alternative: Wet concrete shall not be dropped more than 5m, otherwise the aggregates will separate There is no alternative to good workmanship Chapter 03 Concrete Works GOOD 35

52 Formwork 2 direction braces for columns Brackets Wooden forms Well-built and strong formwork for concrete beams and columns Why is it better? Strong, well-built formwork is essential for good quality concrete structures The thickness of the sheets of formwork is adequate at least 2 cm thick Alternative: There is no alternative to strong formwork 36 GOOD Chapter 03 Concrete Works


53 Formwork Supports for beam formwork Solid support for formwork Supports for slab formwork Why is it better? Well-built formwork is essential for good quality concrete structures Elevated slabs or beams must be supported at 50cm spacing to avoid sagging Do NOT remove the bottom formwork and supports for 28 days, so that the concrete will reach its design strength Alternative: There is no alternative to strong formwork Chapter 03 Concrete Works GOOD 37

54 Formwork Roof beam Supports for beam forms Formwork for roof beams must be well supported Why is it better? Support forms for beams at 50cm spacing until concrete reaches its strength Alternative: There is no alternative for strong supports for formwork 38 GOOD Chapter 03 Concrete Works

55 Formwork Roof beam Formwork for column Beam supports should be at 50cm intervals Wire can not replace solid tie brackets Formwork for beams must be well supported Why is it better? Support formwork for beams at 50 cm spacing until concrete reaches its strength Use wooden tie brackets instead of wire Alternative: There is no alternative for good support Chapter 03 Concrete Works GOOD 39

56 Formwork Concrete rafter Beam support Formwork for concrete rafters must be supported Why is it better? Support formworks for beams at 50cm spacing until concrete reaches its full design strength Alternative: There is no alternative for good supports 40 GOOD Chapter 03 Concrete Works

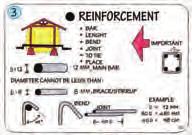
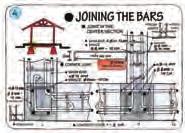
57 Reinforcement Top layer red Bottom layer - green Top Layer Ø12 mm 12mm 50cm overlap Tie Ø 8mm These rebars should overlap 50cm Bottom Layer Ø 12mm There must be a connection between both the rebars of the bottom and the top layer of reinforcement How can I do it better? Bend the rebars as shown and fix them together with wire Length of overlap must be 40 times the diameter, or a minimum of 50cm Why? Overlap is essential to extend the strength of the rebars throughout the structure Well-tied and connected rebars are a basic element of reinforced concrete structures Fixing the reinforcement should be done with great care Chapter 03 Concrete Works BAD 41
 How can I do it better? Bend the rebars as shown in drawing Fixing the reinforcement must be done with great care Why?")
58 Reinforcement Only top layer is marked This rebar shall overlap with the rebar crossing at a right angle 50cm overlap 50cm overlap Horizontal rebars There must be a connection between both these rebars (bottom and top layers) How can I do it better? Bend the rebars as shown in drawing Fixing the reinforcement must be done with great care Why? Well-tied and connected rebars are a basic element of reinforced concrete structures 42 BAD Chapter 03 Concrete Works

59 Reinforcement 50cm overlap to next rebar End of rebar must have a hook These are the outlines of the rebars Only top layer marked There must be NO dead end of rebars they must be connected to the adjacent rebars in the same plane How can I do it better? Use longer pieces of rebars Rebar must never end without a U hook Bend the rebars as shown in the picture (and drawings) Fixing the reinforcement must be done with great care Why? Well-tied and connected rebars are a basic element of reinforced concrete structures Chapter 03 Concrete Works BAD 43

60 Reinforcement Rebars for Column Rebars for foundation beams There is no overlap to other rebars Rebars for foundation beams Strings for setting out Rebars must be connected, i.e. tied and overlapped, to each other How can I do it better? Tie rebars together with thin, flexible wire Each rebar must be tied or connected to the adjacent rebars Why? Only well-tied rebars will ensure the strength of the concrete Connecting the rebars must be done with great care Well-tied and connected rebars are a basic element of reinforced concrete structures 44 BAD Chapter 03 Concrete Works

61 Reinforcement Rebars must be tied to each other There shall be NO space between rebars How can I do it better? Bend the rebars in accordance with what s shown on the drawings Rebars have to overlap by a minimum of 50 cm Fixing the rebars must be done with great care Why? Well-tied and connected rebars are a basic element of reinforced concrete structures Chapter 03 Concrete Works BAD 45
 Fixing the rebars must be done with great care Why?")
62 Reinforcement Rebars must be tied to each other Design dimension of column Rebars must be tied to each other Rebars must be centered in concrete structure How can I do it better? The concrete cover of rebars must be at least 1-2 cm Each rebar has to be connected to the adjacent one(s) Fixing the rebars must be done with great care Why? Adequate concrete cover enables the concrete to reach its design strength 46 BAD Chapter 03 Concrete Works


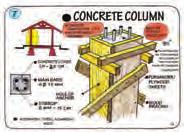
63 Reinforcement The cross section of the column MUST NOT be less than the design Bricks are NOT formwork Rebars must be straight and vertical Rebars must be fixed in a straight vertical line from bottom to top How can I do it better? Rebars for columns must be in a vertical straight line from the foundation up to the roof beam The dimensions of the cross section of any column or beam must not be reduced The dimensions of a column shall not be less than 15x15 cm Bricks are NOT formwork Why? The column is a key element of the house structure Columns carry the load of the entire roof A reduced cross section increases the risk of collapse during an earthquake Columns must be built with great care The stability and structural integrity of the columns are potentially affected by earthquakes Chapter 03 Concrete Works BAD 47


64 Reinforcement Overlap of rebars 50cm minimum Column rebars must be straight and vertical Foundation beam Foundation Rebars of columns must be STRAIGHT, not bent How can I do it better? Rebars for columns must be fixed to be vertical and straight from the foundation up to the roof beam Never reduce the dimensions of the cross section of any column or beam For columns, vertical rebars must be a minimum diameter of 12 mm, and horizontal rebars a minimum diameter of 8 mm Why? The column is a key element of the house structure Columns carry the load of the entire roof Reduced cross sections increase the risk of collapse during an earthquake Columns must be built with great care The stability and structural integrity of the columns are potentially affected by earthquakes 48 BAD Chapter 03 Concrete Works

65 Reinforcement Bent rebars weaken the stability of the structure Column rebars must be straight and vertical Foundation beam Rebars are not covered in concrete Rebars of columns must be STRAIGHT, not bent How can I do it better? Rebars for columns must be vertical and straight from the foundation up to the roof beam The size of the cross section of any column or beam must not be reduced The dimensions of a column shall not be less than 15x15 cm For cplumns, vertical rebars must be a minimum diameter of 12mm, and horizontal rebars a minimum diameter of 8mm Concrete cover over rebars must be 2 cm Why? The column is a key element of the house structure Columns carry the load of the entire roof Reduced cross sections increase the risk of collapse during earthquakes Columns must be built with great care The stability and structural integrity of the columns are potentially affected by earthquakes Chapter 03 Concrete Works BAD 49

66 Reinforcement Ties These distances are not equal The distance between the rebar ties should be constant How can I do it better? Fix rebar ties exactly 15 cm spacing from each other Fixing the reinforcement must be done with great care Why? Rebars are essential for attaining the full strength of a reinforced concrete structure 50 BAD Chapter 03 Concrete Works
 under rebars to get the right cover over the steel rebars Fixing the reinforcement must be done with great care Why?")
67 Reinforcement Twisted rebars Rebars must be fixed straight in the formwork How can I do it better? Rebars must be placed in a straight line Use spacers (blocks) under rebars to get the right cover over the steel rebars Fixing the reinforcement must be done with great care Why? Twisted rebars cannot develop the full strength of the reinforced concrete structure Rebars are a key element of a reinforced concrete structure Chapter 03 Concrete Works BAD 51

68 Reinforcement Bottom formwork for slab Rebars without spacers/ blocks No spacers / blocks are used to hold the rebars in the right position How can I do it better? Rebars must be set on spacers / blocks to get the right concrete cover Why? There are no alternatives to properly fixed reinforcement The more time you spend on fixing the rebars and formwork, the better the concrete will be 52 BAD Chapter 03 Concrete Works


69 Reinforcement Rebars sorted and stacked by size Rebar cages sorted and stacked on supports to keep them clean Production of rebar cages Assembly and storage of rebars and cages Why is it better? Properly sorted and stacked rebars ease the assembly of rebar cages as well as the progress of house construction Supports under the materials keep rebars and cages off the ground and clean Alternative: There is never an alternative to well-organized clean storage Chapter 03 Concrete Works GOOD 53


70 Reinforcement 5 cm Bend Ø12 mm 8 and 12 mm diameter steel bars are the main elements used for reinforcement 5 cm Bend Ø 8 mm Rebars tied to-gether with double wire Why is it better? Check the diameter of rebars to make sure they are the correct size The length of bends at each end of the 8mm diam. Ties shall be 5cm, for the 12 mm diam rebars the length of the bends shall be 8cm. Properly fixed and tied rebars of the right diameter are important for reaching the design strength of the reinforced concrete elements All rebars must be tied to each other at points where they cross Alternative: There are no alternatives to correctly sized and fixed reinforcement The more time spent on reinforcement, the better the concrete will be 54 GOOD Chapter 03 Concrete Works
 Why is it better?")

71 Reinforcement Column rebars - grey Foundation rebars green and blue All blue ties are at the same spacing of 15cm on centers Overlap 50cm Hook 8cm Hook 5cm Example of a beam & column rebars (Colours for illustration only) Why is it better? Correctly sized and fixed rebars are important to reaching the design strength of reinforced concrete structures All rebars must be clean, free of rust and tied to each other Alternative: There are no alternatives to properly fixed reinforcement The more time spent on reinforcement, the better the concrete will be Chapter 03 Concrete Works GOOD 55

72 Reinforcement All ties are at equal spacing No spacer blocks are used - yet Rebars are fixed properly Why is it better? Correctly sized and fixed rebars are important for reaching the strength of reinforced concrete structures All rebars must be tied to each other Ties locations are varied Use spacer blocks below rebars to ensure correct concrete cover Alternative: There are no alternatives to correctly sized and fixed reinforcement The more time spent on reinforcement, the better the concrete will be 56 GOOD Chapter 03 Concrete Works

73 Reinforcement Ø 8 mm Overlap 50 cm Ø 12 mm 15 cm spacing as per design Rebars are neatly assembled but spacer blocks are not used - yet Why is it better? The length of overlap shall not be less than 50 cm Correctly sized and fixed rebars are important for reaching the design strength of reinforced concrete structures All rebars must be tied to each other Alternative: There are no alternatives to properly fixed reinforcement The more time spent on reinforcement, the better the concrete will be Chapter 03 Concrete Works GOOD 57

74 Reinforcement Bricks are NOT formwork Overlap 50 cm with the rebars of foundation Equal spacing between ties Correctly and neatly installed rebars Why is it better? Correctly fixed rebars are important for reaching the strength of reinforced concrete structures All rebars must be tied to each other Alternative: There are no alternatives to correctly sized and fixed reinforcement The more time spent on reinforcement, the better the concrete will be 58 GOOD Chapter 03 Concrete Works

75 Reinforcement Column rebar well centered on beams Equal spacing between ties Adequate concrete cover Note the concrete cover Why is it better? Concrete cover must be at least 2 cm to make sure steel rebars are not exposed All rebars must be tied to each other Alternative: There are no alternatives to adequate concrete cover over reinforcement The more time spent on reinforcement, the better the concrete will be Chapter 03 Concrete Works GOOD 59

76 Reinforcement Column rebars Ø 12 mm Ties Ø 8 mm spaced at 15 cm apart Rebars bent into footing about 70 to 80 cm 90 Angle Fixing the vertical column rebars in the foundation trench Why is it better? A large footing provides a good base for the column reinforcement Bend the column rebars at an 90 angle into the footing Rebars are clean and not rusty Alternative: There are no alternatives to correctly and neatly fixed reinforcement The more time spent on reinforcement, the better the concrete will be 60 GOOD Chapter 03 Concrete Works

77 Reinforcement Correctly assembled rebars Rebar cage for a footing pad for an elevated floor Why is it better? Rebars are correctly and neatly fixed in place Rebars are bent at an exact 90 angle Alternative: There are no alternatives to correctly and neatly fixed reinforcement The more time spent on reinforcement, the better the concrete will be Chapter 03 Concrete Works GOOD 61

78 Reinforcement Support from two sides at right angle Column rebars 90 angle Support from two sides at right angle Trench for foundation Supports form two sides to keep the rebars vertical Why is it better? The rebars must not move during concreting Rebars must be truly vertical so that the column will be perfectly straight Alternative: There are no alternatives to correctly and neatly fixed reinforcement The more time spent on reinforcement, the better the concrete will be 62 GOOD Chapter 03 Concrete Works

79 Reinforcement Column rebars Supports at right angle Supports at right angle Supports from two sides to keep the rebars vertical Why is it better? The rebars must not move during concreting Rebars must be truly vertical so that the column will be perfectly straight Alternative: There are no alternatives to good reinforcement The more time spent on reinforcement, the better the concrete will be Chapter 03 Concrete Works GOOD 63

80 Reinforcement Rebars to connect to reinforcement to roof ring beams Anchors for brick wall connections Steel anchors are necessary to tie the brick wall to the concrete columns Why is it better? Anchors tie the brick wall to the concrete columns Columns and walls are both elements of the structural system and are essential for the strength and stability of the house Alternative: There are no alternatives to correctly fixed reinforcement The more time spent on reinforcement, the better the concrete will be 64 GOOD Chapter 03 Concrete Works

81 Reinforcement Anchors for wall connections Rebars for connecting to roof ring beams Rebars of lintel ring beam Rebars for connecting to lintel ring beam Rebar connections to beams and wall Why is it better? All static elements have to be connected to the static system of the building All rebars have to be connected to each other Alternative: There are no alternatives to correctly and neatly fixed reinforcement The more time spent on reinforcement, the better the concrete will be Chapter 03 Concrete Works GOOD 65
 Check steel reinforcement Use continuous formwork for the entire column Build the brick walls after formwork has been")
82 Beams & Columns Lintels missing Columns were cast in 3 sections Bricks used as formwork Solid framework is essential How can I do it better? First pour the concrete columns up to the roof beam (before building the walls) Check steel reinforcement Use continuous formwork for the entire column Build the brick walls after formwork has been removed Why? The strength of a concrete column increases with the size of its cross section. A column that is too long relative to its cross section can buckle under heavy loads. 66 BAD Chapter 03 Concrete Works


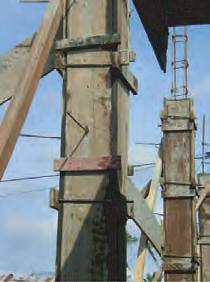
83 Beams & Columns Full design cross section of the column Max. load bearing cross section of column as actuallybuilt Required design cross section of the column Columns must have the design cross section along their entire length How can I do it better? Use plywood formwork instead of using the bricks as formwork The dimensions of any column shall not be less than 15x15cm Brickwork is NOT formwork! WHY? The column is the key bearing element of the house structure Columns help hold up the walls and carry the load of the entire roof Columns must be built with great care The stability and structural integrity of columns are easily affected by earthquakes Chapter 03 Concrete Works BAD 67


84 Beams & Columns Rebars must be vertical Design cross section req d ACTUAL cross section for carrying load Columns must have the design cross section How can I do it better? The dimensions of a concrete column shall not be less than 15x15cm Use plywood formwork instead of using the bricks as formwork Brickwork is NOT formwork! Rebars must be fixed in a vertical position WHY? The column is the key bearing element of the structure of a house Columns help hold up the walls and carry the entire load of the roof Columns must be built with great care The stability and structural integrity of the columns are likely affected by earthquakes 68 BAD Chapter 03 Concrete Works

85 Beams & Columns Upper section of the column Actual load bearing cross section Design load bearing cross section Lower section of the column The full design cross section of a column is essential for the strength and stability of the entire structure How can I do it better? The dimensions of a column shall not be less than 15x15cm Use continuous formwork for the entire column Use plywood formwork instead of using the bricks as formwork Brickwork is NOT formwork! WHY? The column is the key bearing element of the structure of a house Columns help hold up the walls and carry the entire load of the roof Columns must be built with great care The stability and structural integrity of the columns are likely affected by earthquakes Chapter 03 Concrete Works BAD 69


86 Beams & Columns This column cannot carry any load at all Reinforcing bars are not covered by concrete Concrete is not well compacted and the columns are completely out of shape the actual cross section cannot carry any loads How can I do it better? Rebars must embedded in well-compacted concrete Cover over reinforcement must be a minimum of 2cm WHY? Every beam or column is a load-bearing element in the system of a house and has to be carried out very carefully Concrete will never reach full strength when it is not well compacted Reinforcement and the concrete around it constitute the strength of the beam / column 70 BAD Chapter 03 Concrete Works


87 Beams & Columns No Cover on rebars No concrete in the column No Cover on rebars These columns can never carry any loads! How can I do it better? Make sure that the concrete is well-compacted Use solid formwork only bricks are not formwork Watch out that the reinforcement has a minimum cover of 2cm WHY? Only the joint action of reinforcement and concrete will make strong columns and beams to get a rigid and stable load-bearing system. Earthquake-proof system needs a rigid framework Chapter 03 Concrete Works BAD 71


88 Beams & Columns Honeycombs Honeycombs showing less compaction during pouring How can I do it better? Compact the concrete well during the entire pouring WHY? Only well-compacted concrete has structural strength The concrete frame is potentially affected by earthquakes, therefore full attention has to be given to the concrete works 72 BAD Chapter 03 Concrete Works


89 Beams & Columns Rebars twisted Not enough compaction Poor mixing of aggregates Honeycombs No bonding between foundation and beam Honeycombs weaken the strength of concrete How can I do it better? Compact concrete often and with care during pouring Make sure that concrete aggregates do not get separated WHY? Only well-compacted concrete achieves the necessary strength The concrete frame of columns and beams is potentially affected by earthquakes, therefore concrete works must be done with great care Chapter 03 Concrete Works BAD 73

90 Beams & Columns Continuation of column King post of truss is inclined Should be in the same spot King post should be placed straight on top of the column How can I do it better? Move the king post to the top of the column WHY? The vertical load on the king post should be transferred directly to the columns and foundation The concrete frame is potentially affected by earthquakes therefore the concrete works must be done with great care 74 BAD Chapter 03 Concrete Works

91 Beams & Columns A solid stone foundation A solid stone foundation Foundation beams are well-built This well-shaped foundation grid is a solid base for the house structure Why is it better? A solid foundation is the best base for a house Build a strong grid of foundation beams to get a strong structure Alternative: There is no alternative for a good foundation Chapter 03 Concrete Works GOOD 75


92 Beams & Columns Fill must be compacted Foundation beams Brickwork foundation Foundation beams were cast with good formwork Foundation beams Stone foundation Why is it better? Strong formwork helps to achieve the full strength of the concrete so that the structure can resist earthquakes Alternative: There is no alternative if full concrete strength should be attained 76 GOOD Chapter 03 Concrete Works

93 Beams & Columns Base for the floor slab Column and beams are well built Beams of the foundation grid The house structure must be built on a solid foundation grid Why is it better? A solid foundation is the base of a strong house structure A solid grid of foundation beams will make a strong structure Alternative: There is no alternative for a good foundation Chapter 03 Concrete Works GOOD 77

94 Beams & Columns A good connection between roof ring beams and column is important Roof ring beam Columns are well built Lintel beam The skeleton (framework) of the structure should look like this Why is it better? A solid skeleton (framework) is essential for an earthquake-proof building Alternative: There is no alternative for building a solid structure 78 GOOD Chapter 03 Concrete Works


95 Beams & Columns Outer edge of column Inner edge of column Column built with formwork Why is it better? A skeleton (framework) is essential for an earthquake-proof building Alternative: There is no alternative for building good quality structure Chapter 03 Concrete Works GOOD 79

96 Beams & Columns Wall anchors Foundation beams and columns with wall anchors built using good formwork Why is it better? Good formwork is essential for an earthquake-proof building After removal of the formwork, the bricklaying can start Alternative: There is no alternative for getting good quality concrete 80 GOOD Chapter 03 Concrete Works

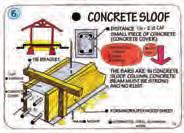
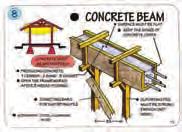
97 Beams & Columns This distance shall not exceed 50cm without a lintel beam Connecting rebars Roof beam will be placed here Max. 3m to found. beam Lintel beam over windows Well-built columns A lintel beam must be used when the distance between bottom of the roof beam and top frame of any windows or doors is more than 50cm Why is it better? The area inside any frame of columns and beams shall not exceed 12 square meters Solid formwork is essential for attaining the good quality concrete that is needed for earthquake-proof buildings Alternative: There is no alternative for building a good quality concrete structure Chapter 03 Concrete Works GOOD 81
 foundation must be built with great care, because the piles carry the entire")
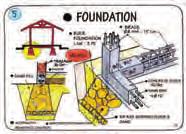
98 Slab Wellbuilt columns with wall anchors Elevated slab Post foundation The elevated slab is supported by a concrete post (or pile) foundation Why is it better? In areas where flooding is possible, it is recommended to build the houses on an elevated slab The concrete post (pile) foundation must be built with great care, because the piles carry the entire load of the house Alternative: There is no alternative to doing good quality concrete work 82 GOOD Chapter 03 Concrete Works

99 Chapter 04 Walls
100


101 Materials Untidy storage of bricks How can I do it better? Stack bricks neatly there is less chance of breakage WHY? Broken bricks make weaker brick walls Chapter 04 Walls BAD 83


102 Materials Brick storage Concrete bricks of standard dimensions Left: Well stacked clay bricks of standard dimensions, i.e. 20x10x5cm Why is it better? Well-stored bricks will not get broken and bricklaying will be easier Alternative: Walls made of hollow concrete blocks 84 GOOD Chapter 04 Walls


103 Construction Broken bricks Defective, broken and poor quality bricks weaken the wall How can I do it better? Bricks of good quality makes for stronger walls Handle bricks with care and stack them in tidy piles on the storage area WHY? Bricks are made of fired clay and break easily Bricks get their strength when laid in cement mortar in masonry walls Chapter 04 Walls BAD 85

104 Construction The joints are as wide as the bricks! The joints are too large How can I do it better? Make vertical & horizontal joints only 1.0 to 1.5cm wide The bricks must be laid perfectly level WHY? Wide joints are not good for the stability of the wall 86 BAD Chapter 04 Walls

105 Construction Brick courses are not level Horizontal Line Brick courses are not level Bricks not laid level, i.e. not in a horizontal line How can I do it better? The joints must be between 1.0 and 1,5cm maximum The bricks have to be laid level, i.e. in a horizontal line WHY? Uneven joints and brickwork not laid level may affect the stability of the wall Chapter 04 Walls BAD 87

106 Construction NO anchors were used Bricks must laid level and with Design width of column Brick joints are not Edge of brickwork Bricks must laid level and with This wall shows many defects How can I do it better? This wall may not withstand an earthquake Follow the suggestions in this book for building brick walls First cast the concrete columns and then start with the bricklaying Bricks must be laid level and plumb, and the joints must be offset by half a brick length I each layer The steel anchors from the columns must be embedded in the brick wall WHY? Using GOOD construction practice as shown in this book will result in good quality house 88 BAD Chapter 04 Walls

107 Construction Top part of wall is OK Joints between bricks are too wide Bricks must be laid exactly level How can I do it better? Set bricks exactly level, i.e. in a horizontal line The joints must be the same width, i.e. 1.0 to 1,5cm maximum WHY? A well built, solid wall contributes to the stability of the house It is easier to put plaster on a smooth brick wall Chapter 04 Walls BAD 89

108 Construction Uneven surface Even surface Bricks used as alternative to stones or rocks Bricks must be laid exactly aligned (on top of each other) to get a smooth wall surface How can I do it better? Lay bricks with a plumb line to get a perfectly vertical line WHY? A well built brick wall contributes to the stability of the house It is much easier to put plaster on a smooth wall surface 90 BAD Chapter 04 Walls
, then build the columns, and last the brick wall WHY?")
109 Construction Design width of columns Bricks are not level Edge of wall Beam is sagging Wall should be built after columns have been built How can I do it better? Build the beam first (with good supports), then build the columns, and last the brick wall WHY? Building in the right sequence is important for a good quality house Chapter 04 Walls BAD 91

110 Construction Load of the wall above Bricks can distribute load better when laid like this Center line Bricks are OK on this side This is how a brick lintel could be built How can I do it better? Lay the bricks for the lintel as shown on the picture above WHY? A lintel must carry and distribute the load of the wall above the opening to the adjacent walls and columns (which carry the load to the footings) 92 BAD Chapter 04 Walls

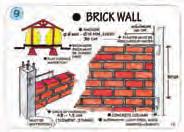
111 Construction Joints should be 1.0 to 1.5 cm Connection to column Clay brick wall Why is it better? The joints must not exceed the dimensions shown The bricks of the next layer up are laid centered on the joint of the lower layer The joint to the column is executed neatly Wall made of hollow concrete blocks Alternative: Chapter 04 Walls GOOD 93


112 Construction Max. height between beams 3m The indicated area is to12m 2 max. Area between columns and beams shall not exceed12m 2 Why is it better? Areas larger than 12 m 2 will not resist even moderate earthquakes For stability reasons it is very important that the anchors from the columns are embedded in the brickwork Alternative: There is no alternative for building stable walls 94 GOOD Chapter 04 Walls
 bricklaying can start For reasons of stability it is important that the anchors are embedded in the brickwork Up to 60cm above foundation beam the")
113 Construction Column with Anchors for walls 60 cm Bricks stacked on a board for ease of work Mortar joints Bricklaying takes place after building the columns Why is it better? After removal of the formwork (for beams & columns) bricklaying can start For reasons of stability it is important that the anchors are embedded in the brickwork Up to 60cm above foundation beam the joints of the brickwork have to be done with water resistant mortar (1,5 units of cement instead of 1 unit) Alternative: There is no alternative to good construction practice Chapter 04 Walls GOOD 95

114 Construction Wall anchors Anchor gets embedded in brickwork Columns Foundation beams Connection of column to brickwall Why is it better? The connection must be done with care To make the connection effective, it is important that the steel anchors are embedded in the brickwork Alternative: There is no alternative to good wall anchors 96 GOOD Chapter 04 Walls

115 Doors & Windows Supports Door frames Foundation beam not yet poured Door & window frames must not be installed before the concrete work has been finished How can I do it better? Build columns and beams before starting brickwork WHY? It is preferable to finish all concrete works first and then start with wall construction and then do the door and window installation. Chapter 04 Walls BAD 97

116 Doors & Windows Lintel bricks shall be laid in two directions Window frames Edge of wall before window installation Joint should be done with care Window frame must be installed before buiding the wall How can I do it better? Install the window and door frames together with building the wall Bricks for lintel should be set in two directions (similar to an arch) Keep a small space between wall and frames and fill it with masonry WHY? A good design minimizes problems on site 98 BAD Chapter 04 Walls
 Alternative: Good preparation and organization eases the")
117 Doors & Windows Door frames Window frames Frames ready for installation Why is it better? Frames are stacked for storage (they should be on supports) Alternative: Good preparation and organization eases the progress of work Chapter 04 Walls GOOD 99

118 Doors & Windows Temporary supports Window frames Window frames ready for installation Why is it better? Temporary supports hold and fix the frames in an upright position during construction Alternative: Good preparation eases the progress of work 100 GOOD Chapter 04 Walls
 hold the frame in a level position during the construction of the wall Alternative: There is no")
119 Doors & Windows Corner brace keeps frame rectangular Supports Space below frame to be filled after wall is finished Spacer Spacers below the frame hold it in a level position Why is it better? Temporary supports keep the frames in a vertical position during construction work Spacer (blocks) hold the frame in a level position during the construction of the wall Alternative: There is no alternative to good quality workmanship Chapter 04 Walls GOOD 101

120 Doors & Windows Louvres above window Corner brace keeps frame rectangular NO lintel beam Supports outside building Spacer Supports can also be installed outside the structure Why is it better? Supports hold the frames in a vertical position during the construction of the walls Spacers keep the frame in a level position during wall erection Alternative: There are none good temporary supports are essential 102 GOOD Chapter 04 Walls

121 Doors & Windows Rigid triangle Cast columns before building the walls Supports outside the building Supports fixed to the ground The rigid triangles formed with the supports keep the frames in a fixed position Why is it better? Temporary supports and frames form a rigid triangle Supports keep the frames in a vertical position during construction work Alternative: Good work preparation ease the work at all Chapter 04 Walls GOOD 103


122 Doors & Windows Lintel Lintel included in roof beam A lintel has to carry the load of the wall above Why is it better? Bricks in lintel are inclined in both directions Roof beam is extended down to top edge of window frame Alternative: Lintels can be built of bricks or of concrete Use concrete lintel beam when vertical distance to roof beam exceeds 50cm 104 GOOD Chapter 04 Walls
 Alternative: Tar paper or plastic sheets can")
123 Plaster 60cmof waterresistant plaster Plaster makes a smooth wall surface Why is it better? To prevent moisture from penetrating the walls the lower 60cm of walls should be plastered with a water-resistant plaster (1,5 units instead of 1,0 unit) Alternative: Tar paper or plastic sheets can be laid on top of foundation beam to prevent moisture from penetrating the bricks Chapter 04 Walls GOOD 105

124 Plaster 60cm of waterresistant plaster A lintel has to carry the load of the wall above Why is it better? To prevent moisture from penetrating the walls the lower 60cm of walls should be plastered with a water-resistant plaster The final appearance of the house can be somewhat shaped with plaster to give it an individual look Before painting the plaster have to be dried out Alternative: The alternative is to leave the exterior finish up to the owner 106 GOOD Chapter 04 Walls

125 Chapter 05 Roof
126

127 Roofing Materials Not well fixed to the purlins Sheets have to be fixed really well How can I do it better? Only properly installed and sealed roofing materials guarantee a leak-proof roof Improperly fastened or loose roofing materials pose a serious risk during storms WHY? There is no alternative to good workmanship Chapter 04 Walls BAD 107

128 Roofing Materials NO rubber seal used Nail on top of roof ridges Rubber seal is needed for a leak-proof roof Note the large head of the roofing nail How can I do it better? Use rubber seals around the roofing nails or screws Put nails on the top of ridges WHY? There is no alternative of good workmanship 108 BAD Chapter 04 Walls

129 Roofing Materials Purlin Corrugated steel sheets Overlap of sheets Corrugated steel sheets to get fixed on purlins Why is it better? Start at the bottom end to mount the sheets A sufficient overlap ensures no water leaks into the house Alternative: Other design of corrugated roof sheets Fibre cement sheets may be coloured Roof tiles, but much more expensive Chapter 05 Roof GOOD 109


130 Roofing Materials Ridge cap covers the top edge of the sheets Overlap of ridge caps Sheets and caps screwed to the purlins Screw protected with a cap Example of fibre cement roofing sheets Why is it better? Overlap is essential for all types of roofing sheets All nails or screws must be of stainless steel/galvanized and have rubber seals All nails or screws should be covered with a plastic cap Alternative: Roof tiles, but they are much heavier and more expensive Galvanized steel sheets are currently the cheapest roofing material 110 GOOD Chapter 05 Roof

 Galvanized or stainless steel materials should be used because they")

131 Roofing Materials Nailed to purlin Rubber seal under plastic cover cap Use nails with a plastic cap Why is it better? There must be a rubber seal between roofing sheet and roofing nails (or screws) Galvanized or stainless steel materials should be used because they do not rust Alternative: Roofing tiles, but they are much heavier and more expensive Fibre cement sheets Galvanized steel sheets are currently the cheapest roofing material Chapter 05 Roof GOOD 111

132 Aluminum Construction Purlin Rafter Tie beam No truss connection to the ring roof beam Truss must be fixed to roof ring beam Why is it better? Rigid and strong connections are essential for a stable roof frame Alternative: The traditionally used material is still wood and it is a good alternativealuminum Construction 112 BAD Chapter 05 Roof

133 Aluminum Construction Purlin extensions Rafter Ridge Board Wooden rafter extension Aluminum roof trusses Why is it better? Roof truss frames of aluminum are lightweight and do not rust Aluminum needs no painting This metal is strong, but also expensive Alternative: The traditional material is still wood, but it must be painted regularly. Chapter 05 Roof GOOD 113

134 Aluminum Construction Rafter Purlin Tie beam Solid connection to roof ring beam Aluminum truss connection to roof ring beam Why is it better? All roof trusses must be tied to the roof ring beam Wood is still a good alternative Alternative: 114 GOOD Chapter 05 Roof


135 Aluminum Construction Purlin Front board Rafter extension Aluminum truss detail with wooden extension for fixing wooden front board Why is it better? It is easier to fix the front board to the wooden rafter extensions Alternative: Wooden roof trusses are still a good alternative. Chapter 05 Roof GOOD 115
 and bolts to fix the rafter to the wall WHY?")
136 Wood Construction This wire is not enough to fix the rafter to the wall The rafter must be supported on entire length of the wall Well supported rafters improve the stability of the roof How can I do it better? Build the wall all the way up to the rafter, so the support is over its entire length Use flat steel (plates) and bolts to fix the rafter to the wall WHY? The better the rafters are supported, the stronger the roof construction will be Rafters need to be supported when they are not tied together by the tie beam 116 BAD Chapter 05 Roof
 and bolts to tie the truss to the roof ring beam WHY? The better the connection of the truss to the wall, the stronger the roof construction will be.")
137 Wood Construction Rafter Purlin Tie Beam Truss not fixed to the roof ring beam Wall Plate The entire roof truss must be fixed to the roof ring beam How can I do it better? Use flat steel (plates) and bolts to tie the truss to the roof ring beam WHY? The better the connection of the truss to the wall, the stronger the roof construction will be. Chapter 05 Roof BAD 117
 and bolts to tie the truss to the roof ring beam WHY?")
138 Wood Construction Rafter Cross Beams Tie beam extension and king post nailed together only Truss not fixed to roof ring beam Make sure that the roof truss is properly connected How can I do it better? Bolts are better than just nails for all truss connections Use flat steel (plates) and bolts to tie the truss to the roof ring beam WHY? The better the connections of the truss to the wall, the stronger the roof construction will be. 118 BAD Chapter 05 Roof

139 Wood Construction Cross beams This is no alternative to angle struts Tie beam Angle strut A roof truss will reach its full strength when all members are tied together How can I do it better? Use proper angle struts instead of unapproved connections to the wall WHY? A roof truss is a structural system and can only function as such when all members are tied together The better the connections of the truss, the stronger the roof construction will be. Chapter 05 Roof BAD 119

140 Wood Construction Purlin Rafter Extension Angle strut Secondary post The connection should bethe other way round Connect the extension ON TOP of the rafter How can I do it better? The extension must be mounted on top of the rafter and must be connected with at least 2 bolts through both members WHY? Both members must function like one structure to carry the load of the roof The better the connections of the truss, the stronger the roof construction will be. 120 BAD Chapter 05 Roof


141 Wood Construction Stacked timber Production of roof trusses Assembled stacked trusses Production of roof trusses Why is it better? Timber sorted and stacked by size ease the production of roof trusses as well as the progress of house construction Alternative: There is never an alternative for a good organisation on a construction site. Chapter 05 Roof GOOD 121

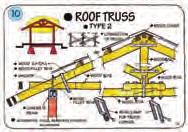
142 Wood Construction Purlin Cross beams Upper tie beam Angle strut Bottom tie beam King post Bolts for good connections The main parts of a roof truss frame Why is it better? Well-built roof trusses will resist windstorms and earthquakes Alternative: There is no alternative for good workmanship 122 GOOD Chapter 05 Roof

143 Wood Construction Purlin King Post Connection of king post and tie beam with bolts only Connect rafter sections with bolts only Connect tie beam sections with bolts How connections of wooden truss members should be made Why is it better? The connections of the wooden truss members make it a rigid frame Bolts connections are much better and stronger than nails Bolts are screwed through both wooden sections and tie them together None Alternative: Chapter 05 Roof GOOD 123

144 Wood Construction Truss King post connections Cross beams fixed to the kings posts make the structure stable Why is it better? The trusses must be tied together with two cross beams to connect the trusses to each other The cross beams stabilize the trusses vertically Bolted connections are better than nails None Alternative: 124 GOOD Chapter 05 Roof

145 Wood Construction Trusses Second cross beam not yet installed Rigid connection between truss and roof ring beam The picture shows where the trusses have to be connected Why is it better? Tight connections are important to make the trusses strong Alternative: There is no alternative to good workmanship Chapter 05 Roof GOOD 125

146 Wood Construction Rafter Flat steel plate connects the bolts Tie beam Concrete roof beam Bolts on each side of truss are embedded in concrete roof beam The truss must be mounted on, and fixed to, the roof ring beam Why is it better? Tight connections between truss and concrete roof ring beam are essential for a strong construction Bolts fasten the flat steel plate tightly to the beam Alternative: Bent rebars of the column can also be used to tie the trusses to roof beam, but they must be fixed to the truss 126 GOOD Chapter 05 Roof


147 Wood Construction Hole for the bolt which is threaded through the tie beam and rafter Bent rebars Rebars extending from the column to tie the truss tightly to the ring roof beam This flat steel plate is one part of truss anchor and it is set in the concrete of the ring beam Different types of truss anchors Why is it better? Tight connections between truss and concrete roof ring beam are essential for a rigid truss frame Bolts fix the flat steel tight to the truss Alternative: There is no alternative to strong connections between the truss and the roof ring beam Chapter 05 Roof GOOD 127


148 Wood Construction Rebars set in concrete, bent & fixed to the purlin Concrete rafters Purlins mounted on concrete rafters Why is it better? Tight connections are important to keep the purlins in place for the roofing Spacing of purlins depends on roofing materials Alternative: There is no alternative to good workmanship 128 GOOD Chapter 05 Roof


149 Wood Construction Purlin support mounted on a wooden rafter Good installation for rafter extension Good examples of roof truss frame construction Why is it better? Tight connections are important to hold the purlins in place for the roofing The connection of rafter extensions must be done with care at least 2 bolts must be used through both wooden sections Alternative: There is no alternative to good workmanship Chapter 05 Roof GOOD 129

150

151 Chapter 06 Floor
152

153 Construction Finished Floor Concrete 5-8cm Sand / Gravel Sand 10-15cm Backfill varies, well compacted Gravel Rocks embedded in water resistant concrete Sand compacted Vertical cross section of floor construction Why is it better? This floor does not draw in moisture Water can seep away into the ground and does not affect the building or its foundations Alternative: The more time spent on placing the different layer, the better the quality of the house will be. Chapter 06 Floor GOOD 131

154 Construction Backfill (soil) ready for compaction Compacted backfill is the base for the floor construction Why is it better? Although compaction has net been done in this layers, but well- compacted backfill prevents later settling of the concrete floor slab Alternative: The more time spent on placing the different floor layer, the better gets the quality of the house will be 132 GOOD Chapter 06 Floor

155 Construction Well compacted and levelled backfill Backfill is the base for the floor construction and must be well compacted Why is it better? Compaction to be done for each layer of backfill Layers of backfill shall not exceed 20 cm in depth When the backfill is well compacted the concrete floor slab cannot settle or crack Alternative: The more time spent on compacting, the smaller the risks of floor settlements or cracking Chapter 06 Floor GOOD 133

156 Construction Well executed floor slab construction Floor slab is the base of the finished floor Why is it better? The surface is smooth and well levelled This is good base for floor tiles, linoleum or just painting the surface Alternative: There is no alternative to good workmanship 134 GOOD Chapter 06 Floor

157 Chapter 07 Services
158


159 Electricity Wires fixed on plaster only Avoid cables coming into contact with steel elements Cable may rub at the edge of column Cables should be installed in plastic (PVC) ducts How can I do it better? For increased safety, electrical wires should be installed in PVC ducts Install the ducts in a straight line under the plaster it makes it easier to find them later on Preferably, electrical wires should be installed out of reach, i.e. higher than 2,5m In masonry walls, the ducts should be installed in the wall or at least in the plaster, in wooden structures the ducts are installed on the surface WHY? A safe electrical installation should prevent system failures and also be no threat to human health and safety Chapter 07 Services BAD 135

160 Electricity Avoid ducts crossings through beams Cables clamps are good Better location for distribution line Wire ducts have to be fixed to the wall How can I do it better? Minimize penetrating beams with ducts to avoid weakening of the beam Electrical wires and ducts should be out of human reach, higher than 2,5m WHY? A safe electrical installation prevents system failures and should meet human health and safety requirements 136 BAD Chapter 07 Services

161 Electricity Cable may rub on sharp edge of ceiling Install a hook to take the weight of the fixture Extend the duct below the ceiling Installation of electrical fixture below the ceiling How can I do it better? Electrical cables shall not rub at the edge of the suspended ceiling Install wires in a PVC duct that extends below the suspending ceiling WHY? A faulty electrical Installation could cause damage to the house A poor installation is also a risk to human health and safety Chapter 07 Services BAD 137


162 Electricity Cable installed in duct & covered by plaster Installation duct covered with plaster Switch and plug installed in plaster wall Before and after electrical installation Why is it better? The wires are installed in a duct and laid in the plaster The safety risk is reduced to a minimum Alternative: There s never an alternative to a safe electrical installation 138 GOOD Chapter 07 Services


163 Water & Sanitation Pipe outlets Never penetrate a beam with a larger pipe How can I do it better? Never penetrate beams with any larger pipe to avoid weakening the beam Set water and sanitation pipes below natural ground level Cross foundation about 60cm below ground level WHY? Do NOT weaken the strength of a concrete beam it is an important element of the earthquake-proof structure Pipes laid below ground are better protected against damage or destruction Chapter 07 Services BAD 139
 the waste water Chamber with settled sludge must be pumped out regularly (when full) Access manhole is essential for inspection and pumping out Vent pipe is")
164 Sanitation 2 nd Chamber for aerobic treatment 1 st Chamber for settling of sludge Inlet from house Outlet to soakaway or drain Access manhole Septic tank for treating human waste Why is it better? The two chambers partially treat (clean) the waste water Chamber with settled sludge must be pumped out regularly (when full) Access manhole is essential for inspection and pumping out Vent pipe is needed Remove formwork of tank cover Alternative: Direct connection to a sewer system if available 140 GOOD Chapter 07 Services