Olde Hickory 1, 2 & Hickory Hill Court Fort Myers, Fl Revised June 10, 2015
|
|
|
- Edwin Hensley
- 5 years ago
- Views:
Transcription
 481-1577 / Naples (239) 596-7887 Fax # (239) 481-1789 Tony Roller <tonyr.")

1 Prepared For: Tony Roller P and M Property Management South Tamiami Trail # B Fort Myers Fl Fort Myers (239) / Naples (239) Fax # (239) Tony Roller <tonyr.pmmgt@gmail.com> Olde Hickory 1, 2 & Hickory Hill Court Fort Myers, Fl Revised June 10, 2015 Prepared By: The Paint Drop by the Valspar Corporation KC Oihus koihus@thepaintdrop.com Sales Representative
2 1) SCOPE OF WORK: 11 Two-Story Buildings (132 Units) 22 Detached Garages, Pool House and 5 Trash Enclosures Valspar Perennial is a 10 year product and is what is specified for this project. a) The areas that are covered in these Repaint Specifications are: 1) All Exterior Stucco Surfaces and Trim (Includes Front and Rear Lanais) 2) Doors and Frames (Entry, Service and Garage) 3) Downspouts 4) Soffits and Fascia (Pressure Clean Only) 5) Electrical Boxes, Electrical Box Plate Covers and Miscellaneous Piping 6) A/C line covers on end of each building (22 in total) 7) Address Numbers on Each Building (11 in total) 2) Optional Scope of Work Items Priced Separately 1) Soffits and Fascia (Perennial Semi-Gloss) Special Notes: Chalking was light in various areas. There are areas of peeling paint on garage doors. Sprinklers need to be adjusted to keep from further staining the paint. Rusted corner bead was noted on random areas. Mildew was noted in random areas on buildings and front doors. Some deteriorated caulk at windows. There will be a color change and the sample area is at the pool house. New lights will be installed prior to painting. Carpet to be removed and a new floor system to be installed prior to painting and the sample is done at unit 626. This project will be done by a brush and roll system. The BOD will allow for the soffit to be sprayed if this option is chosen. The BOD requires a description of the contractor's quality control process for ensuring the project is completed on schedule and to the highest standards. The default color for Condo entrance doors will be Chocolate Milk with owners having the option to choose either Maroon (Red) or Dust Bowl as an alternative color. The project is to start December 1, 2015 Exclusions: Window Frames Screen Enclosures Light Fixtures Steps & landings Drip Edge Hurricane Shutters Rails Fire Extinquisher Boxes Vinyl Doors on Trash Enclosures Page 2
3 3) DELIVERY, STORAGE, AND HANDLING a) Store products in manufacturer's unopened packaging until ready for installation. b) Store and dispose of solvent-based materials, and materials used with solvent-based materials, in accordance with requirements of local authorities having jurisdiction. c) Disposal: 1) Never pour leftover coating down any sink or drain. Use up material on the job or seal can and store safely for future use. 2) Do not incinerate closed containers. 3) For specific disposal or recycle guidelines, contact the local waste management agency or district. Recycle whenever possible. 4) PROJECT CONDITIONS a) Maintain environmental conditions (temperature, humidity, and ventilation) within limits recommended by manufacturer for optimum results. Do not install products under environmental conditions outside manufacturer's absolute limits. 5) WARRANTY a) At project closeout, provide to the Owner or owner's representative an executed copy of the Manufacturer's standard form including a 10 year warranty for materials and outlining the terms and conditions of and any exclusions to their Limited Warranty against Manufacturing Defect. 6) EXTRA MATERIALS a) At project closeout, supply the Owner or owner's representative two gallons of each product for touch-up purposes. b) At project closeout, provide the color mixture name and code to the Owner or owner's representative for accurate future color matching. 7) MANUFACTURERS a) Acceptable Manufacturer: The Valspar Corporation, 1191 Wheeling Road, Wheeling, IL Phone: or visit b) Substitutions: Not permitted, only product manufactured or distributed by The Valspar Corporation are permitted. Page 3
4 8) MATERIALS - GENERAL a) Compatibility: Provide materials that are compatible with one another and the substrates indicated under conditions of service and application, as demonstrated by manufacturer based on testing and field experience. 9) MIXING AND TINTING a) Except where specifically noted in this section, all paint shall be ready-mixed and pre-tinted. Agitate all paint prior to and during application to ensure uniform color, gloss, and consistency. b) Thinner addition shall not exceed manufacturer's printed recommendations. Do not use kerosene or other organic solvents to thin water-based paints. c) Where paint is to be sprayed, thin according to manufacturer's current guidelines. 10) EXAMINATION 1) Do not begin installation until substrates have been properly prepared. b) Ensure that surfaces to receive paint are dry immediately prior to application. c) Ensure that moisture-retaining substrates to receive paint have moisture content within tolerances allowed by coating manufacturer. Where exceeding the following values, promptly notify Architect, or representative, and obtain direction before beginning work. 1) Concrete and Masonry: 13 percent. Allow new or patched concrete to cure a minimum of 28 days. 2) Exterior Wood: 17 percent. d) Examine surfaces to receive coatings for surface imperfections and contaminants that could impair performance or appearance of coatings, including but not limited to, loose primer, rust, scale, oil, grease, mildew, algae, or fungus, stains or marks, cracks, indentations, or abrasions. e) Correct conditions that could impair performance or appearance of coatings in accordance with specified surface preparation procedures before proceeding with coating application. 11) PREPARATION GENERAL a) Clean surfaces thoroughly prior to coating application. Pressure washing involves the removal of oil, grease, dirt, chalk, loose rust, and loose paint. A commercial grade (concentrated) detergent made for pressure washing should be applied during the cleaning process to facilitate complete removal of surface contaminate. b) Do not start work until surfaces to be finished are in proper condition to produce finished surfaces of uniform, satisfactory appearance. c) Stains and Marks: Remove completely, if possible, using materials and methods recommended by coating manufacturer; cover stains and marks which cannot be completely removed with isolating primer or sealer recommended by coating manufacturer to prevent bleed-through. d) Remove Mildew, Algae, and Fungus using materials and methods recommended by coating manufacturer. Before painting, all areas affected by mildew need to be cleaned using one cup of TSP tri-sodium phosphate, or a non ammoniated detergent, mixed with one quart of household bleach and three quarts of water. Allow the solution to dwell on affected surface areas for approximately ten minutes, then rinse thoroughly with clean water. Allow surface to completely dry before painting. e) Remove dust and loose particulate matter from surfaces to receive coatings immediately prior to coating application. f) Move or protect equipment and fixtures adjacent to surfaces indicated to receive coatings to allow application of coatings. Page 4
5 g) Protect adjacent surfaces not indicated to receive coatings. h) Prepare surfaces in accordance with manufacturer's instructions for specified coatings and indicated materials, using only methods and materials recommended by coating manufacturer. 12) SURFACE PREPARATION: INCLUDE UP TO 50 SQUARE FEET OF STUCCO REPAIR a) Concrete and Concrete Masonry: Clean surfaces free of loose particles, sand, efflorescence, laitance, form oil, curing compounds, and other substances which could impair coating performance or appearance. b) Existing Coatings: 1) Remove surface irregularities by scraping or sanding to produce uniform substrate for coating application; apply one coat OF TINTED primer of type recommended by coating manufacturer for maximum coating adhesion. 2) If presence of lead in existing coatings is suspected, cease surface preparation and notify Property Manager immediately. c) Masonry Surfaces - Restored: Remove loose particles, sand, efflorescence, laitance, cleaning compounds and other substances that could impair coating performance or appearance. d) Seal all joints and cracks. e) Metals - Aluminum, Mill-Finish: Clean and etch surfaces with a phosphoric acid-water solution or water based industrial cleaner. Flush with clean water and allow to dry, before applying primer coat. f) Metals - Ferrous, Unprimed: Remove rust or scale, if present, by wire brush cleaning, power tool cleaning, or sandblast cleaning; remove grease, oil, and other contaminants which could impair coating performance or appearance by solvent cleaning, with phosphoric-acid solution cleaning of welds, bolts and nuts; spot-prime repaired welds with specified primer. Fill holes where needed. g) Metals - Ferrous, Shop-Primed: Remove loose primer and rust, if present, by scraping and sanding, feathering edges of cleaned areas to produce uniform flat surface; solvent-clean surfaces and spot-prime bare metal with specified primer, feathering edges to produce uniform flat surface. h) Metal Doors - remove contaminants with cleaning solvent (alcohol) scuff sand and wipe. Test adhesion of primer before starting job. 13) APPLICATION - GENERAL a) Apply each coat to uniform coating thickness in accordance with manufacturer's instructions, not exceeding manufacturer's specified maximum spread rate for indicated surface; thins, brush marks, roller marks, orange-peel, or other application imperfections are not permitted. b) Allow manufacturer's specified drying time, and ensure correct coating adhesion, for each coat before applying next coat. c) Inspect each coat before applying next coat; touch-up surface imperfections with coating material, feathering, and sanding if required; touch-up areas to achieve flat, uniform surface without surface defects visible from 5 feet (1.5 m) straight on-not at an angle. d) Remove dust and other foreign materials from substrate immediately prior to applying each coat. e) Where paint application abuts other materials or other coating color, terminate coating with a clean sharp termination line without coating overlap. f) Where color changes occur between adjoining spaces, through framed openings that are of same color as adjoining surfaces, change color at outside stop corner nearest to face of closed door. g) Re-prepare and re-coat unsatisfactory finishes; refinish entire area to corners or other natural terminations. Page 5
6 14) CLEANING a) Clean excess coating materials, and coating materials deposited on surfaces not indicated to receive coatings, as construction activities of this section progress; do not allow to dry. b) Re-install hardware, electrical equipment plates, mechanical grilles and louvers, lighting fixture trim, and other items that have been removed to protect from contact with coatings. c) Reconnect equipment adjacent to surfaces indicated to receive coatings. d) Relocate to original position equipment and fixtures that have been moved to allow application of coatings. e) Remove protective materials. 15) PROTECTION a) Protect completed coating applications from damage by subsequent construction activities. b) Repair to Property Managements acceptance coatings damaged by subsequent construction activities. Where repairs cannot be made to Property Management s acceptance, re-apply finish coating to nearest adjacent change of surface plane, in both horizontal and vertical directions. Page 6
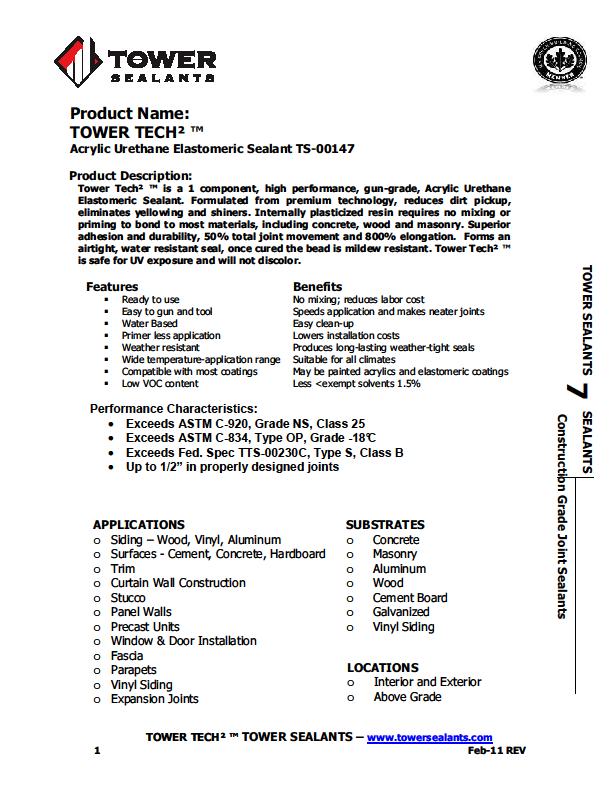
 Apply a continuous bead of Tower Tech II to all Windows, Bands (Tops and Sides) and Door Perimeters 3) Apply a")

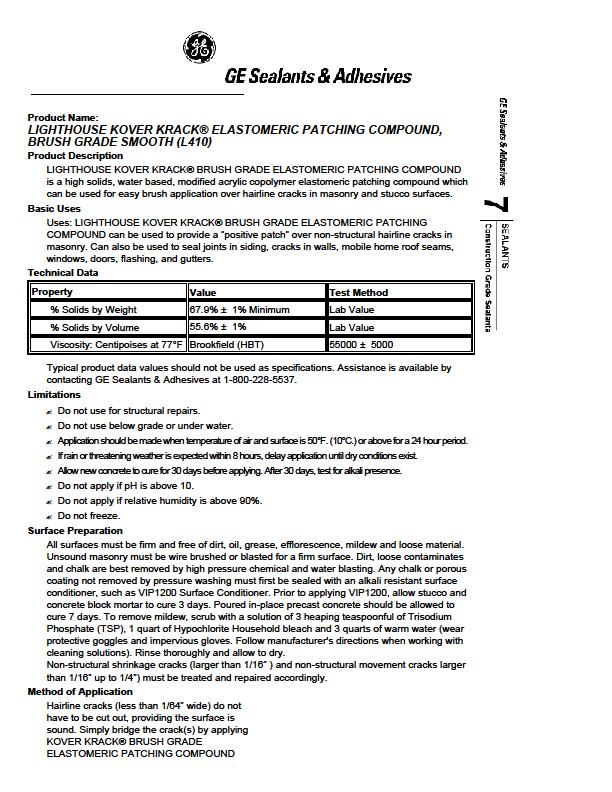
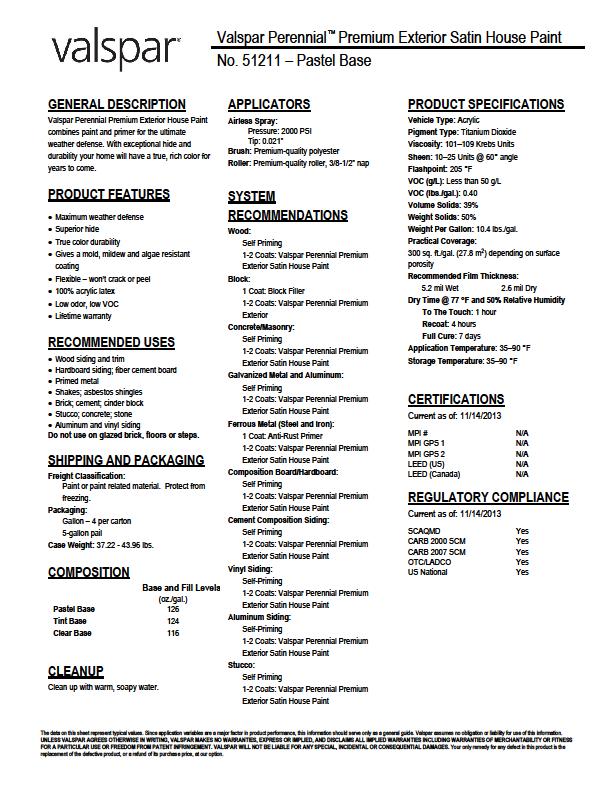
7 16) EXTERIOR SYSTEMS: All Exterior Stucco Surfaces and Trim (Including Lanais) 1) One (1) Coat - Valspar Masonry Primer Conditioner #2935 TINTED TO COLOR 2) Apply a continuous bead of Tower Tech II to all Windows, Bands (Tops and Sides) and Door Perimeters 3) Apply a continuous bead of Lighthouse Elastomeric Smooth Brush Grade L410 to Stucco Cracks 4) One (1) Coat - Valspar Perennial Exterior Latex Satin #51211 line *** NOTE: PLEASE READ ALL PRODUCT DATA SHEETS AND MATERIAL SAFEFTY SHEETS PRIOR TO THE APPLICATION OF ALL COATINGS. Page 7
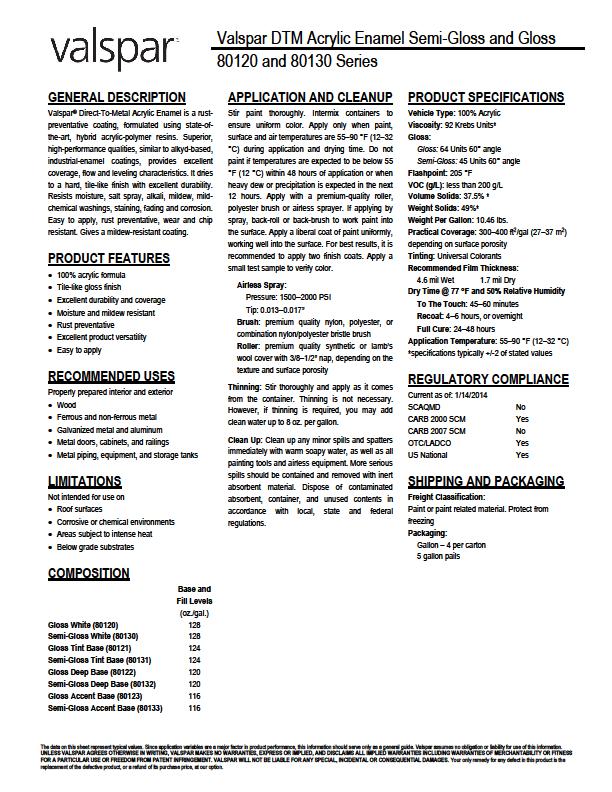
 One (1) Coat - Valspar DTM Semi-Gloss #80120 (Entrance doors may be one of 3")

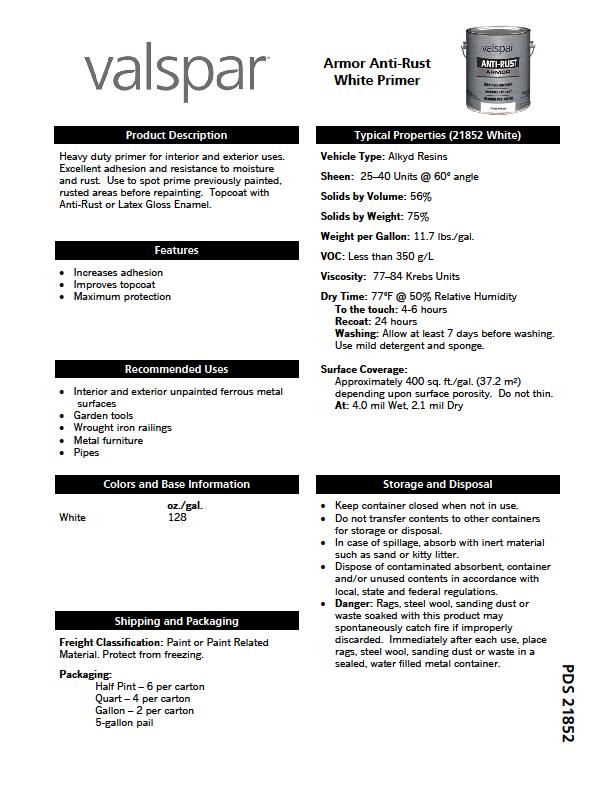
8 17) Doors and Frames (Condo Entry and Garage Service): 1) Spot One (1) Coat Valspar Anti-Rust Primer # ) One (1) Coat Valspar Bonding Primer # ) One (1) Coat - Valspar DTM Semi-Gloss #80120 (Entrance doors may be one of 3 colors) Garage Doors: One (1) Coat Valspar Masonry Primer Conditioner #2935 One (1) Coat - Valspar DTM Semi-Gloss #80120 *** NOTE: PLEASE READ ALL PRODUCT DATA SHEETS AND MATERIAL SAFEFTY SHEETS PRIOR TO THE APPLICATION OF ALL COATINGS. Page 8
 11 Address Numbers: (Maroon Color) 1) One (1) Coat - Valspar")

9 18) Downspouts: 1) One (1) Coat - Valspar Masonry Primer Conditioner #2935 2) One (1) Coat - Valspar Perennial Exterior Latex Satin # ) 11 Address Numbers: (Maroon Color) 1) One (1) Coat - Valspar Masonry Primer Conditioner #2935 2) One (1) Coat - Valspar Perennial Exterior Latex Satin #51211 *** NOTE: PLEASE READ ALL PRODUCT DATA SHEETS AND MATERIAL SAFEFTY SHEETS PRIOR TO THE APPLICATION OF ALL COATINGS. Page 9
 One (1) Coat - Valspar Perennial Exterior Latex Satin #51211 Metal")

10 20) Electrical Boxes and Miscellaneous Piping: 1) Spot Prime One (1) Coat - Valspar Anti-Rust White # ) One (1) Coat - Valspar Masonry Primer Conditioner #2935 3) One (1) Coat - Valspar Perennial Exterior Latex Satin #51211 Metal Chases: One (1) Coat Valspar Bonding Primer #11892 One (1) Coat - Valspar Perennial Exterior Latex Satin #51211 *** NOTE: PLEASE READ ALL PRODUCT DATA SHEETS AND MATERIAL SAFEFTY SHEETS PRIOR TO THE APPLICATION OF ALL COATINGS. Page 10


11 Rusted Corner Bead New Flooring System at Unit 626 Mildew on Window Sill Page 11


12 Peeling Garage Door Rusted Service Doors Bubbled Paint Page 12
 (75% less)")

13 New Color Scheme Milk Chocolate to this Point (Body Color) (75% less) Dustbowl will be the complete stairwells and to these points (Trim Color) Page 13

14 Page 14
15 Page 15
16 Page 16
17 Page 17
18 Page 18
19 Page 19

20 ***Please note that millage rates and coverage can be affected by color changes. Upon color approval, samples will be applied to ensure no changes are needed to the specification. END OF SECTION Page 20