INSTALLATION MATERIALS
|
|
|
- Marion Hutchinson
- 5 years ago
- Views:
Transcription

1 INSTALLATION GUIDE M A T E R I A L S 1


2 CONTENTS Through using this installation guide, all your projects using Koni Materials will finish exactly as you first visualized. This installation guide will go over proper and thorough installation of all types of brick veneer, stone veneer, and natural stone. If you decide to forgo our process or use a different one, any damage incurred from or after installation will be your liability. We hope you find this guide helpful and easy to use! Refer to the Koni Materials YouTube page for installation videos including both grout joint and dry stack application methods Product Info Manufacturing Process Ingredients How It s Made Installation Process Brick Veneer Stone Veneer Natural Stone 16 Installation Diagrams M A T E R I A L S 2 3


3 PRODUCTS Koni Materials has developed a thin brick veneer to meet all your design and construction needs. Currently available in four styles with various color options, our brick veneer is 100% authentic and realistic in texture, shade, and size. Our brick veneer is thin, lightweight, and easy to install. Koni brick veneers will bring beauty and charm to any design! ANTIK BRICK ARABIAN BRICK CORK BRICK KONI BRICK KONI BRICK BLANC CORK BRICK NEW JERSEY Koni Materials started with the goal of producing high quality, low price stone veneers for the building industry. Currently available in 10 styles with various color options, our stone veneer is one of the most authentic products on the market. Koni Materials stone veneer is thin, lightweight, and easy to install. Stone veneer can be used for any project: big or small, interior or exterior. Koni Stone will help your vision become a reality. CANYON STONE CAROLINA STONE CASTLE STONE CLIFF STONE COBBLE STONE FAST SET FIELD STONE GALARZA MOUNTAIN LEDGE PEAK STONE CANYON STONE MONTANA 4 5


4 PRODUCTS Balancing the unique appeal of natural stone with the reliability of expert craftsmen, Koni Materials brings you the Citali Series. The Citali Series is our natural stacked stone paneling, available in a wide variety of styles and colors. The variety in which this natural stone is available makes it the perfect material for almost any project. Inspired by celestial bodies, our Luna Series 12x24 panels offer a wider variety of natural stone paneling to fit the needs of all your projects. Koni Materials products are developed from the highest quality materials, always keeping our customers needs in mind. ASH CIBELES COCO EOS LAVA STONE OPEN LAVA STONE CLOSED FIRA FORREST LAGUNA MALVA MIDAS MOSCATO ODRA PAPEL RUST TARAH CITALI LAGUNA 6 7
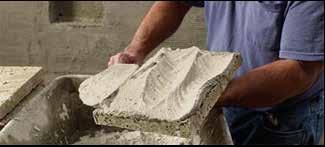
5 HOW IT S MADE The process by which all Koni Materials veneer products are made is with the utmost care, ensuring the highest quality stone veneers, brick veneers, designer stone veneers, and building accessories available to you. With almost 90% of the production process being done by hand, including material development, painting, unmolding, and packaging, you can be sure that your Koni Materials product has been quality checked every step of the way. Let me walk you through the production process at our plant. The Citali Series and Luna Series are both natural stone products. Citali being a 6x24 stacked natural stone panel and Luna being a 12x24 natural stone panel. 4. Pouring Mixture The product mixture developed at the beginning of this process is transferred into large barrels where it is poured into the molds. Most of this process is done by hand as well, with employees measuring the amount of product needed and smoothing out the surface of the mold before moving onto the next step. 1. Product Mixture 5. Curing The very beginning of the development process for any Koni Materials veneer product is the combination of the ingredients necessary to produce the product. In this case, our products are made using: Portland Cement, Mineral Aggregates, Iron Oxide Pigments, and Concrete Additives. It does NOT contain lead. This portion of the process is done mainly by hand, but the mixing itself is done using machine. Filled molds are moved, by hand, from the conveyor belt to the drying rack to solidify and become the Koni Materials products you know. This curing process can take up to 28 days. Some products actually get shipped before fully curing. This does not damage the product, but, if you get a product that has some discoloration, don t fret! The product is most likely still in the curing process and once that process is complete, the product will more closely resemble the product you desired. 2. Mold Development 6. Unmolding To ensure that each Koni Materials manufactured product is unique, the molds used to craft each stone, brick, or accessory are individually developed by hand from naturally occuring materials. Through this process, and the way you design your layout, there will be almost no recognizable pattern in the product. Also, to ensure a continually developing design of our products and to maintain the highest quality we can achieve, we only use individual molds a total of 200 times before they are replaced with new ones. Once the product is dry enough for unmolding (curing may not be finished yet), the molds are taken from the drying rack and unmolded by hand. The molds are then washed thoroughly and ready to restart their part of the process. 3. Mold Painting 7. Packaging & Shipment Before the product mixture can be added to the mold of choice, the mold needs to be hand painted by employees. The painting of the mold before adding the mixture makes sure that the paint will fully integrate into the veneer, creating a complete saturation throughout the product. One of the reasons we use the molds so few times before recreating them is because of this painting process. Koni Materials products are taken directly from unmolding and begin the packaging and shipping process. Each box is indivually hand packed with the product of choice, again checking the quality of the product, and is then shipped out to the Koni Materials warehouse in San Antonio, TX where it can be distributed nationwide. 8 9
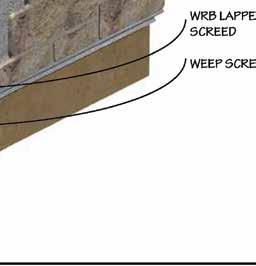
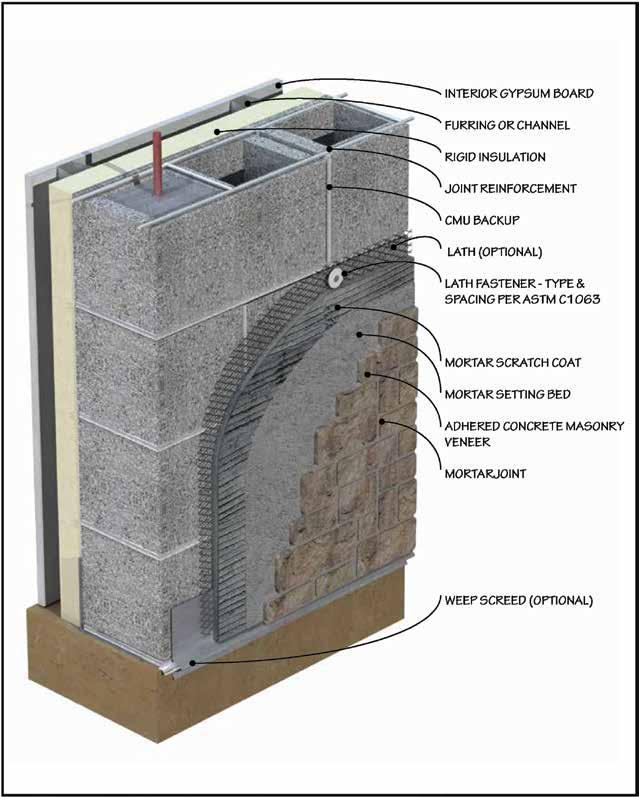
6 INSTALLATION The process by which all Koni Materials brick veneers are installed can vary slightly depeding on your situation, but this is the industry standard installation method. You may need to make adjustments depending on your current project, but, for the most part, this installation method is the most thorough and will ensure a long lasting product. B R I C K These steps are based on the most current MVMA Installation Guide. It may be necessary to modify the instructions to comply with a local code. A water resistant barrier (WRB) should be added to the surface wall for exterior installations. 1. Surface Prep 4. Mortar Setting Bed Verify that the surface to which the brick veneer is to be installed is structurally sound, free of any coatings or materials that would inhibit bonding, and capable of supporting the intended product. The majority of the details in this guide focuses on the installation of veneer products on backup systems consisting of framing with rigid sheathing and concrete. Masonry walls, poured concrete walls, and concrete tilt up panels must be free of dirt, waterproofing, paint, oil, or any other substance that could inhibit the mortar bond and must readily accept/absorb water in order to achieve good bond. Adding moisture helps prevent excessive absorption of moisture from the mortar bed allowing a better bond. Metal Lath & Scratch Coat If using a cement board, skip this step. If a bondable surface cannot be achieved, attach a lath and apply a scratch coat before installing your brick veneer. Laths should be applied horizontally (perpendicular to framing, if present), and should overlap a minimum of 1 at the vertical seams and a minimum of 1/2 at the horizontal seams. Vertical seams should be staggered. Lath should be wrapped around inside and outside corners a minimum of 12. Lath should be fastened every 7 vertically on each stud. A scratch coat is a coat of mortar to be applied on top of the lath (see pg 20 for depiction). Chalk Line Guides Prior to the application of mortar to the back of the brick veneer, the scratch coat and back of the veneer should be moistened so that the surfaces appear damp but are free of standing water. The back of each brick veneer should be entirely coated with a mortar of your choice to a thickness of about a 1/2. Cover the entire back of the veneer, not just the perimeter. Mortared bricks should be firmly worked onto the scratch coat, slid slightly back and forth and held in place for a moment to start the bonding process. Apply mortar in an amount that results in a full setting bed, completely covering the previously applied lath and scratch coat. The resulting thickness of the scratch coat and setting bed should be about 1. If you don t want to apply the mortar to the back of your veneers, mortar may be troweled onto the scratch coat, completely covering the scratch coat. Grout Joint Grouting the joints should be completed only after there is sufficient bond time of the installed brick veneers. Grouting may be done with a grout bag, filling joints to the desired depth, ensuring that mortar is forced into all voids. The grout joints should be a 1/2 in width between veneers. Grout should be thumb- print hard before tooling the joints. The bonding time required before the grout is ready will vary significantly with temperature and humidity. Use a wooden raking stick or pointing tool to tool the joints to the desired depth. Clean Surface Once the scratch coat has dried or if you re applying the brick veneer directly to the surface, measure out the distance desired between each brick (including a 1/2 grout joint). Once you ve measured out your installation area, mark the measurements horizontally using a chalk line. This chalk line will keep your bricks in line as you install. See pg. 21 for an example of stone veneer application with a chalk line guide. Extra precaution should be taken while tooling so the surface of the brick veneer is not damaged. Clean off remaining grout debris on the veneer surface with a dry, soft-bristled brush. Do NOT use a wet brush to prevent grout from smearing. Cleaning off mortar or grout debris should be done as soon as possible as to keep it from drying onto the surface of the brick veneer
7 INSTALLATION The process by which all Koni Materials stone veneers are installed can vary slightly depeding on your situation, but this is the industry standard installation method. You may need to make adjustments depending on your current project, but, for the most part, this installation method is the most thorough and will ensure a long lasting product. S T O N E These steps are based on the most current MVMA Installation Guide. It may be necessary to modify the instructions to comply with a local code. A water resistant barrier (WRB) should be added to the surface wall for exterior installations. 1. Surface Prep 4. Grout Joint 2. Verify that the surface to which the stone veneer is to be installed is structurally sound, free of any coatings or materials that would inhibit bonding, and capable of supporting the intended product. The majority of the details in this guide focuses on the installation of veneer products on backup systems consisting of framing with rigid sheathing and concrete. Masonry walls, poured concrete walls, and concrete tilt up panels must be free of dirt, waterproofing, paint, oil, or any other substance that could inhibit the mortar bond and must readily accept/absorb water in order to achieve good bond. Adding moisture helps prevent excessive absorption of moisture from the mortar bed allowing a better bond. Metal Lath & Scratch Coat 5. Grouting the joints should be completed only after there is sufficient bond time of the installed stone veneers. Grouting may be done with a grout bag, filling joints to the desired depth, ensuring that mortar is forced into all voids. The grout joints should be a 1/2 in width between veneers. Grout should be thumb- print hard before tooling the joints. The bonding time required before the grout is ready will vary significantly with temperature and humidity. Use a wooden raking stick or pointing tool to tool the joints to the desired depth. Dry Stack If using a cement board, skip this step. If a bondable surface cannot be achieved, attach a lath and apply a scratch coat before installing your stone veneer. Laths should be applied horizontally (perpendicular to framing, if present), and should overlap a minimum of 1 at the vertical seams and a minimum of 1/2 at the horizontal seams. Vertical seams should be staggered. Lath should be wrapped around inside and outside corners a minimum of 12. Lath should be fastened every 7 vertically on each stud. A scratch coat is a coat of mortar to be applied on top of the lath (see pg 20 for depiction). If it is intended to use a dry stack method to install your stone veneer, make sure to include step 3 from pg. 10 in this process. When using a dry stack installation method, the stone veneer pieces should be placed directly next to each other, starting from the corner. Frequently check the chalk guide lines to maintain proper alignment. Specify a colored setting mortar to match the color of the stone veneer to blend any exposed areas. 3. Mortar Setting Bed 6. Clean Surface Prior to the application of mortar to the back of the stone veneer, the scratch coat and back of the veneer should be moistened so that the surfaces appear damp but are free of standing water. The back of each stone veneer should be entirely coated with a mortar of your choice to a thickness of about a 1/2. Cover the entire back of the veneer, not just the perimeter. Mortared veneers should be firmly worked onto the scratch coat, slid slightly back and forth and held in place for a moment to start the bonding process. Apply mortar in an amount that results in a full setting bed, completely covering the previously applied lath and scratch coat. The resulting thickness of the scratch coat and setting bed should be about 1. If you don t want to apply the mortar to the back of your veneers, mortar may be troweled onto the scratch coat, completely covering the scratch coat. Extra precaution should be taken while tooling so the surface of the stone veneer is not damaged. Clean off remaining grout debris on the veneer surface with a dry, soft-bristled brush. Do NOT use a wet brush to prevent grout from smearing. Cleaning off mortar or grout debris should be done as soon as possible as to keep it from drying onto the surface of the stone veneer
8 INSTALLATION The process by which all Koni Materials natural stone panels (Citali & Luna Series) are installed can vary slightly depeding on your situation, but this is the industry standard installation method. You may need to make adjustments depending on your current project, but, for the most part, this installation method is the most thorough and will ensure a long lasting product. It may be necessary to modify the instructions to comply with a local code. A water resistant barrier (WRB) should be added to the surface wall for exterior installations. 1. Surface Prep 4. Corner Installation Verify that the surface to which the natural stone panel is to be installed is structurally sound, free of any coatings or materials that would inhibit bonding, and capable of supporting the intended product. Masonry walls, poured concrete walls, and concrete tilt up panels must be free of dirt, waterproofing, paint, oil, or any other substance that could inhibit the bond. Always begin your paneling installation with the corner of the wall and work your way inward. If any pieces need to be cut in order to fit your installation, you can use a wet saw with a diamond blade. When installing the natural stone around a corner, make sure to overlap the edges as to not create a gap in your panels. (For a better explanation of this, check our YouTube channel) 2. Adhesive 5. Dry Stack If there is no mesh backing, skip to step 3. If your natural stone panel has a mesh backing to it, we can recommend the use of a Type R reactive resin adhesive. The adhesive should be applied to the stone in a zig zag pattern, using enough to fully coat the panel. The panel should big wiggled into place on the clean wall and held in place for a few moments to begin the bonding process. We recommend using a dry stack method to install your Citali natural stone panels. A dry stack or grouted method may be used for the Luna Series. When using a dry stack installation method, the stone panels should be placed directly next to each other, starting from the corner. Specify a colored setting mortar to match the color of the natural stone to blend any exposed areas. Depending on the shape of your stone, they may be installed in an interlocking pattern or side by side. 3. Mortar Setting Bed The back of each stone panel should be entirely coated with a mortar of your choice to a thickness of about a 1/2. In any situation, we do not recommend sand mortars, since sand contains different salts, and when mixed with the cement and water, may produce pathologies called efflorescence. Cover the entire back of the panel, not just the perimeter. Mortared stone panels should be firmly worked onto the scratch coat, slid slightly back and forth and held in place for a moment to start the bonding process. Apply mortar in an amount that results in a full setting bed, completely covering the previously applied lath and scratch coat. The resulting thickness of the scratch coat and setting bed should be about 1. If you don t want to apply the mortar to the back of your panels, it may be troweled onto the scratch coat, completely covering the original coat and the panels may Clean off remaining adhesive or mortar debris on the stone panel surface with a dry, soft-bristled brush. Do NOT use a wet brush to prevent grout from smearing. Cleaning off adhesive or mortar debris should be done as soon as possible as to keep it from drying onto the surface of the stone. be placed on while the mortar is still wet Clean Surface

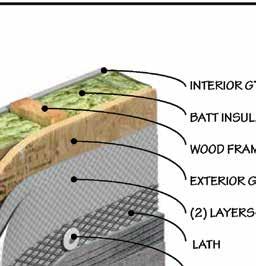
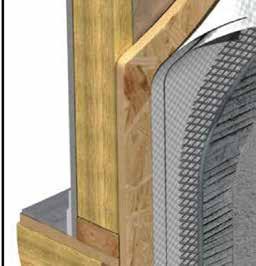
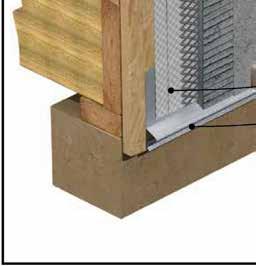
9 DIAGRAMS 1. Installation Over Wood Framing 2. Installation Over Concrete 16 17

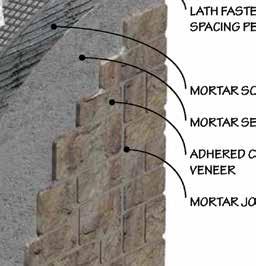
10 DIAGRAMS 3. Installation with Metal Lath and Scratch Coat 4. Installation with Cement Board 18 19

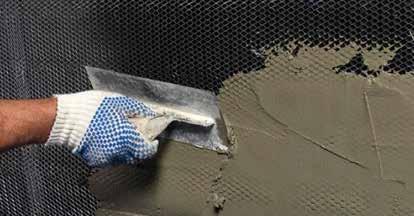
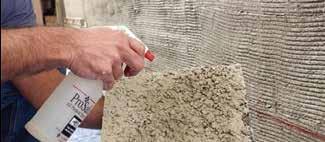
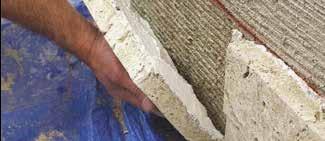
11 PHOTOS 5. Metal Lath Application 7. Veneer Application 6. Scratch Coat Application 20 21

12 22 KONIMATERI ALS.COM