Installation Instructions
|
|
|
- Jack Campbell
- 5 years ago
- Views:
Transcription

1 Installation Instructions
2 This document should be printed and readily available at the installation site. QDuct is a userfriendly system that will save installation time and labor. Installation videos, code documentation and this guide are provided on GENERAL QDuct is the most advanced and innovative pre-insulated exterior HVAC duct system designed for superior AHU energy efficiency and built to endure external applications and other extreme conditions. To ensure an air- and water- tight system, carefully adhere to the following instructions. The QDuct system has been designed using AQC fabrication methods along with the Pal Duct phenolic engineered duct system methods. Use of non-approved accessories and/or material will void the warranty. QDuct is fabricated using SMACNA guidelines for Phenolic Duct Construction Standards, ANSI/SMACNA as applicable. TOOLS Contractor Provided Tools and Accessories: 1. Circular saw with 3 cutting depth and 45 angle cutting ability 2. Utility knife with a minimum 3 blade extension 3. Rubber mallet 4. Flat bar 5. Level 6. Square AQC Provided Tools and Accessories: 1. Q Duct Sealant 2. UL 181 listed tape 3. Tiger connecting clips 4. Squeegee for applying tape and jacketing 5. Exterior jacketing strips for joining sections 6. Blue support plank 7. Caulk gun (power operated recommended) 8. Safety glasses 9. Gloves (recommended for handling/applying sealant) 10. Rubber finger tip 11. Black permanent marker 12. Cardboard or plywood 13. Shop-Vac


 around the external walls of the QDuct ensuring resistance to lift caused by wind force.")
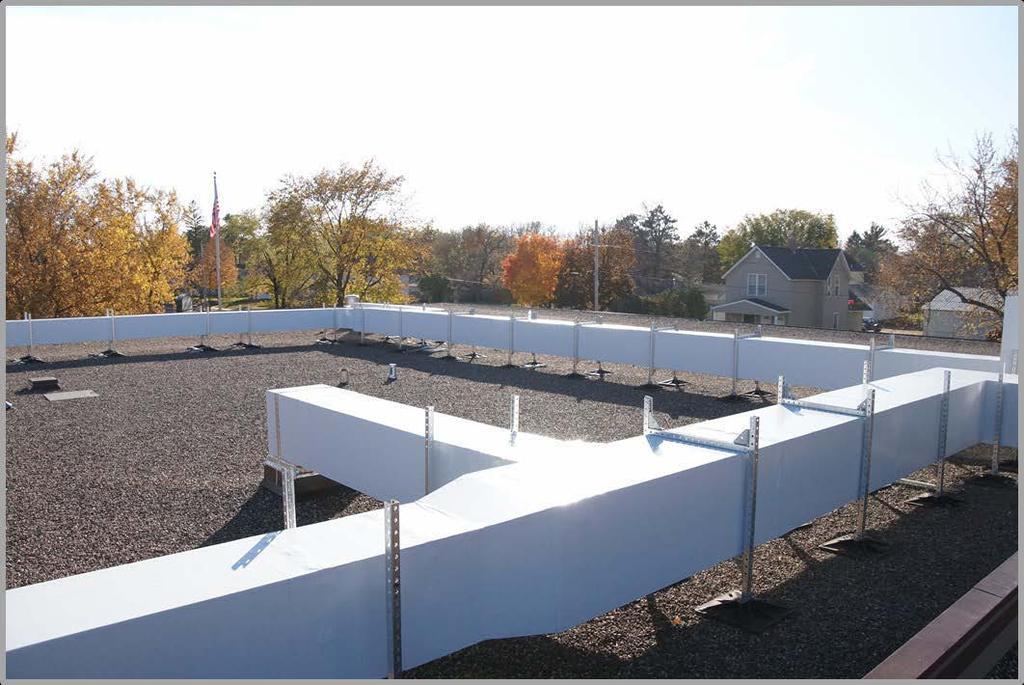
3 SITE CONDITION AND PREPERATION The QDuct is intended for outdoor ducting. Lay cardboard or plywood on roof surface before staging or placing any QDuct product on roof surface to prevent possible damage to product. QDuct is not intended to be installed underground. For underground applications, please visit to learn more about The BlueDuct preinsulated underground system. IDENTIFYING QDUCT SECTIONS To ease the installation, each QDuct system is shipped with a project specific drawing and list of material. The drawing is numbered for each part. Each QDuct part is numbered to match the drawing and the list of material. AQC recommends installing QDuct from the unit outward. DUCT SUPPORTS AQC recommends that duct supports be used in compliance with SMACNA guidelines for Phenolic Duct Construction Standards, ANSI/SMACNA as applicable for exterior ducting. Duct supports should be designed per engineer standards to conform to local codes and consider potential for snow load. Duct supports should be fully enclosed (bottom, left side, right side and top) around the external walls of the QDuct ensuring resistance to lift caused by wind force. Supports should never be secured to the QDuct system using screws, pins or other methods that would penetrate the external jacket of the Q Ductsystem. Duct support spacing shall be every 72 inches or one support per duct section.


4 Due to extreme lightweight QDuct, a minimum of every third support should be secured to the building roof deck. Refer to roofing support manufacturer guidelines for local code requirements. CONNECTING QDUCT SECTIONS Step 1: Apply QDuct Sealant to each section of duct. Sealant should be applied to the ends of both the internal duct layer and the outer duct layer. An additional bead must be applied around the entire circumference of both the 3 internal interlocking surface and the 3 protruding interlocking surface. The sealant must be a continuous bead and a minimum of 3/8. OUTER LAYER INTERNAL LAYER Step 2: T he QDuct is designed for a 3 overlap of the interior and exterior layers for a male-female style connection. Press and hold the interlocking sections of duct together. Maintain full pressure from both sides until the sealant is visibly seeping out of the joint both externally and internally. While maintaining full connecting pressure inspect the exterior of the joint to ensure that sealant is visibly seeping out. Apply additional sealant to fill any observed voids in the seam. Maintain full connecting pressure until all of the tiger connecting clips are properly fastened. Caution: Failure to maintain sufficient connecting pressure will result in an incomplete seal causing air leakage and potential damage to the duct system.


5 CONNECTING QDUCT SECTIONS, CONT. Step 3: Using a rubber mallet, tap the tiger clips into the duct to join the two sections. Tiger clip spacing shall be a maximum of 12 inches between clips on each seam and within 3 inches of every corner. Step 3.5: Smooth the external sealant with a finger or sealant tool pushing the sealant into the joint as it is being smoothed. Step 4: Apply the AQC provided UL 181 tape over the tiger clips and exterior of the duct joint. Center the tape over the duct joint. Use a squeegee to apply friction to the tape to allow the tape to seal properly to the duct. Visually inspect to ensure the edges of the tape are sealed tightly to the duct.


6 CONNECTING QDUCT SECTIONS, CONT. Step 5: Apply the AQC provided exterior jacketing over the tape, tiger clips and duct joint. Center the jacketing over the duct joint. The overlap of the jacketing should be on the bottom or side of the duct. If side, it should overlap facing down to maximize water shedding. There should be no overlapping seams on the top of the duct. With a squeegee, apply heavy pressure to seat the jacketing. Significant pressure and friction ensures a good adhesive bond to the jacketing. Run the squeegee along every seam to ensure the edges are tightly adhered.


7 CUTTING QDUCT LENGTHS When making length adjustments in the field, AQC recommends to cut the male end of the duct. Cut outer layer to the desired length and exercise caution to make sure not to cut the internal layer. Cut internal allowing for a 3 protruding end. Use the AQC provided UL 181 tape to tape all exposed joint openings and refer to Connecting QDuct Sections included on pages 3-5 of this document. QDUCT BRANCH CONNECTION Designate area of desired branch and place the duct section flush to the main trunk line and ensure the duct is properly centered on the main trunk line. Using a permanent marker, trace around the OD of the branched duct on the main trunk line to create an outline. Use a circular saw to cut the outlined area on the main trunk line. A hand saw may be required to finish the cut de- pending upon the thickness of the duct and the depth of the saw blade. Use a flat bar to remove the cut panel from the main trunk line. All exposed joint openings must be taped using the AQC provided UL 181 tape before making a connection. Refer to Connecting QDuct Sections included on pages 3-5 of this document. Place a jacking strip on the bottom of the branch, then on sides of the branch and lastly on the top of the branch.
8 NOTES: Penetrations are prohibited. Due to possible damage that can be caused, there shall be no penetrations made to the QDuct. All sensors shall be mounted during installation with internal support brackets only. The trades must coordinate this step to ensure that penetrations are not made after QDuct installation has been completed. If the QDuct has been penetrated contact your AQC representative for repair assistance. Due to possible leakage and damage, duct modifications are prohibited without factory assistance. If modifications are required contact your AQC representative. Due to possible leakage and damage, third party access panels and doors are prohibited. If access is required after final installation, contact your AQC representative. AQC recommends to wait a minimum of 72 hours from making the last sealed connection to start up the HVAC unit. After a minimum of 24 hours has passed since the last sealed connection was made, the system can be tested to 1 static pressure for 5 minutes. The QDuct Sealant must fully cure (requires 7 days) if a higher static pressure is required. CONNECTING QDUCT TO A ROOF CURB Option 1: QDuct sits flush to curb. Refer to detail shown below.


9 Option 2: QDuct butt joint connects to roof curb butt joint. Fill the entire receiving end of the roof curb with QDuct Sealant. Insert the section of QDuct to be connected and make sure sealant is visibly seeping out of the connection. Apply additional sealant to fill any observed voids. To secure the QDuct to the roof curb, install a piece of hanger strap around the top of the duct and fasten the hanger strap to the roof curb with screws. CONNECTING QDUCT TO A ROOF CURB Refer to detail shown below.

10 CONNECTING QDUCT TO AN HVAC UNIT Refer to detail shown below. CONNECTING QDUCT TO INDOOR PAL DUCT Once QDuct enters the envelope of the building you may want to transition to Pal Duct. To connect to Pal Duct, use the AQC provided UL181 tape to cover the cut edge of the QDuct system. Use UL181 tape to cover the cut edge of the mating Pal Duct section. Apply a continuous 3/8 bead of QDuct Sealant to both the mating QDuct and the Pal Duct ends. Press the two ducts together; apply tiger clips and UL181 tape over the seam. Other connection hardware is available for higher static systems for these different styles, refer to the indoor Pal Duct installation instructions. CONNECTING QDUCT TO INDOOR SHEET METAL DUCT Once QDuct enters the envelope of the building it may be necessary to transition to sheet metal duct. To connect to sheet metal duct, use the AQC provided aluminum U Channel to attach to the end of the QDuct. Add a continuous 3/8 bead of QDuct Sealant around the connection. The sheet metal duct will overlap to the U Channel by approximately 2. Then fasten and seal the sheet metal duct to the U Channel per the specifications for the sheet metal duct installation.
11 WARRANTY AQC Industries Limited Warranty in General AQC Industries (AQC) warrants QDuct Products sold either directly or through its resellers (representatives and distributors) in accordance with the limited warranty set forth in this document (the Limited Warranty). Except as expressly provided in the Limited Warranty, AQC makes no representation or warranty of any kind, express or implied, with respect to QDuct Product, whether as to merchantability, fitness for a particular purpose, warranties arising from course of dealing or usage or trade or any other matter. AQC does not install QDuct Products and has no responsibility or obligation with respect to installation. AQC DIS- CLAIMS ALL WARRANTIES RELATED TO INSTALLATION OF QDuct PRODUCTS. AQC offers webinar based QDuct Installation Training Certification to installing contractors at no charge, and recommends this training prior to in- stalling the QDuct Product. AQC Industries Limited Warranty AQC Industries (AQC) warrants that in normal and contemplated use and service, QDuct Products shall be free from defects in manufacturing materials and workmanship for a period of ten (10) years from the date of manufacture set forth on each of QDuct Products (the Limited Warranty). The Limited Warranty shall only be applicable if AQC is given prompt written notice specifying the nature of the warranty claim within the applicable warranty period. Upon confirmation by AQC that a QDuct Product proves to be defective in manufacturing, materials or workmanship, the exclusive remedy shall be for AQC to, at its option, repair or replace the defective QDUCT Product or issue a credit or refund. The Limited Warranty does not extend to any BlueDuct product subjected to misuse, accident, or alteration. This Limited Warranty does not extend to improper installation. This Limited Warranty does not cover any loss caused by accidents or careless handling of a QDuct Product. This Limited Warranty does not apply to any QDuct Product which has been damaged in transit, abused, altered, modified, used in a manner not originally intended, or used. This Limited Warranty does not cover any QDuct Product that has been installed in a manner not consistent with the QDuct Product instructions. The Limited Warranty set forth above is the only warranty AQC makes for QDuct Products and is in lieu of all warranties express, implied or statutory, including, without limitation, warranties of merchantability, fitness for a particular purpose and infringement, and warranties arising from course of dealing, usage of trade or otherwise. THE REMEDIES SET FORTH IN THIS LIMITED WARRANTY ARE THE ONLY REMEDIES AVAILABLE TO ANY PERSON CLAIMING FOR BREACH OF WARRANTY OR FOR ANY DAMAGES OF ANY KIND OR NATURE. AQC SHALL NOT HAVE ANY OTHER LIABILITY OF ANY DESCRRIPTION,WHETHER ARISING OUT OF WARRANTY (INCLUDING ANY IMPLIED WARRANTIES) OR ANY OTHER CONTRACT, NEGLIGENCE, TORT OR OTHERWISE, INCLUDING, BUT NOT LIM- ITED TO, COST FOR REMOVAL OF DEFECTIVE PRODUCT, COST FOR INSTALLATION OF ANY REPLACEMENT PRODUCT, COMMERCIAL LOSS FROM ANY CAUSE, BUSINESS INTERRUPTION OF ANY NATURE, LOSS OF PROFITS OR ANY OTHER CONSEQUENTIAL LOSS OR DAMAGE, EVEN IF AQC SHALL HAVE BEEN ADVISED OF THE POSSIBILITY OF SUCH LOSS OR DAMAGE. In the event any implied warranties (including, but not limited to the implied warranties of merchantability and fitness for a particular purpose) are found to exist, such warranties are limited (i) in duration to the period of the limited warranties set forth in this Limited Warranty, and (ii) in amount to the total amount paid to AQC for the product inquestion.