Makers of Premium Manufactured Stone STONE FOR THE AGES THE MARK OF EXCEPTIONAL VALUE
|
|
|
- Christine Moody
- 5 years ago
- Views:
Transcription

1 Makers of Premium Manufactured Stone STONE FOR THE AGES THE MARK OF EXCEPTIONAL VALUE

2 MISSION We are committed to being our customers and our employees first choice while adding value to the company every day and positively impacting the communities in which we live.

3 CONTENTS VENEERSTONE Residential Gallery 1-6 Commercial Gallery 7-12 Stone Styles / Colors VENEERSTONE Thin Brick VENEERSTONE The System 21 VENEERSTONE Custom Color 22 Installation Guide Accessories & Accent Pieces 25 Packaging & Warranty 26 MOUNTAIN STONE All Products and Guidelines

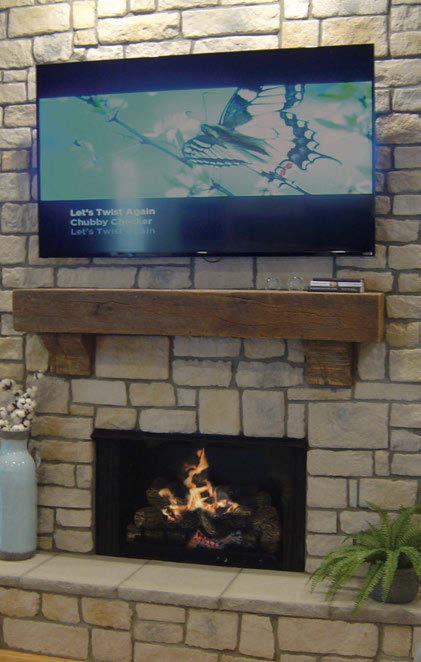
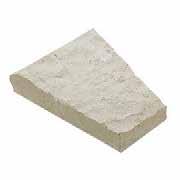
4 residential VENEERSTONE is a well-established, highly respected producer of quality manufactured stone and thin brick. We have a solid reputation for creating products that are virtual replicas of natural stone in texture, shape, color and the finest of detail. Pacific Ledge - Pine Springs VENEERSTONE - RESIDENTIAL GALLERY


5 Imperial Stack - Silver Imperial Stack - Malbeck 2 VENEERSTONE - RESIDENTIAL GALLERY

6 Ledge Stone - Malbeck VENEERSTONE - RESIDENTIAL GALLERY

7 Pacific Ledge - Crestone 4 VENEERSTONE - RESIDENTIAL GALLERY

8 Imperial Stack - Silver VENEERSTONE - RESIDENTIAL GALLERY

9 Ledge Stone and Fieldstone Blend - Custom Color 6 VENEERSTONE - RESIDENTIAL GALLERY

10 COMMERCIAL Our surfaces mimic their natural counterparts because of our unique manufacturing process and strict quality controls. Custom Blend - Custom Color VENEERSTONE - COMMERCIAL GALLERY

11 Pacific Ledge - Custom Color 8 VENEERSTONE - COMMERCIAL GALLERY

12 Imperial Stack - Millsap VENEERSTONE - COMMERCIAL GALLERY

13 Austin Stone - Millsap Custom 10 VENEERSTONE - COMMERCIAL GALLERY


14 Imperial Stack - Creede Custom Austin Stone - Buckeye VENEERSTONE - COMMERCIAL GALLERY


15 Austin Stone - Silver Pacific Ledge - Pine Springs 12 VENEERSTONE - COMMERCIAL GALLERY


16 stone styles The natural warmth and versatility of stone, coupled with your creative planning, can give your home or building the character and personality you desire. VENEERSTONE captures the beauty and durability of natural stone while offering you many key advantages. Austin Stone - Buckeye Austin Stone - Mineral County Austin Stone - Silver Austin Stone - Buckeye We recommend looking at product samples before making final color selections. VENEERSTONE - STONE STYLES/COLORS


17 Imperial Stack - Pine Springs Imperial Stack - Malbeck Imperial Stack - Silver Imperial Stack - Graphite Imperial Stack - Crestone Imperial Stack - Mesa Grey The product images featured here are as accurate as printing and photographic technology allows VENEERSTONE - STONE STYLES/COLORS


18 Imperial Stack - Slate Imperial Stack - Millsap Fieldstone Blue - Creek Shadow Ledge - Crestone Shadow Ledge - Mineral County Shadow Ledge - Walnut We recommend looking at product samples before making final color selections. VENEERSTONE - STONE STYLES/COLORS


19 Stack Stone - Blue Creek Stack Stone - Texas Cream Stack Stone - Mineral County Stack Stone - Creede Ledge Stone - Mineral County Ledge Stone - Malbeck The product images featured here are as accurate as printing and photographic technology allows VENEERSTONE - STONE STYLES/COLORS


20 Pacific Ledge - Mineral County Pacific Ledge - Pine Springs Pacific Ledge - Blue Creek Pacific Ledge - Crestone Pacific Ledge - Redwood Pacific Ledge - Creede We recommend looking at product samples before making final color selections. VENEERSTONE - STONE STYLES/COLORS


21 Montana Cut - Linen Montana Cut - Tahoe Montana Cut - Oxford Montana Cut - Beach Montana Cut - Custom The product images featured here are as accurate as printing and photographic technology allows VENEERSTONE - STONE STYLES/COLORS


22 THIN BRICK 19 THIN BRICK. Create lasting beauty and elegance with our thin brick, available in a variety of sizes, styles and colors. Our thin brick allows you to create beautiful interiors & exteriors. MODULAR BRICK. This profile provides plenty of character and appeal, which has made it our number one seller. The balanced texture and deep rich colors provide warmth and the sense of belonging. The wire-cut look allows for maximum versatility to create both classic and unique designs. APPLICATION. Mortared, packaged assuming 1/2 mortar joint. Changing mortar application will change coverage. PATTERN. Running Bond KING THIN BRICK FLATS. 2.5 H x 9.5 L; average thickness of 3/4 KING THIN BRICK CORNERS. 2.5 H; short return 2.75, long return 7.75 ;with an average thickness of 3/4 ANTIQUE THIN BRICK FLATS H x 7.25 L; average thickness of 3/4 ANTIQUE THIN BRICK CORNERS H; short return 3.5, long return 7.25 ;with an average thickness of 3/4 MODULAR BRICK FLATS H; 7.38 L; average thickness of 1/2 MODULAR BRICK CORNERS H; short return 2.75, long return 7.63 ;with an average thickness of 1/2 VENEERSTONE - THIN BRICK


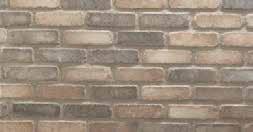
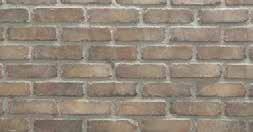

23 KING THIN BRICK City Blend Oaks Blend Red Red with Black Winter Blend ANTIQUE THIN BRICK Dallas Red Red with Black MODULAR BRICK Desert Vista Ocotillo Walnut 20 VENEERSTONE - THIN BRICK


24 INTRODUCING THE SYSTEM CREATE ENDLESS POSSIBILITIES CHOOSE FROM NINE SIZE COMBINATIONS AND THREE STONE TEXTURES A new and exciting custom concept, like no other, from Veneerstone. Nine different stone sizes, with unlimited combinations, showcasing nature inspired textures, and all available in any color blend you can imagine. *Minimum 2,000 square feet. 12 x 24 SMOOTH TEXTURE 12 x 16 SMOOTH 12 x 12 SMOOTH SMOOTH TEXTURE 8 x 24 HONED TEXTURE 8 x 16 HONED 8 x 12 HONED HONED TEXTURE 4 x 24 PITCHED TEXTURE 4 x 16 PITCHED 4 x 12 PITCHED PITCHED TEXTURE 21 VENEERSTONE - THE SYSTEM


25 VENEERSTONE CUSTOM COLOR Let Veneerstone give you custom color manufactured solutions. When designing your home or commercial space, every structure has unique design elements. Sometimes, a little customization is just what is needed to make the space truly your own. Mixing and matching a variety of different colors is the best way to suit your personal color palette. Submit a color swatch, the bark from a tree, a piece of fabric or a natural stone with amazing blended colors. Veneerstone will create a custom color stone in one of its many beautiful stone profiles. Your creative choice in color combinations ensures the perfect unique blend for your project. *Minimum 2000 square feet 22 VENEERSTONE - CUSTOM COLOR


 Install")


26 INSTALLATION STEP-BY-STEP EASY INSTALLATION INSTRUCTIONS For the most up-to-date installation instructions, please visit our website Install water resistive barriers. (exterior applications) Install corrosion resistant metal lath. Mix mortar. Apply mortar for scratch coat. Rake mortar to create scratch coat. Allow to dry. Apply mortar to the entire back of the stone. Install corner stones first. Install flat stones. Trim stones to fit. Grout joints. Strike joints. Brush off excess mortar with a dry brush. NOTE: For specific installation guidelines as an industry standard please visit the MVMA Installation Guide and Detailing for ASTM C 1780 compliance. Find this at: or at: or at: INSTALLATION GUIDE
27 Tools Required Hammer to apply felt paper and metal lath. Wheel Barrow & Hoe or Bucket & Drill Paddle for mixing mortar. Notched Float to apply scratch coat to metal lath. Circular Saw with Masonry Blade for cutting stone. Mason s Trowel to apply mortar to stone. Grout Bag for grouting joints. Jointing Tool to finish mortar joints. Whisk Broom for cleaning joints and stone. How Much Stone Do You Need? Just follow these easy steps to determine how much stone you will need. 1. Measure the width and the height of the area to be covered and convert to square footage; width x height = total square footage. 2. Figure the square feet of any windows, doors and openings and subtract this amount from the first figure. (total square footage windows, doors and openings). 3. Determine how many linear feet of corners you ll need. Measure the linear footage of the outside corner pieces. One linear foot of corners will cover about 1/2 square foot of flat area ie, 20 linear feet of corners = 10 square feet of flat area. Subtract this flat area amount from the total square footage to determine how much total stone you will need. You should allow an extra 5-10% more stone for cutting and trimming on both corners and flats. Materials You Will Need Mortar Components Use pre-mixed masonry mortar, or mix 1 part masonry cement (Type N or Type S) with 2 1/4 to 3 parts masonry sand. Water Resistive Barrier For exterior applications, use two layers of Water Resistive Barrier. Use 15# felt (ASTM D 226), Grade D building paper (ICC-ES AC38), or house wrap and paper backed lath. Metal Lath Use a minimum 2.5 pound corrosion resistant, expanded metal lath, or you may use 18 gauge galvanized woven wire mesh. For metal buildings, use a galvanized, rib expanded metal lath (minimum 3.4 pounds 3/8 ). Check your local building codes for other accepted lath or mesh. Fasteners Use corrosion resistant fasteners (staples, nails, or screws) that penetrate minimum 1 into wood framing or 3/8 into metal framing. Masonry Sealer When required, use a breathable type (non-film forming) sealer. Note: For every 100 sq. ft. of stone installed, you will need 2 to 3, 70 lb. bags masonry mortar (sand must be added at a ratio of 1 part masonry mortar to 3 parts sand) OR, lbs. of pre-mixed masonry mortar (sand included in bag). How To Prepare The Surface Follow these guidelines in preparing different surfaces. Rigid Backwall, Wallboard, Plywood, Paneling, Wall Sheathing Concrete or Fiber board. For exterior applications, install water resistive barriers, overlapping the joints 2 horizontally shingle style and 6 vertically. Ensure that all penetrations (doors, windows) are properly flashed & sealed. Double wrap WRB at inside & outside corners a minimum of 16 each side. Install lath, horizontally with cups up. Overlap lath 1 on horizontal & vertical seams. Lath must wrap corners to the next framing member and at framing member. Lath should be fastened every 6 vertically on each stud. Concrete, Masonry, Stucco, Block That Is Clean and Untreated. Ensure surface is sound and clean, free from release agents, paint, form oil, and sealers. Etch or score the surface to enhance mechanical bond. Surface applied bonding agents may be used. Concrete, Masonry, Stucco, Brick That Is Dirty, Sealed or Painted. Return surface to original condition by sandblasting or waterblasting (wash area to remove sandblast dust). If unable to achieve a suitable bonding surface, attach lath with concrete nails or masonry anchors. Use a bonding agent. Applying Stone Surface Area Use a notched float to apply mortar 1/2 to 3/4 thick. Joint Width If mortared application is specified, joints should be 1/2 to get the most natural look. Setting Stones In Mortar Cover the entire back of the stone with mortar and press the stone firmly into the mortar bed to ensure a good bond. Press hard enough to squeeze out a little mortar around all the edges of the stone. Make sure you have complete coverage between the mortar bed and the surface of the stone. Corner Pieces Corner pieces should be installed first. Alternate the long and short legs on the corner pieces in opposite directions. Flat Pieces After the corner pieces are installed apply flat pieces starting at the outside working in toward the wall center. Cutting and Trimming Use the rear of the brick hammer, edge of trowel, nippers or a circular saw with an abrasive blade to cut and shape stones. If necessary, broken stones can be trimmed and shaped to fill in any gaps. For the most attractive finished appearance, coat with mortar any cut or broken edges. Also, try to place cut edges up when they are above eye level and down when they are below eye level. Level and Plumb Joint Lines Joint lines should be level and plumb. For a more natural look, place long, rectangular pieces of stone horizontally. Mortarless Joint Applications In mortarless joint applications where no mortar joints are used, use a bonding agent and seal with a breathable (non-film-forming) sealer. Grouting & Finishing Joints Grouting Joints If more mortar is needed, fill in the joints with a mortar bag, taking care to avoid getting mortar on the stones surface. Any accidental smears can be removed with a whisk broom after the mortar is crumbly. Never use a wet brush or wire brush. Finishing Joints Proper jointing gives your project an appealing and professional finish. Before finishing, allow mortar joints to become firm (approximately minutes), then point them up with a metal jointing tool. Weather conditions and the type of surface both influence drying time. Remove excess mortar then firmly compress and seal the edges around the stones. Brush stones and joints with a whisk broom to finish and clean the project INSTALLATION GUIDE

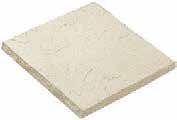
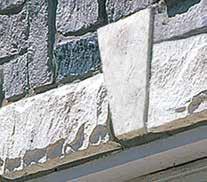
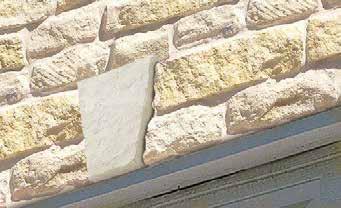
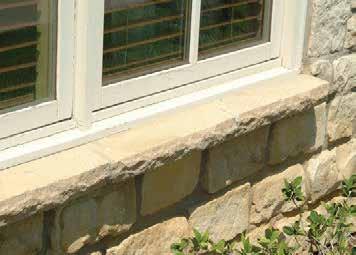


28 ACCESSORIES AND ACCENTS Hearthstones/Flat Wall Coping Stones 19 L x 20 W 1.75 Thick Headerstones 22.5 L x 8 W 2.5 Thick Keystones 10 L x 7.75 W to 4.75 W 2.5 Thick Hearthstones Watertables / Window Sills 18 L x 3.5 W 2 Thick at Front Edge 2.5 Thick at Back Edge ACCESSORIES AND ACCENTS
29 PACKAGING Flat Stones: Pallets are packaged 150 square feet per pallet. 10 square feet Handy Box packages are available for smaller quantities. Corner Stones: Pallets are packaged with 100 linear feet per pallet. 10 linear feet Handy Box packages are available for smaller quantities. Thin Brick Flat Stones: 30 square feet per box. Thin Brick Corner Stones: 15 linear feet per box. All packaged quantities are figured with one-half inch mortar joint except for Stack stone, Ledge Stone, Imperial Stack Stone & Montana Cut Stone. When installing stone, it has been determined that broken pieces can and should be used. WARNING: Concrete veneer contains Crystalline Silica (quartz) and traces of other hazardous substances which are released as dust and can be inhaled when drycutting, drilling, or shaping the product. Crystalline Silica is a chemical known to the State of California to cause cancer, birth defects, and other reproductive harm. Use appropriate safety precautions. Raw materials used in production may vary slightly. We recommend that you blend stones from different boxes throughout your installation area. Variations are inherent in all manufactured stone and concrete products. Questions regarding suitability and/or acceptability must be resolved before installation. Use constitutes acceptance. When installing stone, it has been determined that broken pieces can and should be used. Raw materials used in production may vary slightly. We recommend that you blend stones from different boxes throughout your installation area. Variations are inherent in all manufactured stone and concrete products. Questions regarding suitability and/or acceptability must be resolved before installation. Use constitutes acceptance. warranty LIMITED WARRANTY: Veneerstone carries a 50-year limited warranty when used on structures that conform to all local building codes. Material must be installed according to manufacturer s instructions. Warranty is limited to replacement of defective materials only and does not cover labor to remove or replace stone. Warranty does not cover damage resulting from building settlement, wall movement, contact with chemicals or paint, discoloration due to airborne contaminants or stains caused by material applied to or allowed to come in contact with stone. Warranty is non-transferable and is limited to the original purchaser Veneerstone. All Rights Reserved. REFERENCES A. ASTM C 39 - Standard Test Method for Compressive Strength of Cylindrical Concrete Specimens. B. ASTM C 67 - Standard Test Method for Sampling and Testing Brick and Structural Clay Tile. C. ASTM C Standard Test Method for Steady-State Heat Flux Measurements and Thermal Transmission Properties by Means of the Guarded-Hot-Plate Apparatus. D. ASTM C Standard Practice for Making and Curing Concrete Test Specimens in the Laboratory. E. ASTM C Standard Test Method for Bond Strength of Ceramic Tile to Portland Cement. F. ASTM C Standard Specification for Adhered Manufactured Stone Masonry Veneer Units. G. ASTM C Standard Practice for Installation Methods for Adhered Manufactured Stone Masonry Veneer. H. UL Standard for Safety for Surface Burning Characteristics for Building Materials. I. ICC ES AC 51 Acceptance Criteria for Manufactured Stone Veneer. J. Masonry Veneer Manufactures Association (MVMA); Installation Guide for Adhered Manufactured Stone Veneer. K. LEED: US Green Building Council s Leadership in Energy and Environmental Design Green Building Rating System PACKAGING AND WARRANTY

30 STONE FOR THE AGES