AB Fence Installation Guide
|
|
|
- Alisha Wilkerson
- 6 years ago
- Views:
Transcription
1


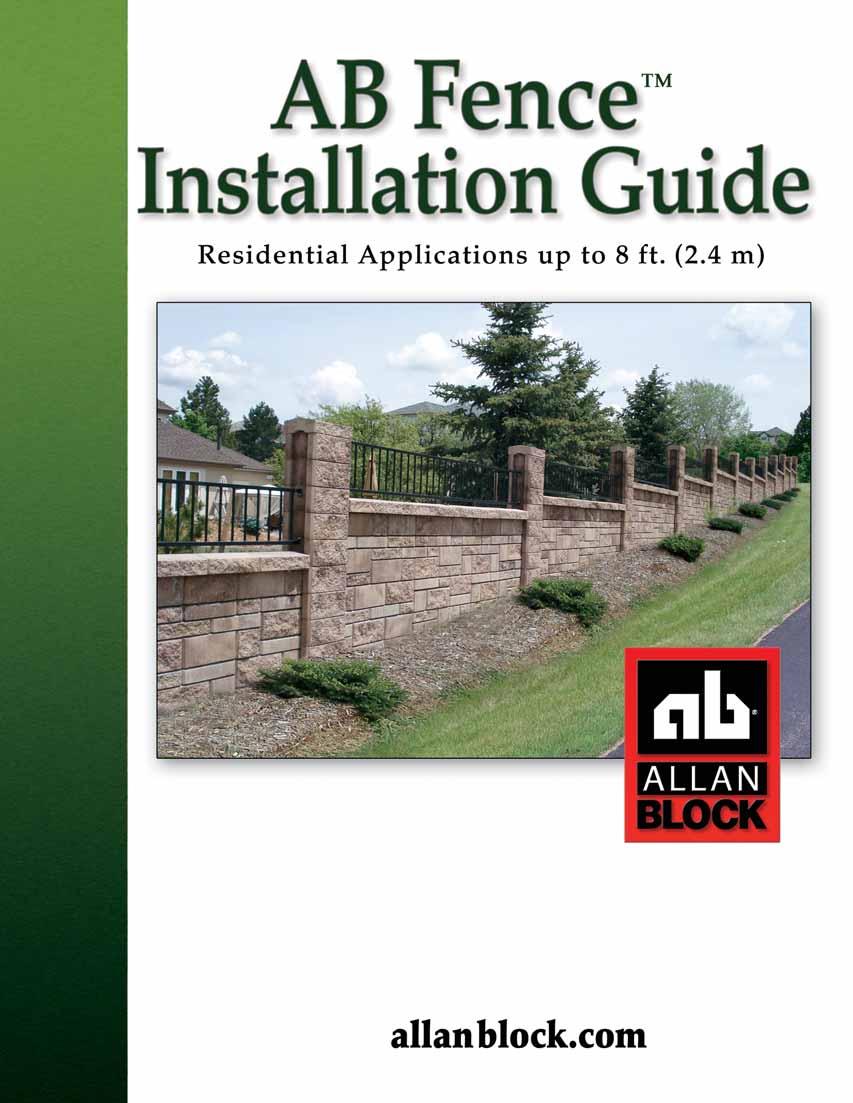
2 allanblock.com AB Fence is a mortarless concrete block fencing system. The patented, maintenance free interlocking blocks provide an attractive and effective solution to issues of sound, security and privacy. Use the AB Fence alone or in conjunction with Allan Block Retaining Wall products to add a premium outdoor space to any landscape. AB Fence Installation Guide Table of Contents AB Fence System 1-2 Overview 3 Applications 4 Planning 5-6 Design 7-8 Build Jigs 9 Layout Pile Construction 12 Post and Panel Construction Patterned Fence Panels Design Elements Water Management 21 Compaction 22 Construction Details Finishing Options Estimating Materials 29 Terminology 30 Allan Block Advantages AB Fence Panel Blocks require no foundation and interlock together in a ball and socket configuration. Just dry-stack together on a level compacted gravel base between the post structures. Allan Block Performance The Allan Block family of products have been developed and engineered to deliver creative landscape solutions. Allan Block Supporting Materials For taller structures see our commercial AB Fence installation guide and the AB Fence Design Manual. Use our AB Fence Estimating Tool to help with determining block quantities and necessary materials. 1


 12 in W (305 mm) 8 in H (200 mm) 70 lbs (35")
 Dimensions 12 in L (305 mm) 12 in W (305 mm) 8 in H (200 mm)")
 6 in W (150 mm) 8 in H (200 mm)")
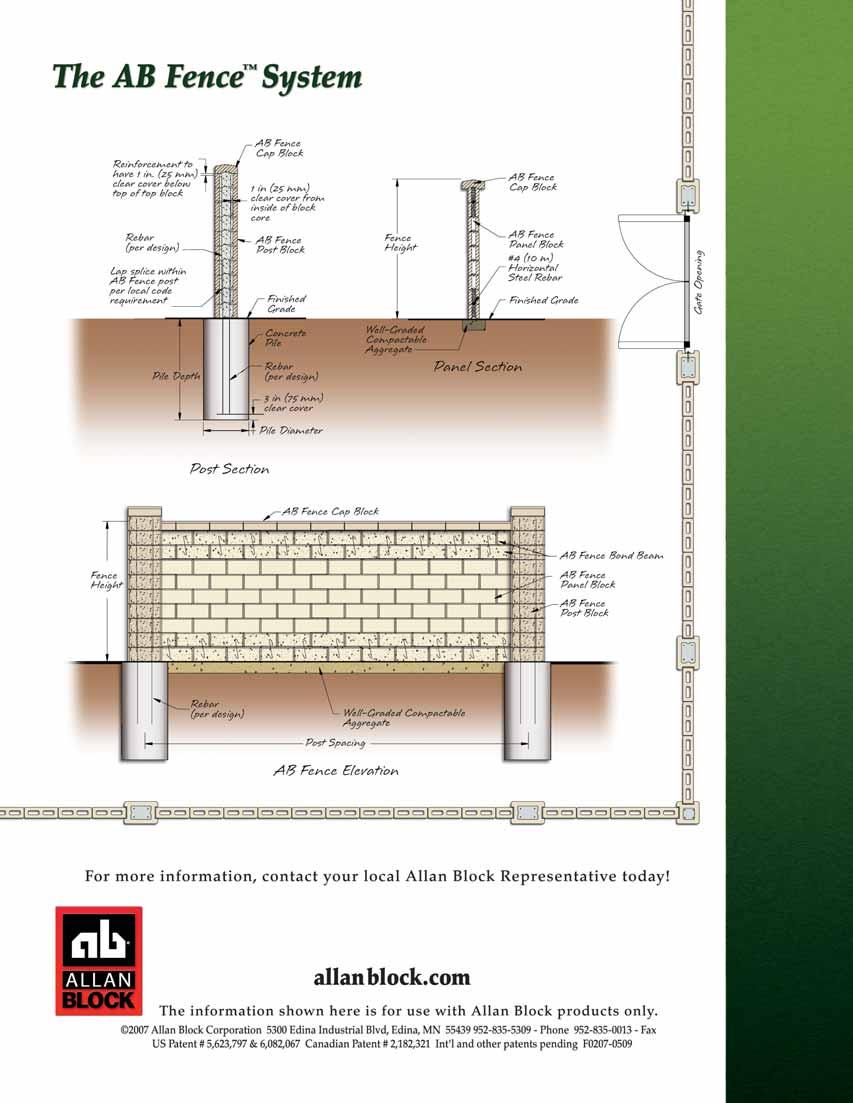
3 AB Fence Collection The AB Fence Blocks are splitfaced on one side and striated on the other side to provide an architectural finish on both sides. The AB Fence system combines the benefits of mortarless technology with the time proven performance of reinforced concrete. The three main structural components are the AB Fence Post Block, the AB Fence Panel Block and the AB Fence Cap Block. The AB Fence Half Panel and Lite Panel Blocks can be used along with the AB Fence Panel Block to create Ashlar Blend patterned panels. Together they provide the ability to design and create a fence that meets the requirements of each individual project. AB Fence Post Block AB Fence Half Panel Block AB Fence Corner Block Approx. Dimensions 18 in L (460 mm) 12 in W (305 mm) 8 in H (200 mm) 70 lbs (35 kg) Approx. Dimensions 9 in L (230 mm) 6 in W (150 mm) 8 in H (200 mm) 25 lbs (11 kg) Approx. Dimensions 12 in L (305 mm) 12 in W (305 mm) 8 in H (200 mm) 50 lbs (25 kg) AB Fence Panel Block AB Fence Lite Panel Block AB Fence Cap Block Approx. Dimensions 18 in L (460 mm) 6 in W (150 mm) 8 in H (200 mm) 50 lbs (25 kg) Approx. Dimensions 18 in L (460 mm) 6 in W (150 mm) 4 in H (100 mm) 25 lbs (11 kg) Approx. Dimensions 18 in L (460 mm) 12 in W (305 mm) 5 in H (130 mm) 60 lbs (30 kg) 2


4 Overview Introduction Concept The Allan Block Fence System is the logical choice for a wide range of fencing and sound barrier applications. It is an attractive addition to developments looking for added security and is ideally suited for sound barrier applications with a noise transmission loss two times greater than wood fences. AB Fence can easily beautify residential locations and increase privacy for perimeters and entrances. The aesthetics of the AB Fence make it an ideal solution for enhancing curb appeal. It allows you to create patterns with textures or colors, develop flowing curves, and adjust for the grade changes of your site. AB Fence provides the long-term durability and low maintenance of concrete masonry without the prohibitive costs associated with mortared masonry construction. Mortarless and Stackable Versatile, Permanent and Easy to Install Long Term Durability Reduced Construction Costs allanblock.com 3


5 Applications Beautification and Privacy Screening and Containment Beautification and Privacy AB Fence can be used alone or combined with other fencing products to integrate gates and entryways. Combine the AB Fence with wrought iron for a beautiful look that would compliment any project or use different colors or the two textures to accentuate the fence. To create unique styles suited specifically for your project incorporate an Ashlar Blend pattern into the fence panels. The framed look created by the beveled edges of the AB Fence block, give the product a distinctive clean look. Screening and Containment Communities are becoming more conscious of the relationship and proximity between commercial centers and surrounding neighborhoods. The AB Fence offers a cost effective and attractive means to separate residential areas from the noise and bustle of industrial and commercial areas. The AB Fence System provides a superior sound wall. The average decibel drop is 32 compared to a typical cedar wood fence at 15. The AB Fence reduces the transmitted noise, more than two times that of the wood fence. 4


6 Planning On-Site Soils Permits Neighbors Site Access Concrete Differences A detailed site plan drawn to scale will help foresee design and construction challenges and provide an accurate reference for estimating. Items to Consider: Base Foundation You must build on solid ground. If your site has soft, wet soils, or if the area was previously excavated, the foundation's soil may need to be replaced with good base material and firmly compacted. Permits Building permits may be required if the fence is above a certain height. Check to see what your local city code requires. Neighbors It's always nice (and smart too) to let your neighbors know about your project before you begin. Vegetation One advantage the AB Fence System has over other concrete fence products is the minimal excavation required during installation. This minimizes the loss of existing vegetaion in the building process. On-Site Soils The soil under the fence will influence not only the design, but also the performance of the fence. It is important to know what the AB Fence will be built on. This soil secures the fence post as well as provides support for the panel sections themselves. In general, sandy soils provide additional strength when compared to clay soils. To identify the soils, a good test is to pick up a small handful of the soil in the palm of your hand and squeeze it to form a ball. Take a sample from at least 12 in. (300 mm) below the surface. Clay Soils Clay soils will stick together to form a ball. They will retain moisture and are not as strong. Typically most soils will be classified as clay and can be used in the project. Sandy Soils Sandy soil, will not stick together because they are granular with no silty fine particles. These soils allow for good drainage and are ideal for building your project. Organic Soils Organic soils will stick together but will not hold once the pressure is released. NEVER use organic soils to build the foundation. 5 allanblock.com In all cases the soil that the AB Fence is built on must be compacted and capable of supporting the weight of the structure.


7 Site Access When planning your project, make sure you can access your site with construction equipment and materials. For sites with restricted access, plan out where you will stage and store your block, rock and other materials. What is Concrete? Concrete is a construction material that consists of cement, aggregate (generally gravel and sand), and water. The materials are mixed together and used to construct the piles and filling the cores for the AB Fence Blocks. The concrete hardens after mixing and placement. The water reacts with the cement, which bonds the other components together, eventually creating a stone-like material. The AB Fence uses two different types of concrete during construction. The piles and AB Fence Post Blocks use concrete with gravel and sand size aggregate. This type of concrete is generally available from concrete plants and used in most types of construction. However, the bond beams require what is referred to as a fine mix concrete grout. This mixture of concrete uses only sand as the aggregate, which makes it ideal for filling the smaller cores of the AB Fence Panel Block. Even though concrete can be as hard as a rock, it still needs to be reinforced. Concrete has relatively high compressive strength, but significantly lower tensile strength. As a result, the concrete used with the AB Fence is often installed with the addition of steel to produce reinforced concrete. Mixing and Consolidating: Concrete Tip: We recommend to contact your local ready mix supplier when large volumes of concrete are needed (ie: post footings, AB Fence Post Blocks or optional foundations). Bags of concrete grout with a mixer will work fine for the smaller volume of material needed for the bond beams. Thorough mixing is essential for the production of high quality concrete. Therefore, equipment and methods should be capable of effectively mixing concrete before it is used to construct the fence. As the concrete is being placed into the block cores, it is important to take time to ensure that air is not trapped within the cores. Always use a concrete vibrator to compact or consolidate the concrete to eliminate any air pockets in the mix. Curing: Because the cement requires time before it gains strength and hardness, concrete must be cured once it has been placed. During the curing process it is important that the concrete is not disturbed and is protected from the weather. We recommend a minimum of 4 hours curing time, but temperature and the type of concrete will greatly influence the time it takes for the concrete to harden or set up. Concrete being poured from local ready mix supplier for post footings. 6


8 Design 7 AB Fence The AB Fence System is similar to a traditional wooden fence in that the panels are supported by the posts. The posts are anchored in place with concrete below ground. Therefore, the final support to the AB Fence or the wooden fence is done by the soil around the pile footings. The advantage of the AB Fence System is how the panels slide into the AB Fence posts, but are still allowed to move independently. This flexibility eliminates the requirement of constructing the panels below the local frost limits, which keeps the installation costs down. Wind Speeds Wind is one of the significant forces of nature and must be considered in the design of the AB Fence System. Average wind speeds will depend on where you live and the weather conditions for that area. Exposure The design of the AB Fence depends on the speed of the wind and the exposure as well. Described below are the three exposure categories used in the designs of the AB Fence: Exposure B: Urban and suburban areas, wooded areas, or other terrain with numerous closely spaced obstructions having the size of a single family dwelling or larger. Exposure C: Open terrain that includes flat open country, grasslands, and bodies of water under 1 mile (1.6 km) in width. Exposure D: The most severe exposure with flat, unobstructed areas and bodies of water over 1 mile (1.6 km) in width. Exposure D extends inland from the shoreline ¼-mile (402 m). allanblock.com For this manual we have set certain design limitations to help with the design and layout of AB Fence projects for residential applications up to 8 ft. (2.4 m) high. Design envelope for this manual: Wind Speed: 80 MPH or less (129 km/h) Exposure: B or better Soil: Clay or better Maximum Post Spacing (center to center): 6 ft high fence (1.8 m) ft (5.3 m) 8 ft high fence (2.4 m) ft (4.7 m) Bond Beams: Top and bottom courses on all heights. Pile Diameter: 2 ft (0.6 m) Pile Depth: 4.0 ft (1.2 m) for 6 ft high fence (1.8 m) 5.0 ft (1.5 m) for 8 ft high fence (2.4 m) or to frost depth, whichever is greater. For additional design information on Wind Speeds and Exposure see the AB Fence Design Manual.

9 Wind Speed Exposure Layout Lot Lines Utilities Where to Begin? Knowing the desired location of the fence is your starting point. Next, finalize the fence height and panel spacing. The AB Fence posts must be placed at set locations to allow for the AB Fence Panel Blocks to fit between them properly without unnecessary cutting of blocks. For the maximum post spacing and associated height refer to the table below. Shorter post spacing can be used to accommodate a project by reducing the spacing size shown in the charts in 8.4 in. (213 mm) increments, which is the approx. length of an AB Fence Half Panel Block. Using the shorter post spacing will not reduce the pile depth. Final pile locations will be determined during the installation process shown on page 10. Additional design information is available in our AB Fence Design Manual which is available on our website at allanblock.com. Panel Height Maximum Post Spacing* Equivalent Panel Block Minimum Pile Depth w/ 2 ft diameter pile (0.6 m) 6 ft (1.8 m) 17.5 ft (5.3 m) 11 blocks 4 ft (1.2 m) 8 ft (2.4 m) 15.3 ft (4.7 m) 9.5 blocks 5 ft (1.5 m) Determining the Number of Panels The best way to explain this is to work through an example. Our sample project will be 105 ft (32 m) long with a desired height of 7 ft (2.1 m). Based on the height and using the table above we know the Maximum Post Spacing will be 15.3 ft (4.7 m) or 9.5 blocks per panel. However with our project this would give us a total of 6.8 panels (105 ft divided by 15.3 ft), which is 6 panels with a span of 9.5 blocks and 1 panel with 7.5 blocks. This will work, but will not look completely uniform. An option may be to use 3 panels at 9 blocks and 4 panels at 9.5 blocks. See the table on the right for more post spacing options. If there will be corners in the project, each section will need to be figured independently, see page 26 for more information. Lot Lines Your city hall will have a copy of your lot survey on file. The survey will not only identify property lines, but will provide an accurate scaled template of your site to help with planning. Utilities Buried utility lines are not only dangerous, they may prevent you from locating your project where you want. Call the local utility companies and have these lines marked. Post Spacing Options Number of Panel Block Post Spacing Increments* ft (2.2 m) ft (2.4 m) ft (2.6 m) ft (2.9 m) ft (3.1 m) ft (3.3 m) ft (3.5 m) ft (3.8 m) ft (4.0 m) ft (4.2 m) ft (4.4 m) ft (4.7 m) ft (4.9 m) ft (5.1 m) ft (5.3 m) *All post spacing measurements are approximate, check with your AB representative to verify block specifications and more information. 8
 Top View of Panel Block 2 X 6 block fastened to post block form Pile Layout Spacer On site measured panel length nub to nub + 0.5 in.")
 Cut a 3 in. by 1.5 in. (75 mm by 38 mm) notch to fit the side of the AB Post Block Figure 2: Post Spacer Jig Figure 4: Stirrup Jig 2.5 in. (65 mm) 14 in (355 mm) Post block template Figure 1: AB Fence Pile Layout Jig 2 x 12 Typical 3 in (75 mm) 1.")

.")

10 9 Build - Tool/Jigs in. ( mm) Recess Nub 1.5 in (38 mm) in. (371.5 mm) Top View of Panel Block 2 X 6 block fastened to post block form Pile Layout Spacer On site measured panel length nub to nub in. (13 mm) 2 x 6 typical Fasten all joints of post block form Do not fasten the panel spacer to the post block form 2 x 12 Post Spacer On site measurement panel length nub to nub in. (13 mm) Cut a 3 in. by 1.5 in. (75 mm by 38 mm) notch to fit the side of the AB Post Block Figure 2: Post Spacer Jig Figure 4: Stirrup Jig 2.5 in. (65 mm) 14 in (355 mm) Post block template Figure 1: AB Fence Pile Layout Jig 2 x 12 Typical 3 in (75 mm) 1.5 in (38 mm) Figure 3: Funnel for Grout Placement AB Fence is designed to utilize the advantages of dry-stacked masonry. This mortarless technology provides an efficient and easy installation process. Before you start building, put these simple tools together to make the job go much smoother. AB Fence Pile Layout Jig The pile layout jig (Figure 1) is used after the piles are poured, but not quite hardened to set the location of the post blocks on the piles and ensure that the exact relative spacing between each AB Fence post is set. This will also indicate precisely where the rebar needs to be placed in the piles (Figure 7). To ensure an accurate pile layout spacer, line up the number of panel blocks your are using on a flat surface and measure the actual panel length nub to nub. Use this field-measured length to assist in pile spacing and in constructing the spacers in Figure 1 and 2. Using 2 x 6 s construct two post block templates as shown in Figure 7. After measuring the exact panel length, nub to nub, cut a 2 x 6 to this length plus a 0.5 in (13 mm) extra. This will be used between the post block templates to create the pile layout spacer shown in Figure 1. Post Spacer The 2 x 12 post spacer (Figure 2) is used to help keep the AB Fence Post Blocks square and aligned as the posts are positioned on the pile and as additional post blocks are being stacked. Using a 2 x 12, notch the ends as shown in Figure 2 to slide into the end of the AB Post Block. This spacer will help you keep the post blocks from being turned or twisted out of alignment and relative to each adjacent post. Funnel Using a funnel to help direct the grout into the block cores will allow for easier installation and keep the grout off the block face. Use two 2 x 6 s approx. 36 in. (915 mm) long and two 15 in. (380 mm) long boards constructed in a manner shown at the left. Position the angle of the 2 x 6 s to match the top surface of the panel block. Leaving a 2.5 in. (65 mm) opening for the grout to flow through. See Figure 3. Stirrup Jig Vertical steel stirrups are used in the bond beams to give added stability to the two course bond beam structure. Using a 2 x 4 and six screws or nails, create a layout similar to the one shown at the left. Use 9 ga wire, approx. 21 in. (535 mm) long to wrap around to create an S shape and to form the stirrup. Making sure the final stirrup is at least 14 in. (355 mm) long. See Figure 4. See page 24 for additional information.


 deep by 12 in. (300 mm) wide trench the entire length of the fence.")
 wide trench 6 in. (150 mm) deep trench Step 1 Establish offsets to the center of the piles.")
 for the pile cap is allowed for the horizontal locations. See Figure 5.")
11 Layout Step 1 Review the approved construction design for post spacing and horizontal alignment. For layout procedures for the corner block, see page 26 for a construction detail or the AB Fence Tech Sheet #2005 available at allanblock.com Mark out the center of each pile per the requirements of the approved construction design. Suggested methods of doing this include: string line to establish the overall layout of your fence, a steel chain to develop precise duplicated spacing between posts, or by having the points set by a surveyor. Establish offsets to the center of the piles for later reference by using a substantial grade stake that is not easily displaced. Step 1 Mark out center of each pile. Excavate a 6 in. (150 mm) deep by 12 in. (300 mm) wide trench the entire length of the fence. The centerline of the trench should also be the centerline of the AB Fence placement. Relocate post center locations using construction offsets and a string line. Trench Dimensions 12 in. (300 mm) wide trench 6 in. (150 mm) deep trench Step 1 Establish offsets to the center of the piles. Excavate the pile holes to the depth and diameter specified in the approved construction design. When drilling the holes keep in mind that hole positioning is critical. A maximum allowable deviation of ±1 in. (25 mm) for the pile cap is allowed for the horizontal locations. See Figure 5. When the pile holes are excavated each hole must be checked to make sure loose material is not at the bottom of the hole. Use a long handled hand tamper to compact this soil when necessary. Step 1 Dig trench. Soils engineers will need to verify bearing capacity at bottom of the pile. Check with your local building officials to see if a site visit is required for pile inspection. Trench Step 1 Auger pile holes. allanblock.com Pile holes 10
 deep.")
 below the design elevation of the top of the pile.")
 maximum vertical pile tolerance - 1 in. (25 mm) vertical pile tolerance Post Spacing Tolerance + 0.5 in.")


12 Build - Con t Step 2 Place sonotube. Step 2 Use a sonotube, or alternate cylindrical tubing material, to form up the top of the pile hole to create a pile cap. The form should have the same inside diameter as the design pile diameter, and be a minimum of 12 in. (300 mm) deep. Place the sonotube in the hole, making sure that the center of the sonotube is in alignment with the centerline of the AB Fence to ±1 in. (25 mm), see Figure 5. Using a laser level, transit or string level, set the top of the sonotube level with or no more than 1 in. (25 mm) below the design elevation of the top of the pile. Use hand levels to level each sonotube pile cap individually. Design pile elevation +1 in. (25 mm) horizontal pile tolerance from centerline Level Piles Design Pile Elevation 1 in. (25 mm) maximum vertical pile tolerance - 1 in. (25 mm) vertical pile tolerance Post Spacing Tolerance in. (13 mm) Design centerline of pile Figure 5: Pile Construction Tolerances Brace the top of the pile with a wood stake or other means Design pile elevation Sonotube The edges of sonotube may be braced against the sides of the pile hole Soil form surface of augered hole Design pile diameter Design centerline of pile Figure 6: Pile Hole Cross Section Design pile depth The sonotube can either be braced against the sides of the hole or staked to maintain elevation and location during casting. For a cross section of the pile hole see Figure 6. Step 3 To set the exact spacing between each AB Fence post, use the AB Fence Pile Layout Jig shown in Figure 1. Mark the placement of the rebar in the pile, using the Post Block Template similar to Figure 7 during the pile pour. For more information see the construction detail on page 26. Spacing between each pile must be 3.5 in. (89 mm) 1.5 in. (38 mm) 2 in. (50 mm) Mark the post block template for each rebar location Rebar Figure 7: Post Block Template with Pile Steel Placement maintained to a tolerance of ± 0.5 in. (13 mm) to allow for proper interlock between post and panel sections. 11

 Vertical Tolerance: 1.0 in. (25 mm) Finish concrete using a hand trowel or other equipment to create a flat surface for post placement. Step 1 Pour concrete. Step 2 Set rebar with spacing jig.")


13 Pile Construction Step 1 Pour concrete meeting or exceeding the minimum strength requirements specified in the approved construction design into the pile holes. During the pour of each pile, ensure that the sonotube is braced to maintain the correct elevation and horizontal location. Double check with laser and hand levels to maintain tolerance; minor adjustments will have to be made during the pour. See Figure 5. Horizontal Tolerance: ±1.0 in. (25 mm) Vertical Tolerance: 1.0 in. (25 mm) Finish concrete using a hand trowel or other equipment to create a flat surface for post placement. Step 1 Pour concrete. Step 2 Set rebar with spacing jig. For mixing and placing concrete in cold weather see AB Fence Tech Sheet #2006 available at allanblock.com. Step 2 Immediately following the concrete pour, relocate the center of the AB Fence post using the AB Fence Pile Layout Jig, shown in Figure 1, and make an impression in the wet concrete to mark it. Place the vertical steel reinforcement bar (rebar) using the placement template shown in Figure 7. Pay close attention to make sure that the center of the template is at the center of the AB Fence post and square to the adjacent AB Fence post. This can be done using offsets and string lines. The rebar must be placed to ± 0.5 in. (13 mm) of the design s horizontal location. When placing rebar, a tolerance of ± 0.5 in. (13 mm) must be maintained to allow for proper interlock between post and panel sections. The rebar must extend into the pile to the depth specified in the approved construction design, but maintain a 3 in. (75 mm) clear cover at the bottom of the pile. The rebar should extend out of the top of the pile to a length equal to or greater than the minimum lap splice requirements set by the approved construction design or a minimum of 24 in. (610 mm). Step 3 Before setting any AB Fence Post Blocks, allow the concrete to harden approximately four hours, or until hard enough to resist more than surface scratching when scraped with rebar. Step 2 Correct rebar placement. Step 3 Set rebar with spacing jig on all piles. Rebar extends out of the pile to a length equal or greater to the minimum lap splice requirements or a minimum of 24 in. (610 mm). Rebar extends into the pile within 3 in. of the bottom. allanblock.com 12


14 Post and Panel Construction Step 1 Fill the trench between each hardened pile with well-graded, granular compactible aggregate. In place of the compacted aggregate base, an unreinforced concrete leveling pad can be used. Screed the aggregate from pile to pile to create a level base for the panel. Step 1 Fill trench. Use a mechanical plate compactor, or other acceptable means, to compact the aggregate. Check base for level using a hand level and screed. The base should be level with the piles. Step 2 Using a laser level, check the elevation of each hardened post pile. Step 1 Compact trench. Post blocks may be placed on a mortar bed, a maximum of 1.0 in. (25 mm) thick, to achieve consistent starting elevation. A mortar bed may be required during the installation of the first post block to achieve a consistent starting elevation. Mortar must be the same strength or greater than the concrete mix used to fill the post block. Set the first AB Fence Post Block on each pile and/or on a mortar bed. Step 1 Level trench. Check the post blocks for level in all directions, and in a straight line from pile to pile, using a string line for reference. Use the 2 x 12 post spacer shown in Figure 2 to help keep the post blocks square and aligned. When errors in spacing occur on post layout, adjustments should be confined to the panel between the two incorrect posts. Check for proper elevation from one post to the next using a laser level or leveled string line. Step 2 Place post block and level. Notched 2 x Step 2 Use post spacer to square up and align posts. allanblock.com


 minimum String Line Place a continuous piece of #4 (10 m) rebar for the horizontal bond beams on the recess on the top of the AB Fence Panel Block. Rebar should be 3 in.")


15 Step 3 Once the first post block and mortar bed have hardened, stack a second post block on each post column. Step 3 Set 2nd post block, level and align. Check the post blocks for plumb; shim with high strength construction adhesive or asphalt shingles as necessary. Level in all directions. Wooden door shims work well and can be removed when concrete has set. Place a course of AB Fence Panel Blocks from post to post on the compacted granular aggregate base. The blocks should be installed level in all directions and in a straight line from post to post. Move the string line to provide a point of reference. A total deviation of in. (3 mm) is allowable. The panels must extend 1 in. (25 mm) minimum into each post. Block Tolerance 1 in. (25 mm) minimum String Line Place a continuous piece of #4 (10 m) rebar for the horizontal bond beams on the recess on the top of the AB Fence Panel Block. Rebar should be 3 in. (75 mm) shorter than entire panel section to allow for a 1.5 in (38 mm) clear cover at each end. Recess on the top of the AB Fence Panel Block where rebar is placed Step 3 Place rebar. If building a patterned fence project, skip ahead to page 18 to finish Step 3. Step 3 Stack 2nd panel block course. Patterned Fence Panel Stack a second course of panel blocks. The panel blocks should be stacked so that the vertical seams align with the midpoint of the block on the course below in a "running bond pattern." A half panel block will be required at the ends of the panel on alternate courses. If a manufactured AB Fence Half Panel Block is not available, an AB Fence Panel Block must be cut to obtain a half panel block. Step 3 Level panel section. Note: When cutting blocks refer to the appropriate MSDS sheets and wear proper safety gear. Check the first two courses of panel block for alignment and plumb. Shim and adjust as necessary. 14


 lifts. Always double check for alignment and plumb.")


16 Post and Panel Construction - Continued Step 4 Fill the cores of the first two courses of panel blocks with fine (sand) mix concrete grout. Using a funnel, similar to the one shown at the left, allows for easy installation and keeps the grout off the face of the panel block. See page 9 for information on constructing a funnel. Step 4 Fill cores with grout. As the cores are filled, place 9 ga vertical steel stirrups in alternating block cores. See page 9 and 24 for more information on stirrup construction and placement. Consolidate the grout with a concrete vibrator to ensure the cores on the bottom course are filled. Remove any excess grout from the top of the panel block. Allow the concrete to harden a minimum of four hours. Step 4 Vibrate grout and install stirrups. Step 5 Stack additional post blocks in maximum of 6 courses or 4 ft. (1.2 m) lifts. Always double check for alignment and plumb. Shim and adjust as necessary and brace as required. The 2 x 12 post spacer can be used by sliding it through the panel area. Next, fill the posts with grout or concrete mix in lifts not to exceed the 6 courses. Consolidate the grout or concrete with a concrete vibrator. Step 5 Install additional post blocks, check for plumb with post spacer. Step 5 Install grout and rebar in post blocks. If additional rebar is required, place it into the grouted cells in conjunction with the stacking of post blocks. Maintain a minimum lap splice of 24 in. (610 mm) when more than one length of rebar is required during construction of post. Cold joints should be located in the middle of the block. Allow the concrete to harden a minimum of two hours. Post blocks must be installed within a ± ½ from vertical. If building a patterned fence project, skip ahead to page 18 for Step 6. Rebar Lap Splice Post/pillar Concrete grout Lap splice 24 in. (610 mm) Rebar allanblock.com 15


 in the vertical direction over the length of panel. Vertical Panel Tolerance +1 in.")


17 Step 6 Stack the panel blocks in between the post columns up to the top two courses. The top two courses will be the next bond beam location. The panel blocks should be stacked in a running bond pattern, paying attention to level and plumb. Before stacking the next two courses, place a 4 in. (100 mm) strip of grout stop material, such as duct tape or building paper. Stack the first course of the next bond beam directly on top of the grout stop in a running bond pattern. Step 6 Place grout stop material. Place a continuous piece of #4 (10 m) rebar for the next horizontal bond beam on the recess on the top of the AB Fence Panel Block. Stack the second course of the next bond beam in a running bond pattern. Seat and straighten the panel with a 4 ft level and a dead blow hammer by striking the front and back sides of the panel. Panels must be installed to a tolerance of ±1 in. (25 mm) in the vertical direction over the length of panel. Vertical Panel Tolerance +1 in. (25 mm) tolerance Step 7 Repeat Step 4 to +1 in. (25 mm) tolerance construct the top bond beam. Allow the concrete in this top bond beam to harden a minimum of two hours. Step 8 Place AB Fence Cap Blocks on top of the post columns and the panels. The cap blocks on the panel sections should be installed in a running bond pattern. Cut one AB Fence Cap Block to fit each panel with a concrete saw using a diamond blade. All cap blocks must be attached with a flexible construction adhesive designed for exterior use on concrete surfaces. Place a in. (9 mm) bead of flexible construction adhesive the length of the block on both angled contact surfaces between the caps and post or panel blocks. Using a 4 ft. level and a dead blow hammer, set caps in place to obtain a level top-surface. Note: When cutting blocks refer to MSDS sheets and wear proper safety gear. Step 7 Construct bond beam. Step 8 Place adhesive for cap placement. Step 8 Install caps. Step 8 Install post caps. 16


18 Building AB Ashlar Blend Patterned Walls with AB Fence Patterned walls resemble hand-laid stone walls and add a whole new look to the AB Fence System. Similar to patterned retaining walls, they require a certain level of detail and craftsmanship to construct. Plan on taking a little extra time to build a patterned fence, particularly when building one for the first time. allanblock.com Wall Patterns To assist in block estimating and to ease the construction process there are pre-set patterns available. A pre-set pattern is repeated for a particular pattern height and length. Remember, a single course consists of a full size block, approx. 8 in. tall (200 mm). Combine the different pre-set patterns to build any height fence required. These pre-set patterns can be flipped or reversed to keep the panels random. Standard Single Course Pattern 8 in. (200 mm) 7 blocks - approx ft. (3.1 m) AB Fence Blocks needed: 2 Panel Blocks 2 Half Panel Blocks 6 Lite Panel Blocks 4 Half Lite Panel Blocks* Standard Two Course Pattern 7 blocks - approx ft. (3.1 m) 16 in. (405 mm) AB Fence Blocks needed: 6 Panel Blocks 4 Half Panel Blocks 8 Lite Panel Blocks 8 Half Lite Panel Blocks* Standard Three Course Pattern 7 blocks - approx ft. (3.1 m) 24 in. (610 mm) AB Fence Blocks needed: 10 Panel Blocks 10 Half Panel Blocks 10 Lite Panel Blocks 4 Half Lite Panel Blocks* Standard Four Course Pattern 7 blocks - approx ft. (3.1 m) 32 in. (810 mm) AB Fence Blocks needed: 15 Panel Blocks 12 Half Panel Blocks 10 Lite Panel Blocks 8 Half Lite Panel Blocks* 17 * Check with your local manufacturer on availability. Use an AB Fence Lite Panel Block cut in half to create an AB Fence Half Lite Panel Block.


.")
19 Building Patterned Fence Panels Refer to page 10 for a detailed description on how to start AB Fence construction. The initial steps include proper layout of the fence, jig construction, placement of the sonotubes, construction of the pile footings, location of the rebar within the pile footings, trench preparation and initial block coursing of posts and panels. Note: The base course of the panel should always use a full course of the AB Fence Panel Block. This will speed the leveling and installation of the panel. The following steps will compliment the installation procedure outlined on the previous pages. The changes to the typical installation for the construction of a patterned fence are as follows. Step 3: Post and Panel Construction - Patterned Walls Stack a second course of panel blocks following the pre-set single course pattern. Repeat the pattern if the panel is longer than 10 ft. (3.0 m). If a manufactured AB Fence Half Panel Block is not available, an AB Fence Panel Block must be cut to obtain a half panel block. By following the pre-set single course pattern the bond beam will still consist of two full courses. Check the first two courses of panel block for alignment and plumb. Shim and adjust as necessary. Step 3 Install 1st course of pattern. Additional vertical stirrups will be needed to meet the one per block minimum. Continue with Steps 4-5 starting on page 15 to continue the fence construction. Step 6: Post and Panel Construction - Patterned Walls Using the pre-set patterns in any combination, stack the panel blocks in between the post columns up to the course below the top bond beam. For example, if there are seven courses between the bond beams, use a combination of the 4-course and 3-course pre-set patterns. The panel blocks should be stacked tight, paying attention to level and plumb. Step 6 Install grout for bond beam. Before stacking the top two courses, place a 4 in. (100 mm) strip of grout stop material, such as duct tape or building papers. Using the pre-set single course pattern, stack the first course of the next bond beam directly on top of the grout stop material. Step 6 Place grout stop material. Place a continuous piece of #4 (10 m) rebar for the horizontal bond beam on the recess on top of the AB Fence Panel Block. Stack the second course of the next bond beam using the single course pre-set pattern. This patterned course should be offset or flipped from the pattern below to avoid a repetitive look. Seat and straighten the panel with a 4 ft level and a dead blow hammer by striking the front and back sides of the panel. Panels must be installed to a tolerance of +1 in. (25 mm) in the vertical direction over the length of panel. See the Vertical Panel Tolerance on page 16. Continue with Steps 7-8 on page 16 to complete the fence construction. allanblock.com 18


20 Design Elements Step Ups Corners Curves Gates/Railings Step Ups The floating panels of the AB Fence do not require continuous footings, making steps and elevation transitions easy, while dramatically reducing construction costs. For slight grade changes it is easy to step the panels at the post locations, but more severe grade changes might require additional changes within the panel itself. Always try to keep a portion of the fence buried when establishing and making the grade transitions. Corners The AB Fence Corner Block makes the construction of a 90 degree corner easy. No special tools or cutting of blocks are required. When laying out the fence to include the corner and adjacent post locations, keep in mind the post spacing is slightly shorter than a panel without a corner post. This will eliminate cutting panel blocks later in the installation process. See page 26 for the construction details on building corners. allanblock.com 19


 14.7 ft. (4.5 m) 16.2 ft. (4.9 m) 65 ft. 79 ft. 92 ft. 106 ft. 119 ft. 133 ft. 146 ft.")


21 Curves The post and panel connection offers the flexibility to create fluid curves and radiuses unmatched by other fencing systems. The length of the panel and the type of connection, Standard or Modified, will determine the radius of the fence, see the Minimum Radius Chart below. Other dramatic transitions can be achieved by modifying the first panel block at the post block to the needed angle. For tighter curves, miter cut an AB Fence Post Block to achieve the desired angle. Post/Panel Connection Standard Modified AB Fence Minimum Radius Chart 7.2 ft. (2.2 m) 8.8 ft. (2.7 m) 10.3 ft. (3.1 m) Panel Width* 11.8 ft. (3.6 m) 13.2 ft. (4.0 m) 14.7 ft. (4.5 m) 16.2 ft. (4.9 m) 65 ft. 79 ft. 92 ft. 106 ft. 119 ft. 133 ft. 146 ft. 20 m 24 m 28 m 32 m 36 m 40 m 44 m 20 ft. 24 ft. 28 ft. 33 ft. 37 ft. 41 ft. 45 ft. 6 m 7 m 9 m 10 m 11 m 12 m 13 m See page 26 for the construction details on building curves. * All dimensions are approximate and will vary by manufacturer. Check with your local manufacturer for exact specifications and availability. Gates/Railings The concrete-filled post blocks provide a secure backing for nearly any gate type and configuration for residential or commercial applications. Heavy gates may require wheels of their own to keep the posts from deflecting under the gate s weight. Always confirm with the project engineer for the best way to support the gate structure. 20


22 Water Management Location of AB Fence To ensure a quality project, the soils used must not become saturated during construction and the final design must route water away from the project. Drainage Path Design for Water The design and performance of most fence structures are based on keeping the area around the fence relatively dry. To ensure a quality project, the soils must not become saturated during construction and the final design must route water in a manner to prevent water from building up around the structure. Incorporating berms and swales into the final design is an easy way to direct surface water away from the fence. During the design process, develop a thorough understanding of the site and determine where the water will come from and how it will be properly managed. If the water cannot be diverted around or away from the fence, it may require installing an opening in the panel to allow the water to move under the fence. You may need to consult with an engineer to ensure that the water has been accounted for in your design. During the building process, stage your materials so surface runoff is not directed improperly. Temporary grading may be needed to ensure water will not drain toward the construction area. It is also good practice to cover the fence area at the end of the day to prevent water saturation if rain is in the forecast. Water Drainage Option Opening for water drainage. (Actual location in the bond beam to be determined by site layout - one per panel maximum) AB Fence Lite Panel Block During the first course placement and at the location in the panel where water needs to be directed under the fence, replace one full panel block with an AB Fence Lite Panel Block and a wood or foam block spacer that is 4 in. (100 mm) high. The block and spacer together should equal the height of one AB Fence Panel Block. Continue with standard bond beam construction, placing rebar and second course of block. Install shorter stirrups when grouting the bond beam in both cores of the AB Fence Lite Panel Block. Remove wood or foam spacer only when bond beam has fully cured. 21


23 Compaction allanblock.com Proper Compaction Tools Rental Equipment In building your AB Fence it is important to remember to compact the soil under the fence. Proper compaction is important to a beautiful finished project. If performed improperly, settlement could occur and result in structural failure or unnecessary maintenance cost. What is Compaction? Compaction is the process of rearranging soils to consolidate the space occupied by the soil particles while forcing out excess air and water. These same results happen to concrete when they are properly mixed and vibrated. Why is compaction important? The main reason to compact soil is to prevent soil from settling and damaging the structure. Compacted soil provides stability and increases the load-bearing capacity while reducing water seepage into the soil. Compaction also helps prevent frost damage. Safety First As with all construction equipment, there are many safety practices that should be followed while using compaction equipment. Keep in mind the personal protection basics that consist of durable work gloves, eye protection, ear protection, dust mask and appropriate work clothes. Make sure you are familiar with the equipment. If possible, ask for some training when picking the equipment up. We recommend reading all operating and safety instructions before operating the machinery. Compaction and the AB Fence It is important to remember that ANY loose material in and around the fence should be compacted. However, there are two specific installation steps in which proper compaction is noted. 1. When the pile holes are excavated each hole must be checked to make sure loose material is not left in the bottom of the hole. Use a long handled hand tamper to compact this soil when necessary. 2. The trench below the panels needs to be compacted prior to placing the well-graded granular aggregate. This will ensure that the panel is constructed on solid ground. Any soft soil should be removed and replaced with aggregate when needed. Tools & Equipment you may need Hand Tools Safety glasses, gloves, dust mask, ear protection, knee pads, 4 level, torpedo level, tape measure, string line, chisel, hand tamper, dead blow hammer, shims, broom, round and square shovel. Power Tools Plate compactor, concrete saw with diamond blade, concrete mixer, concrete vibrator, skid loader with auger and laser level. Rental Equipment Plate compactors, concrete saws, concrete mixers, concrete vibrator, skid loaders and laser levels are required when building an AB Fence project. These are available at most equipment rental centers. 22


24 Construction Details The following drawings provide details for basic construction and design options available with the Allan Block Fence System. These drawings are to be used as reference only and not for construction. Use the approved construction design information for project details. Typical AB Fence Section Panel Step Down 23


25 A single bond beam consists of two courses of AB Fence Panel Block that have their cores filled with sand mix grout. Horizontal steel is placed between the two courses of block and will reinforce the entire bond beam. For additional support, wire stirrups are placed in each block, approximately every other core, to ensure that the courses do not separate. This bond beam configuration creates a solid structural beam capable of reinforcing the panel structure. Bond beams are used at the top and bottom of the panel to create a unified panel structure. Building a Bond Beam Place first bond beam course, lay in rebar on the top of the blocks. Rebar is available at local suppliers in 10 ft and 20 ft sections (3 m and 6 m). Place second bond beam course. Using funnel, start filling the blocks with grout. With a concrete vibrator, consolidate grout. Place stirrups in blocks. Place additional grout to top off blocks after vibrating. Entire bond beam must be cast at the same time. Using a fine or sand mix grout, funnel and a concrete vibrator, you can eliminate the air pockets within the cores of the block. Install stirrups in every other block core prior to vibrating. This will ensure a quality bond beam for maximum stability. Stirrup Sand mix grout Small diameter concrete vibrator to assist the flow of grout around rebar. Vertical hooked stirrups in every other core. For ease of installation place prior to stinging. Reposition as needed during final stages of grouting and stinging. Bond beam second course. 24

. A concrete vibrator is required when placing concrete.")
26 Bond Beam Considerations When building a patterned fence, the bond beam can be constructed either with full height blocks as shown in the Standard Bond Beam Construction detail, or by using the single course pre-set pattern as depicted in the Patterned Bond Beam Construction detail shown below. Proper consolidation of the concrete grout as well as placement of the horizontal steel and wire stirrups are required for both options. Wire stirrups are needed in every other core or one per block (min). A concrete vibrator is required when placing concrete. AB Ashlar Blend Pattern Fence - Standard Bond Beam Construction AB Ashlar Blend Pattern Fence - Patterned Bond Beam Construction 25
27 With modified block placement or cutting of blocks, the AB Fence System can be used for many different types of applications. With a variety of options available AB Fence can be the versatile choice for your project. Step-Ups and Step-Downs Post and Rebar Placement Corner Block with Rebar Placement Building with the AB Corner Block For each corner location the center-on-center spacing needs to be reduced by 1.5 in. (38 mm). If AB Fence Corner Blocks are used on both ends of a panel, the center-on-center spacing is 3 in. (75 mm) shorter than if two AB Fence Post Blocks are used. See the AB Fence Tech Sheet #2005 at allanblock.com for additional information. Standard Connection Modified Connection Gates, Railings or Doors Rotate the AB Fence Panel Block a maximum of 3.5 to create radiuses Cut and rotate the AB Fence Panel Block a maximum of 15.0 to create tighter radiuses 26


28 Finishing Options Castellated Finish with Color Accents Castellated Finish Non-Castellated Finish Gates/Railings Lighting Top of AB Fence Options The AB Fence can be completed using the AB Fence Cap Blocks that gives any project a clean, finished look with aesthetic appeal. By adjusting the height of the AB Post Block, you can create two different types of looks. Castellated Finish Non-Castellated Finish The preferred method is a castellated finish where the posts are taller than the panel by at least one block. Using different colors within the panel or the caps is also a great way to give the AB Fence a dramatic look. Reversing the direction on a course of block easily adds a banding effect with the change in texture. Castellated Finish Non-Castellated Finish Castellated Finish Non-Castellated Finish with Step-ups Non-Castellated Finish Castellated Finish with Reversed Panel Block 27


29 Accenting the AB Fence - Railing Railings can also be added to the top of the AB Fence to offer a softer looking fence with great curb appeal. This option is good for developments where screening is needed. Gates Easily add in gates for access to properties or to containment areas. Make sure to account for the weight of the gate to keep the posts from deflecting out of alignment due to the added weight. Entryways Create entryway displays in any shape and size for residential or commercial developments. Place conduit through the center of the post block prior to pouring concrete Minimum depth per local codes Lighting Lighting brings new possibilities to any landscape. Add a dramatic look with ground mounted or with decorative fixtures secured to the top or sides of the AB Fence posts. Always follow local electrical codes and lighting manufacturers guidelines. allanblock.com 28

30 Estimating Estimating Materials: allanblock.com Aggregate: Base Rock for Trench: Length of fence x 0.5 ft x 1 ft. Divide this number by 27 ft 3 /yd 3 to determine the amount you need in yards. Piles/Posts: Concrete for each Pile: 0.45 yd 3 for each 4 ft pile 0.6 yd 3 for each 5 ft pile AB Fence Post Blocks: Number of blocks per post multiplied by the number of posts. Grout: Number of post blocks for the project x 0.32 ft 3, divide by 27 ft 3 /yd 3 to determine the amount you need in yards. Steel - Available in 10 ft and 20 ft sections: 4 rebars need to extend the entire height of the post down into the pile to within 3 in. (75 mm) of the bottom. For a rough approximation, take the post height plus the pile depth and multiply by 4 to get the entire length of steel required. If a lap splice is required, additional rebar will be needed. Sonotube One 2 ft (50 mm) diameter sonotube per pile approx. 1 ft (25 mm) deep. Panels AB Fence Panel Block. See chart at the right. Grout per Bond Beam Number of panel blocks per course x 2 courses x ft 3. Divide this number by 27 ft 3 /yd 3 to determine the amount you need in yards. Rebar per Bond Beam A single continuous piece of rebar the entire length of the panel. 9 ga Wire Stirrups per Bond Beam Each stirrup is approximately 1.75 ft long and each block will need a stirrup for the bond beam. Take the number of stirrups required times 1.75 ft for the linear footage of 9 ga wire needed. AB Fence Caps One cap block per post. For the panel you will need the same number of caps as panel blocks needed per course. Adhesive: Estimate 6 caps blocks per tube of concrete adhesive. Note: Material estimates do not include overages and only represent the primary materials needed to construct the AB Fence System. AB Fence Panel Length* 6 blocks 8.8 ft (2.7 m) 7 blocks 10.3 ft (3.1 m) 8 blocks 11.8 ft (3.6 m) 9 blocks 13.2 ft (4.0 m) 10 blocks 14.7 ft (4.5 m) 11 blocks 16.2 ft (4.9 m) 12 blocks 17.6 ft (5.4 m) 13 blocks 19.1 ft (5.8 m) AB Fence Half Panel Blocks AB Fence Panel Block Quantity (per each panel) 7 courses 4.8 ft ( 1.5 m) 8 courses 5.4 ft ( 1.7 m) Fence Panel Height w/cap* 9 courses 6.1 ft ( 1.9 m) 10 courses 6.7 ft ( 2.0 m) 11 courses 7.3 ft ( 2.2 m) 12 courses 8.0 ft ( 2.4 m) 13 courses 8.6 ft ( 2.6 m) 14 courses 9.3 ft ( 2.8 m) 15 courses 9.9 ft ( 3.0 m)


31 AB Fence Estimating Tool This handy estimating tool will estimate block, rebar, base rock, concrete and grout quantities for AB Fence projects. The design tables on page 8 under Where to Begin will be needed. These charts have values for post spacing and pile depth for the AB Fence System. If your application does not fall under the conditions outlined in this manual, the AB Fence Design Manual will be needed for different wind speed, soil conditions and exposure coefficients. The tool is run in Microsoft Excel and for the program to work properly, the macros will need to be enabled. Choose between a standard panel or an ashlar panel. Download our AB Fence Estimating Tool at allanblock.com. View and print off material and labor estimate worksheet. Construction Terminology: Bond Beam: A single bond beam consists of two courses of AB Fence Panel Block that have their cores filled with sand mix grout. Horizontal steel is placed between the two courses of block and will reinforce the entire bond beam. For additional support, wire stirrups are placed in each block, approximately every other core, to ensure that the courses do not separate. This bond beam configuration creates a solid structural beam capable of reinforcing the panel structure. Cold Joints: A cold joint refers to the location where the concrete was placed at different times and the first concrete pour had time to cure. This leaves a weaker section of the reinforced concrete structure. The bond beams should be poured in one continuous pour, while the posts may require separate pours. To maximize the strength of the posts, keep the cold joint contained within the center of an AB Fence Post Block. Exposure Rating: This parameter refers to the area and the amount of open space around the project. A description of the exposure coefficient are found in the AB Fence Design Manual. Fence Height: Desired fence elevation. Fine (Sand) Mix Concrete Grout: Concrete grout using sand for the aggregate. View and modify the block and materials price list. Lap Splice: To maintain the tensile strength of the rebar when two separate pieces are used they need to be overlapped, this distance is called lap splice. The overlapping distance is dependent on the rebar diameter and the local building codes. Mortar Bed: A thin layer of concrete mortar used as a leveling pad between the first AB Fence Post Block and the pile footing. Panel Length: Actual length of individual panel blocks placed end to end per panel. Pile Depth: Depth of fence pile derived from design charts or calculations. Pile Diameter: Diameter of fence pile per design. Post Spacing: Distance between center lines of the fence piles. Soil Type: Soil classification and description per geotechnical report. Wind Speed: Wind speeds for design vary between geographical areas. For the design of the AB Fence, a 50 year return period for the wind speed is used. The UBC and other building codes have developed maps which indicate design wind speeds for the particular area of the project. For more information see the AB Fence Design Manual. 30
32
Installation Manual for the. Allan Block Fence System. allanblock.com
 Installation Manual for the Allan Block Fence System allanblock.com - 1 - Visit allanblock.com for more information Table of Contents System 6 AB Fence System and Components 7 Applications 8 Plan 12 Design
Installation Manual for the. Allan Block Fence System. allanblock.com
 Installation Manual for the Allan Block Fence System allanblock.com Visit allanblock.com for more information Table of Contents System 5 AB Fence System and Components 6 Applications 7 Plan 11 Design 15
Installation Manual for the. Allan Block Fence System. allanblock.com
 Installation Manual for the Allan Block Fence System allanblock.com Visit allanblock.com for more information Table of Contents System 5 AB Fence System and Components 6 Applications 7 Plan 11 Design 15
Every effort has been made to accurately represent the colors. However, the colors may vary slightly due to the concrete manufacturing process or
 1 Every effort has been made to accurately represent the colors. However, the colors may vary slightly due to the concrete manufacturing process or this printing process. We recommend viewing actual color
Retaining Wall Systems
 Retaining Wall Systems A family of Retaining Wall Products The versatile Allan Block product line allows easy design and construction of retaining walls to meet specific engineering and site requirements.
Bordeaux Walling. Product & Technical Information
 Product & Technical Information BORDEAUX WALLING Piece Piece Piece Block Block Block Block Pins No. per per Height Length Width Weight Layer Cube (kgs) 1 2 3 1 2 10 150 400/350 250 28 Yes 2 2 10 150 300/300
Construction Procedures
 Construction Procedures 2016 Rev. 1.7 1 Contents Introduction...... 3 Base Row Layout........ 4 Drainage and Backfill..... 6 Compaction... 7 Subsequent Rows... 8 In Pictures.... 10 Variations.. 11 Step
Hardscaping Installation Manual
 Hardscaping Installation Manual INDEX Installation of Pavers... 1 Installation of Meshed Flagstone... 2 Installation of Veneer Stone... 3 Sand Set Installation of Pavers 1. Preparing the ground Mark your
Installation Guide. PrivacyShield Outdoor Enclosure
 Installation Guide PrivacyShield Outdoor Enclosure Table of Contents 1.0 Introduction... 2 2.0 Materials, Delivery & Tools... 2 3.0 Layout and Post Locations. 3 4.0 Foundations... 5 5.0 PVC Installation....
NOVEMBER 2016 GRANDWALL. retaining walls installation guide
 NOVEMBER 2016 GRANDWALL retaining walls installation guide RETAINING WALL INSTALLATION GUIDE RETAINING WALL information Austral Masonry Grandwall retaining wall blocks are an ideal choice for retaining
Redi Rock Specification and Installation Manual
 Redi Rock Specification and Installation Manual 1.0 General Scope This Specification covers the Design, Materials and Installation of Redi Rock modular block Retaining and Freestanding Wall systems as
Gravity Wall. A force to be reckoned with... Gravity (SRW) segmental retaining wall systems are structures
 segmental retaining wall systems are structures") A force to be reckoned with... Gravity (SRW) segmental retaining wall systems are structures lower in height that use the FrogStone unit weight combined with gravel core infill to resist earth pressures
A force to be reckoned with... Gravity (SRW) segmental retaining wall systems are structures lower in height that use the FrogStone unit weight combined with gravel core infill to resist earth pressures
Allan Block. allanblock.com
 allanblock.com Allan Block Allan Block is a leading provider of patented retaining wall systems. For over twenty years Allan Block has been bringing innovative products to the landscape community. We can
AUGUST 2017 HASTINGS. retaining walls installation guide
 AUGUST 2017 HASTINGS retaining walls installation guide RETAINING WALL INSTALLATION GUIDE RETAINING WALL information Austral Masonry retaining wall blocks are an ideal choice for retaining walls in gardens,
at home installation guide Manufactured by:
 at home outdoorsproduct and installation guide Manufactured by: Product and Installation Guide Wall Systems Table of Contents Wall Systems...3-7 Project Planning and Installation... 8-11 DIY Retaining
Garden WallScape Installation Guide
 By CornerStone Wall Solutions Inc. Garden WallScape Installation Guide GRAVITY/DETAILS The perfect balance... between design and nature Garden WallScape Overview note: bolded terms are defined in our online
Construction Procedures
 Construction Procedures 2014 Rev. 1.6 1 Introduction This manual presents the methods and procedures necessary for the proper erection of a LOCK+LOAD retaining wall. problems later during the service life
BELMURO WALL SYSTEM INSTALLATION GUIDE
 BELMURO WALL SYSTEM INSTALLATION GUIDE TABLE OF CONTENTS TABLE OF CONTENTS... 1 SYSTEM DESCRIPTION... 2 DRY STACK SYSTEM: INSTALLATION GUIDE... 5 GEOGRID WALL SYSTEM: INSTALLATION GUIDE... 9 MASONRY WALL
Important: Before You Start
 Advantage ICF System Advantage ICF System TM Field Guide Important: Before You Start Does Your Building Inspector Know You Are Building with the Advantage ICF System? You are required to check with your
G R A V I T Y / G E O G R I D
 GRAVITY/GEOGRID MAGNUMSTONE Overview note: bolded terms are defined in our online glossary at www.cornerstonewallsolutions.com The MagnumStone retaining wall system was developed with the installer in
Download the AB Courtyard Estimating App Today!
 Download the AB Courtyard Estimating App Today! F u n O u t d o o r L i v i n g AB Courtyard Collection The AB Courtyard Collection is a durable, versatile and a cost-effective way to bring value into
Genesis Panel Systems LLC Dura-Max Brick Panel Siding Installation Instructions
 Genesis Panel Systems LLC Dura-Max Brick Panel Siding Installation Instructions Thank you for purchasing the Genesis Dura-Max Brick Panel system for your project. The system allows you to have the look
15 lbs (6.8 kg) Approx. Weight. AB Junior. AB Jumbo. 35 lbs (16 kg) Approx. Weight
 Approx. Weight. AB Junior. AB Jumbo. 35 lbs (16 kg) Approx. Weight") 1 2 The Garden Wall Collection by Allan Block Choose the Right Block. Select the block with the right size and style for your gardening project. AB Garden Accent Textured on both sides, our lightest block
1 2 The Garden Wall Collection by Allan Block Choose the Right Block. Select the block with the right size and style for your gardening project. AB Garden Accent Textured on both sides, our lightest block
The Garden Wall Collection
 1 2 The Garden Wall Collection by Allan Block The Garden Wall Collection gives you three choices for building Great Gardens! 3 Choose the Right Block. Select the block with the right size and style for
Fence & Guardrail Block Reference Manual ReCon Series 50. Aesthetics You Want Performance You Need!
 Fence & Guardrail Block Reference Manual ReCon Series 50 esthetics You Want Performance You Need! www.reconwalls.com Introduction t ReCon, we are proud of our tradition of offering a product line that
67665_MesaInstallationGuide_2 12/10/07 2:12 PM Page 1 E ID U G TION ALLA T INS
 INSTALLATION GUIDE Introduction The Mesa Retaining Wall Systems from Tensar International Corporation offer superior and costeffective solutions for all of your retaining wall needs. This installation
Installation Guidelines
 815 NE 172 nd Avenue Vancouver, WA 98684 877-694-0141 Installation Guidelines Installation steps include job planning, layout, excavating and preparing the soil subgrade, applying geotextiles (optional),
Outdoor Living to Last a Lifetime
 Outdoor Living to Last a Lifetime Once upon a time, backyard improvements meant concrete slabs, treated landscape timbers, maybe a wooden deck and a few plants to finish the job. Today, backyard improvements
Allan Block. Table of Contents. allanblock.com
 allanblock.com AB Fieldstone Collection Facing Series: Cascade Color: Rustic Creek Allan Block Allan Block is a leading provider of patented retaining wall systems. For over twenty years Allan Block has
Steps And Stairs Installation Steps In Wall - Option 1 Steps In Front of Walls - Option 2 Steps In Wall; 10 (25cm) Tread - Option 3 Step Parallel to
 Tread - Option 3 Step Parallel to") Steps And Stairs Installation Steps In Wall - Option 1 Steps In Front of Walls - Option 2 Steps In Wall; 10 (25cm) Tread - Option 3 Step Parallel to Wall - Option 4 Steps and Stairs Q & A E CONSTRUCTION
Steps And Stairs Installation Steps In Wall - Option 1 Steps In Front of Walls - Option 2 Steps In Wall; 10 (25cm) Tread - Option 3 Step Parallel to Wall - Option 4 Steps and Stairs Q & A E CONSTRUCTION
Allan Block. Table of Contents. allanblock.com
 AB Fieldstone Collection Facing Series: Sierra Color: Sandstone allanblock.com Table of Contents Allan Block Allan Block is a leading provider of patented retaining wall systems. For over twenty five years
Steps And Stairs Installation Option 1 - Steps In Wall Option 2 - Steps With Plant Space Option 3 - Steps In Front of Walls Option 4 - Steps Along
 Steps And Stairs Installation Option 1 - Steps In Wall Option 2 - Steps With Plant Space Option 3 - Steps In Front of Walls Option 4 - Steps Along Wall Face Option 5 - Steps In Wall; 10 (25cm) Tread Option
How To Install Your Cambridge Pavingstones System How To Install Your Cambridge Segmental Retaining Wall System
 4 How To Install Your Cambridge Pavingstones System Step 1. Preparation: Sketch a diagram of area to be paved. Square off a 90-degree corner. Set stakes for outside perimeters 6 inches away from area.
Five Stone System. Trench Depth Compactible Rock. Foundation. 57 lbs 41 lbs 31 lbs 47 lbs. Patent Pending. Approximate Weight
 Five Stone System Patent Pending Introduction to the Multi-Use, Multi-Stone System The multi-use, multi-stone system has been developed to give a natural stone appearance to a manufactured system. The
Products for the residential Market. Where. dreams. & yards meet. anchorwall.com
 Products for the residential Market Where dreams & yards meet Easy installation is more than lip service. No pins. No mortar. No misalignments. Rear-lip locator, invented by Anchor, makes installation
Concrete Framing: Slab on Grade
 Concrete Framing: Slab on Grade Casting a Concrete Slab on Grade Concrete Slabs Subgrade Preparation Drainage Layer Slab Edges Vapor Retarder (Moisture Barrier) Reinforcing Pouring the Concrete Finishing
INSTALLATION CHECKLIST 2 ND EDITION. Fox Blocks Abbott Drive Omaha, NE
 Fox Blocks INSTALLATION CHECKLIST ND EDITION Fox Blocks Installation Checklist: ND Edition 6110 Abbott Drive Omaha, NE 6110-69-6 WWW.FOXBLOCKS.COM INSTALLATION CHECKLISTS The Checklists on the following
Retaining Wall Installation Instructions PART 1 RETAINING WALL GENERAL
 Retaining Wall Installation Instructions PART 1 RETAINING WALL GENERAL Work Included: Related Work All labor and material for the furnishing and installing of exterior stone landscaping wall. Masonry Contractor
HOW TO BUILD Garden Walls Frestanding & Landscape Walls
 HOW TO BUILD Garden Walls Frestanding & Landscape Walls 10 Cambridge Wall Book Garden walls This layout depicts a common application of landscape and freestanding designs together in one wall with Columns
Heartland Perma-Column 1841 E 1450 Rd. Lawrence, KS (785)
") Perma-Column Installation Instructions Unlike any other concrete post-frame foundation system, Perma-Column Precast Concrete Piers use 10,000 psi concrete and our unique Sturdi-Wall Plus wet-set bracket
Perma-Column Installation Instructions Unlike any other concrete post-frame foundation system, Perma-Column Precast Concrete Piers use 10,000 psi concrete and our unique Sturdi-Wall Plus wet-set bracket
Backyard Renovation - AB Walls and AB Courtyard A Perfect Match
 Backyard Renovation - AB Walls and AB Courtyard A Perfect Match Before Creating usable and beautiful space in your own backyard can be an exciting adventure as these homeowners in Calgary discovered when
Introducing the first Eco-Friendly mortarless concrete retaining wall system - AB Fieldstone Collection.
 Introducing the first Eco-Friendly mortarless concrete retaining wall system - AB Fieldstone Collection. This innovative new product has unlimited possibilities in style and constructability. It is right
ARMOR-BLOCK. Installation guide. Installation Manual: ARMOR-BLOCK Retaining Wall System. Cap Block. Exposed void for planting.
 ARMOR-BLOCK Installation guide Cap Block Exposed void for planting In situ soil Engineered backfill Compacted and prepared base Setback Lip Ph 0800 655 00 or visit www.csppacific.co.nz 19 February 08 /
LAMINATE GENERAL INSTALLATION INSTRUCTIONS FOR ANGLE-TO-ANGLE FLOORING
 LAMINATE GENERAL INSTALLATION INSTRUCTIONS FOR ANGLE-TO-ANGLE FLOORING WARNING Prior to installation, please ensure that the product received is the correct style and color as well as to the customer s
Create the classic look of stone...
 Create the classic look of stone... The AB Courtyard Collection is a mortarless system developed to deliver creative landscape wall solutions. With over 10 million square metres of AB Courtyard products
10 EXTREME BASEMENT PANELS
 10 EXTREME BASEMENT PANELS On Granular Footings 1. The type of soil is a factor in determining foundation construction details such as footing design, backfill, and drainage provisions. Soils are classified
Fence Stone. Self locating Wall System
 Fence Stone Self locating Wall System Between wall panels End of walls at gate openings etc Internal & external right angles Do it yourself No bricklaying skills required Attractive & efficient For fences
SpaVault TM Installation Guide for Bullfrog Spas (7-10 x 7-10 x 38 )
") SpaVault TM Installation Guide for Bullfrog Spas (7-10 x 7-10 x 38 ) WARNING - When unpacking SpaVault, DO NOT discard styrofoam pieces, these are not packaging materials. Step 1 Excavation Important:
SpaVault TM Installation Guide for Bullfrog Spas (7-10 x 7-10 x 38 ) WARNING - When unpacking SpaVault, DO NOT discard styrofoam pieces, these are not packaging materials. Step 1 Excavation Important:
VERSA-Green TM Plantable Retaining Wall System
 www.versa-lok.com VERSA-Green TM Plantable Retaining Wall System VERSA-GREEN INSTALLATION The VERSA-Green Plantable Wall System from VERSA-LOK is truly the greenest retaining wall available. It combines
MagnumStone Specifications Gravity
 MagnumStone Specifications Gravity SPECIFICATION FOR MAGNUMSTONE GRAVITY MECHANICALLY STABILIZED EARTH SYSTEM PART 1: GENERAL.01Description The work consists of supplying and installing all aspects of
Fence & Guardrail Block Reference Manual ReCon Series 50
 Fence & Guardrail Block Reference Manual ReCon Series 50 esthetics You Want Performance You Need! Copyright 2011 ReCon Wall Systems, Inc. www.reconwalls.com Introduction t ReCon, we are proud of our tradition
Installation Manual. Bigfoot Systems Inc. EM
 Installation Manual Bigfoot Systems Inc. www.bigfootsystems.com EM info@bigfootsystems.com 6750 Highway 3, Martin s Point RR #2, Mahone Bay, Nova Scotia Canada B0J 2E0 TF 1-800-934-0393 PH (902) 627-1600
General Brick Installation Instructions
 Excellent Resource for Clay Paver Installation: http://www.bia.org/resources/clay-brick-pavers/clay-paver-informational- Resources These are general guidelines only. Check your paver manufacturer's recommendations
Exterior System installation instructions
 Exterior System installation instructions 11/20/14 WPS ES-400 & 500 INSTALLATION INSTRUCTION. The WPS ES-400 & 500 systems Façade panels are designed for use as an external wall cladding in conjunction
PS 3000 Installation Manual Step-By-Step Procedures C.9. DOOR AND WINDOW OPENINGS C.9.1 PREPARE IN ADVANCE. C.9.2 VBUCK CONSTRUCTION.
 C.9. DOOR AND WINDOW OPENINGS Openings for doors and windows are formed with bucks, or frames, which are constructed to the rough opening dimensions required for the doors and windows to be installed.
Self Locating Wall System
 From... Self Locating Wall System For fences from low gardens to 2.2 metres high The revolutionary new DIY fence system incorporating purpose made pier blocks for: v Between wall panels v End of walls
Technical Sheet and Installation Guide. Hebel Fence Panels
 Technical Sheet and Installation Guide Hebel Fence Panels Index 1 Technical Sheet 1.1 General Features 2 Design Considerations 3 Installation Guide 3.1 Previous Installation 3.2 Installation of Hebel Fence
OLD BRICK ORIGINALS KILN-FIRED THIN BRICK VENEER Installation Guide. RobinsonBrick.com
 OLD BRICK ORIGINALS KILN-FIRED THIN BRICK VENEER Installation Guide RobinsonBrick.com OLD BRICK ORIGINALS THIN BRICK VENEER Page 2 INTRODUCTION Check local building codes for proper installation guidelines
CAST-IN-PLACE CONCRETE SLOTTED FLOORS FOR SWINE
 CAST-IN-PLACE CONCRETE SLOTTED FLOORS FOR SWINE The Canada Plan Service prepares detailed plans showing how to construct modern farm buildings, livestock housing systems, storages and equipment for Canadian
How to Build a Dry Stone Wall
 Do-It-Yourself: How to Build a Dry Stone Wall An instructional guide for beginners Copyright Stephen Burton and licensed for reuse under this Creative Commons License. By: Stephen T. Kane Table of Contents:
Anchor bolts ASTM F1554, Gr. 36 Wide flange beams ASTM A992, Fy = 50 ksi Misc. structural steel ASTM A36, Fy = 36 ksi
 STRUCTURAL NOTES MATERIAL STRENGTHS Structural Steel Reinforcing Steel Concrete Masonry Structural Lumber Anchor bolts ASTM F1554, Gr. 36 Wide flange beams ASTM A992, Fy = 50 ksi Misc. structural steel
Installation Guide Wall Panels
 Installation Guide Wall Panels Jointless or Dry-Stacked Installation (Read Prior to installation) The MStone system is a jointless / dry-stacked installation where panels and corners fit tightly together
LAMINATE GENERAL INSTALLATION INSTRUCTIONS FOR DROP LOCK FLOORING
 LAMINATE GENERAL INSTALLATION INSTRUCTIONS FOR DROP LOCK FLOORING WARNING Prior to installation, please ensure that the product received is the correct style and color as well as to the customer s satisfaction.
freestone eco Prestige & quality DIY vertical wall Large blocks - 10/m 2 Smooth surface finish No concrete footings
 freestone eco Retaining Wall SystemTM The Freestone ECO Retaining Wall System TM is a more sustainable DIY, vertical retaining wall which is manufactured with up to 40% recycled glass aggregate to provide
Stepping Stone. Name: Date:
 Stepping Stone Name: Date: Description: The project is useful for landscaping. Measurements of the right amount of Portland cement, water, sand, and course aggregates will be used to construct this project.
LEDGESTONE & Ledgestone radius
 LEDGESTONE & radius FRESTANDING & LANDSCAPE WALL 105 Wall LEDGESTONE WALL A Stone look wall for Landscape and Engineered heights The universal size (4 in. high x 8 in. deep x 12 in. long) and efficient
FEAT UR IN G V E R T IC A R E TA IN IN G WA LL SYST E M. Installation. Guide. anchorwall.com
 FEAT UR IN G V E R T IC A R E TA IN IN G WA LL SYST E M Installation Guide Table of Contents and How to Use This Guide table of contents HOW TO USE THIS GUIDE 2 BEFORE YOU BEGIN 2 RETAINING WALL BASICS
MUTUAL MATERIALS TECH SHEET RomanStack. Coverage* 4.5 pcs / ft² (48.44 pcs / m²) 3,242 lb (1,470 kg) 4 x 8 Cap Unit. 1.6 pcs / ln ft (4.
 3,242 lb (1,470 kg) 4 x 8 Cap Unit. 1.6 pcs / ln ft (4.") Available in three wall block sizes and two cap sizes accompanied by 90 corner units. Combine multiple sizes of RomanStack to create intricate Ashlar, repeating or random patterns. Each size utilizes a
Available in three wall block sizes and two cap sizes accompanied by 90 corner units. Combine multiple sizes of RomanStack to create intricate Ashlar, repeating or random patterns. Each size utilizes a
Anchorplex retaining wall construction guide. Building. Anchorplex. Retaining Wall Systems
 Anchorplex retaining wall construction guide Building Anchorplex Retaining Wall Systems Table of Contents and ow to Use This Guide table of contents ow to Use This Guide. 2 About the Anchorplex System.
SECTION PAVING SLABS ON AN AGGREGATE BASE
 SECTION 32 14 13.16 PAVING SLABS ON AN AGGREGATE BASE (1995 MasterFormat Section 02784) NOTE: This guide specification for the U.S. is for paving slabs on a sand bed over a compacted aggregate base for
SECTION PAVING SLABS ON AN AGGREGATE BASE
 SECTION 32 14 13.16 PAVING SLABS ON AN AGGREGATE BASE (1995 MasterFormat Section 02784) NOTE: This guide specification for the U.S. is for paving slabs on a sand bed over a compacted aggregate base for
PART 1-SAWN THIN VENEER GENERAL
 PART 1-SAWN THIN VENEER GENERAL WORK INCLUDED: All labor and material for the furnishing and installing of exterior or interior stone building veneer. RELATED WORK: Masonry Contractor shall include building
Paradise Found. they learned, they developed most of the design themselves, and knew exactly what they wanted before they even started the work.
 Paradise Found Immediately upon walking through the black cast-iron gate at this magnificent Vienna, VA private residence, a breathtaking landscape quickly comes into view. Initially greeted by large concrete
SECTION TRENCHING
 SECTION 31 23 17 TRENCHING PART 1 GENERAL 1.1 SUMMARY A. Section Includes: 1. Excavating trenches for utilities and utility structures. 2. Bedding. 3. Backfilling and compacting to subgrade elevations.
TABLE OF CONTENTS. 1.0 INTRODUCTION 1.1 Greenstone Structural Engineered Panels 1.2 Drawing and Element Numbers
 version 2.5 updated as of 08.04.2017 2 TABLE OF CONTENTS 1.0 INTRODUCTION 1.1 Greenstone Structural Engineered Panels 1.2 Drawing and Element Numbers 2.0 ASSEMBLY 2.1 Sequence of Assembly 2.2 Preparation
Building. Anchorplex. Retaining Wall Systems
 Building Anchorplex Retaining Wall Systems Table of Contents and Introduction table of contents ow to Use This Guide 2 About the Anchorplex System 2 Anchorplex System Material Specifications 3 Anchorplex
Anchorplex retaining wall construction guide
 Anchorplex retaining wall construction guide Building Anchorplex Retaining Wall Systems Table of Contents and Introduction table of contents ow to Use This Guide......................... 2 About the Anchorplex
How to build 4 DIY projects with. AB Courtyard
 How to build 4 DIY projects with AB Courtyard RECOMMENDED FOR Curved Wall Circular Wall Straight Wall Fences Bench Seat AB Courtyard FEATURES > Double sided free-standing wall > Build directly onto existing
MACHINE-LAY Installation Manual
 MACHINE-LAY Installation Manual PaveDrain Installation Manual Table of Contents Section 1: Base Preparation (pages 3 6) Section 2: Machine-Lay PaveDrain Blocks (pages 8 11) Section 3: Edge Restraints (pages
MODULAR ACOUSTIC FENCING INSTALLATION GUIDE
 MODULAR ACOUSTIC FENCING WWW.QUICKBUILTSYSTEMS.COM.AU INSTALLATION GUIDE INTRODUCTION THE QUICKBUILT FENCE SYSTEM IS A SMARTLY DESIGNED MODULAR SYSTEM EASY AND FAST TO INSTALL AND COST EFFECTIVE. // THE
Heron Retaining Walls
 Heron Retaining Walls masonry. build in style build in style Our range of coloured, standard and premium masonry have set a new standard in quality and style for the versatile concrete block. By adding
ACCESSORY STRUCTURE Building permit information For 1 & 2-family dwellings
 ACCESSORY STRUCTURE Building permit information For 1 & 2-family dwellings Building Safety Department 400-2 nd Street South St. Cloud, MN 56301 (320) 255-7239 A building permit is required for any accessory
PAVING SLABS ON A CONCRETE BASE
 SECTION 32 14 13.16 PAVING SLABS ON A CONCRETE BASE (1995 MasterFormat Section 02784) Note: This guide specification for the U.S. is for paving slabs on a sand bed over concrete for pedestrian applications.
2. Determine Random Numbers: Determine random numbers for testing locations using the Probing, Coring, Texture and MIT-SCAN T2 Report.
 JOB GUIDE CONCRETE PAVING INSPECTION 1. Review Contract and Plans: Obtain plans and special provisions and study them in detail. Attend the pre-construction meeting. Attend the pre-paving meeting. 2. Determine
ARTEX AND PLASTER. 2 - Choosing the right product
 ARTEX AND PLASTER Proper plastering is not easy. But DIY plasters are designed with ease of use in mind, and Artex TM is no more difficult to apply than thick paint. It is best to wear gloves when mixing
BioPrism Solid Surface
 Please read all instructions before installing products. STORAGE & HANDLING: Check for damage that may have occurred during transit. Keep receptor flat on pallet, as it was shipped, until ready to install.
installation section three: Installation
 section three: Installation block specifications...c2 wall layout, excavation...c3 protection of soils...c4 leveling pad...c5 lay first course...c6 backfill & compacting...c7 stepping & additional courses...c8
PYZIQUE FRESTANDING & RETAINING WALL
 PYZIQUE FRESTANDING & RETAINING WALL 120 Cambridge Wall Book Pyzique Cambridge Wall Book 121 Pyzique Wall PYZIQUE WALL ONE STONE DOES IT ALL! The Trapezoid shape (4 in. high x 9in. deep x 11 in. and 7
TIMELESS BEAUTY Experience Old-World Charm on a Grander Scale...
 TIMELESS BEAUTY Experience Old-World Charm on a Grander Scale... KEYSTONE century wall Introducing Crafted specifically for taller wall structures and heavy-loading conditions, the Keystone Century Wall
Table of Contents. 1 Introduction. 2 Description. 3 Tools and materials. 4 Footings or slabs. 5 Coursing placement. 6 Reinforcing steel
 Table of Contents 1 Introduction 2 Description 3 Tools and materials 4 Footings or slabs 5 Coursing placement 6 Reinforcing steel 7 Alignment scaffold installation 8 Concrete placement 9 Exterior and interior
INSTALLATION GUIDE PLEASE READ ENTIRE INSTRUCTION MANUAL BEFORE PROCEEDING!
 DURA - TRENCH INSTALLATION GUIDE This guide is intended to aide in the installation of Dura-Trench systems. There are many different applications and situations for the use of this product and the installation
REINFORCED CONCRETE MASONRY SECTION
 SECTION 04 22 02 - REINFORCED CONCRETE MASONRY PART 1 - GENERAL 1.1 RELATED DOCUMENTS A. Drawings and general provisions of Contract, including General and Supplementary Conditions and Division 01 Specification
Retaining Wall Products
 Retaining Wall Products BCP Building Products 18 Kirkcaldy Street Bathurst NSW 2795 Phone 02 6331 2777 Fax 02 6331 6510 sales@bcpbuildingproducts.com.au www.bcpbuildingproducts.com.au Garden Lockstone
VERTI-BLOCK - DESIGN MANUAL
 Company Information General Information Verti-Block is the latest innovative forming system from Verti-Crete, LLC. Recognized worldwide for outstanding aesthetics and performance, Verti-Crete s proprietary
NORTHERN QLD LANDSCAPING COLLECTION RETAINING WALLS. style and function
 NORTHERN QLD LANDSCAPING COLLECTION 2017-18 RETAINING WALLS style and function RETAINING WALLS / NTH QLD / 2 / style and function BEAUTIFUL PRODUCTS with enduring style Our range of coloured, standard
Freedom Barrier Free Shower Pan Installation Instructions
 Tools & Materials you might need for proper installation Materials: 2-1 gallon buckets of solid wood flooring adhesive (non-shrink) or 100% silicone adhesive 20-1.25 wood screws 1 - tube of non-shrink
Freedom Barrier Free Shower Pan Installation Instructions
 Tools & Materials you might need for proper installation Materials: 2-1 gallon buckets of solid wood flooring adhesive (non-shrink) or 100% silicone adhesive 20-1.25 wood screws 1 - tube of non-shrink
SPECIFICATION FOR REINFORCED SOIL WALL
 SPECIFICATION FOR REINFORCED SOIL WALL 1.0 EXTENT OF WORK The work shall consist of Reinforced Soil walls built in accordance with this specification and in conformity with the lines, levels and details
SECTION UNIT MASONRY
 SECTION 04200 UNIT MASONRY PART 1 GENERAL 1.01 SUMMARY A. Furnish labor, materials, and equipment and perform functions required in the installation and maintenance of the work covered by this Section.
APPLICATION FOR A BUILDING PERMIT (Retaining Wall/Garden Wall Construction Details)
") APPLICATION FOR A BUILDING PERMIT (Retaining Wall/Garden Wall Construction Details) City of San Jacinto 595 S. San Jacinto Ave San Jacinto CA 92583 951.487.7330 fax 951.654.9896 Must print legibly, submit
APPLICATION FOR A BUILDING PERMIT (Retaining Wall/Garden Wall Construction Details) City of San Jacinto 595 S. San Jacinto Ave San Jacinto CA 92583 951.487.7330 fax 951.654.9896 Must print legibly, submit