Impact Protection Slabs and Sports Pavement Slabs
|
|
|
- Magdalene Barnett
- 6 years ago
- Views:
Transcription
1 Storage of EUROFLEX Products and adhesive cements EUROFLEX products should normally be stored in dry areas at constant temperature above 10 C. If stored below 10 C, store the slabs at the installation site temperature (> 10 C) for at least 2 hours before installation. Important note: Adhesive cements must be stored at all times in dry locations above 0 C. To avoid colour variations due to differences in sunlight exposure, leave the UV protection film on the products as supplied until just prior to installation. Required Tools - Steel straight edge (e.g. carpenters square 600 mm) - Cutting knife, heavy duty, with replacement blades - Tape measure or meter stick - Felt-tip markers (water soluble) or chalk, etc. - Chalk line with refill chalk - Application gun for dispensing adhesive cement - Adhesive cement cartridges - Sheet metal, plastic liner or cardboard sheet (approx. 2 L x 1,5 W of the slab dimensions) - Hand saw, sabre saw or band saw (with blades for wood) - Kneepads page 1 of 14


2 1. Preparation unbounded subgrade Preparation of Subsurface crushed sand/stone chippings grain size 0/5mm thickness min. 20mm, grain size 0/8mm thickness min. 30mm or comparable level by < 5mm under a 3m lathe 2. Preparation bounded subgrade Note: The basement is taken off till attended depth plus thickness of the slabs. Through acceptance inspection for the subgrade is recommended for installation the slabs. Note: Special for installation Sport Pavement Slabs must be save that the subgrade is possible to absorption the water. The edge trim for the Sport Pavement Slabs must be flexible like the EUROFLEX Lawn edging no concrete! Attention: The subbase for indoor installation should be even, flat and dry. By installation on an already existing subbase should be checked the compatibility. If the subbase material based on PVC migration of plasticizer are possible and unpleasant exhalations. page 2 of 14
3 Subsurface Design / Acceptance Criteria EUROFLEX slabs have excellent drainage properties. The subsurface below them must therefore provide sufficient drainage as well. Paved surfaces (such as concrete or asphalt) must be level with a slope of approx. 2% and have adequate takeoff drains. Any depressions greater than 3 mm in depth which can collect water must be leveled off by suitable materials. Like other elastomeric materials, EUROFLEX products absorb heat when exposed to direct sunlight. Their surface temperatures can be higher than asphalt surfaces exposed to the same conditions. EUROFLEX products should be installed and stored in shady areas if possible to avoid overheating. Preparation of the Subsurface Proper construction and acceptance inspection of this subsurface before installation is extremely important. The following instructions must be followed exactly by the contractor carrying out the subsurface preparation and by the EUROFLEX slab installer in subsequent acceptance inspection. Remove the existing soil to a depth of min 300 mm plus the thickness of the slabs that will be installed. If no edge trim enclosed is present around the area to be covered, install EUROFLEX Lawn Edging for safer playing conditions. EUROFLEX slabs are elastic products with open pores. Based on optional effects of the weather, as much rain, it is possible that the dimensions change. Should questions arise regarding soil conditions and characteristics or expected soil behavior, consult a soil mechanics engineer. Compact each layer with a vibration compactor to 98% standard Proctor density. Following application of the final layer, again check levelness, correct uneven spots with suitable material. Paved subsurface such as concrete or asphalt must be absolute even level without any vertical height. To avoid water collection, must have a slope of at least 2 % and must lead into a take-off drain system. The surfaces must be free of cracks, clean and free of oil or other foreign materials. Regardless of the type of subsurface used; it must not deviate from level by more than 5 mm under a 3 m lathe. page 3 of 14


4 Crushed stones bed stable compacted Leveling crushed sand/stone chippings Stable compacting page 4 of 14
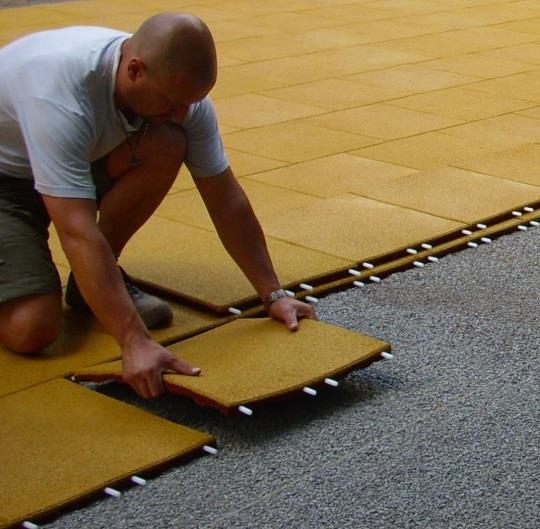
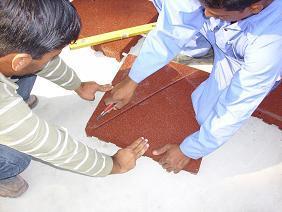
5 Perpendicularity Check, Minimization of Dimensional Variations Start installation by laying a chalk line parallel to and a full slab width away from one side of the surface to be covered. Lay a second chalk line exactly perpendicular (at an angle of 90 ) to the first. Check that the lines are perpendicular by the 3/4/5 rule: Starting at the intersection point of the lines, measure off exactly 3 m down the first line and mark this point, then measure off exactly 4 m down the second line and mark this point. Measure the distance between the two points marked. If the lines are perpendicular, the distance between the points will exactly be 5 m. The dimensional tolerance of EUROFLEX slabs as manufactured is approx. +/- 0,8% in length and width, +/- 2 mm thickness. Dimensional variations can be caused by storage in stacks (elastic compression of the slabs due to the stack weight) and changes in thermal expansion and ambient temperature. The following procedures are recommended to minimize dimensional variations: - Be certain that all slabs to be laid have the same temperature over the entire term of installation. - Spread the slabs out on the ground for 2 hours before final installation to permit them to regain their original dimensions. - Install all slabs in a single session to ensure installation under similar conditions. For ideal installation conditions, the ambient temperature at the site should have been over 4 C for at least 24 hours prior to installation. If the ambient temperature at the site is below 4 C, store the slabs to be installed in a dry area at a temperature of at least 10 C for at least 72 hours prior to installation. Do not install EUROFLEX slabs if ambient temperatures below 4 C are expected at the installation site for an extended period of time. Installation of EUROFLEX Slabs Install the first row of EUROFLEX slabs by placing them precisely along the chalk line (During installation of the Sports Pavement Slabs with synthetic turf, please make certain that the blades of grass or tufting for each tile are aligned in the same direction. Doing so will provide a uniform optical appearance across the entire surface. Start the second row (and every second row thereafter) with a half slab. Connect the slabs of the second row to the first by the integrated connector pins. The masonry-style configuration (Figure 1) provides stability of the installed slabs. Cut the last slab in each row to the required size using a heavy-duty carpet knife or a sabre saw. page 5 of 14


6 Correct: T -joints Incorrect: T -joints Incorrect: cross joints Installed in line page 6 of 14
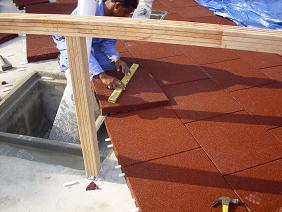
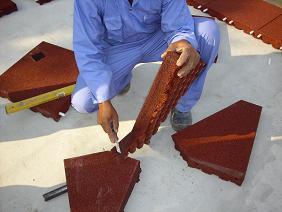
7 Installation Sport Pavement Slabs Cutting slabs with an stable cutter knife Measure and mark cutting edge Cutting with cutter knife page 7 of 14


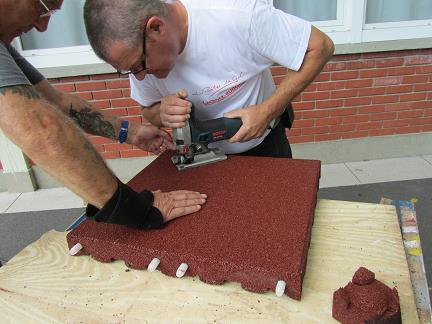

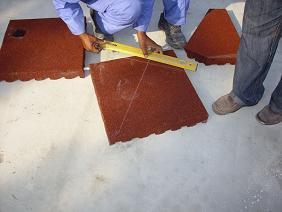
8 Or with a pad saw, saw blade for wood Mark the relief page 8 of 14


9 If the surface to be covered is nonrectangular, cut slabs as required and install as shown. When installing EUROFLEX slabs on granular subsurface, use a sheet metal, plastic or cardboard underlay as an installation aid to keep particles out of the joints between the slabs. page 9 of 14


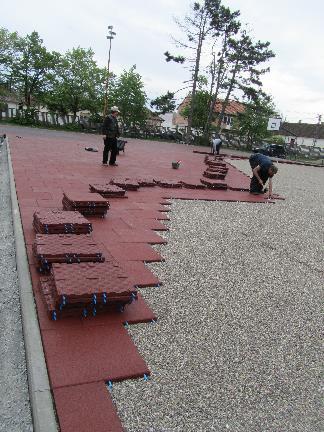
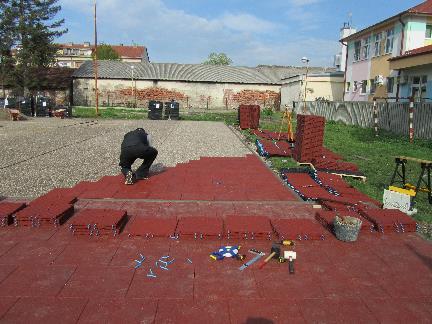
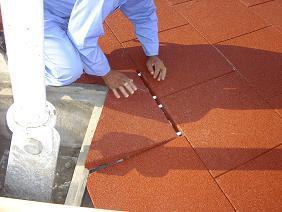
10 Use the second chalk line to check the perpendicularity of installation. Any slabs which will border on the edge limitation enclosing the surface must be cut to size very accurately to ensure a close fit. Glue only slabs of the first and the last row and all slabs on the outer perimeter to each other and to the edge limitation enclosing the surface to secure them against uplifting or unauthorized removal. Read the use instructions for the adhesive cement carefully prior the installation. Use only adhesive cements which are supplied or recommended by KRAIBURG Relastec GmbH & Co. KG. Suitable disposable gloves should be worn during glue application to avoid skin irritation. Attention: At installation sport pavement slabs on bonded subgrade, concrete or asphalt, is a down grade approx. 2% and a free drainage always necessary. It must be sure that the slabs not any wetness absorb at the subgrade. The result would be that the slabs expanded and displace. page 10 of 14

11 Combination different thicknesses of slabs in one area Bonded subbase All slabs in the thickness range of 40mm until 80mm are combinable one below the other because the connector pins are in the same dimension measured von the top of the slabs. The height compensation must be done with the underground. The combination of the 30mm slabs with all other slabs must be done as bordering installation based on the smaller connector pins. page 11 of 14


12 Unbounded subbase The same objectives as for unbounded subbases are valid for the combinability of slabs. The height compensation must be done with the underground. The underground must be sunken in according the thickness of the slabs. Application Line Paints Application line paint on the Sports Pavement Slabs is without difficulty possible. Important is that the paint based on polyurethane e.g. Conipur (Conica sports surfaces or 2 component polyurethane paint made by the company KIPP). page 12 of 14


13 Maintenance of the Installed EUROFLEX Surface Regular cleaning of your installed EUROFLEX surface will promote a long useful life as well as attractive appearance. EUROFLEX surfaces can be kept clean by sweeping with a soft-bristled broom or vacuuming with an industrial vacuum cleaner. High pressure water spraying can also be used to clean EUROFLEX surfaces and provides more efficient dirt removal from the surface pores of the slabs. EUROFLEX slabs are not adversely affected by cleaning with most common household or industrial cleaners when diluted in accordance with manufacturer s recommendations. Light surface stains can be removed with such cleaners using a scrubber or a cleaning rag. Depending on the frequency of use, EUROFLEX surfaces will occasionally need deep cleaning procedures to remove dirt, stains, mold and mildew, etc. These procedures utilize a steam cleaner or power washing with or without the use of cleaning agents. Cleaning the gabs between the slabs is very important. Please note: Out EUROFLEX warranty is not applicable if the product has not been maintained in accordance to out maintenance instructions above. page 13 of 14

14 Gluing instruction Products: EUROFLEX Impact Protection Slabs EUROFLEX Sports Pavement Slabs EUROFLEX Design Slabs EUROFLEX Letter and Number Slabs EUROFLEX Paving Block Tile EUROFLEX Elastic Pavement Blocks EUROFLEX Lawn Edging EUROFLEX Step Blocks EUROFLEX Edge and Corner profile EUROFLEX Edge Protectors EUROFLEX Elephant/ Rhino EUROFLEX Rubber Palisades EUROFLEX Perimeter Panels Required quantity of glue: 1 cartridge (310 ml) for every 3 4 m of joint length glued. Type of glue: elastic 1-component polyurethane adhesive cement e.g. Ottocoll P 83 and Ottocoll m 500 (Otto Chemie, Fridolfing/Germany, Tel. +49 (0) , Other purchasing sources: specialist retailers or your nearest KRAIBURG representative. Preparation: The surfaces must be clean, dry and free of grease. Check adhesion to and compatibility with plastic and painted surfaces before installation. Gluing: Apply adhesive cement from application pistol onto the substrate. The required layer thickness is dependent on the materials being joined. Within 10 minutes, put the upper material in place and apply contact pressure. Due to the pasty consistency of the cement, we recommend maintaining contact pressure until curing is complete. The required curing time is dependent on the layer thickness and the humidity of the ambient air. Processing temperature: + 5 C until +40 C Film after 20 min at 23 C Curing time after 24 h at 23 C Primer for absorbent subgrade: Designed to improve adhesion on minerals materials e.g. porous concrete is grounding recommended. e.g. OTTO primer 1225 for glue Ottocoll P 83 and M 500; for asphalt use OTTO Primer 1216 and Ottocoll P83 Form of delivery: Bottle 100 ml, 250 ml, 500 ml, 1000 ml Application: Apply OTTO Primer smooth with a brush. page 14 of 14
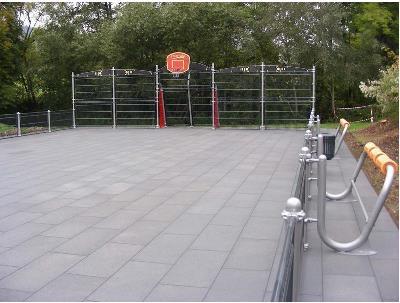
Impact protection Slabs for Outdoor Games
 Installation Instruction Storage of EUROFLEX Products and adhesive cements EUROFLEX products should normally be stored in dry areas at constant temperature above 10 C. If stored below 10 C, store the slabs
INDOOR RUBBER FLOORING INTERLOCKING INSTALLATION / MAINTENANCE GUIDELINES MARATHON SERIES. Four-Side Interlock Loose Lay Installation
 INDOOR RUBBER FLOORING INTERLOCKING INSTALLATION / MAINTENANCE GUIDELINES MARATHON SERIES Four-Side Interlock Loose Lay Installation The following pages are guidelines only... please read this manual thoroughly
Heavy Drop Gym Floor 2-1/2 Tile Installation and Maintenance Manual
 Heavy Drop Gym Floor 2-1/2 Tile Installation and Maintenance Manual Greatmats.com Toll free: 877-822-6622 117 Industrial Ave Fax: 715-825-4928 Milltown, WI 54858 info@greatmats.com TABLE OF CONTENTS BASE
ADPED FIXING GUIDE. Visit to view the PorcelQuick demonstration video
 ADPED FIXING GUIDE PORCEL UICK PorcelQuick Adpeds For fixing 18mm or thicker porcelain tiles to external areas subject to foot traffic. Benefits The Adped system has been designed to speed up the installation
CONSTRUCTION SPECIFICATION FOR CONCRETE UNIT PAVERS
 CITY OF TORONTO STANDARD CONSTRUCTION SPECIFICATIONS FOR ROADS TS 3.80 November 2010 CONSTRUCTION SPECIFICATION FOR CONCRETE UNIT PAVERS INDEX TS 3.80.01 SCOPE... 2 TS 3.80.02 REFERENCES... 2 TS 3.80.03
Suggested laying methods for STONE pavers
 Suggested laying methods for STONE pavers These suggestions are a guide only and should be used in addition to the relevant Australian Standards for trade practices. It is to be noted that installation
SYNTHETIC GRASS INSTALLATION GUIDE SOFT AND HARD SURFACE
 SYNTHETIC GRASS INSTALLATION GUIDE SOFT AND HARD SURFACE HARD SURFACE INSTALLATION You will need: Tape measure Rope or spray paint Weed spray Sharp utility knife and spare blades Synthetic grass adhesive
Construction Specification for Concrete Unit Pavers
 Engineering & Construction Services Division Standard Specifications for Road Works TS 3.80 September 2017 for Concrete Unit Pavers Table of Contents TS 3.80.01 SCOPE... 2 TS 3.80.02 REFERENCES... 2 TS
Hardscaping Installation Manual
 Hardscaping Installation Manual INDEX Installation of Pavers... 1 Installation of Meshed Flagstone... 2 Installation of Veneer Stone... 3 Sand Set Installation of Pavers 1. Preparing the ground Mark your
Playflex SAFETY TILES LAYOUT, DESIGN AND INSTALLATION NOTE BEFORE COMMENCING
 Playflex SAFETY TILES LAYOUT, DESIGN AND INSTALLATION NOTE BEFORE COMMENCING (1) The customer or main contractor should always be made aware of the duration of the installation and limitations involved
Rigid Core Installation & Maintenance Instructions
 Rigid Core Installation & Maintenance Instructions Suitability Rigid Core Click Vinyl Flooring is completely waterproof floating floor and has got exceptional acoustic and insulation properties due to
HYBRID. Pre-Laying Checks
 Warning Veles CK has been developed for exceptional stability in low and high temperatures, however, after installation extreme temperatures (under 5 C or over 50 C) should be avoided by use of interior
vdw 525/825 Quality for Professionals Tree Pit System Resin Binder/ Resin Bound Porous Mortar For pedestrian areas and light traffic loads
 vdw 525/825 Tree Pit System Resin Binder/ Resin Bound Porous Mortar For pedestrian areas and light traffic loads The vdw 525 (Binder only)/825 (Prebagged Mortar) Tree Pit System is a highly UV stable and
DRIVABLE GRASS GUIDELINE FOR DRIVABLE TURF INSTALLATION
 DRIVABLE GRASS GUIDELINE FOR DRIVABLE TURF INSTALLATION Please read through this instruction completely before beginning your installation. Be sure the proper equipment, and safety precautions are in place.
ECO OUTDOOR INSTALLATION TIPS FLOORING TORINO MELBOURNE SYDNEY BRISBANE ADELAIDE PERTH T ECOOUTDOOR.COM.AU
 ECO OUTDOOR INSTALLATION TIPS FLOORING TORINO MELBOURNE SYDNEY BRISBANE ADELAIDE PERTH T. 1300 13 14 13 ECOOUTDOOR.COM.AU Installations Tips Please note these tips are guides only and should be used in
InstallatIon. Guidelines. Relax More. A C T G L O B A L. C O M / X T R E M E L A W N E M A I L : X T R M E L A W A C T G L O B A L.
 InstallatIon Guidelines Relax More. Installation Guide 1. 2. 3. 4. Required Materials 1. Xtreme Lawn 2. Shovel or gas powered sod cutter 3. Vibrating plate compactor 4. Weed barrier mesh 5. Rock aggregate
Installation Instructions for Vinyl Back Ipocork Glued Down HPS Finish Cork Tiles
 Transport, Storage and Acclimation: Transport and store the cartons or tiles in the flat position. Store the tiles at room temperature for at least 48 hours, in their packaging, prior to installation.
Frequently Asked Questions (FAQs) Product Use
 Product Use") 3M TM Slip Resistant Removable Coating Frequently Asked Questions (FAQs) 3M TM Slip Resistant Removable Coating is an indoor, durable, slip resistant film layer. When cured, the film can be easily peeled
3M TM Slip Resistant Removable Coating Frequently Asked Questions (FAQs) 3M TM Slip Resistant Removable Coating is an indoor, durable, slip resistant film layer. When cured, the film can be easily peeled
hüma PARKETTSYSTEM GmbH INSTALLATION GUIDE
 hüma PARKETTSYSTEM GmbH INSTALLATION GUIDE www.huema.co.uk Content Content GENERAL INFORMATION... 4 INSTALLATION NOTES... 6 ACCLIMATISATION... 6 CHECK FOR FAULTS IN THE MATERIAL... 6 REQUIREMENTS FOR
Porcelain Paver Installation Guide
 Porcelain Paver Installation Guide Before any project be sure to thoroughly read, and understand all precautions and warnings. The type of installation will depend on traffic, region, and existing substrate.
Technical Service. INSTALLATION INSTRUCTIONS FOR TARAFLEX SPORT PRODUCTS over Gypsum base Products. This document refers to the following products:
 INSTALLATION INSTRUCTIONS FOR TARAFLEX SPORT PRODUCTS over Gypsum base Products This document refers to the following products: Product Width Width Ft. Installation direction Seams treatment Taraflex Surface
Installation Instructions. Important. Recommended Tools. Palladium Rigid Sheet/Rubrail or Palladium G2 Sheet/Rubrail. Storage
 Important Storage Flat sheet - Store Palladium Rigid Sheet in a clean, dry, interior area at temperatures between 50 F and 95 F [10-35 C]. Keep out of direct sunlight. Make sure sheet is well supported.
Installation ECOWORX / ECOLOGIX INSTALLATION 1. CONDITION YOUR SITE AND TEST 2. PREPARE THE FLOOR
 ECOWORX / ECOLOGIX INSTALLATION Notice: For best results review the following guidelines prior to installation. Shaw will not be responsible for improper installation and failure to follow these guidelines
INSTALLATION / MAINTENANCE GUIDELINES INDOOR RUBBER FLOORING INTERLOCKING
 INSTALLATION / MAINTENANCE GUIDELINES INDOOR RUBBER FLOORING INTERLOCKING TRIATHLON 800 SERIES KALEIDOSCOPE MARATHON EARTH PRISM Four-Side Interlock Loose Lay Installation Reg # SCS-FS-04374 This product
Leaders in Locking Safety Tiles
 Leaders in Locking Safety Tiles SofTILE Installation Procedures February 2005 PAGE Product Storage 1. Adhesive...1 2. SofTILE...1 Tools & Consumables Needed 1. Must Have Tools...1 2. Optional Tools...1
STONE PRODUCT SPECIFICATION SANDSTONE. Some typical installation methods are: Pedestrian traffic only: reinforced concrete* 75mm thick
 Please note these tips are guides only and should be used in addition to the relevant Australian Standards for trade practices. Note that installation may vary from site to site with varying conditions
Mohawk SolidTech. SolidTech Installation Guidelines. Preparation
 55 85ºF (13 30ºC) Preparation We recommend placing a single order for all cartons required for a commercial flooring project. 1. Always store and transport SolidTech Luxury Vinyl Flooring on a flat surface
Installation Instructions. Distributed by:
 Installation Instructions Distributed by: 2 Carpet Installation Check off List 1. Newly poured concrete floors generally will take 30 days per 2.54cm to cure. Moisture should not exceed 2.26kg /1000sf
FRONTIER20 WARNINGS AND RECOMMENDATIONS
 FRONTIER20 WARNINGS AND RECOMMENDATIONS RAISED FLOORS INSTALLATION SYSTEM WARNINGS. Landmark products are made using the best technology available, and their technical performances match or exceed requirements
1-part elastic joint sealant and multipurpose adhesive
 Product Data Sheet Edition 15/11/2005 Identification no: 02 05 01 01 005 0 000001 1-part elastic joint sealant and multipurpose adhesive Construction Product Description Uses Characteristics / Advantages
LAMINATE GENERAL INSTALLATION INSTRUCTIONS FOR ANGLE-TO-ANGLE FLOORING
 LAMINATE GENERAL INSTALLATION INSTRUCTIONS FOR ANGLE-TO-ANGLE FLOORING WARNING Prior to installation, please ensure that the product received is the correct style and color as well as to the customer s
INSTALLATION INSTRUCTIONS - Please read before installation
 INSTALLATION INSTRUCTIONS - Please read before installation The floor panels should be transported in a lying down position. Floor panels should be stored in this position in their unopened packages in
ECO OUTDOOR INSTALLATION TIPS FLOORING COBBLESTONES
 ECO OUTDOOR INSTALLATION TIPS FLOORING COBBLESTONES FLOORING WALLING FURNITURE WWW.ECOOUTDOORUSA.COM Installations Tips Please note these tips are guides only and should be used in addition to the relevant
LAMINATE GENERAL INSTALLATION INSTRUCTIONS FOR DROP LOCK FLOORING
 LAMINATE GENERAL INSTALLATION INSTRUCTIONS FOR DROP LOCK FLOORING WARNING Prior to installation, please ensure that the product received is the correct style and color as well as to the customer s satisfaction.
Installation and Maintenance instructions
 PVC Floorcovering Resilient Residential Installation and Maintenance instructions February 2014 IMPORTANT! Make sure all specifications and instructions are followed carefully. Floor covering exclusively
On load-bearing floors with LK Slotted Board EPS 16
 On load-bearing floors with Design LK Under Floor Heating using LK Slotted Board EPS 16 is for laying on a load-bearing floors only; giving exceptionally low construction height. The product is intended
Installation Instructions for Hercules Rib 52
 Page 1 of 5 Installation Instructions These instructions supersede any verbal or written instructions from connexus representatives, and must be followed in order for the warranty to be in effect. Delivery
ECO OUTDOOR INSTALLATION TIPS FLOORING LIMESTONE MELBOURNE SYDNEY BRISBANE ADELAIDE PERTH T ECOOUTDOOR.COM.AU
 ECO OUTDOOR INSTALLATION TIPS FLOORING LIMESTONE MELBOURNE SYDNEY BRISBANE ADELAIDE PERTH T. 1300 13 14 13 ECOOUTDOOR.COM.AU Installations Tips Please note these tips are guides only and should be used
UltraTile Rubber Weight Floor Tiles Installation and Maintenance Manual
 UltraTile Rubber Weight Floor Tiles Installation and Maintenance Manual Greatmats.com Toll free: 877-822-6622 117 Industrial Ave Fax: 715-825-4928 Milltown, WI 54858 info@greatmats.com TABLE OF CONTENTS
ECO OUTDOOR INSTALLATION TIPS FLOORING SPLIT STONE
 ECO OUTDOOR INSTALLATION TIPS FLOORING SPLIT STONE FLOORING WALLING FURNITURE WWW.ECOOUTDOORUSA.COM Installations Tips Please note these tips are guides only and should be used in addition to the relevant
vdw 870 Quality for Professionals Paving Joint Sand Stabiliser For domestic areas
 vdw 870 For domestic areas For stabilising sand filled joints in paved areas with natural stone setts and slabs, concrete blocks and slabs or brick paving etc. Suitable for new and refurbishment use in
Powerdek Fleck. SECTION Resilient Athletic Flooring
 SECTION 09622 Resilient Athletic Flooring PART 1: GENERAL 1.0 SUMMARY 1.0.1 Work Included A. Prefabricated Rubber Sports Flooring B. Adhesive and accessories required for installation and maintenance 1.0.2
Application Instructions for Keystone Kool Deck on Existing Concrete
 Application Instructions for Keystone Kool Deck on Existing Concrete REQUIRED MATERIALS Keystone Kool Deck PTA Bonding Agent Water 20 Mesh Marble Sand White Portland Cement OPTIONAL TOOLS Mortex Pattern
1. PREPARATION 2. INSTALLATION 3. FINISHING 4. MAINTENANCE
 In the following text vinyl floor(s) refers to floors from the Quick-Step Livyn Ambient Glue+ and Balance Glue+ collections. The branded accessories refer to the specific Quick-Step vinyl accessories.
APOLLO INSTALLATION SECTION I MATERIAL STORAGE & HANDLING
 APOLLO INSTALLATION SECTION I MATERIAL STORAGE & HANDLING General packaging information: All Edgewood products are packaged on wooden pallets. On receipt of merchandise: A) The product in front of you
IVC US. Light Commercial Installation Guide - Sheet Vinyl. Leading the Way
 IVC US Light Commercial Installation Guide - Sheet Vinyl Leading the Way v. 5/2013 IVC US Light Commercial Installation Guide - Sheet Vinyl Flooring IVC US recommends the following guidelines for preparation
Terms and Conditions of Sale All purchases are subject to our published Terms and Conditions of Sale visit
 Important Notice Any circumstances not covered by this guide should be referred to Regupol (Australia) Pty. Ltd. or its Distributors for any particular attention required. There are many factors that may
American Guild Vinyl Flooring - Steadcrest Collection Installation Instructions
 American Guild Vinyl Flooring - Steadcrest Collection Installation Instructions Recommended Adhesive: DuChâteau DUAG-58 Premium Resilient Flooring Adhesive Available in 1- and 4-gallon containers, DUAG-58
Master Grand Fireplace Installation Instructions
 Master Grand Fireplace Installation Instructions Thank you for your purchase of the Master Grand Fireplace from Natural Concrete Products. Please familiarize yourself with these installation instructions
StrataWorx Tile. Installation Guidelines 1. CONDITION YOUR SITE AND TEST 2. PREPARE THE FLOOR
 Notice: For best results, review the following guidelines prior to installation. Shaw will not be responsible for improper installation and failure to follow these guidelines may result in limiting warranty
premium click optimum click
 1 In order to obtain a good result, we advise to follow all given instructions carefully. PREPARATION We recommend to order all panels for the same flooring project at the same time. 2 Always store and
Signature Sports Flooring Installation Instructions. For SignaDeck Premium Rubber Tiles
 Signature Sports Flooring Installation Instructions For SignaDeck Premium Rubber Tiles These instructions supersede any verbal or written instructions from Signature Sports Flooring representatives and
BITUMEN-SET PRECAST CONCRETE PAVING SLABS
 SECTION 32 14 13.16 BITUMEN-SET PRECAST CONCRETE PAVING SLABS (1995 MasterFormat Section 02784) NOTE: This guide specification is the U.S. for concrete paving slabs adhered with a neoprene mastic to a
LOOSE LAY INSTALLATION GUIDE PAGE 1 of 6
 INSTALLATION GUIDE PAGE 1 of 6 MATERIALS REQUIRED FOR INSTALLATION: Tape Measurer Square Ruler Utility Knife 100lb Roller (if using adhesive) ACCEPTABLE SUBFLOORS: Happy Feet International will not warrant
Windsor Fireplace Installation Instructions
 Windsor Fireplace Installation Instructions Thank you for your purchase of the Windsor Fireplace from Natural Concrete Products. Please familiarize yourself with these installation instructions before
ECO OUTDOOR INSTALLATION TIPS FLOORING COBBLESTONES MELBOURNE SYDNEY BRISBANE ADELAIDE PERTH T ECOOUTDOOR.COM.AU
 ECO OUTDOOR INSTALLATION TIPS FLOORING COBBLESTONES MELBOURNE SYDNEY BRISBANE ADELAIDE PERTH T. 1300 13 14 13 ECOOUTDOOR.COM.AU Installations Tips Please note these tips are guides only and should be used
F10. BRICK/BLOCK WALLING To be read with Preliminaries/General conditions. TYPES(S) OF WALLING 110 CLAY FACING BRICKWORK SHALL BE:
 OF WALLING 110 CLAY FACING BRICKWORK SHALL BE:") F10 BRICK/BLOCK WALLING To be read with Preliminaries/General conditions. TYPES(S) OF WALLING 110 CLAY FACING BRICKWORK SHALL BE: Product Name: Pre War Common Size: 215x102x65mm Manufacturer and reference:
F10 BRICK/BLOCK WALLING To be read with Preliminaries/General conditions. TYPES(S) OF WALLING 110 CLAY FACING BRICKWORK SHALL BE: Product Name: Pre War Common Size: 215x102x65mm Manufacturer and reference:
Steps And Stairs Installation Steps In Wall - Option 1 Steps In Front of Walls - Option 2 Steps In Wall; 10 (25cm) Tread - Option 3 Step Parallel to
 Tread - Option 3 Step Parallel to") Steps And Stairs Installation Steps In Wall - Option 1 Steps In Front of Walls - Option 2 Steps In Wall; 10 (25cm) Tread - Option 3 Step Parallel to Wall - Option 4 Steps and Stairs Q & A E CONSTRUCTION
Steps And Stairs Installation Steps In Wall - Option 1 Steps In Front of Walls - Option 2 Steps In Wall; 10 (25cm) Tread - Option 3 Step Parallel to Wall - Option 4 Steps and Stairs Q & A E CONSTRUCTION
Technical Manual. Installation Maintenance - Warranty. Manufactured in the USA by:
 Manufactured in the Technical Manual Installation Maintenance - Warranty USA by: Manufactured in the USA by: Revised on 11/16/12. Supersedes all previous versions. Check website for updates. www.pavesafe.com
B. Reinforcing. Materials shall be as specified in Section 2000 Concrete or as indicated on the plans.
 SECTION 1400 - CONCRETE PAVEMENT 1401 SCOPE. This section governs the furnishing of all labor, equipment, tools, and materials and the performance of all work necessary to construct concrete pavement.
WARNING: SHOULD THE INSTALLATION SEQUENCE NOT FOLLOWED. THE INSTALLATION WILL FAIL IMPORTANT: SEE PAGE 6 0F THIS DOCUMENT
 WARNING: SHOULD THE INSTALLATION SEQUENCE NOT FOLLOWED. THE INSTALLATION WILL FAIL IMPORTANT: SEE PAGE 6 0F THIS DOCUMENT Gerflor GTI CONNECT & ATTRACTION Tiles Installation Instructions 20160919-413 Page
INSTALLATION INSTRUCTIONS FOR WICANDERS DEKWALL
 INSTALLATION INSTRUCTIONS FOR WICANDERS DEKWALL GENERAL INFORMATION Wicanders Dekwall coverings are intended for indoor use only. Please, read the following instructions before installation. Store tiles
optimum glue Preparation INSTALLATION INFORMATION We recommend to order all panels for the same commercial flooring project at the same time.
 Preparation We recommend to order all panels for the same commercial flooring project at the same time. Always store and transport your vinyl floor carefully to prevent distortions. Store and transport
F10. BRICK/BLOCK WALLING To be read with Preliminaries/General conditions. TYPES(S) OF WALLING 110 CLAY FACING BRICKWORK SHALL BE:
 OF WALLING 110 CLAY FACING BRICKWORK SHALL BE:") F10 BRICK/BLOCK WALLING To be read with Preliminaries/General conditions. TYPES(S) OF WALLING 110 CLAY FACING BRICKWORK SHALL BE: Product Name: Olde English Grey Size: 215x102x65mm Manufacturer and reference:
F10 BRICK/BLOCK WALLING To be read with Preliminaries/General conditions. TYPES(S) OF WALLING 110 CLAY FACING BRICKWORK SHALL BE: Product Name: Olde English Grey Size: 215x102x65mm Manufacturer and reference:
Installation Guidelines: Magnolia
 Installation Guidelines: Magnolia 3/8 Engineered Hardwood Staple Down Installation ATTENTION Inspect ALL materials carefully BEFORE Warranties DO NOT cover materials with visible defects once they are
INSTALLATION GUIDE COMPOSITE DECKING
 INSTALLATION GUIDE COMPOSITE DECKING sales@ecoscapeuk.co.uk CONTENTS STORAGE & HANDLING 03 SAFETY & USE 04 TOOLS 05 CALCULATING BOARDS 06 DECKING COMPONENTS + ACCESSORIES 07 PRE INSTALLATION NOTES 09 FALLS
L. W. Mountain, Inc. Floating Glue Installation Instructions *For use with engineered floors only*
 L. W. Mountain, Inc. Floating Glue Installation Instructions *For use with engineered floors only* Inspect the job site carefully before you begin the installation. Some conditions require specific installation
Installation of Ecodure Bamboo or Ecodure Oak over particle board, plywood and existing timber floors
 Installation of Ecodure Bamboo or Ecodure Oak over particle board, plywood and existing timber floors Some basic things you need to know about timber based floors The existing flooring must be clean, dry
DO-IT-YOURSELF SELF ADHESIVE PLANK INSTALLATION
 Woodland Creek Series Self-Adhesive Residential Vinyl Plank Pattern Numbers: Sku 725-6664 PLK1102 Sable Sku 725-6666 PLK1106 Gray Wolf DO-IT-YOURSELF SELF ADHESIVE PLANK INSTALLATION MATERIALS YOU MAY
ENGINEERED LUXURY VINYL GENERAL INSTALLATION INSTRUCTIONS FOR ANGLE-TO-ANGLE FLOORING
 ENGINEERED LUXURY VINYL GENERAL INSTALLATION INSTRUCTIONS FOR ANGLE-TO-ANGLE FLOORING WARNING Prior to installation, please ensure that the product received is the correct style and color as well as to
SECTION PAVING SLABS ON AN AGGREGATE BASE
 SECTION 32 14 13.16 PAVING SLABS ON AN AGGREGATE BASE (1995 MasterFormat Section 02784) NOTE: This guide specification for the U.S. is for paving slabs on a sand bed over a compacted aggregate base for
SECTION PAVING SLABS ON AN AGGREGATE BASE
 SECTION 32 14 13.16 PAVING SLABS ON AN AGGREGATE BASE (1995 MasterFormat Section 02784) NOTE: This guide specification for the U.S. is for paving slabs on a sand bed over a compacted aggregate base for
NUVISTA TILE RUBBER SURFACING INSTALLATION / MAINTENANCE GUIDELINES
 NUVISTA TILE RUBBER SURFACING INSTALLATION / MAINTENANCE GUIDELINES NUVISTA Tile Installation The following pages are guidelines only... please read this manual thoroughly before installing THE TYRED FLOORING
Garden WallScape Installation Guide
 By CornerStone Wall Solutions Inc. Garden WallScape Installation Guide GRAVITY/DETAILS The perfect balance... between design and nature Garden WallScape Overview note: bolded terms are defined in our online
ENGINEERED WATERPROOF FLOORING GENERAL INSTALLATION INSTRUCTIONS FOR VÄLINGE 2G LOCKING FLOORING
 ENGINEERED WATERPROOF FLOORING GENERAL INSTALLATION INSTRUCTIONS FOR VÄLINGE 2G LOCKING FLOORING SITE CONDITIONS Always store the boxes of Engineered Waterproof Flooring (EWF) on a flat and level surface;
Installation / Maintenance Guidelines Indoor Rubber Flooring Interlocking
 Installation / Maintenance Guidelines Indoor Rubber Flooring Interlocking Four-Side Interlock Loose-Lay Installation Reg #SCS-FS-02144 This product has been certified by SCS to meet the rigorous indoor
LUXURY VINYL GENERAL INSTALLATION INSTRUCTIONS FOR DRYBACK FLOORING
 LUXURY VINYL GENERAL INSTALLATION INSTRUCTIONS FOR DRYBACK FLOORING WARNING Prior to installation, please ensure that the product received is the correct style and color as well as to the customer s satisfaction.
Technical Services. Product MM INCH Installation direction Seam treatment GTI CONTROL (welded) 625 X 625 mm 24.5 x 24.
 625 X 625 mm 24.5 x 24.") INSTALLATION INSTRUCTIONS FOR GTI CONTROL TILES This document refers to the following products: Product MM INCH Installation direction Seam treatment GTI CONTROL (welded) 625 X 625 mm 24.5 x 24.5 Same
INSTALLATION INSTRUCTIONS FOR GTI CONTROL TILES This document refers to the following products: Product MM INCH Installation direction Seam treatment GTI CONTROL (welded) 625 X 625 mm 24.5 x 24.5 Same
ECO OUTDOOR INSTALLATION TIPS FLOORING SPLIT STONE MELBOURNE SYDNEY BRISBANE ADELAIDE PERTH T ECOOUTDOOR.COM.AU
 ECO OUTDOOR INSTALLATION TIPS FLOORING SPLIT STONE MELBOURNE SYDNEY BRISBANE ADELAIDE PERTH T. 1300 13 14 13 ECOOUTDOOR.COM.AU Installations Tips Please note these tips are guides only and should be used
LAYING CONTENTS. 1. BEFORE LAYING 1 Hygiene and safety measures 1 Prior considerations 1 Tile-laying materials 2
 TILE LYING LAYING CONTENTS 1. BEFORE LAYING 1 Hygiene and safety measures 1 Prior considerations 1 Tile-laying materials 2 2. TILE-LAYING ON WALL 3 Preparing the worksite 3 Treating the surface and handling
BRANZ Appraisal Certificate # 461 (2010) Internal wet areas.
 Internal wet areas.") SPECIFICATION FOR PROTECTO WRAP AFM-WM FOR INTERNAL WET AREAS BRANZ Appraisal Certificate # 461 (2010) Internal wet areas AFM/WM INTERNAL 0104 Page 1 AFM-WM INTERNAL SPECIFICATION PRODUCT DESCRIPTION Anti
SPECIFICATION FOR PROTECTO WRAP AFM-WM FOR INTERNAL WET AREAS BRANZ Appraisal Certificate # 461 (2010) Internal wet areas AFM/WM INTERNAL 0104 Page 1 AFM-WM INTERNAL SPECIFICATION PRODUCT DESCRIPTION Anti
Construction. Solvent free elastic adhesive for wood flooring. Product Description
 Product Data Sheet Edition 02/09/2010 Identification no: 02 05 02 01 200 0 000001 SikaBond -T52 FC Solvent free elastic adhesive for wood flooring Construction Product Description Uses Characteristics
Steps And Stairs Installation Option 1 - Steps In Wall Option 2 - Steps With Plant Space Option 3 - Steps In Front of Walls Option 4 - Steps Along
 Steps And Stairs Installation Option 1 - Steps In Wall Option 2 - Steps With Plant Space Option 3 - Steps In Front of Walls Option 4 - Steps Along Wall Face Option 5 - Steps In Wall; 10 (25cm) Tread Option
VARIATIONS HARDWOOD SURFACING LINE
 VARIATIONS HARDWOOD SURFACING LINE The Jeff Andrews for Jamie Beckwith Steps pattern is a high-end engineered product collaboratively designed for vertical surfacing industries by Jeff Andrews and Jamie
RITIVEX R LIQUID 1102
 RITIVEX R LIQUID 1102 EDITION: SEPTEMBER 2013 ADHESIVE, ACRYLIC RESIN FOR MULTIPLE USES GENERAL CHARACTERISTICS Acrylic, adhesive, joining resin, water - diluted. It is combined with all cementitious mortars
ECO OUTDOOR INSTALLATION TIPS FLOORING CRAZY PAVING MELBOURNE SYDNEY BRISBANE ADELAIDE PERTH T ECOOUTDOOR.COM.AU
 ECO OUTDOOR INSTALLATION TIPS FLOORING CRAZY PAVING MELBOURNE SYDNEY BRISBANE ADELAIDE PERTH T. 1300 13 14 13 ECOOUTDOOR.COM.AU Installations Tips Please note these tips are guides only and should be used
glue E Installation instructions General Acclimatization and storing conditions Subfloor
 E Installation instructions General glue 1. We recommend to order all panels for the same flooring project at the same time. Compatibility of panels in repeated orders cannot be guaranteed. 2. Make sure
Product Data Sheet Waterproofing Membrane for Ponds and Water Features Description Uses Suitable Surfaces Additional Uses Specification
 Product Data Sheet Pondseal Waterproofing Membrane for Ponds and Water Features Description Pondseal is a polyurethane / acrylic co-polymer, water based coating which when fully cured, forms an impervious,
RECOMMENDED DESIGN SPECIFICATION
 RECOMMENDED DESIGN SPECIFICATION SILICONE COATED SPF ROOFING 1 General 1.1 Section Includes A. Silicone coated SPF roofing system, including substrate board, roof insulation boards, foam insulation materials,
Expanded AmDry Installation Guide
 Expanded Tools Required: Tape measure Utility Knife Straight edge Rubber mallet Circular saw with plywood blade Pull or pry bar 1/2 spacers Pencil / marker Tapping block (made from a piece of 2 x 4 ) Getting
ECO OUTDOOR INSTALLATION TIPS FLOORING PORPHYRY
 ECO OUTDOOR INSTALLATION TIPS FLOORING PORPHYRY FLOORING WALLING FURNITURE WWW.ECOOUTDOORUSA.COM Installations Tips Please note these tips are guides only and should be used in addition to the relevant
STRAIL - installation instructions. Subject to technical changes / December STRAIL level crossing systems & STRAILastic track damping systems
 STRAIL - installation instructions Subject to technical changes / December 2009 STRAIL level crossing systems & STRAILastic track damping systems Gummiwerk KRAIBURG Elastik Gmbh / D-85429 Tittmoning Goellstrasse
Luxury Vinyl Plank (LVP) Flooring Installation Guide For Assistance call
 Flooring Installation Guide For Assistance call") Luxury Vinyl Plank (LVP) Flooring Installation Guide For Assistance call 702-534-1115 IMPORTANT Save time & avoid frustration! Read these entire instructions before starting your installation! Prior to
Luxury Vinyl Plank (LVP) Flooring Installation Guide For Assistance call 702-534-1115 IMPORTANT Save time & avoid frustration! Read these entire instructions before starting your installation! Prior to
RITIVEX R LIQUID 1102
 RITIVEX R LIQUID 1102 EDITION: SEPTEMBER 2013 ADHESIVE, ACRYLIC RESIN FOR MULTIPLE USES GENERAL CHARACTERISTICS Acrylic, adhesive, joining resin, water - diluted. It is combined with all cementitious mortars
WPC Vinyl Floor Installation Guide
 WPC Vinyl Floor Installation Guide Introduction This guide will take you through the necessary steps to install your Bel-Air WPC Vinyl Flooring. Make sure to carefully read through this guide so that you
CONCRETE TILE PAVERS
 Section 32 14 13 CONCRETE TILE PAVERS (1995 MasterFormat Section 02780) Note: This guide specification for the U.S. is for the installation of concrete tile paving units whose thickness are less than the
Installation Instructions
 Installation Instructions The Traditional South American Exotic collections by Elof Hansson can be nailed down, on or above grade. Job site preparation: - If necessary, remove furniture and appliances
1-part elastic joint sealant and multipurpose adhesive
 Product Data Sheet Edition 31/10/2006 Identification no: 02 05 01 01 005 0 000001 1-part elastic joint sealant and multipurpose adhesive Construction Product Description Uses Characteristics / Advantages
STEP UP SHOWER BASE INSTALLATION GUIDE FOR TIMBER AND CONCRETE FLOORS
 GUIDE FOR TIMBER AND CONCRETE FLOORS EDITION: APRIL 2016 IMPORTANT: This guide is for the installation of a Step Up shower base on a timber or concrete floor. If you require a walk in (flush with floor)
SECTION PAVING SLABS ON AN AGGREGATE BASE
 Phone 905-655-3311 1-800-655-3430 Email brooklinsales@brooklin.com CAN-slabs on agg base.doc Phone 905-655-3311 1-800-655-3430 Email brooklinsales@brooklin.com SECTION 32 14 13.16 PAVING SLABS ON AN AGGREGATE