INFINITY TECHNICAL GUIDE
|
|
|
- Clinton Preston
- 6 years ago
- Views:
Transcription
1
2 CONTENTS 1. INFINITY CO-EXTRUDED COMPOSITE DECKING 1.1 An Introduction to Bamboo-Plastic Composite 1.2 What is Infinity Decking and What Are the Benefits? 1.3 Benefits of Infinity vs. Wood 2. TRANSPORTING FORTRESS INFINITY DECK BOARDS 2.1 Stacking 2.2 On-Site 3 BASIC COMPONENTS OF A DECK 4 TOOLS & MATERIALS 4.1 Tools 4.2 Materials 5 JOIST SPACING 5.1 Joist Spacing Table 5.2 Installing Deck Boards At An Angle 5.3 Fortress Infinity Deck Board Specifications 6 GENERAL TIPS & BEST PRACTICES 7 BEFORE INSTALLATION: TIPS FOR PLANNING AHEAD 8 BEFORE INSTALLATION: SITE INSPECTION 9 PRE-INSTALLATION CHECKLIST 10. HULK HIDDEN CLIP & FASTENERS 10.1 HULK Screws & Hidden Clip 10.2 HULK Screws Table 11. INSTALLATION 11.1 Expansion Table 11.2 HULK Hidden Clip Installation 11.3 Laying The Deck 12. BEST PRACTICES: JOISTS 13. BEST PRACTICES: DECK BOARDS 14. BEST PRACTICES: FASCIA 14.1 Fascia Installation: Fasteners 14.2 Fascia Installation: Joint Connections 15. AFTER INSTALLATION 16. DON TS 17. EXAMPLES OF DECKING INSTALLED INCORRECTLY 18. CLEAN & CARE GUIDE /
3 1. INFINITY CO-EXTRUDED COMPOSITE DECKING 1.1 An Introduction to Bamboo-Plastic Composite Wood-Plastic Composites (WPC) are composite materials made of wood fiber/wood flour and thermoplastic(s). WPC are produced by thoroughly mixing ground wood particles and heated thermoplastic resin. WPC may be produced from either virgin or recycled thermoplastics including HDPE, LDPE, PVC, PP, ABS, PS, and PLA. The most common method of production is to extrude the material into the desired shape. These materials can be molded with or without simulated wood grain details. Extruded WPC are formed into both solid and hollow profiles. Injection molding is also used. WPC are still fairly new materials in the market, relative to the long history of natural wood as a building material. WPC were first introduced into the decking market in the early 1990 s. WPC are one of the fastest growing building product materials. Bamboo-Plastic Composites (BPC) are a recent advancement to the already successful introduction of WPC. BPC are very similar to WPC with the primary difference being the introduction of Bamboo as a higher performing substitute to that of the original wood component. Early WPC and even current WPC decking products have shown to struggle with moisture absorption into the wood fiber and core of the product. Bamboo is naturally more resistant to moisture absorption than wood and also introduces stronger structural properties. The engineering behind BPC has shown significant improvement in key performance characteristics for longevity and durability. 1.2 What is Infinity Decking and What Are the Benefits? Over a decade ago a company named Eva-Last of Johannesburg, South Africa discovered there was a need within the South African market for a more robust and superior outdoor composite product. The introduction of well-known North American manufactured composite decking had led to numerous product failures in the harsh South African environment. Through extensive research and stringent testing methods in some of the most unforgiving conditions in the world, Eva-Last developed the Infinity range of Bamboo Plastic Composite (BPC) products. The Infinity range of outdoor BPC products has become the industry leader in Europe, the Middle East and throughout Africa, proving performance in an enormous range of environmental conditions. In 2016, Fortress Deck introduced Infinity to the North American market, finally bringing the globally-proven technology of BPC s to the United States and Canada. Infinity co-extruded deck products are both ultra-low maintenance and environmentally friendly. Infinity BPC products are made from 55% sustainable bamboo fiber and 35% recycled plastic as the two primary components. The unique combination of bamboo fibers and plastic minimizes the need to seal, stain or in other ways treat Infinity composite products. All Infinity profiles are created using High-Density-Polyethylene-Plastics (HDPE). Where this differs from Polyvinyl Chloride (PVC) is that PVC has some disadvantages, among them low thermal stability and high brittleness. Though PVC may have a slightly lower flame spread index when compared to HDPE, when PVC burns it releases highly toxic hydrogen-chloride, hence it is commonly considered as one of the most environmentally damaging thermoplastics. At temperatures above 158 F (70 C), PVC (if not stabilized), can start to degrade and release hydrogen-chloride. Furthermore, photodegradation (damage caused to the board by sunlight) of PVC has been known to take place naturally in the outer layer of the product when exposed to the elements. Infinity is currently used in over 50 countries around the world with global demand and access expanding exponentially. Fortress Deck will provide the United States and Canada with Infinity products for all types of applications, from residential backyard entertainment areas, to massive commercial developments, mountain lodges and highly specialized ocean marinas. The application and possibilities of Infinity are endless. Some of the biggest and most recognized brands in the world already trust Infinity for its superior performance, making it one of the most requested decking products in the world. 3/
4 Designed and formulated in the harsh environments of South Africa, Infinity is superior in quality and performance and has become a trusted outdoor building product. The proven global performance allows Fortress Deck to have an industry leading warranty coverage on all Infinity products. Infinity offers the latest in innovation and design and is a superior, eco-friendly, hassle-free alternative to traditional wood products, exotic hardwoods or wood-plastic composites. 1.3 Benefits of Infinity vs. Wood Ultra-low maintenance Environmentally friendly Mold & moisture resistant UV resistant Rot, warp, and crack resistant Slip resistant Barefoot friendly Simple installation Various color & finish options Utilizes recycled plastics Decreases deforestation 4/


5 2. TRANSPORTING FORTRESS INFINITY DECK BOARDS 2.1 Stacking The best method of stacking is the pyramid method or brick layers method. By shifting the layers of boards halfway across a board s length, the chances of the boards sliding apart are lower and therefore safer. Though the pyramid method is safer for storage purposes, it is not always the most practical. If it is necessary to stack boards, be sure not to stack them too high. Make certain that the height of the stack does not exceed the width of the stack. When stacking boards for transportation, please make sure that the boards are secure, and that there is an even distribution of load. Pyramid method or brick layers method Vertical stacking 2.2 On-site Ensure Infinity Decking has acclimated to the environment before installing. It is important to understand that when installing in colder weather that the composite boards will expand more than when installing in hotter weather and gapping should be adjusted accordingly. Once the boards have reached the building site, ensure that they are stored on level ground. It is recommended that the boards not be stored directly on the ground and that the boards are covered. If the boards need to be stored for long periods, pack the boards on top of pallets. 5/


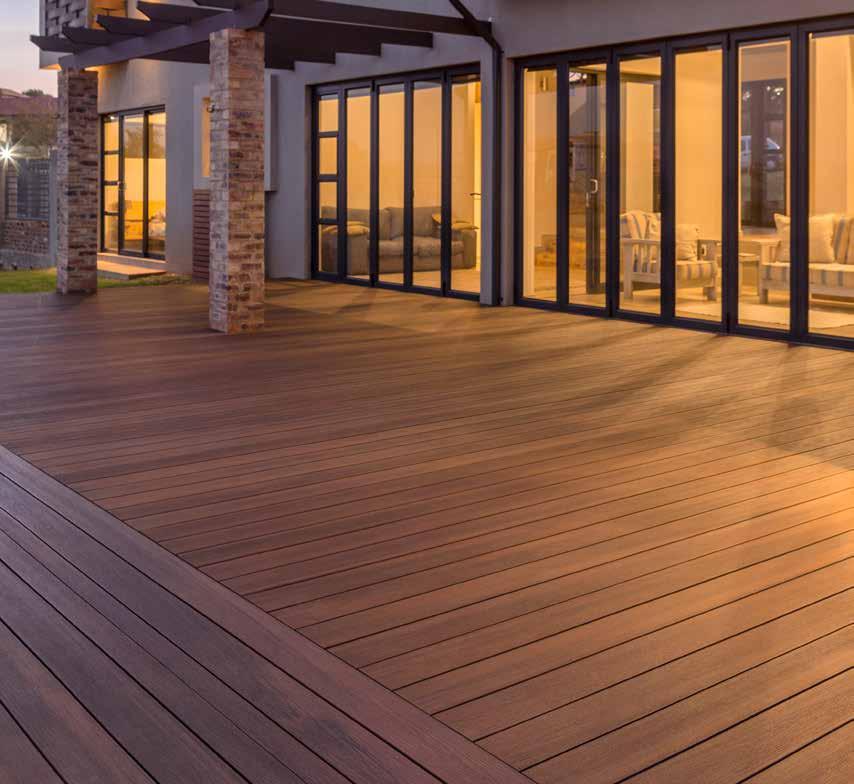
6 Thank you for choosing Infinity Decking. You can be assured that you are using and installing a product that is one of the most durable, highest performing and long lasting in its class. This guide was developed to help installers limit installation faults and workmanship, increase productivity and complete installations that last and conform to warranty specifications. Through support, training and the hands on use of this manual, Fortress Deck aims to give you a better understanding of Infinity Decking and its capabilities. This in turn will give you the tools to advise clients with confidence and good, sound knowledge. Fortress Deck strives to set the standard for composite installers in North America. We aim to lay out good practice guidelines for all installers and manufacturers of composite products so that the industry can be recognized as one that delivers high-quality products through high-quality installations. 3. BASIC COMPONENTS OF A DECK 1. Infinity Deck Board 2. Infinity Fascia Board (12 ) 3. Infinity Fascia/Riser Board (8 ) 4. Infinity Stair Tread Board 5. HULK Hidden Clip 6. HULK Fasteners 7. Infinity Post Sleeve (5 ) 8. Infinity Modern Rails Consult local building code for deck frame requirements 6/


7 4. TOOLS & MATERIALS 4.1 Tools Infinity Decking require the same tools as those used for the installation of traditional wood decks. In order to properly install an Infinity Deck you will need the following tools: MITER SAW with properly sharpened carbide tipped composite cutting blades CIRCULAR SAW with properly sharpened carbide tipped composite cutting blades HAND TOOLS SQUARES Combination squares set squares CORDLESS DRILL (with clutch and screw driver HULK bits provided in every pack of HULK screws) LEVELS Spirit level, laser level and pipe levels MEASURING TAPE CHALK LINER PEN AND PAPER AUGER SHOVEL SAFETY EQUIPMENT 4.2 Materials In order to properly install a Fortress Infinity Deck, you will need the following materials: Infinity Deck Boards Infinity Fascia Boards Clips Clip Screws Surface Mount Composite Screws Carriage Bolts Lag Screws Joists Posts Cement/Concrete String/Line Marker Boards Gravel Frame Screws Truss Clips Truss/Joist Hangers Hurricane Clips HULK Screws 7/
8 5. JOIST SPACING Please consult the chart below to ensure sufficient material and proper spacing of substructure joists for your deck before beginning installation. 5.1 Joist Spacing Table Joist Spacing For Grooved & Square Boards At An Angle Installing Deck Boards At An Angle Installing decking at an angle can help delineate different areas of the deck, and add variety to your deck designs. When installing decking at an angle, the distance the boards must span increases beyond the recommended limit. The solution is simple, however, by reducing the joist spacing. As the angle of the decking becomes more acute, the joist spacing must decrease to provide proper support. Please refer to 5.1 Joist Spacing Table for common deck board angles. 5.3 Fortress Infinity Deck Board Specifications Please make sure you refer to the table below when installing your deck boards Fortress Infinity Deck Boards Board Dimensions Number Of Lf In A Sq. Ft Plank Weight Per Lf Grooved 7/8 x 5 1/ lb Square 7/8 x 5 1/ lb 8/
9 6. GENERAL TIPS & BEST PRACTICES 1. Please follow the instructions when installing Infinity Decking, paying close attention to gapping, spacing and fastener requirements. 2. Before beginning construction, check all areas local building codes and regulations. 3. Infinity products require proper ventilation and drainage to ensure longevity. Adequate drainage is needed to prevent water from pooling under the deck. 4. The more ventilation provided underneath the deck, the better. Don t close the sides and make sure air moves in all directions. This allows moisture to evaporate, ensuring your deck has the longest life span possible. 5. Always use sharp blades. 6. Check your miter saw, against a steel square at the beginning of each day. 7. Recommend that your client not let mulch, leafs, debris, pollen or organic material build up on their deck. 8. A deck should be cleaned with a high pressure hose seasonally and kept free of debris. A deck that collects more debris will need to be cleaned more frequently. Do not let debris accumulate between boards. 9. Always give good and honest advice to clients. If you are unsure of anything, please request assistance from Fortress Deck or contact a specialist in the required field. 10. Be sure to use corrosion-resistant fasteners and connectors. 11. Avoid any deck designs that facilitate the trapping of moisture. Untreated and unsealed timber framing that is continually exposed to moisture will eventually warp and/or splinter. 12. Bracing is recommended for free-standing decks as well as elevated decks requiring long support columns. 13. If you are building a deck that is attached to your house, make sure the framing is strong enough to bear the additional loads the deck will provide, include people, furniture, grill, toys, bikes, and other items. 9/
10 7. BEFORE INSTALLATION: TIPS FOR PLANNING AHEAD Important! Please make sure that before you begin construction, you are aware of building requirements, codes and restrictions. The installation of any Fortress Deck product is a big investment and should be viewed as a serious building project. Installation plays a huge role in the longevity and lifetime of the product and will have a direct influence on performance as well as warranty. If at any stage of the installation you need advice or assistance, please get in touch with Fortress Deck. We are here to help make each and every step of the installation process a success. It is important that you have a solid understanding of the planning and installation process to guarantee that Infinity products are installed correctly. Attention to detail and careful planning are necessary throughout the entire installation process. Make sure you familiarize yourself with the Infinity Technical Guide before beginning construction. Warranty claims will be subject to compliance with specifications outlined in the Infinity Technical Guide. Decide on which boards to use based on: 1. Your client s personal preferences and lifestyle 2. Moisture and drainage conditions 3. Direct sunlight (if the projects site is an area that receives a lot of light you may want to suggest a lighter color that will absorb less heat) 4. Exposure to excessive heat sources including reflected sunlight from low-emissivity (Low-E) glass Good time management of your build can ensure you save money and avoid the hassle and stress of a rushed job. If you can, start planning months in advance to avoid any surprises. Keep in mind the standard length of Infinity materials. If the project allows, try work with standard sizes of 12, 16 and 20 pieces in order to keep costs down and reduce waste. When calculating the amount of Infinity product you require, remember to take waste into account. 10% waste is a good average to work with for a square decks, and round/curved decks will have approximately 15-20% waste. However, please keep in mind that you will still need to calculate this as it can vary depending on the shape and design of the deck. When planning a deck, consider it as an extension to the outdoor living area rather than just an outdoor floor. Decks can incorporate comfort, fun and interesting elements. You may want to suggest a fire pit, grill, pergola, sitting area, dining area etc. to your client. There are no limits to what is possible. Combinations of colors, particularly on a border around the deck or on the fascia will highlight and accent a deck. Experiment, explore and try something that will give the project that WOW factor. You could suggest adding lighting such as FortressAccents, either leading to and/or on the deck. Down lights, spotlights, stair lights, anything is possible. Lighting adds life, looks impressive and brings a wonderful ambience to the deck. 8. BEFORE INSTALLATION: SITE INSPECTION Important! Please make sure that before you begin construction, you are aware of building requirements, codes and restrictions. Inspect and assess the ground and/or surface below your project site before installing Infinity. This should be a dry flat area. For uneven surfaces allow for substructure alterations to create an even base for Infinity Decking. The ground should be well compacted. Ensure the building site allows sufficient deck ventilation and drainage. For non-sleeper system, plan a minimum of 2 elevation space between the ground and the bottom of your lowest joist or beams. For sleeper systems, decking must be elevated a minimum of 1¼ above the ground. 10/
 - Will the ground wash away or subside?")
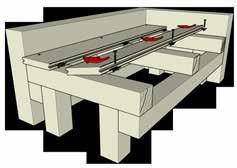
11 9. PRE-INSTALLATION CHECKLIST! - Assessment of the site and area - Ground conditions - Soil type - Drainage - Flood test/drainage - Storm water drains - Where do all the gutters flow to? - How is the roof pitched? - Has the ground been compacted? (Consult with engineer) - Will the ground wash away or subside? (Consult with engineer) - Exposure to sunlight - Plants/trees near the site that may spill sap or residue onto the deck Bring any issues, no matter how big or small, to your client s attention. If you do not discuss issues with them they may not be aware of them. It is your responsibility to let them know what you are not happy with as an installer. Note: Make sure you discuss with your client whether or not they have had or need to have a civil engineer or architect check the site, especially on new building sites, in order to assess whether the ground has been compacted correctly or not and is suitable for decking or light construction. Have it checked for various elements such as storm water drains etc. Check local building codes to ensure all conformance with railing requirements. We highly recommend you insist on your client getting an expert in to check the site before construction begins. Please note: There are many ways to build and install substructures and decks. For the purpose of demonstrating good practices, procedures and skills, we are going to use a single type of material in this guide. These guidelines are not applicable to all applications. Each and every application needs to be assessed accordingly before beginning any installation. Building codes need to be adhered to and all Infinity installation guidelines need to be followed. If you have any questions at any stage of your installation, please get in touch with Fortress Deck regarding your inquiries. 10. HULK HIDDEN CLIP & FASTENERS Eva-Last has developed a range of complete and durable specialized systems that work together to ensure the longevity and stability of the deck HULK Screws HULK screws were developed using state of the art technology and manufacturing methods. They work in perfect synergy with Infinity boards and were designed to do just that. For the best performance and longest lifespan of our products, we recommended HULK screws are used for all Infinity installations. HULK screws are an extremely durable and hard wearing choice for outdoor, corrosion-risk, or long term applications. HULK screws use an advanced bit lock system which maximizes torque transfer and extends the life of bits and screws. It also quickens assembly time. 11/


12 Clip Screw For Wood 500 units per box - M 4.2 x 40mm stainless steel, nano coated clip screw - M 4.2 x 40mm black, nano coated clip screw Torpedo clip screws are specially designed for quick and easy installation into wood. Hidden Clip 500 units per box 304 stainless steel, coated Designed for Infinity Grooved Boards as well as many other grooved boards on the market. Clip Screw for Steel 500 units per box - M 4.2 x 40mm stainless steel, black, nano coated clip screw, SS410 KX - Z-tip - M 4.2 x 40mm black, nano coated clip screw, Z-tip Fastening bits * Every HULK box contains a fastening bit. Z-Tip clip screws are specially designed for quick and easy installation into steel and galvanized steel systems. HULK screws can be used for: deck construction, outdoor furniture assembly, garden applications, cladding, outdoor frames and pergolas. Please refer to the table below for more information on HULK screws and how they should be used HULK Screws Table CLIP SCREW SURFACE MOUNT SCREW FRAME SCREW HI STRENGTH CARBON STEEL TYPE SCREW NOTES HCTO (Ceramic Treated) STAINLESS STEEL UNITS PER BOX HULK Torpedo Tip Nano Black Stainless Steel Screw 500 Clip screw Clip screw used for wood applications HULK Z-Tip Nano Black Stainless Steel Screw 500 Clip screw Clip screw specifically designed for steel applications HULK Torpedo Surface Mount Screw Note: Every HULK box contains a fastening bit. COMING SOON Surface mount screw Surface mount screw used for wood applications *Remember it is good practice to pre-drill when surface mounting deck boards. 12/

13 11. INSTALLATION Important! Please make sure that before you begin construction, you consult building requirements, codes and restrictions regarding spacing and load requirements for rails. All supporting structures and framing must comply with applicable building codes. All local building codes will supercede any recommendations, measurements or techniques in the following installation instructions. If you have any questions or uncertainties, please contact Fortress Deck before beginning installation. Make sure you pre-drill slightly smaller holes than the screw shaft diameter for trim screws and ensure all screws are secure, but not over tightened during installation. This will help prevent pressure cracks and mushrooming. Infinity profiles contain plastic and will expand and contract more so than wood. The expansion and contraction of these profiles must be considered when installing. Sufficient expansion gaps must be left at butt joints as well as where the profiles meet fixed objects. Consider temperatures at time of installation for contraction/expansion purposes. The rate of expansion of Infinity profiles is calculated at or 1/40 per foot (¼ - ⅜ on both sides of a 20 board) over a 50 F swing in temperature. Ensure Infinity has acclimated to the environment before installing. It is important to understand that when installing in colder weather that the composite boards will expand more than when installing in hotter weather and gapping should be adjusted accordingly. Avoid pre-cutting Infinity boards, as not every construction wall is straight and cut all Fortress Infinity products slowly using a sharp fine tooth blade to avoid chipping. The first board is key in the laying process! If it is a fixed deck, place the first plank flush with the rim joist - make sure it is square or parallel with the existing structure or with your frame. Make sure your starting profile is square on the frame and laid perfectly straight, as all subsequent planks will follow its line. Make sure of this by measuring edges and diagonals. Surface mount the board to the rim joist with the preferred overhang. Depending on the design, you can have a bigger overhang, but remember you cannot ever overhang by more than 2. Aesthetically, it often looks better when you overhang about ¼ -½ over the fascia. HULK Hidden Clip can be used when you end flush with the frame and there is no overhang. Fortress Infinity Post Sleeves and Modern Rails are manufactured for on-center post spacing to accommodate 6 and 8 rail sections. Modern Rails are designed in slightly longer spans to account for slight variation in post placement and cut ends during angled rail applications. NOTE: IT IS IMPORTANT TO MEASURE POST SPACING PRIOR TO MAKING ANY CUTS Expansion Table 20 foot board with expansion of (1/40 ) per foot) ¼ - ⅜ gap ¼ - ⅜ gap 20 board explanation = ½ - ¾ ¼ - ⅜ on each side 13/


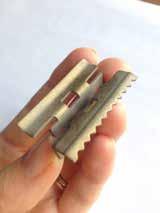
14 11.2 HULK Hidden Clip Installation 1¼ 1¼ First Board Middle Board Last Board 14/


15 11.3 Installation: Laying The Deck Lay boards perpendicular to joists or at a preferred angle. Pre-load clips with HULK screw. Attach subsequent boards to joists with Hulk Hidden Clips. Tighten clip, do not over tighten as this may deform the clip. (Impact driver drill recommended) Move the next profile into position and tap into place with a rubber mallet, then sufficiently tighten clips. Continue to next board. If you are pre-loading clips, try to have someone assist you in placing the clips in position on each board. Install a clip on every joist and fasten with HULK screws. You cannot miss one! Push the next board into place, do not force or push too hard. The clips will keep a gap naturally if installed correctly. If you over tighten, the clip will deform and increase the gap. When installing with a screw, don t over tighten either. It is always a good idea to use a cordless drill with a clutch. Set the clutch relatively light to ensure you don t over tighten. Install last/end profile with surface mount screw as seen in 11.2 HULK Hidden Clip Installation. Please remember to always pre-drill holes to avoid cracking or mushrooming. Surface mount screws should be no closer than 1¼ from the edge of the profile. Install a second support joist as shown below for proper attachment of the hidden clip. Hidden clips should be used on butt joints. Once the support joist is in place, the clips can be secured next to one another. Don t install closer than 1½ from the edge (cut edge). Butt joints require double joists and 2 rows of clips. Leave a minimum of 1¼ between butt joints to allow for debris to fall through. Double joist & double clip 15/
.")


16 11.3 Installation: Laying The Deck Cont. Hulk Hidden clips fit easily, into the board grooves, do not force them in the groove (for expansion & contraction reasons). Use a clip and screw on every joist. Boards must not ever share clips or joist! Screw clip into joist, ensuring that the screw goes down straight and into the center of the joist. Screws must go in at 90 degrees so as not to damage the next board. At board ends on the deck s edge, you can install screws placed perpendicularly at the recommended distance, at minimum of 1¼ from the edge and a minimum of 1½ from board end to prevent splitting the board. Pre-drilling with a sharp drill bit will always provide optimal results. Pre-drilling is recommended to prevent cracking and mushrooming. Drive fasteners perpendicular to the deck surface. Angling fasteners can result in mushrooming on the leading edge. Allow a minimum of 1¼ from the side of the board and 1½ from the end of the board when installing face fasteners. Drive fasteners flush with the deck surface. Do not drive fasteners deeper than ⅛ below the deck surface for best appearance. Do NOT use Flat, Bugle, or Trim Head deck screws, as they will likely result in mushrooming. 16/
 CONSULT LOCAL BUILDING CODES REGARDING PROPER POST INSTALLATION PRACTICES AND MINIMUM RAILING HEIGHTS IN YOUR AREA. Cut Fortress Infinity Post Sleeves to the desired height.")

17 11.4 Installation: Post Fortress Infinity Post Sleeves are manufactured to work with treated 4 x4 post. (Actual dimention 3.5 x 3.5 ) CONSULT LOCAL BUILDING CODES REGARDING PROPER POST INSTALLATION PRACTICES AND MINIMUM RAILING HEIGHTS IN YOUR AREA. Cut Fortress Infinity Post Sleeves to the desired height. Slide post sleeves over treated 4 x4 posts down to the decking surface. Posts should be square and plumb in both directions. Once post sleeves are installed, verify spacing between posts before preceding to railing installation Installation: Modern Rail Straight and Miter/Angle 11.5A 11.B Measure the opening from inside of post to inside of post and determine desired angle and lengths. (11.5A) Transfer the angle and measurements to the Infinity Modern Rails, place top and bottom rails side by side to ensure uniform spacing between posts. Mark rails and cut to desired length and angle. (11.5B) 17/

18 11.5C If needed, attach I-support or crush block to the bottom of the bottom rail. Use one support at the center of a 6 rail section and 2 supports at ⅓ and ⅔ of an 8 rail section. (11.5C) 18/

 Mark the Infinity Modern Rails with the correct dimensions and cut to the desired length. (11.")

19 11.6 Installation: Modern Rail Stair Building codes are very specific on the allowable angles and widths of openings between posts for stair applications. Always consult your local building codes prior to installation. Posts should be installed prior to installing the Infinity Modern Rails. 11.6A 11.6B Place the Infinity Modern Rails on the stairs between the two posts, spanning a minimum of three stairs to determine the desired angle. (11.6A) Mark the Infinity Modern Rails with the correct dimensions and cut to the desired length. (11.6B) Note: Test the Infinity Modern Rails between posts for accuracy of fit prior to marketing the baluster positions. Once rails have been cut to the desired length, place top and bottom rails side by side and mark for accurate baluster placement. NOTE: Baluster spacing must be less than 4. (11.6C) Once baluster spacing has been properly marked, pre-drill holes for fasteners using a bit slightly smaller than the fastener to ensure a secure connection. 11.6C 19/
 12 Fascia 2 x 12 Stringers 1½ minimum 1½ minimum 1½ minimum 1½ from board edge Take measurement of the width of the stairs.")

20 11.8 Installation: Stair Tread 8 Fascia/Riser Stair Tread (1.18 x 12.8 ) 12 Fascia 2 x 12 Stringers 1½ minimum 1½ minimum 1½ minimum 1½ from board edge Take measurement of the width of the stairs. Cut Stair Tread board to the desired lengths. Use a minimum of three fasteners at every stringer, no more than 1½ from the edge of the board. See diagram above for fastener spacing. Stair Tread overhang varies from state to state, Consult local building codes before installation NOTE: It is important to pre-drill at a 90 degree angle to prevent mushrooming or cracking. 20/
21 12. BEST PRACTICES: JOISTS Rim joists - mark spacing and lay out your joists with rim joist in mind. For complex designs you may need to curve the rim joist. You will always need perimeter joists (rim joists) for installing fascia. Always remember to leave 1-1¼ gaps between the double joists to allow debris to fall through the gap. 13. BEST PRACTICES: DECK BOARDS If you are working between set lines, check that they are parallel. This will help with wastage and help disguise lines that are not straight. Use a one or two board perimeter around a deck and then lay the boards perpendicularly inside. Make sure there is an area for water and leaves to fall through. Think about allowing your deck boards to overhang (max 1 ) as opposed to using trim around the edges of the deck boards. Always crossover. Use the length of the profiles in the direction of the shorter side of the deck. Build in boxes. Building a border of two profiles (breaker board) around each profile length area will prevent profiles impacting each other head to toe and will control expansion. When installing fascia, pre-drill holes that are slightly bigger than the screws in the fascia only but not the frame to ensure proper connection to the deck structure. When surface mounting deck boards, pre-drill holes that are slightly smaller than the diameter of the screw shaft When surface mounting boards, fasten to every joist. Important! Always make sure you are working with the correct joist spacing for your profile. Please refer to 5.1 Joist Spacing Table for the correct spacings for your application. 21/
22 14. BEST PRACTICES: FASCIA 14.1 Fascia Installation: Fasteners 12 Fascia Board 8 Fascia Board Fascia boards should be screwed to the frame (end joist or rim joist) and not to the decking boards. 8 Fascia: Use two screws fixed rigidly every 12 along the profile, and no more than 1½ from the start/finish edge. 12 Fascia: Use two screws fixed rigidly every 16 along the profile, and no more than 1½ from the start/finish edge. Allow a ventilation gap of 1½ between the bottom of the fascia board and the ground. Fascia should sit underneath the deck boards. It is recommended to overhang the fascia to prevent impacting the trim unless unless the correct gap spacing is taken into consideration to compensate for contraction and expansion. Cut fascia at an angle of 30 o - 45 o at joints (see 14.2 Fascia Installation: Joint Connections). 22/
23 14.2 Fascia Installation: Joint Connections FRONT VIEW Cut angle at joints TOP VIEW Continuous joint Corner joint (45 ) 15. AFTER INSTALLATION Dispose leftover composite material per local regulations. Minor spills and stains on your deck can be dealt with by cleaning. Please familiarize yourself with the Infinity Cleaning & Care Instructions available at the end of this guide and separately, insist your client does too. Important! Do not sand Infinity Deck Boards Please insist that your client understand Infinity cleaning and care instructions. A deck should be cleaned with a high pressure hose seasonally and kept free of debris. A deck that collects more debris will need to be cleaned more frequently. Do not let debris accumulate between boards. For optimum cleaning and longevity, a high pressure hose should be used. Use at pressures under 1500psi and at a distance of at least 1¼ away from the surface when spraying. 16. DON TS - Do not span over a beam s loading capacity when building a deck, it is unsafe. - Do not rush a job. - Do not use inferior products. - Do not trap moisture. - Do not ever use cracked boards. 23/


24 17. EXAMPLES OF DECKING INSTALLED INCORRECTLY No double joist and no double clip at the butt joint. Counter sink is too deep and too big for the size of the screw. Slopping away, either the earth has dropped or the frame has dropped. There is also insufficient drainage. Screws are too close to the edge of the board, minimum distance from the side of the board should be 1¼. 24/


25 Deck is not sloping away, this deck is sloping to the center. Deck is not sloping correctly. Water is collecting in the center of the boards. No double joist and no double clip. Missing piece of decking. Fascia not cut correctly. 25/


26 Unfinished cutting left. Nobody checked the deck after completion. Poorly planned installation. Improper blocking. No support under the decking. Tree has grown more than allowable cut out. Leave sufficient gaps for the plants and trees to grow. 26/


27 The railing post is only supported by the decking. Proper blocking should be installed to support the railing post. Improper fascia installation. Cracked deck board installed. Cracked deck board installed. Deck sloping away, frame is giving in. 27/
INSTALLATION GUIDELINES
 INSTALLATION GUIDELINES CONTENTS 1 Introduction 2. Storage and handling 3. Expansion and contraction 4. Cutting 5. Spans and supports 6. Ventilation 7. Fasteners 8. Deck installation 9. Installation diagram
Installation Guide (888)
") BamDeck Pro360 Installation Guide (888) 788-2254 The Collection Decking Systems BAMDECK PRO360 5-1/2 Wide Plank Dims: 96 L x 5-1/2 W x 7/8 H BAMDECK PRO360 16FT. 5-1/2 Wide Plank Dims: 192 L x 5-1/2 W
BamDeck Pro360 Installation Guide (888) 788-2254 The Collection Decking Systems BAMDECK PRO360 5-1/2 Wide Plank Dims: 96 L x 5-1/2 W x 7/8 H BAMDECK PRO360 16FT. 5-1/2 Wide Plank Dims: 192 L x 5-1/2 W
31 installation. 32 Job Site Storage & Safety. 33 Tools. 34 Fasteners. 35 Trex Hideaway Hidden Fasteners
 INstallation 3 Job Site Storage & Safety 33 Tools 34 Fasteners 35 Trex Hideaway Hidden Fasteners 37 Framing & Fastening Tips and Special Patterns 38 Gapping 39 Span Guidelines 40 Stairway Assembly 41 Rooftop
ULTRA LOW MAINTENANCE RETAINS WOOD-LIKE APPEARANCE. 25-YEAR eon WARRANTY
 ULTRA LOW MAINTENANCE RETAINS WOOD-LIKE APPEARANCE 25-YEAR eon WARRANTY Maintain your peace of mind, not your backyard. Your outdoor living space is your sanctuary. It s that part of the world where the
INSTALLATION GUIDE BPC DECKING.
 BPC DECKING www.uk.eva-last.com CONTENTS 1 Basic components of a deck 2 Tools & materials 2.1 Tools 2.2 Materials 3 Eva-Last specialised systems 3.1 HULK screws / Table1: HULK screws 4 Joist spacing /
Decking Installation Guide. v
 Decking Installation Guide IMPORTANT: Read all sections before you start For the most up to date information please visit our website @ www.newtechwood.com Prior to installing any composite decking it
DuraLife Capped Composite Decking Installation Instructions
 DuraLife Capped Composite Decking Installation Instructions Planning the design of the deck is the beginning of a successful project. 1. Read the application instructions carefully before starting the
Dura Deck Type 146 Warranty Approved Install Instructions
 Dura Deck Type 146 Warranty Approved Install Instructions Material Composition Dura Deck is produced by extruding a unique composition of reclaimed wood, high density polyethylene and a number of engineered
HOLLOW DECKING PRODUCT GUIDE INSTALLATION TECHNICAL SPECIFICATIONS CARE & MAINTENANCE
 HOLLOW DECKING PRODUCT GUIDE INSTALLATION TECHNICAL SPECIFICATIONS CARE & MAINTENANCE HOLLOW DECKING CN-007A / CN-001T Prior to the installation of any form of Decking, it is recommended that you check
SAiGE Longlife Decking Installation Guide Using Tanalised Joists
 T: 01789 721 576 F: 01789 721 062 E: info@saigedecking.com W: SAiGE Longlife Decking Installation Guide Using Tanalised Joists 1. Introduction As with all instructions SAiGE Longlife Decking Ltd recommends
Decking Installation Guide. v
 Decking Installation Guide v20180427 IMPORTANT: Read All Sections Before You Start For the most up to date information, please visit our website @ www.newtechwood.com Prior to installing any composite
Resysta Gold and Platinum Decking Installation Guidelines
 Resysta Gold and Platinum Decking Installation Guidelines NOTE: Proper planning of the deck layout is essential for ease of installation of deck boards and deck components. Thoroughly read the following
Decking Installation. Veranda ArmorGuard Decking. Veranda Decking. Fiberon Horizon Decking. verandadeck.com (800.
 Veranda ArmorGuard Decking 5.3 in. x.93 in. x 8 or 20 ft. (13 cm x 2.3 cm x 3.66,4.88 & 6.1 m) Square Edge.93 in. x 5.3 in. x 12, 16 or 20 ft. (13 cm x 2.3 cm x 3.66 m) Grooved Fascia.75 in. x 11.25 in.
DECKING PRODUCT GUIDE INSTALLATION CARE & MAINTENANCE
 DECKING PRODUCT GUIDE INSTALLATION CARE & MAINTENANCE DECKING INSTALLATION COEN WPC is a new type of composite made by mixing 60% wood powder with 28% HDPE and 12% additives. These are extruded through
Decking Installation Guide. v AUS
 Decking Installation Guide v20180618 AUS IMPORTANT: Read All Sections Before You Start For the most up to date information, please visit our website @ www.newtechwood.com.au Prior to installing any composite
Veranda ArmorGuard Decking, Veranda Composite Decking and Fiberon Horizon Composite Decking Installation Instructions
 Veranda ArmorGuard Decking, Veranda Composite Decking and Fiberon Horizon Composite Decking Installation Instructions VerandaDeck.com 800.566.3337 (800.HomeDepot) Decking Profiles Veranda ArmorGuard Decking
Decking Installation Guide. v au
 Decking Installation Guide v20170912au IMPORTANT: Read All Sections Before You Start For the most up to date information, please visit our website @ www.newtechwood.com.au Prior to installing any composite
DuraComp Composite Decking Installation Guide. Hidden Plastic Clip Fixing
 Composite Decking Installation Guide Hidden Plastic Clip Fixing Table of Contents SECTION ONE: General Information Site Preparation......2 Site Storage.....2 Safety. 2 Tools....2 Foundation & Sub Structure.2
DECKING INSTALLATION, CARE & MAINTENANCE INSTRUCTIONS
 DECKING INSTALLATION, CARE & MAINTENANCE INSTRUCTIONS 866.729.2378 MOISTURESHIELD.COM limited lifetime warranty 866.729.2378 W W W.MOISTURESHIELD.COM Welcome To The Even Greater Outdoors. Congratulations
Decking Installation Guide. v
 Decking Installation Guide v20170808 IMPORTANT: Read All Sections Before You Start For the most up to date information, please visit our website @ www.newtechwood.com Prior to installing any composite
Cladding & Facade Installation Guide (888)
") TruOrganics Cladding & Facade Installation Guide (888) 788-2254 The Collection Decking Systems TRUORGANICS SQUARE EDGE 5-7/16 Wide Plank Dims: 192 L x 5-7/16 W x 7/8 H Available Colors SEDONA GLACIER DENALI
TruOrganics Cladding & Facade Installation Guide (888) 788-2254 The Collection Decking Systems TRUORGANICS SQUARE EDGE 5-7/16 Wide Plank Dims: 192 L x 5-7/16 W x 7/8 H Available Colors SEDONA GLACIER DENALI
CENTURY HOME LIVING HOLLOW DECKING INSTALLATION GUIDE
 CENTURY HOME LIVING HOLLOW DECKING INSTALLATION GUIDE PRODUCT INFORMATION Century Home Living is a new type of material made by mixing bamboo/wood powder with HDPE (High Density Polyethylene) and other
OUTBACK DECKING INSTALLATION GUIDE CONTENTS. Let s have a look at what you will find in this installation guide.
 o u t b a c k d e c k i n g. c o m. a u OUTBACK DECKING INSTALLATION GUIDE CONTENTS Let s have a look at what you will find in this installation guide. Page. 2 BEFORE YOU START Things you need to know
Siding Installation Guide. v us
 Siding Installation Guide v20180201us IMPORTANT: Read All Sections Before You Start For the most up to date information, please visit our website @ www.newtechwood.com Prior to installing any composite
SOLID DECKING PRODUCT GUIDE INSTALLATION TECHNICAL SPECIFICATIONS CARE & MAINTENANCE
 SOLID DECKING PRODUCT GUIDE INSTALLATION TECHNICAL SPECIFICATIONS CARE & MAINTENANCE SOLID DECKING Prior to the installation of any form of Decking, it is recommended that you check the local building
INSTALLING A CYPRESS DECK. The Natural Choice. Southern Cypress Manufacturers Association
 INSTALLING A CYPRESS DECK The Natural Choice Southern Cypress Manufacturers Association Installing a Cypress Deck The Natural Choice Cypress The Natural Choice.......................... 1 Selecting the
European Siding System Installation Guide. v
 European Siding System Installation Guide v20190215 CONTENTS Important Note 2-3 European Siding Parts 4-5 Under Construction and Framing 6-8 European Siding Installation 9-17 European Siding System Installation
Installation Guide. IMPORTANT: Read all sections before starting. For the most up-to-date information, visit our website: leadvisioninternational.
 Installation Guide IMPORTANT: Read all sections before starting. For the most up-to-date information, visit our website: leadvisioninternational.com Before installing a composite wall cladding, it is recommended
Decking Installation Guide
 Decking Installation Guide 1. Getting Started: Eco Systems Distribution Ltd is the UK distributor for NewTech manufacturing that produces this elegant composite decking. The formula is made up of 50% recycled
CLADDING PRODUCT GUIDE INSTALLATION CARE & MAINTENANCE
 CLADDING PRODUCT GUIDE INSTALLATION CARE & MAINTENANCE COEN COMPOSITE WOOD CLADDING INSTALLATION COEN WPC is a new type of composite made by mixing 60% wood powder with 28% HDPE and 12% additives. These
DEXERDRY INSTALLATION INSTRUCTIONS - PAGE - 1
 DEXERDRY INSTALLATION INSTRUCTIONS - PAGE - 1 Tools and Items Needed Drill/power screwdriver 1/8 drill bit Table saw Circular saw with carbide-tip blade Rubber mallet Chisel or board straightener tool
Wall Cladding Installation Guide. v
 Wall Cladding Installation Guide v20170728 IMPORTANT: Read All Sections Before You Start For the most up to date information, please visit our website @ www.newtechwood.com Prior to installing any composite
Exterior System installation instructions
 Exterior System installation instructions 11/20/14 WPS ES-400 & 500 INSTALLATION INSTRUCTION. The WPS ES-400 & 500 systems Façade panels are designed for use as an external wall cladding in conjunction
CorrectDeck CX. Brochure. Updated: 3/10. Quality You Can Trust Since From North America s Largest Roofing Manufacturer
 CorrectDeck CX Brochure Updated: 3/10 Quality You Can Trust Since 1886... From North America s Largest Roofing Manufacturer CorrectDeckCX Premium Decking www.gaf.com Good for all the things life throws
 www.duralifedecking.com The DuraLife Your Choice Program TM Select Your Favorite Color at the Performance & Price Level You Need DuraLife makes it easy. Simply pick the deck color you like, pick the deck
INSTALLATION GUIDE COMPOSITE DECKING
 INSTALLATION GUIDE COMPOSITE DECKING sales@ecoscapeuk.co.uk CONTENTS STORAGE & HANDLING 03 SAFETY & USE 04 TOOLS 05 CALCULATING BOARDS 06 DECKING COMPONENTS + ACCESSORIES 07 PRE INSTALLATION NOTES 09 FALLS
INSTALLATION GUIDE TREDZ DECKING
 INSTALLATION GUIDE TREDZ DECKING 1 TABLE OF CONTENTS General Introduction... 3 Local Building Codes... 3 Tools Required... 3 Tredz Part Numbers... 3 Sub-Structure Framing... 4 Sub-Structure Framing (con
 www.duralifedecking.com DuraLife makes it easy. Simply pick the deck color you like, pick the deck profile at the performance level you need, and select the railing system to complete your deck. With the
Vertigo Cladding Board
 Installation guide Vertigo Cladding Board Geolam: a stunning alternative to wood cladding Vertigo is a composite wood cladding board requiring minimum maintenance. Durable and fade resistant, it will not
DECKING INSTALLATION GUIDE
 DECKING INSTALLATION GUIDE It is very important to follow the manufacturer s instructions when installing Outback Decking. Fluctuations in climatic temperatures can cause an issue with how the decking
Decking Installation and Maintenance Guide
 Decking Installation and Maintenance Guide Passport American Classic Trailways www.gossencorp.com Building with Gossen Decking is similar to building with traditional decking materials. Installation must
KEVIN JATON. Deck Designer Specification Kit. All rights reserved copyright 2017 DIY Technologies. Page 1
 Deck Designer Specification Kit Page 1 Deck layout diagram Top view without planks Bottom view with planks Top view with planks Page 2 Installation Checklist Building code and zoning requirements Check
Decking Installation Guide
 Decking Installation Guide Starting your project Following delivery of your composite decking boards, we recommend you allow them 24 hours to adjust to local temperature conditions before starting work.
TRANSFORM YOUR GARDEN WITH COMPOSITE DECKING
 TRANSFORM YOUR GARDEN WITH COMPOSITE DECKING Slip resistant Can be worked just like timber Will not rot, splinter, crack or warp Will never require staining or painting Ecological and 100% recyclable Easy
STRONG, DURABLE & MOISTURE-RESISTANT PERFORMS IN RAIN, WIND, SNOW, SAND AND HEAVY TRAFFIC
 Installation Guide -Lite Deck Tile, xbeam & Stair Tread -Maintenance, Repair & Warranty STRONG, DURABLE & MOISTURE-RESISTANT PERFORMS IN RAIN, WIND, SNOW, SAND AND HEAVY TRAFFIC Installation Instructions
Installation Guide -Lite Deck & Patio Tiles & xbeam Deck Planks -Stair Tread & Fascia -Maintenance, Repair & Warranty
 Installation Guide -Lite Deck & Patio Tiles & xbeam Deck Planks -Stair Tread & Fascia -Maintenance, Repair & Warranty STRONG, DURABLE & MOISTURE-RESISTANT PERFORMS IN RAIN, WIND, SNOW, SAND AND HEAVY TRAFFIC
COMPOSITE DECKING, ACCESSORIES & SUPPORT SYSTEMS
 COMPOSITE DECKING, ACCESSORIES & SUPPORT SYSTEMS Embrace the possibilities of a world inspired by nature, designed for life. Eva-Last s range of composite building solutions offer you premium outdoor living
STRONG, DURABLE & MOISTURE-RESISTANT PERFORMS IN RAIN, WIND, SNOW, SAND AND HEAVY TRAFFIC
 COMPOSITE DECKING Installation Guide -Lite Deck Tile, xbeam & Stair Tread -Maintenance, Repair & Warranty STRONG, DURABLE & MOISTURE-RESISTANT PERFORMS IN RAIN, WIND, SNOW, SAND AND HEAVY TRAFFIC Installation
DECKING BROCHURE COMPOSITE DECKING, ACCESSORIES & SUPPORT SYSTEMS. Supplied by. uk.eva-last.com
 DECKING BROCHURE COMPOSITE DECKING, ACCESSORIES & SUPPORT SYSTEMS Supplied by Outdoor Flooring Resistant and sustainable Ultra-low maintenance Environmentally friendly Slip resistant Moisture resistant
6x5. Assembly Manual CAUTION. Sharp Edges PATENTS ARE PENDING. Building Dimensions. Approximate Size. Storage Area. Interior Dimensions
 Assembly Manual 6x5 PATENTS ARE PENDING Building Dimensions Approximate Size Storage Area Exterior Dimensions Interior Dimensions Roof Edge to Roof Edge Wall to Wall Sq. Ft. Cu. Ft. Width Depth Height
DECKING COMPOSITE. Installation Manual 2016
 COMPOSITE DECKING Installation Manual 2016 AB Building Products Ltd. Units 4-5 Regents Court South Way Walworth Industrial Estate Andover Hampshire SP10 5NX www.abbuildingproducts.co.uk Tel: 01264 359984
Decking Buying Guide for Customers
 Decking Buying Guide for Customers Forest Garden 2017 www.forestgarden.co.uk The following guide includes information on the following: What do customers need to consider before they purchase any decking?
Impression Graphic panels
 Impression Graphic panels Installation Guidelines 6003.I Rev. 02 8/15 Please Read Disclaimers: PLEASE READ ALL INSTRUCTIONS BEFORE BEGINNING INSTALLATION!! These guidelines are provided in good faith to
Deck Design Mike & Melissa Deck Option #02
 Deck Design Mike & Melissa Deck Option #02 Congratulations! You just completed your Trex deck design. This report will provide the following information: Deck Layout Diagrams Basic Installation Tips Deck
Installation Guide for Domestic Decking in Recycled Plastic
 Daisy Mill (Gate 3), Unit B Daisy Street, Waterside Colne, Lancashire, BB8 8ER T: 01282 861325 E: sales@kedeltrade.co.uk W: www.kedeltrade.co.uk Installation Guide for Domestic Decking in Recycled Plastic
Resysta Wall Cladding Installation Guidelines
 Resysta Wall Cladding Installation Guidelines NOTE: Proper planning of the wall cladding layout is essential for ease of installation of wall cladding boards and wall cladding components. Thoroughly read
HILLSBOROUGH TOWNSHIP CODE ENFORCEMENT
 HILLSBOROUGH TOWNSHIP CODE ENFORCEMENT SAMPLE GUIDE FOR RESIDENTIAL DECKS revised 7 16 Call before you dig! 1 800 272 1000 New Jersey One Call. Utility Mark Out. THIS GENERIC GUIDE IS NOT ALL INCLUSIVE
Full resistance to corrosion, moulds and fungi. The boards never have to be sealed, stained or painted
 Composite decking is an innovative product that acts as a perfect alternative to traditional timber decking that requires a lot of work in order to maintain its attractive appearance. TERANNA Composite
It s all about. Your Time. Your Flexibility. Your Customers
 For the PROS Superior color retention Resistant to decay and mold Scratch resistant Industry-leading ratings for mechanical strength and durability Easy to install Unique brushed finish that looks & feels
PATENTS ARE PENDING. Building Dimensions. Exterior Dimensions Roof Edge to Roof Edge
 Assembly Manual 8x5 PATENTS ARE PENDING Approximate Size 7980303 Storage Area Building Dimensions Exterior Dimensions Roof Edge to Roof Edge Interior Dimensions Wall to Wall Sq. Ft. Cu. Ft. Width Depth
SECTION COMPOSITE DECKING. Display hidden notes to specifier. (Don't know how? Click Here)
") SECTION 06 73 00 COMPOSITE DECKING Display hidden notes to specifier. (Don't know how? Click Here) Copyright 2017-2017 ARCAT, Inc. - All rights reserved PART 1 GENERAL 1.1 SECTION INCLUDES A. Composite
SECTION 06 73 00 COMPOSITE DECKING Display hidden notes to specifier. (Don't know how? Click Here) Copyright 2017-2017 ARCAT, Inc. - All rights reserved PART 1 GENERAL 1.1 SECTION INCLUDES A. Composite
BUILDERS TIMBER DECKING GUIDE TO
 BUILDERS GUIDE TO TIMBER DECKING WWW.TDCA.ORG.UK 1 2 3 4 BUILDERS GUIDE TO TIMBER DECKING TIMBER DECKS CAN EITHER BE ATTACHED TO A PROPERTY OR FREE-STANDING. THE COMPLEXITY OF BUILD VARIES DEPENDING ON
ENVIROBUILD.COM +44 (0) FSC Trademark Licence: FSC C007915
 FSC Trademark Licence: FSC C007915") ENVIROBUILD.COM FSC Trademark Licence: FSC C007915 2 3 COMPOSITE BENEFITS Hyperion wood-polymer composite decking (WPC Decking) is made from 60% FSC certified recycled wood and 40% recycled High Density
ENVIROBUILD.COM FSC Trademark Licence: FSC C007915 2 3 COMPOSITE BENEFITS Hyperion wood-polymer composite decking (WPC Decking) is made from 60% FSC certified recycled wood and 40% recycled High Density
PATENTS ARE PENDING. Building Dimensions. Exterior Dimensions Roof Edge to Roof Edge
 Assembly Manual 8x9 PATENTS ARE PENDING Approximate Size 7640303 Storage Area Building Dimensions Exterior Dimensions Roof Edge to Roof Edge Interior Dimensions Wall to Wall Sq. Ft. Cu. Ft. Width Depth
DECKING INSTALLATION, CARE & MAINTENANCE INSTRUCTIONS MOISTURESHIELD.COM limited lifetime warranty
 DECKING INSTALLATION, CARE & MAINTENANCE INSTRUCTIONS 866.729.2378 MOISTURESHIELD.COM limited lifetime warranty Welcome To The Even Greater Outdoors. Congratulations on choosing MoistureShield for your
Chapter 2 Understanding The Problem
 Chapter 2 Understanding The Problem What Causes Most Of The Problems With Stucco? EIFS was originally intended to seal and insulate the exterior of the home from the elements. Problems occur when poorly
Proudly Made in the U.S.A. 5-Year Warranty. Wayfinding Products
 5-Year Warranty Proudly Made in the U.S.A. Wayfinding Products Proudly Made in the U.S.A. Directional Bar Tile surface mount or cast-in-place replaceable (wet-set) Bar Tile and Guide Tile units shall be
D ECKING F A S TENI N G
 D ECKING F A S TENI N G Low Maintenance Extremely Durable Leading Warranty Deck shown in Terrain Stone Ash The Tough & True Deck Deck shown in Silver Maple DECKING Terrain Collection The Terrain Collection
Homeowner. For the. Superior color retention. Resistant to decay and mold. Scratch resistant
 For the Homeowner Superior color retention Resistant to decay and mold Scratch resistant Industry-leading ratings for mechanical strength and durability Easy to install Unique brushed finish that looks
LAMINATE GENERAL INSTALLATION INSTRUCTIONS FOR DROP LOCK FLOORING
 LAMINATE GENERAL INSTALLATION INSTRUCTIONS FOR DROP LOCK FLOORING WARNING Prior to installation, please ensure that the product received is the correct style and color as well as to the customer s satisfaction.
LAMINATE GENERAL INSTALLATION INSTRUCTIONS FOR ANGLE-TO-ANGLE FLOORING
 LAMINATE GENERAL INSTALLATION INSTRUCTIONS FOR ANGLE-TO-ANGLE FLOORING WARNING Prior to installation, please ensure that the product received is the correct style and color as well as to the customer s
Bobbie. Deck Designer Specification Kit. All rights reserved copyright 2016 DIY Technologies. Page 1
 Deck Designer Specification Kit Page 1 Deck layout diagram Top view without planks Bottom view with planks Top view with planks Page 2 Deck Part Identification 1. Riser 2. Stringer 3. Tread 4. Fascia 5.
CLR & & 1. & 2. A 5/8 1,500 PSI
 Form #253574 Deck Boards & Components CTN QTY DESCRIPTION USE CALCULATION NOTES DECKING LF=linear feet DECK BOARD-5/4" LFT Bag 4/Skid 48 12' DECK BOARD-5/4" Bag 4/Skid 48 16' DECK BOARD-5/4" Bag 4/Skid
V 2.4. Hardwood Decking Installation Manual
 V 2.4 Hardwood Decking Installation Manual TABLE OF CONTENTS 1. Scope... 2 2. Health and Safety... 3 3. Site Preparation... 4 4. Pre-Installation... 4 5. Fixings... 5 6. Fixing Details for Decking... 6
Step up to the DuraLife Poly-Pro Advantage TM for Proven Performance & Durability
 Step up to the DuraLife Poly-Pro Advantage TM for Proven Performance & Durability Which Composite Decking is Right for You? DuraLife has a decking product to meet your specific design needs. Whether its
Installation Instructions
 Installation Instructions Flue Gas System Basic Kit GA-K - Chimney Flue Gas System for GB125 Oil Condensing Boiler For trained and certified installers Please read carefully prior to installation. 6 720
New Wood Technologies Canada
 New Wood Technologies Canada www.newwoodtech.com WPC AND 360 SHIELD CAPPING Wood plastic products are a new type of environmentalfriendly landscape material which are made from polyolefin plastic and fiber
Siding and Soffit Installation Guidelines
 Siding and Soffit Installation Guidelines email web phone 07 46 16 Longboard Siding & Soffit INTRODUCTION INSTALLATION GUIDELINES NOTE: These instructions are prepared for persons experienced in the field
Decking. Installation Instructions. fiberondecking.com Manufactured by
 Decking Installation Instructions Manufactured by fiberondecking.com 800.57.884 Decking installation instructions Getting started Follow local approved building codes. Careful planning of the finished
Nudo Guide Specification 03/01/2016 FiberScore FRP Wall Panels SECTION FIBERSCORE FIBERGLASS REINFORCED WALL PANELS
 SECTION 09 7720 FIBERSCORE FIBERGLASS REINFORCED WALL PANELS PART 1 - GENERAL 1.1 SUMMARY A. Section Includes: Prefinished polyester glass reinforced plastic sheets and adhered to unfinished [gypsum] [cementitous]
INSTALLATION GUIDE COMPOSITE DECKING
 www.eva-last.co.za COMPOSITE DECKING CONTENTS 1 Basic components of a deck 2 Tools & materials 2.1 Tools 2.2 Materials 3 Eva-Last specialised systems 3.1 HULK screws / Table1: HULK screws 3.2 G-STRUCT
Designed with the Fiberon Deck Design Tool
 Designed with the Fiberon Deck Design Tool All rights reserved copyright 2015 DIY Technologies Deck layout diagram Top view without planks Bottom view with planks Top view with planks Page 2 Deck Part
Siding and Soffit Installation Guidelines
 Siding and Soffit Installation Guidelines email web phone 07 46 16 Longboard Siding & Soffit INTRODUCTION INSTALLATION GUIDELINES NOTE: These instructions are prepared for persons experienced in the field
Conergy SolarFamulus II
 Conergy SolarFamulus II Installation manual www.conergy.com Table of Contents Table of Contents SolarFamulus II for universal use on flat roofs 1 Introduction 1 1.1 Short description 1 1.2 Intended use
INSTALLATION GUIDE DUOFUSE DECKING
 INSTALLATION GUIDE DUOFUSE DECKING We recommend reading through the entire installation instructions before starting, and check the website for the latest installation instructions. Plastivan disclaims
Composite Outdoor Decking, Cladding, Fencing, Railing, Deck Tiles and More
 TM The Number One Flooring Brand www.supremefloors.lk Composite Outdoor Decking, Cladding, Fencing, Railing, Deck Tiles and More CeyaCon (Pvt) Ltd. Showroom / Sales Office #10, School Lane, Colombo 03,
elegrodeck Decking Installation Guide MATERIALS LIST Joist Spacing Installing the Decking Boards
 can be cut and drilled in the same way as timber, however care should be taken to eliminate drill/saw-slip as this can mark the surface of the product. It is recommended that the decking boards are cut
EON DECKING INSTALLATION MANUAL. READ THIS BEFORE STARTING INSTALLATION Refer to Quick Tips on back cover for Do's and Don'ts EFFECTIVE 2005
 EON DECKING INSTALLATION MANUAL Welcome to eon, Natural Beauty that lasts. EFFECTIVE 2005 READ THIS BEFORE STARTING INSTALLATION Refer to Quick Tips on back cover for Do's and Don'ts CODES & STANDARDS
THERMOWOOD PLASTIC COMPOSITE (TWPC)
") ENGLISH THERMOWOOD PLASTIC COMPOSITE (TWPC) WWW.LUNAWOOD.COM LUNAWOOD THERMOWOOD PLASTIC COMPOSITE LUNA TWPC In construction projects, you need to have confidence in the materials used. Thanks to its unique
ENGLISH THERMOWOOD PLASTIC COMPOSITE (TWPC) WWW.LUNAWOOD.COM LUNAWOOD THERMOWOOD PLASTIC COMPOSITE LUNA TWPC In construction projects, you need to have confidence in the materials used. Thanks to its unique
Onduline covers the world. More than 100 countries across the globe
 Onduline covers the world Onduline was founded in 1950 to manufacture and market the now famous corrugated roofing sheets. The outstanding growth and success of Onduline in the last 60 years has seen the
Inspired by the beauty of wood. Decking, Railing & Deck Tile
 Inspired by the beauty of wood Decking, Railing & Deck Tile With Eon there s something for everyone Everyone needs a place to help them relax from the pressures of everyday life. That place is their outdoor
NovaDeck. NovaDeck is available in 5 colors and 3 different finishes, enriching the possibilities when designing.
 NovaDeck Natural wood textures with the highest resistance to UV radiation and other environmental factors such as chlorine, salt and extreme humidity. NovaDeck NovaDeck is an innovative composite decking
SPECIFICATIONS FOR DECK CONSTRUCTION
 www.ecowood.co.za SPECIFICATIONS FOR DECK CONSTRUCTION WHY USE ECOWOOD COMPOSITE DECKING? ECOWOOD is a mixture of wood flour and PVC which is pre-coloured and extruded in the shape of deck boards, in the
Installation Guidelines
 Installation Guidelines Siding Trim Accessories Soffit Rainware Mouldings Deck Fence Rail Window Profiles Pipe Fittings Material Storage, Safety & Tools Material Storage Royal Deck has been properly packaged
TRAPEZOIDAL SHEET METAL RAIL LIFT/VARIO for trapezoidal sheet metal roofs
 Photovoltaic mounting systems Assembly Instructions TRAPEZOIDAL SHEET METAL RAIL LIFT/VARIO for trapezoidal sheet metal roofs 1 Table of contents 1 Introduction 1.1 Intended use 3 1.2 About the document
EP Decking Inc. Installation Guide
 EP Decking Inc. Installation Guide www.epdecking.com EP Decking Inc. Installation Guide Calculating Material Requirements To calculate how many EP Decking pieces you will need, start by calculating the
COMPOSITE DECKING INSTALLATION MANUAL CLIP SYSTEM
 COMPOSITE DECKING INSTALLATION MANUAL CLIP SYSTEM PLEASE READ PRIOR TO INSTALLATION 2 Select the location of your decking carefully taking into account privacy, sun, shade and wind. Consider the layout
Install Instructions. Helix Z1. Important Information. Important:
 Congratulations, you have just purchased the highest quality entrance mat available. Proper installation is necessary to ensure that your warranty will be honored by Impact Specialties. Important Information
The use of wood putty, wood filler and wood stain for enhancement of the flooring should be accepted as normal.
 3/4 SOLID HARDWOOD STRIP AND PLANK FLOORING INSTALLATION INSTRUCTIONS FOR MECHANICALLY FASTENED, STAPLE, NAIL OR CLEAT APPLICATIONS I. GENERAL INFORMATION Owner/Installer Responsibility: Beautiful hardwood