BOLON BY YOU INSTALLATION INSTRUCTIONS ROLLS
|
|
|
- Maximilian Flynn
- 6 years ago
- Views:
Transcription
1 1 (5) THE MATERIAL The material is a woven vinyl product backed with glassfibre-reinforced vinyl. Since the material is a woven product, its structure is naturally irregular. The material is not approved for wet rooms. REQUIREMENTS 1.The sub-floor must be clean, dry and free from cracks. Any adhesion-impairing spots of paint, oil, etc. and any dust should be removed. Please note that asphalt, spillages of oil, impregnating agents and felt pen markings can cause discolouration. 2a.Necessary damp-proofing must be in place to prevent harmful moisture coming into contact with the flooring. Follow national rules and regulations with regard to moisture in floor structures. In the absence of such rules and regulations, use the following as guidelines. 2b. When laying this product, the RH in any sub-floor of normal structural concrete must not exceed 85 %. This value only applies to construction moisture. Measuring must always be performed by specially trained personnel. Sub-floors of sheet material are assumed to contain an 8 % moisture ratio (which corresponds to 40 % RH at +20 C), so that no movement occurs that may subsequently cause damage. In the event of any piping in floors, pipes must be laid so that the flooring material is not continuously exposed to temperatures higher than 30 C, as otherwise discolouration and other changes to the material can occur. This also applies to areas with underfloor heating. PREPARATIONS 1. Carefully remove all dust and loose particles. When using leveling compound, it is important to achieve the necessary strength and evenness. For best result subfloor eveness of max ±5mm/2m is recommended. Highly or unevenly absorbent sub-floors should be preglued with diluted floor adhesive (1:4). The pre-glued layer must be completely dry before commencing laying. Installation on an existing plastic covering is not recommended. With painted sub floors, there is a risk of discolouration. Existing paint must be removed. Use pencil for any markings. Use material from the same production batch. 4. Take into account incoming light and high-traffic areas when installing. Avoid joints across the material, since pattern matching is not possible. The lengths must be laid in the same direction (see arrow on reverse). INSTALLATION 1. Installation should take place at a room temperature of at least +18 C. The relative air humidity in the premises must be 30-60%. Higher levels of air humidity result in longer drying times and a risk of blistering. Use adhesives designed for vinyl flooring. Normal consumption is around 4 m2/litre of adhesive for absorbent sub-floors and around 5 m2/litre for non-absorbent sub-floors. Always employ sticky adhesive, even for absorbent subfloors. This is to avoid bubbles due to the flooring being stiff and not adhering firmly to the adhesive if it is wetglued. Be careful to ensure that the entire floor covering is in contact with the adhesive by using a heavy roller or similar. 4. Installation time depends on various things, including type of sub-floor, absorption capacity of sub-floor, temperature and humidity of the air in the room. INFO@
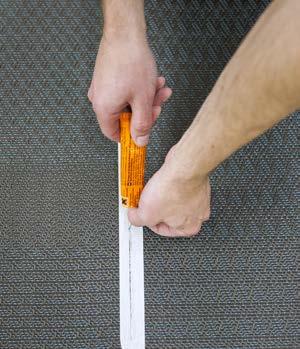
2 2 (5) IMPORTANT! The lengths are overlapped and then double-cut in order to achieve a tight seam (see images on page 3). Mark the location of the seam to facilitate the next stage. After installation, run a joint roller over the installation with a minimu pressure of 75 kg. WELDING The seams must always be chemically welded. Use chemical welding fluid TYPE A from Werner Müller or TYPE F from CeGe Floor with a pointed needle to get down into the seam. A welded seam has much greater strength, and you avoid future dirt accumulation in the seam. MISCELLANEOUS a, If the material is being installed on steps, mouldings must be used. b, Wheels on office chairs must be polyamide (hard type, designed for textile flooring). c, Furniture must have feet of teflon, polythene, stainless steel or similar. d, Certain types of rubber found in wheels of trolleys, entrance mats, etc. can cause discolouration in the form of migration. This type of discolouration cannot be removed. 1. Adhesive residues in the seam must be avoided since it will make the seam more visible and sensitive for dirt, also the strength will be less. To avoid adhesive in/around the seam, make sure that the adhesive is dry (12-24h) before cold welding. Apply masking tape over the seam and press the tape properly with your hand or a roller. Use Werner Mueller tape item no or an equivalent. Make a trial seam or weld a smaller distance first in order to ensure that the tape works with the cold welding liquid. Cut the tape at the seam with a rotary cutter or an ordinary straight mat knife. 4. Shake the tube of cold welding liquid and apply the liquid by pressing the needle deep down into the seam in order to ensure that the liquid penetrates down. Work with two hands by pressing the needle with one finger and squeezing the tube carefully with the other hand. Apply so that there is a 5-mm-wide layer of cold welding liquid on the tape. 5. Remove the tape after approx. 10 minutes by pulling carefully backwards. INFO@


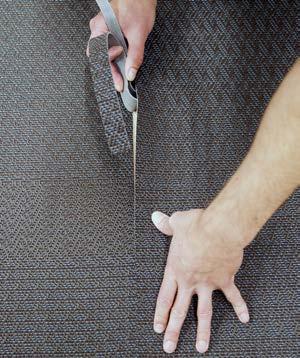
3 3 (5) LACE 1. Overlap 2 sheets of flooring 4 cm and double cut. The edge will be seen in the pattern but this is intentional. LACE LACE WEAVE 1. Overlap 2 sheets of flooring 4 cm and double cut. The edge will be seen in the pattern but this is intentional. WEAVE WEAVE INFO@


4 4 (5) DOT 1. Overlap 2 sheets of flooring 4 cm and double cut. Make sure do not cut in the big dots. DOT DOT GEOMETRIC 1. Overlap 2 sheets of flooring so the pattern repeat of two side-by-side squares is 15 cm. Cut so one square is about 7,5 cm. GEOMETRIC GEOMETRIC INFO@


5 5 (5) STRIPE 1. Overlap so the pattern over two stripes are about 6 cm. Cut so the stripe is around 3 cm. STRIPE STRIPE GRID 1. Overlap the entire smooth section over the mottled. Cut so that the smooth section is around 1.5 cm. The width of the mottled section is of secondary importance. GRID GRID INFO@
6 Bolon (3) INSTALLATION INSTRUCTIONS TILES THE MATERIAL The material is a woven vinyl product backed with glassfibre-reinforced vinyl. Since the material is a woven product, its structure is naturally irregular. The material is not approved for wet rooms. REQUIREMENTS 1.The sub-floor must be clean, dry and free from cracks. Any adhesion-impairing spots of paint, oil, etc. and any dust should be removed. Please note that asphalt, spillages of oil, impregnating agents and felt pen markings can cause discolouration. When installing on raised floor systems ensure that the panels are in level. Install the tiles randomly over the panels. Preferably use tackifier. 2a.Necessary damp-proofing must be in place to prevent harmful moisture coming into contact with the flooring. Follow national rules and regulations with regard to moisture in floor structures. In the absence of such rules and regulations, use the following as guidelines. 2b. When laying this product, the RH in any sub-floor of normal structural concrete must not exceed 85 %. This value only applies to construction moisture. Measuring must always be performed by specially trained personnel. Sub-floors of sheet material are assumed to contain an 8 % moisture ratio (which corresponds to 40 % RH at +20 C), so that no movement occurs that may subsequently cause damage. In the event of any piping in floors, pipes must be laid so that the flooring material is not continuously exposed to temperatures higher than 30 C, as otherwise discolouration and other changes to the material can occur. This also applies to areas with underfloor heating. PREPARATIONS 1. Carefully remove all dust and loose particles. When using leveling compound, it is important to achieve the necessary strength and evenness. For best result ± 3 mm/2 m and ± 1,2 mm/0,25 m or better is recommended. Highly or unevenly absorbent sub-floors should be preglued with diluted floor adhesive (1:4). The pre-glued layer must be completely dry before commencing laying. Installation on an existing plastic covering is not recommended. With painted sub floors, there is a risk of discolouration. Existing paint must be removed. Use pencil for any markings. 4. Before installation, material, adhesive and sub-floor must be allowed to adjust to room temperature, i.e. a temperature of at least +18 C. The relative air humidity must be %. Higher levels of air humidity result in longer drying times and a risk of blistering. INSTALLATION 1. Make sure that the tiles have adjusted to room temperature before installation and that the boxes of tiles are on a level surface. Acclimatisation can take several days for complete pallets. Installation should take place at a room temperature of at least +18 C. The relative air humidity in the premises must be 30-60%. Higher levels of air humidity result in longer drying times and a risk of blistering. Use adhesives designed for vinyl flooring. 4. Employ wet gluing for absorbent sub-floors. With sealed sub-floors (e.g. damp-proofed sub-floor), use late wet gluing to early sticky gluing. Late sticky gluing will result in a poorer glue joint and you also run the risk of the glued edges standing out from the surface of the flooring. Normal consumption is around 4 m2/litre of adhesive for absorbent sub-floors and around 5 m2/litre for non-absorbent sub-floors. Installation time depends on various things, including type of sub-floor, absorption capacity of sub-floor, temperature and air humidity in the room. Tackifier can be handy to use if it is necessary to be able to lift the tiles, e.g. installation on raised floor systems. INFO@
7 Bolon (3) INSTALLATION INSTRUCTIONS TILES For best results, the tiles should be turned one quarter-turn to form a chequered pattern. It also works to lay the tiles in the same direction. If this is the case, we recommend laying the tiles using a so-called bricklay, i.e. offset half a tile to the side. This gives a more uniform result than laying with a continuous joint, which is also possible (see images on page 3). For best result if installing as figure 2 or 3, the tiles shall be mixed before installation. 4. As it takes time to cut edge tiles, it may be best to spread adhesive on the area where complete tiles will be laid first. Once this is done, cut all edge tiles and lay them at the same time. 5. After installation, run a joint roller over all joints lengthways and crossways with a minimum pressure of 75 kg. Since the material is a woven fabric with natural variations in structure, slight differences in shade may be seen if the tiles are laid in the same direction. Take note of the direction of the arrow on the reverse. Bolon tiles should be installed using traditional installation methods for flooring tiles. 1. It is usual to begin installation from the centre of the room. In corridors and small rooms it may be simpler to work from one side to the other and use the centre line as a guide mark. The centre line can be drawn out as follows: Draw a line from the centre between two of the walls. Then draw the second line to form a cross with the other line. To achieve a right angle, the 3:4:5 method can be used. MISCELLANEOUS a, If the material is being installed on steps, mouldings must be used. b, Wheels on office chairs must be polyamide (hard type, designed for textile flooring). c, Furniture must have feet of teflon, polythene, stainless steel or similar, without sharp edges. d, Certain types of rubber found in wheels of trolleys, entrance mats, etc. can cause discolouration in the form of migration. This type of discolouration cannot be removed. Begin laying tiles at the centre point. Work outwards from the first tile, creating a pyramid. Continue in this way until the first quarter of the floor is complete. Be careful to follow the guidelines and ensure that the tiles fit closely together. If the first tiles do not follow the guidelines, this will affect the whole process. Only spread adhesive over an area of a size that can be covered with tiles while the adhesive retains the right consistency. INFO@
8 Bolon (3) INSTALLATION INSTRUCTIONS TILES 1. Tiles turned one quarter-turn to form a chequered pattern. Tiles in a so-called bricklay, i.e. offset half a tile to the side. Tiles with a continuous joint. INFO@
BOLON BY JEAN NOUVEL DESIGN INSTALLATION INSTRUCTIONS ROLLS
 1 (2) INSTALLATION INSTRUCTIONS ROLLS THE MATERIAL The material is a woven vinyl product backed with glassfibre-reinforced vinyl. Since the material is a woven product, its structure is naturally irregular.
INSTALLATION INSTRUCTIONS FOR ARTISAN ROLL
 1 (2) The material The material is woven vinyl flooring backed with glassfibre-reinforced vinyl. Since the material is a woven product, its structure is naturally irregular. The material is not approved
ARTISAN INSTALLATION INSTRUCTIONS ROLLS
 Bolon 2016-02-01 1 (3) INSTALLATION INSTRUCTIONS ROLLS THE MATERIAL The material is a woven vinyl product backed with glassfibre-reinforced vinyl. Since the material is a woven product, its structure is
BOLON BY JEAN NOUVEL DESIGN
 1 (4) INSTALLATION INSTRUCTIONS ROLLS - BOLON GREEN WELDING THE MATERIAL The material is a woven vinyl product backed with glass fiber reinforced vinyl. Since the material is a woven product, its structure
BKB INSTALLATION INSTRUCTIONS ROLLS - BOLON GREEN WELD
 1 (4) INSTALLATION INSTRUCTIONS ROLLS - BOLON GREEN WELD THE MATERIAL The material is a woven vinyl product backed with glass fiber reinforced vinyl. Since the material is a woven product, its structure
ARTISAN INSTALLATION INSTRUCTIONS ROLLS - BOLON GREEN WELD
 1 (4) INSTALLATION INSTRUCTIONS ROLLS - BOLON GREEN WELD THE MATERIAL The material is a woven vinyl product backed with glass fiber reinforced vinyl. Since the material is a woven product, its structure
BOLON BY MISSONI INSTALLATION INSTRUCTIONS ROLLS - BOLON GREEN WELD
 1 (4) INSTALLATION INSTRUCTIONS ROLLS - BOLON GREEN WELD THE MATERIAL The material is a woven vinyl product backed with glass fiber reinforced vinyl. Since the material is a woven product, its structure
GRAPHIC INSTALLATION INSTRUCTIONS ROLLS - BOLON GREEN WELD
 1 (5) INSTALLATION INSTRUCTIONS ROLLS - BOLON GREEN WELD THE MATERIAL The material is a woven vinyl product backed with glass fiber reinforced vinyl. Since the material is a woven product, its structure
CREATE INSTALLATION INSTRUCTIONS ROLLS - BOLON GREEN WELD
 1 (4) INSTALLATION INSTRUCTIONS ROLLS - BOLON GREEN WELD THE MATERIAL The material is a woven vinyl product backed with glass fiber reinforced vinyl. Since the material is a woven product, its structure
Bolon Plank. Installation Guidelines. bolon.theandrewsgroup.com.au
 Bolon Plank bolon.theandrewsgroup.com.au bolon@theandrewsgroup.com.au 01 Bolon Bolon is a woven flooring backed with glass fibre-reinforced PVC. Since the material is a woven product, its structure is
Rigid Core Installation & Maintenance Instructions
 Rigid Core Installation & Maintenance Instructions Suitability Rigid Core Click Vinyl Flooring is completely waterproof floating floor and has got exceptional acoustic and insulation properties due to
Installation and Maintenance instructions
 PVC Floorcovering Resilient Residential Installation and Maintenance instructions February 2014 IMPORTANT! Make sure all specifications and instructions are followed carefully. Floor covering exclusively
Texline Ideal loose lay
 Installation Guide Texline Ideal loose lay When installed correctly Gerflor Texline s patented construction makes it an ideal loose lay solution since it does not expand or contract with changing weather.
INSTALLATION. The no mess, fast and easy, Peel & Stick flooring underlay and installation system... Quick Glance - Features and Benefits
 The no mess, fast and easy, Peel & Stick flooring underlay and installation system... Ezy-Install is a new, environmentally friendly, acoustic underlay and flooring installation system with a unique Peel
Installation and general maintenance instructions Leoline
 Installation and general maintenance instructions Leoline www.leoline.co.uk Installation & Maintenance The installation of Leoline floors is straightforward and follows the same guidelines that apply to
Installation and general maintenance instructions Leoline
 Installation and general maintenance instructions Leoline www.leoline.ie Installation & Maintenance The installation of Leoline floors is straightforward and follows the same guidelines that apply to all
Installation manual Number TV 02/2016 HE floor coverings Date Pages 5. Tarkett Vinisin Branch of Kalush
 Tarkett Vinisin Branch of Kalush Installation manual Number TV 02/2016 HE floor coverings Date 06-2016 Pages 5 Requirements related to the background When installing flexible floor coverings it is very
HYBRID. Pre-Laying Checks
 Warning Veles CK has been developed for exceptional stability in low and high temperatures, however, after installation extreme temperatures (under 5 C or over 50 C) should be avoided by use of interior
Installation Instruction
 Installation Instruction Transport & storage 1 Handling 2 Subfloor control 3 Installation 4 Reminder Exclusive 260 Honeycomb Tile Blue 5 1. TRANSPORT & STORAGE 2. HANDLING In general the rolls must be
For wooden fabricated underlay e.g. plywood, care must be taken to store the material in an area where it will not become damp or contaminated.
 Page 1 The preparation/dryness of the subfloor and installation procedures should all be as BS 8203: 2001. i.e.: The relative humidity of a solid subfloor should be below 75%RH when tested with a Hygrometer
INSTALLATION INSTRUCTIONS - Please read before installation
 INSTALLATION INSTRUCTIONS - Please read before installation The floor panels should be transported in a lying down position. Floor panels should be stored in this position in their unopened packages in
Modular Resilient Flooring. LVT Installation Guide
 Modular Resilient Flooring LVT Installation Guide Preparation It is recommended that modular resilient floor covering installation shall not begin until all other trades are completed. 1. Storage, handling
Installation Instructions for Vinyl Back Ipocork Glued Down HPS Finish Cork Tiles
 Transport, Storage and Acclimation: Transport and store the cartons or tiles in the flat position. Store the tiles at room temperature for at least 48 hours, in their packaging, prior to installation.
Signature Sports Flooring Installation Instructions. For SignaDeck Premium Rubber Tiles
 Signature Sports Flooring Installation Instructions For SignaDeck Premium Rubber Tiles These instructions supersede any verbal or written instructions from Signature Sports Flooring representatives and
Tarkett Carpet Tile Installation Guide
 Tarkett Carpet Tile Installation Guide 1 Inspecting and preparing floor surfaces When fitting carpet and carpet tiles, the subfloor always demands special attention. The subfloor quite literally forms
Installation and general maintenance instructions Leoline
 Installation and general maintenance instructions Leoline Installation & Maintenance The installation of Leoline floors is straightforward and follows the same guidelines that apply to all quality resilient
1. PREPARATION 2. INSTALLATION 3. FINISHING 4. MAINTENANCE
 In the following text vinyl floor(s) refers to floors from the Quick-Step Livyn Ambient Glue+ and Balance Glue+ collections. The branded accessories refer to the specific Quick-Step vinyl accessories.
optimum glue Preparation INSTALLATION INFORMATION We recommend to order all panels for the same commercial flooring project at the same time.
 Preparation We recommend to order all panels for the same commercial flooring project at the same time. Always store and transport your vinyl floor carefully to prevent distortions. Store and transport
Installation Guidance Note: Allura Flex
 Installation Guidance Note: Allura Flex General Advice The appearance, performance and durability of the installed floorcovering will be determined to a large extent by the quality of the prepared subfloor
INDOOR RUBBER FLOORING INTERLOCKING INSTALLATION / MAINTENANCE GUIDELINES MARATHON SERIES. Four-Side Interlock Loose Lay Installation
 INDOOR RUBBER FLOORING INTERLOCKING INSTALLATION / MAINTENANCE GUIDELINES MARATHON SERIES Four-Side Interlock Loose Lay Installation The following pages are guidelines only... please read this manual thoroughly
INSTALLATION INSTRUCTIONS FOR WICANDERS HYDROCORK
 INSTALLATION INSTRUCTIONS FOR WICANDERS HYDROCORK GENERAL INFORMATION Hydrocork floors are intended for indoor use only. Please read the following instructions before installation. Hydrocork connection
StrataWorx Tile. Installation Guidelines 1. CONDITION YOUR SITE AND TEST 2. PREPARE THE FLOOR
 Notice: For best results, review the following guidelines prior to installation. Shaw will not be responsible for improper installation and failure to follow these guidelines may result in limiting warranty
Installation ECOWORX / ECOLOGIX INSTALLATION 1. CONDITION YOUR SITE AND TEST 2. PREPARE THE FLOOR
 ECOWORX / ECOLOGIX INSTALLATION Notice: For best results review the following guidelines prior to installation. Shaw will not be responsible for improper installation and failure to follow these guidelines
GLUE-DOWN INSTALLATION VIRTUO 30 / 55
 Before laying the flooring, it is a good idea to inspect it and to identify any problems with the appearance. If there are any visible defects, please notify GERFLOR and wait to hear from them before laying
For wooden fabricated underlay e.g. plywood, care must be taken to store the material in an area where it will not become damp or contaminated.
 Page 1 The preparation/dryness of the subfloor and installation procedures should all be as BS 8203: 2001. i.e.: The relative humidity of a solid subfloor should be below 75%RH when tested with a Hygrometer
INSTALLATION INSTRUCTIONS FOR HYDROCORK AS GLUE DOWN
 INSTALLATION INSTRUCTIONS FOR HYDROCORK AS GLUE DOWN GENERAL INFORMATION Hydrocork floors are intended for indoor use only. Please read the following instructions before installation. PRIOR TO INSTALLATION
Tarkett Vylon Plus, Standard Plus, Somplan Plus, Contract Plus Tiles & Sheet
 METHOD STATEMENT Tarkett Vylon Plus, Standard Plus, Page 1 The preparation/dryness of the subfloor and installation procedures should all be as BS 8203: 2001. i.e.: The relative humidity of a solid subfloor
Moisture Requirements Moisture testing must be performed. Patcraft requires the use of the following test methods:
 Installation LokDots TM Ecoworx Tile Installation System Notice For best results review the following guidelines prior to installation. Shaw will not be responsible for improper installation and failure
Modular Carpet. Installation Instructions. Ecoflex AIR Cushion Back Ecoflex ICT Vinyl Back Ecoflex NXT PVC Free Back
 Modular Carpet Installation Instructions Ecoflex AIR Cushion Back Ecoflex ICT Vinyl Back Ecoflex NXT PVC Free Back 160 South Industrial Blvd. Technical Services Department Calhoun, GA. 30701 508 East Morris
Installation Guide. LooseLay Flooring
 Installation Guide LooseLay Flooring Before you Start Things to Consider The following are guidelines for installing MAXX Floors LooseLay Vinyl Flooring. 1. All areas where the product will be installed
Tufted and Woven Goods Direct Glue-Down
 Tufted and Woven Goods Direct Glue-Down Installation Instructions Duraloc AIR Duraloc AIR Performance Unibond Flex Unibond Flex Bloc Unibond Laminate Unibond Plus Unibond Plus Bloc Weldlok Weldlok Bloc
Modular Carpet Tile Installation Instructions
 Modular Carpet Tile Installation Instructions UltraSet Vinyl Back 160 South Industrial Blvd. Calhoun, GA. 30701 Dalton, GA 30721 www.mohawkflooring.com Technical Services Department 508 East Morris St.
premium click optimum click
 5 golden rules Install your floor between 18 and 30 C. 48h Pergo Vinyl must be acclimatized in the room of installation between 18-30 (64-86 F) for a period of at least 48 hours before installation. This
Installation and general maintenance instructions Design Floors Dryback
 Installation and general maintenance instructions Design Floors Dryback Installation & Maintenance The installation of Design Floors is straightforward and follows the same guidelines that apply to all
2. Subfloor Preparation - Removal of Existing Floor Coverings
 Generic Scope of Works - Forbo Sure Step and Safe Step Sheet Vinyls 1) Subfloor Preparation - New Concrete Floors 2) Subfloor Preparation Preparing Existing Concrete / Removal of Existing Floorcoverings
Installation Instructions for Hercules Rib 52
 Page 1 of 5 Installation Instructions These instructions supersede any verbal or written instructions from connexus representatives, and must be followed in order for the warranty to be in effect. Delivery
hüma PARKETTSYSTEM GmbH INSTALLATION GUIDE
 hüma PARKETTSYSTEM GmbH INSTALLATION GUIDE www.huema.co.uk Content Content GENERAL INFORMATION... 4 INSTALLATION NOTES... 6 ACCLIMATISATION... 6 CHECK FOR FAULTS IN THE MATERIAL... 6 REQUIREMENTS FOR
VINYL COMPOSITION TILE
 ASSET Reference Specification ASTM F 1066-99 Standard Specification for Vinyl Composition Floor Tile Products: Azrock s Vinyl Composition Tile -Standard Price Products -Premium Priced Products -Slip Resistant
FlexLok Adhesive Tabs for Carpet Tile
 FlexLok Adhesive Tabs for Carpet Tile INSTALLATION EcoFlex ICT EcoFlex NXT 160 South Industrial Blvd. Calhoun, GA. 30701 MohawkGroup.com Technical Services Department 508 East Morris St. Dalton, GA 30721
Berkshires Glueless and Full Spread Installation Instructions
 INSTALLATION INSTRUCTIONS Berkshires Glueless and Full Spread Installation Instructions March 22, 2012 PRIOR TO INSTALLATION Carefully check flooring material for any defects. Contact your supplier immediately
The following instructions should be reviewed prior to installation. Shaw Industries will not be responsible for improper installation.
 Installation of Shaw Contract Group Modular Carpet (Ecoworx, Ecoworx ES, Ecologix, Ergoflex, Ergoflex ES) INSTALLATION GUIDELINES The following instructions should be reviewed prior to installation. Shaw
PREMIUM LUXURY VINYL FLOORING LOOSE LAY INSTALLATION & MAINTENANCE
 PREMIUM LUXURY VINYL FLOORING LOOSE LAY INSTALLATION & MAINTENANCE All instructions and recommendations are based on the most recent information available. If you receive a printed copy of these instructions,
LOOSE LAY INSTALLATION GUIDE PAGE 1 of 6
 INSTALLATION GUIDE PAGE 1 of 6 MATERIALS REQUIRED FOR INSTALLATION: Tape Measurer Square Ruler Utility Knife 100lb Roller (if using adhesive) ACCEPTABLE SUBFLOORS: Happy Feet International will not warrant
premium click optimum click
 1 In order to obtain a good result, we advise to follow all given instructions carefully. PREPARATION We recommend to order all panels for the same flooring project at the same time. 2 Always store and
Installation Guide Acoustic Carpet Tiles
 Installation Guide Acoustic Carpet Tiles Contents Preface 2 Floor Requirements 2 Tile Installation 3 Stair Installation 4 Product Warranty 5 Recommendations 7 Preface Preface for Australian Installation
For wooden fabricated underlay e.g. plywood, care must be taken to store the material in an area where it will not become damp or contaminated.
 Page 1 1.30MM VERTICAL AND T The preparation/dryness of the wall / subfloor and installation procedures should all be as BS 476. i.e.: The relative humidity of the wall must be below 75%RH when tested
PURE INSTALLATION MANUAL
 INSTALLATION MANUAL Pure Click 40 is an LVT floor, designed for use in residential areas. Pure Click 55 is suited for both residential and commercial areas such as shops, hotel rooms, etc. To obtain a
INSTALLATION INSTRUCTIONS
 1 of 6 INSTALLATION INSTRUCTIONS IMPORTANT! Store the floorboards at room temperature for at least 48 hours, still in their packaging, prior to commencing installation. Ideal room temperature is 18-22
INSTALLATION MANUAL FULLY ADHERED INSTALLATIONS
 SHOCKPAD BL41 MANUAL FULLY ADHERED S Manufactured in the U.S.A. by: Revised 07/08/2015 Supersedes all previous versions. Check website for updates. 866-795-2732 www.ecoreathletic.com 1 TABLE OF CONTENTS
Installation Guidance Note: Flotex Sheet
 General Advice The appearance, performance and durability of the installed floorcovering will be determined to a large extent by the quality of the prepared subfloor and the conditions in which they are
Installation instruction
 TACKY TILE Installation instruction Introduction Tacky Tile has a Tacky technology backing that bonds firmly but not permanently to the subfloor, making installation easy, fast and clean. If at any time
Installation Instructions. Important. Recommended Tools. Palladium Rigid Sheet/Rubrail or Palladium G2 Sheet/Rubrail. Storage
 Important Storage Flat sheet - Store Palladium Rigid Sheet in a clean, dry, interior area at temperatures between 50 F and 95 F [10-35 C]. Keep out of direct sunlight. Make sure sheet is well supported.
Estillon bv P.O. box 121 NL 6600 AC WIJCHEN Tel: +31 (0) Website:
 Website:") Egalsoft,, an underlay brand which stands for experience, quality and reliability! Egalsoft is a unique self adhesive underlay which provides durability, comfort and an easy installation. Egalsoft s self
Egalsoft,, an underlay brand which stands for experience, quality and reliability! Egalsoft is a unique self adhesive underlay which provides durability, comfort and an easy installation. Egalsoft s self
WATER TUFF VINYL FLOORING ATTENTION! READ BEFORE INSTALLING! Angle-Tap Installation Instructions
 WATER TUFF VINYL FLOORING ATTENTION! READ BEFORE INSTALLING! Angle-Tap Installation Instructions FLOORING MATERIAL SHOULD BE INSPECTED PRIOR TO INSTALLATION Responsibility for the suitability of this flooring
A. Work of this Section, as shown or specified, shall be in accordance with the requirements of the Contract Documents.
 PART 1 GENERAL 1.1 GENERAL REQUIREMENTS A. Work of this Section, as shown or specified, shall be in accordance with the requirements of the Contract Documents. 1.2 SECTION INCLUDES A. Work of this Section
INSTALLATION INSTRUCTIONS
 INSTALLATION INSTRUCTIONS Dear customer, Thank you for buying our veneer Par-ky floor. Please read our installation instructions carefully. If these instructions are not followed, the installer will be
American Guild Vinyl Flooring - Steadcrest Collection Installation Instructions
 American Guild Vinyl Flooring - Steadcrest Collection Installation Instructions Recommended Adhesive: DuChâteau DUAG-58 Premium Resilient Flooring Adhesive Available in 1- and 4-gallon containers, DUAG-58
IVC US. Light Commercial Installation Guide - Sheet Vinyl. Leading the Way
 IVC US Light Commercial Installation Guide - Sheet Vinyl Leading the Way v. 5/2013 IVC US Light Commercial Installation Guide - Sheet Vinyl Flooring IVC US recommends the following guidelines for preparation
Installation Instructions
 Installation Instructions 160 South Industrial Blvd. Technical Services Department Calhoun, Georgia 30701 508 East Morris St. Dalton, Georgia 30721 www.mohawkgroup.com 800.833.6954 2 Carpet Installation
USA USA USA PURE CLICK
 MADE IN BELGIUM MADE IN BELGIUM 0. MADE IN BELGIUM 100 % QUALITY USA USA USA 100 100 % % QUALITY QUALITY PURE CLICK CLICK CLICK DESIGN CLICK DESIGN FLOOR FLOOR INSTALLATION MANUAL 2 Pure Click 40 is a
Technical Service. INSTALLATION INSTRUCTIONS FOR TARAFLEX SPORT PRODUCTS over Gypsum base Products. This document refers to the following products:
 INSTALLATION INSTRUCTIONS FOR TARAFLEX SPORT PRODUCTS over Gypsum base Products This document refers to the following products: Product Width Width Ft. Installation direction Seams treatment Taraflex Surface
glue E Installation instructions General Acclimatization and storing conditions Subfloor
 E Installation instructions General glue 1. We recommend to order all panels for the same flooring project at the same time. Compatibility of panels in repeated orders cannot be guaranteed. 2. Make sure
PARKAY XPR Installation Instructions (Architect Collection)
") Parkay Floors 1-855-5-PARKAY www.parkayfloors.com PARKAY XPR Installation Instructions (Architect Collection) BEFORE YOU START PARKAY XPR FLOORING has a patented locking system making it ideal for a floating
Parkay Floors 1-855-5-PARKAY www.parkayfloors.com PARKAY XPR Installation Instructions (Architect Collection) BEFORE YOU START PARKAY XPR FLOORING has a patented locking system making it ideal for a floating
be installed while the adhesive is wet for better pattern matching capabilities. Concrete floors must be sealed if dusting or powdering exists. The fo
 Installation of Commercial Broadloom Products lbs. per 1000 sq. ft. per 24 hours. Do not begin the installation if a higher moisture transmission rate is detected. Do not use other methods of moisture
Laying instruction. Needle felt carpet
 Laying instruction Needle felt carpet Edition: 01/2018 Contents Introduction 3 1. Preparation 1.1. Material check 4 1.2. Material storage 4 1.3. Acclimatisation 4 2. Subfloors / examinations / underlays
Technical Services. Product MM INCH Installation direction Seam treatment GTI CONTROL (welded) 625 X 625 mm 24.5 x 24.
 625 X 625 mm 24.5 x 24.") INSTALLATION INSTRUCTIONS FOR GTI CONTROL TILES This document refers to the following products: Product MM INCH Installation direction Seam treatment GTI CONTROL (welded) 625 X 625 mm 24.5 x 24.5 Same
INSTALLATION INSTRUCTIONS FOR GTI CONTROL TILES This document refers to the following products: Product MM INCH Installation direction Seam treatment GTI CONTROL (welded) 625 X 625 mm 24.5 x 24.5 Same
Installation Instructions. Suitable: Glued down carpets Parquet: adhesive remnants
 Installation Instructions Sigaway Dry Installation Method Using the old covering instead of tearing it out. For carpet Information regarding suitability Floor coverings Suitable existing sub-surfaces Suitable:
Maintenance Guide Runners and Rugs Blinds and Curtains Felt pads Scratch cover products Ventilation and climate control
 Maintenance Guide GAT floating floors require little maintenance and always greatly benefit from regular care and protection. In doing so, the life of the floor finish and floor are greatly enhanced. Runners
PURE INSTALLATION MANUAL
 INSTALLATION MANUAL Pure Click 40 is an LVT floor, designed for use in residential areas. Pure Click 55 is suited for both residential and commercial areas such as shops, hotel rooms, etc. To obtain a
VESDURA VINYL PLANKS 7.5MM WPC CLICK LOCK - AMERICANA COLLECTION
 VESDURA VINYL PLANKS 7.5MM WPC CLICK LOCK - AMERICANA COLLECTION Before You Start Click lock vinyl plank flooring is normally laid without adhesive. Before installation, planks must be allowed to acclimatize
VESDURA VINYL PLANKS 5.5MM WPC CLICK LOCK - AMERICANA COLLECTION
 VESDURA VINYL PLANKS 5.5MM WPC CLICK LOCK - AMERICANA COLLECTION Before You Start Click lock vinyl plank flooring is normally laid without adhesive. Before installation, planks must be allowed to acclimatize
Stop and Read Before Installing Material
 Premium Dry Erase Materials Installation procedures for full wall application with woven and nonwoven backed products Stop and Read Before Installing Material Installation Procedures EXAMINATION Jot.a.wall
Installation Instructions. Distributed by:
 Installation Instructions Distributed by: 2 Carpet Installation Check off List 1. Newly poured concrete floors generally will take 30 days per 2.54cm to cure. Moisture should not exceed 2.26kg /1000sf
COMMERCIAL LINOLEUM SHEET FLOORING
 COMMERCIAL LINOLEUM SHEET FLOORING Installation System SEAMING OPTIONS Highly Recommended Optional Optional Required Full-Spread/S-760 Full-Spread/ Full-Spread/ Full-Spread/ May Flash and Heat Weld Seams
AttainSilence & Attain
 AttainSilence & Attain Attain 4.2mm Click over 1mm ECOsilence, Attain 4.2mm Click AttainSilence Click 4.2.1 & Attain Click 4.2 Technical Manual Installation Maintenance Warranty Manufactured in the U.S.A.
ELECTROSTATIC FLOORING Installation Instructions
 ELECTROSTATIC FLOORING Installation Instructions Toro EL and Granit AS (Sheet and Tile) HANDLING AND STORAGE 1. Johnsonite Electrostatic Flooring and adhesives must be site conditioned at room temperature
Product Size Thickness Installation direction Seams treatment
 INSTALLATION INSTRUCTIONS FOR GERFLOR SAGA 2, CREATION TILES AND PLANKS This document refers to the following products: Product Size Thickness Installation direction Seams treatment Creation Tiles See
INSTALLATION INSTRUCTION
 INSTALLATION INSTRUCTION EGGER LAMINATE FLOORING with glueless locking system just clic! www.egger.com INSPECTION RESPONSIBILITY / SUB FLOORS 1. INSPECTION RESPONSIBILITY Laminate flooring from EGGER is
Instructions for laying Parmate Engineered Flooring
 Instructions for laying Parmate Engineered Flooring Before installation The condition of the underlying substrate is extremely important. An uneven, physically weak or inappropriate substrate will affect
SOLID HARDWOOD FLOORS INSTALLING WITH CLIPS
 TIPS AND GUIDANCE SOLID HARDWOOD FLOORS INSTALLING WITH CLIPS CREATING EXCEPTIONAL SPACES BEFORE INSTALLING..! The building must be weather tight. The heating system must be installed, tested and during
TEXAS GRANITE COMMERCIAL VINYL TILES
 SITE CONDITIONS 1. Store the flooring and adhesive in the installation area. 2. The temperature must be kept between 18 C (65 F) and 24 C (75 F) for 48 hours before, during and after installation. 3. Both
Mohawk SolidTech. SolidTech Installation Guidelines. Preparation
 55 85ºF (13 30ºC) Preparation We recommend placing a single order for all cartons required for a commercial flooring project. 1. Always store and transport SolidTech Luxury Vinyl Flooring on a flat surface
INSTALLATION INSTRUCTIONS FOR WICANDERS DEKWALL
 INSTALLATION INSTRUCTIONS FOR WICANDERS DEKWALL GENERAL INFORMATION Wicanders Dekwall coverings are intended for indoor use only. Please, read the following instructions before installation. Store tiles
Carpets Installation Guidelines
 Carpet and Carpet Tile Data Sheet: Page 1 of 5 May 2013 Preface These sheets have been compiled to present a basic overview of procedures when installing Gradus carpets. It has been designed as a guide
Commercial Resilient Sheet Flooring
 Commercial Resilient Sheet Flooring INSTALLATION 160 South Industrial Blvd. Calhoun, GA. 30701 MohawkGroup.com Technical Services Department 508 East Morris St. Dalton, GA 30721 800.833.6954 product_tech@mohawkind.com
WARNING: SHOULD THE INSTALLATION SEQUENCE NOT FOLLOWED. THE INSTALLATION WILL FAIL IMPORTANT: SEE PAGE 6 0F THIS DOCUMENT
 WARNING: SHOULD THE INSTALLATION SEQUENCE NOT FOLLOWED. THE INSTALLATION WILL FAIL IMPORTANT: SEE PAGE 6 0F THIS DOCUMENT Gerflor GTI CONNECT & ATTRACTION Tiles Installation Instructions 20160919-413 Page
Installation Recommendations noraplan floor coverings
 Installation Recommendations noraplan floor coverings The subfloor must fulfil the requirements of the country-specific standards regarding the readiness for installation. At the time of installation and