YOUR STEP-BY-STEP GUIDE TO THE PERFECT INSTALLATION. Non-Lit Magnifying Mirrors
|
|
|
- Daniel Bruce
- 6 years ago
- Views:
Transcription


1 YOUR STEPBYSTEP GUIDE TO THE PERFECT INSTALLATION NonLit Magnifying Mirrors you can view our complete range online,
2 Thank you for choosing a Thermogroup product. Our commitment to simple, honest, ontime quality service ensures that we are here to help throughout every stage of your project from idea to installation and, most importantly, after sales support. This instruction manual provides a stepbystep guide to a perfect installation as well as details on the warranty and how to get Technical Support should you need it. To ensure a safe, hasslefree installation please take the time to read this guide in full before you start. This product is covered by a 1 Year warranty, subject to terms and conditions. Be sure to keep the receipt as proof of purchase, this will be required to validate your warranty. If you have any questions about your Ablaze Magnifying Mirror or any of our other products call our Technical Support team on We will do our best to find a solution and will always give that little bit extra. Read and understand this installation guide in full before installation Take note of how to suitably care for and maintain your product Do not commence to complete any maintenance work unless you are fully qualified or have spoken to the supplier Call our technical helpline for free on


3 : Begin by determining the appropriate location and height. We recommend approximately 150cm from the floor if the mirror is to be used while standing, and 120cm from the floor if used while seated. Remove the unit from its packaging and lay it carefully on a stable surface on top of the product bag so that it does not get scratched. Remove wall mounting bracket E from the shaving mirror by unscrewing the two decorative caps A &B from the face plate. Use the wall mounting bracket as a guide and mark the location of the screw holes for the bracket on the wall. CAUTION: Check the internal wall location for structural strength. Injury to people or damage to the mirror and/or mounting surface may result if mirror is pulled from the surface. To limit the likelihood of such injury or damage, mount the mirror on a structural wall material that is sound. Drill holes in the wall at the marked locations. Insert wall plugs in each hole. Install wall mounting bracket onto the wall using the mounting screws provided. Lift the shaving mirror and slide screws C and D back through the face plate and fasten in position with decorative nuts A and B and ensure these are tight. you can view our complete range online,


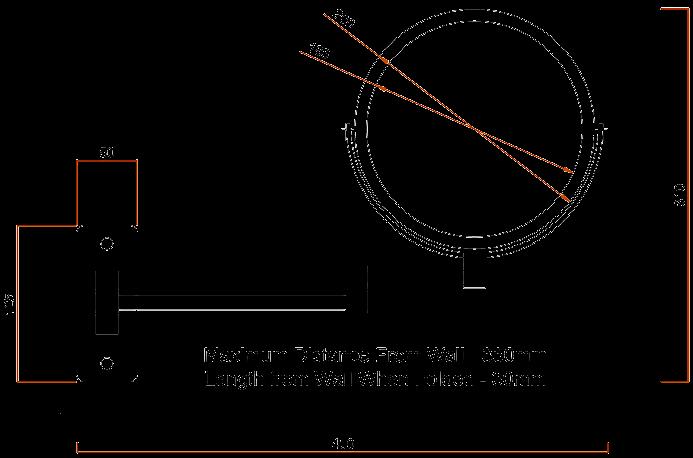
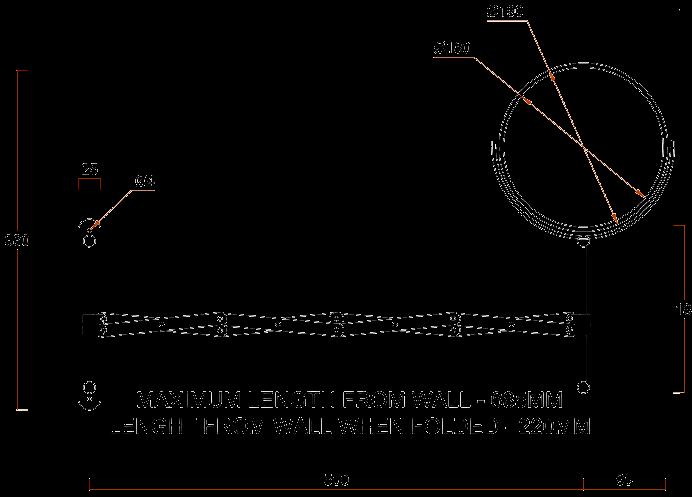
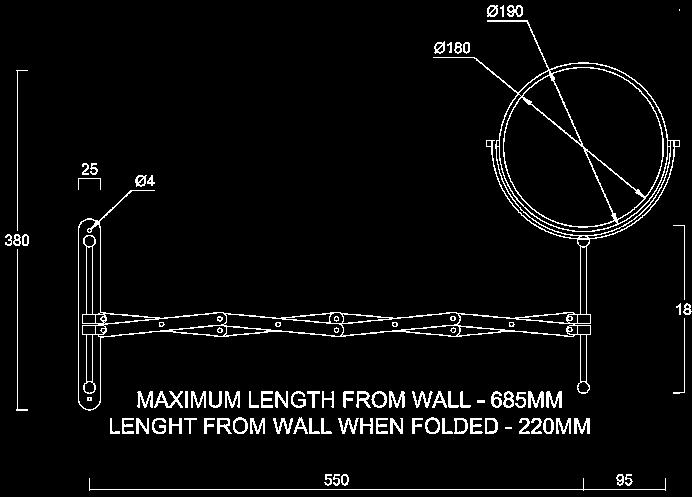
4 : Begin by determining the appropriate location and height. We recommend approximately 150cm from the floor if the mirror is to be used while standing, and 120cm from the floor if used while seated. Remove the unit from its packaging and lay it carefully on a stable surface on top of the product bag so that it does not get scratched. Using the wall mounting bracket A as a guide and mark the location of the screw holes for the bracket on the wall. CAUTION: Check the internal wall location for structural strength. Injury to people or damage to the mirror and/or mounting surface may result if mirror is pulled from the surface. To limit the likelihood of such injury or damage, mount the mirror on a structural wall material that is sound. Drill holes in the wall at the marked locations. Insert wall plugs in each hole. Install wall mounting bracket onto the wall using the mounting screws provided. Take the shaving mirror part B and screw it onto mounting rod C on the end of the shaving mirror arm and ensure this is tightened firmly. Call our technical helpline for free on


5 Begin by determining the appropriate location and height. We recommend approximately 150cm from the floor if the mirror is to be used while standing, and 120cm from the floor if used while seated. Remove the unit from its packaging and lay it carefully on a stable surface on top of the product bag so that it does not get scratched. Remove mounting bracket C from the shaving mirror by unscrewing the grub screws from points A & B using the allen key provided. This will allow you to remove the face plate and mounting bracket from the shaving mirror. Use the wall mounting bracket C as a guide, mark the location of the screw holes for the bracket on the wall. CAUTION: Check the internal wall location for structural strength. Injury to people or damage to the mirror and/or mounting surface may result if mirror is pulled from the surface. To limit the likelihood of such injury or damage, mount the mirror on a structural wall material that is sound. Drill holes in the wall at the marked locations. Insert wall plugs in each hole. Install wall mounting bracket onto the wall using the mounting screws provided. Place the face place back onto the wall mounting bracket. Lift the shaving mirror and slide onto the mounting points. Using the allen key tighten the grub screws at point A & B you can view our complete range online,
6 Thermogroup covers all its products with a satisfaction guarantee. In addition, Thermogroup will supply a replacement product where a fault is shown to be caused by manufacture, materials or workmanship providing the goods have been installed correctly and according to installation instructions. This guarantee does not include removal, freight or installation costs. Thermogroup s products come with guarantees that cannot be excluded under Australian Consumer Law and you are entitled to a replacement or refund for a major failure & compensation for any other reasonable foreseeable loss or damage. You are also entitled to have the goods repaired or replaced if the goods fail to be of acceptable quality and the failure does not amount to a major failure. All of the standard Ablaze Magnifying Mirrors have a 1 Year warranty. To use the warranty, repair or service the customer must provide purchase invoice/receipt, and any other relevant details. If the product develops a fault within the warranty period due to normal wear and tear, Thermogroup, at its discretion, will recognise whether it s a faulty product or not. If it is impossible or not economical for the manufacturer to repair the product, the manufacturer will replace the faulty product with a new unit of the same model or if there is no stock available of the same model, the manufacturer will replace the product with a new unit of a similar size. No responsibility can be taken for altered dimensions and lining up of existing holes. The repair service offered within the warranty period only covers the faults and problem as developed from the manufacturer s errors. Any damage caused by improper use or carelessness or incorrect wiring is not covered. Thermogroup is not responsible for any monetary loss or injuries caused by improper use of this product. Clean the mirror with any glass cleaner or soap and water Do not use any abrasive cleaner on the mirror frame Do not submerge mirror in water or use excessive of water for cleaning purposes This appliance is intended for household use To store the mirror, use original packaging Call our technical helpline for free on


7 you can view our complete range online,

8 R16SM Round, Chrome, 1 & 5x Magnification 200 ø 330 R18SM Round, Chrome, 1 & 8x Magnification 200 ø 330 R10SM Round, Chrome, 1 & 10x Magnification 200 ø 330 S15SM Square, Chrome, 1 & 5x Magnification 200x S15SMB Square, Matt Black, 1 & 5x Magnification 200x R16SMB Round, Matt Black, 1 & 5x Magnification 200 ø 330 R205GSM Round, Gold, 1 & 5x Magnification 200 ø 330 CR465SM Round, Chrome, 1 & 3x Magnification 170 ø 570 RS204GSM Round, Gold, 1 & 4x Magnification 200 ø 500 R46SM Round, Chrome, 1 & 4x Magnification 200 ø 500 Thermogroup UK sales@thermogroupuk.com Thermogroup EU sales@thermogroupeu.com (0) Call our technical helpline for free on Thermogroup AU sales@thermogroup.com.au
QUADLUX SHOWER ENCLOSURE INSTALLATION INSTRUCTIONS
 QUADLUX SHOWER ENCLOSURE INSTALLATION INSTRUCTIONS IMPORTANT DreamLine TM reserves the right to alter, modify or redesign products at any time without prior notice. For the latest up-to-date technical
Wall Down Light MR16 Low Voltage GANWL-MC60D-MR16. Adjustable Twin Light MR16 Low Voltage GANWL-MC60AT-MR16
 INSTALLATION INSTRUCTIONS Wall Down Light MR16 Low Voltage GANWL-MC60D-MR16 Adjustable Single Wall Light MR16 Low Voltage GANWL-MC60AS-MR16 Adjustable Twin Light MR16 Low Voltage GANWL-MC60AT-MR16 Up/Down
QUATRALUX SHOWER ENCLOSURE INSTALLATION INSTRUCTIONS
 QUATRALUX SHOWER ENCLOSURE INSTALLATION INSTRUCTIONS IMPORTANT DreamLine TM reserves the right to alter, modify or redesign products at any time without prior notice. For the latest up-to-date technical
PRISMLUX SHOWER ENCLOSURE INSTALLATION INSTRUCTIONS
 PRISMLUX SHOWER ENCLOSURE INSTALLATION INSTRUCTIONS IMPORTANT DreamLine TM reserves the right to alter, modify or redesign products at any time without prior notice. For the latest up-to-date technical
QUATRA LUX SHOWER ENCLOSURE INSTALLATION INSTRUCTIONS
 QUATRA LUX SHOWER ENCLOSURE INSTALLATION INSTRUCTIONS IMPORTANT DreamLine TM reserves the right to alter, modify or redesign products at any time without prior notice. For the latest up-to-date technical
Nexia 2-pk Gas Lift Barstool Stock # NEX2PGLBST-BE Black # NEX2PGLBST-RE Red
 LOT NUMBER: DATE PURCHASED: / / Nexia 2-pk Gas Lift Barstool Stock # NEX2PGLBST-BE Black # NEX2PGLBST-RE Red ADULT ASSEMBLY REQUIRED If you have any questions regarding assembly or if parts are missing,
Frameless Hinged Door - Alcove. These instructions must be left with the user. Installation Guide W2-B
 Frameless Hinged Door - Alcove These instructions must be left with the user Installation Guide 1 1290647-W2-B 1290647-W2-B 2 Introduction Thank you for purchasing a quality product. To enjoy the full
IMPORTANT, RETAIN FOR FUTURE REFERENCE: READ CAREFULLY
 IMPORTANT, RETAIN FOR FUTURE REFERENCE: READ CAREFULLY SHELF MAXIMUM WEIGHT CAPACITY: 908 kg / 2000 lb EVENLY DISTRIBUTED. ENTIRE UNIT MAXIMUM WEIGHT CAPACITY: 3629 kg / 8000 lb EVENLY DISTRIBUTED. CONCENTRATED
CORNERVIEW SHOWER ENCLOSURE INSTALLATION INSTRUCTIONS
 CORNERVIEW SHOWER ENCLOSURE INSTALLATION INSTRUCTIONS IMPORTANT DreamLine TM reserves the right to alter, modify or redesign products at any time without prior notice. For the latest up-to-date technical
BUTTERFLY SHOWER DOOR INSTALLATION INSTRUCTIONS
 BUTTERFLY SHOWER DOOR INSTALLATION INSTRUCTIONS IMPORTANT DreamLine TM reserves the right to alter, modify or redesign products at any time without prior notice. For the latest up-to-date technical drawings,
Shower Column SHCM Installation Guide
 Shower Column SHCM-2718-00 Installation Guide 1 I. Parts List: 1. Goose-neck shower arm 1 pc 12, Mounting screws 4pcs 21 2,3 Nuts 2 pc 13, Water supply hoses 2pcs 14 4,7, Rubber washer (used together 6
INSTALLATION GUIDE MODELS DMV2402 / DMV3002 / DMV3602
 INSTALLATION GUIDE MODELS DMV2402 / DMV3002 / DMV3602 Getting Started 01 Required Tools & Materials 01 Floating Vanity Installation 02 Drawer & Door Adjustment 03 Soft-Close Drawer Removal/Installation
the fixed post kit product manual for folding clotheslines
 the fixed post kit product manual for folding clotheslines 2 Introduction Pack Contents and Installation 3 Congratulations Congratulations on the purchase of your new Hills Folding Clothesline Post Kit.
TORERO TUB DOOR INSTALLATION INSTRUCTIONS
 TORERO TUB DOOR INSTALLATION INSTRUCTIONS IMPORTANT DreamLine TM reserves the right to alter, modify or redesign products at any time without prior notice. For the latest up-to-date technical drawings,
BESTMOVE STANDING TRANSFER AID
 BESTMOVE STANDING TRANSFER AID MODELS BestMove 400 BestMove 450 PRODUCT FEATURES *BestMove 450 shown Ensure the product has been assembled according to the instructions in this manual. OPERATING ASSEMBLY
FLEX SHOWER DOOR INSTALLATION INSTRUCTIONS. For more information on DreamLine TM Shower Doors please visit
 FLEX SHOWER DOOR INSTALLATION INSTRUCTIONS IMPORTANT DreamLine TM reserves the right to alter, modify or redesign products at any time without prior notice. For the latest up-to-date technical drawings,
Aqua Swing Tub Door & EX/RT Panel
 Aqua Swing Tub Door & EX/RT Panel TUB DOOR AND PANEL INSTALLATION INSTRUCTIONS IMPORTANT DreamLine reserves the right to alter, modify or redesign products at any time without prior notice. For the latest
These instructions must be left with the user
 Torsion Quadrant These instructions must be left with the user Installation Guide 1 1209651-W2-A Thank you for purchasing a quality Kohler product. To enjoy the full potential of your new product, please
QUATRA SHOWER ENCLOSURE INSTALLATION INSTRUCTIONS
 QUATRA SHOWER ENCLOSURE INSTALLATION INSTRUCTIONS IMPORTANT! DreamLine TM reserves the right to alter, modify or redesign products at any time without prior notice. For the latest up-to-date technical
SHCM SHOWER COLUMN INSTALLATION INSTRUCTIONS
 SHCM-27180 SHOWER COLUMN INSTALLATION INSTRUCTIONS IMPORTANT DreamLine TM reserves the right to alter, modify or redesign products at any time without prior notice. For the latest up-to-date technical
INSTALLATION GUIDE MODELS DMV2401 / DMV3001 / DMV3601 DMV4801 / DMV6001 / DMV60DS / DMV72DS
 INSTALLATION GUIDE MODELS DMV2401 / DMV3001 / DMV3601 DMV4801 / DMV6001 / DMV60DS / DMV72DS Getting Started 01 Required Tools & Materials 01 Vanity Installation 02 Drawer & Door Adjustment 03 Soft-Close
Double Tidy Rail. Assembly Instructions- Please keep for future reference. Important - Please read these instructions fully before starting assembly
 Double Tidy Rail ssembly Instructions- Please keep for future reference 87198 Dimensions Width - 89cm Depth - 8cm Height - 101/17cm Important - Please read these instructions fully before starting assembly
Spacia Curved Shower Screen Installation Instructions
 Spacia Curved Shower Screen Installation Instructions Enclosure comprises of screen, wall & base Chrome D Handles Available size 1000mm x 1000mm Base, Screen height: 2000mm Base entry height 70mm, overall
FLEX SHOWER ENCLOSURE INSTALLATION INSTRUCTIONS
 FLEX SHOWER ENCLOSURE INSTALLATION INSTRUCTIONS IMPORTANT DreamLine TM reserves the right to alter, modify or redesign products at any time without prior notice. For the latest up-to-date technical drawings,
Euro Frameless Sliding Shower Screen Installation Instructions
 Euro Frameless Sliding Shower Screen Installation Instructions Frameless Reversible Chrome Fittings 8mm Clear Safety Glass Can be installed on shower base or tiled floor Front Only Available sizes: To
Vellore Barstool Model # MAL-77BL-E Black # MAL-77WT-E White
 LOT NUMBER: DATE PURCHASED: / / Vellore Barstool Model # MAL-77BL-E Black # MAL-77WT-E White ADULT ASSEMBLY REQUIRED If you have any questions regarding assembly or if parts are missing, DO NOT return
AQUA UNO TUB DOOR INSTALLATION INSTRUCTIONS
 AQUA UNO TUB DOOR INSTALLATION INSTRUCTIONS IMPORTANT DreamLine TM reserves the right to alter, modify or redesign products at any time without prior notice. For the latest up-to-date technical drawings,
BESTMOVE STANDING TRANSFER AID
 BESTMOVE STANDING TRANSFER AID L.L.C. MODELS BestMove 400 BestMove 450 PRODUCT FEATURES *BestMove 450 shown Ensure the product has been assembled according to the instructions in this manual. OPERATING
These instructions must be left with the user
 Leap Walk In These instructions must be left with the user Installation Guide 1 1245548-W2-A 1245548-W2-A 2 Thank you for purchasing a quality Mira product. To enjoy the full potential of your new product,
Leap Walk In Enclosure
 Leap Walk In Enclosure These instructions must be left with the user Installation Guide 1 1245546-W2-A Thank you for purchasing a quality Mira product. To enjoy the full potential of your new product,
General Guidelines. Tools Required. Safety. Deluxe Steel Folding Scooter & Wheelchair Carrier Instructions for Part # SC500-V3
 Deluxe Steel Folding Scooter & Wheelchair Carrier Instructions for Part # SC500-V3 General Guidelines It is the user s responsibility to read and follow all instructions. Keep these instructions with the
DESCRIPTION SAFETY: WARNINGS ORDERING INFORMATION T01-B INSTALLATION INSTRUCTIONS DROP-IN AND FREESTANDING BATH K-11343T / K-11344T
 INSTALLATION INSTRUCTIONS DROP-IN AND FREESTANDING BATH K-11343T / K-11344T BEFORE YOU BEGIN Turn off the water supply. The plumbing installation must comply with all local water supply and building regulations.
Mira Elevate Pivot Door Mira Elevate Pivot Door and Side Panel
 Mira Elevate Pivot Door Mira Elevate Pivot Door and Side Panel These instructions must be left with the user Installation Guide 1 1222046-W2-F Thank you for purchasing a quality Kohler product. To enjoy
LAHAINA. Lahaina Showerspa Model #1030 Installation Instructions
 LAHAINA Lahaina Showerspa Model #1030 Installation Instructions Lahaina ShowerSpa Model #1030 Please Read The Following Instructions COMPLETELY Before Beginning! Our goal is to ensure your installation
Protective Capony RTC-16
 Protective Capony RTC-16 ASSEMBLY AND OPERATION MANUAL Protective Canopy RTC-16 Assembly and Operation Manual CONTENT: 1 APPLICATION...3 2 OPERATION CONDITIONS...3 3 TECHNICAL SPECIFICATIONS...3 4 DELIVERY
Model No. BWTDWFK-TRIFLO.
 Model No. BWTDWFK-TRIFLO www.bwt-uk.co.uk Before you start This tap is suitable for use at water supply pressures of 2 bar (min.) to 5 bar (max.). This product must be connected to the water supply in
Festoon Manual Heavy Duty C-Track
 Festoon Manual Heavy Duty C-Track 966300.3 Heavy Duty C-Track Manual CONDUCTIX INCORPORATED The technical data and images which appear in this manual are for informational purposes only. NO WARRANTIES,
DEEP SOAK PRODUCT REQUIREMENTS. A. Product Requirements. B. Product Inspection. C. Clearance Requirements T01-A
 DEEP SOAK INSTALLATION INSTRUCTIONS / INTEGRATED ACRYLIC BATH(WITH APRON/DRAIN) K-98156T/K-98157T/K-98158T/K-98159T BEFORE YOU BEGIN Please read these instructions carefully to familiarize yourself with
Bravo Platform Unpacking Guide
 This guide describes how to unpack the Bravo device from the shipping carton. Depending on the order, the shipment can include additional packages for the Bravo utilities, pipetting head, computer, and
Regent Bar Stool - White Model # REGBST-W
 Regent Bar Stool - White LOT NUMBER: DATE PURCHASED: / / ADULT ASSEMBLY REQUIRED If you have any questions regarding assembly or if parts are missing, DO NOT return this item to the store where it was
BESTMOVE STANDING TRANSFER AID
 BESTMOVE STANDING TRANSFER AID L.L.C. MODELS BestMove 400 BestMove 450 PRODUCT FEATURES *BestMove 450 shown Ensure the product has been assembled according to the instructions in this manual. OPERATING
MONOLITH. Basin System. installation + maintenance
 MONOLITH Basin System installation + maintenance contents 3 Monolith 5 4 Components List 5 Technical Data 6 Before you Install 10 Installation 14 ADA Compliance 15 Operation 15 Maintenance 16 Cleaning
Prime Shower Enclosure & Base
 Prime Shower Enclosure & Base SHOWER ENCLOSURE & BASE INSTALLATION INSTRUCTIONS IMPORTANT DreamLine reserves the right to alter, modify or redesign products at any time without prior notice. For the latest
Universal Projector Ceiling Mount - Black Installation Instructions
 Universal Projector Ceiling Mount - Black Installation Instructions Important Safety Information Use proper safety equipment during installation If you don't understand the installation instructions, have
Wall-Mount & Back to Wall Toilets
 Wall-Mount & Back to Wall Toilets Installation Guide FLOOR LW600 back to wall LW600 wall-mount FLOOR 05-04 Attention Before Installation If you are installing this product in a new construction or remodel,
DLB-23 Shower Enclosure Installation and User s guide
 DLB-23 Shower Enclosure Installation and User s guide I. Mounting Preparation 1. After opening the case, read this introduction carefully, check all the packed parts, examine the shower cabinet for shipping
AQUA T UB DOOR AND T UB DOOR GLASS PANEL INSTALLATION INSTRUCTIONS
 AQUA T UB DOOR AND T UB DOOR GLASS PANEL INSTALLATION INSTRUCTIONS IMPORTANT DreamLine TM reserves the right to alter, modify or redesign products at any time without prior notice. For the latest up-to-date
Risk of fire and electrical shock. DISCONNECT POWER AT ELECTRICAL PANEL before installing or servicing this product.
 INSTALLATION INSTRUCTIONS RAIL 2 RM2D T-BAR LED NOTE: The following instructions provide general guidelines for product installation. For additional information consult the applicable electrical codes
4 Double Hooks on a Board
 4 Double Hooks on a oard ssembly Instructions - Please keep for future reference 875/5292 875/5340 Dimensions Width - 45.7cm Depth - 7cm Height - 0.5cm Important Please read these instructions fully before
Conergy SolarFamulus II
 Conergy SolarFamulus II Installation manual www.conergy.com Table of Contents Table of Contents SolarFamulus II for universal use on flat roofs 1 Introduction 1 1.1 Short description 1 1.2 Intended use
Inground Light 5 GANL-GIG5. Inground Light 8 GANL-GIG8 INSTALLATION INSTRUCTIONS
 INSTALLATION INSTRUCTIONS Inground Light 5 GANL-GIG5 Inground Light 8 GANL-GIG8 NOTE: 1. Gardens at Night fittings should only be connected to approved Gardens at Night 24VDC or 48VDC Constant Voltage
POOL STEP INSTRUCTIONS (NE1087WH)
") POOL STEP INSTRUCTIONS (NE1087WH) 6492 The sequence of the instructions may vary at points depending on the type of step system that you have purchased. If there are different instructions for your system,
POOL STEP INSTRUCTIONS (NE1087WH) 6492 The sequence of the instructions may vary at points depending on the type of step system that you have purchased. If there are different instructions for your system,
Euro Corner Entry Shower Screen Installation Instructions
 Euro Corner Entry Shower Screen Installation Instructions Corner Entry Space Saving Design Dual Sliding Doors, magnetic seals Silver Frame 6mm Clear Safety Glass Can be installed on shower base or tiled
Prime Shower Enclosure & Base Kit
 Prime Shower Enclosure & Base Kit SHOWER ENCLOSURE AND SHOWER BASE KIT INSTALLATION INSTRUCTIONS IMPORTANT DreamLine TM reserves the right to alter, modify or redesign products at any time without prior
Free-standing rail systems, adjustable. Item no:
 Free-standing rail systems, adjustable Item no: 553000 1.00......... Purpose and use.............................................. 3 1.01......... Manufacturer..................................................
Platform stair lift PLG7
 Platform stair lift PLG7 ORIGINAL-user manual Part 2: Assembly Instruction English Version 2.00 ASCENDOR GMBH Drautendorf 48 4174 Niederwaldkirchen Austria Tel.: +43 7231 40040 Fax: +43 7231 40040-590
Enigma-Z Shower Door & Base Kit
 Enigma-Z Shower Door & Base Kit SHOWER Door AND SHOWER BASE KIT INSTALLATION INSTRUCTIONS IMPORTANT DreamLine TM reserves the right to alter, modify or redesign products at any time without prior notice.
booster EX2 / EX3 Operating Manual Extrusion Welder Weldy AG Galileo-Strasse 10 CH-6056 Kaegiswil / Switzerland TECHSPANGROUP
 booster EX2 / EX3 Extrusion Welder Operating Manual Weldy AG Galileo-Strasse 10 CH-6056 Kaegiswil / Switzerland TECHSPANGROUP Australia: Tel. 1-800 148 791 Fax. 1-800 148 799 www.weldy.com.au New Zealand:
Cornerview Shower Enclosure & Base
 Cornerview Shower Enclosure & Base SHOWER ENCLOSURE AND BASE INSTALLATION INSTRUCTIONS IMPORTANT DreamLine reserves the right to alter, modify or redesign products at any time without prior notice. For
Leap Side Panel (S43E)
") Leap Side Panel (S43E) These instructions must be left with the user Installation Guide 1 Thank you for purchasing a quality Mira product. To enjoy the full potential of your new product, please take time
Leap Side Panel (S43E) These instructions must be left with the user Installation Guide 1 Thank you for purchasing a quality Mira product. To enjoy the full potential of your new product, please take time
This Installation Guide uses the following symbols to indicate important information. Always observe the instructions indicated by these symbols.
 VIGO INDUSTRIES INSTALLATION GUIDE FOR STANDING SHOWER CABIN (MODEL VG06062) SAFETY PRECAUTIONS This Installation Guide uses the following symbols to indicate important information. Always observe the
ASSEMBLY & USER INSTRUCTIONS - UBETRACK MOBILE STORAGE SYSTEM. version 1.0 EN 3
 ASSEMBLY & USER INSTRUCTIONS - UBETRACK MOBILE STORAGE SYSTEM version 1.0 3 TABLE OF CONTTS Definitions... 5 General safety regulations... 5 Introduction... 7 Product... 8 Optionally available... 11 Assembly
PE45 AMAZON MONKEY BARS OWNER'S MANUAL
 PE45 AMAZON MONKEY BARS OWNER'S MANUAL WARNING! The disassembled product may contain small parts which pose a choking hazard to children under 3. IMPORTANT: This product may contain sharp points and small
INSTALLATION MANUAL & Warranty Information
 ONE PIECE SHOWER STALLS INSTALLATION MANUAL & Warranty Information 255 Hutchings Street Winnipeg, Manitoba R2X 2R4 - Phone: (204) 633-6122 - Fax: (204) 632-4854 Toll Free Phone: 1-800-665-7531 - Toll Free
Molokai ShowerSpa Model #1006
 Molokai ShowerSpa Model #1006 Please Read The Following Instructions COMPLETELY Before Beginning! Our goal is to ensure your installation goes smoothly and safely. Please read these instructions carefully
General Guidelines. Tools Required. Steel Folding Scooter & Wheelchair Carrier Instructions for Part # SC400-V2. Safety
 Steel Folding Scooter & Wheelchair Carrier Instructions for Part # SC400-V2 General Guidelines It is the user s responsibility to read and follow all instructions. Keep these instructions with the product
KADO LUX HEATED TOWEL RAIL
 page 1 of 5 600 500 250 Typ 100 700 Table 1.0 FEATURES Low Voltage Easy install Any leg cable Ecotimer Safe installation in ANY zone ALL wall types, pre-wiring IS required Cable can enter left or right
EXIRA EXPOSED PIPE SHOWER INSTALLATION
 SKU(s): 923583 EXIRA EXPOSED PIPE SHOWER INSTALLATION BEFORE YOU BEGIN We recommend consulting a professional if you are unfamiliar with installing plumbing fixtures. Signature Hardware accepts no liability
Sphere Touch Control Rangehood
 Sphere Touch Control Rangehood Model No. TCR-001 Please read and save the instruction Sphere Touch Control Rangehood Features: Touch Control Tempered Glass Front Variable Speed 2 High Volume Airflow 12v
Model # 338S-PR. 5/1/2014 Page 1 of 12
 Model # 338S-PR 5/1/2014 Page 1 of 12 /1/2014 Page 2 of 12 1675 Locust Street Red Bud, IL 62278 Phone: 618-282-8200 Fax: 618-282-8202 WARRANTY & TERMS WARRANTY: 5 Year Limited Warranty on Thermoplastic
DCS VEGA 432, 632, 832
 page 1 of 5 360 560 760 432 632 832 Table 1.0 FEATURES Low Voltage Easy install Any leg cable Ecotimer Safe installation in ANY zone ALL wall types, pre-wiring IS required Cable can enter left or right
DCS SCARPA 432, 632, 832
 page 1 of 5 412 612 812 432 632 832 Table 1.0 FEATURES Low Voltage Easy install Any leg cable Ecotimer Safe installation in ANY zone ALL wall types, pre-wiring IS required Cable can enter left or right
General Guidelines. Instructions for Part # WP Safety. It is the user s responsibility to read and follow all instructions.
 General Guidelines It is the user s responsibility to read and follow all instructions. Instructions for Part # WP-48-1000 Keep these instructions with the product at all times and review before each use.
Model # 338S-P. 7/31/2012 Page 1 of 13
 Model # 338S-P 7/31/2012 Page 1 of 13 7/31/2012 Page 2 of 13 1675 Locust Street Red Bud, IL 62278 Phone: 618-282-8200 Fax: 618-282-8202 WARRANTY & TERMS WARRANTY: 5 Year Limited Warranty on Thermoplastic
Avalon 3' Bed. Assembly Instructions Please keep for future reference 634/ / /2779
 Avalon ' ed Assembly Instructions Please keep for future reference 64/1 64/4 64/ Dimensions (') Length - 00cm Width - 4cm Height - 4cm Important Please read these instructions fully before starting assembly
PRR. Flush Mount Racking System. Installation Manual
 PRR Flush Mount Racking System Installation Manual Release, September 2014 Table of Contents 1. Introduction 1.1 Product Overview 1.2 About This Manual 1.3 Product Liability 1.4 Standards Compliance 1.5
Model # 338S-RDP. 7/31/2012 Page 1 of 13
 Model # 338S-RDP 7/31/2012 Page 1 of 13 7/31/2012 Page 2 of 13 1675 Locust Street Red Bud, IL 62278 Phone: 618-282-8200 Fax: 618-282-8202 WARRANTY & TERMS WARRANTY: 5 Year Limited Warranty on Thermoplastic
DCS Lava. Cleaning Recommendations. Table 1.0
 page 1 of 5 600 500 250 Typ 70 660 Table 1.0 FEATURES Low Voltage Easy install Any leg cable Ecotimer Safe installation in ANY zone ALL wall types, pre-wiring IS required Cable can enter left or right
Enigma-X Shower Door & Base Kit
 Enigma-X Shower Door & Base Kit SHOWER Door AND SHOWER BASE KIT INSTALLATION INSTRUCTIONS IMPORTANT DreamLine TM reserves the right to alter, modify or redesign products at any time without prior notice.
FLOOR MOUNTED. Cava, Cava Dua, Toko, Toko Dua FEATURES SPECIFICATIONS
 Cava, Cava Dua, Toko, Toko Dua Functional and stylish the DCS range of floor mounted heated towel rails look great next to freestanding baths and compliment any bathroom or ensuite. FEATURES Low Voltage
TOLL FREE: (866) VANITY SPECIFICATIONS. VANITY COMPONENTS Model VG09008
 VANITY SPECIFICATIONS. VANITY COMPONENTS Model VG09008") VANITY SPECIFICATIONS VANITY COMPONENTS Model VG09008 MODEL VG09008 FEATURES Wall-mounted cabinet Soft closing sliding cabinet drawer hardware Cabinet ships assembled PACKING LIST Vanity Brackets - 2 Plastic
VANITY SPECIFICATIONS VANITY COMPONENTS Model VG09008 MODEL VG09008 FEATURES Wall-mounted cabinet Soft closing sliding cabinet drawer hardware Cabinet ships assembled PACKING LIST Vanity Brackets - 2 Plastic
AQUA UNO T UB DOOR AND T UB DOOR GLASS PANEL INSTALLATION INSTRUCTIONS
 AQUA UNO T UB DOOR AND T UB DOOR GLASS PANEL INSTALLATION INSTRUCTIONS IMPORTANT DreamLine TM reserves the right to alter, modify or redesign products at any time without prior notice. For the latest up-to-date
DESIGN QUADRANT DOUBLE DOOR
 DESIGN QUADRANT DUBLE DR DQDSC0800 DQDSC0900 DQDSC1000 800mm DUBLE DR 900mm DUBLE DR 1000mm DUBLE DR INSTALLATIN INSTRUCTINS IMPRTANT - Please read before installation Please read these instructions carefully
6032 SH 3P Residential Shower Installation Instructions Gelcoat & Solid Surface Bathware
 Tools/materials you might need for proper installation 6D galvanized screws 100% silicone caulking caulking gun acrylic latex caulk shims tape measure 1/8 drill bit Phillips screw driver cardboard china
1675 Locust Street Red Bud, IL Phone: Fax: WARRANTY & TERMS
 Model # 349S-P6 1675 Locust Street Red Bud, IL 62278 Phone: 618-282-8200 Fax: 618-282-8202 WARRANTY & TERMS WARRANTY: 5 Year Limited Warranty on Thermoplastic coated elements. Ultra Play guarantees all
Owner s Manual & Safety Instructions
 Owner s Manual & Safety Instructions Save This Manual Keep this manual for the safety warnings and precautions, assembly, operating, inspection, maintenance and cleaning procedures. Write the product s
Charisma Shower Door & Base Kit
 Charisma Shower Door & Base Kit SHOWER Door AND SHOWER BASE KIT INSTALLATION INSTRUCTIONS IMPORTANT DreamLine TM reserves the right to alter, modify or redesign products at any time without prior notice.
ALPINE PATIO COVER INSTALLATION INSTRUCTIONS
 ALPINE PATIO COVER INSTALLATION INSTRUCTIONS Contact us at: 1-800-851-0865 or www.americana.com Before You Begin: Consult your local building department for any required permits You may be required to
Model # 362S-RDP. 9/17/2012 Page 1 of 12
 Model # 362S-RDP 9/17/2012 Page 1 of 12 9/17/2012 Page 2 of 12 1675 Locust Street Red Bud, IL 62278 Phone: 618-282-8200 Fax: 618-282-8202 WARRANTY & TERMS WARRANTY: 5 Year Limited Warranty on Thermoplastic
OZARK PATIO COVER INSTALLATION INSTRUCTIONS
 OZARK PATIO COVER INSTALLATION INSTRUCTIONS Contact us at: 1-800-851-0865 or www.americana.com Before You Begin: Consult your local building department for any required permits You may be required to obtain
SHOWER/BATH TRANSFER BENCH LM8362
 SHOWER/BATH TRANSFER BENCH LM8362 Thank you for purchasing this Evocare Shower/Bath Transfer Bench. It is strongly recommended that you read through this user manual prior to using your Transfer Bench
Aqua Ultra Shower Door & Base Kit
 Aqua Ultra Shower Door & Base Kit SHOWER Door AND SHOWER BASE KIT INSTALLATION INSTRUCTIONS IMPORTANT DreamLine TM reserves the right to alter, modify or redesign products at any time without prior notice.
Model # 940S-P6-BB. 6/7/2017 Page 1 of 10
 Model # 940S-P6-BB 6/7/2017 Page 1 of 10 /7/2017 Page 2 of 10 1675 Locust Street Red Bud, IL 62278 Phone: 618-282-8200 Fax: 618-282-8202 WARRANTY & TERMS WARRANTY: 5 Year Limited Warranty on Thermoplastic
INSTALLATION AND OPERATION MANUAL
 Pneumatic Wheel Lift Model: RWL-50T REV. A PLEASE READ THE ENTIRE CONTENTS OF THIS MANUAL PRIOR TO INSTALLATION AND OPERATION. BY PROCEEDING YOU AGREE THAT YOU FULLY UNDERSTAND AND COMPREHEND THE FULL
Assembly Instructions Legacy Basic Acoustical Shell
 Assembly Instructions Legacy Basic Acoustical Shell Contents Important User Information...........................2 Safety Precautions.................................3 Required Tools.....................................3
Model # 504S-P. 9/14/2011 Page 1 of 9
 Model # 504S-P 9/14/2011 Page 1 of 9 9/14/2011 Page 2 of 9 1675 Locust Street Red Bud, IL 62278 Phone: 618-282-8200 Fax: 618-282-8202 WARRANTY & TERMS WARRANTY: 5 Year Limited Warranty on Thermoplastic
TETON PATIO COVER INSTALLATION INSTRUCTIONS
 TETON PATIO COVER INSTALLATION INSTRUCTIONS Contact us at: 1-888-442-2928 or www.americana.com Before You Begin: Consult your local building department for any required permits You may be required to obtain