SNAP-LOK 1 1/2 Installation Manual
|
|
|
- Pearl Green
- 5 years ago
- Views:
Transcription


1 Flat Ribbed Striated SNAP-LOK 1 1/2 Installation Manual
2 Table of Contents Important Notice/Safety/Storage/Tools...1 Roofing Anatomy/Side Trim...2 Measuring Your Roof...3 Roofing Installation/Felt/Cutting Panels...4 Drip Edge Installation...5 W Valley Installation...6 Fastening Schedule/Proper Screw Installation...7 Squaring Panels...8 Transition Flashing Installation...9 Endwall Installation...10 Sidewall Installation...11 Gable Trim Installation...12 Ridge Cap Installation...13 Roof Boot Installation...14 Special Trim Information...15 Care and Maintenance...16 Policies...17 Order Form

3 SNAP-Lok PRODUCT INFORMATION Pg.1 Tools Recommended Variable speed drill or screw gun, Snips, Extension Ladder Turbo shears, Tape Measure, Hand bending tools, Chalk line String line, Drill bits, Tool belt, Utility Knife Important Notice This manual is to aid the installer with the installation of the Snap-Lok Panel. Due to the different complexities of roofs and roofing situations, it is difficult to create a manual that covers every situation that the installer may encounter. This manual is to serve as a guideline to properly installing the Snap-Lok Panel. Check with local building codes prior to installing metal roofing. Any questions you may have regarding proper installation of the Snap-Lok Panel should be directed to a Tri County Metals representative. Safety Roofing can result in serious injury or death. Extreme caution should be used at all times when installing metal roofing. The information in this manual is to show the correct placement of the metal roofing parts. It is the responsibility of the erector to perform the placement of these parts in a safe manner. Refer to OSHA guidelines for applicable safety requirements. Never walk on a wet metal roof. Never walk on an unfastened roof panel. Storage/Handling Moisture trapped between stacked sheets may cause water stains or white rust to form under the paint, which can affect the life and service of the metal. If metal is not used immediately, store in a well ventilated dry location. Any outdoor storage is at the customer s own risk! If outdoor storage cannot be avoided the likelihood of damage may be reduced by protecting the metal using a canvas of waterproof paper. Fan sheets lightly at the bottom to allow for air circulation. Keep the sheets off the ground by using an insulator such as wood. Never cover the metal with plastic as this will cause condensation to form.
4 Pg.2 Panel Specification Coverage Width Minimum Slope - 1/4:12. Tube sealant recommended on pitches below 2/12 Gauges - 24 Coating Galvalume Paint - Fluropon featuring Kynar 500 Warranty - 25 years (Galvalume ) 35 years (Painted) Panel Gauge Substrate Approval# 1 1/2 Snap-Lok 24 15/32 plywood Z- Flashing Eave Cleats Panel Starters Rivets Drip Edge 1 Gable Trim ' Sidewall ' Endwall ' 1 Transition ' 1 Valley 2 20' Ridge Cap ' 2 Clip Spacing 1 ½ Snap-Lok Every 24 with clips Titebond (tubes)


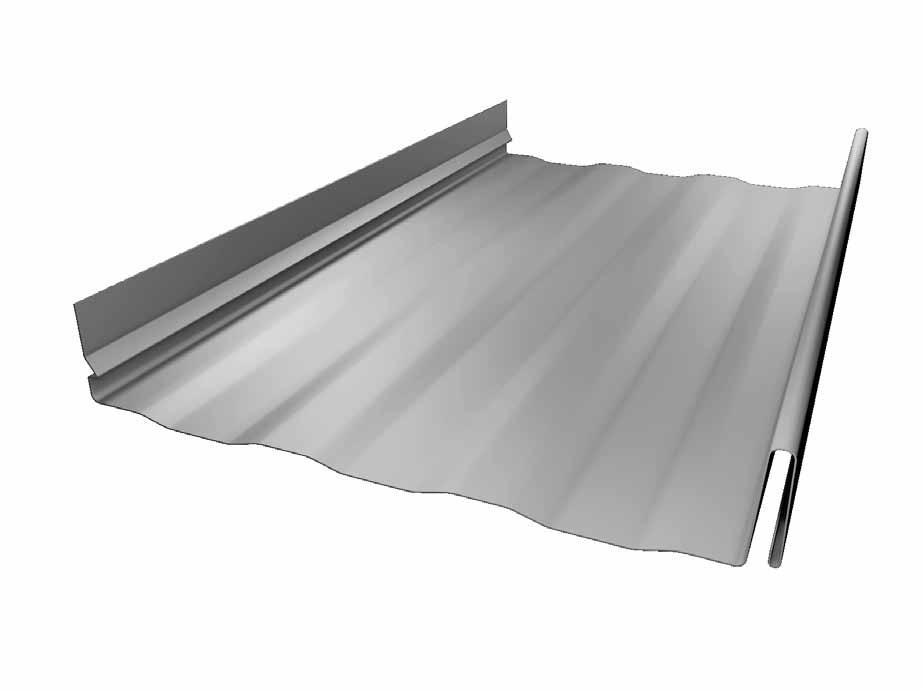
5 Roofing Anatomy Pg.3 Ridge Cap 17 Pg. 13 W- Valley 9 Pg. 6 Gable Trim 16 Pg. 12 Sidewall Trim 15 Pg. 11 Transition Flashing Pg Drip Edge 8 Pg. 5 Endwall Pg Eave Cleat Panel Starter Z Flashing Used to attach drip edge and gable trim to the fascia board. (Optional) Used to attach panel edges at valley ends, drip edge and at roof transitions. Used to attach the ridge cap, gable trim, sidewall, endwall, and transition flashings to the roof.
6 Pg.4 Measuring your Roof for an Estimate > Start by sketching a birds eye view of your roof. This can be aided by using Google Earth or similar online programs. > Identify each part of your roof similar to the drawing below. > Once you have drawn your roof and identified each part, measure each line and include it on the drawing. > Include on the drawing the location of plumbing stacks (if any) and the diameter of the pipe.
 3.")
7 Drip Edge Pg.5 Clip Panel Pancake Screws Extended Eave Drip Eave Cleat Notes: 1. Attach eave cleat flashing to fascia board using 1 pancake screws every 4 on-center.. Overlap eave cleat flashing a minimum of 3. (Optional) 3. Attach drip edge flashing to roof deck with 1 pancake screws 4 on-center, while hooking the bottom edge of the eave trim flashing to the bottom edge of the eave cleat flashing. (Optional) 4. Overlap drip edge flashing a minimum of Allow drip edge to run past corner of roof 3 so it can be folded to ensure maximum weather tightness. 6. Attach roofing panel at eave by notching 1 off of each panel rib from the panel edge leaving 1 of panel to be folded over the drip edge flashing. 7. Slide hemmed panel edge over drip edge flashing. 8. Use hand seamers to finish crimping panels over drip edge if using extended eave drip.

8 Pg.6 W-Valley Upper Panel Panel Cleat Upper Panel Pancake Screw Pancake Screw Note: 1. Starting at the bottom, fasten W-Valley trim flashing to roof substrate using 1 pancake screws every 4 on-center. 2. Allow W-Valley trim flashing to overhang roof edge so it can be trimmed back flush with roof overhang. 3. End lap w-valley flashing a minimum of 6 inches. 3. Cut roofing panels so they stop 3 from the diverter in the center of the W-Valley trim flashing. 4. Apply tacky tape the entire length of the w-valley flashing 5 from the center diverter 5. Attach panel starter on top of the tacky tape and screw the panel starter down every 24 using 1 pancake screws. 6. Slide hemmed panel over panel starter and install a 1 pancake screw according to screw placement on page 2. RECOMMENDED ACCESSORIES: (1 roll = 50 of coverage)


9 Fastening Schedule Pg.7 Section removed for clarity Z- Flashing Eave Cleats Panel Starters Rivets Drip Edge 1 Gable Trim ' Sidewall ' Endwall ' 1 Transition ' 1 Valley 2 20' Ridge Cap ' 2 Titebond (tubes)
10 Pg.8 Squaring Panels Step 1: Temporally place a nail 3 from the cave and gable as shown here as A. Measure 3 parallel on the eave line and place another nail shown here as B. The triangle method will work on a larger scale as well. For example if your roof panels are 16 long then you can multiply the by 4 so you will be measuring Just make sure that you multiply all measurements by the same number. The next step will be making a chalk line going from your point A to point C. You will want this line to be as close to the edge of the gable as possible so your first panel will be about an 1/8 from the edge of the roof. You will want to measure 9 6 from your chalk line at the A and C points and make another chalk line. This will help you as you start installing your panels to make sure they are still square with your eave. It is a good idea to continue this process for the entire project and on both sides of your roof.


11 Transition Flashing Pg.9 Upper Panel Panel Cleat Transition Flashing Rivet Pancake Screw Z-Flashing Set Back Lower Panel Notes: 1. Install bottom roofing panels first. Pancake Screw 2. Apply tacky tape in the flat part of the lower roof panels where the z-flashing is going to be installed. 3. Notch the z-flashing to fit over the panel ribs and install over the tacky tape using 1 pancake screws every 6 on-center. 4. Use Titebond to seal openings created between z-flashing and panel ribs. 5. Slide the transition flashing over the installed z-flashing. 6. Secure transition flashing to z-flashing using rivets every 12 on-center. 7. Apply tacky tape to the top side of the transition flashing. 8. Install a panel starter on top of the tacky tape using 1 pancake screws every 24 on-center. 9. Slide the hemmed panel over the panel starter and attach the panel to the roof substrate using 1 pancake screws (according to screw placement on page 2. RECOMMENDED ACCESSORIES: (1 roll= 50 ) Titebond (1 tube = 31 linear feet (1/4 bead)

12 Siding Roof Deck Pg.10 Endwall Flashing Z-Flashing Pancake Screws Rivet Panel Notes: 1 Apply tacky tape in between the ribs of the panel. 2. Notch z-flashing to fit over panel ribs and install on top of tacky tape 3. Fasten z-flashing to panels using 1 pancake screws every 6 on-center. 4. Use Titebond to seal openings created between z-flashing and the panel ribs 5. Slide Endwall flashing over z-flashing 6. Secure endwall flashing to z-flashing using rivets every 12 on-center. 7. Attach endwall flashing to wall 8. Cover endwall flashing with siding or counter-flashing. RECOMMENDED ACCESSORIES: (1 roll = 50 ) Titebond (1 tube = 31 linear feet (1/4 bead)

13 Siding Sidewall Flashing Pg.11 Rivet Pancake Screws Z-Flashing Panel Notes: 1. Apply tacky tape along the panel where the z-flashing is going to be installed. 2. Attach the z-flashing to the panel by using 1 pancake screws every Slide the sidewall flashing over the z-flashing 4. Secure the sidewall flashing to the z-flashing using rivets every Attach the sidewall flashing to the wall 6. Cover the sidewall flashing with siding or counter flashing. RECOMMENDED ACCESSORIES: (1 roll = 50 of coverage)

 5.")
14 Pg.12 Gable Trim Eave Cleat Z-Flashing Panel Pancake Screw Notes: 1. Apply tacky tape to topside of panel where z-flashing will be installed. 2. If the panel rib is not going to be under the gable trim flashing, the panel will need to be turned up 1 3. Install z-flashing on top of tacky tape and fasten to roof deck using 1 pancake screws every Attach eave cleat to fascia board using 1 pancake screws every 4. (Optional) 5. Slide gable trim flashing over z-flashing and then snap it over the eave cleat. (Optional) 6. Secure gable trim to z-flashing using rivets every 12. RECOMMENDED ACCESSORIES (1 roll = 50 of coverage)


15 Ridge Cap Pg.13 Non-Vented Installation Vented Ridge Installation Rivet Panel Z Flashing Panel Rivet Pancake Screw Pancake Screw Non-Vented Installation 1. Stop panels 2 from center line of ridge for vented ridge installation. 2. Apply tacky tape to flat part of panel 3. Notch z-flashing to fit over panel ribs 4. Install z-flashing on top of tacky tape and f asten to panel using 1 pancake screws every Use Titebond to seal openings created between z-flashing and panel ribs 6. Slide ridge cap over z flashing on both sides and secure using rivets every 12. Recommended Accessories: Flexo-Vent (1 box = 20 of coverage) Titebond (1 tube = 31 linear feet (1/4 bead) Vented Ridge Installation 1. Apply tacky tape below the predrill holes in the vent clip 2. Use two vent clips equally spaced between the ribs. 3. Install one pancake screw through the large access hole in the top of the anchor clip on the down slope slide. 4. Slip the Flex-O-Vent underneath the vent clip. 5. Insert another pancake screw in the up-slope hole. 6. Attach the ridge cap to the Flex-O-Vent clip with rivets. (Make sure to not install rivet through the large access hole in the profile vent clip)


 Apply sealant between base and roof.")
16 Pg.14 Roof Boot Installation 1 2 Choose appropriate Master Flash with opening at least 20% smaller than pipe diameter. If necessary trim opening to 20% smaller than pipe diameter. Slide Master Flash down over pipe. (A nonpetroleum base lubricant will ease installation.) Apply sealant between base and roof. 3 4 Use fasteners to complete sealing. Space screws no more than 3 apart around the pipe.
17 Special Trim Information Pg.15 Tri County Metals can manufacture special trim designs separate from those designs included in the manual. If your project requires special trim, please provide us with the following information: 1. A drawing of the trim design. 2. Clearly marked dimensions of each leg of the drawing. 3. Clearly marked degrees of each angle. 4. Clearly indicate the color side. 3 Color 110 o Trim Manufacturing Specifications 6 > Hem size must be 1/2 or larger. > Bends on hemmed legs need to be greater than 1/2 or else the hem obstructs the break. > Smashed parts need to be at least 1 1/4. > Maximum bend break can do is 135 degrees. > When bending angles opposite of one another, like that of a Z Flashing, the middle part of the Z must be at least 1/2 or larger. > When bending two 90 degree bends on the same side, one leg has to be equal to or less than the length of the material between the two bends. > Pieces with more than two bends on the same side are difficult to do unless the bends are large enough. Please talk with a Tri County Metals representative for assistance. > For trim pieces that have to slide over another piece where the inside dimensions are critical, please indicate CRITICAL measurement.
 One cup of Simple Green, or other non-toxic")
18 Pg.16 Care and Maintenance To maintain the original finish of the metal roofing panels, the only regular maintenance necessary is that of annual washing. Mild solutions of biodegradable cleaner or household ammonia will aid in the removal of most dirt, and the following are recommended levels: 1) One cup of Simple Green, or other non-toxic biodegradable cleaner, which contain less than 0.5% phosphate, dissolved into two gallons of warm water. NOTE: The use of detergents containing greater than 0.5% phosphate is not recommended for use in general cleaning of building panels. NEVER BLEND CLEANSERS OR DETERGENTS WITH BLEACH. 2.) One cup of household ammonia dissolved into five gallons of water (room temperature). Working from the bottom to the top of the metal roofing panels, the panels may be washed with either solution. The use of a well soaked cloth, sponge, brush (with very soft bristles), or a low pressure spray washer is advised. We do not recommend the use of scouring powders or industrial solvents, since these agents may damage the film. Solvent containing cleaners such as Fantastic, however, are very effective and can be used without concern. If mildew or other fungal growth is a problem and cannot be removed as outlined above, household bleach, mixed at a concentration of one cup of bleach to five gallons of water, along with one cup of a mild soap (e.g., Ivory) to aid wetting, is recommended. Once the metal roofing panels is washed, thorough rinsing with clear water is necessary to eliminate the possibility of residue. Failure to remove all residues from these cleaning steps may damage the film.
19 Policies Pg.17 RETURN POLICY: All Tri County Metals trim is manufactured from either our 25 year (Galvalume ) or our 40 year (Painted) warranty metal and is returnable as long as it is deemed by our Company s Production Manager as being in good, clean and resalable condition, free from scratches, mars and other damages. Tri County Metals reserves the right to charge a 20% restocking fee. The same general principle applies also to the return of other accessories such as screws, boots, closures, etc. Trim that is custom made (different than the stated specifications in this manual, including L Flashing and Fascia are not returnable, and is considered the property of the customer once it has been made, whether paid for or not. This Policy also pertains to metal roofing and siding panels, which cannot be returned. PAYMENT: Tri County Metals accepts cash, check, Visa, MasterCard, Discover Card and America Express. Personal checks require the check writers drivers license # and date of birth. Returned checks will be assessed a $35 dollar return check fee. DELIVERY POLICY: Delivery charges apply to all orders where delivery is requested. Please call for details. SALES TAX: All orders picked up at Tri County Metals, and all orders delivered within the State of Florida, are subject to State Sales Tax. Tax Exemptions should be verified prior to delivery or customer pick up. Orders delivered out of state are tax exempt. warranted PRODUCTS: Galvalume products carry a 25 1/2 year warranty, and painted products carry a 35 year warranty. (Ask for details) INDEMNITY: All prices and designs are subject to change without notice. DISCLAIMER: While we have made every attempt at accuracy in this manual, we are not responsible for typographic, printing or technical errors. The success of Tri County Metals has been, and will continue to be, because of our valued customers. We strive to be a company where contractors as well as home owners are welcome. We will assist you in calculating the materials needed to complete your project and at a price you can afford. We understand that our customer s time is important and we make every effort to get you in and out as quickly and efficiently as possible. Quality, price, service and availability are the mainstays of our business and we don t plan on changing it.
20 Please select: Quote Request Order Name: Phone: Address: Job Name: Pickup Location: Delivery Location: Panels 5V Crimp Gauge: Color: Ultra-Rib Gauge: Color: PBR Gauge: Color: Enter Panel Sizes Quantity Feet Inches TCM-Lok Gauge: Color: SnapLok Gauge: Color: Mechanical Lok Gauge: Color: INSULATION/VENTILATION Double Bubble Insulation Double Bubble Tape Flex-o-Vent Profile Vent Vent Clips SEALANTS Peel and Seal Titebond Expanding Foam Inside Closures Outside Closures QTY QTY TRIM Drip Edge Ridge Cap Hip Cap Gable Rake Valley Sidewall Endwall Transition Flashing Chimney Flashing Panel Starter Z-Flashing Eave Cleat QTY UNDERLAYMENTS/PURLINS Peel & Stick Underlayment Synthetic Underlayment 1 x 4 x 12 SYP QTY Specialty Trim 1 (attach drawing or draw in box) Specialty Trim 2 (attach drawing or draw in box) FASTENERS 1 1 1/ /2" Pancakes Tek Screws Lap Screws FASTENERS Stainless Rivets Painted Rivets Purlin Screws #9 x 3 Collated Nails Stick Nails Trim Nails 1-1/4 Felt Nails 1 1/4 Stinger Nails Woodgrip Screw QTY QTY WoodZac QTY Woodgrip XG QTY FLASHINGS Roof Boots #3: 1/4-5 Color: #5: 4 1/4-7 1/2 #7: 6-11 #9: 9-19 Electric Pipe Boot Touch-Up Paint Spray Style Gooseneck Vents QTY Standard QTY High Temp Notes: Trenton 301 SE 16th St Trenton, FL Office # (352) Fax # (352) Live Oak th Trail Live Oak, FL Office # (386) Fax # (386) Ocala 3021 Northwest Blitchton Rd. Ocala, FL Office # (352) Fax # (352) Tallahassee 3708 Northwest Passage Tallahassee, FL Office # (850) Fax # (850)
DETAIL MANUAL A COMPREHENSIVE GUIDE TO METAL ROOFING GULFLOKTM HIDDEN SCREW METAL ROOF SYSTEM
 DETAIL MANUAL A COMPREHENSIVE GUIDE TO METAL ROOFING GULFLOKTM HIDDEN SCREW METAL ROOF SYSTEM Gulf Coast Standing Seam Roofing Panels Since 2004, Gulf Coast Supply and Manufacturing has been happy to offer
Central Snap. Condition Details C SNAPDETAILS
 Central Snap Condition Details D C SNAPDETAILS150612.2 The men and women at Central States Manufacturing, Inc. would like to welcome you. OUR MISSION Central States Manufacturing, Inc. is a 100% employee-owned
TRIAD CORRUGATED METAL, INC.
 TRIAD CORRUGATED METAL, INC. C O M M E R C I A L R E S I D E N T I A L A G R I C U L T U R A L Snap Loc Panel Guide Snap Loc metal panels are a perfect fit for residential, architectural and commercial
Black s Metals Installation Guide
 Storage Black s Metals Installation Guide If metal is not to be used immediately, store inside in a well ventilated, dry location. Condensation or other moisture can form between the sheets during storage
INSTALLATION GUIDE.
 INSTALLATION GUIDE www.gerardusa.com INSTALLATION NOTIFICATION The installation procedures demonstrated in this manual are recommended methods for the installation of the Gerard Canyon Shake counter batten
ALLMET CONTINENTAL INSTALLATION GUIDE
 ALLMET CONTINENTAL INSTALLATION GUIDE www.allmet.com INSTALLATION NOTIFICATION The installation procedures demonstrated in this manual are recommended methods for the installation of the Allmet Continental
Western States 7/8 Corrugated
 Western States 7/8 Corrugated Installation, Flashings & Shop Drawing Detail Guide Table of Contents Section Page Section Page Notes to Designer / Installers..1 Fastener Placement and Selection.2-3 Key
StrongSeam SSFF1 Panel
 StrongSeam SSFF1 Panel Installation Manual May 2016 12 TO 24 COVERAGE CLIP OFFSET STRIATED PANEL (2 STRIATION BEADS ON PANEL) 0.875 0.9375 26 ga. & 24 ga. UL90 #529 UL2218 Class IV/Impact UL790 Class A/Fire
Pacific Tile Counter Batten and Batten
 Pacific Tile Counter Batten and Batten INSTALLATION GUIDE www.gerardusa.com INSTALLATION NOTIFICATION The installation procedures demonstrated in this manual are recommended methods for the installation
INSTALLATION MANUAL Heritage Series
 INSTALLATION MANUAL Heritage Series STEEL ROOF PANELS HEAD OFFICE 1418 Michael St., Ottawa, ON K1B 3R2 WATS LINE: 1 800-267-0860 TEL.: 1 613-746-3206 FAX: 1 613-746-0445 Contents Page Introduction, Storage..
Product Guide HELPFUL INFORMATION ON PANELS, TRIMS, GUTTERS AND ACCESSORIES
 5V Product Guide HELPFUL INFORMATION ON PANELS, TRIMS, GUTTERS AND ACCESSORIES ½" 24" COVERAGE Copyright 2018, Central States Manufacturing, Inc., All Rights Reserved. D C GUID_PROD_5V_180201 The men
ML-150. w w w. s a q u l i t y m e ta l s. c o m. san antonio branch 210 W. Peden San Antonio TX P. (210) F.
 F.") ML-150 san antonio branch 210 W. Peden San Antonio TX 78204 P. (210) 227-7276 F. (210) 227-0329 MCALLEN branch 2221 Austin Ave McAllen TX 78501 P. (956) 627-2966 F. (956) 627-0918 w w w. s a q u l i t
ML-150 san antonio branch 210 W. Peden San Antonio TX 78204 P. (210) 227-7276 F. (210) 227-0329 MCALLEN branch 2221 Austin Ave McAllen TX 78501 P. (956) 627-2966 F. (956) 627-0918 w w w. s a q u l i t
1.5 mechanical lock ml 150
 1.5 mechanical lock ml 150 Strip Width Base Material Thickness Min Tensible Min Yield Coatings Max 16 Steel.0225 to.0336 in 52 - ksi 50 - ski Painted / Galvalume UL CONSTRUCTION NUMBERS: TGKX554 The Mechanical
PIPE. Central Texas Largest Distributor. Structural Steel, Pipe and Metal Building Components
 Central Texas Largest Distributor Structural Steel, Pipe and Metal Building Components PIPE Waco Location P.O. Box 154485 913 South Loop Dr. Waco Texas 76705 Local - 254-754-2611 Bryan Location 9401 E.
1 1/2" SSR. FABRAL The pursuit of excellence since 1967
 1 1/2" SSR Detail Manual and Estimate Guide 16" 1 1 2" PROPER STORAGE When moisture remains in contact with Galvanized panels in the absence of freely circulating air, white, black or dark gray corrosion
SLATE ROOFING INSTALLATION PROPOSAL [Last updated 10/08/2017]
![SLATE ROOFING INSTALLATION PROPOSAL [Last updated 10/08/2017]](/thumbs/72/67816830.jpg "SLATE ROOFING INSTALLATION PROPOSAL [Last updated 10/08/2017]") [Change these specifications as needed. Use this sample proposal at your own risk. This is a simple, general proposal and is not meant to be a comprehensive proposal for all situations or projects. If
[Change these specifications as needed. Use this sample proposal at your own risk. This is a simple, general proposal and is not meant to be a comprehensive proposal for all situations or projects. If
Residential Pricing Guide
 Guide TABLE OF CONTENTS Panels 5V Crimp Slimline 2 4 Accessories Flat Sheets Coils V-Groove Soffit Ridge Caps Roof Jacks Touch-up Paint Insulation Slimline Rib Cover Closure Strips Tube Sealant 6 6 7
Brava Spanish Tile. Installation Manual. Brava Roof Tile Phone: Fax:
 Brava Spanish Tile Installation Manual Brava Roof Tile Phone: 319-338-5706 Fax: 319-343-1038 www.bravarooftile.com This document includes the recommended and suggested installation procedures for Brava
Aqua Swing Tub Door & EX/RT Panel
 Aqua Swing Tub Door & EX/RT Panel TUB DOOR AND PANEL INSTALLATION INSTRUCTIONS IMPORTANT DreamLine reserves the right to alter, modify or redesign products at any time without prior notice. For the latest
Prior to ordering and installing materials, all dimensions should be verified by field measurements.
 Important Information The application and detail drawings in this manual are strictly for illustration purposes and may not be applicable to all building designs or product installations. All projects
Stile. Spanish Tile Installation Guide
 Stile Spanish Tile Installation Guide IMPORTANT INFORMATION THE APPLICATION AND DETAIL DRAWINGS IN THIS MANUAL ARE STRICTLY FOR ILLUSTRATION PURPOSES AND MAY NOT BE APPLICABLE TO ALL BUILDING DESIGNS OR
HOW TO FIGURE METAL ROOFING MATERIALS
 HOW TO FIGURE METAL ROOFING MATERIALS 1. The first step in figuring your metal roofing is to make a sketch of it, complete with the roof measurements. Take the house below as an example: 52 R 12-8 P 19
238T and 138T Panel and Accessories Price List 9/29/2017 (price good for shipments through 11/31/2017) Customer Job Date Sales Rep 238T PANEL ITEM #
 Customer Job Date Sales Rep 238T PANEL ITEM #") 238T and 138T Panel and Accessories Price List 9/29/2017 (price good for shipments through 11/31/2017) Customer Job Date Sales Rep 238T PANEL ITEM # DESCRIPTION SELLING PRICE UOM 238T 238T Seam Cap 24
238T and 138T Panel and Accessories Price List 9/29/2017 (price good for shipments through 11/31/2017) Customer Job Date Sales Rep 238T PANEL ITEM # DESCRIPTION SELLING PRICE UOM 238T 238T Seam Cap 24
Central Texas Metal Roofing Supply Co., Inc 36" NET COVERAGE SHEET WIDTH 38 ¼ 40 ¼ 38 ¼ 40 ¼ 38 ¼ 40 ¼ 40 ¼ 40 ¼
 36" 1 2 " 6" GAUGE PANEL FINISH NET COVERAGE SHEET WIDTH WEIGHT PER SQ. 26 26 26 26 24 24 24 24 TEXAS RIB CHANNEL GUARD TEXAS RIB CHANNEL GUARD TEXAS RIB CHANNEL GUARD CHANNEL GUARD CHANNEL GUARD GALVALUME
Agenda. Safety Decking Basics Decking Issues Felt Kick Out Flashing Fascia
 Decking & Fascia Agenda Safety Decking Basics Decking Issues Felt Kick Out Flashing Fascia 2 Chapter 7 Tools & Materials Tools for Decking Hammer Measuring Tape Chalk Line Speed Square Utility Knife Circular
Central Texas Metal Roofing Supply Co., Inc NET COVERAGE SHEET WIDTH
 1 2 " 1 24" GAUGE PANEL FINISH NET COVERAGE SHEET WIDTH WEIGHT PER SQ. 26 5 Vee GALVALUME 24 26 3/8 95.00 PRICE PER SQ. PRICE PER LINEAR FOOT PANEL PRICING: 1. Price per Square is based on 26 3/8 sheet
INSTALLATION MANUAL. METAL INSULATED PANELS -ROXUL -Expanded Polystyrene
 INSTALLATION MANUAL METAL INSULATED PANELS -ROXUL -Expanded Polystyrene Insulated Metal Panels London Eco-Metal Manufacturing Inc. **Also see Eco-Metal s Handling Manual** These instructions are provided
DAN S CUSTOM SHEETMETAL Manufacturer and Distributor
 About the Company DAN S CUSTOM SHEETMETAL Manufacturer and Distributor In 1993, DCSM was the first manufacture in the state of Florida to fabricate metal eave closure for tile. We have established a reputation
PATENTS ARE PENDING. Building Dimensions. Exterior Dimensions Roof Edge to Roof Edge
 Assembly Manual 8x9 PATENTS ARE PENDING Approximate Size 7640303 Storage Area Building Dimensions Exterior Dimensions Roof Edge to Roof Edge Interior Dimensions Wall to Wall Sq. Ft. Cu. Ft. Width Depth
Installation Guide Wall Panels
 Installation Guide Wall Panels Jointless or Dry-Stacked Installation (Read Prior to installation) The MStone system is a jointless / dry-stacked installation where panels and corners fit tightly together
Central Seam Plus. Central-Loc
 Central Seam Plus Central-Loc Product Guide HELPFUL INFORMATION ON PANELS, TRIMS, GUTTERS AND ACCESSORIES 3" 3" " or 18" COVERAGE " or 18" COVERAGE Central Seam Plus Field seamed Central-Loc Snaps together
Tile Roofing Inspection
 Tile Roofing Inspection www.tileroofing.org 1 Tile Roofing Inspection www.tileroofingtraining.org John Jensen Jensen Roofing Inc. TRI Training Program Manager 2 Revised 09-11 1 What you can see, and what
PBR & PBU PANELS. Technical/Installation Information
 PBR & PBU PANELS Technical/Installation Information IMPORTANT NOTICE READ THIS MANUAL COMPLETELY PRIOR TO BEGINNING THE INSTALLATION OF THE Retro-R PANELS. THE MANUFACTURER DETAILS MUST BE FOLLOWED AS
Installation Instructions
 Installation Instructions RainTight Decks www.raintightdecks.com Underdeck Installation Instructions Table of Contents Page 3 Page 4 Page 5 Page 6 Page 7 Tools Required Introduction and How the system
1 1/2 SSR INSTALLATION GUIDE AGRICULTURAL LIGHT COMMERCIAL RESIDENTIAL
 1 1/2 SSR INSTALLATION GUIDE AGRICULTURAL LIGHT COMMERCIAL RESIDENTIAL Due to Product improvements, changes and other factors, Fabral reserves the right to change or delete information herein without prior
UNA-CLAD Metal Roofing Systems Application Guide
 UNA-CLAD Metal Roofing Systems Application Guide UC-3 Double-Lock Architectural Series UC-4 No-Clip Architectural Series UC-6 Double-Lock Structural Series UC-14 Snap-Lock Standing Seam Series March 22,
METAL ROOFING: RE-ROOFING QUESTIONS & ANSWERS
 METAL ROOFING: RE-ROOFING QUESTIONS & ANSWERS Building contractors are always looking for installation methods that will provide them with savings on labor and materials expenses. Here are some important
SECTION METAL ROOF PANELS
 SECTION 07 41 13 PART 1 GENERAL 1.1 SECTION INCLUDES A. Standing-seam roof panels. B. Metal roofing accessories. 1.2 RELATED SECTIONS A. Section 07 62 00 - Sheet Metal Flashing. B. Section 07 72 00 - Roof
Specifications for FL-100 Soffit Panel
 Union Corrugating Company Specifications for FL-100 Soffit Panel SECTION 07410 METAL SOFFIT PANELS PART 1 GENERAL 1.1 DESCRIPTON A. Section Includes: 1. Preformed metal soffit panel system 2. Associated
RIB PANEL INSTALLATION
 GOLDIN METALS, INC. www.goldinmetals.com 12440 SEAWAY ROAD Mailing Address: 14231 SEAWAY ROAD, SUITE 7000 GULFPORT, MS 39503 (228) 896-6216, Ext. 230 FAX (228) 896-4873 4400 PETERS ROAD P.O. BOX 700 HARVEY,
TECHNICAL INFORMATION
 TECHNICAL INFORMATION SECTION 07320 TWO-PIECE TAPERED MISSION CLAY ROOFING TILE PART 1 GENERAL 1.01 SECTION INCLUDES A. Formed clay roofing tiles, complete with components and other required accessories
1 PVC or ABS drain with strainer
 Patents Pending ProBase II Single-Slope Shower Base and Kit CONTENTS 1. General Information...1 2. Materials...1 3. Planning...2 4. Preparation...3 5. Layout...3 6. Install Base and Shims...4 7. Install
Jackson Plant: 308 Alabama Blvd. Jackson, GA (800) /Fax: (800)
 /Fax: (800)") Jackson Plant: 308 Alabama Blvd. Jackson, GA 30233 (800)884-4484/Fax: (800)765-4484 Idabel Plant: Rt. 3 Idabel, OK 74745 (800)926-8509/Fax: (800)289-6007 Headquarters: Lancaster Plant: 3449 Hempland Road
Jackson Plant: 308 Alabama Blvd. Jackson, GA 30233 (800)884-4484/Fax: (800)765-4484 Idabel Plant: Rt. 3 Idabel, OK 74745 (800)926-8509/Fax: (800)289-6007 Headquarters: Lancaster Plant: 3449 Hempland Road
HANDBOOK OF CONSTRUCTION DETAILS
 HANDBOOK OF CONSTRUCTION DETAILS ARCHITECTURAL PRODUCTS FOR THE BUILDING INDUSTRY 12" SSR, Decor-Flush 7, Amp Lok, Double Lock, GrandCurve, High Seam, Posi-Lock Soffit, Slim Seam 7, Snap-on-Batten, Snap-On-Seam,
Pittsburgh Corning ProVantage Glass Block Installation System Assembly Instructions
 Pittsburgh Corning ProVantage Glass Block Installation System Assembly Instructions Introduction: The ProVantage Glass Block Installation System is the easiest way to install Pittsburgh Corning Premiere
DECKING INSTALLATION, CARE & MAINTENANCE INSTRUCTIONS
 DECKING INSTALLATION, CARE & MAINTENANCE INSTRUCTIONS 866.729.2378 MOISTURESHIELD.COM limited lifetime warranty 866.729.2378 W W W.MOISTURESHIELD.COM Welcome To The Even Greater Outdoors. Congratulations
Chapter 7. Roof Framing
 Chapter 7. Roof Framing 7.1 ROOFING PREP WORK 7.2 INSTALLING ROOF TRUSSES 7.3 INSTALLING PORCH TRUSSES 7.4 SHEATHING ROOF 7.5 INSTALLING SUB-FASCIA 7.6 BUILDING AND INSTALLING SCUTTLE BOX 7.7 INSTALLING
Drexel Metals Clips and Accessories
 Drexel Metals Clips and Accessories Your machine makes one component of the total metal roof system. Drexel Metals has invested millions of dollars to ensure our metal roof system meet the required building
KS SERIES - VERTICAL INSTALLATION
 CS-DS-01-KSV CS DISCLAIMER CS-PP-01-KSV PANEL PROFILES CS-PP-02-KSV PANEL PROFILES CS-PP-03-KSV PANEL PROFILES CS-PJ-01-KSV KS SERIES EXPANDED PANEL JOINT CS-PJ-02-KSV KS SERIES ENGAGED PANEL JOINT CS-PJ-03-KSV
OREGON ROOF CONSULTING - ROOF INSPECTION FORM
 Oregon CCB: 199121 PO Box 220190, Milwaukie, OR 97222 Washington License: OREGORC871MR OREGON ROOF CONSULTING - ROOF INSPECTION FORM General Roof Conditions: NA = Not Applicable Debris on Roof Physical
November 2017, V 1.2 INSTALLATION MANUAL
 November 2017, V 1.2 INSTALLATION MANUAL FOREWORD INSTALLATION MANUAL FOR THE PROFESSIONAL INSTALLER Dear customer, Congratulations on your purchase of this product. Known for its outstanding qualities,
ROOFING CONTRACTORS GENERAL TRADE KNOWLEDGE EXAMINATION CONTENT INFORMATION
 ROOFING CONTRACTORS GENERAL TRADE KNOWLEDGE EXAMINATION CONTENT INFORMATION Revised September 14 The General Trade Knowledge portion of the examination is administered daily in Computer Based Testing (CBT)
STILE. Panel Information. Design/Installation Considerations. Flashing Profiles. Detail Conditions. Notes. Accessory Profiles. Testing Information
 Table of ontents Product Page No. Product Page No. Panel Information Profile...PST-2 Panel Overview...PST-2 Flashing Profiles Eave...PST- Extended Eave...PST- leat...pst- Stile Starter...PST- Box Gutter...PST-
Rev. 07 8/15 Please Read Disclaimers:
 FiberCorr panels Guidelines 6005.FC Rev. 07 8/15 Please Read Disclaimers: PLEASE READ ALL INSTRUCTIONS BEFORE BEGINNING INSTALLATION!! These guidelines are provided in good faith to help prevent any problems
RESIDENTIAL RE-ROOFING PERMIT APPLICATION
 RESIDENTIAL RE-ROOFING PERMIT APPLICATION Effective date: October 1, 2007. Note: These requirements apply to residential structures built prior to implementation of the FBC on March 1, 2002. I. LEGAL DESCRIPTION:
Built to Last a Lifetime
 Built to Last a Lifetime Welcome to Lincoln 2 This brochure will introduce you to Lincoln Steel Buildings from the ground up starting with the framing of the building all the way to the roof and finally
Weep Valves Stucco Wire Mesh Reinforcement Weather Resistive Barrier Sheathing Insulation Framing
 INSTALLATION INSTRUCTION FOR SINGLE-HUNG AND FIXED WINDOW REPLACEMENT using FLUSH FLANGE Installation Instructions for replacing windows in a Typical Stucco Application. These instructions were developed
SECTION MANUFACTURED ROOF AND WALL PANELS SECTION SHEET METAL ROOFING
 SPECIFICATIONS www.englertinc.com MANUFACTURER ENGLERT, INC. 1200 Amboy Avenue Perth Amboy, New Jersey 08861 Tel: (732) 826-8614 Fax: (732) 826-8865 PART I - GENERAL 1.01 WORK INCLUDED SECTION 07410 -
Se incluyen las instrucciones en español
 Page 1 of 16 Pittsburgh Corning Corporation Pittsburgh, PA 15239 1-800-624-2120 www.pittsburghcorning.com All trademarks and registered trademarks in this brochure are owned and protected by Pittsburgh
DREXEL METALS CLIPS AND ACCESSORIES SIMPLIFYING METAL ROOFING SYSTEMS ARCHITECTURAL COMMERCIAL RESTORATION/CUSTOM
 DREXEL METALS CLIPS AND ACCESSORIES SIMPLIFYING METAL ROOFING SYSTEMS Your machine makes one component of the total metal roof system. Drexel Metals has invested millions of dollars to ensure our metal
Thin Brick Façade. Façades Installation Guide
 Thin Brick Façade Façades Installation Guide October 2016 BENCHMARK Welcome to Kingspan, global leaders in the design and manufacture of insulated metal panels. Insulated panels serve as energy efficient,
LP SmartSide Perfection Shingle
 Application Instructions Fiber Substrate Lap Siding A A - Lap Siding ON SITE STORAGE Store off the ground well supported, on a flat well-drained surface. (Diagram 1a) Additional support may be required
S BI COM P ON E NT CA T ALOG
 SBI METAL BUILDINGS & COMPONENTS S BI COM P ON E NT CA T ALOG Date: 03 / 16 / 2017 COMMERCIAL PRODUCTS Commercial Panels and Trim Cee, Zee, Eave Struts, Angle, Channel, and Clips Accessories FT 0 1 2 3
SECTION CONCRETE TILE ROOFING. A. Section Includes: Concrete tile roofing as shown on Drawings and as specified.
 SECTION 07322 CONCRETE TILE ROOFING PART 1 GENERAL 1.01 SUMMARY A. Section Includes: Concrete tile roofing as shown on Drawings and as specified. 1.02 SYSTEM DESCRIPTION A. Performance: Meet the following
Metafor Panel System Installation Guide
 Installation Guide innovative cladding design solutions Product Description Universal Flashing Kit Supplemental Guide for VM Pro-Zinc Training To enroll in a VM PRO-ZINC Training Course contact: UMICORE
SECTION MANUFACTURED ROOF AND PANELS SECTION SHEET METAL ROOFING
 SPECIFICATIONS www.englertinc.com MANUFACTURER ENGLERT, INC. 1200 Amboy Avenue Perth Amboy, New Jersey 08861 Tel: (732) 826-8614 Fax: (732) 826-8865 PART I - GENERAL 1.01 WORK INCLUDED SECTION 07410 -
DRY SEAL INSTALLATION GUIDE
 DRY SEAL INSTALLATION GUIDE Effective September 2015 Tech Support: 800.523.2347 LaminatorsInc.com TABLE OF CONTENTS Handling and Maintenance of Omega-Lite Panels 1 System Limitations and Pre-Installation
WARRANTY PROVIDER ACCEPTED A REFERENCE GUIDE OF TYPICAL RAINSCREEN WALL AND WINDOW DETAILS
 WARRANTY PROVIDER ACCEPTED A REFERENCE GUIDE OF TYPICAL RAINSCREEN WALL AND WINDOW DETAILS Per: 2006 B.C.B.C. Part 9 DISCLAIMER: THE INFORMATION CONTAINED IN THIS DOCUMENT REPRESENTS CURRENT WOOD FRAME
SECTION INSULATED METAL WALL PANELS. ATAS International, Inc. General Specification for Commercial/Industrial and Architectural Applications
 SECTION 07 42 13 INSULATED METAL WALL PANELS ATAS International, Inc. General Specification for Commercial/Industrial and Architectural Applications PART 1 GENERAL 1.1. Summary The contract drawings indicate
J41 Reinforced bitumen membrane roof coverings
 J41 Reinforced bitumen membrane roof coverings To be read with Preliminaries/General conditions. A comprehensive waterproofing system comprising two reinforced bituminous membranes fully adhered to thermal
SECTION METAL ROOFING MASTER SPECIFICATION
 SECTION 07 41 13 METAL ROOFING MASTER SPECIFICATION PART I - GENERAL REQUIREMENTS 1.01 DESCRIPTION OF WORK: A. Section Includes: The extent of each type of preformed metal roofing panel as indicated on
NUCOR VR 16 II STANDING SEAM ROOF SYSTEM TABLE OF CONTENTS
 NUCOR VR 16 II STANDING SEAM ROOF SYSTEM TABLE OF CONTENTS Nucor VR16 II Vertical Rib Standing Seam Roof System...2 Nucor VR16 II Property and Span Tables...3 Standard Details...5 ED3010PE - Gutter...5
Margaret Greene Park Washroom Building 80 Westwood Road, Guelph, Ontario. Structural and Maintenance Remedial Work
 SCOPE OF WORK Margaret Greene Park Washroom Building 80 Westwood Road, Guelph, Ontario Structural and Maintenance Remedial Work Prepared For City of Guelph City Hall, 1 Carden Street, Guelph, ON N1H 3A1
Galvanized Steel TECHNICAL BULLETIN #1
 Galvanized Steel TECHNICAL BULLETIN #1 Guide to Good Practice in the use of Galvanized Steel for Roofing and Siding Products Panels fabricated from Galvanized Steel may provide many years of trouble-free
FreeStyle Linear Drain with Full Mortar Bed Adapter Kit
 FreeStyle Linear Drain with Full Mortar Bed Adapter Kit U.S. Patent No. 8,474,068 Patents Pending: Canada & EP Publication No. 2354339 Discard Linear Drain installation instructions and refer to these
Guide Specification SDP 200
 PART 1 GENERAL 1.01 SUMMARY A. Section Includes: Sheet metal roofing panels, metal trim, accessories, fasteners, closures, and sealants. [Specifier Note: Edit paragraph below to suit project requirements.]
FOR FIELD USE PLEASE DISTRIBUTE TO THE ERECTION CREW
 COVER INSTRUCTIONS FOR INSTALLING NBS CLASSIC ROOF FOR FIELD USE PLEASE DISTRIBUTE TO THE ERECTION CREW WATERLOO, IN 305 Industrial Parkway Waterloo, IN 46793 Phone: 260-837-7891 Fax: 260-837-7384 SWANSEA,
PBR & PBU Panels. Technical/Installation Information
 PBR & PBU Panels Technical/Installation Information TABLE OF CONTENTS A. PBR Panel 1. General Description..................................................................... 2 2. Architect/Engineer Information............................................................
CS-100 Guide Specifications
 MANUFACTURER CUSTOM-BILT METALS 1333 Corporate Drive, Suite 103 Irving, Texas 75038-2520 (800) 826-7813 or info@custombiltmetals.com www.custombiltmetals.com CS-100 Guide Specifications This Guide Specification
STORAGE AND TRANSPORTION
 Content 1. General & Notes 2. Substrate Processing 3. Panel Layout 4. Tools 5. Screws 6. Installation instructions 7. Cleaning 8. FAQS 8. MSDS General & Notes In comparison to natural or cast stone, Questone
The Ashland Project. Total Area: 1,778 Sq.Ft. 3 Bedroom, 2 Bath, 2 Car Garage
 The Ashland Project Total Area: 1,778 Sq.Ft. 3 Bedroom, 2 Bath, 2 Car Garage The garage and bedroom extend from the front of this three bedroom home, drawing you visually into the entryway. Brick and stucco
technical drawings Cutted roof tile Levelling batten Plasma roof tile Plasma eave tile (without ribs on the lower side) C Metalic batten Linkage tile
 C Metalic batten Linkage tile") technical drawings Straight bond Cross bond Cutted roof tile Levelling batten 1 Plasma eave tile (without ribs on the lower side) C Metalic batten Linkage tile Omega batten 2 Barge tile right Gable left
technical drawings Straight bond Cross bond Cutted roof tile Levelling batten 1 Plasma eave tile (without ribs on the lower side) C Metalic batten Linkage tile Omega batten 2 Barge tile right Gable left
Central Snap. Product Guide. 16" or 18" COVERAGE 1¾" HELPFUL INFORMATION ON PANELS, TRIMS, GUTTERS AND ACCESSORIES
 Central Snap Product Guide HELPFUL INFORMATION ON PANELS, TRIMS, GUTTERS AND ACCESSORIES 1¾" 16" or 18" COVERAGE Copyright 2018, Central States Manufacturing, Inc., All Rights Reserved. D C GUID_PROD_CENTRALSNAP_180201.1
SECTION STRUCTURAL RETROFIT ROOF SUB-FRAMING SYSTEM
 SECTION 13 34 21 - STRUCTURAL RETROFIT ROOF SUB-FRAMING SYSTEM PART 1 - GENERAL 1.1 DESCRIPTION A. The structural retrofit roof sub-framing system will provide support for a new metal roofing system constructed
N Scale Double Track Lift Bridge v1.2
 N Scale Double Track Lift Bridge v1.2 3.25"W x 16"L x 7.5"H Plus two 5" long approach bridges Instructions for assembly of the Lift Bridge Included in this kit: Instructions and part diagrams 138ea. 1/16"
City of Republic Community Development Department. Residential Roofs REVISION DATE: JANUARY 2017
 City of Republic Community Development Department Residential Roofs REVISION DATE: JANUARY 2017 A residential roof permit is required for new roofs and for replacement roofs when the replacement area is
Vertigo Cladding Board
 Installation guide Vertigo Cladding Board Geolam: a stunning alternative to wood cladding Vertigo is a composite wood cladding board requiring minimum maintenance. Durable and fade resistant, it will not
NatureScape. 3 Thermally Broken 2 Non-thermal
 NatureScape 3 Thermally Broken 2 Non-thermal REASONS TO CONSIDER PREFABRICATED: Pre-designed, pre-engineered and pre-inspected, the NatureScape enclosure guarantees that the room will be delivered and
1 Exam Prep. Roofing Practice Exam 9
 1 Exam Prep Roofing Practice Exam 9 1. Roof assemblies are fire rated in accordance with STM E 100 and UL 790 UL108 and STM E 790 The building official UL 790 and STM E 108 2. The underlayment and composition
Addendum No. 1. ITB for Emergency Management/Utilities Administration Building Renovation Addendum Release Date April 06, 2017
 City of Wilton Manors Finance Department 2020 Wilton Drive Wilton Manors, FL 33305 Phone (954) 390-2171 Fax (954)390-2199 www.wiltonmanors.com Addendum No. 1 ITB # 2016-16 ITB for Emergency Management/Utilities
J41 Reinforced bitumen membrane roof coverings
 J41 Reinforced bitumen membrane roof coverings To be read with Preliminaries/General conditions. TYPES OF COVERING 110 BUILT-UP REINFORCED BITUMEN MEMBRANE WARM DECK ROOF COVERING Substrate: Plywood to
SECTION Tile Roof Guideline. B. "Pan" Tile: Clay tile on the underlayment, convex in shape.
 SECTION 07 32 13 Tile Roof Guideline PART 1 GENERAL 1.1 RELATED DOCUMENTS A. The drawings and general provisions of the contract, including General and Specific Conditions, and Division 1 (General Requirements)
Freedom Barrier Free Shower Pan Installation Instructions
 Tools & Materials you might need for proper installation Materials: 2-1 gallon buckets of solid wood flooring adhesive (non-shrink) or 100% silicone adhesive 20-1.25 wood screws 1 - tube of non-shrink
SECTION MANUFACTURED ROOF AND WALL PANELS SECTION SHEET METAL ROOFING
 SPECIFICATIONS www.englertinc.com MANUFACTURER ENGLERT, INC. 1200 Amboy Avenue Perth Amboy, New Jersey 08861 Tel: (732) 826-8614 Fax: (732) 826-8865 PART I GENERAL 1.01 WORK INCLUDED SECTION 07410 - MANUFACTURED
SECTION ROOF SPECIALTIES
 PART 1 - GENERAL 1.1 DESCRIPTION SECTION 07 71 00 1. Use this section only for NCA projects. 2. Delete between // // if not applicable to project. Also delete any other item or paragraph not applicable
100 Veka Drive Fombell, PA GO4.VEKA
 100 Veka Drive Fombell, PA 16123 1.888.GO4.VEKA www.vekadeck.com www.vekainnovations.com VEKA Innovations WARRANTY VEKA Innovations warrants their rigid vinyl extrusions to be the finest quality available
VISUM3. One tile creates the visual effect of three
 VISUM VISUM3 One tile creates the visual effect of three The innovative design allows lower installation costs and achieves with one tile a triple tile look EN 539-2 resistance EN 539-1 Impermeability
ROOF MOUNT KIT OWNERS MANUAL
 ROOF MOUNT KIT OWNERS MANUAL Made in the USA by: Primus Wind Power, Inc. 938 Quail St. Lakewood, CO 80215 Phone: (303) 242-5820 www.primuswindpower.com AIR is a trademark of Primus Wind Power, Inc. ROOF
Installation Data Freedomline 4-Piece Showers F1364P, F1424P*, F1604P Fax on Demand # 1163
 ADA/ANSI COMPLIANT BARRIER-FREE SHOWER STALLS For roll-in showers with beveled thresholds, build up or recess the bathroom floor 3/4 inch less the thickness of the finished floor, ensuring that the finished
Tools & Equipment Chalk line Caulk gun 50-75mm brushes 2 hand roller Hammer Hook blade knife/scissors Pencils
 Installation Guide This installation Guide is to give the user a general overview of the application of an EPDM roof. It is intended as a broad reference guide. Safety Awareness The bonding adhesive MUST