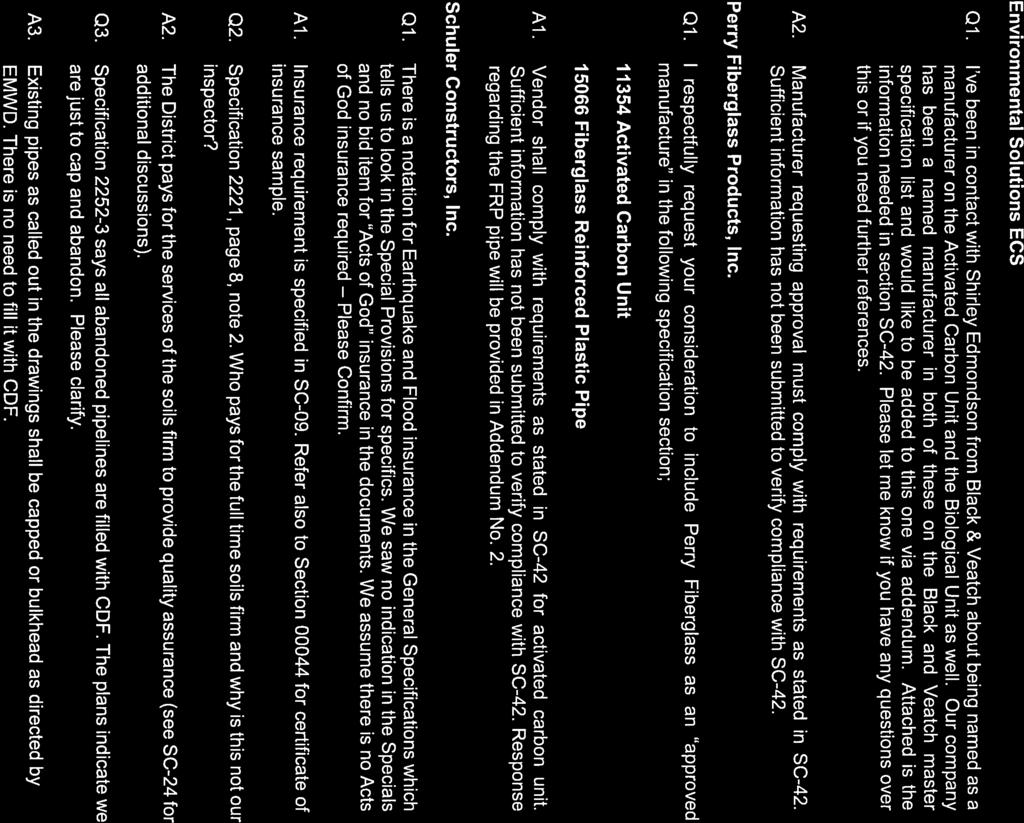
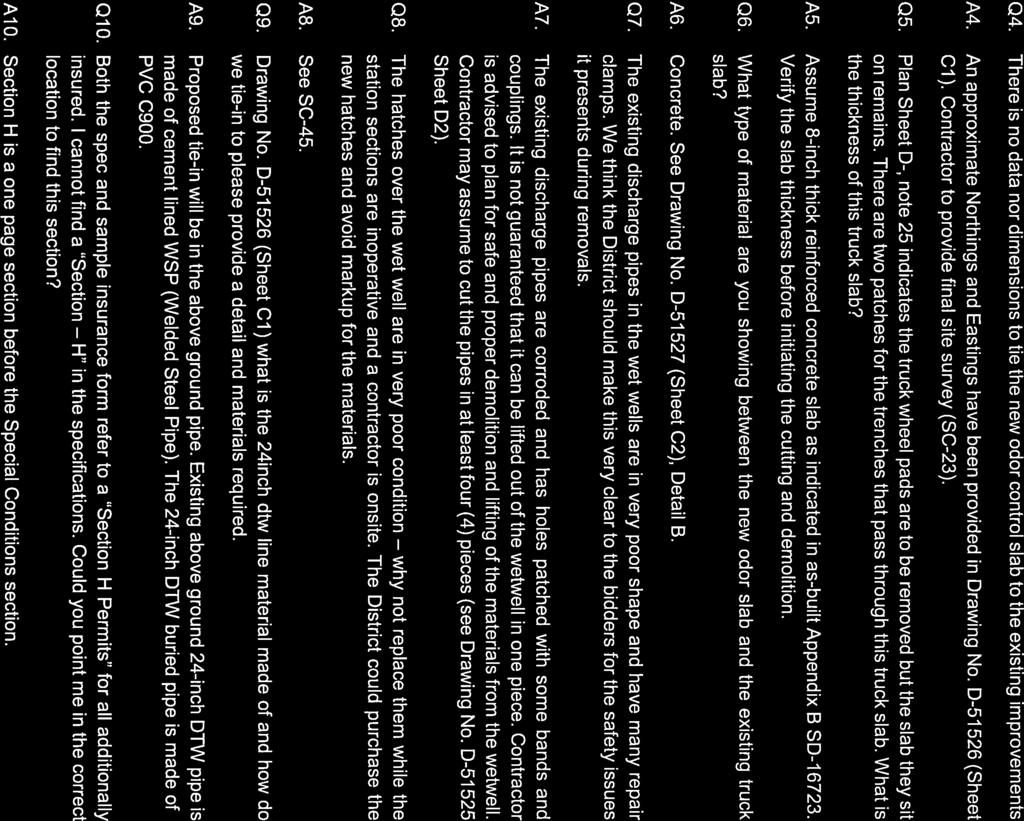
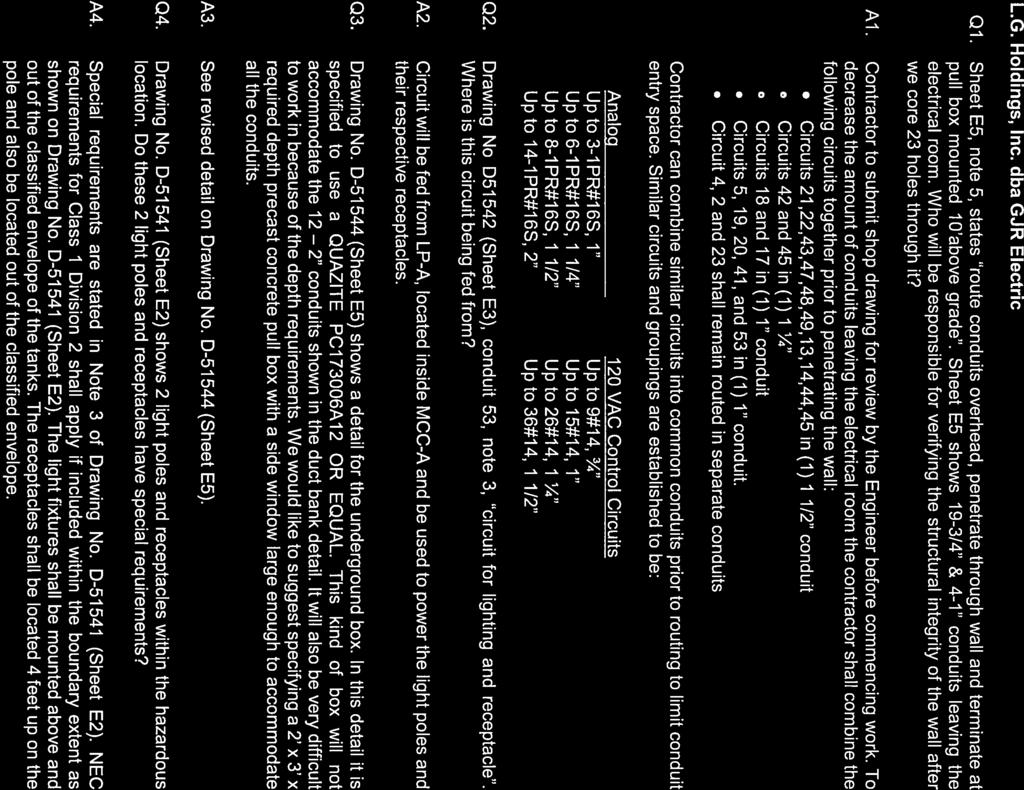
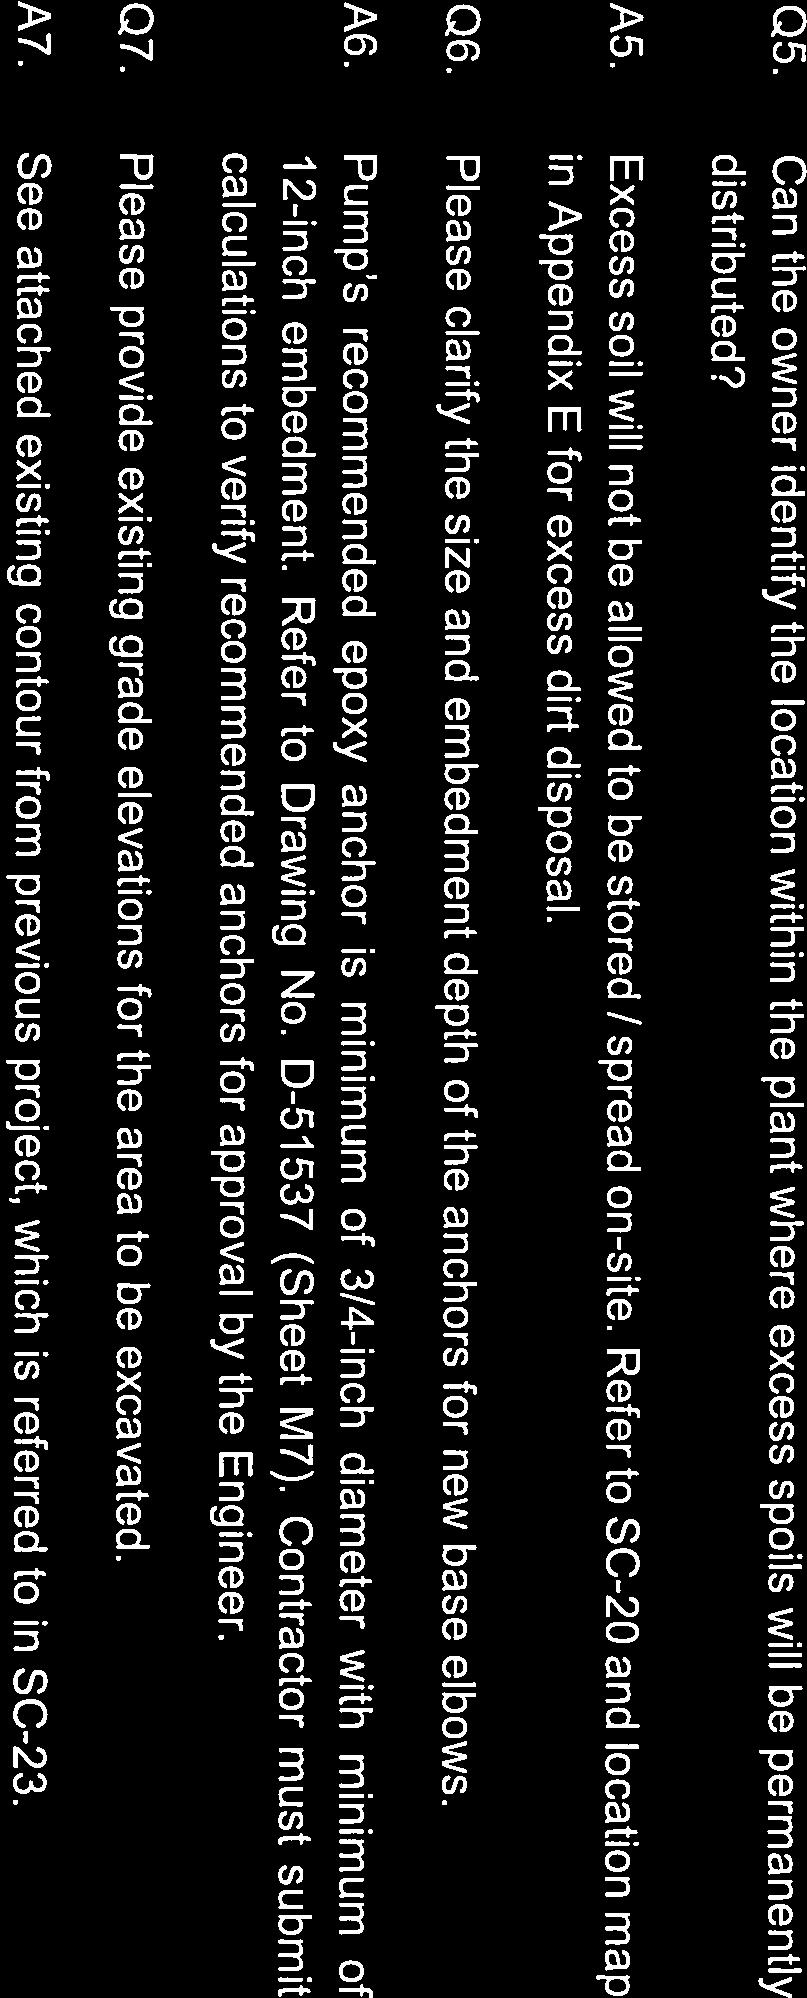
|
|
|
- Alexina Townsend
- 5 years ago
- Views:
Transcription
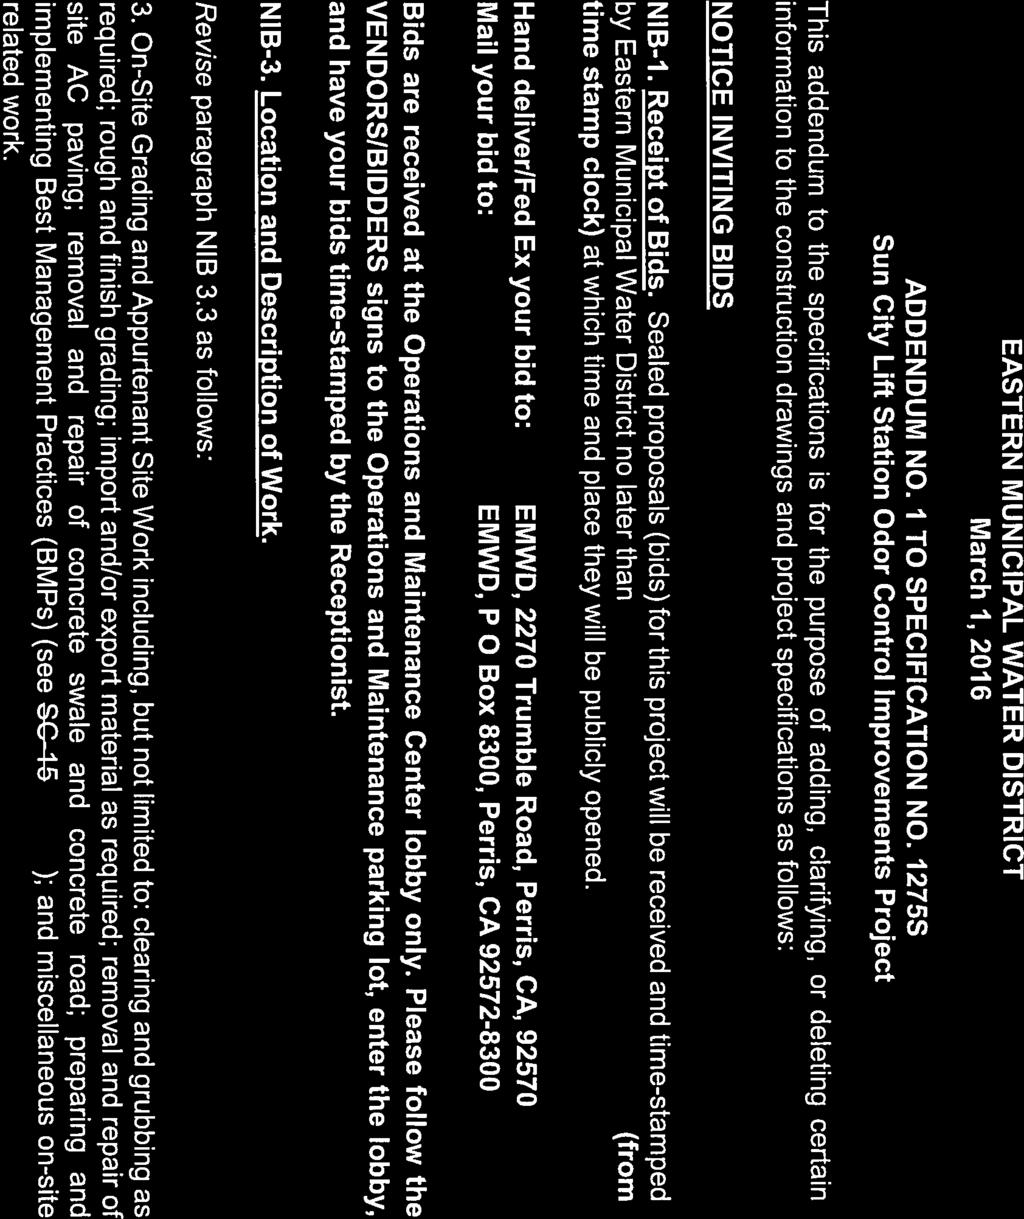

1
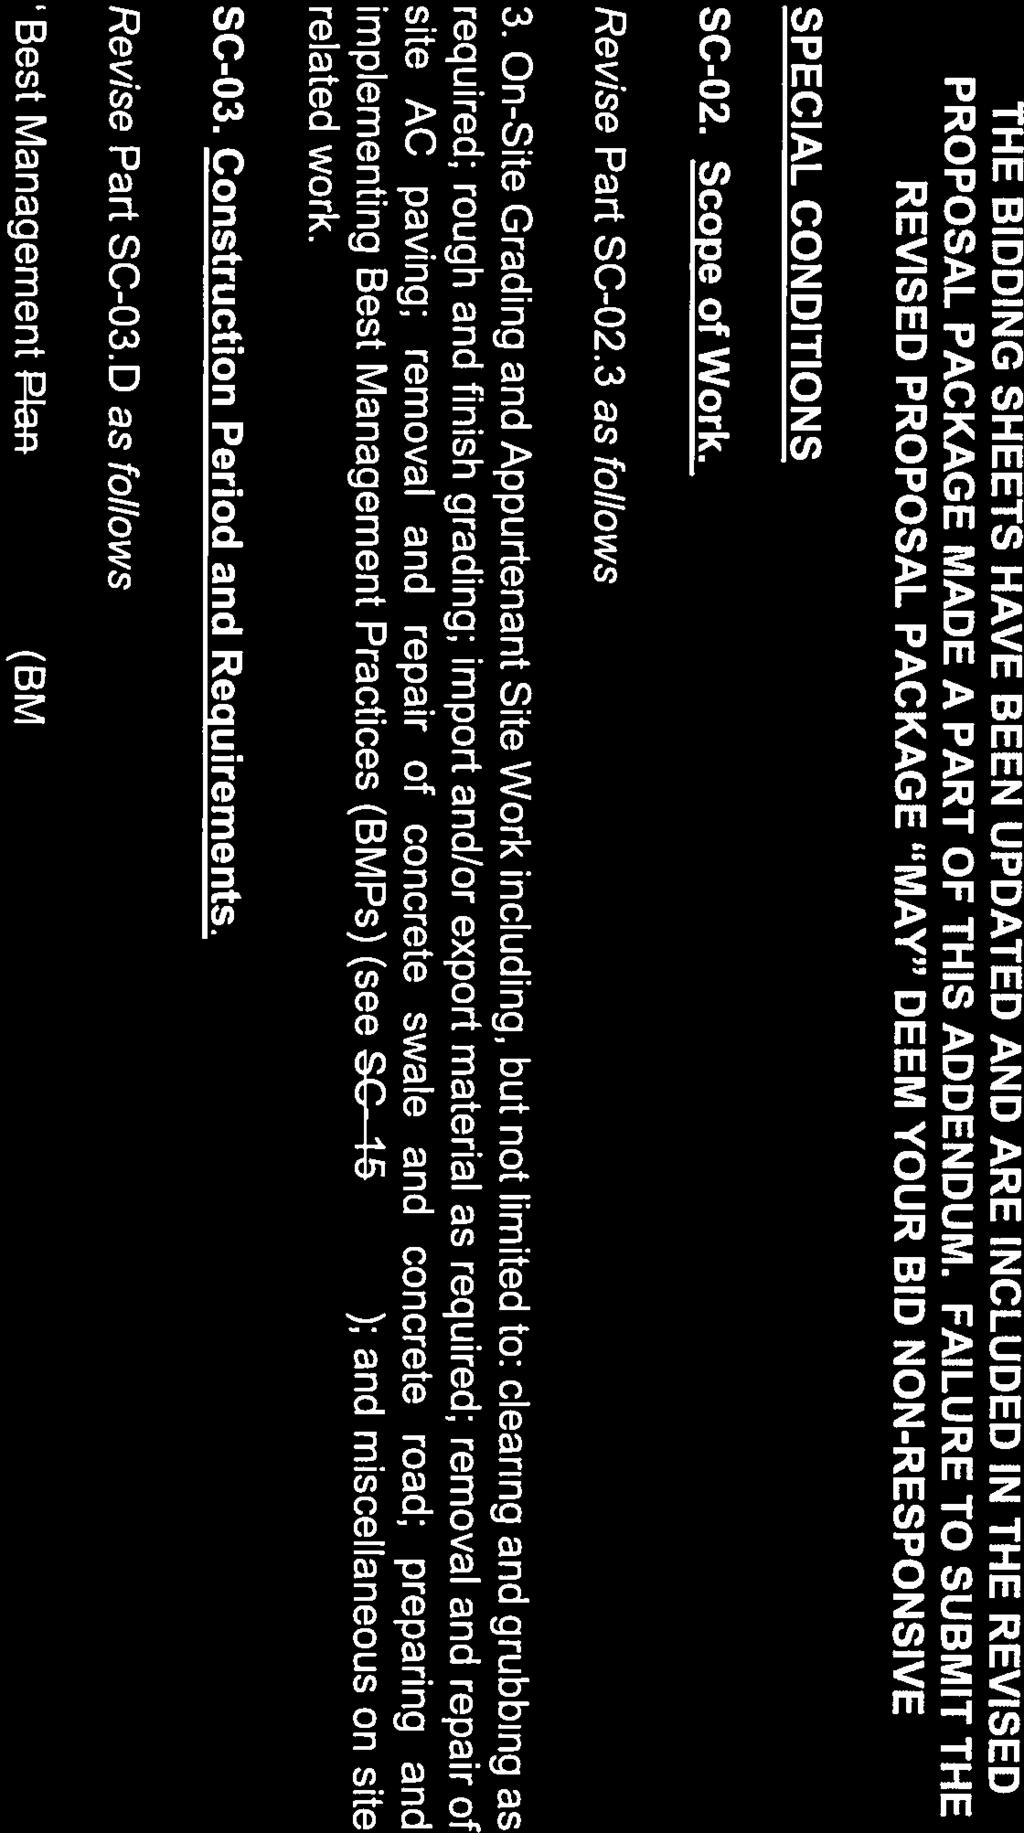

2
3
4
5
6
7
8
9
10


11


12
13 Joint Sealants SECTION JOINT SEALANTS PART 1 GENERAL 1.01 SUMMARY A. Section includes: 1. Acrylic-Latex sealant. 2. Precast concrete joint sealant. 3. Silicone sealant. 4. Synthetic rubber sealing compound. 5. Synthetic sponge rubber filler. 6. Related materials REFERENCES A. American Association of State Highway and Transportation Officials (AASHTO): 1. M Standard Specification for Joints for Concrete Pipe, Manholes, and Precast Box Sections Using Preformed Flexible Joint Sealants. B. ASTM International (ASTM): 1. C Standard Specification for Elastomeric Joint Sealants. 2. C Standard Specification for Joints for Concrete Pipe, Manholes, and Precast Box Sections Using Preformed Flexible Joint Sealants. 3. D Standard Test Methods for Vulcanized Rubber and Thermoplastic Elastomers - Tension. 4. D Standard Test Method for Tear Strength of Conventional Vulcanized Rubber and Thermoplastic Elastomer SUBMITTALS A. Product data. B. Samples, include color selections. C. Manufacturer's Installation Instructions. D. Warranty QUALITY ASSURANCE A. Manufacturer qualifications: Manufacturer of proposed product for minimum 5 years with satisfactory performance record. B. Installer qualifications: Manufacturer approved installer of products similar to specified products on minimum 5 projects of similar scope as Project with satisfactory performance record.
14 Joint Sealants PROJECT/SITE CONDITIONS A. Environmental requirements: Do not apply sealant on wet or frosty surfaces or when surface temperature is higher than 100 degrees Fahrenheit or lower than recommended by the manufacturer DELIVERY, STORAGE, AND HANDLING A. Deliver, store, and handle products in accordance with manufacturer's recommendations. B. Code date packages. Do not use material older than manufacturer s published shelf life. Store materials at temperatures lower than 80 degrees Fahrenheit. Condition materials in accordance with manufacturer s instructions prior to installation SEQUENCING AND SCHEDULING A. Caulk joints prior to painting WARRANTY A. Warrant to correct defective products for minimum 5 years in accordance with manufacturer's standard warranty. PART 2 PRODUCTS 2.01 ACRYLIC-LATEX SEALANT A. Permanently flexible, nonstaining, and nonbleeding latex modified acrylic sealant compound, colors as selected by ENGINEER from manufacturer's standard options. Manufacturers: One of the following or equal: 1. Tremco, Tremflex Pecora Corp., Number AC Sonneborn, Sonolac PRECAST CONCRETE JOINT SEALANT A. Preformed, cold-applied, ready-to-use, flexible joint sealant in accordance with ASTM C 990 and AASHTO M 198. Manufacturers: One of the following or equal. 1. Henry Corporation, Ram-Nek. 2. Concrete Sealants Division, ConSeal SILICONE SEALANT A. ASTM C 920, Type S, Grade NS, Class 25, single component silicone sealant. Manufacturers: One of the following or equal: 1. Tremco, Proglaze. 2. Pecora Corp., Number Dow Corning, Number General Electric, Number 1200 Series.
15 Joint Sealants SYNTHETIC RUBBER SEALING COMPOUND A. Manufacturer: One of the following or equal: 1. Sika Corporation, Lyndhurst, NJ, Sikaflex 2c NS or SL 2. Polymeric Systems, Inc., PSI Pacific Polymers, Garden Grove, CA, Elastothane 227R. B. Material: In accordance with ASTM C 920 Type M, Grade P (pourable), Class 25 and Type M, Grade NS (non-sag), Class 25; multi-part polyurethane; able to cure at room temperature to firm, highly resilient polymer; able to perform satisfactory when continuously submerged in water or sewage and exposed to direct sunlight in dry condition; with the following properties determined at 75 degrees Fahrenheit and 50 percent relative humidity: 1. Base: Polyurethane rubber. 2. Solids: Minimum 97 percent. 3. Application time: Minimum 2 hours. 4. Cure time: Maximum 3 days. 5. Tack free time: 24 hours. 6. Ultimate hardness: Non-sag 25, Pourable/SL 40, within 5 Shore A. 7. Tensile strength: Non-sag 120 pounds per square inch minimum and selfleveling minimum 170 pounds per square inch when tested in accordance with ASTM D Ultimate elongation: Minimum 490 percent when tested in accordance with ASTM D Tear resistance: Non-sag 45 pounds per inch minimum and self-leveling minimum 85 pounds per inch when tested in accordance with ASTM D 624, Die C. 10. Service temperature range: Minus 25 degrees to 158 degrees Fahrenheit. C. Color: Gray to match concrete, unless indicated on the Drawings SYNTHETIC SPONGE RUBBER FILLER A. Closed-cell expanded sponge rubber manufactured from synthetic polymer neoprene base, or resilient polyethylene foam backer rod. Manufacturers: One of the following or equal: 1. Presstite, Number Ropax Rod Stock. 2. Rubatex Corp., Rubatex-Cord. B. Characteristics: 1. Suitable for application intended. 2. Strength: As necessary for supporting sealing compound during application. 3. Resiliency: Sufficient resiliency to prevent significant load transfer across joint. 4. Resistance to environmental conditions of installation. 5. Bonding: No bonding to the sealing compound. 6. Structure: Cellular, prevents wicking or absorption of water. 7. Compatibility with other materials in joint and acceptance by manufacturer of sealing compound. 8. Size: Minimum 25 percent greater than nominal joint width RELATED MATERIALS A. Primer: Nonstaining type, recommended by sealant manufacturer to suit application.
16 Joint Sealants B. Joint cleaner: Noncorrosive, nonstaining, compatible with joint forming materials and as recommended by sealant manufacturer. C. Bond breaker tape: Pressure-sensitive tape recommended by sealant manufacturer to suit application. PART 3 EXECUTION 3.01 EXAMINATION A. Verify acceptability of joint dimensions, physical, and environmental conditions. B. Verify that surfaces are dry, clean, and free of dirt, grease, curing compound, and other residue which might interfere with adhesion of sealants PREPARATION A. Allow concrete to cure thoroughly before caulking. B. Synthetic sponge rubber filler: 1. Prepare surfaces designated to receive filler in accordance with manufacturer's installation instructions. 2. Do not stretch filler beyond its normal length during installation. C. Caulking: 1. Verify that surfaces are dry, clean, and free of dirt, grease, curing compounds, and other residue that might interfere with adhesion of sealant. 2. Concrete, masonry, wood, and steel surfaces: Clean and prime in accordance with manufacturer's instructions prior to caulking. D. Synthetic rubber sealing compound: 1. Ensure surfaces to which synthetic rubber must bond are dry and free of dust, dirt, and other foreign residue. 2. Heavy sandblasted caulking groove to sound surface, and prime with manufacturer's recommended primer for particular surface. E. For sidewalks, pavements, and similar joints sealed with elastomeric sealants and subject to traffic and other abrasion and indentation exposures, fill joints to depth equal to 75 percent of joint width, but neither more than 5/8 inches deep nor less then 3/8 inches deep. F. For normal moving building joints sealed with elastomeric sealants not subject to traffic, fill joints to depth equal to 50 percent of joint width, but neither more than 1/2 inch deep nor less than 1/4 inch deep. G. For joints sealed with acrylic-latex sealants, fill joints to depth in range of 75 percent to 125 percent of joint width. H. Use joint filler to achieve required joint depths, to allow sealants to perform properly. I. Prepare surfaces and install synthetic sponge rubber filler in accordance with manufacturer's recommendations.
17 Joint Sealants J. Do not stretch filler beyond normal length during installation. K. Apply bond breaker when recommended by joint sealer manufacturer INSTALLATION A. Synthetic sponge rubber filler: Install filler in accordance with manufacturer's installation instructions. B. Caulking, joints, and sealing: 1. Construct expansion, contraction, and construction joints as indicated on the Drawings. 2. Install pipe and conduit in structures as indicated on the Drawings. 3. Caulk doors, windows, louvers, and other items installed in or over concrete openings inside and out. 4. Use synthetic rubber sealing compound for caulking where indicated on the Drawings or as specified, except for masonry construction and where specified otherwise. 5. Complete caulking prior to painting. 6. Verify that concrete is thoroughly cured prior to caulking. 7. When filler compressible material is used, use untreated type. 8. Apply caulking with pneumatic caulking gun. 9. Use nozzles of proper shape and size for application intended. 10. Maintain continuous bond between caulking and sides of joint to eliminate gaps, bubbles, or voids and fill joint in continuous operation without layering of compound. 11. Employ experienced applicators to caulk joints and seams in neat workmanlike manner. 12. To hasten curing of compound when used on wide joints subject to movement, apply heat with infrared lamps or other convenient means. 13. Apply synthetic rubber sealing compound with pneumatic caulking tool or other acceptable method CLEANING A. Clean surfaces adjacent to sealant as work progresses. B. Remove excess uncured sealant by soaking and scrubbing with sealant cleaning solvent. C. Remove excess cured sealant by sanding with Number 80 grit sandpaper. D. Leave finished work in neat, clean condition SCHEDULE A. Acrylic latex: 1. Use where indicated on the Drawings. 2. Interior joints with movement less than 7.5 percent and not subject to wet conditions. B. Silicone: 1. Use where indicated on the Drawings.
18 Joint Sealants Joints and recesses formed where window, door, louver and vent frames, and sill adjoin masonry, concrete, stucco, or metal surfaces. 3. Door threshold bedding. 4. Moist or wet locations, including joints around plumbing fixtures. 5. Stainless steel doors and frames, including joints between applied stops and frames, and around anchor bolts. 6. Plenum joints. C. Synthetic rubber sealing compound, non-sag Type II: 1. Use where indicated on the Drawings. 2. Water-bearing and earth-bearing concrete structures. 3. Joints in masonry, concrete vertical surfaces, and metal-faced panels in vertical surfaces. 4. Joints between sheet metal flashing and trim. 5. Joints between sheet metal flashing and trim, and vertical wall surfaces. 6. Small voids between materials requiring filling for weathertight performance in vertical surfaces. 7. Perimeters of frames of doors, windows, louvers, and other openings where bonding is critical to airtight performance. 8. Expansion and control joints in masonry vertical surfaces. D. Synthetic rubber sealing compound, self-leveling Type I: 1. Use where indicated on the Drawings. 2. Expansion and control joints in masonry, concrete horizontal surfaces, and metal panels in horizontal surfaces. 3. Small voids between materials requiring filling for weathertight performance in horizontal surfaces. 4. Pavement joints. 5. Perimeters of frames of doors, windows, louvers, and other openings in horizontal surfaces where bonding is critical to airtight performance. END OF SECTION
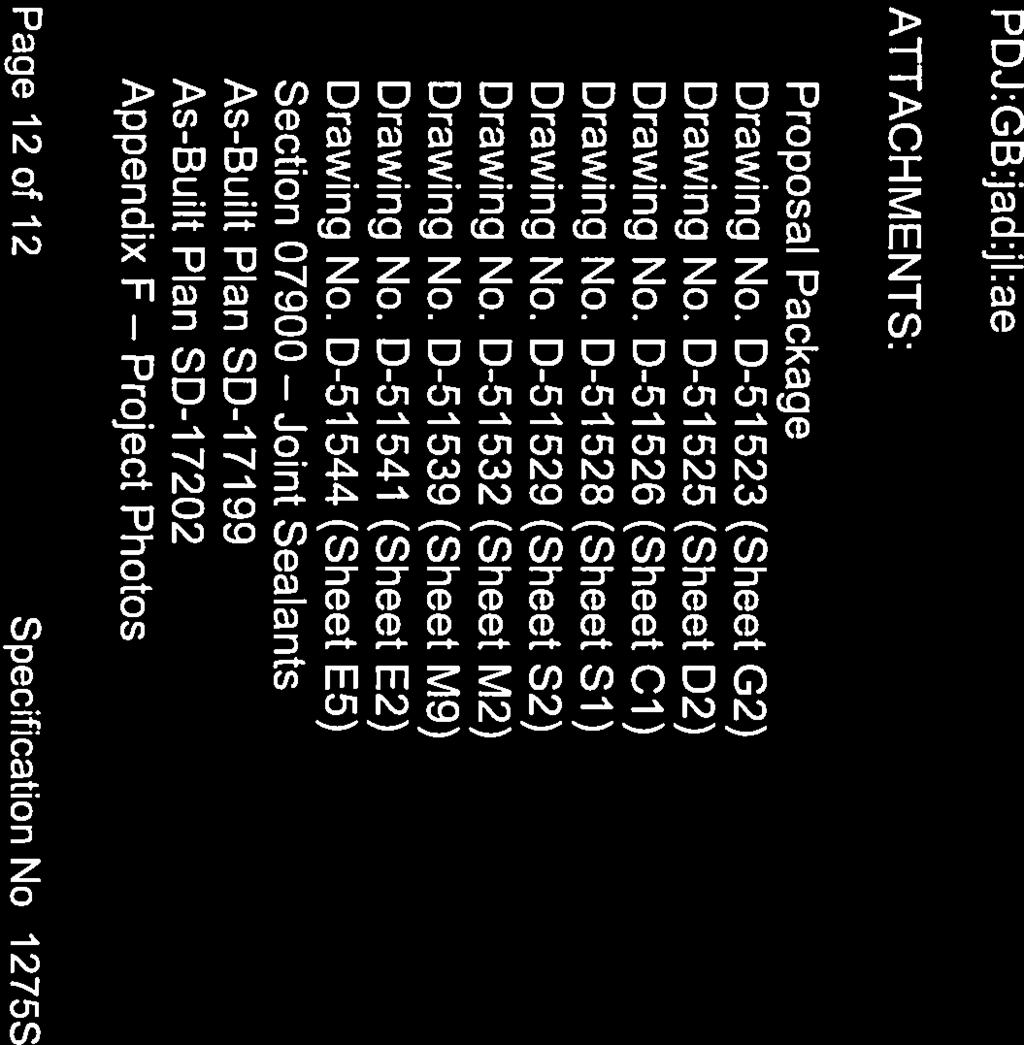
19 APPENDIX F Project Photos
20 [Page Left Intentionally Blank]

21 PHOTO 1 REMOVE EXISTING SUBMERSIBLE PORTABLE PUMP INCLUDING CABLES AND PIPING REPLACE EXISTING RAILINGS MODIFY CONCRETE PEDESTAL / SADDLE TO FIT THE NEW 18-INCH DIP DEMO EXISTING PIPE REPLACE EXISTING ALUMINUM COVER IN-KIND.

22 PHOTO 2 ELECTRICAL JUNCTION BOX DEMO EXISTING UNUSED CONDUITS AND SUPPORTS DEMO EXISTING UNUSED CABLES


23 PHOTO 3 DEMO EXISTING PLATES REPLACE EXISTING ALUMINUM COVER IN-KIND


24 PHOTO 4 DEMO PLATES (SEE DRAWING M9 FOR THE PROPOSED SEAL) PROVIDE PVC PLUGS ON EXISTING CABLE SLEEVES