AASHTOWare BrDR D FEM Analysis Tutorial. Curved Steel Multi-Span 3D Example
|
|
|
- Marshall Powell
- 5 years ago
- Views:
Transcription
1 AASHTOWare BrDR D FEM Analysis Tutorial Curved Steel Multi-Span 3D Example
2 3DFEM4 Curved Steel I Beam Using BrDR LRFD Engine This example details the data input of a curved composite steel plate girder structure in BrDR and performing a 3D FEM analysis. This example is an I-Girder Bridge, SR 302, from Mississippi DOT inventory. Structure Typical Section Last Modified: 3/13/2018 1
 Structural steel yield")
3 Topics Covered Structure Framing Plan Comments and Assumptions Data Entry of a four-span curved steel plate girder bridge Diaphragm definitions 3D analysis settings 3D model Analysis and Results Comments and Assumptions Per the design plans, the following material strengths were used: o o o o Structural steel yield strength = 50 ksi (girders, stiffeners, and splices) Structural steel yield strength = 36 ksi (diaphragms) Concrete compressive strength = 4.00 ksi (Class AA) Reinforcing steel yield strength = 60 ksi District, County and Owner information is not populated Traffic data and design speed for LRFR analysis o Assumed ADTT = 1000 o Design speed = 50 mph ¼ Integral Wearing Surface HL93 will be vehicle used for LRFR ratings and HS-20 scaled to HS-25 will be vehicle used for LFR ratings. An additional self-load of 0.01 kip/ft was applied to each beam/girder to account for bolts, stiffeners, diaphragm connections, etc. BrR does not handle staggered bolt patterns for girder splices. Bolt patterns are entered as non-staggered. Splice gap = 3/8 at field splices. Approximate values of Y Distance were input for all Diaphragm Definitions. Last Modified: 3/13/2018 2


4 Data Entry From the Bridge Explorer, select File New New Bridge from the menu to create a new bridge. Enter the following bridge description data. Last Modified: 3/13/2018 3

5 Close the window by clicking OK. This saves the data to memory and closes the window. To enter the materials to be used by members of the bridge, click on the Materials. The tree with the expanded Materials branch is shown below. to expand the Bridge Workspace tree for Last Modified: 3/13/2018 4
. The window shown below will open.")
6 To add a concrete material for the deck, click on Concrete in the tree and select File New from the menu (or right mouse click on Concrete and select New). The window shown below will open. Last Modified: 3/13/2018 5

7 Enter the following concrete material properties for the deck concrete or copy from the library. The materials can be found on the drawings. If copied from the library, the window will be populated. Click OK to save the data to memory and close the window. Last Modified: 3/13/2018 6
8 Enter the following steel material properties for the girder. Do the same for the stiffeners and diaphragms, except use 36 ksi strength. Click OK to save the data to memory and close the window. Last Modified: 3/13/2018 7
.")

9 To add reinforcement material, click on Reinforcing Steel in the tree and select File New from the menu (or right mouse click on Reinforcing Steel and select New). Click on the Copy from Library button to open the Reinforcing Steel Materials Library Data window. Select the Grade 60 material and click OK. The selected material properties are copied to the Bridge Materials - Reinforcing Steel window. Close the window by clicking OK. This saves the data to memory and closes the window. Last Modified: 3/13/2018 8

.")
10 To enter a steel shape to be used in this bridge, expand the tree labeled Beam Shapes as shown below. Click on Steel I Shapes in the tree and select File New from the menu (or double-click on I Beams in the tree). The window shown below will open. Last Modified: 3/13/2018 9

11 Click on the Copy from Library button. Select the Shapes from the Library Data window and click OK. The diaphragm properties are copied to the window as shown below. Angles are similar. Enter in the angles and W12x53. Last Modified: 3/13/


12 To enter the appurtenances to be used within the bridge, expand the tree branch labeled Appurtenances. To define a parapet, double-click on Parapet in the tree and enter the parapet dimensions as shown below. Click OK to save the data to memory and close the window. Enter the bolt definition. Use 7/8 diameter High Strength bolts. Last Modified: 3/13/

13 Diaphragm Definition Open the Diaphragm Definition window shown below. Last Modified: 3/13/

14 The following window shows a diaphragm definition that can be assigned to locations in the Framing Plan window. Steel bridges may contain any of the 4 types of diaphragm definitions. Straight concrete bridges may only contain Type 4 diaphragm definitions. Now, add the shapes for Diaphragms A and B. Last Modified: 3/13/

15 Last Modified: 3/13/


16 The following window shows a lateral bracing definition that can be assigned to locations in the Framing Plan window. The default LRFD dynamic load allowance and default LRFD factors will be used so we will skip to Superstructure Definition. Last Modified: 3/13/
 to create a new structure definition. Select Girder System and the Structure Definition window will open.")
17 Double click on SUPERSTRUCTURE DEFINITIONS (or click on SUPERSTRUCTURE DEFINITIONS and select File/New from the menu or right mouse click on SUPERSTRUCTURE DEFINITIONS and select New from the popup menu) to create a new structure definition. Select Girder System and the Structure Definition window will open. Enter the appropriate data as shown below: Last Modified: 3/13/

18 Only concentric girders with a constant deck width are supported and only steel member alternatives can be created for a curved superstructure. The following shows the new controls to describe the curved geometry. Click on Ok to save the data to memory and close the window. The design speed and superelevation are used to compute the centrifugal force effects on the truck live load. The high side of the roadway is assumed to be at the outside of the curve. Last Modified: 3/13/
19 The following types of horizontal alignments are supported. The Distance from PC to First Support Line and Distance from Last Support Line to PT are necessary to determine the member lengths when the first or last support line is skewed. If the member starts before the defined PC location, that portion of the member is assumed to be tangent to the curve at the defined PC location. If the member ends after the defined PT location, that portion of the member is assumed to be tangent to the curve at the defined PT location. Last Modified: 3/13/

20 The Superstructure Definition window contains the following settings to control the 3D analysis. Last Modified: 3/13/


21 The analysis of all member alternatives in the superstructure definition will use the following engine and specification set on the Specs tab. An exception to this is LFD rating of curved systems. The LFD rating is performed in accordance with the AASHTO Guide Specifications for Horizontally Curved Steel Girder Highway Bridges We can now go to the Bridge Alternatives and create a new Bridge Alternative, a new Superstructure, and a new Superstructure Alternative. The partially expanded Bridge Workspace tree is shown below: Last Modified: 3/13/

22 Open the Framing Plan Details: Layout tab to see how the girders are located in the structure typical section. A new field is available for curved girder systems to locate the leftmost girder relative to the superstructure definition reference line. Enter a negative value if the leftmost girder is to the left of the superstructure definition reference line. This along with the entered girder spacing determines the computed radii of the girders. Bearings are oriented in a local coordinate system at each member support in curved girder systems. The user is able to enter default values for the orientation of the Member Support constraints on this window and then apply them to all members. This is a shortcut feature to allow for ease of data entry. The constraints can be modified on the Member Support window as necessary. The constraint settings on this window are not used in the analysis, the constraint settings on the Member Support window are used instead. Select 'Tangent' if the local x axis for bearing alignment is parallel to the tangent of the member reference line at the support. Select 'Chord' if the local x axis for the bearing alignment is parallel to a specified chord angle from the tangent of the member reference line at the support. The following sketch shows an example of defining a bearing alignment along a chord. Last Modified: 3/13/
23 Open the Framing Plan Details: Diaphragms tab to see how diaphragm definitions are assigned to the framing plan. The weight of the diaphragms will be computed by the software and applied to the 3D model. Diaphragms in curved girder systems can be located by one of 3 methods: entering the spacing along both girders of the bay entering the spacing along the left girder of the bay entering the spacing along the right girder of the bay The spacing reference type Both must be used when the diaphragms are not radial to either girder. This spacing reference type may also be used when the diaphragms are radial as shown in this example. If the diaphragms are located by entering the spacing along the left or right girder of the bay, the resulting diaphragm location on the alternate girder will be computed by the program by casting a line perpendicular to the tangent of the specified girder at each spacing interval. Last Modified: 3/13/

24 A wizard is available to create the diaphragm locations for the user. The wizard is not available if any of the supports are skewed. In the class, use the spreadsheet to copy and paste over the diaphragm locations. Last Modified: 3/13/

25 Open the Framing Plan Details: Lateral Bracing Ranges tab to see how lateral bracing definitions are assigned to the framing plan. Values can be copied in from the spreadsheet for this window to save time. Last Modified: 3/13/


26 A new window to identify which diaphragms should be loaded for live load is now available for both straight and curved girder systems. This window contains a listing of each diaphragm location in the superstructure definition. The first number is the bay number and the second number is the numerical id of the diaphragm starting with 1 for the diaphragm at the start of the bay. Selecting a diaphragm in this window will result in influence surfaces for the diaphragm members being generated and then loaded with the live load. Including a lot of diaphragms in the live load analysis can greatly affect the run time and amount of memory needed for the analysis. Note that the diaphragms are always included in the FE model. This checkbox only controls if the diaphragm members are loaded for live load. Last Modified: 3/13/

27 Similarly, the same can be done with the lateral bracing. Last Modified: 3/13/

28 Next define the structure typical section by double-clicking on Structure Typical Section in the Bridge Workspace tree. The Structure Typical Section contains the following changes for curved girder systems. The width of the deck must be constant along the length of the structure. (Refer to assumptions listed above) The overhangs are computed based on the distance from the superstructure definition reference line to the leftmost girder and girder spacing entered on the Framing Plan window and the deck width entered here. Last Modified: 3/13/

 tab is used to enter information about the")
29 To view the skematics such as the framing plan, typical section and girder elevation, sit on tree and select button circled. The Deck (cont d) tab is used to enter information about the deck concrete and thickness. Last Modified: 3/13/


30 Enter the following parapets: Lane Positions: Use the Compute button to have BrD compute the lane positions for you. These lane positions are used by BrD to compute the LRFD live load distribution factors. Last Modified: 3/13/


31 Next enter transverse and Bearing Stiffeners. Last Modified: 3/13/

32 Describing a member: The member window shows the data that was generated when the structure definition was created. No changes are required at this time. The first Member Alternative that we create will automatically be assigned as the Existing and Current Member alternative for this Member. Last Modified: 3/13/

33 Open the Member Supports window to see how bearings can be oriented for curved girder systems. For curved girder systems bearings are oriented in a local coordinate system at each member support. Select 'Tangent' if the local x axis for bearing alignment is parallel to the tangent of the member reference line at the support. Select 'Chord' if the local x axis for the bearing alignment is parallel to a specified chord angle from the tangent of the member reference line at the support. The following sketch shows an example of defining a bearing alignment along a chord. Last Modified: 3/13/


34 Defining a Member Alternative: Double-click MEMBER ALTERNATIVES in the tree to create a new alternative. The New Member Alternative dialog shown below will open. Select Steel for the Material Type and Plate for the Girder Type. Click Ok to close the dialog and create a new member alternative. The Member Alternative Description window will open. Enter the appropriate data as shown below. Last Modified: 3/13/


35 The condition and system factors can be updated on the Factors tab if an inspection report is available and the user can check specific control options. Last Modified: 3/13/


36 Next describe the beam by double clicking on Girder Profile in the tree. The Beam Details windows with the appropriate data are shown below. The top and bottom flange are the same so you can use the copy feature. Last Modified: 3/13/

37 Next for Girder 1, define the splice locations by double-clicking in the Bridge Workspace tree. The splices are the same for all locations and all girders. Look ahead to page 42 for the splice locations for Girders G2-G5. Last Modified: 3/13/

38 Last Modified: 3/13/


39 Last Modified: 3/13/

40 Open the Deck Profile and enter the data describing the structural properties of the deck. See window shown below. Hit the compute from Typical Section button to compute the effective flange widths and it will populate automatically. Deduct off ¼ integral wearing surface. The reinforcement is defined on the reinforcement tab. The window is shown below. Last Modified: 3/13/


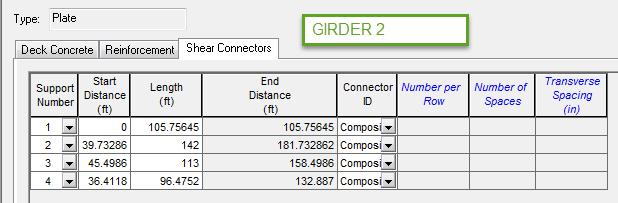
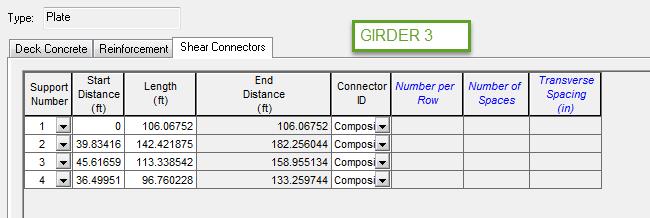
41 The shear connectors indicate if the bridge is composite. The haunch profile is defined by double clicking on Haunch Profile in the tree. The window is shown below. The length can be found under the member. Last Modified: 3/13/


42 The lateral support is defined by double clicking on Lateral Support in the tree. The stiffener ranges are defined by double clicking on Stiffener Ranges in the tree. Last Modified: 3/13/


43 The bearing stiffeners are defined similarly by double clicking on Support 1 to Support 5. Select the appropriate bearing stiffener from the pull down selections. The pull down selections were defined previously. Last Modified: 3/13/

44 Last Modified: 3/13/

45 The description of Girder 1 for this structure definition is complete. Girders 2 through 5 are similar. The information is provided below. The girder flanges and web sizes are the same as Girder 1. The length will need updated in haunch and, lateral support. The stiffeners will need to be generated at the diaphragm locations. Last Modified: 3/13/


46 Last Modified: 3/13/


47 Last Modified: 3/13/


48 Last Modified: 3/13/


49 Last Modified: 3/13/
50 3D analysis settings It is not recommended that users launch an analysis in training as due to the large number of degrees of freedom in this example, analysis runtime will require a 64 bit PC and adequate memory that is likely not available on attendee laptops. For the Bridge Design training, open the Analysis Settings window and make the following selections for an HL93 Design Review. Last Modified: 3/13/


51 For the Bridge Rating training, open the Analysis Settings window and make the following selections. Last Modified: 3/13/

52 For both training sessions, select the following output controls. Be sure to check the Detailed Influence Line Loading to be able to view the centrifugal force calculations. This example now shows the results from a 3D LFD rating. It is not recommended that users launch an analysis in training as due to the large number of degrees of freedom in this example, analysis runtime will require a 64 bit PC and adequate memory that is likely not available on attendee laptops. Last Modified: 3/13/

53 The software develops the 3D model using the member alternative marked as Existing for each member. If the member does not have a member alternative marked as Existing and only has 1 member alternative, that member alternative is used for the 3D model. If the member has no member alternative marked as Existing and more than 1 member alternative, the analysis will not be performed. When the analysis is launched for the superstructure definition, spec checking and rating is only performed for member alternatives marked as Existing. When the analysis is launched for a single member alternative (as shown here), the spec checking and rating will only be performed for that member alternative. A new feature for both straight and curved girder system FE analysis is the ability to reuse existing FEA results. The program will generate new dead load and live load influence surface FE models and compare the models to previous models. If the models compare exactly then the FEA results will be reused. The live load will be applied to the previous influence surfaces. This leads to a greatly reduced runtime on successive runs. Last Modified: 3/13/


 for the models.")
54 The following shows the output files created by the 3D LFD rating. Similar files are created for a 3D LRFD design review. The 3D Model files list the data for the models including nodes, members, properties and loads. The 3D Model Actions files list the FE results (reactions, element actions, displacements) for the models. The Model Graphics files can be opened to graphically view the FE models. The following shows the graphics for the Stage 1 model which contains the steel beams and diaphragms. Last Modified: 3/13/


55 Node and element numbers can be turned on from the Tools menu. The mouse controls manipulation of the view. Zoom by rolling the mouse wheel. Translate by pushing down the mouse wheel. Rotate by pushing down the left mouse button. The generated influence surfaces for the unit live loading can be viewed by selecting the Stage 3 Graphics model and then selecting File/Open/ Influence Surfaces.sur. An influence surface for viewing can be chosen by selecting Tools/Change Influence Surface and then selecting desired actions. Last Modified: 3/13/


56 Tabular results and spec check details can be viewed for the member alternatives that were analyzed. The LRFD HL93 Design Review is similar to the LFD rating process and specifications can be viewed using the same procedure except the code references the selected LFRD code articles. Last Modified: 3/13/

57 The 3D LFD results of the HS25 rating are shown for all griders using the bridge explorer and for G1 below: Last Modified: 3/13/

.")
58 The centrifugal force effect calculations can be found in the detailed influence surface loading files found in the following folder (of the Documents folder). Last Modified: 3/13/
59 3D Model The modeling techniques used are the result of a survey of researchers and practitioners and review of several software packages. Steel beams are modeled with: Shell elements for the deck Beam elements for the top and bottom flanges Shell elements for the web For a curved girder system, the deck nodes and top flange nodes are connected by way of a master-slave constraint. For straight girder systems a rigid link is used to connect these nodes. Deck (Shell Elements) A Master Slave Flange (Beam Elements) Web (Shell Elements) Flange (Beam Elements) Section Partial Elevation View of Model Last Modified: 3/13/
60 The moment at a beam cross section is calculated by solve the equilibrium equations at that section. This moment is then used in the specification check articles in the same way that it would for a line girder analysis. Deck (Shell Elements) A Master Slave Flange (Beam Elements) Web (Shell Elements) Element Nodal Forces M Flange (Beam Elements) Section Partial Elevation View of Model Mesh Generation The FE model created by BrR/BrD will contain nodes at the following locations: Cross section property change points Span tenth points Support locations Diaphragm locations User defined points of interest The user controls the mesh generation by the controls previously shown on the Superstructure Definition: Analysis tab. The software creates the mesh following the number of elements selected between beams or within the web of a steel beam and the target aspect ratio entered by the user. The presence of nodes at the locations listed above may result in some elements falling outside the target aspect ratio. Last Modified: 3/13/


61 The following plan views show how the mesh for this example can be controlled by the user. 1 shells between beams, target aspect ratio = 4 4 shells between beams, target aspect ratio = 2 Loading The program computes all of the dead loads acting on the beam including the self-weight of the beam, user defined appurtenances on the structure typical section, wearing surfaces, diaphragms and user defined member loads. omposite dead loads are applied directly to the deck shells in the 3D model in their actual location. They are not distributed to the girders based on the choices available in the Superstructure Loads window. The Stage 3 FE model is loaded with unit loads at each deck node within the travelway to generate influence surfaces for the beam. Lane positions and combinations are determined based on the travelway and the transverse loading parameters set by the user on the Superstructure Definition: Analysis Settings tab. The influence surfaces are then loaded with the selected vehicles to find the maximum live load effects. Last Modified: 3/13/
62 Analysis and Results LFD (HS-20 scaled to HS-25) Last Modified: 3/13/
63 Last Modified: 3/13/


64 LRFR (HL-93) For the entire bridge, import the file SR 302 3DFEM4.xml and open its Bridge Workspace. can be run for LRFR. The other girders Last Modified: 3/13/