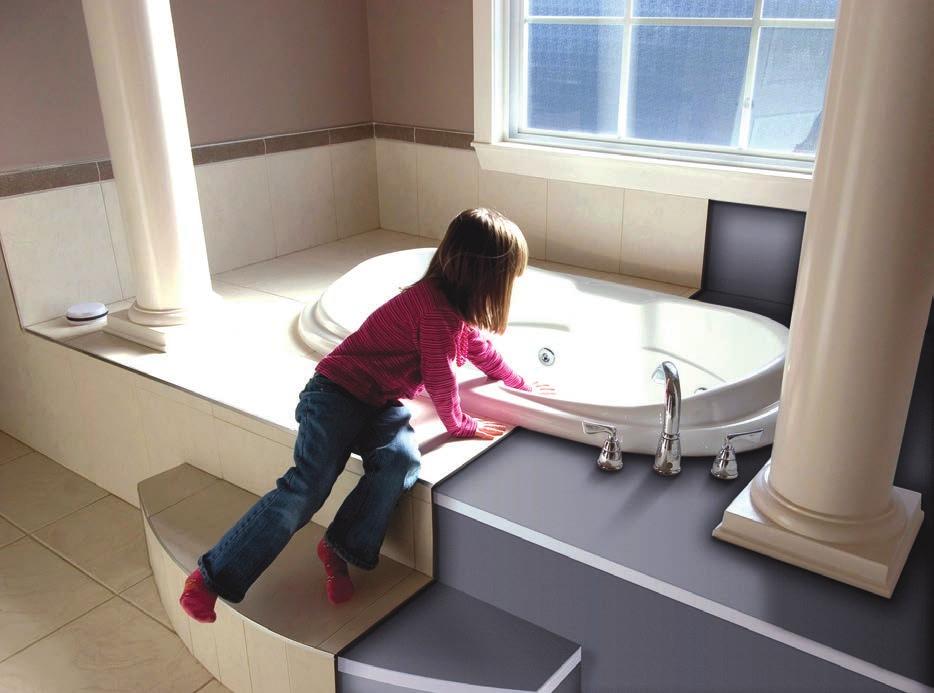
Fully waterproof. Highly insulating. Fix to solid wall/timber. Ready to tile or plaster. Holds 62kg/m 2 on walls. 40 tonnes/m 2 on floors
|
|
|
- Randolph Lambert
- 5 years ago
- Views:
Transcription

1


2 The all in one solution for insulating and waterproofing! Marmox Multiboard is the all-in-one solution for waterproofing, insulating and drylining. It is lightweight, easy to cut to size and can be applied to floors, walls and ceilings as a surface ready for tiles or plaster. There are various thicknesses available ranging from 4mm to 60mm and this gives the Multiboard many uses from lining walls, floors and ceilings to constructing vanity units and steam benches. With Curved Multiboard any feature-defining curve can be created. Waterproofing Being completely waterproof, as opposed to merely water resistant, means that no water at all can be absorbed into the core of the Multiboard. This means that they will not bend, bow or distort in the way that plasterboard can for example. Multiboard can be used as a waterproofing tile backer board in many situations including wetrooms, steam rooms and even swimming pools. Fully waterproof Highly insulating Fix to solid wall/timber Ready to tile or plaster Holds 62kg/m 2 on walls 40 tonnes/m 2 on floors Lightweight to handle Easy to cut

3 Insulating The Energy Saving Trust recommends using Marmox Multiboard as an internal wall insulation board. It is particularly popular in providing insulation to solid masonry walls without cavities and where insulation on the outside of the building is impractical or would affect the look of the building. Using Marmox Multiboard to line what used to be a cold wall will also significantly reduce the surface condensation on that wall. XPS (extruded polystyrene) is one of the most effective insulation materials available and also has the benefit that its thermal insulation properties are not affected whatsoever by wet or damp conditions. Other softer insulation materials absorb water and when that happens they effectively stop providing insulation. High strength Multiboard can hold a tile weight of 62kg per square metre, double that of standard lining board and with a high compressive strength of 40 tonnes/m 2 Multiboard can be used on virtually any tiled floor.
4 Underfloor heating Did you know that 40% of heat generated by underfloor heating gets lost through concrete floors? Marmox Multiboard acts as a barrier, reflecting the heat upwards into the room and reducing the heat loss. This will dramatically reduce heating costs because the heating can be set at a much lower temperature to feel the same effects. By using Multiboard in conjunction with underfloor heating a warm floor can be achieved in as little as 20 minutes as opposed to several hours if they are not used. This is the reason that insulation is recommended for use with heating wire by underfloor heating manufacturers. What is Multiboard made of? Marmox Multiboard comprises a core of XPS. This is not the white type of polystyrene commonly used for packaging, it is a closed cell structure known as extruded polystyrene that will not allow water or water vapour to pass through it. The surface is coated on either side with a thin but robust layer of fibreglass reinforced polymer concrete. This layer provides the perfect level of porosity to bond with tile adhesive and plaster. Multiboard sizes thickness (mm) width (mm) length (mm) / / / / / / / weight (kg) / / / / / / / R value (m.k/w)
5 At Marmox we extrude our own high strength polystyrene, which gives Multiboard two main advantages over other tile backer boards: 1) We can control the quality at all times. 2) We do not have to buy in polystyrene separately; this means we can keep our prices as competitive as possible! Although Multiboards are extremely lightweight, they are exceptionally strong and can be fixed directly to a framework just as easily as they can be fixed to solid walls. As a tile backer board they can hold a tile weight of 62kg/m 2 (which is about double that of standard plasterboard). This high strength makes them ideal for using large format tiles and stones. Sustainability Our factory operates a zero waste policy where all waste material from Marmox Multiboard production is recycled into other less formulation critical products. In accordance with EN13164 and the EU s Construction Product Regulations Marmox Multiboards do not contain any VOCs, or emit any dangerous substances. ODP = zero, GWP = 0.29 Technical data Compressive Strength (at 10% deformation) Thermal Conductivity Water Absorption of XPS Coefficient of Thermal Expansion Flammability ODP GWP Declaration of Performance (CE) (EN 826) 450kPa (45 tonnes/m 2 ) (EN 13164) Watts/mK (EN 12087) <0.7% (ASTM D696) 8x10⁻⁶ k -1 (EN 476-6,7) Class 0 (EN 13501) Class E zero 0.29 XPS-EN13164-T1-CS(10\Y)400-CC(2/1/10)115-WL(T)3


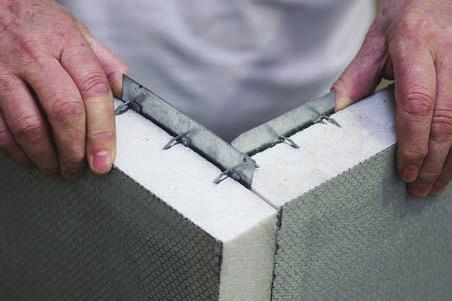
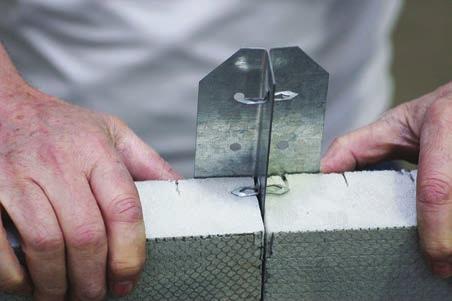
 Long boards - 3 rows of 5 fixings (1 inch from the edges) Joints Be sure to tape all the joints with Marmox Reinforcing Tape.")
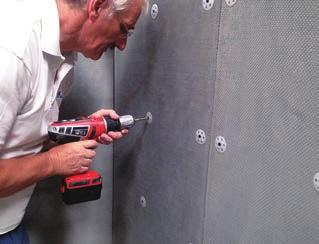
6 Marmox Multiboards can be applied directly to solid walls simply with screws and washers. Multiboards are an ideal way to cut down on the heat lost through solid walls. Buildings with solid walls and without cavity will feel a considerable difference in room temperature when coated with Marmox Multiboards. Multiboards are very easy to install, as they are lightweight and very easy to cut to size with a saw or knife. Multiboards can be fixed vertically or horizontally onto walls and you can also fix to the ceiling. Preparation Measure the Multiboard and cut to size. It is very easy to cut with a saw or knife. Fixing Offer the Multiboard up to the wall and use Marmox washers and 50mm screws (longer for thicker boards). Be aware of any electrical wires or pipework that may be in the wall. Short boards - 3 rows of 3 fixings (1 inch from the edges) Long boards - 3 rows of 5 fixings (1 inch from the edges) Joints Be sure to tape all the joints with Marmox Reinforcing Tape. If the area needs to be waterproof be sure to tape all the corners and joints with Marmox Self Adhesive Waterproof tape. Final touch The Multiboard is now ready to be covered. Tiles - Tile directly onto the Multiboard. Plaster - Coat the Multiboard with 1 part PVA and 5 parts water. Plaster when primer is still tacky. Wallpaper - Use a rubber mallet to sink in any washers that are protruding and then cover with a lining paper before applying the final wallpaper.


 Fixing Use a steel screw/marmox washer at every 300mm.")
7 Lots of modern buildings are made using timber or metal stud frames that are then lined with plaster board or wooden panels. Marmox Multiboard is the ideal alternative for lining such walls because unlike wood or plaster, Multiboards are fully waterproof making them perfect for wetrooms, bathrooms and kitchens. Multiboards also offer high thermal insulation that can benefit every room in the house by significantly reducing your heating loss. Multiboards are suitable for plastering, tiling or even wallpapering when thick lining paper is used. Preparation Marmox Multiboard is available in thicknesses ranging from 4mm to 60mm. Please note the following guide for thicknesses relating to stud work. 600 centres use 20mm Multiboard (or thicker) 400 centres use 12.5mm Multiboard 300 centres use 10mm Multiboard (no thinner) Fixing Use a steel screw/marmox washer at every 300mm. 600 centres use 2 rows of 5 fixings 300 centres use 3 rows of 4 fixings Joints Be sure to tape all the joints with Marmox Reinforcing Tape (as shown in image 2). If the area needs to be waterproof be sure to tape all the corners and joints with Marmox Self Adhesive Waterproof tape. Final touch The Multiboard is now ready to be covered. Tiles - Tile directly onto the Multiboard. Plaster - Coat the Multiboard with 1 part PVA and 5 parts water. Plaster when primer is still tacky. Wallpaper - Use a rubber mallet to sink in any washers that are protruding and then cover with a lining paper before applying the final wallpaper.


8 Multiboard can be fixed directly to a solid wall of brick or block and then simply plasterd or tiled. As thin as 10mm Multiboard can be used on walls and therefore does not take up much valuable living space. The Multiboard can be stuck to walls using a flexible cement based tile adhesive. It is recommended to remove all existing tiles or boarding that is currently on the wall before sticking the Multiboard to the wall. If it is impractical to remove the boarding or tiles then be sure to also screw fix through to the main supporting wall or timber frame. Preparation Make sure the wall has been dusted down as best as possible and is free from any protrusions. Fixing Comb a cement based flexible adhesive (C2) over the whole surface of the Multiboard or the wall itself. 6/8mm trowel Push firmly onto the wall. It s ideal to stagger the joints. Joints Be sure to tape all the joints with Marmox Reinforcing Tape. For waterproofing be sure to tape all the corners and joints with Marmox Self Adhesive Waterproof tape. Final touch The Multiboard is now ready to be covered. Tiles - Tile directly onto the Multiboard. Plaster - Coat the Multiboard with 1 part PVA and 5 parts water. Plaster when primer is still tacky. Wallpaper - Use a rubber mallet to sink in any washers that are protruding and then cover with a lining paper before applying the final wallpaper.


 Long boards - 8 fixings (6 around edges, 2 in the middle) Put a dab of cement based flexible tile adhesive (C2) over the holes on the")
9 Another way to fix the Mutliboards to a solid wall is with Marmox fixing dowels. This method can be particularly useful if the wall is uneven, as it allows enough space behind the Mutliboard to level it out to a smooth flat surface for applying a finish. This simple method involves applying adhesive to the Multiboard (dot and dab) then drilling through into the wall, pushing through the dowel and then hammering in the red pin until tight and flush. Preparation Measure the Multiboards and cut them to size. They are very easy to cut with a saw or knife. 10mm Multiboard (or thicker) should be used on walls Fixing Drill fixing holes through the Multiboard into the solid wall. Short boards - 5 fixings (1 in each corner, 1 in the middle) Long boards - 8 fixings (6 around edges, 2 in the middle) Put a dab of cement based flexible tile adhesive (C2) over the holes on the Multiboard and then offer up to the wall. Push firmly and then level with a spirit level. Push in the white dowel and then hammer in the red pin Joints Tape all the joints with Marmox Reinforcing Tape. If the area needs to be waterproof be sure to tape all the corners and joints with Marmox Self Adhesive Waterproof tape. Final touch The Multiboard is now ready to be covered. Tiles - Tile directly onto the Multiboard. Plaster - Coat the Multiboard with 1 part PVA and 5 parts water. Plaster when primer is still tacky. Wallpaper - Use a rubber mallet to sink in any washers that are protruding and then cover with a lining paper before applying the final wallpaper.


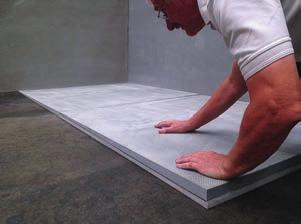
10 To significantly cut down on heat loss through the floor (ie, to improve the U-value) Marmox Multiboard should be used to cover all areas before tiling. As well as reducing heat loss through the floor, Marmox Multiboard offers the ideal base to tile onto, ensuring a smooth level floor when the tiles are laid. Also being fully waterproof they guarantee that any water that makes its way through the tile adhesive will go no further. Multiboard will support a weight of 40 tonnes/m 2 on floors. Most underfloor heating companies recommend using this type of insulation. Preparation Make sure the floor is dust/dirt free and level. Any loose floor boards should be secured down. On a concrete or sheet timber floor, any thickness of Multiboard can be used. For adhering to traditional floorboards, 10mm Multiboard or thicker must be used. Fixing Comb a full bed of cement based flexible adhesive over the surface of the Multiboard or onto the floor. 6/8mm trowel 20mm trowel for uneven floors Push firmly onto the floor, being sure to stagger the joints. Joints Tape all the joints with Marmox Reinforcing Tape. For waterproofing be sure to tape all the corners and joints with Marmox Self Adhesive Waterproof tape instead of the reinforcing tape. Final touch The Multiboard is now ready to be covered. Tiles - Tile directly onto the Multiboard. Heating wire - Lay directly onto the Multiboard and then tile.


 Joints Tape all the joints with")


11 Preparation Secure down any loose floor boards. Any thickness Multiboard can be used on sheet flooring with screws and washers. However it is not recommended to use screws and washers on traditional floorboards. Fixing Use a steel screw and Marmox washer at every 300mm. Make sure the screws embed into the floor by at least 30mm. Short boards - 3 rows of 4 fixings (1 inch in from the edges) Joints Tape all the joints with Marmox Reinforcing Tape. For waterproofing be sure to tape all the corners and joints with Marmox Self Adhesive Waterproof tape instead of the reinforcing tape. Final touch The Multiboard is now ready to be covered. Tiles - Tile directly onto the Multiboard. Heating wire - Lay directly onto the Multiboard and then tile.


 Cut the pipe boxing to the required size.")
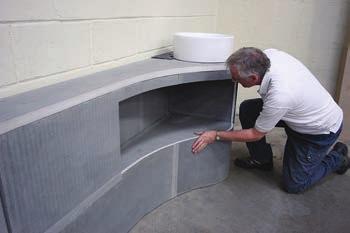
12 Marmox Multiboard is extremely versatile and the ideal way to waterproof a bathroom or wetroom. To make things even easier, Marmox curved Multiboard and pipe boxing Multiboard helps to make creative ideas more achievable. Curved Multiboard comes in flat boxes and simply bends to the required curve ready for mosaic tiling. Marmox pipe-boxing comes in flat sheets that bend to a 90 o angle and seals with a self adhesive tape. Preparation Measure out the pipe work that needs covering to ensure the correct size pipe boxing. The Marmox Multiboard pipe boxing is available in 3 different sizes mm + 150mm wide, 1250mm long 200mm + 200mm wide, 1250mm long 300mm + 300mm wide, 1250mm long 400mm + 200mm wide, 1250mm long Fixing 1) Cut the pipe boxing to the required size. Peel off the 2) backing tape from the self-adhesive strip and fold the board to a 90 O angle. 3) Push on the wall brackets (as shown in picture 2) Use 4 wall brackets per 1250mm board (2 either side) 4) 5) Run a bead of Marmox Multibond / Marmox Acrylic Sealant along the edges of the pipe boxing and offer it up to the wall. Secure with stainless steel screws. Joints The pipe boxing can be stacked up to the necessary height, just put a bead of Marmox Multibond / Marmox Acrylic Sealant where the Multiboard meets. Be sure to tape all the joints with Marmox Reinforcing Tape or Marmox Self Adhesive Waterproof tape in wet areas. Final touch The Multiboard is now ready to be covered in the normal way (see previous pages).


 should be laid over to offer support. Final touch The Curved Multiboard is now ready to be covered. Tiles - Tile directly onto the Multiboard.")
13 Preparation The Curved Multiboard comes flat packed and can be easily bent to the required radius. Simply measure and cut to the required size. Fixing Ideally the best way to bend the Curved Multiboard is to have the slits on the inside of the circular shape at all times and the smooth edge on the outside. Fix to a wooden framework with screws and Marmox washers or stick to Multiboard with Marmox Multibond / Marmox Acrylic Sealant. Joints Be sure to tape all the joints with Marmox Reinforcing Tape. Note: It is also possible to bend the Curved Multiboard with the slits on the outside. However if this is done then a flexible cement based tile adhesive needs to be used to fill out all of the slits on the surface and then a sheet of fibreglass mesh (as shown in picture 2) should be laid over to offer support. Final touch The Curved Multiboard is now ready to be covered. Tiles - Tile directly onto the Multiboard. Plaster - Coat the Multiboard with 1 part PVA and 5 parts water. Plaster when primer is still tacky.


14 When you ve finished tiling your walls and floors with Multiboard the obvious next step is to tile around the bath with matching tiles. In order to do this effectively Marmox Multiboard bath panel kit offers the solution. Simply cut the side and end panels to the correct length, place into position and then adjust the height of the feet supplied. With Multiboard it is easy to cut out a panel for pipework access! They are then ready to be tiled. Included in the kit is Marmox S/A Waterproof Tape, bath panel feet and a tube of Marmox Acrylic Sealant or Marmox Multibond.

15 Included in the kit product Bath side panel Bath end panel Acrylic sealant/multibond Marmox S/A waterproof tape Bath panel feet (x4) width 600mm 600mm 100mm length 800mm 1800mm 2.5m description Marmox Multiboard Marmox Multiboard 300ml cartridge Self adhesive rubber tape Adjustable height Preparation Position bath and make sure you have enough room to allow a 30mm panel to fit under the edges (move bath legs if necessary). Fixing 1) Measure the end of the bath and cut the end panel to size. (Make sure to leave a 30mm gap on outer edge for the side panel to sit in front of). 2) Wedge panel under the end of the bath. 3) In the same way, cut to size and apply the side panel. 4) Tighten the adjustable feet. End Panel - 800mm x 600mm x 30mm Side Panel mm x 600mm x 30mm Joints Apply the Marmox S/A Waterproof Tape where the 2 panels meet each other and where they meet the wall. Final touch The Multiboard is now ready to be covered. Tiles - Tile directly onto the board.


16 Impact sound is structural vibration, transmitted from a point of impact. This is where the vibration is transferred through the wood, concrete, bricks and beams. Adding ceramic tiles increases the vibration and makes the noise clearer and louder, which can be a common problem when tiling. Marmox SoundBoard is a thermal insulating tile backer board with one side coated with a sound attenuating layer of synthetic rubber that isolates the tiles from the floor so that there is nothing for the sound waves to travel through. Using SoundBoard will reduce impact noise heard in the room below greater than the recommended minimum of 17dB.

17 Technical data Test Thermal conductivity Thermal resistance DL w Weighted impact sound reduction to ISO As above (with tiled surface) Dimensions 8mm W/mk 0.23 m.kw 0.28 db 0.20 db 1250mm x 600mm 12mm W/mk 0.34 m.kw 0.28 db 0.20 db 1250mm x 600mm Preparation Make sure floor is dust and dirt free. Note: Marmox SoundBoards should only be used on floors. Fixing 1a) For the ultimate acoustic performance use a Mastic Gun, apply Flexible MS Polymer over the impact layer (black side) of the Soundboard. Note: 1 tube Flexible MS Polymer / Marmox Multibond per box of SoundBoards. High thermal insulation Can reduce impact sound Fully waterproof Use with under-tile heating Easy to cut with a saw or knife Ready to receive tiles 1b) Push firmly onto the floor, being sure to stagger the joints and leaving a 5mm gap around the edge of the room that should be filled with a mastic. 2) Alternatively, fix the SoundBoard to the floor using a cement based flexible tile adhesive. Again leave a 5mm gap around the edge and fill it with MS Polymer/MMB. Joints Tape all the joints with Marmox Reinforcing Tape. For waterproofing be sure to tape all the corners and joints with Marmox Self Adhesive Waterproof tape instead of the Marmox Reinforcing Tape. Final touch The SoundBoard is now ready to be covered. Tiles - Tile directly onto the Multiboard. Heating wire - Lay directly onto the Multiboard, then tile.


.")
18 Marmox products are ideal for shower and wetroom applications and with the Marmox Showerlay it s easy work to create a stylish sloping floor. A Showerlay is a floor level panel that can be cut to fit the shower area or to produce an irregular shower base. Place directly onto a concrete or wooden floor or lower into the floor by placing support between the floor joists. By using the Showerlay with Multiboard you can create a fully waterproof shower area or steam room with total ease and reasurance. Horizontal drain has a flow rate of 30 litres/min with a BS 40mm outlet pipe. Vertical drain has a 48 litres/min flow rate with BS 50mm outlet pipe (40mm adaptor available for the vertical drain). fully waterproof lightweight to handle reinforced for extra support ready for tiling centre or offset drainage can be can down to size Boarding lowered between joists Standard floor on joists
19 Centre drain Offset drain size (mm) 800 x x x x x x x 1500 perimeter (mm) weight (kg) size (mm) 1000 x x x x x x x 900 perimeter (mm) weight (kg) Preparation Make sure floor is dust and dirt free. Fixing 1) Position the Showerlay on the wooden floor and draw around the drain hole, marking the floor. The Showerlay can be laid onto the existing floor or lowered to joist level. If lowering then make sure to place support boarding between and flush with the top of the joists (minimum 18mm wood). The Showerlay needs to be fully supported. Cut out a key hole shape 10mm larger than the 2) circumference of the drain and big enough to allow the Dallmer drain knuckle to move upwards freely. 3) Position in the drain and the pipework making sure everything lines up and that the floor is level. 4) Place the black rubber ring on top of the drain. 5) Stick the Showerlay to the floor with a full bed of cement based flexible tile adhesive. 6 Check again by using a spirit level on all edges of the Showerlay. 7) Screw the plastic ring through into the Dallmer drain, using the tool provided for a very tight seal. 8) Place the hair trap and funnel into the drain and then the grill on top. These 2 sizes are also available with centre drain position Joints Be sure to tape all the edges and joints with Marmox Self Adhesive Waterproof tape and all corners with Marmox Waterproof Corners. Final touch Now coat the surrounding walls and floor with Marmox Multiboard and tiling can begin.


20 There are four Showerlays with linear style drains available. These linear versions of the popular Showerlay are 40mm thick and slope down to 20mm around the drainage area. They are compatible with the Marmox Linear drain kit, which includes the linear drain, Marmox S/A Waterproof Tape and a tube of Marmox Multibond or Bostik Serious Stuff. The linear drain is very easy to access and clean as it has a small square access plate that can be tiled. Simply lift up the tile to reach the drain. Also the linear stainless steel grill can be easily removed and cleaned. The flow rate is 36 litres/min with a 50mm outlet pipe (40mm adaptor included). new linear drain position fully waterproof lightweight to handle reinforced for extra support ready for tiling easy to install Boarding lowered between joists Standard floor on joists

21 Showerlay Linear sizes size (mm) 1200 x x x x 900 drain position centre centre offset offset perimeter (mm) weight (kg) Included in the kit product Horizontal waste Multibond/Flexible MS polymer Marmox S/A waterproof tape Preparation Make sure floor is dust and dirt free. Fixing 1) 2) 3) 4) 5) 6) 7) Position the Showerlay Linear on the floor and mark out the square area with a pencil, marking the floor. Now draw and cut a hole big enough to fit the Linearis drain. Make it slightly larger than the mark made on the floor and allow room for the drain s knuckle. Support the gully from underneath with a wooden shelf so that the top rim of the drain is at the same height as the underside of the wooden base. Using a cement based flexible adhesive, stick the Showerlay Linear to the floor and push down, checking all is level. Apply a generous amount of the MS polymer (Bostic Serious Stuff) or Marmox Multibond into the recessed part of the Showerlay Linear. Position the drain into the gully (which should be firmly supported). Ensure the sealant is constant all around the drain body. Place a heavy weight (about 20kg) on top of the square section and leave to dry for 24 hours. Joints Be sure to tape all the edges and joints with Marmox Self Adhesive Waterproof tape and all corners with Marmox Waterproof Corners. Final touch Now coat the surrounding walls and floor with Marmox Multiboard and tiling can begin. Tiles should be at least 10mm thick with this drain.


22 The New Showerstone is a great addition to the Marmox wetroom range. It is a floor level panel that can be coated with either vinyl or tile and is strong enough to be laid directly onto the floor joists. By using the Showerstone with Marmox Multiboard you can create a fully waterproof shower area with a strong enough point load to easily allow wheelchair access and the smallest of tiles! Unlike other Marmox products, Showerstone is made with a GRP material. It is compatible with any adhesive and is ideal for wheelchair access. Designed to be used with Marmox McAlpine drains, which have a British Standard 40mm outlet pipe and a flow rate of 36 litres/min. fully waterproof holds up to 600kg vinyl or any sized tiles can lay direct to floor joists wheelchair access easy installation Showerstone directly onto joists Showerstone on concrete floor
 19 26 33 25 28 30 Preparation Make sure floor is dust and dirt free.")
23 Centre drain sizes Offset drain sizes size (mm) 1000 x 1000 perimeter (mm) 22 weight (kg) 26 size (mm) 900 x x x x x x 800 perimeter (mm) weight (kg) Preparation Make sure floor is dust and dirt free. Fixing 1) 2) 3) 4) 5) 6) 7) 8) 9) Position the Showerstone on the wooden floor and draw around it with a pencil marking the floor. Cut out the floorboards. Make sure the Showerstone doesn t overhang the joists. Add extra support around all the edges as necessary. Create a small wooden shelf under the drain area. Mark out the drain area on the shelf by pencilling around the hole in the Showerstone and then cut out the hole. Now screw the support shelf firmly into place. Fix drain pipes together (BS 40mm). Make sure the drain pipe slopes away from the drain to allow drainage. Stick the Showerstone to the joists using Marmox Sealant on the shelf and all along the floor joists. Use a bead of Marmox Sealant around the recess in the Showerstone. Note: Do not use an acetoxy silicone as doing so could damage the plastic. Use the tool provided to screw the drain colour through the Showerstone hole into the gully as tightly as possible. Drill through the plastic collar and metal plate into the support shelf (3mm metal drill). Use a 20mm S/S screw. Repeat this for the other 3 indents in the plastic collar. Connect either a vinyl or tile top section. Joints Tape the edges with Marmox Self Adhesive Waterproof tape. Final touch Now it is ready to lay vinyl or tiles.


 2) 3) 4) 5) 6) 7) 8) 9) 10) 11) 12) 13) Sit the 2 parts of the Showerlay Plinth into position. Be aware of floor level at all stages.")
24 Many wetroom floors are fitted onto existing solid concrete floors. This can potentially be a difficult job digging out all the concrete to allow for the pipework. So instead of having to build up a joisted floor to make the job easier, Marmox Plinth is the perfect answer. Made from a block of Marmox s own special extruded polystyrene the Marmox Plinth is 1500mm x 1000mm x 100mm in size. Depending on the size of the Showerlay/Showerstone will determine how many are needed. Two will allow for most Showerlay/Showerstone but more may be needed for some of the larger sizes. create step into the shower area hides pipework ideal for concrete floors fully waterproof high strength easy to install Preparation Make sure floor is dust and dirt free. Fixing 1) 2) 3) 4) 5) 6) 7) 8) 9) 10) 11) 12) 13) Sit the 2 parts of the Showerlay Plinth into position. Be aware of floor level at all stages. Place the Showerlay on top of the Plinth making sure it does not over hang the Plinth on any sides. Mark out the hole and Showerlay edges with a pencil. Remove the Showerlay and place the Dallmer drain upside down over the drawn circle. Now draw a pencil line around the Dallmer drain leaving a 10mm gap. Cut the Plinth to size by cutting along the pencil lines. Cut out a hole for the drain and space for the pipework. Lay the Plinth into position and mark the wall for the pipework, then remove the Plinth and drill out the hole drawn on the wall. Fix down the Plinth to the floor using a full bed of flexible cement based tile adhesive, checking all is level. Connect the Dallmer drain to the pipe and feed the pipe through the wall. Make sure the drain has enough space to move freely up and down and that the black rubber ring is on top. Using a flexible cement based tile adhesive fix down the Showerlay to the Plinth, making sure it is level. Screw parts into the Dallmer drain (see Showerlay page). Use a screen or create an up-stand as preferred. Joints Tape the edges with Marmox Self Adhesive Waterproof Tape. Final touch Now it is ready for tiling.


 Push firmly onto the floor.")
 It is possible to trim down the edge to fit with the suitable drain.")
25 Made from the same material as the standard Multiboard, Sloping Multiboard slopes from 33mm on one end down to 10mm on the other. Sloping Multiboard is ideal for wetrooms with the drainage along the edge of the wall. Create an effective slope that can easily be extended to the whole of the room by putting the Sloping boards side by side. Also ideal for use on balconies. Sloping Multiboard comes in sheets 1200mm x 1200mm and can easily be cut to size. Preparation Make sure the floor is dust/dirt free and level. Fixing 1) Comb a full of cement based tile adhesive over the surface of the Sloping Multiboard or onto the floor. 6/8mm trowel 20mm trowel for uneven floors 2) Push firmly onto the floor. 3) Sit the Sloping Multiboard side by side with the thin edge closest to the wall or butted up to where the drain will be. 4) It is possible to trim down the edge to fit with the suitable drain. 5) To extend the area out further, lay down standard 20mm Multiboard and then sit another Sloping Multiboard on top (as shown in pic 3). Stick the Multiboard together with flexible cement based tile adhesive. Joints Tape all the joints with Marmox Reinforcing Tape. For waterproofing be sure to tape all the corners and joints with Marmox Self Adhesive Waterproof tape instead of the reinforcing tape. Final touch The Sloping Multiboards are now ready to be covered. Tiles - Tile directly onto the Sloping Multiboard. Heating wire - Lay directly onto the Sloping Multiboard and then tile.

26 Marmox takes pride in producing the best and most secure wetroom systems available on the market. With a leak free guarantee the Marmox Multiboard and Showerlay system offers a solid foundation for any wetroom design to be built upon. With this in mind the next important step is the finishing touches that turn the wetroom into something that looks special. So why stop with designer tiles when you can have a designer drain cover as well! Made from the highest quality, 3mm solid stainless steel and hand polished to a mirror shine or brushed effect finish, these are the highest quality drain covers on the market. There are four different collections - Style, Contemporary, Modern and Corporate (twelve different designs in total). Alternatively you can have them made with your own design or branded with a company logo.


27 Bespoke drain covers available upon request For use with Showerlay only! Contemporary Collection Modern Collection
 Horizontal or")
")
 McAlpine Vinyl")


28 Dallmer Tile Drain (for Showerlay) Horizontal or vertical (Picture shows the Dallmer standard grate) McAlpine Tile Drain (for Showerstone) McAlpine Vinyl Drain (for Showerstone) Dallmer Delux Grate Showerlay Linear Drain Kit Includes drain, tape and adhesive Marmox S/A Waterproof Tape Reinforcing Tape


29 Plastic / Metal Washers Joint Bracket Fixing Dowels Perpendicular Bracket Marmox Acrylic Sealant / Multibond Sealant Wall Bracket


30 History Founded in 1999, Marmox (UK) Ltd is a British company and an integral part of CMB-International; one of the world s leading manufacturers of construction chemicals and building materials. CMB was founded in 1981 and has grown to become one of the world s largest producers of extruded polystyrene. Quality All Marmox production is subject to the controls of ISO9001 and because our products are used globally they also conform to all European, United States and International standards where


31 appropriate. For the UK market, Marmox Multiboard is BBA certified as a tile backer board, CE marked as an insulation board and recommended by the Energy Saving Trust. All Marmox products are guaranteed for ten years. Warehousing With large warehousing we are able to hold more stock than ever before. All sizes of all Marmox products are kept in stock and goods should be delivered within 2-5 working days. However most orders are processed and dispatched the same day.
 Short Multiboards (per pallet) Long Multiboards (per pallet) Thickness (mm) Number of boards Square metres Number of boards Square")

32 Convert to square metres... Marmox Multiboards Short Multiboards (per carton) Short Multiboards (per pallet) Long Multiboards (per pallet) Thickness (mm) Number of boards Square metres Number of boards Square metres Number of boards Square metres / / / / Also available from Marmox Marmox Thermoblock has been designed to eliminate the thermal bridge at the wall/floor junction. Follow us /marmoxukltd Registered Address: Caxton House, Hopewell Drive, Chatham, Kent, ME5 7NP, UK Registration Number: VAT Number: