STORMWATER DETENTION SYSTEM INSTALLATION GUIDE
|
|
|
- Gwendolyn Greene
- 5 years ago
- Views:
Transcription


1 STORMWATER DETENTION SYSTEM INSTALLATION GUIDE 1
 If You re Assembling R-Tank Modules o Dead Blow Mallets o Work Tables (3/4\" plywood placed on R-Tank modules works well)")
 o Pipe Boot Kits (If not using kits, you ll need duct tape and a stainless steel band clamp for each inlet and outlet pipe, and for each inspection or maintenance port.")
2 PRE-CONSTRUCTION CHECKLIST Tools You ll Need o Laser or Transit o Measuring Tape (long enough to mark R-Tank footprint) o Razor Knife o Screw Driver / Nut Driver Set (for pipe boots) o String Line o Marking Paint o Reciprocating Saw (to cut in inspection & maintenance ports) If You re Assembling R-Tank Modules o Dead Blow Mallets o Work Tables (3/4" plywood placed on R-Tank modules works well) Materials You ll Need o R-Tank modules o Geotextile o Geogrid (only for load bearing applications) o Liner (only if required by plans) o Base & Backfill Material (per spec section 2.03) o Pipe Boot Kits (If not using kits, you ll need duct tape and a stainless steel band clamp for each inlet and outlet pipe, and for each inspection or maintenance port.) o Maintenance Port Kits (kits include non-corrosive rigid anti-scour pad, fabric pipe boot, duct tape, stainless steel band clamp, 12 schedule 40 PVC pipe, and an HS20 rated ring and cover) o Metallic Tape Equipment You ll Need o Forklift and other equipment/tools needed to unload box truck o Pallet jack (to unload material from box truck) o Walk-Behind Trench Roller (Plate compactor may work for smaller projects) o Low Ground Pressure (LGP) tracked Skid Steer or Dozer (<7.0 psi Gross Operating Pressure) o LGP Dozer - 10 Ton Max Gross Vehicle Weight and 7.0 psi Max Operating Pressure o Roller - 6 Ton Max Gross Vehicle Weight Note: This list does not include equipment or tools needed to excavate or level the floor of the excavation. STEP 1 - EXCAVATION The excavation limits and the location of the R-Tank System should be staked out. The design drawings should be used to determine these locations. If the excavation limits are not shown on the plans, then add 2 on each side of the R-Tank system to determine the limits. Excavate the designated surveyed area according to plans following all relevant local, state and OSHA guidelines. Typical excavations should include: - Two foot perimeter around R-Tank to allow for proper compaction of backfill. - Enough depth to accommodate a minimum 3 base (if required) below the R-Tank. Fig. 1 Excavate according to plans, following all governmental regulations. Level the bottom of the excavation (see Fig. 1) as shown on plans. Most excavations have a flat bottom while some will slope toward the outlet pipe. 2
 unless infiltration of stormwater into subgrade is desired. A minimum bearing capacity of 2,000 psf (per spec section 3.")
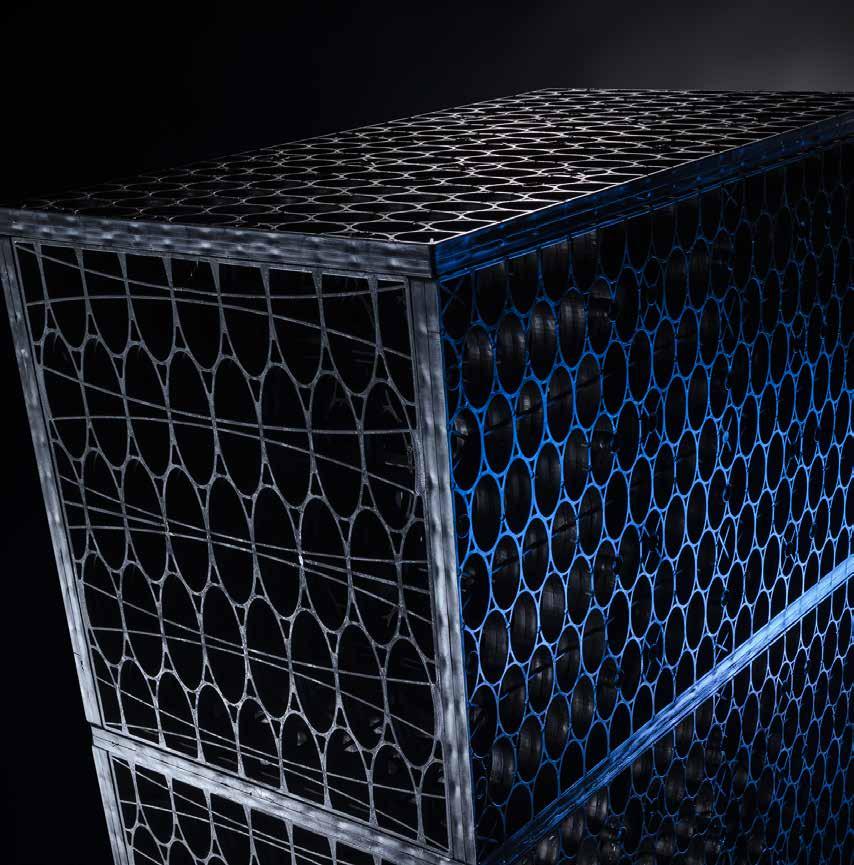
3 EXCAVATION - CONT acfenvironmental.com Prepare the subgrade according to plans. Base of excavation must be uniform, level and free of debris and soft or yielding subgrade areas. Compact to at least 95% Standard Proctor Density (or as required by Engineer) unless infiltration of stormwater into subgrade is desired. A minimum bearing capacity of 2,000 psf (per spec section 3.02D) must be achieved prior to beginning installation of R-Tank modules. If the subgrade is pumping or appears excessively soft, the design engineer should be consulted for advice. STEP 2 - ASSEMBLE R-TANK UNITS If R-Tank units arrive on your project in flat panels, they will need to be assembled. Complete directions are provided below, and there is a video available by searching YouTube for R-Tank assembly or by using this link: youtube.com/watch?v=0mtztvktq5q. Building the modules should take 2-3 minutes per segment. This is a conservative estimate used to approximate the total man hours needed for assembly. The estimate includes the workers doing the assembly as well as material handlers to keep the assembly workers moving. R-Tank LD modules are ONLY for applications not subjected to traffic loads. Begin by connecting four (4) small plates to one large plate, using the connection locations shown in red dots below. Begin by connecting five (5) small plates to one large plate, using the connection locations shown in green dots below. UD modules have three different plates: a top/bottom plate, a side plate, and an internal plate. Sides will have five columns in them, while the internal plates only have 4. Next, attach a second large plate opposite the first. Finally, add two large plates to the sides, and the Single module is complete. To build a double module (or taller), follow the directions above, using the top of the Single module as your first large plate to connect additional small plates. Next, attach a second large plate opposite the first. Finally, add two plates to the sides, and the Single module is complete. To build a double module (or taller), follow the directions above, using the top of the Single module as your first large plate to connect additional small plates. Begin by connecting four (4) internal plates to the bottom plate. Next, add four side plates, and finish the single module by snapping on the top. To build a double module (or taller), follow the directions above, using the top of the Single module as your first bottom plate to connect additional plates. To increase the speed of the installation, many contractors choose to assemble the R-Tank units prior to or during excavation and base preparation (Step 1). Other contractors wait until these steps are completed and then perform the assembly IN THE EXCAVATION allowing completed units to be placed into their final location as they are assembled. Consider which option will work best for your project. ACF offers an on-site assembly service. Call to request a quote,

 Standing water in the excavation will prevent proper base preparation and must be removed, if present. Fig.")
4 STEP 3 - PREPARE BASE A thin layer (minimum 3 ) of material is recommended to establish a level working platform. Some projects may require geotextile below this base material, so be sure to check your plans. In regions with sandy soils meeting the requirements noted and where the subgrade elevation is above the groundwater table, imported base materials may not be needed. (For more information see specification section 2.03A.) Standing water in the excavation will prevent proper base preparation and must be removed, if present. Fig. 2 Base must be smooth to ensure units fit together without gaps. Install base materials. Base materials must meet spec section 2.03A. Grade and level base as shown on plans with no more than 1/2 variance (+/- 1/4 ). Base must be free of debris and large rocks. Creating a smooth, level platform will allow for faster installation of R-Tank modules, as they will fit together evenly, eliminating detail work that can delay your progress. STEP 4 - PLACE GEOTEXTILE Geotextile will be required below the R-Tank on most projects, but not all. Check your plans to ensure that geotextile is to be placed between the base and the R-Tank units. Cut strips of Geotextile to the proper length and place them over the base, covering the floor of the excavation. The geotextile should extend at least 2 beyond the edge of the R-Tank footprint. Some contractors choose to cut the geotextile strips long enough to wrap up the sides and over the top of the R-Tank in a single piece (see Fig. 3). If space allows and the folded flaps of geotextile will not slow your progress, you may want to consider doing this. If a liner is required on your project, this method should be used to protect the liner. Fig. 3 Pull wrinkles out of geotextiles so material lays flat. 4


5 PLACE GEOTEXTILE - CONT. Adjacent panels of material should be overlapped by 12 or more, as shown on the plans. Use pins, staples, sandbags or other ballast to hold the geotextile in place, preventing it from blowing or sliding out of position acfenvironmental.com Patch any holes made in the Geotextile by placing a small patch of fabric over the damaged area. The patch must be large enough to cover the damaged area with at least 12 of overlap on undamaged material. If a liner and/or additional geotextile is required per plans, install these now as shown on the project plans. Fig.4 Reduced overlaps don t create significant savings and can create delays. Many contractors find that it is both easier and less expensive to have specialty contractors install the liner (typically used when building a cistern). If you are installing a liner yourself, handle it VERY CAREFULLY to avoid damage. WARNING: Geotextiles are flammable. No smoking should be permitted on the geotextile. STEP 5 - INSTALL R-TANK MODULES Determine the starting location. It is often helpful to use an inlet or outlet pipe to guide you. Using a string line, establish two adjacent edges of the R-Tank footprint. Ensure that your corner is square. Mark these two edges with marking paint and remove the string line (see Fig. 5). Begin placing R-Tanks in the corner of the marked area. Do NOT place units on their sides, as this will void the warranty. Check your plans to ensure correct orientation of the R-Tanks (see Fig. 6). Check the plans to ensure the R-Tanks are running in the correct direction (North/South vs. East/West) to match the footprint shown on plans (see Fig. 6). Fig. 5 Use a string line and marking paint to square the system footprint. LD/ HD/ SD SIDE VIEW FRONT VIEW UD 23.62" 23.62" SIDE VIEW FRONT VIEW VIEW Fig. 6 Make sure the tanks are oriented properly 23.62" in the excavation " 14.17" 14.17"
, but reasonable efforts should be made to minimize these variations.")
6 INSTALL R-TANK MODULES - CONT. R-Tank units should fit together evenly. Occasional minor gaps between units (< ½ ) or variations in the height of the units (< ½ ) are acceptable (see Fig. 7), but reasonable efforts should be made to minimize these variations. If gaps or height variations persist through 3 or more adjacent units, remove the modules and pull back the textile to repair base. No lateral connections between adjacent R-Tank units are required. Fig. 7 Minor variations (less than width of top plate) in tank height are acceptable. IMPORTANT: Anyone walking directly on top of the units should be instructed to keep their weight over the vertical supports of the tank to prevent damaging the units. For LD, HD and SD modules, the large side plate of the tanks should be placed on the perimeter of the system. This will require that two ends of the tank area will have a row of tanks placed perpendicular to all other tanks (see Fig. 8). Option 1: End column should cover 75% of the final module. Option 2: End column may extend beyond the final row. Fig. 8 Plan view showing the end rows turned perpendicular. The corners may not match up perfectly, so two acceptable alternatives are shown. Most plans do not show this configuration. Field adjustments are easily made. STEP 6 - INSTALL INSPECTION / MAINTENANCE PORTS All ports should be made from pipe long enough to extend from the bottom of the R-Tank to finished grade. Maintenance ports are typically made from Schedule 40 PVC pipe (check plans for actual size and type of pipe). Cut the pipe to length, leaving enough excess to trim the top when final grade is reached. BACKFILL COMPACTED TO 95% STANDARD PROCTOR DENSITY NOTES THIS PORT IS USED TO PUMP WATER INTO THE SYSTEM AND RE-SUSPEND ACCUMULATED SEDIMENT SO THAT IT MAY BE PUMPED OUT. MINIMUM REQUIRED MAINTENANCE INCLUDES A QUARTERLY INSPECTION DURING THE FIRST YEAR OF A OPERATION AND A YEARLY INSPECTION THEREAFTER. FLUSH AS NEEDED. ONLY R-TANKᴴᴰ AND R-TANK SD MAY BE USED IN TRAFFIC APPLICATIONS. R-TANK (REGULAR SHOWN) 12" DIA. PVC MAINTENANCE PORT B 16.25" FRAME AND COVER REINFORCED CONCRETE COLLAR WHERE REQUIRED PAVED SURFACE GEOGRID NON-CORROSIVE HOSE CLAMP 1" +/- VENTING PERFORATIONS GEOTEXTILE DEPTH SUMMARY TYPE A B Drill several 1 diameter holes (air vents) into the pipe just below where the top of the R-Tank will be once the pipe is installed into the tank. Air vents can also be made with a chop saw or grinder by cutting several 3-5 vertical slots into the pipe just below the top of the R-Tank. AS SHOWN R-TANK 12" MIN - 36" MAX ON PLANS R-TANKᴴᴰ 20" MIN ' MAX 12" SD R-TANK 18" MIN ' MAX 12" PIPE NOTCHING PATTERN 1.5" 8" NOTCHES CUT IN SHADED AREAS (8 OPENINGS TOTAL) 3.5" NON-CORROSIVE SOLID PLATE PLASTIC, SLATE OR EQUIVALENT NOTCH BOTTOM OF PIPE SEE PATTERN Using a reciprocating saw, cut several 8 triangular notches into the bottom of the pipe as shown on plans (see Fig. 9). MAINTENANCE PORT FOR R-TANK, R-TANKᴴᴰ, AND R-TANK SD FOR ADDITIONAL INFORMATION PLEASE CONTACT: ACF ENVIRONMENTAL, , 6/16 Identify the location of all ports and remove the R-Tank from each location. If the location of Maintenance Ports is not shown on your plans, include a port within 10 of all inlet and outlet pipes (a single Maintenance Port can cover multiple pipe connections), and include additional Maintenance Ports as needed to prevent the distance between ports from exceeding 50 feet. Fig. 9 Cut 8 notches into the bottom of Maintenance Port. 6


7 INSTALL INSPECTION / MAINTENANCE PORTS - CONT acfenvironmental.com All modules will need to be dissambled in order to cut, remove, and/or relocate internal plates. This process will vary based on the module your project is using, as noted below. LD Modules To accommodate the maintenance port, remove the two internal plates and reconnect them at the connection points a few inches closer to the edges of the module. This will provide enough room for a 12 pipe. Using your reciprocating saw, cut a circular hole the same size as the pipe in the center of the horizontal R-Tank plates, between the relocated internal plates. All horizontally oriented plates will need to be cut EXCEPT FOR THE BOTTOM PLATE. See Table 1 for the number of horizontal plates that will need to be cut. HD / SD Modules To accomodate the maintenance port, remove the center interior small plate (see Fig. 10). Using your reciprocating saw, cut a circular hole the same size as the pipe in the center of the horizontal R-Tank plates, between the internal plates. All horizontally oriented plates will need to be cut EXCEPT FOR THE BOTTOM PLATE. See Table 1 for the number of horizontal plates that will need to be cut for your specific module. UD Modules Use a 10 PVC Pipe to create the maintenance port. A 12 pipe will not fit correctly. To accommodate the 10 pipe, remove the two center internal plates. Cut one of the plates in half vertically, so that you are left with two pieces, each with two full columns. Reinsert these pieces into the module on the edges, perpendicular to the full-size internal plates (see Fig. 11). Discard the other internal plate that was removed. Using your reciprocating saw, cut a circular hole the same size as the 10 pipe in the center of the horizontal R-Tank plates, between the internal columns. All horizontal plates will need to be cut EXCEPT FOR THE BOTTOM PLATE. See Table 1 below for the number of horizontal plates that will need to be cut for your specific module. Fig. 10 For HD and SD modules, make space for the pipe by removing the center plate Fig. 11 For UD modules, two internal plates are removed, and two half-pieces are reinserted perpendicular to the other internal pieces. IMPORTANT: Do not over-cut the R-Tank plates. Minimize the gaps between the pipe and the R-Tank plates. This is particularly important with the top plate. Unit Single Double Triple Quad Pent Table 1 Cut 1 Large Plate 2 Large Plates 3 Large Plates 4 Large Plates 5 Large Plates 7
, and replace the R-Tank into the proper location.")
8 INSTALL INSPECTION / MAINTENANCE PORTS - CONT. Reassemble the R-Tank when cutting is completed. Remember to insert the non-corrosive anti-scour pad in the bottom of the R-Tank (should fit directly below the Maintenance Port), and replace the R-Tank into the proper location. If using Prefabricated Pipe Boot Kits, install the boot onto the pipe now, leaving the band clamps loose so that final adjustments may be made in Step 7. Install the pipe into the R-Tank unit (see Fig. 12) and make sure it is plumb. Temporarily seal the opening on top of the pipe with a cap or temporary lid to prevent debris from entering the system during construction. STEP 7 - SEAL R-TANK WITH GEOTEXTILE Fig. 12 Installed maintenance port Clean off any debris that may be lying on top of the exposed geotextile around the perimeter of the R-Tank. Cut strips of geotextile to fit over the top and down both sides of the R-Tank with at least 2 of excess material on each side of the system. This 2 flap should overlay the geotextile placed below the R-Tank units, creating a clean 24 overlap to seal the system. 8

. Leave corners loose to avoid creating weak spots in the material.")


9 acfenvironmental.com SEAL R-TANKS WITH GEOTEXTILE - CONT. Adjacent strips of geotextile should overlap at least 12 or as shown on plans. Use duct tape, sand bags or other ballast to temporarily secure overlaps. Where the geotextile intersects an Inspection or Maintenance Port, cut an X into the geotextile and pull it over the pipe. The flaps of the X should point AWAY from the R-Tank (see Fig. 13). Use a fabric boot and a stainless steel band clamp to seal the flaps to the pipe. Fold geotextile for outside corners similar to sheets on a bed, and lay excess material flat against R-Tank (see Fig. 15). Leave corners loose to avoid creating weak spots in the material. Temporarily secure excess fabric with duct tape. Fig. 13 Cut an X into textile to accomodate pipe penetration and seal with a boot. IMPORTANT: Take special care with Inside Corners on the footprint of the system. Cut geotextile as needed to ensure that it lays flat against the R-Tank. Use additional pieces of geotextile to seal the corner and any cuts that are made (12 overlap). Connect Inlet & Outlet Pipes Fig. 14 Encapsulate R-Tanks with geotextile. If using Prefabricated Pipe Boot Kits, install them onto the Inlet and Outlet Pipes, leaving the band clamps loose so that final adjustments may be made. (see Fig. 16) Where the inlet and outlet pipes connect to the R-Tank, cut an X into the geotextile so that the pipe makes DIRECT contact with the R-Tank. Pull the flaps of the X over the pipe so that the flaps of the X point AWAY from the R-Tank. Use a stainless steel band clamp to seal the flaps to the pipe. WARNING: Inlet and Outlet pipes must make DIRECT contact with the R-Tank, allowing water to flow directly into or out of the R-Tank without filtering through the geotextile. Failing to correctly connect pipes will cause the system to malfunction. Fig. 15 Finished envelope should lay flat against R-Tank. If used, adjust all pipe boots so that the fabric lays snug against the R-Tank. Tighten the band clamps with a screw/nut driver. Use duct tape to secure the boot flap to the outside of the geotextile envelope. Walk bottom edge of geotextile along the sides of R-Tank to eliminate gaps between the fabric and the bottom corner of the R-Tank. Fig. 16 Seal the pipe boot with the included band clamps and duct tape. 9
.")
10 STEP 8 - BACKFILL SIDES Place backfill material (see specification section 2.03 B) around perimeter of the R-Tank, distributing the material evenly to prevent shoving of the R-Tank units. All backfill material must meet requirements listed in the specification. Use a trench roller or plate compactor to compact backfill in 12 lifts (see Fig. 17). IMPORTANT: Vibratory compaction of the side backfill (see Fig. 17) is a critical step that both compacts the backfill and eliminates the minor gaps between individual R-Tank units. While some backfill materials will yield a 95% proctor density without compaction, vibratory compaction of the material must be completed to ensure the stability of the system. Skipping this step will void the manufacturer s warranty. Fig. 17 Vibratory compaction of side backfill is ALWAYS REQUIRED, regardless of what backfill material is used. Continue placing and compacting backfill in 12 lifts until the material reaches the top of the R-Tank units. STEP 9 - BACKFILL TOP Dump backfill material adjacent to the R-Tank and, using your LGP Skid Steer or Dozer, push the material over the R-Tank system. Backfill must meet requirements listed in specification section 2.03 B. Largest Track Dozers that can be used with 12 of cover over R-Tank Machine Operating Track Ground Weight Dimensions Pressure Case 850K LGP 20,700 lbs 28 x 92.6 = 2593 si 4.0 psi Caterpillar D5K LGP 21,347 lbs 26 x 91 = 2366 si 4.52 psi John Deere 550J LGP 18,252 lbs 24 x 86 = 2064 si 4.2 psi Komatsu D39PX-21 19,620 lbs 25 x 93 = 2325 si 4.27 psi New Holland D95 LGP 20,700 lbs 28 x 93 = 2604 si 4.0 psi This list is not intended to be all inclusive, but representative. If your machine is not listed and you cannot find its ground pressure, you ll need to find your vehicle s Operating Weight and measure the area where the tracks contact the ground. Take these dimensions and multiply them (Length x Width), then multiply by 2 (since the machine has two tracks), then divide the Operating Weight by the total square inches of contact area to determine the contact pressure of the machine. If the contact pressure is less than 7.0 psi and the operating weight is less than 20,000 lbs, the machine will work with 12 of cover. 10


11 BACKFILL TOP - CONT acfenvironmental.com When pushing backfill over R-Tank units, work in the direction of the geotextile overlap to avoid shoving material between the fabric layers. WARNING: A minimum of 12 of material must be maintained between the Dozer tracks and the top of the R-Tank. For best results, push at least 14 (or more if needed) of backfill over the units so that as the material compacts beneath the dozer, a 12 minimum lift is maintained. It is recommended that the dozer drive straight on and then back straight off of the system during backfill placement. Turning movements are likely to shove the backfill material, reducing the thickness of the lift and potentially damaging the R-Tank modules. Fig. 18 Use an LGP dozer to push backfill over R-Tank units. WARNING: Dump trucks should not drive over or dump material on top of the R-Tank. Lightly compact top backfill to 95% standard proctor density or as shown on plans using your walk-behind trench roller. Alternately, a roller (maximum gross vehicle weight of 6 tons) may be used. Roller must remain in static mode until a minimum of 24 of cover has been placed over the modules (per spec, section 3.05 A5). Sheep foot rollers should not be used. WARNING: Some materials will compact significantly while others may shove excessively as you work. Never allow your lift thickness to compact to less than 12 without adding more material. STEP 10 - PLACE GEOGRID Geogrid is required for most load-bearing applications (see Fig. 19), such as systems placed beneath parking lots and roads. It is not required for some UD installations and above systems used in open space where traffic is prohibited, such as sport fields or natural areas. Geogrid must be placed 12 above the R-Tank, or as shown on plans. Overlap adjacent panels by 18 minimum or as specified in plans. Roll out Geogrid over the top of the system, with the edges of the grid extending 5 from R-Tank footprint or 3 beyond the edge of excavation or more as show on plans (refer to CAD detail HS20 loads). If metallic tape used to locate the system has been specified, now is a good time to install it. Fig. 19 Overlap Geogrid 18 or as required by plans. 11
. All cover material must meet requirements of specification section 2.03C.")
 is 3. Use R-Tank HD units for cover depths less than 7, R-Tank SD units for cover depths up to 10, and R-Tank XD units for cover depths up to 16.")


12 STEP 11 - PLACE ADDITIONAL COVER AS NEEDED If additional cover or pavement base is required by the plans, begin placing and compacting material in the same manner as discussed in Step 9. Push cover material parallel to the geogrid for best results (see Fig. 20). All cover material must meet requirements of specification section 2.03C. To achieve proper compaction requirements, it may be beneficial to begin placing material in 6 lifts. Fig. 20 Pushing backfill parallel to the Geogrid prevents the grid from shoving. WARNING: Maximum cover for R-Tank LD systems (4-plate) is 3. Use R-Tank HD units for cover depths less than 7, R-Tank SD units for cover depths up to 10, and R-Tank XD units for cover depths up to 16. If you suspect the incorrect module is being used on your project, please contact ACF Environmental at STEP 12 - SECURE THE INSTALLATION Construction loads are often the heaviest loads that ever drive over the R-Tank System, and there are many construction vehicles that exceed the HS20 standard that most detention systems are designed to meet. To prevent damage from these vehicles, the installation should be secured to prevent unauthorized traffic from driving over the system once it has been installed. Fig. 21 Secure the installation with temporary fencing. Projects nearing completion (within three months) should use warning tape or temporary fencing to secure the installation (see Fig. 21). For larger projects with ongoing construction activities, consider a more durable method for preventing unauthorized traffic from accessing the system (see Fig. 22). Regardless of what method is selected to secure the installation, it must remain in place until construction activity has concluded and no further access of vehicles exceeding the HS20 standard is necessary. Fig. 22 Secured R-Tank installation using Jersey Barriers. STEP 13 - INSTALL PRETREATMENT DEVICES Install pre-treatment devices prior to activating the R-Tank System to prevent debris from entering the system (see Fig. 23). Fig. 23 Trash Guard Plus prevents contamination of your system. For more information about Stormwater Management, contact Inside Sales at at info@acfenv.com