Section 4 CONVENTIONAL FALL PROTECTION
|
|
|
- Reginald Moody
- 5 years ago
- Views:
Transcription

1 Section 4 CONVENTIONAL FALL PROTECTION
2 Disclaimer This material was produced under grant number SH SH7 from the Occupational Safety and Health Administration, U.S. Department of Labor. It does not necessarily reflect the views or policies of the U.S. Department of Labor, nor does mention of trade names, commercial products, or organizations imply endorsement by the U.S. Government. This presentation is intended to discuss Federal Regulations only - your individual State requirements may be more stringent as many states operate their own state OSHA and they may have adopted construction standards that are different from information presented in this training. If you live in a state with an OSHA approved state plan, you should contact your local administrator for further information on the standards applicable in your state. These materials are meant for informational purposes only. No representation is made as to the thoroughness of the presentation.
3 Disclaimer, cont. It is not the intent to provide compliance-based training in this presentation, the intent is more to address hazard awareness in the residential construction (i.e. home building) industry, and to recognize the overlapping hazards present in many construction workplaces. Photos shown in this presentation may depict situations that are not in compliance with applicable OSHA/safety requirements. No legal advice is offered or implied, and no attorney-client relationship is intended or established. If legal advice or other expert assistance is required the services of a competent professional person should be sought. It is the responsibility of the employer and its employees to comply with all pertinent OSHA/safety rules and regulations in the jurisdiction in which they work.
4 Copyright Information 2018 This material is the copyrighted property of the Job-Site Safety Institute and the National Association of Home Builders. By federal regulation, OSHA reserves a license to use and disseminate such material for the purpose of promoting safety and health in the workplace. The Job-Site Safety Institute and the National Association of Home Builders hereby authorizes employers and workplace safety and health professionals to use this material, distributed by or through OSHA, in their workplaces or practices in accordance with the guidance contained in the material. To this end, permission is granted to use such copyrighted material solely for non-commercial, instructional, personal, or scholarly purposes. The material may be used and incorporated into other workplace safety and health programs on the condition that no fee may be charged for the subsequent use of the material. Use of the material for any other purpose, particularly commercial use, without the prior, express written permission of the copyright owner/s is prohibited. Furthermore, any modification to the material is prohibited without the prior, express written permission of the copyright owners.
5 Learning Objectives: Section 4 Identify when fall protection is required. Identify types of conventional fall protection systems. Determine which protection system to use for a given fall hazard. Identify key requirements and basic safety practices for each protection system.
6 When is Fall Protection Required? OSHA 1926 Subpart M Where workers on a residential construction site are exposed to vertical drops of 6 feet or more, OSHA requires that employers provide fall protection in one of three ways before work begins: 1) Conventional Fall Protection 2) Other Work Methods (Section 2) 3) Non-Conventional Fall Protection (Section 4)

7 Requirements on Jobsites Some OSHA State-Plan states may have different trigger heights of when conventional fall protection is required on residential jobsites. These states include, but may not be limited to: California Kentucky North Carolina Arizona Washington Oregon Approved OSHA State Plans

 Guardrails 2)")

8 What is Conventional Fall Protection? 1) Guardrails 2) Safety Nets 3) Personal Fall Arrest System (PFAS)
9 Guardrail Systems Barrier built to OSHA specifications; constructed to prevent workers from falling to lower levels Protects against these hazards: Window and Wall Openings Unprotected Sides and Edges Floor Holes
10 Guardrail Systems Are Needed For: Stairwell Openings Open-sided Wall Openings Second and Third Story Non-loading Bearing Walls When the Studs Are 24 OC Low (Less Than 39 ) Silled Windows Second and Third Story Deck Floor Holes for Open Foyers or Cat Walks Sliding Glass and French Door Openings Onto Decks and Porches Skylight Openings Cut Into the Roof
11 Height Requirements for Guardrails Toprail 42 in. ± 3 in. (1.1 m) Midrail 21 in. ± 3 in. (50 cm) Toe Board Minimum of 3 ½ in. (4 in. nominal) (10.2 cm)
12 Requirements for Guardrails Vertical Supports Install no more than every 8 ft. (2.4 m) Weight Requirement Must support at least 200 lbs. (90.9 kg) of force outward and downward along top edge

13 Properly installed guardrail system 42 ± 3 21 ± 3 Toeboard min. 3-1/2

14 Guardrail Uses in Residential Construction Wall Openings Wall openings greater than 18 need to be protected.

15 Guardrail Uses in Residential Construction Wall Openings Wall openings greater than 18 need to be protected.

16 Guardrail Uses in Residential Construction Wall Openings Wall openings greater than 18 need to be protected.

17 Guardrail Uses in Residential Construction Wall Openings Wall openings greater than 18 need to be protected.
18 Guardrail During Drywall Installation Prevent the need to remove guardrails during drywall installation: Build guardrail uprights 6 to 12 in. (15.4 to 30.5 cm) away from where drywall will be placed

19 Guardrail Uses in Residential Construction Wall Openings even when Drywall is Installed.

20 Guardrail Uses in Residential Construction 24 on Center Studs need Guardrails
21 Requirement for Window Openings Window openings with a 6 ft. fall hazard (1.8 m) require the installation of a guardrail system, if the bottom sill height is less than 39 in. (1.1 m). For all window openings, the sill height determines the need for a guardrail.

22 Guardrail Uses in Residential Construction Window Openings Window openings with a fall hazard and low sill height. Less than 39

23 Is a guardrail required?


24 Guardrail Uses in Residential Construction Window Openings Window openings with a fall hazard and low sill height.

25 Guardrail Uses in Residential Construction Window Openings Window openings with a fall hazard and low sill height.


26 Guardrail Uses in Residential Construction Window Openings Window openings with a fall hazard and low sill height.

27 Guardrail Uses in Residential Construction Window Openings Window openings with a fall hazard and low sill height.


28 Guardrail Uses in Residential Construction Floor Openings Guardrails can be used to protect unguarded floor openings.

29 Guardrail Uses in Residential Construction Stair Openings Guardrails can be used to protect unguarded stair openings.

30 Guardrail Uses in Residential Construction Stair Openings Guardrails can be used to protect unguarded stair openings.


31 Guardrail Uses in Residential Construction Rear Door Openings Guardrails can be used to protect unguarded doorways.


32 Guardrail Uses in Residential Construction Rear Door Openings Guardrails can be used to protect unguarded doorways.

33 Guardrail Uses in Residential Construction Protect Elevated Workers When workers are using stilts, increase the height of the top edge of the top rail to the amount equal to height of stilts.
34 Guardrail Uses in Residential Construction Completed decks Lofts Stair landings Ramps or runways Open-sided balconies and platforms

35 Guardrail Uses in Residential Construction Open-Sided Balcony and Platforms

36 Guardrail Uses in Residential Construction Open-Sided Balcony and Platforms Greater Than 6 Fall

37 Safety Nets System consisting of connectors and net installed below a working surface; designed to prevent a worker from contacting a lower level or structure in the event of a fall.
38 Safety Nets When used, safety must extend 8 feet beyond the edge of the work surface where employees are exposed and be installed as close under the work surface as practical but in no case more than 25 feet below. Safety nets must be drop-tested at the jobsite after initial installation and before being used as a fall protection system, and at 6-month intervals if left in one place.

39 Safety Nets The drop-test consists of a 400 pound bag of sand, that is inches in diameter, dropped into the net from the highest walking/working surface at which workers are exposed to fall hazards, but dropped from at least 42 inches above that level.

40 Personal Fall Arrest Systems Commonly called a (PFAS) it s comprised of an anchorage point, connectors, and a body harness used together to keep a worker from free falling from an elevated surface.


41 Proper PFAS for roofing Shock Absorbing Lanyard Full Body Harness Rope Grab Lifeline Anchor Point
.")
42 Personal Fall Arrest Systems Lifelines can include rope-grab systems or selfretracting lanyards (SRL s). Rope-grab system Self-retracting lanyard (SRL)

43 Self-Retracting Lanyards / SRL s The availability and lower prices of SRL s has led to a dramatic increase in their use in recent years. SRL s are available for a variety of uses, including leading edge work.
44 PFAS Prior to Use Review the manufacturer's instructions for proper use, inspection, donning, limitations, accessories, and other information. Inspect a PFAS prior to EACH USE. Remember in the event of a fall, this protects your LIFE. Don t use a PFAS that is damaged, worn, or has experienced an arrested fall.
45 PFAS Components D-rings and snaphooks must be capable of withstanding 3,600 lbs. without failure. Snaphooks must not be attached to: Directly to webbing, rope or wire rope To each other To a D-ring with another snaphook or connector on it To a horizontal lifeline
 connectors for defects Inspect rope or lifeline for any rips, tears, or deformities")
46 Inspecting Components of PFAS Inspecting a harness: Inspecting the buckles Inspecting the lanyard Carefully checking the webbing for distortions Check the hardware (D-rings) connectors for defects Inspect rope or lifeline for any rips, tears, or deformities

47 Inspecting PFAS Quick Tip Many types of harnesses and SRL s have inspection tags installed on them. This makes it easy for you to keep track of the inspections you have performed.

48 Wearing a PFAS Proper wear: locate the D- ring on the back of the harness in the center of the back between the shoulder blades.

49 Wearing a PFAS Proper wear: always adjust the harness to ensure it fits tight to prevent you from falling out of the harness in the event of a fall.


50 Anchor Point Requirements Anchor points must be capable of supporting 5,000 pounds or twice the intended load.

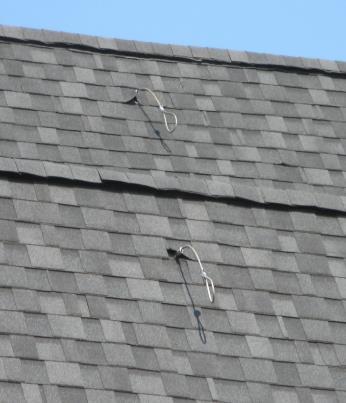
51 Examples of Anchor Points Anchor point is installed on a series of braced roof trusses.

52 Examples of Anchor Points Anchor point is installed through floor sheathing into floor trusses to support a worker using a leading edge self-retracting lifeline.

53 Anchor Points A horizontal lifeline is attached to a vertical structural pole and can be used to tie off framers.

54 Anchor Points, cont. A horizontal lifeline is attached to a vertical structural pole and can be used to tie off framers.


55 Examples of Anchor Points Sample Anchor Points:
56 Calculating Fall Distances Regulations require that a worker cannot free fall more than 6 feet. How far a worker will fall depends on a variety of factors, which include but is not limited to: Body size of worker Fit of harness, to allow for stretch Type of lanyard (rip-stitch or self-retracting) Safety factors

57 Calculating Fall Distances
58 Swing Fall Hazard A hazard created if a worker is not directly below the anchor point and experiences a fall; which caused the worker to swing back towards the anchor point. In order to minimize the swing follow a fall: Work directly below the anchor. Do not extend your work zone more than 30 o from the anchor. Manage the slack in the rope.
59 Swing Fall Hazard
60 Swing Fall Hazard Swing Fall Hazard

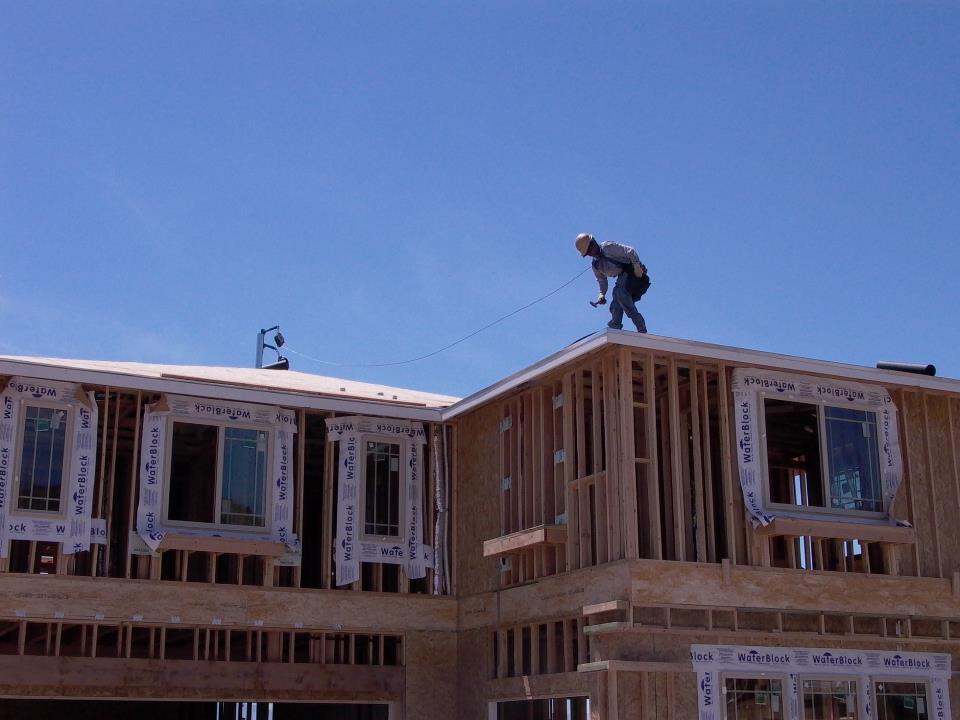
61 Identify the Hazards How many hazards do you see in this photo?

62 Identify the Hazards How many hazards do you see in this photo?

63 Identify the Hazards How many hazards do you see in this photo?
64 Limitations of using a PFAS Limitations of conventional fall protection systems during the installation of exterior walls may include: Lack of a suitable anchor point to withstand 5000 pounds or twice the intended load from a falling worker. Installation of guardrail system could involve more risk, due to the duration of the fall exposure.
65 Limitations of using a PFAS Manufacturers of personal fall arrest system components may prohibit the anchor point to be placed at ground level, or below a workers D ring on their harness. Clearance distance below a worker, which is needed when using a personal fall arrest system, may not be sufficient to prevent the worker from contacting the next lower level, should a fall occur. Manufacturers may have differing installation/usage requirements; always refer to the manufacturers instruction prior to use.
66 Recap In construction, the trigger height for when conventional fall protection (guardrails, PFAS, safety nets) is required is 6 feet. Before being exposed to fall hazards, workers must be trained. Understand the proper use and limitations of fall protection systems before beginning work. Never take shortcuts, always ask for assistance from a supervisor or competent person if you are unsure about a fall hazard or protective system.