What are Polyaspartics?
|
|
|
- Arabella Barnett
- 5 years ago
- Views:
Transcription
1 What are Polyaspartics? To begin with, a polyaspartic is a type of polyurea (actually a polyaspartic aliphatic polyurea). Polyurea as a commercially viable material was developed in the 1980s by Texaco Chemical Company (now Huntsman Chemical). The patents on the product are currently owned by Bayer AG. All polyureas are twopart systems, meaning that a resin has to be mixed with a catalyst to create the curing reaction that hardens the material. Polyurea has been used very successfully for corrosion-resistant coatings and repair materials, although application is awkward since it has an extremely short pot life about 3 seconds, so the two parts must be mixed at the spray tip, requiring lots of maintenance on expensive high-pressure equipment. Polyaspartic polyurea (or simply polyaspartics) overcomes many of those difficulties, while retaining the advantages. According to Bayer Material Science, polyaspartics are "based on the reaction of an aliphatic polyisocyanate and a polyaspartic ester, which is an aliphatic diamine." I bet you're glad we got that cleared up! For most of us, the important thing to understand is that polyaspartics are a polymer coating material that has the following characteristics: Rapid curing (from 5 to 120 minutes, depending on the formulation) Can be successfully applied at surface temperatures from -30 F to 140 F Very low viscosity equivalent to water which gives it outstanding wetting ability on a properly prepared concrete floor High film build (up to 18 mils in a single coat) Bubble-free surfaces even at high humidity (although high humidity can speed up the cure time considerably) Potlife of 5 to 120 minutes UV stable so it will never turn yellow and can provide UV protection to underlying coatings Made with a high solids content (as high as 100%), which means low or no volatile organics (VOCs) during application The cured coating can handle temperatures up to 350 F Crystal clear and does not blush white from moisture in the concrete Able to resist most stains, especially from oils and fats and even from red wine High abrasion resistance higher than epoxy or urethane May be able to resist higher internal moisture vapor emission rates than some other non-breathing coatings although this is an issue that is currently being investigated

2 What are Polyaspartics Used For? In exterior structures, especially bridges, corrosion of the embedded reinforcing steel is the number one enemy. If these structures can be sealed so that water can't penetrate, there can be no corrosion. Polyaspartics can play a role in this protection. On the San Mateo-Hayward Bridge, a 7-mile crossing of San Francisco Bay, all concrete beams and piles received a thee-part coating developed by Hehr International Polymers. The coatings were an epoxy sealant, a polyurea primer, and a polyaspartic top coat that provided additional protection and prevented UVdegradation of the polyurea coating. Not only has this coating system prevented any chlorides from migrating into the concrete, it has remained crystal clear and has even prevented barnacle growth.

3 Some less dramatic applications of polyaspartics include: Garage floors This has been the first major decorative use of polyaspartics. Several companies have emerged that are selling and installing pigmented polyaspartic garage floors with embedded vinyl flecks or quartz sand beads, similar to epoxy floors. The big selling point for the polyaspartics is the speed of the application. A polyaspartic garage floor can be completed start to finish in about 5 hours (an epoxy floor typically takes 5 days). While the materials cost more, the contractor can theoretically do the job in a single trip to the site. Polyaspartics may not be the best material for all situations, depending on the condition of the concrete especially if the floor has high moisture vapor emission rates

4 Commercial floors Kitchens, restrooms, and other commercial applications are great applications for this surface, since it resists stains and withstands heavy abrasion as much as 3 times the abrasion resistance of epoxy. "We are finding that contractors start with garage floors," says Doug Bannister of The Stamp Store, "but I think polyaspartics have great applications for high-wear commercial use. You've got superior abrasion resistance, optical clarity, and quick turnaround, so you can return to service in hours instead of days and the sun will not fade or discolor polyaspartics like it will epoxy. Polyaspartic Case Study The meat department in this grocery store had a two-year-old epoxy coating of which about 90% had peeled up, leaving the concrete unprotected and the failed epoxy allowed bacteria to penetrate the floor. It needed to be fixed immediately, but the store owners didn't want to close their meat department for several days to install a new epoxy system. This would have been an extreme inconvenience for employees and customers and a significant loss of profits. There also was concern over the loss of business due to the odors emitted during installation of an epoxy system. A final condition was the need to keep the freezers on, meaning the new coating would have to be installed at temperatures as low as 15 F, much too cold for epoxy.


5 One evening, the flooring contractor moved in immediately after closing time and began by diamond grinding the floor. Degraded areas were removed and patched with polyaspartic mixed with silica sand. All the patch work was cured and diamond ground 45 minutes later.

6 The first treatment applied was a penetrating silicate moisture barrier, supplied by Advantage Concrete Coatings that was intended to eliminate moisture vapor emissions. Advantage recommends this material any time a floor has a moisture vapor emission rate greater than 7 pounds/1000 square feet/24 hours or if the floor will be washed down on a regular basis. When this coating was dry in about 3 hours--workers applied a pigmented coat of 75% solids polyaspartic (AdvaCoat) and waited 45 minutes for it to cure. The top coat was again 75% solids pigmented polyaspartic polyurea into which a non-slip grit was broadcast and the entire floor was back-rolled. Before opening time the next morning the store's workers had moved their tables back in to the meat department and business resumed as usual.

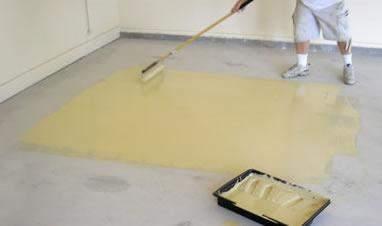
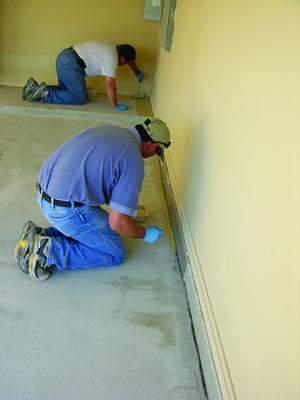
7 Installing a Polyaspartic Floor The first step is getting trained to do the installation properly. Flexmar, The Stamp Store, Advantage, and others offer training programs. "This is a critical step," said Flexmar's Jack Bracco. "It's not that installation is difficult, it's simply that we want people to employ a repeated process. Installers who have been using epoxy or polyurethane have their own way of doing things. We are trying to standardize the process to assure success." Step 1: Installation of a polyaspartic floor starts with floor preparation to rid the surface of laitance and contaminants. This is critical to success. The lowviscosity material must be able to penetrate the surface. Acid etching is not recommended, since it adds moisture to the concrete and the lower ph can lead to delamination problems. Most providers recommend a diamond grind at a 60 to 80 grit just enough to get through the paste surface layer and open the pores of the concrete.

8 Step 2: Cracks and joints can then be repaired. Bracco recommends filling the cracks with sand then wetting the sand with polyurea. Polyureas cure so rapidly that these repairs can be ground flush with the concrete surface in about 20 minutes. "The polyaspartic has such great elongation properties that you simply install the coating right over the top of these repaired cracks without getting any reflection" said Bannister. Harms notes that this does not include contraction joints. "We don't fill the joint, we coat down into it and back out, because if you tie the joint, it can crack the slab at mid-panel." Polyaspartic is usually mixed with equal amounts of Part A and Part B. Step 3: At this point, the floor can be acid stained or colored with acrylic waterbased stains. The installer then rolls on the first of three coats of polyaspartic. This is when you can see whether the coating is wetting--absorbing into the concrete. Different providers recommend different thicknesses for this primer coat and the one or two subsequent coats of polyaspartic. Bracco and Bannister recommend a 2 to 3 mil thick primer coat, while Harms goers with a 10-mil coat. "Bonding comes from two things," said Bracco, the surface profile and the ability to flow into the substrate. With polyaspartics we have a little extra time before it cross links, so it has time to absorb into the concrete." The primer coat and bed coat typically contains pigment
9

10 Step 4: Within an hour (or less) the primer has cured enough to walk on. For applications that incorporate vinyl chips or quartz sand, the second coat is then put down. For applications with color, both of these first two coats incorporate pigment. For acid stained floors, Bannister recommends stopping at two coats of clear polyaspartic. For floors with vinyl chips or quartz, that material is immediately broadcast into this "bed" layer. This layer varies from 2 mils to 18 mils thick, with the vinyl chips adding as much as 8 mils. "The chips wet out to form a laminar layer parallel to floor," said Bracco. "The ability to wet those chips is very important. Epoxy has a much higher viscosity, so the chips tend to lay on edge. Polyaspartics wet out the chips and they lay down to give you the laminar effect that helps in the overall protection of the concrete." Step 5: Once the bed coat has cured, Harms recommends scraping the surface. "We scrape it hard with a floor scraper to clean up the vinyl chips. That makes it smoother and also reduces the amount of product needed in the top coat to cover the vinyl chips." Workers then vacuum up all loose materials before rolling on the top coat. The top coat is always clear and goes on in a range of 6 to 18 mils. Thinner coats are applied with 3/8-inch nap rollers and thicker coats with ¾- inch naps. Thinner coats leave a slight texture to the surface as some of the vinyl chips or quartz pokes through. This all results in final coating thicknesses from 11 to 40 mils. All of this can be accomplished in a single day. Typically, the new floor can be opened to foot traffic in 2 or 3 hours and can be driven on within 24 hours.