Instructions on how to install a Pre casted Calabrese oven kit September 2017
|
|
|
- Bryce Paul
- 5 years ago
- Views:
Transcription
.")
.")

1 Instructions on how to install a Pre casted Calabrese oven kit September 2017 Before you start you will need a roll of chicken wire 5 metres, tie wire and aluminium foil x 3 rolls 1. On your slab roll out the Aluminium foil covering the area of your slab, Do 2 layers of foil ( Picture 1). Lay your insulation board on top of the (aluminium foil ) area in where the oven will be going keeping centre ( Picture 2 ). Make sure the board is at least 80mm off the back of your base to allow for insulation blanket & render (Picture 3). ( the Alumium foil acts as a barrier for moisture between the slab and the insulation board ) Picture 1 Picture 2 Once the insulation board is layed out, place your floor cooking tiles ontop of the insulation board in the following order listed on page 2. The tiles may overhang the insulation board on the left and right of the tiles. With the offcuts of the insulation board or excess fibre blanket pack this under the tiles that overhang to support tiles. PLEASE NOTE THE STANDARD INSULATION BOARD is between 40mm and 50mm thick for the Courtyard, entertainer & Grande. IF YOU RECEIVE 4 pieces of 25mm thick board in your courtyard, Entertainer or Grande kit PLEASE DOUBLE THE SHEET UP TO MAKE 50mm.. Picture 3


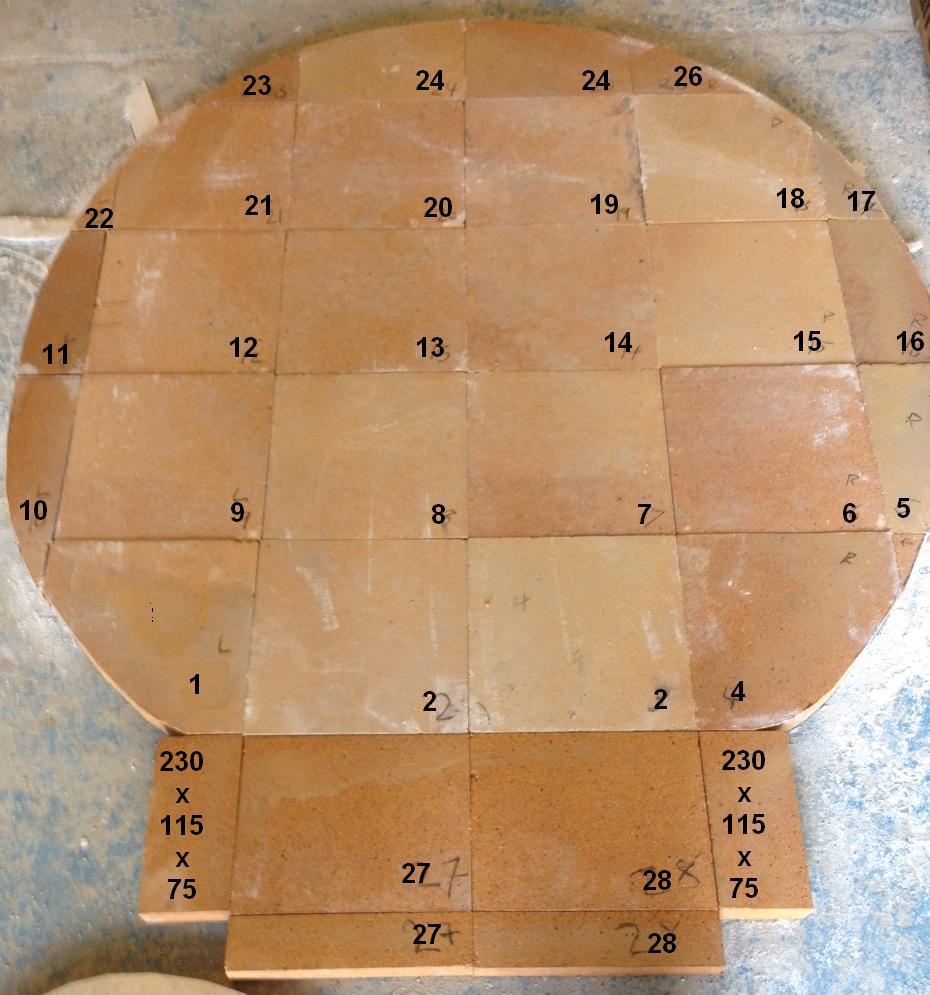
2 Calabrese Courtyard Tile plan Calabrese Entertainer Tile plan Calabrese 800 Tile plan Calabrese Grande Tile plan

 The oven")

 If the oven is in pieces lift each piece and join together with the mortar supplied in the")
3 Picture 4 Picture 5 Picture 6 Picture 7 When you lay your floor tiles ontop of the board one is slightly higher than the other you can gently grind this down with an angle grinder to make it smooth. (Picture 4) (if you do this it will leave grind marks in the floor tiles ) Using 4+ people lift the oven into place ontop of the cooking tiles ( please be careful it weighs kg in 1 piece) The oven should match up to the tiles cut.. Leaving a 230mm area in front of the door area for your flue arch bricks. If in 2 or 3 pieces again please take precautions when lifting. (Picture 6) If the oven is in pieces lift each piece and join together with the mortar supplied in the TUB (picture 9). The castable is powder in the bag. Tip: To get a tight join use a ratchet strap join each piece tightening it until its sealed.

 When you cut the Calsil board to conform to the shape of the floor tiles keep these pieces")


4 Picture 8 Picture 9 Picture 10 With any mortar or Castable that you may have left over ONLY AFTER MORTARING THE FRONT ARCH BRICKS fill the join between the oven and the floor tiles. If you don t have enough don t worry. (Picture 9) When you cut the Calsil board to conform to the shape of the floor tiles keep these pieces leftover and trim them to fit under the front arch tiles. Then the underfloor tiles sit flush to the front. (Picture 10) Picture 11 Put together the flue arch template using 200mm battens (only 6 needed) The template is to be placed ontop of the front floor tiles. Make sure your template is evenly spaced on the ovens opening. Use 4 x 2-4mm spacers underneath the template to lift the template up so when taking it once the bricks are dry it will drop. Follow the combination below for your oven ( Picture 11)


5 Don t forget to fold the foil that you placed under the oven insulation board up to cover the board. Picture 12 Picture , Courtyard Entertainer, Grande 800*, Courtyard - Calabrese 63/51/51/51/51/51/51/51/51/51/51/51/51/51/51/63 *Calabrese 800 has smaller 25mm thick front underfloor tile & only a 230 x 115 x 75 brick with no 25mm tile under the front flue arch Entertainer, Grande - Calabrese - 63/51/51/63/51/51/63/51/51/51/51/63/51/51/63/51/51/63 When putting the combination together only use a 3mm thin scrape of mortar to bind the bricks together. On the back of the arch bricks put a thin scrape of mortar and this will bind the bricks to the ovens body When you start to get to the top of the bricks arch set your 75/51, 80mm cut arch bricks. Leaving a 150mm gap behind in where your flue will sit. See below (picture 14)


6 Picture 14 Gently squeeze the flue in and it should sit in there. Tear a small amount of insulation blanket off and pack in around the flue, straighten your flue.. With the castable supplied mix this with water until you obtain a doughy consistency. Then pack this around the flue to seal it in. Once the castable is dry slowly pull your template out and clean the inside joints of any excess mortar using a scraper and a wet sponge. Slide the x 50 x 50mm tiles in under the front tiles to create your front using a small amount of mortar to glue them in. For the courtyard they are approx 250 x 50 x 50mm ( Picture 15) Picture 15


7 Courtyard & 800 Brick Trim For the optional brick trim and stainless cap which is extra we supply mortar them ontop of the flue top 4 x 51mm flue bricks in the following combination and insert the stainless flue ontop. Entertainer / Grande Brick trim


8 For the brick trim optional on the entertainer and Grande models when assembling please make sure the face bricks are at the front and the Cut bricks with the grain exposed each side are on the back.


9 Then once you have mortared the top bricks with any left over mortar spread over the top of the brick trim to make a seal then gently insert the stainless steel cap. When pushing the stainless steel cap down the mortar spread over the top will create a seal. For any excess mortar on the bricks use a wet sponge and remove before it drys. With any left over castable mix to a doughy consistency and fill in the joints in between the flue arch and front floor tiles. Picture 16 Picture 17 With your household aluminium foil a wrap the ovens chamber like a hot potato. Please do minimum 3 layers over the oven and create a Flashing edge near the bricks. (Picture 16 & 17) You can use tape to hold it down if it gets a bit windy


10 Place ceramic fibre blanket over the oven (not over the brick front) and make sure it is fully covered tucking it in on the corners around the arch (please use gloves and a mask when handling and cutting the ceramic blanket) and overlapping any joins. Optional: Using Aluminium foil as a secondary barrier cover the ceramic blanket FULLY so you cant see any blanket at all ( this acts as a barrier so no moisture can penetrate the blanket over time. Wrap chicken wire over the Aluminium foil and ceramic fibre blanket and make sure the mesh is secured down. Dont worry if you pierce the aluminum foil. Make sure the chicken wire is tight. Picture 18 Picture 19 Picture 20


11 Picture 21 Picture 22 Once this is done mix your render ( mix below) and form over the top to create a rough layer covering the chicken wire ( Picture 22 ). If you see the chicken wire its not a worry, the first coat is the rough coat. Wait till the render is touch dry say 1hr. Then mix another lot of render to do the final coat. Make sure this coat covers the entire oven and no chicken wire must be seen. After you have finished the final coat wait till its touch try and in a circular fashion use a damp sponge to give you a fine texture. (picture 21) RENDER MIX = 5 - Bags of 20kg BORAL SAND CEMENT + 10 handfuls of Boral builders clay When using the sand cement, mix 3-20kg bags first with 6 handfuls of builders clay together and render the oven. Then with the final layer 2-20kg bags sand cement & 4 handfuls of builders clay. If you don t find the BORAL brand of clay and cement its ok. Moisture is the ovens biggest enemy over time!! When the render has dried, usually 24hrs later the curing process must begin straight away. During the curing process no moisture must get into the oven otherwise you are reversing the curing. ( curing instructions below). When the curing process is finished you must seal the rendered dome to prevent any moisture getting back in.. Bondcrete can be used aswell. This mixes with water and seals the oven. This is available from any local hardware store. Curing your oven. Recommended curing is good quality BBQ heat beads available at supermarkets and hardware stores. Heat them up on a gas bbq or fireplace until they are white around the edges. Place them in a metal pan and put in the centre of the oven keeping the oven at roughly degrees- no higher. You can close the door entirely or keep the door ajar a few centermetres to let the air in to keep the heat beads going.the heat will dissipate quicker than usual as you re heating up a cold structure. PLEASE BE PATIENT as its protecting


12 your oven for life. The heat beads are to stay in the oven for a minimum 24 48hrs (the longer the better) replacing the heat beads with new ones that are hot to keep the heat at degrees. This pushes any moisture out of the oven and drys it for LIFE to prevent any issues. After the 48hr process then you can start to light a small fire in the metal pan keeping the flame very minimal. Push that into the centre of the oven. Slowly build the temperature up and add more timber until your fire is large. You will notice the ovens chamber changing colour and getting very hot. That s a good sign, its pushing and moisture out!! The back of the door will sweat as well. When the oven has changed to its dry colour and the door has stopped sweating your good to go. Make sure after rendering and curing you keep the ovens rendered chamber out of the rain or from any moisture. If moisture gets in the oven before sealing you need to start the curing process again. The ovens chamber and render must be completely dry before sealing. Once this is done your ready to cook! Sealing your oven Your oven is now completely dry and you must seal it to prevent any moisture getting back in. We recommend products. Bondall or Boncrete liquid sealer Remember to follow the sealant manufacturer s instruction on the tin and recoat after 12 months or so. REMEMBER ONCE YOU HAVE CURED THE OVEN IT MUST STAY DRY INSIDE OR THIS CAN CAUSE THE OVEN NOT TO HEAT UP TO TEMPERATURE AND CRACKING First firing Upon your first firing please remember your heating up a structure this takes time. Light a small fire on the floor cooking tiles just inside the door archway at 6 oclock so its receiving sufficient oxygen to become larger. After you have a large fire inside the door arch or middle of the oven then move the fire to either 3 oclock or 9 oclock inside the oven up against the chamber wall. The flame needs to travel the entire length of the chamber to heat the other side of the oven. Your chamber will turn black on the inside. This is because the carbon from the timber is burning off and the oven is NOT hot enough. When you have a large fire inside the oven for a long period of time you will notice the chamber in areas start to turn white. This means the oven is heating up. Once the oven turns 75% white or 100 % white your oven is hot enough to cook pizza!
13 To maintain this heat you will have to keep stoking the fire with timber to keep the temperature up. Please note the door on the oven is not to be used at any stage upon the firing up and cooking. It is only meant to be used to keep the heat in overnight or between use. After you have used the oven and it is hot you can leave the fire in the oven and close the door. The oven will eventually cool down within 24 48hrs. To clean the floor of the oven simply scrape the floor to remove any food and scrape with a wire brush. Once the oven has cooled down you can take the Ash out and gently wipe the floor clean with wet, hot cloth. Maintenance of your oven. If you notice small hairline cracks in the oven, not to worry it does happen. There are many reasons for this. Every 6 months add a sealer to the ovens chamber to help protect it from any moisture rentering the oven. If your stainless steel front starts to lose a lttle paint, just spray some touch up paint on it to keep it looking great.