LIQUID APPLIED FLASHING
|
|
|
- Patience Whitehead
- 5 years ago
- Views:
Transcription
1 7 th Annual Passive House Conference 2012 LIQUID APPLIED FLASHING SAM HAGERMAN Owner Hammer and Hand Inc. President Passive House Alliance 1020 SE HARRISON ST. PORTLAND, OREGON FAIRVIEW AVE E #103C SEATTLE, WA

2 7 th Annual Passive House Conference 2012


3 7 th Annual Passive House Conference 2012

4 7 th Annual Passive House Conference 2012


5 7 th Annual Passive House Conference 2012 Water Management of Noninsulating and Insulating Sheathings Final Report J. Smegal and J. Lstiburek Building Science Corporation April 2012 Figure 9. Wrinkle caused by thermal cycling and expansion/contraction The peel and stick, or self-adhered membrane, can be very successful as a water and air barrier if
6 7 th Annual Passive House Conference 2012 August 2010 Issue 4 Technology & Research Bulletin Excessive Use of Self Adhesive Bituminous Membranes in Standard Wood Frame Construction l Bulletin #4 Many changes have been introduced to the construction of building enclosures in an attempt to reduce the extent and severity of water penetration problems. One of these innovations has been the more prevalent use of self adhesive bituminous membranes as a protected flashing material at interface and penetration details. As with any innovation, there is a need to be wary of unintended impacts of this change. With the focus clearly on keeping water out of the wall once in service, there can be a lack of recognition of the reduction of drying capability that is inherent in using vapor impermeable membrane within a wood-frame wall that is intended to otherwise dry to the exterior. In addition, the focus on exterior moisture (rain penetration) fails to acknowledge that a variety of moisture sources can exist and potentially contribute to an unanticipated moisture problem. This bulletin applies to wood-frame wall assemblies designed with interior vapor control membranes, and relatively permeable water resistive membranes, as applicable to mixed and cold climates. l Balance of Wetting and Drying In addition to rain penetration, several other moisture sources need be considered such as wet wood used to construct, wood wetted during construction, and condensation related to vapor diffusion and/or air leakage. Since wood decay is governed by moisture content, time, and temperature, the moisture tolerance of wood elements of a building assembly depend both on its tendency to retain moisture from a variety of sources, the speed at which it can drain and/or dry, and the wood s ability to resist fungal decay. Drainage can be encouraged through the use of appropriate detailing that sheds water and assemblies that provide effective drainage behind cladding. Drying potential is largely governed by the material properties and location of these materials within an assembly. Vapor impermeable exterior surfaces or membranes that are intended to reduce wetting from exterior sources may actually increase the probability of decay because they slow the drying process to the exterior. This unique balance of wetting and drying mechanisms must be considered for every project. l Construction Moisture The combination of construction moisture and poor drying potential can lead to wood decay, even with well designed wall assemblies. An example of this potential is the use of an exterior insulated rainscreen wall assembly that incorporates a vapor impermeable, self- 1
7 7 th Annual Passive House Conference /4 Gap between flashing and siding

8 Flashing Basics Head Flashing 4 110º Trim Depth + 1/4 1/2 min 3/8 Prefinished Galvanized Steel 24 Gauge Minimum
 4 110º Trim Depth + 1/4 Hemmed Edge Cut a 1/2 notch in")


9 Flashing Basics Head Flashing with Ends Dams (Code Minimum in B.C.) 4 110º Trim Depth + 1/4 Hemmed Edge Cut a 1/2 notch in the front face 1/2 Fold up end to make end dam Note: Do Not fold tight to back leg of flashing so positive slope is maintained Form a safety edge by folding down outer corner Head Flashing with End Dam Prefinished Galvanized Steel 24 Gauge Minimum

10 Pumpkin Ridge Passive House Framing Advanced Framing: Studs placed at 24 O.C. More efficient use of materials Window sized to fit between studs and single window header eliminate more lumber

11 Pumpkin Ridge Passive House Rough Opening Rough opening size accounts for plywood buck and gap allowance for window install
12 Pumpkin Ridge Passive House Install ¾ Plywood Window Buck Window Buck begins at the inside of the 2x6 wall framing and extends out past the sheathing

13 Pumpkin Ridge Passive House Joint and Seam Filler ApplicaCon Tool Joint and Seam Filler into place on the areas pictured: Seams in sheathing IntersecSon of buck and sheathing Along outside corners of buck Face of window buck and back into the opening

14 Pumpkin Ridge Passive House ADach TJIs TJIs align with studs and extend to the edge of the window buck

15 Pumpkin Ridge Passive House Blocking Around Window Buck OpSonal blocking at top and botom of window buck
16 Pumpkin Ridge Passive House Agepan Sheathing Agepan sheathing installed in 2x8 sheets, tongue and groove Rough Opening should be cut with a router and rough sanded to prepare the surface for Liquid- Applied Flashing
17 Pumpkin Ridge Passive House Joint and Seam Filler to Wet- set Beveled Sill Apply Joint and seam filler to botom of window buck where beveled sill will be installed
18 Pumpkin Ridge Passive House Install Beveled Sill Beveled sill drains water away from the building

19 Pumpkin Ridge Passive House Joint and Seam Filler around RO in Agepan Seal the seams to prepare RO in Agepan for Fast Flash

20 Pumpkin Ridge Passive House Fast Flash 9 out from and back into opening Apply Fast Flash, tooling into place Extend 9 from RO in all direcsons as well as back into the buck far enough to align with the back of the beveled sill piece

21 Pumpkin Ridge Passive House Install Window
22 Pumpkin Ridge Passive House ADach Furring Strips 1x4 Rain Screen furring strips align with TJIs and studs Do not install furring strip at the window head yet, trim and head flashing need to be installed first.
23 Pumpkin Ridge Passive House Trim Match slope of botom trim piece to beveled sill angle
24 Pumpkin Ridge Passive House Head Flashing Bed head flashing into Fast flash. Bead and buter more Fast flask over the top of the flashing leg for a consnuous drainage plane Use head flashing with end dams or folded down edges

25 Pumpkin Ridge Passive House Bug Screen Cor- A- Vent SV- 5 used at botom ant top of window opening to keep bugs out Furring strips above window head can now be atached

26 Pumpkin Ridge Passive House Siding Completed Rain Screen
27 Pumpkin Ridge Passive House Air Flow Gaps ¼ Gap above head flashing and below trim at sill to allow air flow through the Rain Screen

28 7 th Annual Passive House Conference 2012

29 7 th Annual Passive House Conference 2012

30 7 th Annual Passive House Conference 2012

31 7 th Annual Passive House Conference 2012

32 7 th Annual Passive House Conference 2012

33 7 th Annual Passive House Conference 2012

34 7 th Annual Passive House Conference 2012

35 7 th Annual Passive House Conference 2012

36 7 th Annual Passive House Conference 2012

37 7 th Annual Passive House Conference 2012

38 7 th Annual Passive House Conference 2012

39 7 th Annual Passive House Conference 2012

40 7 th Annual Passive House Conference 2012

41 7 th Annual Passive House Conference 2012

42 7 th Annual Passive House Conference 2012

43 7 th Annual Passive House Conference 2012

44 7 th Annual Passive House Conference 2012

45 7 th Annual Passive House Conference 2012

46 7 th Annual Passive House Conference 2012

47 7 th Annual Passive House Conference 2012

48 7 th Annual Passive House Conference 2012

49 7 th Annual Passive House Conference 2012
50 7 th Annual Passive House Conference 2012 QUESTIONS?

51 Window Installation in Passive Houses ways to achieve superior insulation, airtightness and durability Florian Speier Swiss Architect CPHC co-founder, Zola European Windows
52 What makes a window perform? Glass l l l U-value SHGC Clarity (VT, color) Frame l l l U-value Tight seal durability Spacer l l l Non-metallic Structurally sound Aesthetics Install l l l overinsulation Airtightness Water tightness

53 American high performance Windows l l l l Main suppliers: Serious, Thermotech, Cascadia Fiberglass frames Thin frames Shorter lead times Heat demand as low as 5.35 kbtu/ft.yr

54 Euro windows I - upvc l l l Lowest cost PH window available Steel reinforced Toxic in production and disposal l Estimated lifespan 25 years Heat demand 4.55 kbtu/ft2.yr

55 Euro Windows II - wood l l l l Craftsmanship Need to be repainted about every six to ten years Factory finished Lifespan if well maintained 40+ years Heat demand as low as 4.55 kbtu/ft.yr


56 Euro Windows III aluminum clad l l l l Nearly Maintenance free Rain screen aluminum cladding Wood interior Thermally broken frames Heat demand as low as 4.45 kbtu/ft.yr

57
58
59 Installation positions l Flush outside (easiest, best solar gain potential) Centered (more difficult install,better thermal performance) Overinsulated & centered (most difficult install, best performance)

60 Installation positions l l l Flush outside (easiest, best solar gain potential) Sample wall: 2x4 plus TJI, solid window buck from ply Psi install: BTU/hrftF
61 Installation positions l l l Center of wall Sample wall: 2x4 plus TJI, solid window buck from ply Psi install: BTU/hrftF


62 Installation positions l l l Center of wall, overinsulated inside and outside Sample wall: 2x4 plus TJI, solid window buck from ply Psi install: BTU/hrftF

63 Rough Opening Prep Window Install Overinsulation


64 Rough Opening Prep Window Install Overinsulation R.O. prep objectives Bringing the airtight layer to the inside Weather proofing the rough opening Most Euro windows are designed for an airtight connection on the inside wrap your air barrier into the rough opening. Tip: cladding your R.O. with OSB will make this easier and more durable.

65 Rough Opening Prep Window Install Overinsulation
66 Rough Opening Prep Window Install Overinsulation Install objectives Mechanical attachment Air tightness Insulation (Gap between R.O and window) Weather proofing


67 Rough Opening Prep Window Install Overinsulation Brackets for fixed frames, screws for operable frames. Spacing 24 o.c. but first attachment point no more than 8 from corner Mechanical attachment

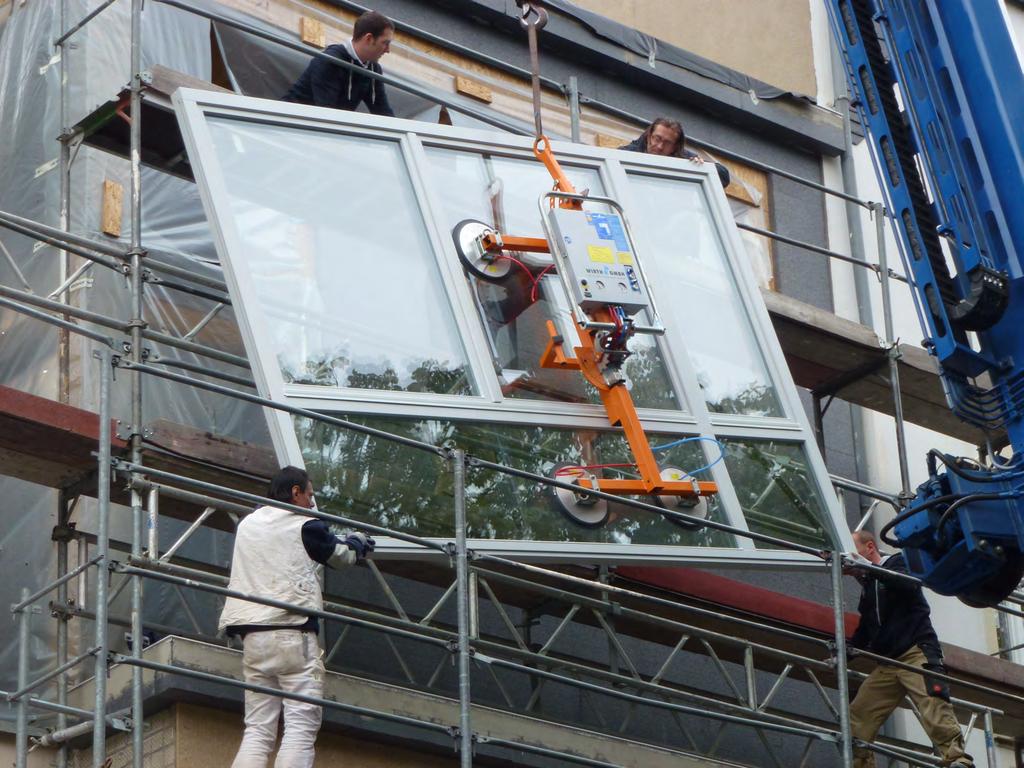
68 Rough Opening Prep Window Install Overinsulation Move the window to your work area, tools: suction cups and forearm forklifts Mechanical attachment

 Mechanical")
69 Rough Opening Prep Window Install Overinsulation Remove sash, predrill for install screws (operable) Mechanical attachment


70 Rough Opening Prep Window Install Overinsulation Mechanical attachment Remove sash, predrill for install screws (operable) or mount brackets to frame (fixed)
71 Rough Opening Prep Window Install Overinsulation Consider when deciding on an install method: Goals inside/outside drying Timing of install is the finish façade already on or can we use tapes on the outside still? How precise and reliable will your R.O. s be? Labor cost / material cost
72 Rough Opening Prep Window Install Overinsulation Tape / Foam / Tape Tape / Foam / Compression tape ` ` Air tightness Insulation Weather Proofing Specialty tape to window butt or face Spray applied foam or stuffed with mineral wool Specialty tape to face of window same same Compression tape at butt or face, allowing full install from inside 3 in 1 Single compression tape on butt side fulfills all functions Caulk / Air / Caulk Specialty caulk Air space Caulk / w drainage points

73 Rough Opening Prep Window Install Overinsulation Impact of foam vs void r.o gap dry condition Foam psi-install BTU/hrftF Air gap psi-install BTU/hrftF


74 Rough Opening Prep Window Install Overinsulation Jim Maduena / Jonah Stanford inside drying install: Illbruck Duo attached to side of frame Set from outside Zip tape over outside face


75 Rough Opening Prep Window Install Overinsulation Jim Maduena / Jonah Stanford inside drying install: Illbruck Duo attached to side of frame Set from outside Zip tape over outside face


76 Rough Opening Prep Window Install Overinsulation Results: Install completed within 24hrs of arrival of Zola truck Blower door test 30hrs after arrival of windows: 0.18ACH50

77 Rough Opening Prep Window Install Overinsulation

78 Thank you! l Questions? Call or Florian Speier florian@zolawindows.com