Yanchi Bamboo Flooring Installation Guide Pre-Installation Checklist Conditioning and Acclimating Your Bamboo Floor Before Installation
|
|
|
- Franklin Paul
- 5 years ago
- Views:
Transcription
1 Yanchi Bamboo Flooring Installation Guide READ COMPLETELY BEFORE STARTING INSTALLATION. Congratulations on choosing Yanchi bamboo flooring. Please take time to read the following procedures before you begin installation. With the correct installation of this flooring, following the precautions in this guide, this natural product will give you many years of satisfaction. Yanchi bamboo flooring is manufactured to standards that permit a variance in thickness, width, and length of no more than 0.25mm (that is less than 0.01 inch). While quality control procedures at the factory ensure that very few defective boards are delivered to the consumer, the owner/installer of this bamboo flooring is responsible for the final inspection. Claims cannot be made for defective boards after they have been installed. Pre-Installation Checklist Read the Warranty carefully before installing the product. All installed strips will be considered accepted by the installer and/or homeowner. Before you order flooring, make sure you add at least 5% to the actual area size you are going to cover. The industry standard for allowable small defects, mismilling or misgrading is 5 %. Due to Yanchi Bamboo flooring being a natural product, distinctions in the look and color of each plank may vary. In order to account for these variations in look, please analyze and compare the photos of the product on to the samples that you order. For a congruent look during the installation of Yanchi Bamboo Flooring, please source from multiple boxes of the product simultaneously. This will ensure that the entirety of the floor maintains a similar look. During the installation, play with different lengths and variations of planks to achieve the most preferable appearance. Moldings that share a comparable color to the flooring planks should be used together. BuildDirect s warranty does not cover natural variations in Yanchi Bamboo Flooring products. Wood should never be stored outdoors or in a damp area. If it is to be installed in a new home or a renovation, ensure that all doors and windows are already in place, that the walls are puttied, painted and dry. Hardwood flooring should always be the last item installed. The temperature of the room should be approximately 65º for at least five (5) days prior to installation. The relative humidity of the environment should be roughly 40% - 50%. The humidity should be maintained at that level all year round. Leave the hardwood flooring in the boxes until installation. Remove any carpet, underpad and glue from the sub floor. Make sure that sub-floor is absolutely sound, level, dry, has no protruding nail heads and is clean of dirt, wax, grease, etc. Conditioning and Acclimating Your Bamboo Floor Before Installation Maintain low moisture levels is crucial for the lifespan of your bamboo floors. Bamboo floors are hygroscopic. This means that the shape and size of the floors will grow and shrink naturally with the amount of moisure it absorbs and releases. The variation levels in growth of your bamboo floors is correlated to the implementation of actions taken to prevent moisure build-up. Furthermore, actions preventing moisure fluctuation will help protect the structure of both the floors and surrounding infastructure. It is important to acclimate this product for at least 10 days. To properly acclimate, move the product into the rooms where they will be installed. Ensure the carton is raised off the ground. Cross-stack boxes on a pallet is recommended to improve airflow during acclimation. More time is necessary for extreme climates where the relative humidity of the environment is not 40% - 50%. Page 1
2 Testing Moisture Levels in Subfloor General: Measure the moisture content withn the subfloor before proceeding with the installation. Be sure to identify and rid the source of excessive moisture before progressing further. Be sure to lengthen the time of acclimation and allow for further ventalation of the product until it is in suitable condition. At this point, your product is ready for moisture barriers to be applied. Moisture may be prone to varying with seasonal change. For this reason, results of moisture tests are only applicable during the day of testing. Moisture barriers must always be applied for every installation of Yanchi Bamboo flooring. BuildDirect does not cover warranty for moisture related issues or damages. When tests show that moisture vapor levels are flush with, or exceeding 12%, they will need to be corrected and lowered before the installation can commence. Wood/Bamboo Subflooring: When tests show that moisture vapor levels are flush with, or exceeding 12%, they will need to be corrected and lowered before the installation can commence. Wood/Bamboo flooring must always be installed with a vapour barrier. BuildDirect will always recomend the use of vapour barriers, specifically when moisture content levels of the subfloors and floors are surmounting 3%. Concrete Subflooring: Concrete subfloors have to be tested for moisture vapour pressure in varius locations in order to provide dependable results. In the case where results conclude that moisture vapor is at or exceeding the required vapor content, concrete floors must be installed with an impermeable vapor retarder with a perm level lower than.13. This retarder must be able to permanently deter moisture vapor. Other Considerations: Before installation, lay out the flooring where it is to be installed (that is, lay the planks down roughly as they will appear after installation), taking care to mix it in a shading pattern pleasing to your eye. Installer should inspect each plank at this time for finish and quality. Once installed, it becomes the responsibility of the installer/homeowner. Remember that all natural flooring comes in a range of colors and shades. Our quality control procedures at the factory ensure that very few, if any defective planks are delivered to the consumer. Remove baseboards and undercut door jambs to insure a quality installation. Remember to allow room for expansion around the entire perimeter of the flooring. Failure to provide room for expansion will result in installation issues. Tips and Maintenance Practical Tips - Installation of a factory-finished hardwood floor requires more care than a conventional floor to prevent damaging the floor s finish during installation. Frequent use of a vacuum cleaner during installation is highly recommended to eliminate saw dust and wood chips. - Place your tools on the plywood or on a piece of cardboard rather than directly on the hardwood floor. - To better hide the expansion joint around the room, cut the gypsum so that the wood can use that space as an expansion joint. - If a strip presents too much color variation or a minor defect, put it aside and use it in a less visible area such as a closet. You can also cut a defective strip and use it to start or end a row. - Save remaining strips after installation and store them in a proper place for future repairs. - Remove adhesive from surface of the floor as soon as possible. Maintenance - Use non-wax flooring cleaner to keep your floor in good condition. Use of conventional, domestic cleaners may permanently damage your floor s finish. Page 2
3 - Never clean your hardwood floor with a wet mop or cloth. Water and wood are natural enemies. - Do not wax your hardwood floor. - Vacuum your floor frequently to eliminate the presence of solid particles (such as sand) which may damage and/or scratch your floor. - Place protective felt underneath your furniture to protect your floor. Clean the felt regularly and replace it when necessary. - When moving heavy furniture (fridge, piano, etc.), place a thick rug underneath furniture legs before moving Page 3
4 Installation Methods Covered In This Guide: T&G - Nail-down Method T&G - Floating Method Click Lock - Floating Method Installing Bamboo Flooring on Top of a Wood Subfloor (Nail-down Method) Installation Requirements Gypsum joints must be completed and dried. Concrete work must have been completed at least 45 days prior to installation. The heating system must be functional and the building must be heated up to 65 F for a minimum of 7 days immediately prior to installation. The relative humidity of the building must be between 40% and 50%. Plywood humidity (subfloor) must not exceed 12%. Subfloor thickness must be a minimum of ¾ Particle boards or chipboards must not be used as the subfloor. Before Installing It is important to acclimate this product for at least 10 days. To properly acclimate, move the product into the rooms where they will be installed. Ensure the carton is raised off the ground. Cross-stack boxes on a pallet is recommended to improve airflow during acclimation. More time is necessary for extreme climates where the relative humidity of the environment is not 40% - 50%. Make sure the subfloor (plywood) is properly attached to the joists to avoid creaking. Correct slight irregularities on the subfloor with a sander. All the nails and screws of the subfloor must be driven in properly. Remove baseboards and doorsills. Cut 2cm (9/16 ) off the bottom of the doorframes to insert the strips underneath them. Vacuum the subfloor regularly during installation to make sure it is always clean and dust free. A vapor barrier or felt paper (#15) placed between the subfloor and the strips will help keep the humidity content of the flooring more stable. 1 ¼ minimum length, 15-gage nails, or staples are recommended to fasten the floor. Installation Guide 1. When installing your floor, be sure to use a moisture barrier that is compatible with the flooring product 2. Always lay flooring perpendicular to the floor joist when nailing in the product. 3. Yanchi Bamboo flooring products will expand with moisture. To account for this, please leave a 1/2 space around the outside area of the room as well as vertical standing objects that use spacers. 4. Before nailing in any boards, plan out your layout plan by placing boards in the desired positions (dry lay). Page 4
5 5. Use a sample plank to test the air pressure and angle of your pneumatic nailer is correct before you start your floor installation. Correct and adjust the pneumatic nailer based on any surface or tongue damages to the sample plank. Do not start the installation until you find a suitable setting that will not damage the planks. 6. Refrain from starting the installation in the middle of the flooring area. Use the walls of the room to make sure your planks are straightly alligned. 7. Glue or blind nail your initial row of planks. 8. Connect the planks together by matching the mating side of the first plank with the shorter side of the side plank. 9. Once you get to the end of the row, cut off the excess length of the last plank and start the second row. 10. End joints of each consecutive row must be offset by a minimum of six inches in order to achieve the most aesthetic appearance. 11. Move on to the second row and make sure to connect the short plank edges with those of the longer edges. 12. Start the third row by nailing nailing above the tongue without deviation at a 45 degree angle. 13. Keep an eye on the pressure of the nailer to ensure the nails are not driven deeper than need be. If the nail goes too deeply through the nail pocket or is not correctly sitting in the nail pocket, your bamboo floors will not allow for the next plank to properly be installed in unison to the other palnks. 14. A nail spacing of 8 to 10 inches along long side of the board is the most ideal when installing your flooring. 15. Do not nail any closer than 4 inches from the end of the board to avoid plank damage and installation problems. 16. With the remaing rows, first connect the short edges of each plank and then tap the long edges together with a pull bar. 17. Throughout the installation, make sure to double check that your floor is being installed straight. 18. Planks may need to be cut in the last row to properly fit. 19. The procress that was used to install the first two rows of planks must be again used to install the last two rows. Page 5
6 Installing Bamboo Floors on Top of a Concrete Subfloor (Floating Method) Important Notices The adhesive has to be a 100% Urethane-based product. The adhesive manufacturer s installation instructions are to be followed. Installation Requirements Gypsum joints must be completed and dried. Concrete work must have been completed at least 45 days prior to installation. The heating system must be functional and the building must be heated up to 65 F for a minimum of 7 days immediately prior to installation. The relative humidity of the building must be between 40% and 50% Before Installing It is important to acclimate this product for at least 10 days. To properly acclimate, move the product into the rooms where they will be installed. Ensure the carton is raised off the ground. Cross-stack boxes on a pallet is recommended to improve airflow during acclimation. More time is necessary for extreme climates where the relative humidity of the environment is not 40% - 50%. Correct slight irregularities on the subfloor. Remove baseboards and doorsills. Cut 9/16 off the bottom of the doorframes to insert the strips underneath them. Vacuum the subfloor regularly during installation to make sure it is always clean and dust free. Installation Guide 1. Please use Tongue & Groove Bamboo Flooring Glue for all Yanchi Bamboo floating floor installations. 2. Pleas ensure that the subfloor, job site, and environment are suitable for bamboo flooring before commencing your installation. 3. Before you start your installation, be sure to coat concrete subfloors with moisture control sealing products to prevent moisutre buildup. 4. Yanchi Bamboo flooring products will expand with moisture. To account for this, please leave a 1/2 space around the outside area of the room as well as vertical standing objects that use spacers. 5. Before nailing in any boards, plan out your layout plan by placing boards in the desired positions (dry lay). 6. Refrain from starting the installation in the middle of the flooring area. Use the walls of the room to make sure your planks are straightly alligned. 7. To start, place a your first plank in the corner so it borders both corners of the wall. Make sure the longer, grooved side is against the longer wall. 8. Drip a consistent thin line of glue across the under side of the groove in the plank. 9. Connect the planks together by matching the mating side of the first plank with the shorter side of the side plank. 10. Once you get to the end of the row, cut off the excess length of the last plank and start the second row. 11. End joints of each consecutive row must be offset by a minimum of six inches in order to achieve the most aesthetic appearance. 12. Move on to the second row and make sure to connect the short plank edges with those of the longer edges. 13. When finishing the row and trimming the last plank to fit to the row, be sure to leave room for the planks to expand. This is in order to prevent damage to both the rest of the floor as well as your foundation. 14. With the remaing rows, first connect the short edges of each plank and then tap the long edges together with a pull bar. Page 6

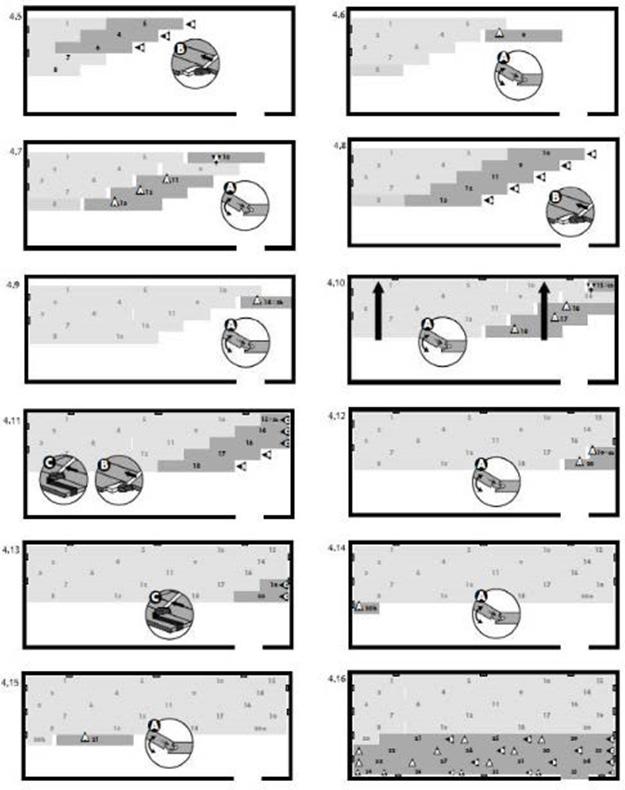
7 Installing Click Lock Bamboo Floors (Floating Method) Installation Requirements Gypsum joints must be completed and dried. Concrete work must have been completed at least 45 days prior to installation. The heating system must be functional and the building must be heated up to 65 F for a minimum of 7 days immediately prior to installation. The relative humidity of the building must be between 40% and 50% Before Installing It is important to acclimate this product for at least 10 days. To properly acclimate, move the product into the rooms where they will be installed. Ensure the carton is raised off the ground. Cross-stack boxes on a pallet is recommended to improve airflow during acclimation. More time is necessary for extreme climates where the relative humidity of the environment is not 40% - 50%. Correct slight irregularities on the subfloor. Remove baseboards and doorsills. Cut 9/16 off the bottom of the doorframes to insert the strips underneath them. Vacuum the subfloor regularly during installation to make sure it is always clean and dust free. Installation Guide Method A: Position the plank at a angle to the plank already installed. Move the plank gently up and down while pushing forward. The plank will then automatically fold into place. You can either insert the tongue into the groove or the groove on to the tongue. The tongue in groove method is most common, and also the easiest. Never force the plank to lay flat, always help it to fold into position. See Diagrams A-1 through A-3. Method B: You can also tap the planks into place with a tapping block and hammer without lifting the planks. For this method you will need a special tapping block designed for 4/2 inch (42mm) flooring. The planks should not be tapped together with a single tap. To avoid damaging the plank, you must tap them together gradually. See Diagrams B-1 and B-2. Page 7
 for this purpose (Figure 4).")

8 Remove all wall base or molding, and undercut door trims if needed. When installing over concrete or a crawl space, you will need to use a vapor barrier; you can use polyethylene film (6 mm or more thickness) for this purpose (Figure 4). Overlap the seams by 4 6 inches ( mm), and then tape the seams to provide a seamless moisture barrier. Put down the plastic film as necessary until you complete that section, this will help to keep the moisture barrier from getting damaged. Allow the film to run up the wall a short distance; then trim so it will be covered by wall molding (Figure 2). When starting the installation, it is important to take time to plan the installation; accurate measurements will allow you to avoid having to cut small strips when you reach the other side of the room. If necessary, you may need to trim the starting row width so that you can avoid very thin strips of flooring when you reach the other side of the room. To start, the sides of the planks that will go next to the wall will need to have the tongue portion removed (Figure 3) to allow room for expansion. You will also need to take a board and cut off one third; these two pieces will be used to begin the second and third rows. Follow the procedures shown in Figures for the first four rows; you can then push these rows into place along the wall. Be sure to use spacers or scrap pieces of flooring along the wall to maintain expansion gap. At this point, you can avoid a stair step joint pattern by using the pieces of boards cut off when finishing a row (or cut new ones). Be sure these pieces are at least 8 inches (203 mm) long. Always keep the end joints at least 8 inches (203 mm) apart. You can then finish the room as shown in Figures Please Note: Be sure there is sufficient room for expansion along all walls, under door frames, and around any pipes or fixtures attached to or come through the subfloor. Rooms longer than 40 feet ( m) will require an expansion gap (you can decide where you think it will look best), which can be finished with the T-Molding. When installing in other rooms, leave an expansion gap directly beneath the door; this can then be covered with the T-Molding. Never attach the flooring directly to the subfloor as it will prevent the floor from expanding/ contracting. Page 8
9 Page 9


10 In places where you cannot use the tapping block to push the boards into place, you will need to use the pull bar. You can then gently tap the boards in place. This is necessary for the last board in each row and when finishing the last row. See Diagrams 5A 5C. Pipes: In rows where there is a pipe or other object through the subfloor, make sure the object lines up exactly where two boards will meet on the short ends. Take care to measure carefully before cutting, so the two boards end at the middle of the object. Use a drill or hole bit that is the diameter of the pipe or object, plus 3/4 inch (20mm) for expansion. Click the two short sides of the boards together, then drill the hole centered on the joint between the boards as shown. Now you can separate the two boards and install as normal. See Diagrams 6A 6C. Under door frames: When sawing boards that will go under the door frame, you need to be sure to leave 3/8 inch (70mm) for expansion under the door frame. When undercutting the door frame, be sure you cut far enough under, so that the frame covers the board, and still has enough room for expansion. Use the tapping block to gently tap the board into place, and then use the pull bar to gently tap into place. Remember that this board needs to end so that the transition piece used in the doorway ends directly under the middle of the door, plus the expansion gap. If you are installing in the adjacent room, the T-Molding should be centered under the door. See Diagrams 7A & 7B. Page 10
11 Transitions: All transition pieces should be attached to the subfloor with a high quality construction adhesive available at all Home Centers and Hardware stores. Place a generous bead of adhesive under the part of the transition that will sit directly on the subfloor, and then press the transition firmly in place. Be sure the transition sits firmly in the adhesive, and take care not to get any adhesive on the finish. Remove any adhesive from the finish immediately with mineral spirits and buff off any residue with a dry soft cloth. It may be necessary to place heavy weights on the transition until the adhesive dries to ensure it will lay flat. If necessary, you can also use small finish nails by pre-drilling, countersinking, and then filling the nail hole with matching putty. Never attach the transitions directly to the flooring. Finishing the floor: Remove spacers around the perimeter of the floor, then replace existing or install new wall base or molding. Never nail the wall base or molding directly to the flooring. CONGRATULATIONS! You can now enjoy your beautiful new floor! Page 11