INSTALLATION GUIDE A Unique Retaining Wall System That s Engineered to Last!
|
|
|
- Robert Holt
- 5 years ago
- Views:
Transcription

1 INSTALLATION GUIDE A Unique Retaining Wall System That s Engineered to Last!

2 Safety Safety is the number one concern of Big Block, Inc. It s of utmost importance that Big Block walls be installed in a safe manner. All local, state, and federal safety regulations must be followed by the contractor in the field. Additionally, Big Block, Inc. greatly encourages all users and installers to set up company programs or seek third party safety coordinators to help implement safety programs tailored to their specific needs. Safety-training materials specific to your company can be found at gov or by calling OSHA (6742). Leveling Pad Existing soils must be removed to the bottom of the leveling pad elevation for the retaining wall. The existing soils shall be evaluated by the Professional Engineer responsible for the wall. Any unsuitable material shall be excavated and replaced as directed by the Professional Engineer. The base material must be compacted to a minimum of 95% maximum dry density as determined by standard proctor test. Leveling pad material shall be crushed stone, 1 inch diameter and smaller or a poured concrete footing as designed by a Professional Engineer. Leveling pad depth shall be determined by the Professional Engineer. Preliminary minimum depth requirements are provided in the Big Block design charts. If a poured concrete leveling pad is required by Engineer a 16 wide footing will best accommodate the locking devices on our middle blocks. When using crushed stone leveling pad our bottom blocks are recommended. Internal and external drainage shall be evaluated by the Professional Engineer. Drainstone and perforated pipe shall be installed behind the wall in the leveling pad. The drain shall run the entire length of the wall and have proper outlets to provide complete drainage for the wall. The leveling pad material shall be placed and compacted to provide a uniform, level pad on which to construct the retaining wall. There are two main methods of establishing grades in the leveling pad. Method 1 - Check the leveling pad elevations with a grade rod and transit or a laser level. Method 2 - Set the tops of two 20 long grade pipes to the proper elevation and screed the material between the pipes. The leveling pad shall be compacted to 95% maximum dry density. A plate vibrating compactor or other appropriate construction equipment shall be used.

3 Setting Retaining Wall Blocks It is recommended that wall construction should begin at a fixed point such as a building wall, 90 corner, or at the lowest elevation of the wall. Construction Equipment Blocks are typically delivered to the construction site using a flat bed trailer or boom truck. Rubber tired backhoes, loaders, skid steers, or excavators are used to set the retaining wall blocks. For installation equipment purposes 24 blocks weigh on average 1500 pounds and 42 blocks weigh on average 2500 pounds. Please use appropriate equipment rated to handle these weights. Place a complete row of blocks. To prevent backfill material from washing out through the joints between blocks place non-woven geotextile fabric in the vertical joint between the blocks to hold the backfill material in place. Backfill between blocks and at least 12 inches behind the wall with washed drainstone. Place geotextile fabric between the drainstone and the remaining backfill material if specified. Backfill behind the washed drainstone with material as specified by the Professional Engineer.

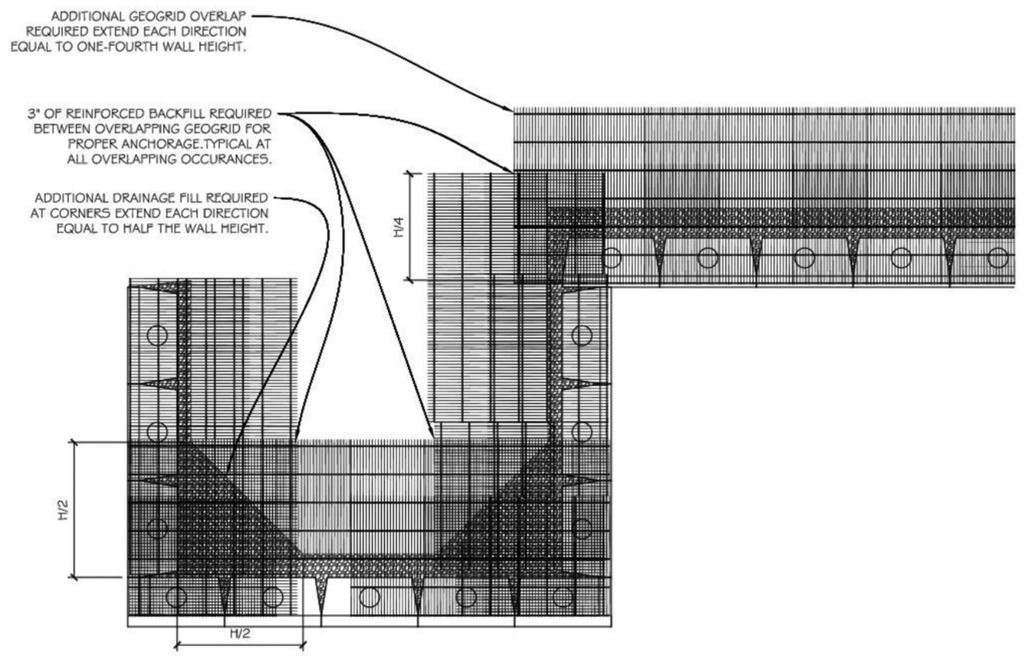
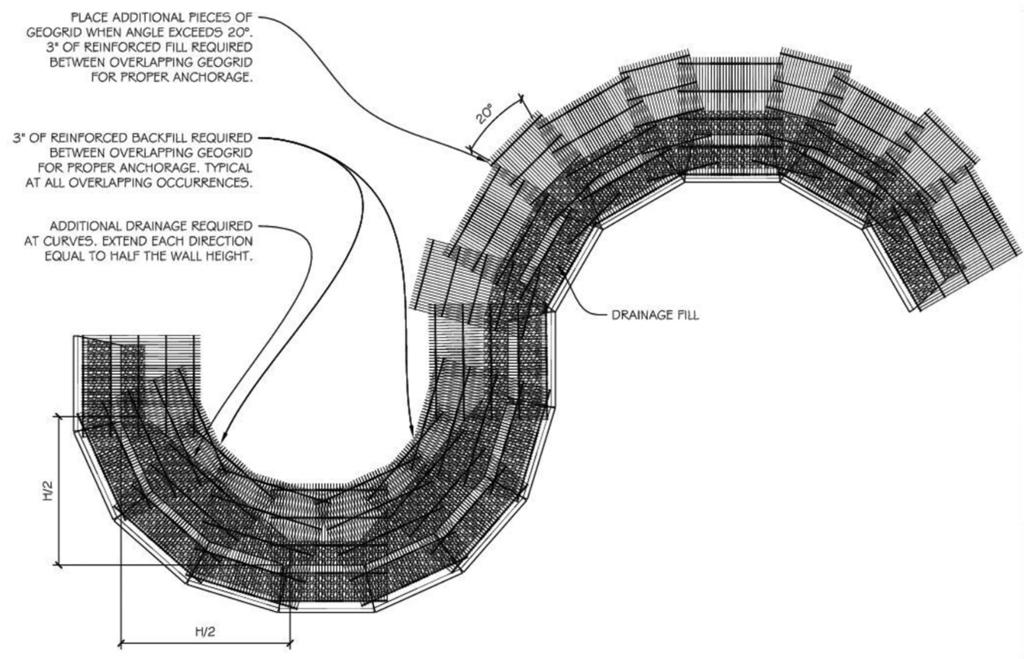
4 Compact the washed drainstone and backfill material to a minimum of 95% maximum dry density. Place the lifts as specified and use proper equipment to insure complete compaction of the backfill material. Sweep the top of each course of blocks clean before starting construction of the next course. Repeat these steps with each course of blocks to the top of the wall. If ground water seepage is observed along the exposed cut face behind the retaining wall, contact your local Engineer immediately. Contractor shall commence work and continue without interruption or delays. Expedite construction to minimize the time the excavation is open. Base and back of excavation should expose fresh, undisturbed soil or rock. There shall be no frozen, soft, wet, loose, or disturbed soils (i.e. fall-in) along the base of the wall or the back of the excavation. Reinforced Soil Walls Additional steps are required to install geogrid and make proper connection to the retaining wall blocks for reinforced soil walls. Geogrid reinforced soil walls shall be constructed per the detailed design prepared by a Professional Engineer. Use specified geogrid (per detailed design) with the strong direction (i.e. roll direction) PERPEN- DICULAR to the wall face. Length of geogrid is measured from the face of the wall to the back of geogrid. Geogrid must be pulled tight and pinned down prior to placing and compacting additional backfill. Place tensioning. Perform compaction from face of wall to rear excavation Geogrid placement on corners shall follow the procedures outlined in the Design Manual for Segmental Retaining Walls, Second Edition, Copyright 1997, National Concrete Masonry Association, Herndon, Virginia. See the following details for convex and concave curve corners.
5
6 Drainage features shall be installed per the detailed design prepared by a Professional Engineer. The site should include drainage swales or other methods to direct water away from the wall. If required by Professional Engineer positive Geogrid connections shall be made using the Big Block Geogrid Connection in the following manner. Install a complete row of retaining wall blocks. Sweep the top of the blocks clean. Drill two 1/2ø x 2-1/2 deep pin holes in blocks using pin hole location template available from your local Big Block dealer. Place one 1/2ø x (#4 Bar) x 5 Long Grade 60 Rebar Pin #4 into each pin hole. Place geogrid on block. Place 1/2ø x (#4 Bar) x 46 Long Grade 60 rebar between block and pins. Wrap grid over the bar and extend back into the soil 2-0. Install the next course of retaining wall blocks to lock the geogrid connection in place. Pull the geogrid flat and tight. Secure it in place with pins or staples as recommended by the manufacturer. Backfill and compact as specified. Big Block, Inc Cole Pkwy Shawnee, KS Office Fax