LEDGESTONE & Ledgestone radius
|
|
|
- Annabella Cox
- 5 years ago
- Views:
Transcription


1 LEDGESTONE & radius FRESTANDING & LANDSCAPE WALL 105
 and efficient design allow wall units to be placed in unlimited patterns - from staggered running bond placement in straight, curved or serpentine walls - with little or no cutting.")

 72 inches for")
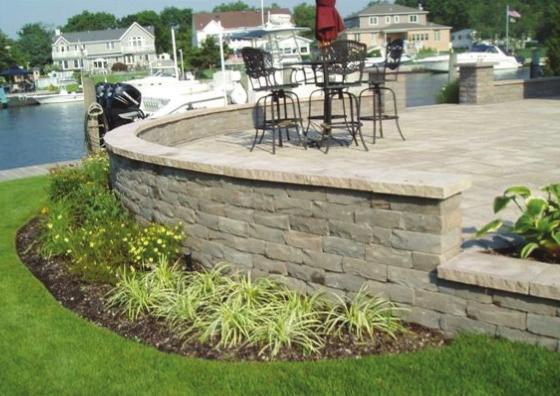
2 Wall LEDGESTONE WALL A Stone look wall for Landscape and Engineered heights The universal size (4 in. high x 8 in. deep x 12 in. long) and efficient design allow wall units to be placed in unlimited patterns - from staggered running bond placement in straight, curved or serpentine walls - with little or no cutting. Radius units can be interspersed throughout the wall design - Front face side out or front and rear side of Radius side out. The Cambridge cap completes the project. The tumbled units have distressing on the surfaces for a natural stone look any way it s viewed. Corner stones are available and can make a Column with no cutting. Adaptable! - The 12-inch length is the perfect dimension for most projects. Maximum wall heights are: 20 inches with proper backfill for freestanding and retaining walls without using glue 30 inches with proper backfill and glue (see New Geogrid Guide) 72 inches for engineered Retaining wall systems with Geogrid (see New Geogrid Guide) Singe Sided Radius Stone and Double Sided Radis Ideal for: Freestanding walls ( Radius) Retaining walls - Radius Planter and garden walls - Radius Seat walls - Radius Outdoor Grill and Firepit in Columns Steps Edging and curbing (example: in lieu of Belgian block) 106


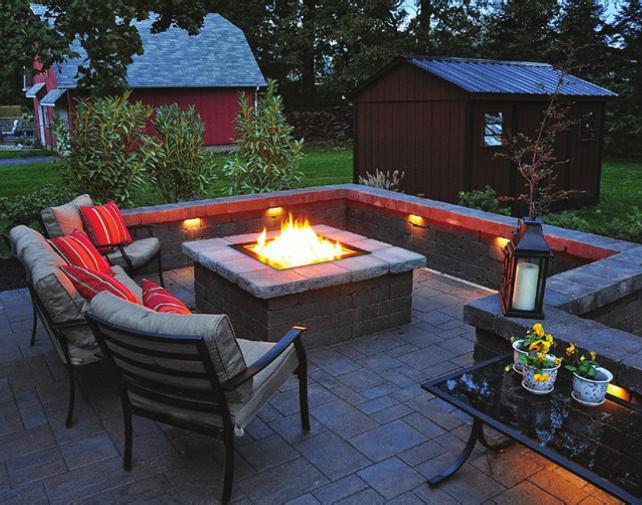
3 Wall Accessories Radius Bench Project with Columns and Radius Fire Pit Radius Grill Kitchen Project with Columns and Radius Double Sided Walls 107

.")
4 Cambridge Wall System Wall Distinguished by its natural-looking rock face with bold ridges and deep clefts, Wall is a perfect accompaniment to the popular Cambridge Pavingstone Series and other Cambridge Pavingstones, Wallstones as well as Outdoor Living Fully-Assembled Models and Pre- Packaged Kits. The wallstones are one size and can be used in a variety of single-sided applications from a freestanding and retaining wall to steps and edging. A Wall Corner for left and right corners is also available (sold separately). Radius Wall The double-sided trapezoid shape allows for easy completion of straight, curved, circular and serpentine designs without cutting by alternating front and back sides. 108


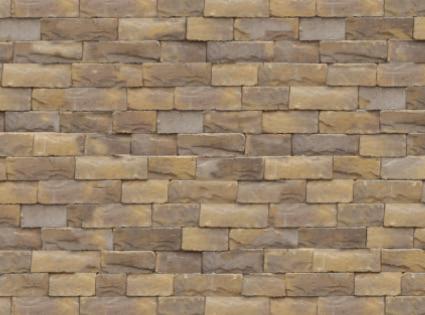
5 Looking through the Cambridge catalog, we were taken by the pavers and wall and knew that was what we wanted. Looks lovely in any light! The paver and wall colors and textures perfectly complement each other. Janet and Amy THE LEDGESTONE WALL SHAPES AVAILABLE COLORS For color availability in a selected shape, refer to the Color Selection Guide on Page 104. Wallstone 4 High 8 Deep 12 Long BLUESTONE BLEND ONYX/NATURAL Corner Wallstone 4 High 8 Deep 12 Long Radius Wallstone 4 High 8 Deep Front Face: 11 1/2 Long Rear Face: 7 3/4 Long CAMBRIDGE MANUFACTURING TECHNOLOGY For professional-grade fit, the specifications of every Cambridge wallstone have been developed using advanced technology so you can achieve optimal results in hundreds of style and pattern designs. SAHARA/CHESTNUT SANDSTONE BLEND TOFFEE/ONYX 109


 only. The Corner wallstone has textures on two sides, one long face and one short face.")
6 SINGLE-SIDED Distinguished by its natural looking, rock face with bold ridges and deep clefts, Wall is a perfect accompaniment to the popular Cambridge Pavingstone Series as well as other Cambridge Wallstones and Outdoor Living Pre-Packaged Kits. Wallstone Size: 4 High x 8 Deep x 12 Long Corner Wallstone Size: 4 High x 8 Deep x 12 Long The wallstones are one size and can be used in a variety of single-sided applications from a freestanding and retaining wall to steps and edging. A Wall Corner for left and right corners is also available (sold separately). Single-Sided Wall Wall with corners, columns and steps, works well with the outdoor living kits and shares most of the colors. Wallstones & Corner Wallstones The Wall system has two basic wallstones. Both are 4 high, 12 long and 8 wide. The Wallstone has texture on one side (long face) only. The Corner wallstone has textures on two sides, one long face and one short face. The corners are purchased separately from the wall and come in convenient ½ cube packages. Columns A column can also be created utilizing Corner Wallstones to create some dramatic corners or endings of the wall as the column is faced on all sides. 110
 Radius Wallstones are available in the standard Renaissance texture.")


7 DOUBLE-SIDED Radius Radius Wallstone Size: 4 High x 8 Deep x 11 1/2 Long (Front Face) & 7 3/4 Long (Rear Face) Radius Wallstones are available in the standard Renaissance texture. Each wallstone has two faces that allow many types of projects to be created such as freestanding walls, steps, borders, raised planter beds and even a barbeque/fire pit. The Radius Wallstone will be used to build the freestanding wall. There are markings on the top and side of the Radius Wallstone that will guide you in knowing where the center is during the project build. This wall system is more like natural stone than any other system, so being aware of the center of the wall is very important. Top Center Side Center Corner: Radius single sided corner utilizes a special pre cut Corner pieces and making two transition stones (below) 111


8 RADIUS DOUBLE-SIDED Radius Wallstones are available in the standard Renaissance texture. Each wallstone has two faces that allow for many types of projects such as freestanding walls, steps, borders, raised planter beds and even a barbeque/ fire pit. This layout for single-sided walls will use Corners from the Cambridge Single-Sided Wall System. Please refer to the section for creating the wall base foundation before setting the wallstones. The Radius Wallstone can be used to build a single-sided landscape wall for flower beds or changes in grade. There are markings on the top and side of the Radius Wallstone that will guide you in recognizing the center during the project build. This wallstone system is more like natural stone than any other system, so being aware of the center of the wall is very important. Radius wall in to the column and build the next course of the column so it lines up with the first course, using one 8 cut and four Corners. 112


 Including: Radius Double Sided")


9 VERTICAL OR SETBACK 10 PAGES of LEDGESTONE & LEDGESTONE RADIUS HOW-TO All the Detail you need to build and Radius walls located in the Designscape Pages in the rear of this book. BUILD RETAINING WALLS WITH LEDGESTONE (Single-Sided) Including: Radius Double Sided Freestanding Wall New for 2017 we now have tested and predesigned engineering templates and support if needed for stamped wall projects with Olde English Wall and Single Sided wall available in the Retaining Wall Chapter of this book stating on Page XX Single Sided Landscape Wall Columns without Cuts Geogrid tables There are various projects available such as this Curved Top Domino wall at cambridgewallsupport.com 113
10 SINGLE-SIDED Installation Instructions: Single-Sided Wall Wall with corners, columns and steps, works well with the outdoor living kits and shares most of the colors. Wallstones & Corner Wallstones The Wall system has two basic wallstones. Both are 4 high, 12 long and 8 wide. The Wallstone has texture on one side (long face) only. The Corner wallstone has textures on two sides, one long face and one short face. The corners are purchased separately from the wall and come in convenient ½ cube packages. The Wall and Corner Wallstones Wall each have 5 distinct front faces. The corners have an additional 5 distinct short face textures. The Wall may be Wall Corners turned over to create an additional 5 variations of the 5 patterns. The corners create right and left versions when turned. Base: Follow the Base guide in this book to create a stable and level support structure to build your wall on. Be sure to bury 1 for every 12 of wall showing and observe any local building code. First Layer Set the corner first then work from the corner out in both directions after marking the rear most part of the wall from both directions. Note: Walls Figure 1 have a stone-like face texture on the front and a smooth machine finish on the rear of the wallstones. It is better to use a straight edge and string line on the rear face. Make sure all wallstones are level and straight. The first layer is the most critical one of the project as it is the only row you can control the height of individual wallstones without grinding and shimming. It is better to get this layer perfect then everything else will be much easier (see Figure 1 and 2). Figure 2 The Wall can also be installed setting each row back from the layer below by 3/8-inch as shown in Figure 4. This 7-degree batter creates a stronger wall in places where soil conditions or loads need a margin of safety. 3/8" Setback Figure 4 Adjustment Wallstones When building any wall there will come a time when it will be necessary to cut a wallstone to finish the layer or to ensure that the bond lines of the wallstones do not overlap. NEVER CUT THE CORNER wallstone. If there is a space that needs an Adjustment Wallstone adjustment, cut the wallstone with a masonry saw to fit the opening (see Figure 5). Figure 5 Cap Row is a single-sided wall system so there are a few options when capping the final layer of the wall. is a solid rectangle wallstone so one option is to simply build layers until you have reached your desired height. That will reflect the purpose of the wall (to hold back soil). If you want to add additional detail on the top layer that will only hold back mulch and not soil, move the cap row out 1 to 2 inches from the rear face towards the front of the wall. This will create a defined cap that is pleasing to the eye (see Figure 6). Figure 6 Steps Steps are a necessity for most landscape or retaining walls. The steps will repeat every 8 inches. This design produces a 12-inch stair tread with an 8-inch rise (see Figure 7). It will be necessary to build the steps on undisturbed soil with top soil removed and a minimum of 6 inches of compacted ¾-inch crushed stone below each step. Columns Figure 7 A column can also be created utilizing Corner Wallstones to create some dramatic corners or endings of the wall as the column is faced on all sides (see Figure 8). Second Layer The corner will be alternated on each row with the short or Figure 3 long face. This will allow the bond lines of the adjoining wallstones to create extra strength. Figure 3 depicts a vertical wall application as the faces of the wallstone are positioned directly above the wallstones below them. Figure 8 114
11 DOUBLE-SIDED Radius Installation Instructions: Radius Double-Sided Freestanding Wall This project will outline a freestanding or sitting wall with a finished end of the wall. Shown is a Radius freestanding, doublesided wall with the end of the wall cut from Corners (Two required per layer). First Layer Place the first layer of Radius wallstones on the prepared foundation, alternating every other wallstone. Use a carpenter s level in all directions and use a string line down the center of Figure 1 the wall to verify straightness. Be certain that the base course is level and the wallstones lay flat and straight on the center. For micro-leveling and to help the wallstones lay flat, keep a bag of sand handy and use small handfuls to level and stabilize the first layer. Start from the Radius Corner Wallstone and work out from that point in each direction towards the end of the wall alternating long and short faces and flipping the wallstones. Keep the center aligned to keep the wall straight. The first layer is the most important. All other layers depend on that layer to determine the center (straightness) and level of the wall. When you get to the end of the wall, you will need to cut and place a transition wallstone cut from a Radius Wallstone. This will transition the wall from angled to square edges of the corner (end of wall) wallstones. A total of three cuts with a masonry saw will be required for each layer. The transition wallstone should be cut, so that the rule of flipping every other wallstone continues with this wallstone. This layout will repeat exactly for layers with odd numbers (1, 3, 5, 7, etc). Figure 2 Cut At End Of Top Transition Wallstone Cut 3 inches as shown in Figure 2 from the short side of a Single-Sided Corner. This cut will produce a wallstone with texture on one long and one short face. Cut 5 inches as shown in Figure 5 from the short side of a Single- Sided Corner. This cut will produce a wallstone with texture on one long and one short face. The transition wallstone is cut from the point where the center line stops on the left or right depending on the orientation needed for the wallstone (up or down). Figure 3 Second Layer Start by alternating the corner and working out to the end of the wall from that point in Figure 4 each direction, alternating long and short faces and flipping the wallstones. Keep everything straight, level and plumb by using the centerlines on the faces of the wallstone below. When you get to the end of the wall, install your transition wallstone and be sure the flipped orientation is correct for the wallstone next to it. Place the two 12-inch long cut pieces at Figure 5 the end of the wall directly over the wallstones below. Place the 3-inch piece (Figure 6) above the 5-inch piece on the layer below and place the 5-inch piece (Figure 7) above the 3-inch piece on the layer below. An alternating seam will be created that will be repeated for layers with even numbers (2, 4, 6, 8, etc). Cut 3 inches as shown from the long side of the Corner. This cut will produce a wallstone with texture on one long and one short face. Figure 6 Cut At End Of Top Transition Wallstone Cut 5 inches as shown from the long side of the Corner. This cut will produce a wallstone with texture on one long and one short face. The transition wallstone is the same for each layer, the side you cut might be different depending on the wallstone orientation next Figure 7 to the transition (see Figure 5). The wallstone is cut from the point where the centerline stops on the left or right depending on the orientation needed for the wallstone (up or down). Third Layer The third layer corner will alternate from the one below and will be exactly the same as the first layer. It will be the starting point for this layer that will be the same as the first (Layer 1). Use a level to maintain height. Alternate front and rear faces and flip the wallstones as in all previous layers. Continue to alternate the corner and build the wall to the height desired following the odd & even formula. Note: The layers repeat. Always set the correct orientation of the transition wallstone and alternate the 8-inch and 12-inch long wallstones in the configurations outlined. Radius Cap Row Imprints on the Radius Wallstone will help with the installation of the cap row. Identify the center of the cap stone and match the center with the center of the final layer of wallstones. A chalk line can help. The cap row overhang will be correct if you use the center as your guide Figure 10 Figure 8 Cast Stone Cap Figure 9 Even Number Row Repeats Second Layer Odd Number Row Repeats First Layer as the wallstones below have slightly different widths. The end of the wall cap overhang should be the average of the side overhang. Glue all cap stones with retaining wall adhesive. A segmental retaining wall engineer should design all Radius retaining wall structures that exceed 24 inches. There are other pages in this book for corners and ends of wall. Textures, colors, project pictures, install video and this document are available for download as well as where to buy, at cambridgepavers.com 115
12 DOUBLE-SIDED Radius Installation Instructions: Radius Double-Sided Wall This project will outline a freestanding or sitting wall. Shown is a Radius freestanding double-sided wall with Cambridge Cast Stone Caps and Columns. Radius Wallstones are available in the standard Renaissance texture. Each wallstone has two faces that allow many types of projects to be created such as freestanding walls, steps, borders, raised planter beds and even a barbeque/fire pit. The Radius Wallstone will be used to build the freestanding wall. There are markings on the top and side of the Radius Wallstone that will guide you in knowing where the center is during the project build. This wall system is more like natural stone than any other system, so being aware of the center of the wall is very important. Alignment System And Order For Vertical Wall Set the vertical alignment directly above the wallstones in the next lower layer. Use this visual alignment for each successive layer of wallstones. As successive layers are set, stagger the face seams of the wallstones for interlocking wall strength and a closed multi-wallstone look on both sides. Note: Because the imprinted texture style of the Radius creates variation of the face widths on each side much like real stone the wallstone will align using the center top and side marks to keep the wall straight. The Radius vertical freestanding wall uses the alternating faces of the front and rear of Center Of Top And Bottom the wallstone creating a look of multiple wallstone sizes all from a single wallstone. RULE: Flip over every other wallstone. You can tell the difference because the top has a centerline and the bottom of the wallstone does not. The Figure 1 side marks run the full height of the wallstone. The center will clearly be seen by jointing the side marks shown on the top with those on the bottom of the wallstones. This is used as a guide to identify the center of the wall. Corners And Ends Cut one of the wallstones in half with a masonry saw. The corner wallstone for Radius is the Radius Pre-Cut Corner. On the first layer, the half-cut wallstone will serve as the transition from a radius shape to the square shaped corner on both sides of the corner as shown. Top Center Side Center Half Wallstone Figure 2 Note: The pattern of Flipping (turning over) every other wallstone applies to all wallstones except the corner. Side Center Top Center Half Wallstone Pre-cut Corner First Layer Place the first layer of Radius Wallstones on Figure 3 the prepared foundation, alternating every other wallstone. Use a carpenter s level in all directions and use a string line down the center of the wall to verify straightness. Serpentine walls may be built too. Be certain the base course is level and wallstones lay flat and are straight on the center. For micro-leveling and to help the wallstones lay flat, keep a bag of sand handy and use small handfuls to level and stabilize the first layer. Start from the Radius corner detail in Figure 2 and work out from that point in each direction, alternating long and short faces and flipping the wallstones. Keep the center aligned to keep the wall straight. The first layer is the most important. All other layers depend on that layer to determine the center (straightness) and level of the wall. This layout will repeat exactly for layers with odd numbers (1, 3, 5, 7, etc.). Second Layer Start by alternating the corner and working out from that point in each direction, alternating long Figure 4 and short faces and flipping the wallstones. Keep everything straight, level and plumb by using the centerlines on the faces of the wallstones below and by the side mark alignment of the top and bottom combinations. This layout will repeat for layers with even numbers (2, 4, 6, 8, etc.). Tip: Be careful that no vertical bond lines are above a bond line below. Third Layer The third layer corner will alternate from the one below and will be the starting point for this layer. Use a level to maintain height. Figure 5 Alternate front and rear faces and flip the wallstones as in all previous layers. Continue to alternate the corner and build the wall to the height desired following the odd and even formula. Radius Cap Row Imprints on the Radius Wallstone will help with the installation of the cap row. Identify the center of the cap stone and match it with the center of the final layer of wallstones. A chalk line can help. The cap row overhang will be correct if you use the center as Figure 6 Cast Stone Cap your guide as the wallstones below have slightly different widths. Glue all cap stones with retaining wall adhesive. A segmental retaining wall engineer should design all Radius retaining wall structures exceeding 24 inches. There are other pages in this book for corner and ends of wall. Textures, colors, project pictures, install video and this document are available for download as well as where to buy at cambridgepavers.com. 116


13 DOUBLE-SIDED Radius Installation Instructions: Radius Single-Sided Landscape Wall This project will outline options for building a single-sided landscape wall in vertical or in setback for more strength. Shown is a Radius Wall set ALL-UP as a setback single-sided planting bed with one end terminating into the hill and the other end terminating into a Column. Radius Wallstones are available in the standard Renaissance texture. Each wallstone has two faces that allow for many types of projects such as freestanding walls, steps, borders, raised planter beds and even a barbeque/ fire pit. This layout for single-sided walls will use Corners from the Cambridge Single-Sided Wall System. Please refer to the section for creating the wall base foundation before setting the wallstones. The Radius Wallstone can be used to build a single-sided landscape wall for flower beds or changes in grade. There are markings on the top and side of the Radius Wallstone that will guide you in recognizing the center during the project build. This wallstone system is more like natural stone than any other system, so being aware of the center of the wall is very important. Alignment System And Order For Landscape Wall Set the vertical alignment directly above the wallstones in the next lower layer. Use this visual alignment for each successive layer of wallstones. Note: Because the style of the Radius has imprinted texture, it creates variation of the face widths on each side Figure 2 much like real stone the wallstone should be set using the center top and side marks to keep the wall straight. Every other wallstone is flipped so we show one wallstone with top up and the next with bottom up. There are marks on the side and top of the wallstone to help you determine the middle of the wall. The Radius landscaping wall is shown as a vertical wall with all wallstones set with the large face out. You have the option for the look of a multi-sized face if you use the double-sided system described on another page in this book for single- or double-sided Figure 3 walls. If you set the wallstones with all long faces out, it is more cost effective. RULE: Flip over every other wallstone. You can tell the difference because the top has a centerline and the bottom of the wallstone does not. The side marks run the full height of the wallstone so the center will clearly be seen on wallstones turned over (bottom). Corners The corner wallstone for Radius in this single-sided configuration is the Single-sided Corner. Note: The pattern of Flipping (turning over) every other wallstone applies to all wallstones. Top Center Side Center Figure 4 First Layer Place the first layer of Radius Wallstones on the prepared foundation, alternating the flipping of every other wallstone. Use a carpenter s level in all directions and use a string line down the Figure 5 center of the wall to verifies straightness. Serpentine walls can be built as well. Be certain that the base course is level and wallstones lay flat and are straight on the center. For micro-leveling and to help the wallstones lay flat, keep a bag of sand handy and use small handfuls to level and stabilize the first layer. Start from the corner detail in Figure 5 and work out from that point in each direction and remember to keep flipping the wallstones. Keep the center aligned to keep the wall straight. The first layer is the most important. All other layers will depend on that layer to determine the center (straightness) and level of the wall. This layout will repeat exactly for layers with odd numbers (1, 3, 5, 7, etc). Second Layer Start by alternating the corner and working out from that point in each direction and flipping the wallstones. Keep everything straight, level and plumb by using the centerlines on the wallstone faces below noting the side mark alignment of Single-Sided Corner Figure 6 Figure 1 the top and bottom combinations. This layout will repeat for layers with even numbers (2, 4, 6, 8, etc) Tip: Be careful that no vertical bond lines are above a bond line below. Third Layer The third layer corner will alternate from the one below and will be the starting point for this layer that will be the same as the first (Layer 1). Use a level to maintain height. Flip as in all previous layers. Continue to alternate the corner and build the wall to the height desired following the oddeven formula. Radius Cap Row The center top grooves on the Radius Wallstone will help with the installation of the cap row. Identify the center of the cap and mark it with a crayon and then match the center with the center of the final layer of wallstones. A chalk line can help. The cap row overhang will be correct if you use the center as your guide as the wallstones below have slightly different widths. Glue all cap stones with retaining wall adhesive. All-Up Single Sided Wall A stronger wall can be built by setting all of the Radius Wallstones with tops up. This will create a unique look with a setback of 7 degrees. The only limitation is that there is no 90-degree corner Figure 1-A with this configuration. The options are to have a radius corner and to run the end of the wall into the bank or terminate into a column made with Corners. All-Up First Layer The first layer has all markings up with all long faces out to the face Figure 2-A of the wall. Walls can be curved or straight. Curves normally do not require cutting. Follow the base wall recommendations and also address drainage. A wall will always fail if you let water build up behind the wall. Install piping and stone behind the wall as per base instructions. All-Up Second Layer The second and all subsequent layers will stagger the joints of the wallstones below. Set the bottom front edge of the wallstone on the top edge of the wallstone below. Set Top And Bottom Offset From Center 1/2" Figure 4-A All-Up Third Layer The layer can now repeat. Layer 1 is the template for all odd numbered layers and Layer 2 is the template for all even numbered layers. All-Up Finishing Layer Repeat the layers as previously described making sure that water does not flow against the wall. Finish with Cambridge Cast Stone Caps. Figure 3-A Figure 7 Figure 8 This will cause a natural half-inch setback. The texture is uneven, so do your best to estimate the difference. Tip: The side marking should be set back about a half inch from the center top marks on the wallstones below. See Figure 4-A. Natural offset is shown by placing the bottom of the wallstone on the front top edge of the wallstone below. Figure 5-A Figure 6-A A segmental retaining wall engineer should design all Radius retaining wall structures exceeding 24 inches. Textures, colors, project pictures, install video and this document are available for download as well as where to buy at cambridgepavers.com. 117
14 DOUBLE-SIDED Radius Installation Instructions: Radius Double-Sided Wall Up & Down Alternative Pattern The Radius Wall can be set as a double sided wall so that all of the textures on one layer face the same direction (up or down) with the direction alternating on each course. This creates a smoother look without the need to flip stones. It will have a profile similar to a chair rail every 2 layers. Figure 3 Discard Discard Larger side of Stone Matching 90 degree corners can be made by making a 45 degree cut in two stones starting with the corner of the smaller face on the unmarked side of the stone. The two pieces are then glued together with masonry adhesive to make a corner. These are the only cuts needed if the length equals full stones on the first layer. See Figure 1. Starting with the corner, lay the first course so the center mark of each stone faces up, alternating them as shown in Figure 2. Figure 1 Figure 2 Starting with the corner, set the second course so the unmarked side is facing up. Make sure the bond lines do not overlap. Repeat the first layer for all odd layers and repeat the second layer for all even layers. A cross section of the wall should look like Figure 4 above. This wall pattern is perfect for Radius double-sided walls and benches. For finished pictures of this project go to cambridgewallsupport.com cambridgepavers.com. Figure 4 Installation Instructions: Radius and Single-Sided Wall with Integrated Columns at End of Wall Figure 1 A transition stone is made by cutting with a masonry saw 90 degrees from the small face of the stone. To cut transition stones for the end of wall take the larger side of the stone and draw a guide line connecting the two center marks. Draw a line from one corner at a 90 degree angle from the guide line as shown. See Figures 1 & 2 The only cuts required on the columns are 8 standard cuts. Cut the stone to 8 long (8 x8 ). See Figure 3 Figure 2 Figure 3 Terminate the first course with a Radius Transition stone cut as shown in Figures 1 & 2. See Figure 4 Build the first course of the column, using two block cut to 8 and four Corners. See Figure 5 On the second course, continue the Radius wall into the column and build the next course of the column so it lines up with the first course using one 8 cut and four Corners. See Figure 6 Figure 4 Figure 5 Figure 6 The third course and all odd numbered courses will be the same as the first course. See Figure 7 The fourth course and all even numbered courses will be the same as the second course. See Figure 8 Finish the column with a Cast Stone Column Cap. See Figure 9 Figure 9 Figure 7 Figure 8 118


15 Custom Work Made for You Cambridge Pre-Cut & Pre-Packaged Wall Grill Module Kit All Outdoor Living Grills Come with a Stainless Steel Appliance Package Made With Wallstones 6 3 Long, 3 Deep, 3 6 High Shown In Sahara/Chestnut With Granite Countertop Venetian Gold 119