Recla Metals RCM INSTALLATION GUIDELINES
|
|
|
- Gordon Cain
- 5 years ago
- Views:
Transcription
1 Recla Metals RCM INSTALLATION GUIDELINES Caution: RCM roofing panels must be applied on a minimum roof pitch of 2½:12 or greater. Important Notice: This guide must by read in its entirety before beginning installation. This guide is supplied by Recla Metals for use by its customers, and is intended to be a guide only. This does not replace local or state building codes. Recla Metals assumes no responsibility for any problems, which might arise as a result of improper installation or any personal injury or property damage that might occur with the products use. Note: Under certain conditions, panels may have oil on the sheets. This is a characteristic of roll forming. Such oil will not be accepted as cause for rejection. In areas of high temperature fluctuations or low humidity, it may take longer for sheets to fully patina. Contact Recla Metals for a simple solutions to break the oil down and patina the sheets quicker than would happen naturally. In areas of snow accumulation, snow guards, or snow blocks, may need to be added to the metal roof system to reduce or eliminate snow or ice from cascading from a higher roof and damaging lower roofs, roof valleys, gutters, or objects on the ground. Check with your installer and local building codes as to the need of snow blocks or guards in your area and design appropriately. MINIMUM RECOMMENDED TOOLS & EQUIPMENT Screw Gun 2,000 to 2,500 rpm Clutch type screw gun with a depth sensing nose piece is recommended to insure proper installation of the screws. The following bits will be required: 1/4 hex magnetic socket 5/16 hex magnetic socket Snips For miscellaneous panel and flashing cutting requirements. Three pairs will be required: one for left edge, one for right edge, and one for centerline cuts. Electric Nibblers, Roto Zip and Metal Shears Used for general metal cutting, such as cutting the panels in hip and valley areas. Penetrations such as pipe jacks and stove pipes may be cut and trimmed with a roto zip. Chalk Line Used to assist in the alignment of panels, flashings, etc Caulking Gun Used for miscellaneous caulking and sealing to inhibit water infiltration. Rivet Tool Used for miscellaneous flashing and trim applications.
2 Hand Bending Tools Used to hand bend the ends of trim components to provide a neat, finished appearance. Marking Tools Indelible markers, pencils, or scratching tools. Scratch Awl Can be made from old screwdrivers ground to a point. Used to mark the steel, open hems, and as a punch. Utility Knife Used for miscellaneous cutting. Electric Drill Used to drill holes such as those required for pop rivet installation. String Line Use for general alignment and measuring. Tape Measure 25-foot minimum (another at 50 foot is handy). Locking Pliers Standard and Duckbill style for miscellaneous clamping and bending of parts. SAFETY CONSIDERATIONS Never use unsecured or partially installed panels as a working platform. Do not walk on panels until they are in place on the roof and all of the fasteners have been installed. Metal roofing panels are slippery when wet, dusty, frosty, or oily. Do not attempt to walk on a metal roof under these conditions. Wearing soft-soled shoes will improve traction and minimize damage to the surface. Always be aware of your position on the roof relative to your surroundings. Take note of the locations of roof openings, roof edges, equipment, coworkers, etc. Always wear proper clothing and safety attire. Wear proper clothing when working with sheet metal in order to minimize the potential for cuts, abrasions and other injuries. Eye protection and gloves are a must when working with sheet metal products. Hearing protection should be used when power-cutting metal panels. Use care when operating electrical and other power equipment. Observe all manufacturer s safety recommendations. Roof installation on windy days can be dangerous. Avoid working with sheet metal products on windy days.
3 DELIVERY, HANDLING & STORAGE Always inspect the shipment upon delivery. Check for damage and verify material quantities against the shipping list. Note any damaged material or shortages at the time of delivery. Handle panel bundles and individual panels with care to avoid damage. Longer bundles and panels may require two or more pick points properly spaced to avoid damage that can result from buckling and/or bending of the panels. Store the panels and other materials in a dry, well-ventilated area, away from traffic. Elevate one end of the bundle so that any moisture that may have accumulated during shipping can run off. Be sure that air will be able to circulate freely around the bundles to avoid the build-up of moisture. Never store materials in direct contact with the ground. Wear clean, non-marking, soft-soled shoes when walking on the panels to avoid shoe marks or damage to the sheet. ESTIMATING A ROOF Step 1 Sketch a birds-eye view of the roof and label each section (see example below.) H I G F E D C B A
4 Sketch a diagram of each roof section. Show all measurements. It is important to measure exact center of the ridge to the eave edge. Do not allow anything for overhang. 18' 14' 8' 8' 22' H 18' 10' 18' I 24' 30' 11' 22' 12' G 15' 8' 8' 8' 23' F 40' 18' 15' E 15' D 15' 30' 14' 14' C 22' 7' 15' B 13' 22' A 22' 15' 13' Additional Information Required: Roof Pitch, Skylights (Location & Size), Chimney (Location & Size), and Size and Number of Pipe Penetrations. Additional Identification: Ridge, Hips, Valleys, Gables, Etc. Step 2 From the diagram you completed in Step 1, you are now ready to develop your roofing panel cut list. Each panel style covers a different area so the only measurements you need are the distance from the eave to the ridge and the ridge length. You can then determine the number of panels needed by dividing the ridge length by the panel coverage. So for Section A of your roof, take 7 divided by the panel coverage. Then round up to the nearest whole number. That equals the number of panel you need in that section. For hips and valleys, start with section G. The eave length is 12 and the ridge length is 22, with a difference of 10. You will need 12 3 (coverage) = 4 pcs. X 6 to reach the area where the valley starts. Remember that you have 10 remaining to cover the area. Calculate the length of each panel going into the valley by first determining the roof s pitch. Pitch is how much rise your roof has in inches for every foot of horizontal run. Use the Hip and Valley Chart below to ensure you order the correct panel length for hips and valleys. For example, section G is a 4/12 pitch (4/12p). According to the chart below, we know each panel will be 36 1/8 shorter. Since we are measuring from the longest point of the angle, your first piece will be the same length as the full eave to ridge measurement and each piece after will be 36 1/8 shorter. Hip & Valley Chart When determining the panel length needed for a hip or valley, the panel will either be shorter or longer as you go up or down the hip or valley. The chart
5 below shows you the amount to add or subtract from each panel according to the pitch of your roof, for hips and valleys where the intersecting roof planes are at 90º to each other. 1/12p = 36 1 /8 5/12p = 39 9/12p = 45 2/12p = 36½ 6/12p = 40¼ 10/12p = 46 7 /8 3/12p = 37 7/12p = /16 11/12p = /16 4/12p = 37 15/16 8/12p 43 ¼ 12/12p = 50 15/16 FASTENER CALCULATIONS: Panel Screws: Quantity will vary based on spacing of fastener rows. For solid decking, use #10 x 1 1/2 screws. For 2 x 4 wood purlins, use #10 x 1 1/2 Woodgrip screws. For steel purlins, use Steelgrip screws Figure 75% of the Total Square Feet of Material. Example: 2000sqft of material X 75%=1500 Screws ACCESSORY FASTENERS: Use #12 x 7/8 Lap Drills (stitch) Use #10 x 1 1/2 for Decking Use #10 x 1 1/2 for Purlins ALL accessories should be fastened with 12 centers. CLOSURES: Closures are calculated on nominal 3 coverage. Some closures will be longer depending on the profile used. Closures are used in areas that need to be covered for dirt, bugs and rodents. Closures do not ensure watertightness. Be sure to take into account proper ventilation when determining where closures are to be placed. There is a difference in some profiles whether outside or inside closures need to be used. Please be specific when ordering each type. OTHER ACCESSORIES: Tape Sealant, Pipe Boots, etc can be bought locally through your building supply dealer.
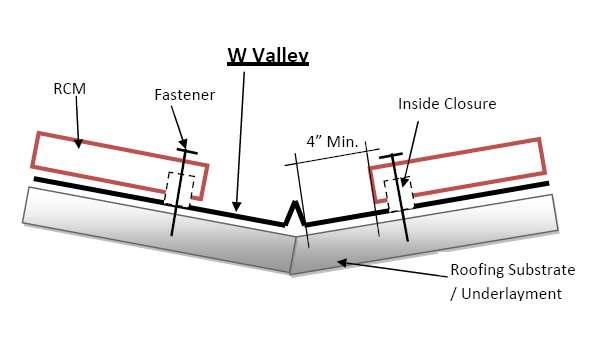
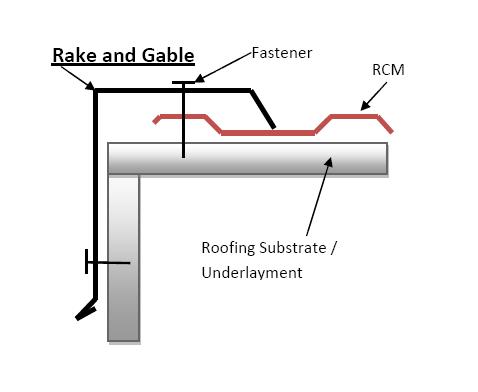
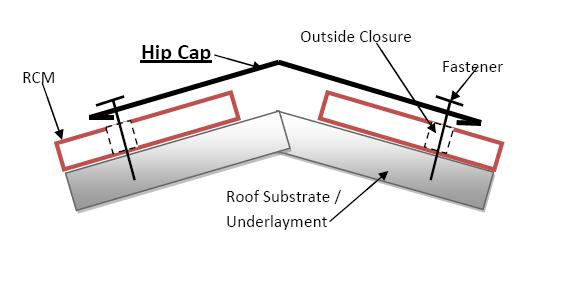
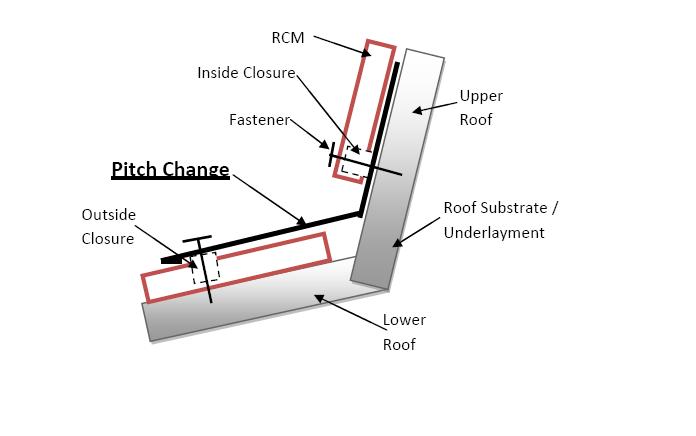
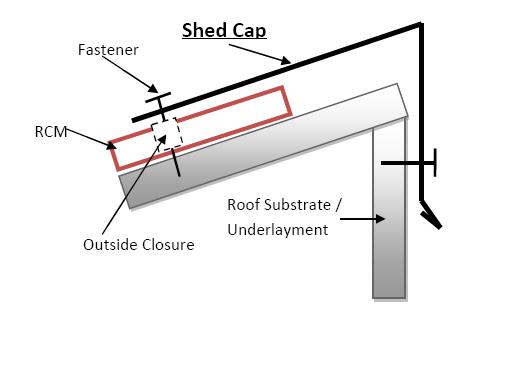
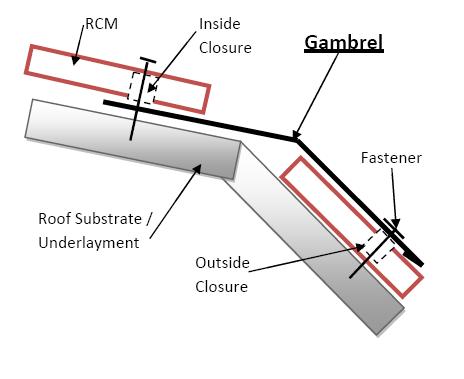
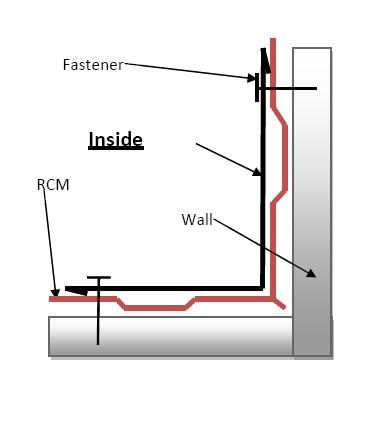
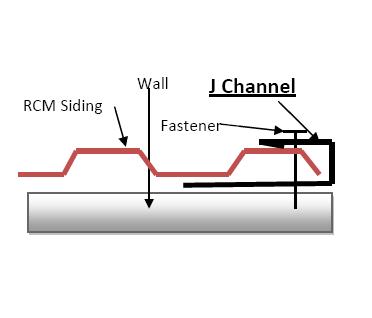
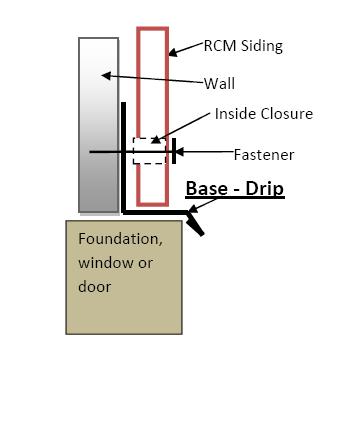
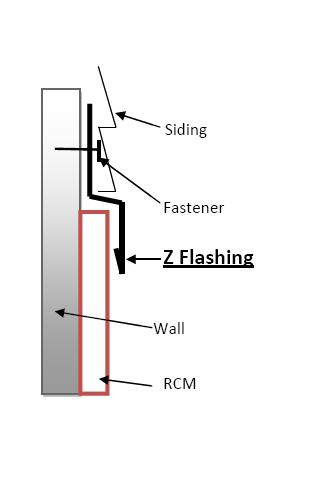
6 Trim Details Ridge Cap Transition Rake/ Gable Eave/ Drip Edge Z Flashing Outside Corner Drip Cap/ Base Cap J Channel Endwall Inside Corner Sidewall RIDGE CAP This piece is used at the peak of a typical two-slope roof. The ridge can be ventilated, by using Profile Vent in place of sealant and outside closures. HIP CAP This piece covers projecting angles formed at the intersection of the two sloping roof planes. RAKE/GABLE TRIM This piece is installed on the house between the ridge and the eave, holding down the first panel edge and the last panel edge. Gable-trim seals out the weather and gives a neat finished appearance. DRIP EDGE/EAVE TRIM This piece is used at the eave or gutter edge of the building, and must be installed before any panels. W-VALLEY Used to flash the valley formed by intersecting roof planes. SIDEWALL This piece is used when the roofing panel is installed parallel to a vertical wall. ENDWALL This piece is used when the upper end of panel butts into a vertical wall. SHED CAP This piece is used at the top of a single sloped roof. TRANSITION This piece is used where two roofs of different pitch meet, the top section being steeper than the lower section.
7 RECLA METALS STANDARD FLASHING ALL FLASHING IS MADE IN 10' SECTIONS. ALL MATERIAL IS 24G EXCEPT THE VALLEYS WHICH ARE 22G. 22G FLASHING IS AVAILABLE BY REQUEST. THERE MUST BE A MINIMUM ORDER OF $100 FOR FLASHING OR A $20 SETUP FEE WILL APPLY 4" W VALLEY 6" 1" 5 8 " 1" 11" RIDGE CAP 5 8 " 4" 8" SPECIFY PITCH SPECIFY PITCH 12" PITCH CHANGE/ TRANSITION SHED CAP SPECIFY PITCH SPECIFY PITCH SPECIFY PITCH " DRIP EDGE " 3" 5 8 " 2" ENDWALL 6" SPECIFY PITCH Z FLASHING " 3" SIDEWALL 6" X 2" X= DEPTH OF CORRUGATION 3" 3" 1" 3" 2" J CHANNEL RAKE & GABLE 5 8 " X X= DEPTH OF CORRUGATION DRIP CAP 4" 4" 3" X 5 8 " OUTSIDE CORNER X= DEPTH OF CORRUGATION 4" INSIDE CORNER 4"
8 You are now ready to order your new metal roof. If you have any questions, or need your materials list checked, please contact RECLA METALS or one of their distributors. Panels: Specify Style/Profile ft. in. ft. in. ft. in. ft. in ft. in. ft. in. ft. in. ft. in. ft. in. RCM Order Form NOTE: Use more space as needed for a variety of lengths Accessories: pcs. Of Drip Edge Pitch = pcs. Of Ridge Cap Pitch = pcs. Of Gable Trim pcs. Of Sidewall pcs. Of Endwall Pitch = pcs. Of W Valley pcs. Of Transition High Pitch and Low Pitch= pcs. Of Shed Cap Pitch = pcs. Of Specialty Flashing (sketch required) pcs. Of J Channel pcs. Of Outside Corner pcs. Of Inside Corner pcs. Of Window/Base Cap pcs. Of Z Flashing pcs. Of 1 ½ #10 Screws pcs. Of other types of fasteners - Specify pcs. Of Closures Specify Inside or Outside
9 NEW ROOFS 1 Make sure there are no nails or other objects protruding from the substrate that might puncture the underlayment or damage the roof panels. Clean all debris from the deck. Check for any high or low spots in the deck, which will cause waviness in the metal panels. 2 Check all details for possible roof penetrations, which must be added to the deck prior to roof panel installation (vented ridge for example). 3 Cover the entire roof deck with synthetic ice and water shield or equivalent (hereinafter referred to as underlayment). Begin at the eave at the gable end and roll out the underlayment horizontally (parallel to the eave). Allow each consecutive course to overlap the previous one at least 4. Overlap the end a minimum of 6 when starting a new roll of underlayment. Areas of underlayment that have been torn or cut should be replaced or repaired prior to installation of the metal roof. 4. Place an alignment line along the gable end where the first roof panel will be installed. THIS LINE SHOULD BE LOCATED 1/2 IN FROM THE GABLE EDGE OF THE ROOF DECK AND SQUARE WITH THE EAVE LINE. Various methods exist for insuring that the line is square. Call your nearest RECLA METALS representative if you need assistance. EXISTING ROOFS In many cases, RECLA METALS Roofing Panels can be installed over existing roofing. Some jurisdictions will allow retrofit over certain types of roofing without tear-off of the old roofing. Check with your local codes or building department for the specific requirements in your area. If the roof is to be stripped down to the existing decking, follow the procedures for new roofs. Be sure to check the existing roof and repair any damaged areas prior to installation of the new roof system. The following steps should be taken when installing new metal roof panels over existing roofing. 1. Inspect the roof for damage and make the necessary repairs. 2. Secure any warped or loose roofing. 3. Make sure there are no nails or other objects protruding from the roof that might puncture the new underlayment or damage the new roof panels. 4. Remove all other debris from the roof. 5. Cut off any overhanging roofing flush with the roof deck, and remove all hip and ridge caps. 6. Install 2x4 24 o.c. to attach the panels. Note: For best results, Metal Roofing requires a relatively smooth and flat substrate. Application over rough and/or uneven surfaces is not recommended.
10 PANEL INSTALLATION Note: Prior to panel installation, determine which items need to be installed prior to panels (such as eave, valley, swept wing, etc.) 1 Working off the eave edge, establish a straight line up the gable edge from which you are starting. This will insure that the first panel laid will be straight and square with the eave. (See Illustration #2) 2 Before fastening the panel to the roof deck, check to make sure that the panel is overhanging the eave by 1. 3 Once the first panel is in proper position, secure it to the roof deck with #10 fasteners per the standard fastening pattern. 4 Set the gable trim into a bead of butyl tape and screw it to the fascia board. This fully secures the first panel to the roof deck. 5 Position the second panel (overlap edge on top of the underlap edge of first panel) assuring that the eave edge is in position (1 overhang). Secure the second panel to the deck with #10 fasteners. 6 Each consecutive panel will be installed in the same manner. Design Considerations Rust Information and Warranties RCM has a unique, natural oxide coating that when fully mature is dense, tightly adherent and relatively impervious to further atmospheric corrosion. Minor damage to this oxide coating heals itself, therefore, maintenance is greatly reduced. RCM is suitable for many environmental conditions, including heavy commercial environments. It is compatible with other construction materials such as stone, wood and stucco when appropriate details are incorporated in the design. The Weathering Process RCM's alloy, as well as environmental conditions, are key factors influencing the formation of rust. Under appropriate atmospheric conditions, RCM develops a durable, tightly adherent, protective oxide coating. The appearance, texture and maturity of this coating depend on three interrelated factors: Time, degree of exposure and atmospheric
11 environment. With time, the rust coating changes from a "rusty" red-orange to a dark purple-brown patina. The time frame in which this happens depends on the following factors: 1. The degree of exposure has a strong influence on the weathering process. Steel exposed to rain, sun, and wind weathers more quickly than steel in a sheltered location. 2. The atmospheric environment also impacts rust development. Frequent wet-dry cycles (i.e. rainfall and dew that is dried by the sun) is key to the weathering process. 3. The degree of atmospheric contamination also has an effect. In moderate industrial environments (i.e. places that get acid rain) RCM will mature more rapidly. In rural locations, the rust develops more slowly and generally has a lighter tone. In arid climates, the rust process is dramatically slower and may need a little "man made assistance" to achieve darker rust. Warranties RCM will fall under the same structural warranties on their products as many other roofing manufacturers have. Fire ratings, wind uplift, and impact resistance are all equivalent to other steel roofing manufacturers. Roofing manufacturers that have painted roofs can offer a paint warranty which you purchase separately for your roof. Because RCM has a natural finish, not chemical based paints, its lifetime has to do with Mother Nature, not man made chemicals.

12 Standard Flashing Details
13
14
15
16
17
18