Module 2: Fire Science
|
|
|
- Sophie Hancock
- 5 years ago
- Views:
Transcription
1 Module 2: Fire Science Introduction This module gives participants the basic fire science foundation for understanding the principles and topics in subsequent modules, such as home protection strategies, fuel reduction, home assessments, and living in a fire environment. The information in this module will also help participants in preparing the wildfire preparedness plan for their property, which is a requisite for all participants in CFA training. Finally, the concepts, terminology, and information about the science of fire will help participants communicate fire-related information more competently to others when doing outreach. Room setup The facilitator should secure a room large enough to comfortably accommodate the number of participants. Organize the room in a U-shape layout with long tables and chairs (See Room setup, page 7). The room should have a large screen to display the presentation. Up front, there should be a large table (6 to 8 feet in length) that the instructor can use for in-class demonstrations and to display various props. Total time needed Classroom: 2 hours Field: 3 hours Equipment needed Classroom Computer with PowerPoint Projector and screen Candle, glass jar, petroleum jelly, and lighter for demonstration #1 (fire triangle) Hair dryer, ice cubes, and radiant heater for demonstration #2 (modes of heat transfer) Grass, pine needles, and small to large branches for demonstration #3 (fuel sizes) Fuel kit for demonstration #4 (fire behavior with matchstick forest) To be performed outdoors due to smoke! Field Fire equipment (shovel, Pulaski, fire extinguisher) in vans if field tour is conducted during fire season Background resources Reducing Fire Risk on Your Forest Properties (PNW 618) oregonstate.edu/pnw618 Local case study on examples of fire behavior and effects from a recent local wildfire Fire behavior computer models to demonstrate potential fire behavior in your local area. These may be found at local branches of state or federal forest management agencies. If possible, visit these sites to see where high, moderate, or low fire severity is expected. Host prep Recruit instructor(s) Familiarize instructors and panelists with objectives, content, agenda, and structure of session Communicate with CFA participants to confirm location and time Reserve classroom Identify field tour location that illustrates examples of fire behavior and fuels, such as a recent burn site The location should provide opportunities to make comparisons between fuel loads, slope, fuel type, and treated versus CITIZEN FIRE ACADEMY 21
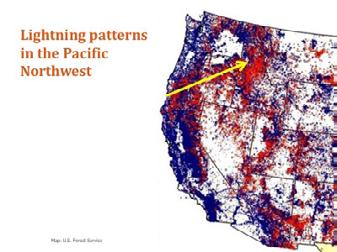
2 untreated lands. If possible, discuss weather effects on fire intensity and spread. Confirm field tour host(s) and location prior to field tour Confirm transportation to field tour location Prep Demonstrations #1 3 Confirm permission to conduct Demonstration #4 (Matchstick Forest) outdoors at class or field site Confirm projector and laptop for presentations Set up room Prepare refreshments (if applicable) Class prerequisites There is no prework for this module. Learning objectives Participants will: Recognize the common ignition sources in their state or region Analyze the components of the fire triangle and fire behavior triangle Interpret how fuel (and its arrangement), weather, and topography interact to affect fire behavior Behavior objectives Participants will: Describe to peers how fuel loading, fuel continuity, and the chemical makeup of fuel affect fire behavior Apply knowledge to other modules and topics, including home assessments Describe which factors can and cannot be mitigated when it comes to fire severity, intensity, and subsequent effects Continue work on their wildfire preparedness plan Delivery methods Presentation from instructors 3 in-class demonstrations 1 outdoor demonstration Discussion Field tour Instructor guidance This module is foundational to most of the modules in the CFA training. It is important that you be enthusiastic and make this module fun, and the demonstrations in this module will help achieve that. Be sure to practice them ahead of time so they all go smoothly in the classroom. The field trip will be very important in bringing some real-world application to this module. Try to locate a recent wildfire where you can take participants to discuss all the concepts within this module, including the fire triangle and fire behavior triangle. In particular, examine the severity of the fire and what influence fuel, weather, or topography may have had on behavior. Sample agenda Location: Auditorium 9:00 a.m. Welcome, introductions, and logistics for the day 9:30 a.m. Presentation and demonstrations 10:30 a.m. Break 10:45 a.m. Presentation and remaining demonstrations 11:45 a.m. Lunch 1:00 p.m. Field tour begins 4:00 p.m. Field tour ends Content outline Briefly define risk versus hazard (these definitions will be repeated in subsequent modules throughout the curriculum) Sources of fire ignitions and acres burned in Oregon Lightning Human Components of combustion the fire triangle Heat Oxygen Fuel Demonstration #1: Fire Triangle (for setup instructions, see Exercises, page 23) CITIZEN FIRE ACADEMY 22
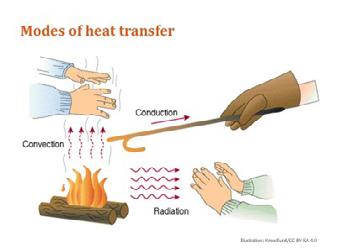
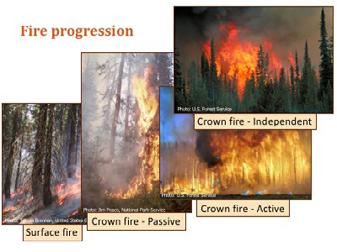
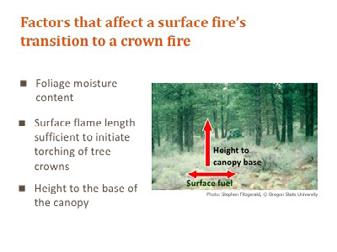
3 How wildfires behave the fire behavior triangle Weather Topography Fuels Aspects of fire behavior Fire spread and intensity: how fast and how hot Fire severity: how hot and what effect it has on soils, vegetation, etc. Fire brands, spotting, and fire whirls Watchout! conditions Wind greater than 20 mph Temperature greater than 89 degrees Humidity less than 20 percent Local influences (vary by region) East winds Diurnal effects Atmospheric stability or instability Fog and marine air Modes of heat transfer Convection Conduction Radiation Demonstration #2: Modes of Heat Transfer (for setup instructions, see Exercises, page 24) Fuel is the common denominator! (for the fire triangles) Fuel particle size (small fuel and large fuel; or 1-hour, 10-hour, 100-hour, and hour) How fuel particle size affects wetting and drying Demonstration #3: Fuel Size Examples and Their Contribution to Fire Behavior (for setup instructions, see Exercises, page 25) Fuel loading (amount in tons/per acre) Fuel arrangement and continuity Vertical (ladder fuels) Horizontal (continuity) Fuel chemical makeup Oils, terpenes, etc. Fire-prone plants versus fire-resistant vegetation Local influences Variations of fuels in your region (e.g., low shrub component in northeast Oregon) Homes as fuel and their combustibility (mention this only briefly; more detail will be given in the Home Protection Strategies module) Roofs, decks, siding, and vegetation Embers and their entry into homes Fire behavior principles demonstration Demonstration #4: Matchstick Forest Fire Behavior Demonstration (for setup instructions, see Exercises, page 26) Discuss observations Additional instruction (optional) Present a case study on fire and fire behavior which could include the following: Modeling of fire progression and fire behavior for a given landscape Example of a wildfire for each region showing the variation in fire spread, intensity, and effects Squires Peak (Medford/Central Point area) B & B (central Oregon east Cascades area) Oak Knoll (Ashland) Other examples from your region This topic could also be covered on the field trip Exercises There are four demonstrations for this module. Demonstrations #1 through #3 can be performed inside, but demonstration #4 should be performed outside the classroom to avoid setting off smoke alarms. Below are setup directions and discussion points for each demonstration. Demonstration #1 Fire Triangle This demonstration illustrates that if you take away one element of the fire triangle (oxygen, fuel, or CITIZEN FIRE ACADEMY 23

4 heat source), the fire will go out. This demonstration is conducted in front of the class on a table with a fire-proof surface. You will need a clear glass jar, a tea light candle, petroleum jelly, and a lighter or match. Place a little petroleum jelly on the rim of the jar to create a seal between the rim and the table top. Light the candle and place the jar over the candle. After a few moments, the candle will begin to dim and go out. Ask participants the follow questions: Why did the candle go out? (Lack of oxygen). What else can we do to extinguish flames? (Deny the fire of fuel, such as creating a fire line in mineral soil; reduce or eliminate the heat source by using water; take away the oxygen by using a chemical fire extinguisher for chemical, fuel, or grease fires) (Optional) Discuss the relationship between photosynthesis and combustion Present the chemical formula for photosynthesis: matter) burning. Oxygen is consumed and carbon dioxide and heat are released into the atmosphere. Both processes are directly related, each one being the opposite of the other. Demonstration #2 Modes of Heat Transfer The purpose of this demonstration is to illustrate convective, conduction, and radiant modes of heat transfer to fuel. This demonstration is conducted in front of the class. You will need a hair dryer, ice (of different sizes), and a radiant heater. There are three modes of heat transfer: 1. Conduction 2. Convection 3. Radiation Carbon Cycle Photosynthesis CO 2 + H 2 O + energy C 6 H 12 O 6 + O 2 carbon dioxide water sun glucose represents any organic matter in plants oxygen Adapted from diagram by Charles Ophardt, Elmhurst College Present the chemical formula for combustion: Carbon Cycle Combustion, Metabolism CH 4 + O 2 CO 2 + H 2 O + energy or C 6 H 12 O 6 oxygen represents any fossil fuel, food, organic matter carbon dioxide water (heat) Adapted from diagram by Charles Ophardt, Elmhurst College Explain that photosynthesis is the process of plants slowly taking energy (heat) from the sun and growing tissue. Carbon dioxide is stored in the tissue, and oxygen is released into the atmosphere. Combustion is the process of that tissue (plant Convection Use the hair dryer to illustrate heat transfer by convection. Turn the hair dryer on and vary the speed of the fan. Convection heating is the most efficient mode of heat transfer. The movement of warm air more effectively dries and heats the fuel ahead as the fire spreads. Conduction Illustration: Kmecfiunit/CC BY-SA 4.0 Conduction is the next mode of heat transfer. You will use ice cubes (or chunks) of different sizes to represent different-size fire brands that might land on fuel and ignite it. Describe that a fire brand is, essentially, a nugget of heat the same way an ice cube is a nugget of cold. Take a small piece of ice and place it against your forearm. The ice cube conveys coldness to your skin via conduction. Likewise, when a fire brand makes CITIZEN FIRE ACADEMY 24

 and the fuel particle s size (e.g., needles versus large branches) and moisture content determine whether the fuel will eventually combust.")
5 direct contact with a fuel particle, heat transfers from the fire brand to the fuel. The bigger the ice cube, the longer and the more your skin is cooled as the ice melts. Thus, the more uncomfortable your skin feels. A very large chunk of ice against your skin could even cause damage, much like how a large fire brand can conduct enough heat to a fuel particle that it reaches the point of combustion. Of course, the fire brand s size (total amount of heat) and the fuel particle s size (e.g., needles versus large branches) and moisture content determine whether the fuel will eventually combust. Radiation Radiation is the least efficient mode of heat transfer. Radiant heating is caused by the transmission of electromagnetic waves from a heat source that are then absorbed by an object, generating heat; this can occur even through a vacuum. The amount of radiant energy absorbed is a function of the square of the distance between the heat source and the object. Before the demonstration, place 100-hour fuels (1 to 3 inches in diameter) at different distances from a radiant (light) heat source for at least 15 to 20 minutes, giving them enough time to absorb the radiation and heat up. Later, using an infrared thermometer, measure the temperature of each one, noting the differences. Demonstration #3 Fuel Size Examples and Their Contribution to Fire Behavior For this demonstration, you will need examples of 1-hour, 10-hour, 100-hour, and 1000-hour fuels (grass, pine needles, and small to large branches). Arrange the fuel examples on the front table so participants can see them; or, better yet, pass the fuel examples around so the participants can feel them and look at them more closely. Pass out a copy of Table 8, page 37 from Reducing Fire Risk on Your Forest Property Wildfire (PNW 618): pnw618 and then discuss what we mean by 1-hour, 10-hour, 100-hour, and 1,000-hour fuels. The main concept to get across to participants is how a fuel particle s size and surface-to-volume ratio affect wetting and drying time and, consequently, its ability to ignite by convection, conduction, and radiation (see Figure 1). Another way to illustrate this concept is to show how to properly construct a campfire (this could also be shown in a video from the web). A campfire is constructed with the following fuels in this order: 1. Tinder (1-hour fuels): up to ¼ inch in diameter, dry grass or needles or paper 2. Kindling (10-hour fuels): ¼ inch to 1 inch in diameter, small twigs; (100-hour fuels): 1 inch to 3 inches in diameter, larger branches 3. Fuel logs (1,000-hour): 3 inches to 8 inches in diameter or greater Figure 1 Graph: U.S. Forest Service Photo: Jason/Troop 317 Wiki CITIZEN FIRE ACADEMY 25
.")
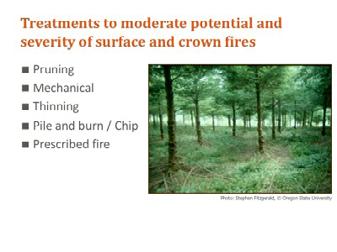
6 With a strike of the match, the 1-hour fuels ignite, preheating and igniting the 10-hour fuels above, and so on. Layering the fuels in reverse order makes a campfire more difficult to ignite. Demonstration #4 Matchstick Forest Fire Behavior Demonstration This demonstration is meant to illustrate and summarize the concepts presented in the Fire Behavior Triangle (fuel, weather, topography). Ahead of time, use the fire kit to create two or three different matchstick forests with different fuel loading and structure: Multi-strata forest with trees of different heights (e.g., matchsticks of different heights) with heavier surface fuels (cedar chips, paper shreds, or both) Open forest with low surface fuels (e.g., more widely spaced matchsticks with low levels of cedar chips, paper shreds, or both) Clumpy or patchy forest. This can be created by leaving openings with no matchsticks. In addition to openings, you can vary the density of the matchsticks to represent a more open forest versus a really dense forest. Take the three matchstick forests outside the building to avoid setting off smoke alarms. With the participants, discuss the differences in the fuel conditions. Ask them how they think each one might burn? Ignite the matchstick forests one at time and observe if the fire behaves as the participants predicted. If not, why? Photo: Kara Baylog, Oregon State University To add variation to the burning, use a small battery-operated fan to create wind and place one of the matchstick forests on an incline to create slope. Compare the fire behavior (crown versus surface fire, rate of spread) between the three forest types. Once the matchstick forests have burned, use a squirt bottle filled with water to extinguish the flames. Field tour The length of the field trip is 3 hours, including travel time. The purpose of the field trip is to reinforce concepts on the fire and fire behavior triangles: potential ignition sources, fuel, weather, and topography. Look for field sites that illustrate the following: heavy, moderate, and light fuel levels different fuel types (grass, shrub, timber) fuel continuity and fuel structure (fuel ladders, dense versus light densities) activity fuels versus natural fuels variations in terrain and how that might affect fire behavior fire behavior from a recent wildfire showing variations in fire intensity or severity or both (discuss factors that may have contributed to the intensity or severity and the fire effects observed) Alternative delivery methods With enough preplanning by the instructor and prework by the participants, it is possible to deliver this module entirely in the field. However, the instructor may have to forego some of the in-class demonstrations. Suggested homework The information presented in this module will give participants necessary background knowledge to continue working on their wildfire preparedness plan at home. Self-assessment questions 1. What comprises the fire triangle? (Fuel, heat, oxygen) 2. What comprises the fire behavior triangle? (Fuel, topography, weather) CITIZEN FIRE ACADEMY 26
7 3. How does slope influence fire behavior? (The flames tilt more towards the slope and the fuels ahead, more effectively preheating and combusting them. Thus, fire tends to move faster uphill than over a flat area.) 4. What is a fuel ladder? (Comprised of grass, shrubs or small trees, and medium-sized trees) 5. What is the one component we can manipulate to reduce fire intensity and how fast it moves? (Fuel) CITIZEN FIRE ACADEMY 27

8 Fire Science Materials Photo: Carrie Berger, Oregon State University CITIZEN FIRE ACADEMY 28


9 slide deck CITIZEN FIRE ACADEMY 29


10 CITIZEN FIRE ACADEMY 30


11 CITIZEN FIRE ACADEMY 31