Lesson Plan: Exploring the Water Cycle By: Kim Castagna
|
|
|
- Gordon Gabriel Francis
- 5 years ago
- Views:
Transcription
1 Lesson Plan: Exploring the Water Cycle By: Kim Castagna Target Grade: MS Integrated - 6th Teacher Prep Time: 30 minutes Lesson Time: 3 days (50-60 minutes each) Day 1: 10 minutes Setting up transpiration portion 50 minutes - Creating & revising water cycle posters in groups Day 2: 50 minutes - Modeling the water cycle in a different way Day 3: 40 minutes - Presentation of Water Cycle Models 10 minutes - Post assessment on bottom of group posters/individual student model for science notebooks. Lesson Overview: In this lesson, students will observe/investigate the movement of water through the different stages of the water cycle and determine what drives this cycle. Students are asked to think about what precipitation is then watch a video about why the water cycle is important. They observe a simple version of the water cycle and record these observations. Students are asked what stages require solar radiation, which require water to give off heat, and which are driven by the force of gravity. Students record on their posters the different processes in the water cycle and how energy is involved. Students build their understanding of the water cycle through different models that are shown or experienced. The culminating activity has students creating their own model of the water cycle from the viewpoint of a water molecule including the processes, the energy involved, and gravity. Learning Objective: Students will be able to develop a model demonstrating the path a drop of water travels along as it completes the cyclic pattern of the water cycle. NGSS: MS-ESS2-4: Develop a model to describe the cycling of water through systems driven by energy from the sun and the force of gravity. Science and Engineering Practice #2 Developing and using models Develop a model to describe unobservable mechanisms. Develop and/or use a model to predict and/or describe phenomena. Disciplinary Core Idea MS-ESS2.C The Roles of water in Earth s Surface Processes Water continually cycles among land, ocean and atmosphere via transpiration, evaporation, condensation and crystallization, and precipitation, as well as downhill flows on land. Cross Cutting Concept #5 Energy and matter; flows, cycles and conservation. Within a natural system, the transfer of energy drives the motion and/or cycling of matter. 1
2 Where this lesson fits in: This lesson should be done at the beginning of the unit that includes the water cycle. It serves as a way to build upon prior knowledge and introduce new terminology and parts of the cycle not previously learned. Materials Needed: 1 qt. sealable plastic bags (1 per group of students) Lab materials to create a mini-water cycle: plastic shoe box, plastic wrap, water, ring stand, heat lamp with clamp, plastic bag with ice cubes, glass cup (or plastic cup with weight inside - a small rock works fine) to capture precipitation under the ice. Stack of 3 x 3 post-its (1 per group of students) 12 x 18 sheets of construction paper/poster paper (1 per group of students) + extras for student groups creating a comic strip model. Colored pencils, crayons or markers (1 set per group of students) Various materials found in a classroom that could be used for dramatization. Laptops/computers available for students creating a technology model. Poster of Reasoning Through Talk Prompts found in google drive. Video Links: The Fresh Water Connection (video) 1:24 minutes. Why study water cycle Water Cycle animation (video) 3:00 minutes No narration, but labels parts of the cycle to use with paper model Water, Water, Everywhere! (video) 6:31 minutes. Teacher Prep: Group students into groups of 3 or 4. Download the videos from the links provided. Prior to the lesson, use the following lab materials to create a mini-water cycle: plastic shoe box type container, plastic wrap, water filled to about 1 deep, ring stand, heat lamp with clamp, plastic bag, ice cubes, a cup to capture precipitation (glass or plastic with a rock to hold it down). Assemble the mini-cycle in a shoe box. Copies of ndividual student model for science notebooks. Create poster of Reasoning Through Talk Prompts found in google drive. Background Information: Water is found almost everywhere on Earth: from high in the atmosphere (as water vapor) to low in the atmosphere (precipitation, droplets in clouds) to mountain snow caps and glaciers (solid) to running liquid water on the land, ocean, and underground. Energy from the sun and the force of gravity drive the continual cycling of water among these reservoirs. Sunlight causes evaporation and propels oceanic and atmospheric circulation, which transports water around the globe. Gravity causes precipitation to fall from clouds and water to flow downward on the land through watersheds. Lesson Sequence: Day 1: 10 minutes Prior to the lesson 1. Have students go outside and place a plastic bag over a cluster of leaves on a plant/bush. Seal off the plastic bag and return to class. If this is not possible, place a class plant in a plastic bag and place outside in the sun. If 2
 3. Brainstorm with tablemates what you know about the water cycle. 4.")

3 needed, spray some water inside the bag to speed up the process. 2. Turn the lamp on for your mini-cycle in a shoe box Day 1: 15 minutes Engage: 1. Think Pair- Share What is precipitation? Have students record their thinking in their science notebook. 2. Show the Fresh Water Connection video (1:24 minutes) 3. Brainstorm with tablemates what you know about the water cycle. 4. In groups, on poster paper, draw a large (use entire space) simple model (diagram) of the water cycle that includes the places on Earth water is found, and arrows showing how water moves. Teacher may need to model the drawing. Students then draw in the water cycle, including direction arrows showing movement of water. At this point, all drawing should be done in pencil as students may need to make revisions later. Use post-its to label stages of the water cycle. 5. After working for about 5 minutes on their own, allow groups to send a spy 3
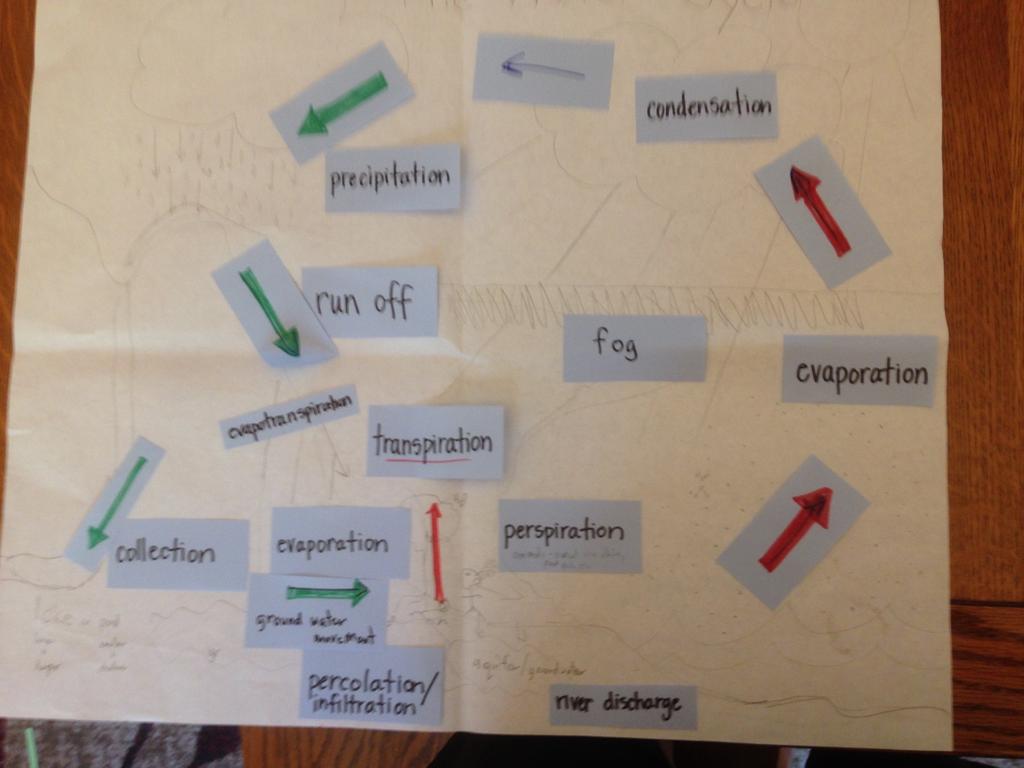
4 to another group to look at their diagram, and ask about it. Then they can return and add it to their diagram. 6. Place the poster face down in the center of the table. We ll revisit it later in the lesson. Day 1: 10 minutes Day 1: 25 minutes Including Plants in the Water Cycle 1. Think Pair- Share the question, Based upon what we just viewed, why is it important to study and understand the water cycle? 2. Have each group of students share out their group response and chart the responses. ESR (expected student response) To know where water comes from To know where water goes To see why water is everywhere 3. Go outside and view the plastic bags placed around the plant leaves (previously placed), remove the bag and return to class. Or, pass around the plant that is inside a bag. Inside the classroom, students will notice there is water present inside the bag, but not outside. Make observations about the moisture inside the plastic bag. Discuss where the water came from and provide evidence. How do we know the water was there? What makes you say that? Why is there water in the bag, but not outside on leaves? ESR It was in the plant because because all plants need water. It was in the air inside the bag because air makes water. It was in the air outside the bag because it might have rained. 4. After class discussion about the plant - water - bag phenomenon, ask students to add this new information into their diagrams. 5. Define the phenomenon as transpiration and allow students to edit group posters adding transpiration and plants if not previously included. Allow groups to send a spy to another group to look at their diagram and ask about it. Refer to Reasoning Through Talk poster and encourage its usage for questioning. 6. Then they can return and add it to their diagram. Creating & Revising a Poster Model of Water Cycle 1. Show the Water Cycle Animation video (3 minutes) without narration. For the first viewing, simply watch the video. While watching multiple times, students can revise their post-it labels and directional arrows on the water cycle group poster (for EL & SpEd students, provide a word bank). Students will draw any portions previously left out. Give time after each viewing to make necessary adjustments on group posters. Discuss and share any changes or additions made. Word Bank: Evaporation Runoff Infiltration/Percolation Condensation Groundwater Runoff Solar Radiation 4
5 Precipitation Transpiration Water Cycle Video recording sheet for class diagram. Use only if teacher feels students need the guidance, otherwise let students draw their own based upon prior knowledge and learning about the water cycle. 2. Ask which stages require energy from the sun to move water. Tell students to discuss this as a group and draw arrows to indicate the movement. Color the arrow/s red on individual and class diagrams. (Solar Radiation, Evaporation, Transpiration) 3. Ask which stages require water molecules to give away heat energy (cool down). Tell students to discuss this as a group and draw arrows to indicate the movement. Color the arrow/s blue on individual and class diagrams. (Condensation) 4. Ask which stages are driven by gravity. Tell students to discuss this as a group and draw arrows to indicate the movement. Color the arrow/s green on individual and class diagrams. (Precipitation, Runoff, Ground Water Runoff, Infiltration/Percolation) 5. Show the last video, Water, Water, Everywhere! (6:31 minutes) This video ties together the concepts in the lesson. 6. After working for about 5 minutes on their own, allow groups to send a spy to another group to look at their diagram, and ask about it. Have them ask about the coloring of red, blue and green. Then they can return and add it to their diagram. 7. Make any last corrections/adjustments to group posters of the water cycle. Write all stages in pen and remove all post-its since drawing model should now be complete. 8. View the class mini-cycle in a shoe box. Discuss how this models the water cycle and the stages represented. Discuss what is making the water move and provide evidence. What makes you say that? ESR 5
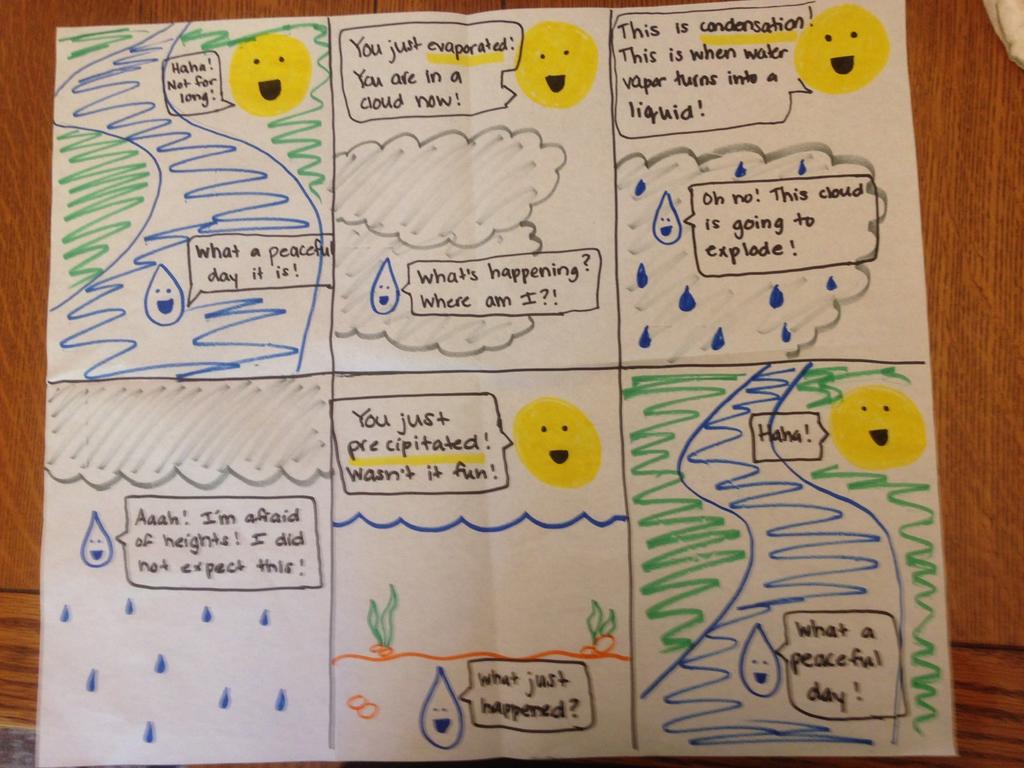
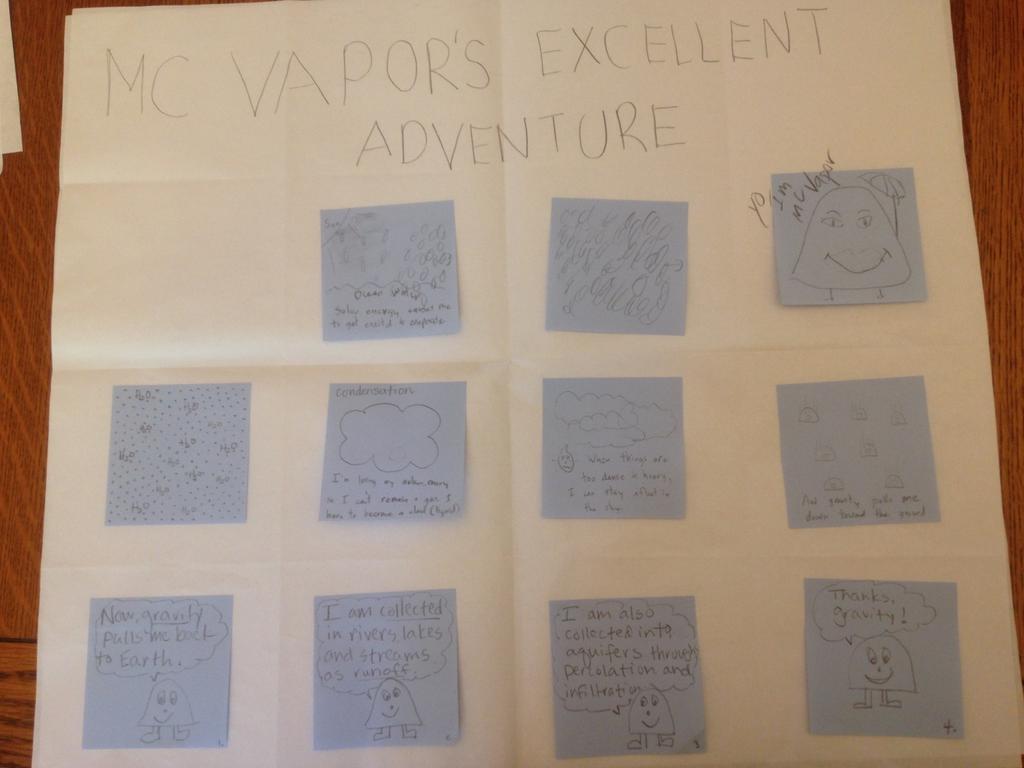
6 Lamp is in place of the sun Water in the bottom is for the ocean Ice cubes are the cold in the clouds causing condensation The water collects and drops down like rain/precipitation because of gravity Day 2: 50 minutes Project - Modeling the Water Cycle in a Different Way For this mini-project, students will describe/demonstrate the movement of a water drop through the water cycle. The water drop may begin anywhere in the cycle and must go through at least two phase changes, (ie: liquid to gas and back to liquid or solid). It must also include how gravity and the sun s radiation (energy) drive the cycle. Each project will be shared/presented with the class. 1. Present the 3 modeling options and discuss the grading rubric. There are 3 options for group projects modeling the water cycle: I. Create a comic strip with a molecule of water as the main character. a. The comic must include text that explains what is happening in each frame. b. The text can be dialogue spoken by the drop or written as captions at the bottom of the frame. II. Create a technology presentation with a diagram of the water cycle a. The diagram needs to look different from the one created in class. It needs to have the drop moving from one step to another. b. Each step in the cycle must have text that describes what is happening to the drop. The text can be dialogue spoken by the drop or written as captions near the drop. c. The presentation will be printed to be turned in for grading. III. Create a dramatization showing a drop of water travelling through the water cycle. a. The dramatization must include members to represent parts of the cycle in appearance and movements. b. The dramatization must include narration of what is happening throughout the water cycle. The written narration will be turned in for grading. The project will be scored with the attached rubric. 2. Students in groups will decide upon their mini-project and start planning and preparing. They may use any materials the teacher has available. 6
7 Day 3: 50 minutes Presentation of Water Cycle Models 1. Students will make any last minute finishing touches on models. 2. Students will practice their presentation making sure all members are participating. 3. Students will present the projects. 4. After all presentations are completed, pass back their original drawing models. 5. Post Assessments: Group: On the bottom of each group poster, describe how energy transfers through the water cycle model and the role gravity plays throughout by answering the following questions.. (This will include heat transfer driven by the sun and the role gravitational energy plays) a. What types of energy are involved in the water cycle? b. How do these energy transfers cause water to move through the water cycle? Give 3 examples used in diagram. Individual: Give each student a copy of the blank water cycle template to glue into their science notebook. Ask them to fill in the water cycle, color the arrows and answer the questions from the group poster. 7
8 Water Cycle Mini-Project Rubric Concept Understanding demonstrated a full understanding of how a water molecule can move through the water cycle. Students included the role of the sun and gravity. demonstrated a good understanding of how a water molecule can move through the water cycle. Students included the role of the sun and gravity. demonstrated some understanding of how a water molecule can move through the water cycle. Students included the role of the sun and/or gravity. demonstrated little understanding of how a water molecule can move through the water cycle. Students did not include the role of the sun or gravity. Proper Use of Terminology properly used all the key terms associated with the water cycle properly used most the key terms associated with the water cycle properly used some the key terms associated with the water cycle properly used two or fewer key terms associated with the water cycle Presentation Skills fully communicated the concepts in the water cycle in a clear manner. All students participated. adequately communicated the concepts in the water cycle in a decent manner. All students participated. communicated the concepts in the water cycle in a manner that may have been difficult to understand or follow. Most students participated. poorly communicated the concepts in the water cycle in a manner that was difficult to understand or follow. Few students participated. Neatness and Legibility All of the following are true: The project is neat. All writing is legible. The sequence is easily followed. The project is colorful. Three of the following are true: The project is neat. All writing is legible. The sequence is easily followed. The project is colorful. Two of the following are true: The project is neat. All writing is legible. The sequence is easily followed. The project is colorful. One of the following are true: The project is neat. All writing is legible. The sequence is easily followed. The project is colorful. 8
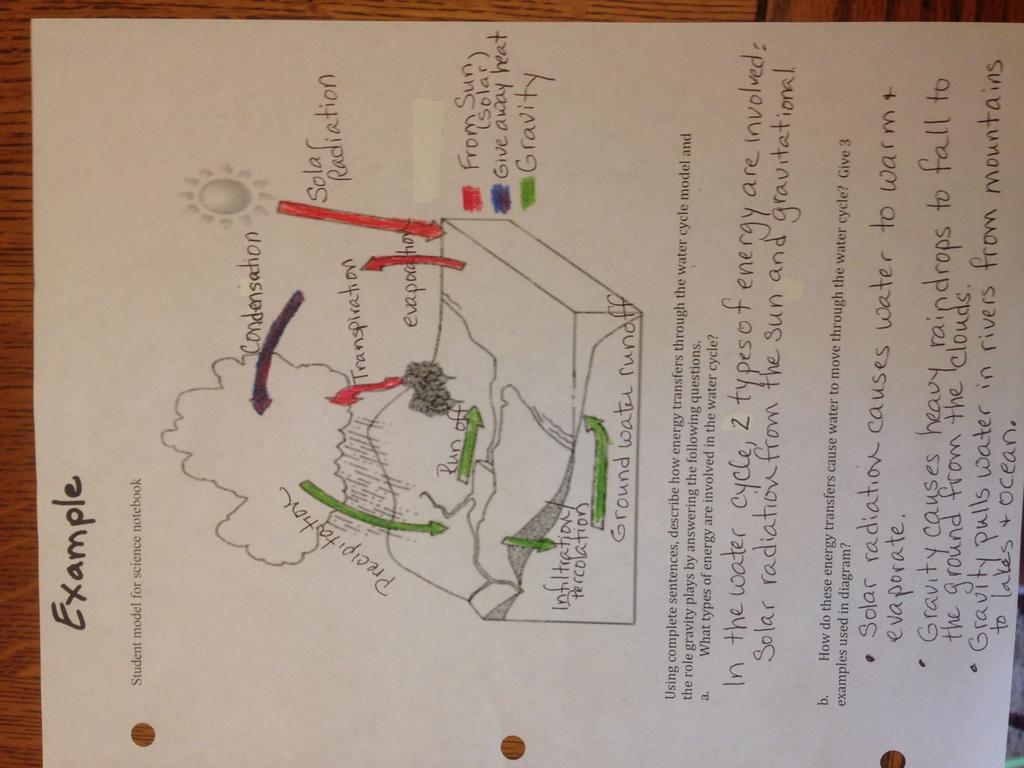
9 Student model for science notebook Using complete sentences, describe how energy transfers through the water cycle model and the role gravity plays by answering the following questions. a. What types of energy are involved in the water cycle? b. How do these energy transfers cause water to move through the water cycle? Give 3 examples used in diagram? 9
10 10

11 11
12 12
13 13
14 14