Take the:: By Doing: Using: Seeing Watersheds, warm up Branching Out. By Doing: Using: Water Models. By Doing: Using:
|
|
|
- Vivian Higgins
- 5 years ago
- Views:
Transcription


1 Take the: Attend the:: Take the:: Thank you for participating in the Arizona Water Festival program! Our program assessment shows that students who experience the entire Water Festival unit, from pre-lessons to post-lessons, get far more out of the experience than their peers who only attend the festival without any pre or post-festival teaching. We know that both classroom time and your own prep time are precious, so we ve tried to make this as easy as possible for you. This chart will show you what to do, and what standards you ll be covering as you do it! PRE-TEST Watersheds Seeing Watersheds, warm up Branching Out WET Guide 2.0, p. 187 Supplement 3.1, P.O. 1,2; 4.3, P.O. 1,2;6.3,P.O.1,2* Water Cycle Water Models Supplement (Old WET Guide) 2.2, P.O 1, 3 Groundwater Get the Groundwater Picture, parts I & II WET Guide 2.0, p , P.O. 1, 2, 3, 4 Water Conservation Technology Blue Planet Activity A Drop in the Bucket Discoverwater.org WET Guide, 2.0, p , P.O. 1,2; 4.3, P.O. 1,2;6.3,P.O.1,2 WATER FESTIVAL! 3.1, P.O. 1,2; 4. 3, P.O. 1,4; 6.2, P.O. 1,2,3, 6.3, P.O. 1,2 Watersheds Storm Water, Part II Sum of the Parts WET Guide 2.0, p. 395 WET Guide 2.0, p , P.O.; 2.0, P.O. 4 Water Cycle Blue Traveler Activity Thirsty Plants Discoverwater.org Supplement 2.1, P.O. 2; 4.1, P.O. 1;6.3, P.O. 1, 2; Groundwater Common Water WET Guide 2.0, p , P.O. 1, 3, 4 Water Conservation Technology Water Detectives Activity** Discoverwater.org 4.3, P.O. 4 * Note that Strand 1 standards are covered throughout the unit as you explore water through scientific inquiry!! **If internet access is an issue, consider using My Water Footprint, p. 441 POST-TEST Engagement * Impact * Inquiry
2 WARM UP: What is a Watershed? (have them brainstorm on the word). If they don t know, ask them what a toolshed is. A place where tools are stored. That s a start. How what pets do? They shed hair. Give them the definition: A watershed is a land area that drains to the low points. (Use hand motions: with hands and arms up at shoulder height and palms down, move hands in circles to show the land area and then move hands down to the ground to show the low point; do this as you say the definition.) So what marks the boundary of a watershed? The high points or mountain ridges mark the watershed boundary. So that a drop of water just to the left of that high point goes into one watershed and the drop of water just to the right goes into another watershed. A watershed could be as big as the 7 state Colorado River Watershed, as big as the Santa Cruz River Watershed or it could be the land area in the back of your school yard where water drains into a drainage ditch! ACTIVITY: We are going to make a raised relief map that will contain many partial watersheds and some whole watersheds. 1. Put a piece of 8 ½ by 11 white paper (used on one side) down on the table in front of you (white side up) 2. Crumple up a second piece of 8 ½ by 11 white paper (used on one side) with the white side facing out 3. Un-crumple the paper until you can find all 4 corners, but do not lay it all the way flat 4. Tape all four corners down on the flat white piece of paper 5. Using water soluble markers, draw features on your watershed using this key: A. Green marker to draw a line along all of the ridges (the up folded areas). B. Blue marker to draw a line along all of the valleys (the down folded areas). C. Red marker to indicate any abandoned mines with a * symbol. D. Purple marker to indicate cities with a crosshatched pattern. E. Brown marker to indicate a farm with a colored-in square symbol. You have made a model of the land surface or a raised relief model. Predict how water is going to flow in your model when we spray them. What direction will water flow? Why? Gravity works! Are there areas on your model that have no outlet and will hold water? This would be a closed basin like the Great Salt Lake or Willcox Playa. Take your model outside and spray it with a spray bottle, in other words make it rain on your model! WRAP UP: Did any of your cities flood? If there was pollution on your city streets could it get in to your farm field? Could excess pesticide or fertilizers from farms go in to your cities? Could old mines affect water coming into cities or farms? What is a watershed? Further Thought: What do you think we manage when we talk watershed management? It s really the land area or land use that we manage to maintain water quality in a drainage or stream! Runoff is water that flows over the land surface to a drainage. References: Adapted from Project WET Curriculum and Activity Guide, 1st edition, Branching Out activity, p. 129, Project WET Foundation, 1995.
3

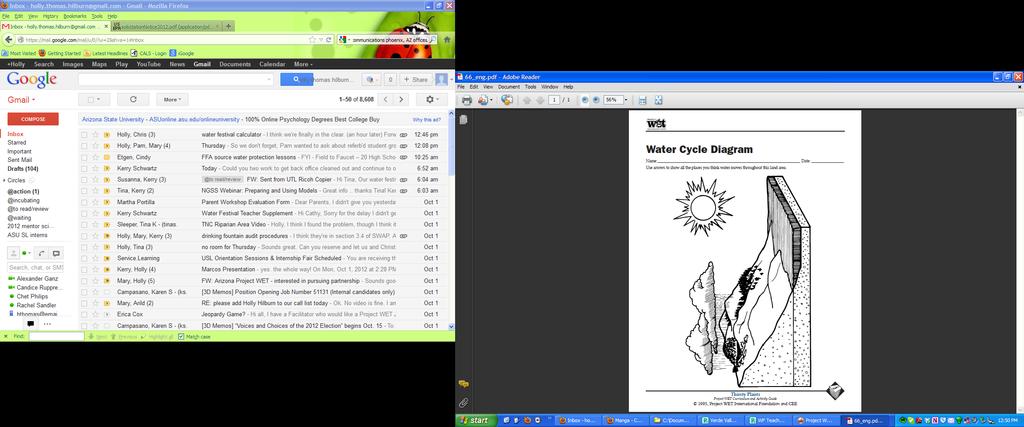
4 Classroom Water Cycle Model Objective: Recognize the roles of condensation, evaporation, and precipitation in the water cycle. Materials: Hot plate or other heat source Fry pan or pie plate Ice Sauce Pan or cooking pot Pot holder or heat-resistant gloves Water Warm Up: When it rains or snows, students see evidence of the water cycle. But some components of the water cycle are not visible to the eye. Ask students to brainstorm what they think of when they think of the water cycle. Activity: During this activity, please use descriptive words rather than exact terminology. Have students make a list of observations and explain each. Discuss the processes that are occurring and how they might be exhibited in nature. Method: Boil water in a pot. Ask, What do you see happening? Use descriptive words. Take a colder pot or pie plate. Let students feel it to see that it is completely dry inside. Hold the colder pot over the steam. Ask, What s happening? The cold pot is getting wet at the bottom. Ask, Why? The vapor from the air. Ask, Why does liquid water gather here? It touches a colder surface, so it condenses to become liquid. Hold a pan of ice above the rising water vapor; Drops of water vapor should condense on the bottom of the pan of ice and fall back into the pot. Look! Water is dripping at the bottom. Ask, Why is it dripping? Water has become too heavy and is being pulled down by gravity. The water (polar) has to stick to something, like a dust particle (condensate particle) to form a drop & all those drops form a cloud. Ask, What does the cold pot represent in the natural cycle? Dust particles that water can cling to. Remember that water is sticky (adhesion). Water also sticks to itself (cohesion). Ask, So, what form is water in when it becomes a cloud? It s liquid! If it were a gas, it d be invisible. So it s liquid. The cloud is condensation. Ask, What causes precipitation? The liquid gets heavy and falls. Ask, Is steam liquid or vapor? It s liquid! We can see it. Let s go back to the picture: Ask, What makes it all work? THE SUN! Vocabulary: Evaporation: Change of state from liquid water to water vapor (gas). Condensation: Change of state from water vapor (gas) to liquid water. Precipitation: Water falling in a liquid or solid state from the atmosphere to Earth.
5 Water Cycle in a Jar Objective: Recognize the roles of condensation and evaporation in the water cycle. Materials: Two identical clear glass jars or one cut 2 liter bottle Sand Water One small rock Tape Water Cycle in a Jar handout Observation Sheet, Water Cycle Model handout Warm Up: When it rains or snows, students see evidence of the water cycle. But some components of the water cycle are not visible to the eye. Ask students to brainstorm on what they think of when they think of the water cycle. Activity: Give students a copy of Water Cycle in a Jar. Have them construct their own models or construct a single class model. Record observations on Observation Sheet. Follow-Up: Have students reflect on their prior knowledge of the water cycle and compare it to their current knowledge. Ask students to identify the processes of evaporation and condensation. Vocabulary: Saturate: fill with liquid to the point that additional liquid is not absorbed Evaporation: Change of state from liquid water to water vapor (gas). Condensation: Change of state from water vapor (gas) to liquid water.
6
7

8 Before the Water Festival, do this to learn why we should conserve water! The Project WET Foundation has developed an exciting way for children to learn water! Discoverwater.org is a free, interactive web site full of water information and games for kids! You are welcome to use any portion of the website, but we have specifically selected a few items that will be particularly useful for fourth graders participating in the Arizona Water Festival Program. The opening home page looks like this: To get to the Blue Planet Activity, click here, on the Blue Planet. Then, click here! Students will play a short game in which they see how much of the earth is covered in water. This could be done as a whole group with a projector or Smart Board, in pairs, or individually.
9 Objective: Students will explain how plants transport water through transpiration and describe the importance of plants in the water cycle. Materials: Celery stalks or white carnations Clear container with water colored with red or blue food coloring. Place celery or carnation in water for several hours, until leaves or petals are colored with the dye. Paper towel tube Paper that is cut into a series of connecting circles (see diagram) Clear plastic bag and twist tie for each group Warm-Up Remind students of the Incredible Journey game played at the water festival (or the Blue Traveler activity on discoverwater.org). Note that plants were a place that water traveled in the water cycle. Ask students how water gets into plants. Most students know it is the roots. Ask how water gets OUT of plants. Show students the celery or carnation with blue dye in it. How did the dye get from the jar into the leaves or petals? What in a tree that is 20 feet tall? How does water get from the bottom to the top? The Activity 1. Give each small group an empty plastic bag and twist tie. 2. Take students outside to an area with several plants (a variety of types is nice, and sunny areas work best.) Have students carefully place the bag over several leaves of their plant. (You may want to have a few larger plastic bags on hand for some groups who choose large trees or plants with large leaves.) Each group should count and record the number leaves in its bag and estimate the total number of leaves on the plant. 3. After 30 minutes (or whatever timeframe works for your class) carefully remove the bag from the leaves. Make observations how much water is in the bag. Have students estimate this volume (it may be helpful to have a few small graduated cylinders around for reference). Students can fill in a chart similar to the one on the following page. 4. To wrap up, show students the paper towel tube with the cut-out circles inserted. Explain that the tube represents part of the tissues inside a plant (xylem), similar to veins inside our bodies. The paper circles represent water molecules. 5. Point out the water molecule near the top of the tube, explain that this represents a molecule at a pore in a leaf (stoma). During the day, increased heat energy will cause water to evaporate. To show evaporation, pull on the top circle to draw the next circle near the top, then tear off the top circle. Explain that this represents a water molecule being evaporated from the leaf (transpiration). This creates a pull on the next molecules, pulling them farther up the xylem.
10 Which plant transpired the most water? Which plant transpired the least water? Estimate the mass of water YOUR plant would transpire during seven hours of sunlight. Assume a constant rate of transpiration. Plant Name or Description Amount of water in bag Number of leaves on plant Number of leaves in bag Minutes bag was on plant Transpiration per hour Plant 1 Plant 2 Plant 3 Volume of water in bag X Leaves on plant Leaves in bag = Estimated water transpired from plant in X minutes Estimated water transpired from plant in X minutes X minutes = Transpiration volume per minute Transpiration volume Transpiration volume per minute X = per hour


11 After the Water Festival, do this activity to review what you ve learned the water cycle! Click here! To review what you learned the water cycle! First, click here! Then, click here! Students will review processes and places in the water cycle, then play a digital version of the Incredible Journey game that they played at the water festival, learning more the water cycle AND scientists who study water.

12 After the Water Festival, do this to learn more how to conserve water! Click here to learn more ways to conserve water! Then, click here to play! Students will identify water wasters and water savers in a neighborhood where water is being used in many ways.