HIRING MANAGER S (AND PPA/CCC DEPT) USER S GUIDE
|
|
|
- Damon Carson
- 5 years ago
- Views:
Transcription
1 HIRING MANAGER S (AND PPA/CCC DEPT) USER S GUIDE University of Alaska Hiring System PeopleAdmin, Inc W. 6 th Street Austin, TX Revised November 1, 2005
2 TABLE OF CONTENTS INTRODUCTION... 5 GETTING STARTED... 7 LOGGING IN.9 POSITION DESCRIPTIONS...10 Create New PD... 9 Justification for Position Position Details Labor Distribution Peer Positions Job Description Responsibilities Direct Subordinates Knowledge/Skills & Abilities Supplemental Documentation Approval Submitting the Position Description Copy a PD from an Existing PD Reclassify/Update PD Employee Review of PD Printer Friendly PD Search Approved Position Descriptions Search Pending Position Descriptions Search Position Description Status RECRUITMENT...43 Faculty Recruitments Emergency Hire, Direct Appointment and Other Special Hires Copy a Job Posting From a Previous Posting Create Job Posting Posting Details Web Posting Text Job Duties Advertising Labor Distribution Preliminary Screening Questions Preliminary Screening Points Additional Screening Documents Activating Guest Users Approval Saving/Approving the Posting One Page Guide for Creating a Job Posting Applicant Profile Viewing Applicants to Your Job Posting Sorting and Filtering Applicants by Different Criteria Printing Job Form and Contract Letter Reports Viewing and Printing Applications Viewing and Printing Documents Changing the Status of Applicants
3 Interview Process Hire Process Reopening Positions Printing Job Form and Contract Letter Reports ADMINISTRATIVE FUNCTIONS...90 Changing Your Password Logging Out CHECKLISTS...91 Position Description Actions...91 Create New/Reclassify/Update PD Search Approved Position Descriptions Search Pending Position Descriptions...92 Search Status of Position Descriptions...92 Job Postings...93 Creating a Job Posting..93 Searching a Pending Job Posting 94 Searching an Active Job Posting.94 View a Posting by Status...94 Changing the Status of a Posting.94 Applicant Administration...95 Searching Applicants and View Application...95 Changing the status of an Application.96 WORKFLOW DIAGRAMS...97 RECRUITMENT FREQUENTLY ASKED QUESTIONS PD FREQUENTLY ASKED QUESTIONS BROWSER TROUBLESHOOTING
4 4
5 INTRODUCTION Welcome to the University of Alaska Online Employment Application System. The Human Resources department has implemented this system in order to automate many of the paperdriven aspects of the employment application process. You will use this system to: Create/modify/update position descriptions Create and submit Requisitions to HR View Applicants to your Requisitions Notify HR of your decisions regarding the status of each applicant The system is designed to benefit you by facilitating: Faster processing of employment information Up-to-date access to information regarding all of your requisitions More detailed screening of Applicants qualifications before they reach the interview stage The system has added a feature to include job vacancy templates for temporary, adjunct, student, staff, and faculty positions. The system also has features that allow departments to manage labor pools and process applications for temporary and student positions via the web. Screening and notifications to applicants, and the ability for applicants to view the status of their applications are additional enhancements to UA s recruitment process. The HR department has provided these training materials to assist with your understanding and use of this system. Your Web Browser The Employment Application System is designed to run in a web browser over the Internet. The system supports browser versions of Netscape 4.7 and above and Internet Explorer 4.0 and above. However some of the older browser versions are less powerful than newer versions, so the appearance of certain screens and printed documents may be slightly askew. Please notify the system administrator of any significant issues that arise. The site is best viewed in Internet Explorer 5.5 and above. The site also requires you to have Adobe Acrobat Reader installed. This is a free download available at It is recommended that you do not use your browser's "Back", "Forward" or "Refresh" buttons to navigate the site, or open a new browser window from your existing window. This may cause unexpected results, including loss of data or being logged out of the system. Please use the navigational buttons within the site. Security of Applicant Data To ensure the security of the data provided by applicants, the system will automatically log you out after 60 minutes if it detects no activity. However, anytime you leave your computer we strongly recommend that you save any work in progress and Logout of the system by clicking on the logout link located on the bottom left side of your screen. Things to keep in mind about this system Fields with an Asterisk (*) are required, so if you do not include information in the field, an error message will appear and you will be required to complete it before proceeding. 5
6 Work that is created or modified in this system is Not Saved unless you click Save and stay on this page. If you log out or click a link on the left side before completing these steps, none of the information you have edited will be saved. If you would like to cancel an action like stopping a PD classification, requisition, or hiring proposal, you may choose Cancel. If the action is pending for another user, you may also contact that user and request they cancel the action. 6
7 GETTING STARTED CREATING A USER ID To enter the Uakjobs.com administration site type After entering the URL, the login screen for the system will appear and should be similar to the following screen: Before you may enter the site, you must create your own account by clicking on the Create User Account" link on the left side of the screen. After you click this link, the following screen will appear: 7
.")
8 Enter a user name and password, along with the rest of the requested information. When choosing the type of access needed, choose Hiring Manager/Supervisor, and employee (or PPA/CCC Dept, if necessary). When selecting your department, choose all of the departments you supervise (for PPA/CCC Dept users, select all of the departments that you are the PPA/CCC for). Please write down your user name and password. You will need them each time you log in to the system. After completing this form, click Continue, and you will be asked to review your information. After you have reviewed it, click Submit. Your request will then be sent to the Human Resources Department, who will review your user account request and notify you when approved. Once HR notifies you that your request has been accepted, you will then be able to log in to the system with your user name and password. 8

9 LOGGING IN After your user account has been approved, you will receive an and you can log into the website. Once you log in you will be brought to the following page: Whenever you log in, you will see any active jobs within your department. This page is designed to help you keep track of the actions required by you or your department. You will perform actions by clicking on the links on the left side of the screen. Each link and its corresponding action will be covered in detail in this manual. The links on the dark blue section on the left side of the page are resources to assist you with performing actions in the system. In here you will find flowcharts for the Position Description, Job Posting, and Hiring Process. In addition, there are documents that tell you what is required to write a position description or job posting. You will also find resources such as sample interview questions, questions that can t be asked and helpful links. 9
10 POSITION DESCRIPTIONS New Position Descriptions Position Descriptions are only applicable to regular staff positions. You have the ability to view only those Position Descriptions in your department(s). You may check the status of a PD including approvals, or view a PD that has been approved. You can also create a new PD, reclassify/update or modify an existing PD. Position Description options are broken down into different Requests in the online system. Typical other Request options are: Establish a New Position Description Establish a New Position Description by copying an existing Position Description Reclassify / Update a Position Description Employee Review To create a new PD, click on the New/Reclassify/Update option on the left side menu. To begin a position description request, click the New/reclassify/update link in the Position Description section of the navigation bar. Your Request choices will then appear. In the following example, Establish a New Position was selected. 10

11 Justification for the Action There are several tabs across the top of the screen. When you first enter this screen, you will be in the Justification tab. This screen allows you to enter information pertaining to the justification for creating a new position. When you have completed this page, select Continue to next page. 11


12 Position Details You will now be looking at the screen with Position Details. Enter information into all applicable and required fields. You will see some words that are underlined which are links to additional information or helpful tips. A few notes about this screen: 1. Fields with an Asterisk (*) are required, so if you do not include information in the field, an error message will appear and you will be required to complete it before proceeding. 2. VERY IMPORTANT: A Position Description is Not Saved unless you click Save and stay on this page. If you log out or click a link on the left side before completing these steps, none of the information you have edited will be saved. 12

13 At the bottom of the page, you may identify users who have access to this Position Description. If you would like someone in your office or department to see this PD, select them from this list. This will enable users to view and check the status of the PD. When you are done, click Continue to the Next Page. 13
14 Labor Distribution In the labor distribution tab, identify the funding that will pay for the salary of this position including org, fund, and percentage split. Click the Continue to next page button when done. 14
15 Peer Positions This is an optional field to identify positions that are peer to the one being created. If a peer position exists, click Add New Entry. You can enter the position title, department, incumbent s name and their PCN. When done, click Add Entry. After the entry is made, you may view it, edit it, delete it, or add another entry. When you are done entering peer positions, choose Continue to next page. 15

16 Job Description After continuing to the next page, you will be taken to the Job Description tab. The Duties of a Position Description are the major responsibilities the incumbent in this position performs on a routine basis. (Duties should be grouped by broad functional areas.) You will be able to add as many duties as needed for this particular position. For each duty you add, you should add a description of the duty, (indicate whether the duty is essential for the performance of this position), and indicate the estimated percent of time spent performing the duty. The duty percentages should total 100%. To add edit duties to your Position Description, click on the Edit link within the table. 16


17 Once you are finished entering your duties, you ll see a screen similar to the following: You may click the Continue to Next Page button to go to any additional tabs. 17
18 Responsibilities Under the responsibilities tab, if applicable, enter budget responsibilities, the scope and complexity of their work, and indicate the type of supervisory responsibility they have. When all of the applicable fields are completed, click on the Continue to the Next Page button. 18
19 Direct Subordinates This section only applies to employees who have supervisory responsibility. If this position doesn t supervise, click the Continue to the next page button. Otherwise, enter the name of the direct subordinate, job title, indicate whether the positions are student or temporary, and the employee s responsibility for the position. Click Add Entry to save record. You may view, edit or delete record. To add additional subordinates, click on the Add New Entry button. When all records have been entered, click on the Continue to Next Page button. 19
20 Knowledge, Skills & Abilities Enter the knowledge, skills and abilities of this position and indicate the type of supervision that is given to this position. Next, list any decisions this position makes independently and ant other information to help describe this position. When you are done, click the Continue to Next Page Button. 20

21 Supplemental Documentation On this page, you may include supplemental documentation to support your Position Description request. For example, memos or organizational charts may be requested when creating a new Position Description. You may attach a particular document by clicking the Attach link next to the specific type of document you want to attach to your position. In addition, you may also click on the organization chart template here. Once you have selected the document type you wish to upload you will have 2 options: You may browse for the file if you have it stored on your computer in one of the following formats: o Adobe Acrobat o Microsoft Word o Microsoft Excel o Microsoft Powerpoint You may copy and paste and/or type text into the large text area at the bottom of the screen if you do not have your document in one of the above formats or if you do not have your document saved on your computer. 21

22 Once you have browsed for your file or pasted it into the text box, choose attach. Confirm when prompted and click Continue to the Next Page. 22

23 Approval The Approval section allows you to select up to 2 people in your departmental structure who will approve the position description. If your departmental structure does not require an additional approval, please select No Dept. Approvals Necessary and the position description will be sent directly to Human Resources. After you make your selection, click Continue to Next Page. 23

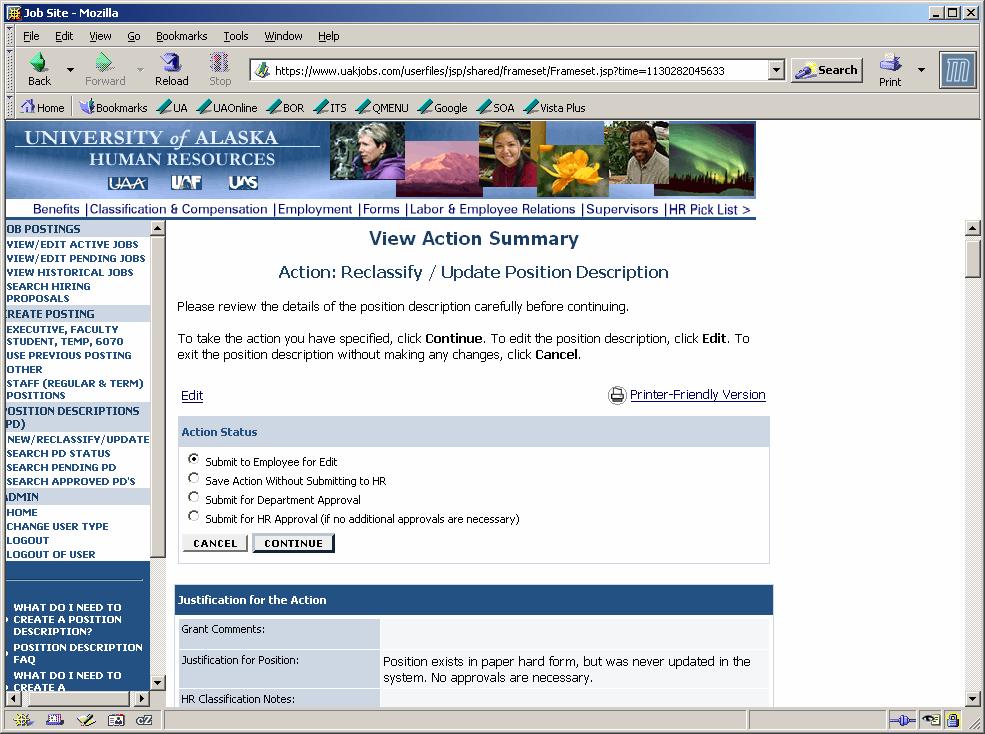
24 Submitting the Position Description After clicking the Continue to Next Page button from the previous screen and viewing any notes associated with the position description, click on the Continue to Next Page or Preview Action buttons. You should see a screen similar to the following. Scroll down through this screen to review the information you entered. The last step is to select an action for the PD. If you would like to save the PD without submitting it to HR, click the first button. This will enable you to save the PD and return to it and make changes. If the PD needs to be approved by a secondary supervisor or department head, click on the Submit for Department Approval button. The Submit for HR approval button allows department heads to send the request directly to HR, if there isn t a secondary supervisor that needs to approve the PD. After selecting your choice, click Continue to go to the confirmation page. 24
25 Press Confirm to complete this step. The details of your position description are NOT SAVED until you complete this step. 25
26 OTHER POSITION DESCRIPTION ACTIONS AND ADMINISTRATION Copy a Position Description from an Existing Position Description Not all new PD s have to be created from scratch, because you have the ability to copy a PD from an existing PD within your department. This will be useful for identical positions within your department or positions that have similar job duties and responsibilities. In addition, it may be used in reorganizations where new positions are being created. The process of creating a PD from an existing PD is similar to creating a new PD with the exceptions noted below. Choose New/Reclassify/Update position description from the left-side menu. You will be brought to the following page where you have the option of choosing Establish a New Position Description by Copying an Existing Position Description. Choose Start Action Establish a New Position by Copying an Existing Position under the Action column and you will be taken to the following page: 26

27 To find the PD you want to copy, you can enter PCN, employee name, employee ID number or system title into the search criteria. You can also search by not specifying any of the criteria and choosing Search. A list of items will appear that meet your search criteria. If you do not want to copy a position and want to create a new PD from scratch, you may select Do Not Copy Position, Continue to Next Page. 27

28 After you have found the PD you want to copy, click on the Select title and Continue button. From this point forward, the position description action is the same process as creating a new PD. Please refer to create new PD procedures to complete the rest of the PD. 28
29 Update/Reclassify a Position Description To reclassify or update an existing position, click on the New/Reclassify/Update option on the left side menu. You will then be brought to the New/Reclassify/Update page: Many PD actions will be updates to existing position descriptions. This action will be used to reclassify a position when significant changes are made to a position that warrant reclassification. -OR- it can be used to update a position description, e.g. supervisor changes, incumbent changes, or minor changes to job duties. Whether this is a change in classification or not, we are still just updating the official position description with new information. The function of Reclassifying/Updating a position description follows the same process and steps as a new PD and many of the fields will already be populated. 29

30 Once you have started your request, you must find the existing position description you wish to modify. After you enter the appropriate search criteria of incumbent name, ID, or system title, a list of results will display. Click on the Start Action link under the Job Title and the PD will appear. The first tab that will be displayed is the Justification for the Position. You will be required to indicate whether the position is an update or reclassification in this field with appropriate justification. 30

31 On the Posting Details tab, you may update information on some fields that may have changed such as: supervisor, department and department users who have access to this position. Update and modify all remaining pages of this PD. Modify the applicable fields as necessary on all of the tabs. When you are done updating or reclassifying the position, you may choose to: submit to employee back for edits, save the PD, submit for departmental approvals, or submit for HR approval. Please note that if you are merely updating the incumbent in the position, changing a department name, or supervisor, the PD still should be submitted to HR. For additional information on completing all of the fields, please refer to the Create New PD instructions above. 31
32 32

33 Employee Review of a Position Description When an incumbent changes or when job functions change as a result of reorganization, the PD must be updated to reflect the current information. Employees are required to review the position description associated with their position. Please note that if changes to the position change including Peer Positions, Job Description, Direct Subordinates or Knowledge/Skills/Abilities, you will need to choose to Reclassify or Update the Position Description. Choose New/Reclassify/Update from the left side menu and you will be taken to the following page: Review After selecting Start Action under Employee Review under the Action column, you will be taken to a search screen. You may search by the employee s first name, last name, position number or position title. Select Search after entering the search criteria. A list of results will display with positions descriptions within your department that met your search criteria. 33


34 Revieww By choosing View summary under the Job Title column, you can view and print a printer-friendly version of the PD. If you would like to view the history of the PD including updates, reclassifications and approvals, choose View History under the Last Action column. Choose Start Action under the Job Title column to begin the Employee Review. You will then be taken to the following screen: 34

35 After choosing Start Action, the Position Description will appear in a new window. You will notice that there are both fewer tabs at the top and fewer fields that can be modified, as compared to a new or updated position description. You may update the name, ID number, eclass and a few other fields on this Position Details page. When you are done, continue to view and modify all necessary fields. Click Continue to the next page. Next you can update the fund, org and percentages of the labor distribution. When you are done click Continue to the next page. Next you may view the Peer Positions of the position. When you are done click Continue to the next page. Next you can view the Job Description. Click Continue to the next page when done. The Direct Subordinates can be reviewed next, and choose Continue to the next page when done. Last, you may review the Knowledge/Skills/ and Abilities of the position. When you are done, click Continue to the next page, and you will be brought to a summary page. For Review At the summary page, you may complete the action and forward it to the employee for certification by choosing Submit to Employee for Certification. If you would like to save the changes and come back to make edits, you can choose Save Action without submitting. Click the Continue button after making your choice, and confirm when prompted. When the employee logs-into the system, they will be required to certify that they have read their position description. They can choose Search Pending PD from the left side menu. A list of results will display and they can choose View under the Job Title. After they choose view, the employee s position description appears in a new window. They can review the PD, but not make any edits. After reviewing the PD, they must click on the I certify that I have read my Position Description button. Next they should click the Continue button and confirm when prompted. 35

36 Printer Friendly Position Descriptions If you would like to print out position descriptions, click on Search Approved Position Descriptions from the left-side menu. Enter the applicable search criteria and choose search. A list of Position Descriptions that meet your search criteria will display as follows: Click Get Reports List under the job title and the following screen will display: 36


37 Click on Generate Report and the printer friendly version of the PD will appear so it can be printed: 37
38 Search Approved PD s Approved PD s are for both vacant and occupied positions. Click the Search Approved PD link under the Position Description header on the left side menu. Enter criteria to search for position descriptions. You may filter your selection by specific search criteria, or you may leave the search criteria blank to retrieve all of the approved position descriptions you have access to in the system. A list of PD s will appear with their status categorized by job title, PCN, PCLS, employee ID, employee last name, and last action: Once you have found the position you would like to view, you can click the Get Reports List link under the Job Title header to view a printer-friendly version of the PD. Click the View Summary link under the Job Title header to view the position description in a summary format. 38


39 Click the View History link under the Last Action header to review the history including updates, edits and approvals. 39

40 Search Pending Position Descriptions Pending PD s include position descriptions (within your department) that have been saved, or are awaiting approval and classification. Click the Search Pending PD link under the Position Description header on the left side menu. A list of PD s within your department will appear and you can view the position title, pending title, working title, request number, current status, and action type. Once you have found the position you would like to view, click the View link under the Position Title header to view a PD. You will be taken back to the summary view where you can click on the Edit link at the top. Once in the edit view, you can review and modify the details of the Action Request and save as appropriate. 40

41 Search PD Status To search on the status of PD (or edit a PD), choose the Search PD Status option. You may locate any action request and check the approvals by using this function. Click the Search PD Status link under the Position Description header on the left side menu. Enter criteria to search for position descriptions. You may filter your selection by specific search criteria, or you may leave the search criteria blank to retrieve all of the approved position descriptions you have access to in the system. A list of PD s within your department will appear and you can view the job title, status, action type, action number, employee last name, date first submitted to HR, and date approved. Once you have found the position you would like to view, click the View Summary link below the position title header. If you would like to view and modify the position description, click the View link below the Job Title. 41

42 You will be taken back to the summary view where you can click on the Edit link at the top. Once in the edit view, you can review and modify the details of the Action Request and approve as appropriate. 42
43 RECRUITMENT Faculty Recruitments When you recruit for a faculty position, information is pulled from a template rather than a position description. Job duties and responsibilities are completed which can be modified to suit your needs. If you are recruiting for multiple ranks like an Assistant/Associate/Professor, (or if you are unsure of the rank that the position will be hired at), you can modify the working job title to reflect these ranks. You can also include wording in the job description to let applicants know that depending on the qualifications, the candidate may be hired at a different rank. To create a faculty recruitment, choose Create Posting from Executive/Faculty/Student/ Temp/6070 on the left-side menu. Next, click on the link for Executive/Faculty/Student/Temp/6070 on the new screen. You may then choose faculty template that corresponds with the rank/level you would like to recruit. The recruitment process and fields on the tabs are identical to those on a recruitment for staff positions. For specific information on these fields see below. On the Web Posting Text page, in the Required Applicant Documents checkbox, indicate all documents that faculty applicants must attach including: Curriculum Vitae, Teaching/Research statements, Transcripts, Statement of Philosophy of Teaching Methodology, Letters of Recommendation or Letters of Reference. You will also want to list these required documents under the Special Instructions to Applicants field on this same page. Since some special documents like Teaching Evaluations aren t listed under the required documents, you will want to instruct applicants to attach this document as a Supplemental Document (1). When selecting the checkboxes on the Optional Applicant Documents field on the Web Posting Text page, it is a good idea to select multiple Supplemental Documents so applicants can attach all necessary documents. When completing the hiring proposal, you will want to specify the first and second-level approvers of this position. In most cases, faculty hires require approval of a Dean/Director and Provost/Chancellor Delegate. Hiring Proposals for faculty candidates shouldn t be sent to the Department/Executive Delegate, Chancellor Delegate/Provost, or President Delegate because these approvers are only in place for staff exceptional placement salary requests. Since the templates don t differentiate between UNAC and ACCFT, the templates default UNAC information including title, salary grade, etc. When the hiring proposal is submitted for HR approval, you can modify all applicable fields including job title, salary grade and other pertinent information. 43

44 EMERGENCY HIRE/DIRECT APPOINTMENT/CASUAL LABOR HIRES If you need to hire someone on an emergency hire, direct appointment, casual labor or reappointment basis, you can do so through the uakjobs.com system. For more information including criteria and definitions of these special hiring scenarios, see the Board of Regent s Policy & Regulation R (It is also helpful to consult with your local HR office prior to beginning a special hiring.) The process is similar to the normal recruitment where job duties and responsibilities, and approvals are obtained. You can send a URL of the posting to the applicant where only he or she can apply. Once the candidate has applied you can bypass the screening process and begin the hiring proposal. If you would like to initiate a recruitment for this type of position, click create posting from Staff (Regular and Term Positions), or Executive, Faculty, Student, Temp, 6070 as you would for a normal recruitment. Complete the Justification tab for the recruitment and click Continue to the Next Page. You will notice a field on the bottom called Quicklink. This field is a direct link to the job so you can send it to your department and interested applicants. For this type of recruitment, you can send it to the applicant you want to hire. On the Posting Details tab, complete all of the required fields. On the field called Type of Recruitment choose the recruitment that meets the criteria as outlined in Policy and Regulation. Complete the remaining fields on the Posting Details tab and click Continue to the Next Page. 44

45 On the Web Posting tab, be sure to enter a Posting Date and Closing Date. When entering the closing date, allow ample time for the candidate to apply. Complete the remaining fields on this tab and click Continue to the Next Page. 45

46 After you have completed the Web Posting Text page, enter the job duties on the Duties tab. Click Continue to the Next Page and you will be on the Advertising tab. Because this recruitment won t be advertised in any publication or source, choose an Advertising Source of Web and click Continue to the Next Page. Next, complete the fields on the Labor Distribution tab and click Continue to the Next Page. Since you do not need to include additional screening documents or preliminary screening questions, click on the Approval tab. On the Approval tab, specify the first and second level approvers (if necessary), and click Continue to the Next Page. After clicking the Continue to Next Page button from the previous screen you will see a job posting summary screen and be able to submit the posting as appropriate. Scroll down through this screen to review the information you entered. The Save without Submitting option will allow you to save your work and edit it before submitting it for approval. The choice of Submit for Departmental Approval will send the job posting for departmental approval. If you choose No Dept Approvals Necessary and selected Submit for Departmental Approval, the job posting will be sent to a departmental approver that doesn t exist. Therefore, make sure you have selected an approver if one is necessary. If you don t need to send the posting for Departmental Approval, choose Submit for HR Approval (if no additional departmental approvals necessary) and the posting will be sent directly to HR. Once you have selected an option, click the Continue button either at the top or the bottom of this page. After making your selection, click Continue to go to the confirmation page. Press Confirm to complete this step. For detailed information on the individual fields and tabs on these pages, please see the Create Posting procedures below. 46
47 Once the applicable approvals of department, human resources, grant and budget are obtained, your position will be notified and will be notified via . Since the recruitment is a special hiring, the job will not show up on the regular applicant site. Instead, the posting will be hidden from all applicants except for the one that has the secret URL. At that point you may view your position and click on the position details tab and copy the Quicklink. You can then the applicant the URL and ask them to apply. The application process for the applicant is the same as a normal recruitment, except they will not be required to answer the preliminary screening questions. Once the applicant has applied, you may skip the screening and interview process and begin the Hiring Proposal. For more information about the Hiring Proposal, see the create job posting section below. 47

48 CREATING A JOB POSTING FROM A PREVIOUS POSTING You can initiate a recruitment from any previous recruitment that had any prior status including cancelled, saved, filled or unfilled. When you create a job from a previous job, all of the job details, responsibilities, knowledge, skills and abilities will be copied. In addition, all of the department specific information will appear as well as the preliminary screening questions and additional screening documents that were used in the last recruitment. To initiate a recruitment from a previous recruitment click on Create Posting Use Previous Posting, on the left side menu. A list of previous recruitments will appear that you were the supervisor/hiring manager for that recruitment. Click Create under the job title and the job information will appear. Continue to update and/or modify all fields in this recruitment as necessary. See the next section for detailed information about the individual tabs and approval routing. 48

49 CREATING A JOB POSTING Job postings may be created from a position description or a template. Regular or term staff positions are created from a position description while executive, faculty, student, temp, 6070 positions are created from templates. If you are creating a staff position, skip to the next page, otherwise you may click on Executive, Faculty, Student, Temp, 6070 to initiate a recruitment for these types. Choose the template that matches the type of position you are recruiting by clicking on Create. If you are recruiting for a regular or term staff position see below. A list of Position Templates for non-staff positions will appear. Click on Create under the job title for the position template that matches the type of position you would like to hire. Once you choose a template, the job posting process and fields are the same for staff and non-staff positions. 49
.")

50 If you are creating a job posting from Regular or Term Staff position, you will need to choose Regular & Term Staff Position from the Create Posting header on the left side menu. If the position is new, a PD will need to be created and approved prior to recruiting, (See the Create PD section for more information). Perform a search on the PD by entering name, position number, job title or employee ID number into the search criteria. A list of results will display that meet your criteria. You can view the position description summary by choosing View Summary, otherwise you can choose the Create link to begin the job posting. 50
51 Posting Details In the following example, the "Regular/Staff Position option was selected. After searching and selecting the position you want to use, you should see a screen similar to the following: There are several tabs across the top of the screen. When you first enter this screen, you will be in the Posting Details tab. When you are creating your posting, you will notice that information from the Position Description or Position Template will automatically fill in some of the blanks on the Position Requisition. Required fields within this tab include: your department, timekeeping location, working job title, contact person, supervisor, type of recruitment, whether the recruitment will only be open to internal candidates only, employment type, assignment type, and whether relocation can be paid. You will see that additional fields exist within this tab and should be completed if applicable. When all of these fields are completed, click the Continue to next page button. You will see a field called Contact Name that will identify a person in your department that can see the job posting and answer questions about it. If you are the contact person and hiring manager for this position, choose your name in both of these fields. If you need to identify an Assistant, PPA/CCC or other person as the contact person, choose their name from the list. A few notes about this screen: 1. Fields with an Asterisk (*) are required, so if you do not include information in the field, an error message will appear and you will be required to complete it. 2. VERY IMPORTANT: A Requisition is Not Saved unless you click continue to the next page or save and stay on this page. If you log out or click a link on the left side before completing these steps, none of the information you have edited will be saved. TIP: Words in some fields are colored blue on these screens will appear on the applicant site exactly as you enter it on this screen, so please proofread carefully. 51
52 Web Posting Text You will be brought to the Web Posting Text tab, which contains the text that will be displayed on the web posting. You may modify or enter information into the required fields including: a summary of position and department, knowledge skills and abilities, required training or education, length of time and experience required for position, and required documents that must be submitted by applicants. Click the Continue to next page button when done. 52

53 Job Duties Next, you will be taken to the Job Duties page. You can edit or enter additional information in this section to explain the typical job duties of the position. When you are done, click the Continue to next page button. 53

54 Advertising In the Advertising tab, identify whether the job posting will be advertised only on the web, or the local newspaper, Chronicle of Higher Education, Higher EdJobs.com or other venue. Human Resources will coordinate placement in the newspaper, but will also need run dates, the advertisement, and funding to pay for the ad. If you would like to advertise in additional places, please identify those in the Additional Advertising field. When these fields are completed, click the Continue to next page button. 54

55 Labor Distribution In the labor distribution tab, identify the funding that will pay for the salary of this position including org, fund, and percentage split. These accounts may include restricted grant funding and general funding. This data will be entered into Banner and be used to charge their salary. Click the Add New Entry button to add the labor distribution. After you have entered data into these fields, click Add Entry. You may then view or edit each entry. You can add as many lines as necessary, but be sure that the total equals 100%. Click the Continue to next page button when done. 55

56 Preliminary Screening Questions The Preliminary Screening Questions tab contains questions that you create to determine whether applicants meet the minimum qualifications of the position. By choosing the disqualifying box, a candidate who doesn t meet the qualifications are automatically disqualified from the position. (You may want to contact your HR consultant/representative to determine if preliminary screening is appropriate for your search). If you assign preliminary screening criteria, candidates will be automatically notified after they apply of whether they fail to pass initial screening and are therefore no longer being considered as an applicant for the position or if they are still considered in the pool. If preliminary questions default into these fields, you can modify or delete them. If you are not adding any Screening Questions, click the Continue to Next Page button. To add a Screening Question to this Requisition, click on the Add a Question button, which returns the following page: 56


57 The first step is to search existing questions. You can enter a keyword to search the question text (or leave the field blank). After you click Search, the system will return a list of all questions that have been entered previously by Human Resources or Hiring Managers for other Requisitions. Select one of the questions from the list if it is appropriate for this Requisition. If you do not find an applicable sample question from the list, you may create a question from scratch by clicking on the Create a Question link at the bottom of the Search Results screen. 57

58 After clicking the Create a Question button, the following screen will appear: Step 1: Please enter question text: Enter the text of the question you wish to ask all candidates who will apply to this Posting. Step 2: Please select answer type: select either Closed Ended or Open Ended described in the following sections. Step 3: Enter answer choices or select answer format based upon your selection in step 2. 58

59 Adding Closed Ended Questions Closed Ended questions require a multiple-choice answer. For example: Do you have experience working in an office environment? Possible Responses: Yes or No After selecting the Closed Ended radio button, enter the answer choices that candidates can choose from in the boxes labeled Possible Responses. In this case, you would enter: 1. Yes 2. No 59


60 Adding Open Ended Questions Open Ended questions do NOT require a multiple-choice answer. For example: Describe any work experience relevant to this position. After selecting the Open Ended radio button, select one of the answer-type choices from the right side of the screen. To limit the length of a candidate s response to less than 50 characters, select Short Text. Otherwise, select Long Text (Text > 50 characters). If a phone or a date is the required response, select the Phone or the Date options. In the following example, Long Text was selected as the answer-type for the open-ended question. The next step is to click on the Submit Question button at the bottom of the screen. This attaches the question to the Requisition, and every applicant who applies to this Requisition will be asked this question. 60


61 After you click Submit Question, you should see a screen similar to the following. This screen summarizes the question(s) you have entered. As you enter additional questions, they will be added to this summary screen. From this screen you may continue to add more questions by clicking the Add a Question button. You may also delete a question you have entered by clicking the box next to the relevant question and clicking the Delete Question(s) button. You also have the ability to require an applicant to provide an answer to the question you added. The applicant will not be allowed to proceed without answering a question with the Required status. If you spot a typo in your question, click on the Edit link at the end of the question to correct it. When you have finished adding screening questions for this Requisition, click the Continue to Next Page button. 61

62 Preliminary Screening Points You may assign points to answers for closed-ended screening questions that can be used to rank applicants and designate an answer as a disqualifying answer. Applicants who select a disqualifying answer will be automatically moved to a status of not hired with a reason of did not meet minimum qualifications. Points that are assigned to a position must be reasonable. For assistance in assigning points, contact your HR office. If you have not assigned preliminary screening questions to this position, no questions will appear in the preliminary screening points screen; otherwise all of the questions will appear. To assign points, enter a score into the score column that corresponds to each possible response. In the example below, the score increases by an increment of 5 for more experience. If you would like to enter an answer as a disqualifying answer, click the corresponding checkbox. In the example below, the answer of 0-6 months and no experience is checked. If an applicant answers this question as having no experience or only having 0-6 months experience, they will be automatically disqualified, because this position requires at least 7 months of experience. Enter the disqualifying answers and scores for all questions, and click Continue to Next Page when finished. 62

63 Additional Screening Documents Next, you can attach documents that are required for the recruitment including secondary screening questions, interview questions, and reference check questions. Click on the Attach link under the attach column to attach a document. You may attach a document by clicking the browse button and choose Attach, or you can paste the document into the Paste a new document field and choose Attach. When prompted choose Confirm, and attach additional documents if necessary. If you are done attaching documents or if you choose to not attach any documents, choose Continue to Next Page. 63
 to which they are assigned, and are not permitted to take action on any of the applicants.")
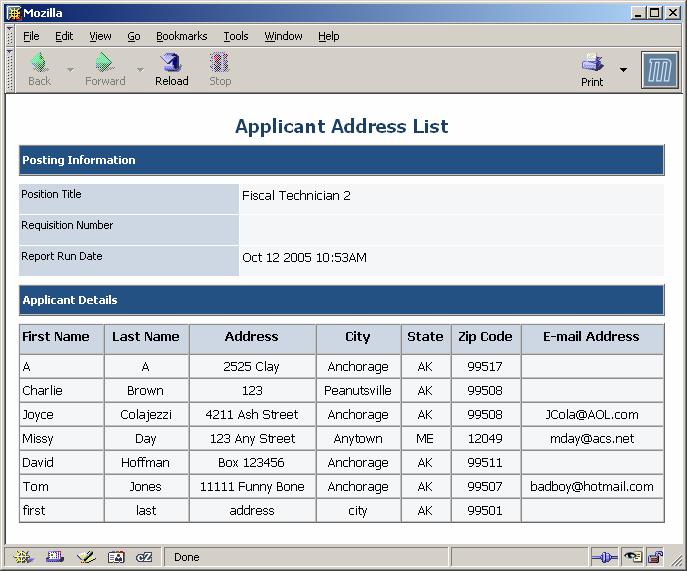
64 Activating Guest Users If your Requisition involves committee review, you may set up a special account that will be used by members of the review committee to log in to the system and view the Applicants to this Requisition. Guest Users are only able to view the applicants to the Requisition(s) to which they are assigned, and are not permitted to take action on any of the applicants. When the Requisition is filled, the guest user name and password are automatically deactivated. To set up a guest user account, click the "Activate Guest User" link. 64

65 After clicking the Activate Guest User link, you should see a screen similar to the following: The system automatically assigns a User Name for this Requisition (which will be GU####). You will need to enter a password, which must be between 6 and 20 characters. Please record this user name and password and notify the Hiring Manager of the user name and password so that he or she can give it to the committee members. After entering a password for the Guest User, click Continue to Next Page to continue to the final step. 65

66 Approval Under the Approval tab, identify the first and second level approvers for this position. First level approvers normally are supervisors of the position or managers of the department, while second level approvers are Deans/Directors or secondary supervisors. If you are an approver and no further approvers are necessary, choose No Dept Approvers Necessary and click on the Continue to the next page button. 66

67 Saving/Approving the Posting After clicking the Continue to Next Page button from the previous screen you will be brought to the View Posting Summary page. You should see a screen similar to the following. Scroll down through this screen to review the information you entered. The last step is to choose an option and submit the job posting. The Save without Submitting option will allow you to save your work and edit it before submitting it for approval. The choice of Submit for Departmental Approval will send the job posting for departmental approval. If you choose No Dept Approvals Necessary and selected Submit for Departmental Approval, the job posting will be sent to a departmental approver that doesn t exist. Therefore, make sure you have selected an approver if one is necessary. If you don t need to send the posting for Departmental Approval, choose Submit for HR Approval (if no additional departmental approvals necessary) and the posting will be sent directly to HR. Once you have selected an option, click the Continue button either at the top or the bottom of this page. After making your selection, click Continue to go to the confirmation page. Press Confirm to complete this step. The details of your Requisition are NOT SAVED until you complete this step. 67
68 One Page Guide for Creating Posting All regular and term staff positions require the position be created from a position description. If the position isn t a regular staff position, it will be created from a position template. Click on the executive, faculty, student, temp, 6070 link to initiate a recruitment for these types. When you are creating your posting, you will notice that information from the templates or Position Description automatically fill in some of the blanks on the Position Requisition. 1) From the site, click Regular Staff Position or Executive, Faculty, Student, Temp, 6070 template. 2) Search for the Position you wish to create and select the Create link under the job title. 3) Complete the fields in the Justification, Posting Details, Web Posting Details, Advertising, and Labor Distribution tabs. a. When finished with each page, click Continue to Next Page 4) Add preliminary screening question(s) Preliminary screening questions are questions that applicants must answer to determine whether they meet the minimum qualifications of the position. By choosing the disqualifying box, a candidate who doesn t meet the qualifications are automatically disqualified from the position. (You may want to contact your HR consultant/representative to determine if preliminary screening is appropriate for your search). If you assign preliminary screening criteria, candidates will be notified of their status after they apply. If they fail to pass the initial screening, they no longer are considered as an applicant for the position. a. From Screening Questions section, click Add A Question b. Click Search c. Select one of the previously entered questions, or click Create A Question d. Enter the text of the question e. Designate the question as closed-ended (e.g., Yes/No) or open-ended (e.g. free text) f. Designate answer choices for a closed-ended question, or answer type for an open-ended question g. Click Submit Question to attach the question to the Requisition h. Enter additional screening questions, or click Continue to Next Page 5) Assign points to each answer for closed-ended screening questions (to skip, click Continue to Next Page). Click the Disqualifying box next to answers that would disqualify a candidate from consideration. When finished, click Continue to Next Page 6) Attach documents that are needed including secondary screening questions, interview questions, and reference check questions, then click on Continue to Next Page 7) Assign a Guest User" for committee members if appropriate, then click Continue to Next Page 8) Review the Requisition, and edit if necessary. When finished, select the appropriate action and click Confirm on the following screen 68
69 APPLICANT PROFILES Applicants can create an Applicant Profile on the website to describe their qualifications, knowledge, training or experience. This optional tool is separate from the application process and applicants are asked many questions to indicate preferences for type of work desired, work availability, education level, computer experience, and specific experience. Human Resources has the capability to search on these criteria for managers and send s to applicants that meet the criteria and ask them to apply. If you have a position that is hard to fill or if your position requires someone with unique skills, the applicant profile may be a tool to assist you in finding the right candidate. You may contact your local HR office to conduct a search or answer any questions associated with the applicant profile. 69


70 VIEWING APPLICANTS TO YOUR JOB POSTINGS After logging in to the system, if you have a Job Posting that is currently accepting applications, you will see a screen that looks similar to the following: Underneath the Job Postings heading on the left navigation bar, you are presented with the option to View Active, View Pending and View Historical Jobs. View/Edit Active Jobs: Jobs that are Active are either: Currently posted on the applicant site, or No longer posted but contain applicants still under review You may view the Job Posting by clicking on the blue link underneath the title in the Job Title column. You can view the current status of the position including approvals in the Posting Status column. View/Edit Pending Jobs: Jobs that are pending are either: Waiting for final review/approval by HR, including addition of additional information Approved by HR but not Active on the applicant site 70

71 You may view the Job Posting by clicking on the blue link underneath the title in the Job Title column. You can view the current status of the position including approvals in the Posting Status column. View Historical Jobs: Jobs that are Historical are either: Filled and are no longer listed on the applicant website Cancelled and therefore not listed on the applicant website To view the details of a specific Posting, including the description and the Applicants to that Posting, click on the word View below the relevant title. This will bring you to a screen similar to the following: 71

72 You will notice the posting data is divided into tabs, listed across the top, starting with Applicants. This first tab lists the Applicants who have applied to this Posting. Additional information is also provided on this screen, including their date applied, status, etc. You may click through the other tabs at the top of the screen to view more details about the Job Posting, including Screening Questions and Points. Please note that you will not be able to view applicants until the review date or posting date has passed. From the screen shown above you may perform a number of tasks, including: Sort and view applicants by different criteria Print applications and documents Change an applicant s status 72
73 Sorting & Filtering Applicants by Different Criteria To sort applicants by Name, Date Applied, etc., click the arrow at the top of the data column you wish to sort. The order in which applicants are displayed will change accordingly. You may sort them by clicking on the triangle in the header to sort in ascending or descending order. To filter applicants by score, enter a numeric value in the Minimum Score box, and click Refresh. Only applicants meeting the score entered (and higher) will be included in your results. The section at the bottom of the screen labeled "Refresh" enables you to view only the applicants who meet the criteria you filter (view) them by. You may also choose to show Active Applicants, Inactive Applicants, or both. This is performed by checking the boxes next to Active Applicants (active Applicants are those still under review) and Inactive Applicants (inactive Applicants are no longer under review). Click the Refresh button to refresh the screen. 73

74 Printing the Applicant Report If you would like to view and print a summary of applicants for your job posting with contact information, choose View/Edit Active Job Postings. In the search criteria page, choose a status of Review Date Passed and Closed. A summary of job postings that meet the criteria will display: Next, click Get Reports List under the Posting Number column to view applicants on your job posting. Choose Applicant Address List and click on the Generate Report button. A new window will appear with applicant names and contact information. 74
75 75
76 Viewing and Printing Applications To view and print a single application, click the link "View Application" under the applicant s name from the "Active Applicants" screen (the screen shown on the previous page). After clicking on this link, a screen similar to the following will appear in a new browser window. It may take a few moments for the information to load into the new window. Select File>Print from your browser s menu to print the applications. There is a signature line at the bottom of the page for obtaining the applicant s signature, if necessary. To close the window, click the "Close Window" link, or click the X in the upper right-hand corner of the window (this will NOT log you out of the system it will simply return you to the list of Applicants on the View Applicants screen). To view and print multiple applications at the same time, perform the following steps: 1. Check the boxes next to the corresponding Applicants whose applications you wish to print (or click the All/None link). These boxes are located on the right side of the page. (See top of next page.) 2. Click the View Multiple Applications button. 3. A new window will appear (it may take several moments to load). This window contains all the applications you selected to print. 4. Select File > Print from your browser s menu to print the application(s). 76

77 The resulting application of candidates will look similar to: 77

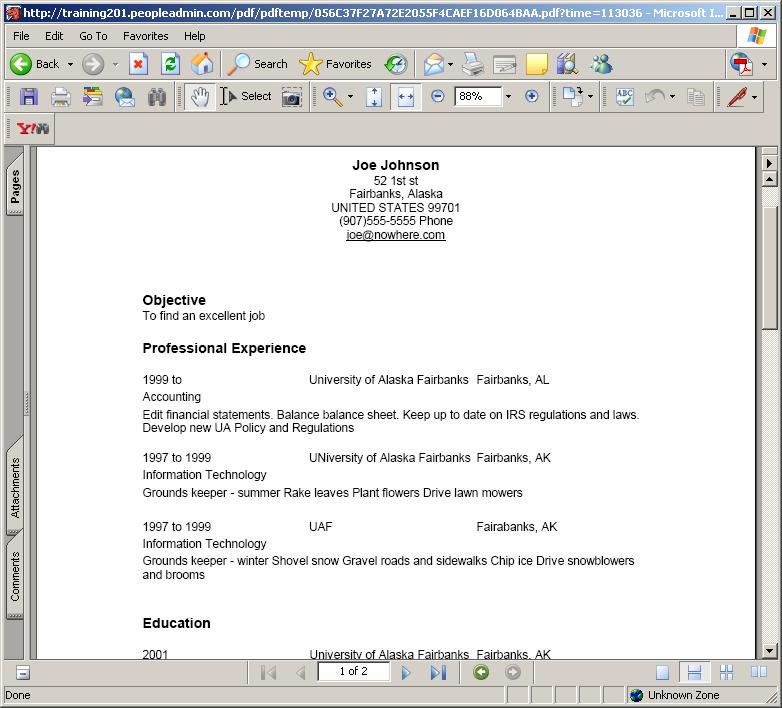
78 Viewing and Printing Documents If you would like to view applicant s resume, cover letter and other application materials you may do so on the Applicants tab. This process is similar to printing applications, except the documents appear in the Adobe Acrobat Reader software. This is done to preserve the integrity of the documents formatting and to assist in preventing viruses from entering the system via documents attached by applicants. To view and print a single document (like a resume or cover letter) that the applicant attached when applying for the Posting, click the link of the document under the column labeled Documents from the "Active Applicants" screen. After clicking the link, a new window will appear (it may take several moments to load) in Adobe Acrobat Reader. This window contains the document for the applicants you selected to print. Select File>Print from the Adobe Acrobat Reader menu to print the document. To close the window, click on the X in the upper right corner of the window (this will NOT log you out of the system it will simply return you to the list of applicants on the View Posting screen). To view and print multiple documents at the same time, perform the following steps: 1. Check the boxes next to the corresponding applicants you wish to print (or click the All/None link). These boxes are located on the right side of the page. 2. Click the View Multiple Documents button. 3. Select File>Print from the Adobe Acrobat menu. The applicant s uploaded document will look similar to the following: 78
79 79

80 Changing the Status of Applicants Applicant Review Process Intermediate Screening and Interview Request After a position has closed, you may perform the intermediate screening of candidates to determine who will be interviewed. (Note: stages of a recruitment differ depending on the needs of the position; some recruitments may not have an intermediate screening stage, and other recruitments may have multiple interviews). If you are not already viewing your recruitment, choose View/Edit Active Jobs from the left-side menu and click View under the job title. You may view the candidate s application and documents and rate their skills, knowledge and abilities based on the intermediate screening questions that have been submitted. You can download these questions by clicking on the Additional Documents tab of your recruitment, and choosing View. Once the committee has performed the intermediate screening, the hiring manager must change the status of the applicants and submit the candidates to HR for approval to interview. 80

81 Click on the new tab called Applicants. You can view the applicant s current status under the Status column. If you would like to see a list of all applicants in this recruitment, click the Active Applicants and Inactive Applicants, and click the Refresh button. This will enable you to see all applicants in your job posting with their respective status. To change the status of an applicant you may either click on the link called Change Status for each applicant, or if you would like to change all of the applicant s statuses at the same time, you can check the box on the farthest right column for each applicant and click on the Change Multiple Applicant Statuses button. In either case, you will be brought to the Change Applicant Status page: 81

82 The system defaults applicants who are still active as Under Review by Committee/Manager. To change the status of applicants to proceed to the interview stage, choose the correct status under the Status drop-down menu. If you would like to interview a candidate, choose a status of Interview Pending (the Reason drop-down box does not need to be completed). To eliminate a candidate from further consideration, you may choose Not Hired. Next you will need to go to the Reason box and choose the applicable reason why they were eliminated from the pool (such as Eliminated- Intermediate scoring). 82
83 After you have changed the status of all active applicants, click Continue to the Confirm Page. You will be prompted to save the changes or go back to the previous screen and modify your changes. Choose Save Status Changes. You will now see the Change Applicant Status page with a list of active applicants. The next step in proceeding to the interview stage is to attach a scoring summary sheet. This document should include a justification with a summary and scores/ranking of all candidates who were evaluated in the intermediate screening. Click on the Additional Screening Documents tab and click Attach next to the Document Type of Scoring Summary 1. Attach the document and confirm when prompted. 83

84 The last step in proceeding to the interview stage after the applicant s statuses have been changes and the scoring summary has been attached, is to submit the interview request. Click on the View Posting Summary button at the bottom of the page and a screen will display similar to: 84

85 Click on the Submit Candidates to HR for Approval button to send the interview request to HR. Press the Continue button and confirm when prompted. You will receive an when HR has reviewed the request or you can check the status of the request by clicking on the View/Edit Active Jobs link. If HR does not approve the request, you will receive an from HR requiring you to log-into the system and modify your interview request. If this occurs, you will be required to re-submit the request to HR. Applicant Review Process Interview Once you have received approval from HR, you may begin conducting interviews. Interview questions may be downloaded from the Additional Screening Documents tab of your recruitment. After you have completed interviews, you may download Reference Check Questions from the Additional Screening Documents tab and call references of the top candidates. 85

86 Applicant Review Process Hire After interviews are complete, you may follow the old process of submitting the hire request, including a memo of justification and completing a flow report. After the position is accepted by the candidate and filled, you will be required to change the status of the position as filled. Click on the View/Edit Job Postings link on the left-side menu, and a list of your current positions will display. Click View under the job title and click on the Applicants tab. Choose the candidate that was hired and change their status to Hired. Be sure to update the statuses of all of the applicants. For candidates that were not hired, choose a status of Not Hired, and indicate the applicable reason in the Reason box. For candidates that are alternates, choose a reason of Eliminated- First Alternate. Click Continue to the Confirm Page, and confirm when prompted. Next, click on View Posting Summary button on the bottom of the page, and the following screen will display. Click on the button labeled Fill, press Continue and confirm when prompted. The recruitment process is now complete and the status will be changed to Filled. 86
.")
87 Reopening Positions A position may be re-opened to extend the review date for a larger pool of candidates, to recruit externally, OR to continuously recruit for an open until filled position where multiple hires will occur (labor and adjunct pooled positions). You may reopen a position in cases where a candidate has not been hired and you would like to reopen a position (or to re-open for an external recruitment). After you search for the job, you may click on the View Posting Summary link and you will be brought to the following screen. To submit the requisition to HR for re-opening, click on the Submit to HR for Posting, click on the confirm button, and confirm when prompted. HR will re-post the position and change the closing/review date. Currently, the system doesn t allow users the ability to hire a candidate and reopen the recruitment (like pooled positions); however, this will soon be fixed. 87

88 Printing Job Forms and Contract Letter Reports Once an applicant is approved for hire and they have accepted a position, you may view and print a Job Form and Contract Letter report for their new position. Choose Search Hiring Proposals from the left-side menu and a screen similar to the following will display all hiring proposals: If you click on Get Reports List, under the Job Title, the following screen will display: 88
89 You may then choose to generate a report for a Job Form and Contract Letter that can be printed. 89


90 ADMINISTRATIVE FUNCTIONS Changing Your Password To change your password, click the Change Password link on the left navigation bar, and enter the required information. The change will be updated automatically. Logging Out To ensure the security of the data provided by applicants, the system will automatically log you out after 60 minutes if it detects no activity. However, anytime you leave your computer we strongly recommend that you save any work in progress and Logout of the system by clicking on the logout link located on the bottom left side of your screen. 90
91 POSITION DESCRIPTION The Position Description links are only applicable to regular staff positions only. You may check the status of a PD including approvals, view a PD that has been approved, create a new PD, reclassify, or update a PD. Create New /Reclassify /Update To begin a position description action, click the New/Reclassify/Update link in the Job Description section of the navigation bar. Your Action choices will then appear. 1. To create a new PD, choose Establish a New Position Description, and choose start action. 2. To update or reclassify a PD, choose, Reclassify/Update a New Position Description. Search for the PD you wish to update and choose Start Action. Selecting a Justification - enter information pertaining to the justification of the new, reclassification or position update. Labor Distribution - identify the funding that will pay for the salary including org, fund, and percentage. Position Details - Once the title is selected and you have selected an existing position from which to copy, you will be looking at the Position Details screen for the Position Description. 1. Fields with an Asterisk (*) are required, so if you do not include information in the field, an error message will appear and you will be required to complete it. 2. VERY IMPORTANT: A Position Description is Not Saved until after you have completed the final step of the process by clicking Confirm on the final summary page. If you log out or click a link on the left side before completing these steps, none of the information you have edited will be saved. Job Description - After continuing to the next page, you may be taken to additional details tabs. One of the tabs you will be filling out is the Job Description tab. 1. The Duties of a Position Description are the major responsibilities the incumbent in this position performs on a routine basis. Essential duties are those that MUST be performed by the incumbent in the position. 2. To add edit duties to your Position Description, click on the Edit link within the table. Supplemental Documentation The supplemental documentation tab contains information to support your Position Description request such as memos or organizational charts. You may attach a particular document by clicking the Attach link next to the specific type of document you want to attach to your position. In addition, you may also click on the organization chart template here. 1. Once you have selected the document type you wish to upload you will have 2 options: 2. You may browse for the file if you have it stored on your computer in one a format of Adobe Acrobat, Microsoft Word, or Microsoft Excel. 3. You may copy and paste and/or type text into the large text area at the bottom of the screen if you do not have your document in one of the above formats or if you do not have your document saved on your computer. Submitting the Position Description - After clicking the Continue to Next Page button from the previous screen and viewing any notes associated with the position description, click on the Continue to Next Page or Preview Action buttons. Scroll down through this screen to review the information you entered. Next, select one of the choices and click the Continue button either at the top or the bottom of this page. After selecting your choice, click Continue to go to the confirmation page. Press Confirm to complete this step. The details of your position description are NOT SAVED until you complete this step. 91
92 Searching Approved Position Descriptions To search for PD s that have received final classification choose the Search Approved PD option. Approved PD s are ones for both vacant and occupied positions. Click the Search Approved PD link under the Position Description header on the left side menu. Enter criteria to search for position descriptions. You may filter your selection by specific search criteria, or you may leave the search criteria blank to retrieve all of the approved position descriptions you have access to in the system. A list of PD s will appear with their status categorized by job title, PCN, PCLS, employee ID, employee last name, and last action. Once you have found the position you would like to view, click the Get Reports List link under the Job Title header to view a printer-friendly version of the PD. Click the View Summary link under the Job Title header under the Last Action header.. To review the history including updates, edits and approvals, click the View History link under the l You will be taken back to a tab view where you can modify the details of the position description. Searching Pending Position Descriptions To search for PD s that are Pending, choose the Pending PD option. The include position descriptions (within your department) that have been saved, and are awaiting approval and classification. Click the Search Pending PD link under the Position Description header on the left side menu. A list of PD s within your department will appear and you can view the position title, pending title, working title, request number, current status, and action type. Once you have found the position you would like to view, click the View link under the Position Title header to view a PD. You will be taken back to the summary view where you can click on the Edit link at the top. Once in the edit view, you can review and modify the details of the Action Request and save as appropriate. Searching Status of Position Descriptions To search on the status of PD, (or edit a PD), choose the Search PD Status option. You may locate any action request and check the approvals by using this function. Click the Search PD Status link under the Position Description header on the left side menu. Enter criteria to search for position descriptions. You may filter your selection by specific search criteria, or you may leave the search criteria blank to retrieve all of the approved position descriptions you have access to in the system. A list of PD s within your department will appear and you can view the job title, status, action type, action number, employee last name, date first submitted to HR, and date approved. Once you have found the position you would like to view, click the View Summary link below the position title header. If you would like to view and modify the position description, click the View link below the Job Title. You will be taken back to the summary view where you can click on the Edit link at the top. Once in the edit view, you can review and modify the details of the Action Request and approve as appropriate. 92
93 JOB POSTINGS Creating a Job Posting All regular staff positions require the position be created from a position description. If the position isn t a regular staff position, it will be created from a position template. On the Job Posting header on the left side of the menu, click Regular Staff Position or Executive, Faculty, Student, Temp, 6070 depending on the type of posting you would like to create. Conduct a search for the Position you wish to create. A list of criteria that meets your search criteria will appear. Select the Create link under the job title. Fill in the Posting Details, Web Posting Text, Duties, Advertising, and Labor Distribution will appear. When finished with each page, click Continue to Next Page. Under the preliminary screening question(s) tab, you can create preliminary screening questions that applicants must answer to determine whether they meet the minimum qualifications of the position. By choosing the disqualifying box, a candidate who doesn t meet the qualifications are automatically disqualified from the position. 1. From Screening Questions section, click Add A Question 2. Click Search 3. Select one of the previously entered questions, or click Create A Question 4. Enter the text of the question 5. Designate the question as closed-ended (e.g., Yes/No) or open-ended (e.g. free text) 6. Designate answer choices for a closed-ended question, or answer type for an openended question 7. Click Submit Question to attach the question to the Requisition Enter additional screening questions, or click Continue to Next Page Under the Preliminary Screening Points tab, you can assign points to each answer for closed-ended screening questions (to skip, click Continue to Next Page ). Click the Disqualifying box next to answers that would disqualify a candidate from consideration. When finished, click Continue to Next Page. Under the Additional Screening Documents tab, you can attach documents that are needed including secondary screening questions, interview questions, and reference check questions, then click on Continue to Next Page. Under the Guest User tab, you can assign a Guest User" if appropriate, then click Continue to Next Page Review the Requisition, and edit if necessary. When finished, select the appropriate step and then click Confirm on the following screen. 93
94 Searching Pending Job Postings You may search for jobs that are Pending, which include jobs that have not yet been posted. These include recruitments that may not be completed, still require approvals, or are awaiting posting. To view pending jobs click View/Edit Pending Jobs under the Job Posting header on the left side. A list of pending jobs will appear with the date submitted, department, and posting status. To view the job posting and applicants, click View under the job title column. You can view the current status of the posting including the approvals under the Posting Status column. Searching Active Job Postings All jobs that aren t pending are considered Active which include open, closed or have candidates under review. To view active jobs click View/Edit Active Jobs under the Job Posting header on the left side. A list of active jobs will appear with the posting number, number of current applications, job open date, close date, department and posting status. To view the job posting and applicants, click View under the job title column. Viewing Postings by Status After clicking the Search button. At the top of the screen are tabs that organize your search results by the status of the Posting. You may sort Postings within each tab by clicking on the arrows next to the column headings. Changing the Status of a Posting The actions which you perform on a Posting are customized based on your hiring process, but may include: 1. Post the Requisition (enable candidates to view it on your Online Employment Site) 2. Close the Posting (remove it from your Online Employment Site) 3. Fill the Posting (designate that the Posting has been filled) 4. Place a Posting on Hold (stop accepting applications in order to review current applicant pool, but it may be opened up again in the future) 5. Additional statuses, depending on your hiring process To perform any of these actions, click the appropriate link under Posting Status. Click the Confirm button on the ensuing confirmation page. The Posting will then appear under the tab representing its new status (On Hold, Filled, etc.) 94
95 APPLICANT ADMINISTRATION There are several methods to view applicants in the system. You may view an applicant by clicking Search under the Job Postings heading on the left, then selecting the Posting whose applicants you wish to view. Please note that Hiring Managers will not be able to view applicants until the review date or posting date has passed. Search applicants and view their application To view applicants, click on View /Edit Active Jobs, under the Job Posting header on the left. Choose the position you wish review by selecting View under Job Title. Choose View Application below a name to bring up a listing of the applicants for this posting. To view and print a single application, click the "View Application" link under the applicant s name from the "Active Applicants" screen. To view and print multiple applications at the same time, perform the following steps: Check the boxes next to the corresponding Applicants you wish to print (or click All"). Click the View Multiple Applications button. A new window will appear. This window contains all the applicant information you selected to print. Select File > Print from your browser s menu to print the application(s) To view and print uploaded documents, click the link of the document under the column labeled Documents from the "Active Applicants" screen, and the documents will be loaded using the Adobe Acrobat Reader software. To view and print a single document (such as a resume or cover letter) that the applicant attached when applying for the Posting, Select File>Print from the Adobe Reader menu to print the document. To view and print multiple documents at the same time, perform the following steps: 1. Check the boxes next to the corresponding applicants you wish to print (or click All ). 2. Click the View Multiple Documents button. 3. Select File>Print from the Adobe Acrobat menu. The applicant s history, and status can be viewed under the column labeled Status from the "Active Applicants" screen. You can check the status changes status such as application submittal, withdrawal, and no longer under consideration, etc. 95
96 Changing the Status of Applicants To View applicants, click on View /Edit Active Jobs under the Job Posting header on the left side menu. Choose the position you wish review by selecting View under Job Title. Choose View Application below a name to bring up a listing of the applicants for this posting. To change the status of an applicant, after they have been reviewed, interviewed and after a final decision has been made, click the Change Status link under the Status column heading. To change the status of multiple applicants at the same time, check the box under the All/None column for each applicant that you wish to change, then click the button labeled Change Multiple Applicant Statuses. You may also click the All link to select all applicants at the same time. To deselect all applicants, click the None link. After clicking the Change Multiple Applicant Statuses button, a drop down menu of the statuses an applicant could be changed. Select the status to which you wish to change each applicant, and then click the Continue to Confirm Page button. To reset the statuses to their original values, click the Reset to Original Status button. To return to the previous screen, click Cancel. You may also change all selected applicants statuses at the same time, to the same status, by using the Change For All Applicants feature at the top of the screen. After setting all applicants statuses using the Change For All Applicants feature, you can change individual applicant statuses below. After clicking on the Continue to Confirm Page button, you will come to a confirmation page. Select the Save Status Changes button to complete the action. Select the Cancel button to return to the previous screen to edit your changes. After performing the secondary screening on applicants, you may recommend applicants for interview. Under the Applicants tab, you can change the status of the applicants and choose Submit candidates to HR for Approval on the Posting Status tab. After HR approval is received, you may download the interview and reference check questions by clicking on the Additional Screening Documents, and conduct interviews. After clicking on the Continue to Confirm Page button, you will come to a confirmation page. Select the Save Status Changes button to complete the action. Select the Cancel button to return to the previous screen to edit your changes. 96

97 Workflow - PD 97

98 Workflow Job Requisition (page 1 of 2) 98

99 Workflow Job Requisition (page 2 of 2) 99