PL-5522SP/PL-3542SP. User Guide 8/17/2016. Page 0 of SmartLinx Solutions, LLC.
|
|
|
- Leonard Morrison
- 5 years ago
- Views:
Transcription

1 PL-5522SP/PL-3542SP User Guide 8/17/2016 Page 0 of 11
2 Table of Contents 1.0 Clock IN and Clock OUT Lunch/Break Punch Clock Out Meal Deduction Message Info Mode Info Mode Access Detailed Schedule Punch History Totals Fingerprint Enrollment... 8 Page 1 of 11


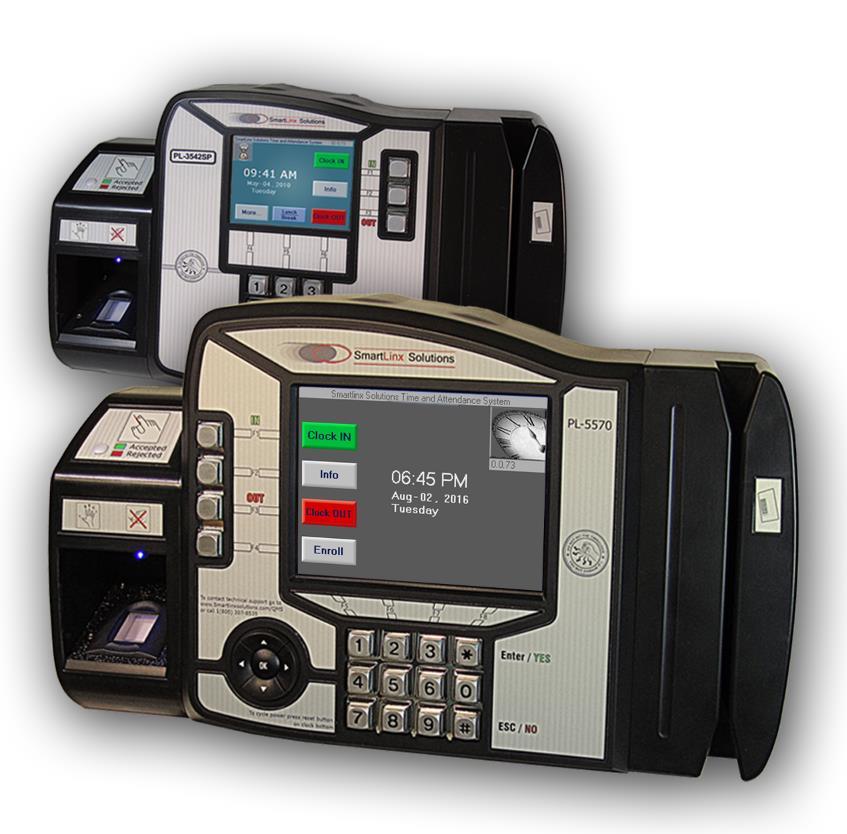
3 1.0 Clock IN and Clock OUT The time clock has two methods of employee verification: the employee fingerprint template or a 4-digit employee PIN. These methods of verification are essential for the integrity of the punches. The prevention of the use of false IDs is extremely helpful in making sure that an employee has fulfilled their scheduled work. The recommended verification method is the fingerprint sensor. However, some employees may work in environments that may hinder the readability of their fingerprint, such as kitchen employees, and a PIN can be used as an alternative. Figure 1 - Main Screens To sign in on the device press the F1 key or the icon on the screen. icon on the screen. To sign out on the device, press the F3 key or the Figure 2 - Sign-in Screen (Badge ID) Follow the on screen instructions and enter your Badge ID on the keypad or slide your card through the card reader, depending on the options available on your device. If the keypad has been damaged or is not working, you may use the touch-screen keypad in the bottom right corner to enter your ID. Page 2 of 11


4 Once a correct Badge ID has been entered, continue following the directions on the screen and place your fingerprint on the sensor. Do not apply excessive pressure to the sensor. Figure 3 - Sign-in Screen (Fingerprint) If your fingerprint or PIN verification has been successful, a welcome screen will appear displaying your name and the Date and Time for which you will be credited. Figure 5 - Sign-in Accepted Figure 4 - Sign-out Accepted Otherwise you will see failed verification screen and will need to re-attempt the punch. Figure 6 - Verification Rejected Page 3 of 11


5 2.0 Lunch/Break Punch This option can be activated and deactivated remotely, upon client request. If the function has been activated, an icon will be available at the bottom of the main screen. The clocking IN or OUT from break or lunch is nearly identical to the clocking IN or OUT procedure at the start or end of a shift. The employee merely needs to press the appropriate icon to indicate a Lunch or Break punch, rather than a regular punch. Figure 7 - Lunch and Break Punch Screens Figure 8 - Lunch Punch Screens Depending on the policies of your organization, you may have the ability to punch for either lunch or break, or both. Follow the process illustrated on the screen. It will continue in an identical manner to the regular punch process, after the Lunch or Break selection is made. Page 4 of 11
 Only a Confirm button; or 2) Accept and Do Not Accept.")

6 3.0 Clock Out Meal Deduction Message While clocking OUT, a user defined meal deduction message can be displayed upon entering badge ID. This message can be up to 100 characters and one of two confirmation options: 1) Only a Confirm button; or 2) Accept and Do Not Accept. Figure 9 - Cancel Meal Deduction Screen The employee will be prompted to or the statement. The corresponding record will be transmitted to Time & Attendance, along with the punch. If the employee ignores the message, the punch will not be accepted and the following error screen will be displayed: Figure 10 - CMD No Response Error Page 5 of 11


7 4.0 Info Mode 4.1 Info Mode Access Figure 11 - Info Mode Screen The Info Mode screen allows employees to access their schedule and other useful information, that would normally require management assistance. To enter the Info Mode, press the icon on the main screen. Next, verify the Badge ID with fingerprint or PIN, by following the directions on the screen. This will grant access to the employee s personal information. Once the Personal Information Menu appears, the employee can select the type of information they are interested in by touching the appropriate button or icon. 4.2 Detailed Schedule To access the schedule option of Info Mode, access the Personal Information Menu screen described on the above and press the icon labeled or the F1 key. The screen will display the employee s Weekly Shift Schedule in day and shift format. Specific start and end times do not display. If no shifts are scheduled for the following week, the screen will appear blank. Figure 12 - Schedule Screen Page 6 of 11


8 To access the Detailed Schedule, press the icon at the bottom of the Weekly Schedule screen, or by pressing the F4 key. The Detailed Schedule screen will display distinct times and dates for the start and end times of the employee s next two shifts. Figure 13 - Schedule Details Screen 4.3 Punch History Selecting on the info mode screen, or by pressing F2, will allow you to review your punch history that is currently stored in the clock. Use the prior and next buttons to navigate from punch to punch. The Punch Log is limited to save memory for actual punches but full punch history is always available from Time & Attendance. Figure 15 - Punch Log Screen Figure 14 - Punch Log Details Use the button to review more specific information about each punch. Page 7 of 11


9 4.4 Totals The Totals screen provides an employee with the total amount of hours accumulated at work during the current payroll period. The user can access this information by pressing the icon, or the corresponding F3 key, on the Personal Information Menu screen. This mode allows them to track the amount of hours they have worked without having to approach HR or Management. The total hours worked by an employee are displayed in decimal format. Please note that total hours are accurate as of the previous day, and employees should not expect to see time from a shift they are currently or just finished working. Figure 16 - Totals Screen 5.0 Fingerprint Enrollment The FP Enroll mode must be active in order to enroll an employee fingerprint. This is indicated by the icon at the top right corner of the More screen or the bottom of the Main screen, depending on the clock model. If the enroll mode has been deactivated, please contact Customer Support. Figure 18 - Main Screen (Small) Figure 17 - More Screen Page 8 of 11


10 Figure 19 - Main Screen (Large) To enroll an employee fingerprint, press the icon on the Main screen and then the icon or the corresponding key. Follow the directions on the screen and enter your organization s password. If you wish to change the password, please inform Customer Support and they will assist you with this action. Figure 20 - Password Screen Page 9 of 11
 If the employee ID has an existing fingerprint template, you will be asked if you wish")


11 Next, enter the employee s Badge ID number. Figure 21 - Enrollment Screen (ID) If the employee ID has an existing fingerprint template, you will be asked if you wish to override it or cancel the action. Pressing the button will erase the prior fingerprint template and allow you to enroll a new one. Figure 22 - Enrollment Screen (Override) Before proceeding, make sure that the Badge ID and the Employee Name match the employee being enrolled. To proceed with the enrollment process, press the icon or the corresponding F4 key. Following the instructions on the screen closely, have the employee place his or her finger firmly on the fingerprint sensor. The employee should not apply excessive pressure to the sensor. Page 10 of 11


12 Figure 23 - Enrollment Screen (FP) If the template Quality or Content is lower than the recommended percentage, you will need to reapply the finger. Follow the instructions on the screen and repeat the process as many times as necessary to reach a satisfactory result. The terminal will display the result of the enrollment process prior to returning to the main screen. Figure 24 - FP Error Screens If after several attempts, a finger does not produce sufficient results, attempt the enrollment with a different finger. Figure 25 - Enrollment Screen (Succes) Once the Quality and Content are at acceptable levels, the fingerprint template will be stored and the employee can use the time clock. Page 11 of 11