eenrollment and ebilling User Guide for Group Leaders v1.2 R8/18
|
|
|
- Allan Ellis
- 5 years ago
- Views:
Transcription

1 1 eenrollment and ebilling User Guide for Group Leaders v1.2 R8/18
2 Table of Contents 2 eenrollment Overview Resources Access Common Transactions Subsequent Application (New Hire) Order ID Cards Add Dependent Cancel Coverage for a Dependent Cancel Coverage for an Employee Terminate an Employee Rehire an Employee Enroll a Terminated Employee in COBRA ebilling Overview Common Transactions View Invoice Details Make a Payment Print Invoice Contact Information
3 3
4 eenrollment Overview 4 What is eenrollment? Blue Cross web-based benefits administration application Replaces paper and the Group Enrollment Tool (GET) Process open enrollment elections, add new hires, process qualifying life event changes, record terminations, etc. within hours Access this secure, reliable, and user friendly tool via your laptop or mobile device Within eenrollment, you can: Manage multiple classes and subgroups Run multiple reports Make life/qualifying event changes Add and terminate dependents by product View an electronic history of transactions keyed for subscribers See data visualization of what plans are selected most

5 WHAT OUR CUSTOMERS ARE SAYING A b o u t D o i n g B u s i n e s s W i t h U s O N L I N E Benefit enrollment and updates are processed quickly and efficiently More control & input I would recommend simply because it makes your job a little easier We ve gained more control and input with our members accounts User-friendly & convenient Info is available 24/7 Reports customized to our needs Great tool for managing benefits Easy to see all member info in one place The tool allows us to still be involved, input daily changes, and provide basic customer service Reports can be customized to meet our needs We can see what plans are utilized most It has enabled me to be more efficient in the day to day operations of our business Efficient Effective Empowering 5

6 6 eenrollment Resources From the Resources tab within eenrollment: Click on Your Carrier Information to find short videos to walk you through task specific actions Click on Training to find Quick Tips and a Benefits Administrator Role User Guide


7 eenrollment and ebilling Access 7 Access is available to group leaders and producers Access can be provisioned at the subgroup level Group Leader must be registered for AccessBlue Log into AccessBlue on the bcbsla.com website
8 eenrollment Common Transactions 8
9 9 Subsequent Application (New Hire)

10 10 eenrollment Functionality Search for an Employee In the search field, enter the employee s full name, last name only, partial name, or SSN into the search field To view a full roster of employees, enter a comma in the search field To view the employee record, click employee s highlighted name
11 11 eenrollment Functionality Subsequent Application From the Employees tab, click the button Enter demographic and work information. Required fields are identified with an asterisk (*). Click at bottom of page.
12 eenrollment Functionality 12 The following ONLY applies to groups with Life or Disability products that have more than one Life Class. All other groups, please disregard and continue to slide 15. You will see one Life Class field per product until your group is close to renewal (approx days prior to renewal).
13 eenrollment Functionality 13 The following ONLY applies to groups with Life or Disability products that have more than one Life Class. When your group is close to renewal (approx days prior to renewal), you will begin seeing two Life Class fields per product displayed as Class Even Year and Class Odd Year.
14 eenrollment Functionality 14 The following ONLY applies to groups with Life or Disability products that have more than one Life Class. When you see more than one Life Class field, you must make a selection for each drop-down in order to continue enrollment.
15 eenrollment Functionality 15 Subsequent Application (cont.) The employee is now saved in eenrollment as an Active Employee, but is not enrolled in any benefits If you exit eenrollment after saving the employee but before enrolling them in benefits, you will find a task* on your home screen when logging back in. *A Benefits not started task indicates the employee has not been enrolled in benefits and the transaction has not been submitted to BCBSLA.

16 eenrollment Functionality 16 Subsequent Application (cont.) Click to enroll the new Active Employee in benefits
17 eenrollment Functionality 17 Subsequent Application (cont.) Make benefit elections and click
18 eenrollment Functionality 18 Subsequent Application (cont.) Select coverage tier and click
19 eenrollment Functionality 19 Subsequent Application (cont.) Answer Medicare and Additional Insurance Questions and click
20 eenrollment Functionality 20 Subsequent Application (cont.) Review information on the page for accuracy and click
21 Order ID Cards 21

22 eenrollment Functionality 22 Order ID Cards From the Employee Navigation Bar, search for and open the employee s record Click on the right side of the screen Select Request Insurance Cards from the drop-down Note: Request Insurance Cards option will not be available during a subscribers initial eligibility and open enrollment period.
23 eenrollment Functionality 23 Order ID Cards (cont d) Select number of ID cards needed for each product, as applicable, from the dropdown Click
24 Add Dependent 24
25 eenrollment Functionality 25 Add a Dependent From the Employee Navigation Bar, search for and open the employee s record Select Benefit Details Select the button to right of the screen then.
26 eenrollment Functionality 26 Add a Dependent (cont.) Select the Qualifying Life Event* from the drop down, then click *Open Enrollment is considered a Qualifying Life Event and will be listed in the drop down Enter Date of Qualifying Life Event, then click
27 eenrollment Functionality 27 Add a Dependent (cont.) If Applicable, Coverage Level, then Persons Covered Once workflow is completed, click
28 28 Cancel Coverage for a Dependent
29 29 eenrollment Functionality Cancel Coverage for a Dependent From the Employee Navigation Bar, search for and open the employee s record Select Benefit Details Select the button to right of the screen then
30 eenrollment Functionality 30 Cancel Coverage for a Dependent (cont.) Select the Qualifying Life Event from the drop down, then click Enter Date of Qualifying Life Event and date notified, then click
31 eenrollment Functionality 31 Cancel Coverage for a Dependent (cont.) If Applicable, edit Coverage Level, then Edit Persons Covered Once workflow is completed, click
32 32 Cancel Coverage* for an Employee *Cancelling coverage does not terminate employment; subscriber remains as an active employee.
33 eenrollment Functionality 33 Cancel Coverage for an Active Employee (cont.) Select the Qualifying Life Event from the drop down, then click Enter Date of Qualifying Life Event and date notified, then click
34 34 eenrollment Functionality Cancel Coverage for an Active Employee From the Employee Navigation Bar, search for and open the employee s record Select Benefit Details Select the button to right of the screen On the next screen select
35 eenrollment Functionality 35 Cancel Coverage for an Active Employee (cont.) Select then select reason for cancellation Review information on screen for accuracy and click
36 eenrollment Functionality 36 Cancel Coverage for an Active Employee (cont.) Review information on screen for accuracy and click
37 Terminate an Employee 37

38 38 eenrollment Functionality Terminate an Employee From the Employee Navigation Bar, search for and open the employee s record Select Terminate Employee from the drop down
39 eenrollment Functionality 39 Terminate an Employee (cont.) Enter employee s date of termination and reason for the termination then click
40 eenrollment Functionality 40 Terminate an Employee (cont.) Review information for accuracy then click
41 Rehire an Employee 41


42 42 eenrollment Functionality Rehire an Employee From the Employee Navigation Bar, search for and open the employee s record in the Terminated Employees list Select Rehire Employee from the drop down
43 eenrollment Functionality 43 Rehire an Employee (cont.) Enter the employee s rehire date and click Note: Login ID, New Password & Confirm New Password are for groups with employee facing functionality only
44 eenrollment Functionality 44 Rehire an Employee (cont.) Select how to reinstate benefits for the employee and click
45 eenrollment Functionality 45 Rehire an Employee (cont.) Review the information on the page and click On the next screen, click
 The employee is once again an Active employee Click on the button to begin electing")
46 eenrollment Functionality 46 Rehire an Employee (cont.) The employee is once again an Active employee Click on the button to begin electing benefits for the rehired employee.
47 47 Enroll Terminated Employee in COBRA

48 48 eenrollment Functionality Enroll Terminated Employee in COBRA From the Home tab, select then Select the COBRA eligible person from the list Select Manage COBRA from the drop down
49 eenrollment Functionality 49 Enroll Terminated Employee in COBRA (cont.) Select product to enroll in and click Select the qualifying event from the drop down If applicable, select the appropriate plan to enroll in and continue through the workflow
 Once you click, click Benefit details to see the terminated employees COBRA")
50 eenrollment Functionality 50 Enroll Terminated Employee in COBRA (cont.) Once you click, click Benefit details to see the terminated employees COBRA elections
51 51 eenrollment Functionality Qualifying Event Documentation Only 5 transactions require additional documentation: Overage dependent Adoption within 31 days of birth Adoption not within 31 days of birth Qualified Medical Child Support Order or Court Order Loss of Medicaid At the time the transaction is entered into eenrollment, the person entering the transaction should: Submit an to MBSpecialAccountsInquiry@bcbsla.com (special groups) or SASInquiryMailbox@bcbsla.com (regular fully-insured maintenance) and include the following: Group name and number, Subscriber name and ID, Dependent name, and required documentation PLEASE NOTE: a send-back letter may still go out requesting the documentation. If it has already been submitted, please disregard the send-back letter.
52 52
53 ebilling Overview 53 You can: View and pay invoices securely online 24 hours a day, 7 days a week Option to pay prior month only, or total amount due when applicable Option to pay at the subgroup level Consolidated invoice medical, dental, life and disability on one invoice Sort and subtotal data to customize view or export invoice to Excel
54 ebilling Overview 54 Download invoices - No more paper invoices, checks, postage, and dated filing processes Never miss a payment with electronic payment options and reminders Access accurate billing and payment history any time you need it
55 55 ebilling Common Transactions
56 ebilling Functionality 56 View Invoice Details To view details of the invoice, click View Details or View Consolidated Details if you have more than one subgroup. Click on Please Pay, Summary, Current Premiums and Employee Adjustments to see the sections of the invoice.
57 Create Payment Account 57

58 ebilling Functionality 58 Create Payment Account Group leaders have the ability to create payment accounts by going to the Setup tab and clicking.
59 ebilling Functionality 59 Create Payment Account (cont d) Group Leaders enter bank account information and may elect to make the account their default payment account. They may also elect to restrict the account so only they can view or make changes to it.
60 ebilling Functionality 60 Create Payment Account (cont d) Group Leaders may elect to enable Auto-Draft, a recurring payment that happens each month on the due date (1 st or 15 th ), by checking the box. Once enabled, Auto-Draft will begin the next due date. If Auto-Draft is enabled on the due date, prior to 4:00 pm CST, the first draft will occur that day. Click to complete creation of your payment account.
61 61 ebilling Functionality Create Payment Account (cont d) Group leaders may disable Auto-Draft at any time by going to the Setup tab, clicking on Payment Accounts and selecting the account with Auto-Draft enabled. Click on Options and select View/Edit Account from the drop-down menu Disable Auto-Draft by un-checking the box in the Auto-Draft section. If Auto-Draft is disabled on the due date, prior to 4:00 pm CST, the draft will not occur. Click to complete changes made to your payment account.
62 ebilling Functionality 62 Create Payment Account (cont d) If the group has multiple subgroups, bank accounts can be made available to all subgroups for payment or restricted for use by only certain subgroups under Invoice Restrictions (only visible if group has multiple subgroups). Group leaders must click once selections are made.
63 Make a Payment 63
64 64 ebilling Functionality Make a Payment Click and choose payment method* If you select to make an online payment, you will then choose to use a bank account you have already set up or create a new account then click *Groups with 100+ enrolled will only have the Make online payment option available.
65 ebilling Functionality 65 Make a Payment (cont.) If you choose to create a new account, you will need to enter your bank information then click You may also elect to save bank account information by checking the box under Account Options.
66 ebilling Group Leader Functionality 66 Make a Payment (cont.) You will have the option to pay the Outstanding Balance (prior month) or the Total Amount Due Payments made by 4:00 pm CST will be sent to the bank the same day
 Check the box to authorize payment.")
67 ebilling Group Leader Functionality 67 Make a Payment (cont.) Check the box to authorize payment. You also have the ability to print the screen. Click
68 ebilling Group Leader Functionality 68 Make a Payment (cont.) You will receive a confirmation screen and have the ability to print this screen as well.
69 ebilling Functionality 69 Pending Payments Group leaders can view scheduled payments by going to Pending Payments on the right side of the Home screen Payments will show as pending until 4:00 pm on the payment date.
70 ebilling Functionality 70 Cancel a Pending Payment Group leaders can cancel a scheduled payment by Going to Pending Payments on the right side of the Home screen Select Cancel Payment from the Options drop down
71 Print Invoice 71
72 ebilling Functionality 72 Print Invoice On the Home screen, click You can print to PDF, Excel (CSV) or HTML The following will result in a close approximation of the paper invoice (as shown on next slide) Select Summary, Please Pay and Current Premium check boxes Sort By Last Name, Then By Subscriber ID Subtotal by Subscriber ID
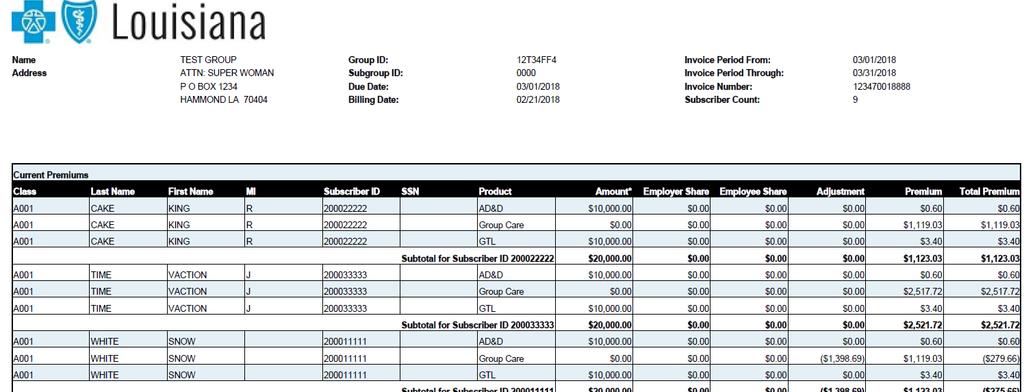
73 ebilling Functionality 73
74 Contact Information 74 Access eenrollment ebusiness Service Desk: (225) (800) ebilling ebusiness Service Desk: (225) (800) Resources Tab: Videos User Guide Navigation Help Line: (authentication required) Help Line: (authentication required) Quick Tips for Brokers Quick Tips for Group Leaders Quick Tips for Brokers Quick Tips for Group Leaders
75 Questions 75