REQUISITION INITIATOR TRAINING A GUIDE TO COMPLETING REQUISITIONS, INQUIRING ABOUT REQUISITIONS STATUS, AND RUNNING REQUISITIONS REPORTS
|
|
|
- Clifton Stafford
- 5 years ago
- Views:
Transcription


1 REQUISITION INITIATOR TRAINING A GUIDE TO COMPLETING REQUISITIONS, INQUIRING ABOUT REQUISITIONS STATUS, AND RUNNING REQUISITIONS REPORTS 11/29/2017 1
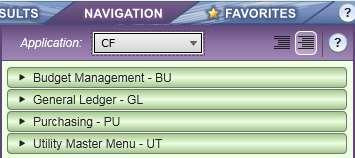
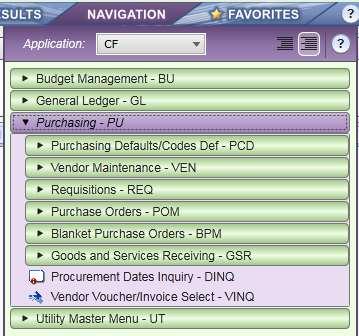
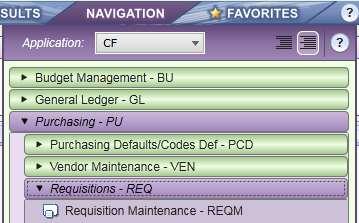
2 STARTING THE REQUISITION PROCESS Login to Colleague using your NetID username and password. Click on the NAVIGATION tab at the top of the screen and change the Application dropdown to CF, if it s not already there. Click on PU-Purchasing. Click on REQ-Requisitions then click on REQM-Requisition Maintenance. Note: Increase and decreases to outstanding purchase orders require Purchasing to do a Change Order. The increases require a new requisition to be created and approved at which time the Purchasing Department will make the increase to the PO and delete the requisition. The PO is printed and mailed to the vendor. Decreases require only an from the department requesting a decrease. Once completed, the PO will be printed and mailed to the vendor. 2
3 LOG-IN SCREENSHOTS 3


4 BEGINNING YOUR REQUISITION To begin a new requisition enter A to add. If you are working with an existing requisition, enter the requisition #. In the next pop-up, simply press Enter or click OK. This will assign the requisition number automatically. 4
5 REQUIRED FIELDS ON REQS Requisition Date The current date is automatically populated after you press Enter. Initiator Type your employee ID number or username to populate the field with your full name. 5

6 VENDOR LOOKUP If you know your vendor s Colleague ID number, type it into the Vendor ID field. To lookup a vendor by name, type a portion of the name or all of it in the Vendor ID field. In this example, we typed Home Depot and received multiple results. This occurs because of duplicate entries or different branches. 6

7 VENDOR LOOKUP If the vendor address does not match the address on your quote, simply Detail into the address line to see if there are more addresses entered in the system for your vendor. If you cannot find the vendor in the vendor database, you may manually type it in starting with the Name field. Please input the data in the correct fields. All new vendors must register online in VendorLink and provide the required documentation and a copy of their insurance policy, if required, before a purchase order can be issued to them. New vendors must register online via the HCC Purchasing Department s website at: by clicking on Vendor Registration. 7
8 CENTRAL RECEIVING All items being shipped to the College must go through the Brandon Campus Central Receiving Warehouse except for the following: A. Products/materials which will be installed onsite by the vendor. B. Services and/or non-physical items on Blanket Purchase Orders. C. Emergency items that impact the safety of the students, faculty, and staff. Duplication of Orders - We occasionally get duplications on orders. This is due to staff members placing the order before or after the PO has been issued. The vendor receives the PO and also fills the order placed over the phone by the staff member. Departments should not order items in the absence of a signed HCC Purchase Order issued by the HCC Purchasing Department. If you would like to know about your order status, please contact Purchasing staff, who will follow-up with the vendor or you may contact the vendor directly. If you place an order over the phone, you must give the vendor the HCC PO number with a warning not to duplicate the order upon receipt of the hardcopy PO. 8
9 CENTRAL RECEIVING CONTINUED DO NOT CHANGE THE DELIVERY ADDRESS BY PHONE FROM CENTRAL RECEIVING TO YOUR OFFICE. This causes a delay in the payment process to vendors and creates unnecessary paperwork for your department and the Accounts Payable Department. Goods ordered on a Purchase Order that starts with the letter P must be shipped to Central Receiving. 9
 for your delivery address.")
10 CENTRAL RECEIVING CONTINUED In the event the Ship To must be your physical address you may input SA (See Above Text for Delivery) in the Ship To field or enter an ellipsis to perform a lookup to see if your address is listed. If your address in not listed, use the SA (See Above Text for Delivery) for your delivery address. Your name and address must be typed into the Printed Comments field on the requisition. This will be covered later in the training. Enter your selection number in the Input box and click Open. 10
11 BUYER SELECTION Leave the Buyer field blank unless you know who will be processing your requisition in the Purchasing Department. If you know which Purchasing staff member will be processing your requisition, type their name into the Buyer field and press Enter. 11
12 ACCOUNTS PAYABLE (AP) TYPE Always type 111 into the AP Type field. 12
13 CREATING LINE ITEMS Click the Detail icon next to Line Items. 13

14 CREATING LINE ITEMS This is the RQIL screen Requisition Item List. This screen will display all the line items you enter once you have completed inputting them. From here you want to go to the RQIM screen for Requisition Item Maintenance. Click the Detail button for Line 1. 14

15 CREATING LINE ITEMS When filling out this screen, you must give a complete detailed description of the product and/or service you which to purchase. If you are requesting products, please give a complete description of the product with a part number for each item. If you are requesting a service such as repair or installation of equipment, please provide a complete description of what is to be done. All vendor quotes, proposals, and other backup for your requisition should be ed to requisitions@hccfl.edu. 15
16 CREATING LINE ITEM DESCRIPTIONS Incorrect Description A. Food catering B. Payment to Bill Bird for services Correct Description A. Blanket Purchase Order to provide catering services for the SGA Welcome Back Bash event to be held on 01/09/2017 at the Brandon Campus as per Quote #0117 dated 12/19/2016. B. Blanket Purchase Order to provide for consulting services to develop a course curriculum for a driver education program as per HCC Agreement for Services # AS for the term period of 07/01/ /30/
17 CREATING LINE ITEM DESCRIPTIONS Incorrect Description C. Skil Saw D. Printer repair E. Quote Correct Description C. Part # SS17583 Skil Saw 15amp 240 volt D. Blanket Purchase Order to provide all necessary materials and labor to repair HP 1200N printer as per Invoice # dated 01/03/2017. Note: If work has already been completed, indicate this on the requisition. E. Blanket Purchase Order to provide all necessary materials and labor to install A/V equipment as per Quote # dated 01/09/


18 CREATING LINE ITEM DESCRIPTIONS Click Detail button next to Description in order to open the Description input field to full-size. An Item Description pop-up will appear where you can input your requisition line item description. Once you have entered your text, click the Save button at the top. 18

19 Input Estimated Price Input Quantity Input Unit of Issue (aka Unit of Measure UOM) Input GL Account No. and press Enter twice. Note: GL Account # s must be appropriate for the products or services being ordered. Incorrect GL s will hold up the Purchasing process and cause a delay regarding payment to the vendor. CREATING LINE ITEMS 19


20 CREATING LINE ITEMS When finished, click the Save button. Click the Update button. 20


21 CREATING LINE ITEMS Note: The screen has refreshed for another line item to be entered. If you have one, enter it. If not, click the Cancel button. Then click the Cancel button which will take you back to the RQIL screen. 21

22 CREATING LINE ITEMS You now have 1 Line Item listed. Remember, this screen will list all the line items you put in. If you are finished, click the Save button and then the Update button when prompted. 22

23 APPROVALS LOOKUP All requisitions must be approved by a Budget Officer for from department. Other approvals are required if the requisition amount exceeds your Budget Officer s approval authority. Directors, Deans, & Managers have approval authority up to $10,000. Members of the President s Cabinet such as Campus Presidents, Vice Presidents, and Executive Directors have approval authority up to $35,000. The College President must approve all requisitions over $35,
24 APPROPRIATE APPROVALS 24

25 APPROVAL LOOKUP CONTINUED To input the appropriate approvers for your requisition on the Next Approvers list, click on the Detail icon next to the Approvals field. 25
 and other appropriate approvers, if required.")
26 APPROVAL LOOKUP CONTINUED The left column of this screen will list the Budget Officers that have already approved the requisition. The right column is where you will input your Budget Officer(s) and other appropriate approvers, if required. You can either type a Budget Officer s username or type an ellipsis to perform a lookup in order to find the name(s) of the appropriate approver(s). 26

27 APPROVAL LOOKUP CONTINUED If you need to perform an ellipsis lookup, then a list of all Budget Officers and other approvers will appear. Double-click the line item to select the appropriate person s name and it will drop into the Next Approvals column. 27

28 APPROVAL LOOKUP CONTINUED Repeat this process until you have all of the appropriate Budget Officers and/or other approvers listed in the Next Approvals column. Once all approver names are entered, click the Save button. You will receive a popup with the choices to Update, Cancel, and Return. Click on Update. Then you will be returned to the main requisition screen. 28

29 PRINTED COMMENTS The Printed Comments field is used to instruct the Central Receiving Warehouse and the vendors on where to deliver the product. It also provides contact information for the vendor in the event of a service call or equipment installation. To view this screen fullsize in a pop-up box, click the Detail button. 29
30 PRINTED COMMENTS Two purposes for the Printed Comments field: 1. Provide contact and location information so the Central Receiving Warehouse can deliver it to you. For example: College Contact: Stefanie Faber GWSC Ext sfaber@hccfl.edu 2. Provide contact and location information so the Vendor can deliver it to you and/or so they can provide the services and/or onsite installation. For example: Coordinate with: Stefanie Faber GWS District Admin. Ctr. 39 Columbia Dr. 6th Floor, Room 617 Tampa, FL sfaber@hccfl.edu 30

31 PRINTED COMMENTS Once you have the correct information in the Printed Comments field, click the Save button and the Update button when prompted to return to the main screen. 31
32 COMMENTS The Comments field is used mainly for information pertaining to the requisition and its purchase request. You may put any information in this field that helps justify the purchase or you may leave it blank. This requires the same process as the Printed Comments; Detail button, put in your information, click save and update buttons. 32
33 REQUISITION DONE Once all of the information is in, the only thing remaining is to change the Requisition Done field from No to Yes. If you are missing information that is required on the requisition, it will let you know and will not allow you to change the field to Yes. General Ledger (GL) Accounts is one of those fields. If you are missing a GL Account the system will not allow you to complete the requisition and will keep it in an In Progress status. 33
, it moves into the Not Approved Status, at this point they can see the requisition and approve it. Click the Save button.")
34 REQUISITION DONE Budget Officers and other approvers will not be able to see the requisition while it is in the In Progress status. Once it is coded Y (Yes), it moves into the Not Approved Status, at this point they can see the requisition and approve it. Click the Save button. Click the Update button. 11/29/
35 RETRIEVING YOUR REQUISITION NUMBER After you have clicked the Update button, an automated pop-up box will appear with your assigned requisition number. This box will appear whether the requisition is complete or not. In any case, you have the number to track it and to bring it back up if it s incomplete. Click the OK button and the requisition maintenance screen will refresh so you may enter your next requisition. 35

36 Requisition Inquiry (RINQ) Screen This screen is used to check the status of your requisition. This screen will indicate the status of the requisition in the Purchasing process and will give you the purchase order number, if one has been assigned. It will also show who has already approved the requisition. 36

37 Requisition Inquiry (RINQ) Screen Enter the requisition number you were assigned into the Requisition Lookup box. 37
 To view the PO inquiry screen, if one has been assigned, click the Detail button to the right of the PO")
38 Requisition Inquiry (RINQ) Screen Requisition Status PO number, if assigned Check who has approved Line Item(s) with description(s) To view the PO inquiry screen, if one has been assigned, click the Detail button to the right of the PO number. 38
39 Purchase Order Inquiry (PINQ) Screen This will show the PO that was created from your requisition. The PO Date is the date that the Purchase Order was created If your PO is a P type purchase order, you can see the order status and whether the product has been received. To see additional line items click into the first item and hit the enter key to scroll down. 39

40 Once you re done looking at the PO, simply click the Cancel button. Then click Cancel again. This will return you to the RINQ screen. 11/29/
41 Requisition Register (RREG) This tool can be used to pull up requisitions that you have done. This report can be run using various search requirements such as Initiator, GL account number and by vendor. We will be discussing the lookup by Initiator. This will be the main use of this screen for the user. 41
42 Requisition Register (RREG) The range requests that you enter a beginning and ending figure in the boxes as shown. In this case we want requisitions from 07/01/16 through 06/30/2017. If you want just today s date then you would put today s date in both boxes. The same goes for the other boxes. The next requirement is the Initiator, simply type in your Colleague Employee ID # and hit enter. The field will populate with your name. 42

43 Requisition Register (RREG) Click the Save button at the top of the screen. Click the Update button in the pop-up message box. 43


44 Requisition Register No changes are required for this next screen; just click the Save button. RREG Click the Update button in the pop-up message box. 44
 if you want to view it on screen.")
45 Requisition Register (RREG) With this screen you can determine how you want to view your search results. The P shown to the right of Output Device indicates it will go to a Printer. You can change this to an H (Hold) if you want to view it on screen. To send it to the printer do a lookup of the printers by typing next to Printer and hit Enter. 45

46 Requisition Register (RREG) Once you have selected the method to view the results, click the Save button. Click Update. 11/29/

47 Requisition Register There is no input required for this next screen. Click the Save button and click Update when prompt is displayed. Your report will either print or go to your screen depending on your request. RREG 47