Employee Portal Overview 3. Accessing the Employee Portal 4. Employee Portal Home Page 4. Update Login Information 6. Updating Personal Profile 7
|
|
|
- Rosemary Paul
- 5 years ago
- Views:
Transcription
1 x
2 Table of Contents Employee Portal Overview 3 Accessing the Employee Portal 4 Employee Portal Home Page 4 Update Login Information 6 Updating Personal Profile 7 Sign-Up for Direct Deposit 8 Report Missing and/or Request a New Paylocity Benefit Card 9 Filing Claims and Uploading Receipts 10 View Account Balance and Activity 12 Track Expenses 13 Add an Expense to the Dashboard 14 Pay an Expense from the Dashboard 15 View Payment History 16 Access Plan Information 17 Mobile 18
3 Employee Portal Overview Your company offers a variety of benefits that are designed to make your life easier, provide you with great coverage that is affordable to you and support your goals for the future. To that end, we'd like to welcome you to the Online Employee Portal. This one-stop portal allows you to manage your tax-favored accounts (Flexible Spending Account (FSAs), Health Reimbursement Arrangement (HRA), Health Savings Account (HSA), and Transportation Management Account (TMA) that includes Parking and/or Transit and gives you 24/7 access to view step-by-step instructions on how to: Change your login ID and/or password Benefit enrollment File a claim online Upload receipts and track expenses View account balance and activity View your claims history and payment (reimbursement) history Update your personal profile information Download plan information, forms and notifications Report a lost/stolen Benny Card and request a new one
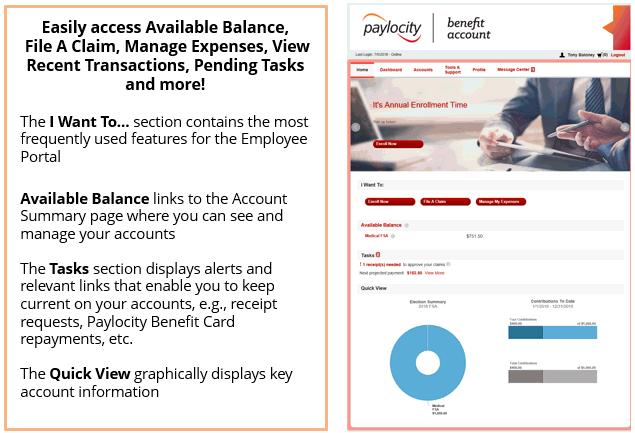
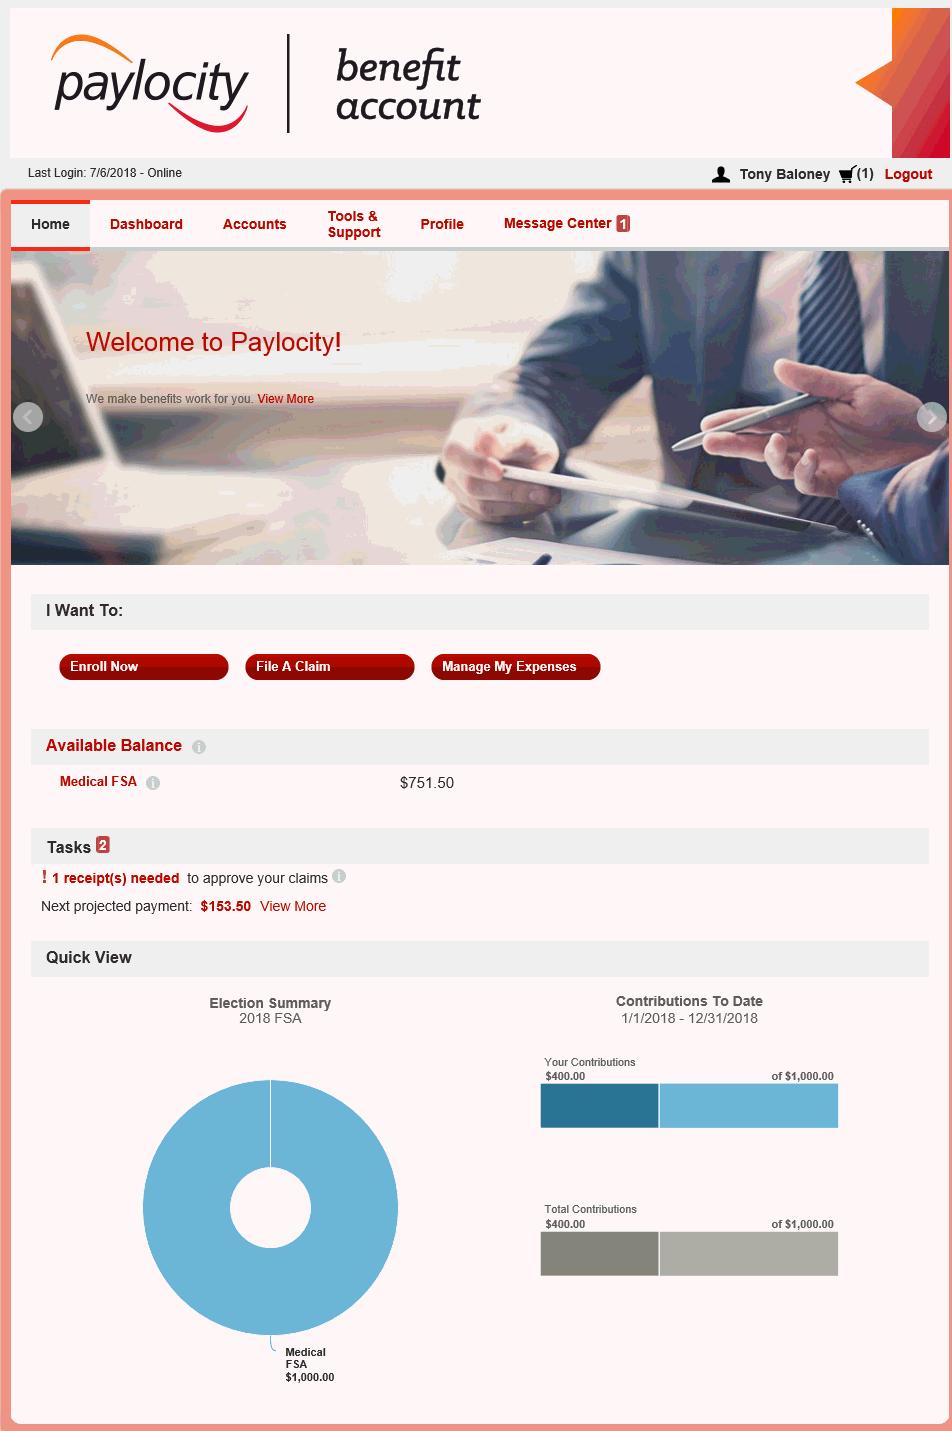
4 Accessing the Employee Portal Paylocity provides a secure portal through which all authorized users can gain access to their benefit information. This section provides step-by-step instructions for secure access and login to the Employee Portal. 1. Navigate to 2. Enter your Username and Password The Username is a combination of: -the user's first initial of their first name -the users entire last name -the last four digits of the users social security number (SSN) -the two letter abbreviation for the user's home state Example: John Smith Illinois would be entered as jsmith1234il (not case sensitive) The initial temporary password is "beneflex" (all lower case) Users will be prompted to change the password upon initial login 3. Select Login Employee Portal Home Page The Home Page is a dashboard which allows you to quickly and easily access and manage your account information.
5

6 Update Login Information 1. From the Home page, select the Profile tab 2. Select Login Information from left-hand navigation bar 3. Select applicable link for needed change 4. Follow instructions on the screen For new users, upon initial log in you will be prompted to change the password that was assigned by your plan administrator Follow the instructions to complete the change 5. Select Save

7 Updating Personal Profile Review and update your personal profile summary details, dependent information, and beneficiaries. 1. From the Home page, navigate to the Profile tab 2. Select Update Profile link 3. Complete your changes as needed 4. Some profile changes will require you to answer an additional security question 5. Select Submit to save changes or Cancel to discard changes 6. Updates will appear on the Profile Summary screen

8 Sign-Up for Direct Deposit The fastest way to get to be reimbursed for expenses is to enroll for direct deposit to a personal checking account. If your employer offers direct deposit, use the following step-by-step instructions to enroll. 1. From the Home page, navigate to the Tools & Support tab 2. Select Change Payment Method under the How Do I? section 3. Select Banking/Cards and then Add Bank Account 4. Select Payment Method. Go to the Alternate Payment Method and choose Direct Deposit and select Submit 5. Enter your bank account information 6. Select Submit 7. The Payment Method Changed confirmation displays NOTE: If there is a bank validation requirement, you will be notified on the portal to look for a small transactions or "micro-deposit" in your designated bank account in the next couple days to enter online, which will validate your account.
9 Report Missing and/or Request a New Paylocity Benefit Card The Paylocity Benefit Card makes it easy to access the money you've set aside in your tax advantaged benefit account such as an FSA, HSA, TMA, and/or HRA. Simply use your card to pay for qualified expenses at any IIAS Merchant. The amount of your purchase will be automatically deducted from your account using you pretax dollars and electronically transferred to the merchant for payment. Note: The Paylocity Benefit Card is not available for all plans. Check with your employer for specific details regarding your account. 1. From the Home page, navigate to the Profile tab 2. Select Banking link from left-hand navigational section 3. Under the Debit Card column, select Report Lost/Stolen or Order Replacement 4. Complete the online instructions 5. Click Submit
10 Filing Claims and Uploading Receipts Claim filing made easy with the Paylocity claim filing wizard! The wizard simply walks users through their claim submission including entry of information, payee details and uploading itemized bills/receipts. 1. On the Home page, select File a Claim OR from any page on the portal expand the I Want To... section on the top right-hand side of the screen 2. Using the Pay From dropdown, select the account from which you would like to receive reimbursement 3. Using the Pay To dropdown, select a payee and then click Next 4. Select the Upload Valid Documentation to upload required receipt. Additional receipts can be added to the claim by clicking on the Add Another Receipt link 5. Select Next to enter the remaining Claim Details 6. Once the information has been added, click Next and your claim will be added to the Claims Basket on upper right-hand of page 7. To add more than one claim, select Add Another 8. Once all claims have been entered, select Submit to send the claims for processing NOTE: Your claim must be submitted prior to logging out of the portal. Once you log out, the claims being held in the Claims Basket will be deleted. 9. Print the Claim Confirmation Form for your records 10. If you see a Receipts Needed link in the Tasks section of your Home page, click on it. You will be taken to the Claims page where you can see the claims that require documentation. You can easily upload the receipts from this page. Simply click to expand the line item to view claim details and Upload Receipts link.
11

12 View Account Balance and Activity For Account Balance Only: 1. On the Home page, navigate to the Available Balance section For Account Activity: 1. Select the Available Balance link on the Home page to be redirected to the Account Summary page 2. Select a dollar amount to display more details

13 Track Expenses On the Dashboard tab, you can easily view healthcare expenses for ongoing management of medical claims, premiums, and card transactions. 1. Filter expenses by selecting the filter options on the navigation pane on the left side of the screen or by clicking on the field headers within the Dashboard 2. Search for specific expenses using the Search field at the bottom left of the screen

14 Add an Expense to the Dashboard Navigate to the Dashboard tab 1. Select Add Expense in the upper left side of the page 2. Complete the expense information fields. You can also upload a copy of the receipt and add notes for your records 3. Once the expense has been added to the Dashboard, you will have the option to pay the expense NOTE: Adding an expense to the Dashboard will not generate a reimbursement until you opt to pay it. See Pay an Expense from the Dashboard for further details.
15 Pay an Expense from the Dashboard Process payments and reimbursements for unpaid expenses directly from the Dashboard page. 1. Navigate to the Dashboard tab 2. Expenses will be categorized and payments can be initiated for unpaid expenses by selecting the Pay button to the right of the expense details 3. Simply choose which expenses you would like paid and you will be presented with the eligible accounts from which you can initiate payment 4. When you click Pay, the claim details from the Dashboard will be prepopulated within the claim form 5. Review and edit the claim details as needed and then Submit for processing

16 View Payment History View reimbursement payments made to date, including debit card transactions. 1. Navigate to the Accounts tab 2. Select Payments from the left hand side of the screen and reimbursement payments made to date including debit card transactions will display. Apply filters from the left-hand side of the screen to filter by Method, Status and Date 3. Click on the line of the claim payment to expand the data to display additional details about the transaction

17 Access Plan Information 1. Navigate to the Accounts tab Click on the Account Summary tab from the left side navigation pane 2. Select the applicable Account name to open the Plan Rules, including Filing Rules, Debit Card Rules and Claim Summary if applicable 3. OR from the Home page, under the Tools & Support tab, you may view Plan Summaries for basic information. 4. Select each applicable plan to see plan details
18 Mobile Manage your benefits anywhere, 24/7 with our mobile app. Convenient, realtime access to all your benefit accounts makes it easy to view recent account activity along with the ability to: Submit Claims Check Account Balances Track Healthcare Expenses Upload Pictures of Receipts Receive Text Alerts View Message Center Access Eligible Expense Scanner Accept HSA Custodial Agreements Complete HSA Transactions View HSA Investments Available for all iphones, ipads, and Android devices. Download at itunes or Google Play.