e-recruitment Guide Hiring Offer Phase
|
|
|
- Allyson Hubbard
- 5 years ago
- Views:
Transcription
1 e-recruitment Guide Hiring Offer Phase
2 Contents Page 3 Page 4 Page 5 Page 6 Page 7 Page 8-9 The Job Requisition Process The Hiring Process erec Recruiter Overview Display Candidates Page - Overview Activites - Overview Questionnaire Completing the Request to Appoint Questionnaire Page 10 Page 11 Page 12 Page 13 Notifying candidates they have been unsuccessful after interview Setting unsuccessful candidates to Rejected Tracking the candidate to be appointed & accessing the contract of employment. Setting the Job requisition to Closed Information for staff using an UNMANAGED computer Popups should automatically be allowed for staff on managed computers When using the e-recruitment system please ensure that you have allowed Popups. Guidance on how you can do this is available via the link below: 2
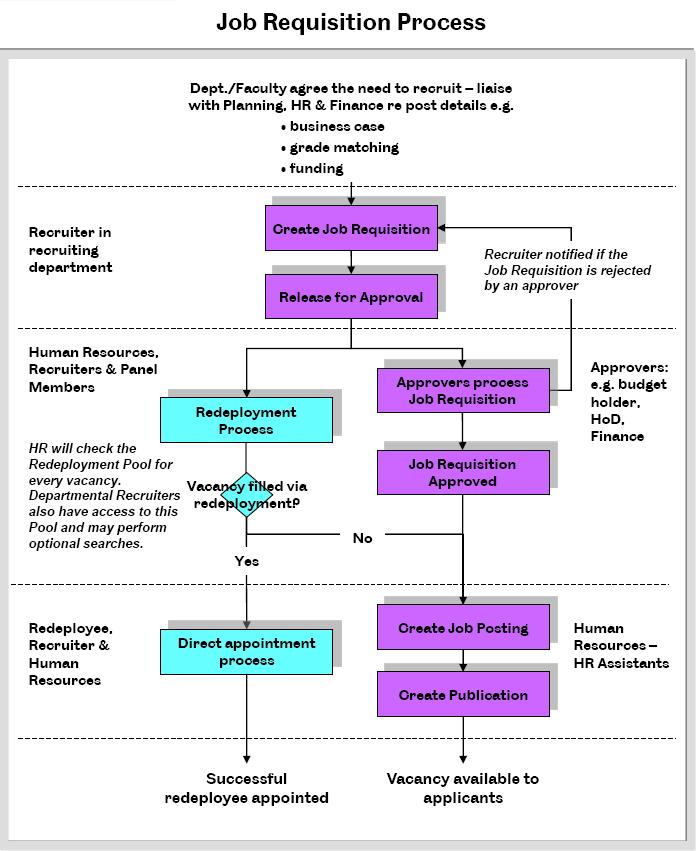
3 3

4 4

5 Click to Create a Job Requisition, Access Recruitment Groups, Create a Contract Admin and view Redeployment Candidates. Screens will open in a pop-up Activities where an should have likely been sent but was not, will appear under Unsent Correspondence e.g. if you do not select Send when doing a WHA Activity. erec Recruiter Overview If HR propose a redeployee against one of your requisitions it will appear under Redeployment Activities. Access your requisitions through the My Draft snd My Released links Use this Search box to find Requisitions/Contracts and Published Job Postings where you are in the Recruitment Group. You can also use it to search for any candidate. If you have been added as a support Recruiter, the requisition will appear under Team Requisitions Highlight a row and click to launch the Bulk Download and Shortlisting Report. These buttons will be greyed out until the reports are ready for download You can sort the requisitions table by clicking on the column headings and typing in the filter row to find specific requisitions. Highlight a row and click Click to Edit a requisition the Requisition button to show Create, Edit, Copy, Highlight a row and Close, Delete and Status click the Display options Candidates button to 5 open your candidate page Click to export the table into Microsoft Excel
 and click Activities to launch the activities menu Highlight multiple candidates and select Compare Candidates to open their Education and Work Experience in a sideby-side")
6 Display Candidates Page Overview Tick the Rejected and Withdrawn tickboxes, then select Apply to display the rejected and withdrawn candidates Click to display the PDF overview of the job requisition Highlight a candidate(s) and click Activities to launch the activities menu Highlight multiple candidates and select Compare Candidates to open their Education and Work Experience in a sideby-side view Candidates will move between the tabs when activities are ran. Candidates will appear in the All tab until they are set to rejected or have withdrawn from the process You can sort the requisitions table by clicking on the column headings. Click the filter icon to open the filter row. The filter row uses * as a wildcard. Click to open the Candidate Profile Export table to Excel Click to toggle between Unread/Read If a Personnel Number is shown it s likely that the candidate is internal Click to open a specific application form Click to show Two Tick candidates 6

7 Activites Overview The calendar icon indicated that an activity is in the Planned stage The Due On date is when the activity started and the Completed On date is when the activity was completed. Click the arrow next to each Process heading to display the activities. The icon indicates that an has been sent. Then click the blue activities link to run that specific activity Delete an activity by clicking on the bin icon The green tick symbol means that activity has been completed Edit an activity by clicking the pencil icon

8 How to complete the Request to Appoint (RTA) Questionnaire Once you have sent the candidate the WHA Questionnaire you will complete the Request to Appoint (RTA) Questionnaire. You do not have to wait for the candidate to complete the Work Health Assessment questionnaire in order to complete the RTA. On completion of the RTA, e- Recruitment will automatically notify your designated HR Assistant that you are ready to appoint and that the RTA questionnaire is awaiting their attention. 1. Select the candidate you would like to appoint 2. Click Activities > Offer Phase > Request To Appoint Questionnaire 3. Click on Complete Questionnaire You can add a note or attachment in the top section of the activity. The candidate will not have visibility of anything added here. 4. Complete the Questionnaire with information about the candidate and position. Fields marked with a * are Mandatory 8
9 5. If you are able to complete the Questionnaire you should click Complete. This will automatically send the RTA to Human resources. Once you have clicked Submit you are unable to edit the form. If you do not have all the required information you should click Save. This will allow you to access the form again to complete at a later date. For details regarding how to access the form again see the next page. 6. Click on OK to exit the RTA activity If you selected to Save the RTA you can return to the questionnaire to complete it: 1. Select the candidate for whom you have started the Request to Appoint Questionnaire. 2. Click on Activities > Offer Phase 3. Click on the Edit symbol on the RTA activity row. This will open the saved activity. 4. Click on Complete Questionnaire You can add a note or attachment in the top section of the activity. The candidate will not have visibility of anything added here. 5. Complete the Questionnaire with information about the candidate and position. Fields marked with a * are Mandatory 6. Click Complete 7. Click OK 9

10 How do I notify candidates they have been unsucessful after interview? It is possible to notify multiple candidates they have been unsuccessful simultaneously. The same will be sent to all the candidates you select. If you would like to add additional information for certain candidates you should process their s individually. If a candidate has been interviewed they should be informed over the phone if they have been unsuccessful and it should only be recorded in e-recruitment, rather than an being sent. 1. Select the candidate(s) you wish to notify they were unsuccessful 2. Click Activities > Rejection > Correspondence: Reject after Interview 3. Click the Change Letter Section link should you wish to edit the text of the . You can add a note or attachment in the top section of the activity. The candidate will not have visibility of anything added here. To add an attachment that the candidate will receive, select the Add to button. Clicking Send and then OK will send the to the candidate. Just selecting OK will save the activity but not send the . If you do not want to send an then click on the Completed radio button on the top Status row. 10

11 How do I set unsuccessful candidates as Rejected? Once you have notified your unsuccessful candidates by or letter, you are required to set their status to Rejected and enter the reason they were unsuccessful into the system. This data is used in the management information reporting and Equal Opportunities monitoring for recruitment activities. You can set more than one candidate to Rejected at once if the Rejection Reason is the same. This activity should only be done once you have notified the candidates they have been unsuccessful. This Activity will automatically update a candidate s application profile to Unsuccessful. They will see this status the next time they login but will previously have received the notification. 1. Click on the Rejection Process tab to view all unsuccessful candidates 2. Select the candidates with a rejection reason in common 3. Click Activities > Rejection > Set Candidates to Rejected 4. Select the correct Status Reason You can add a note or attachment in the top section of the activity. The candidate will not have visibility of anything added here. 5. Click OK Once you have set the unsuccessful candidates to Rejected they will not appear on the Display Candidate screen. To view these candidates you need to tick the Rejected tickbox and select Apply 11
12 Tracking the candidate to be appointed & accessing the contract of employment You have now completed all the Recruiter s activities within the Hiring phase. However, you will be able to monitor the subsequent activities carried out by the Human Resources Team via the Activities screen for the successful candidate. The Human Resources Business Support Team will record the following; - RTA Information Verified by HR (HR have all the information required to produce the contract) - Certificate of Sponsorship Issued (where relevant) - HR Issued Contract (the contract of appointment will be attached to this activity) 1. To view the activities performed for a candidate, select that candidate and then select Activites Once Human Resources have completed the HR Issued Contact activity, the appointed candidate(s) will move to the To Be Hired status To access the contract of employment: 1. Select the candidate(s) where you wish to view the contract 2. Click Activities > Offer Phase > Select the Edit symbol against HR Issue Contract 3. A PDF overview of the contract will appear in the attachments section. 12


13 Setting the Job Requisition to Closed Once you have completed the recruitment process and the successful candidate has started in the post you should change the Status of the Job Requisition to Closed. - This will move the Job Requisition out of your main view meaning your list of Job Requisitions does not become too long. - By changing the status the Job Requisition will be removed from your Panel Members screen ensuring their list of Job Requisitions relates to current vacancies only. - You can still access the Job Requisition by searching for closed requisitions. 1. In your main dashboard view highlight the requisition you wish to close. 2. Select the Requisition drop-down and then select Close 3. Choose a Status Reason and select OK 13