HRDPower Guide for Advanced Users Version 1.0. Ver 1.0
|
|
|
- Terence Marshall
- 6 years ago
- Views:
Transcription
1 Ver 1.0 1
2 Contents Content Page No Competency Frame Work 4 Competency Ratings 5 HRDPower System Requirements 7 Technical Support 8 How to Install 9 How to Login 11 Filters Filtering Single Condition 12 Filtering Multiple Condition One Table 13 Filtering Multiple Condition More than one table 14 Modules (List View) Employee 15 Training Program 17 Competency 19 Position 20 Questionnaire 21 Finance 24 Trainer 27 Modules (Actions View) Employee 28 Training Program Dates 31 Competency 34 Position 36 Questionnaire 37 Budget 41 Expenditure 42 Trainer 44 Maintenance Field Placement 46 Field Definition 49 Lookup Lists 59 2
3 Global Update 63 Competency Audit Wizard 69 Competency Rating Wizard 75 Setup Save List Order as default 77 Enter Values Individually in Actions Screen 79 Security Management 81 Configuration 94 Database Backup /Restore 105 Archive / Unarchive 111 Services Salary Calculator 113 Calculator 114 Web 115 Scheduler 116 Reminder 117 Sticky Note 118 Messaging 119 Bulk Appraisal Wizard 121 Appraisal Rating Wizard 121 Bulk Data Entry 122 Multiple Assignments 126 Training Program Calendar 129 Library 129 Hoe to Use Help 129 Reports & Graphs Reports (Standard) 130 Graphs 130 Report Writer Designing Reports 131 For Report Writer Help 131 Start Report Writer 131 Importing of Data into HRDPower Import 133 Quick References 152 General FAQ 173 Glossary 191 3
4 PAGE Framework RCL A (Assessment) P Performance E (Evaluation) Person CCL Training Needs Analysis G (Competency Gap Analysis) Programme PCL Gap = RCL - CCL 4
5 What do you mean by. 1. Rating Scales HRDPower Guide for Advanced Users Version 1.0 Required Competency Level / Current Competency Level / Proposed Competency Level / Accredited Level Level Description 1 Beginner Unable to do the job. 2 Learner Able to do the job but not to the required standards and requiring total supervision. 3 Proficient Able to do the job to the required standards but requiring occasional supervision. 4 Competent Able to do the job to the required standards independently all the time. 5 Professional Exceeds the required standards all the time and can supervise others. 6 Role Model Exceeds the required standards all the time, is a role model and can train others. 2. Importance to Job Level Description 1 Less important to the job 2 Important to the job 3 Very important to the job 3. Training Priority Level Description 1 Essential 2 Highly Desirable 3 Desirable 4. Mode This value is set based on the Competency Gap. Level Description 1 Competent No Training Required 2 Being Developed If assigned to any Training Program 3 Training Need If the Competency Gap is greater than 0 (zero) 5
6 6
7 System Requirements HRDPower Guide for Advanced Users Version 1.0 To run HRDPower, system needs to be equipped with the following criteria. Minimum Recommended O.S. Microsoft Windows 98 Microsoft Windows 98 or above RAM 64 MB RAM 128 MB RAM Hard Disk Space 50 MB 50 MB or above 7
8 Technical Support Telephone Calls to the International Help Desk are answered around the clock, seven days a week. Support enquiry s sent via are handled throughout the day. We make every effort to respond to all enquiries within one business day. Specialist Management Resources 14-4 Jalan Bangsar Utama 1, Bangsar Utama 59000, Kuala Lumpur, Malaysia Tel: Fax: helpdesk@hrdpower.com 8
9 Installing HRDPower HRDPower Guide for Advanced Users Version 1.0 The HRDPower installation consists of 2 component installations: 1. Server Installation & 2. Client Installation Stand Alone Installation If the user wants to use HRDPower in a single system alone, then the same system will serve as server and client. Network Installation If the user wants to use HRDPower over a network, so that multiple users can work on the system, then they need to configure one system as server and other systems as client. Note: Make sure you have purchased necessary user license in order to use HRDPower over a network 1. Insert HRDPower Setup Disc 2. Explore installation CD. 3. Double click Setup.exe file. 4. The installation wizard will update system files, if required and may reboot our system. Once rebooted, the installation should commence, if it did not double click setup.exe again. 5. The Installation wizard would welcome the user to the installation of software. 6. The next step installation would recommends to close any programs before proceeding with the installation 7. Indicate which HRDPower Components you want to install 9

10 Server: Select this check box if the user wants to install the server component of HRDPower. Client: Select this check box if the user wants to install the client component of HRDPower. For a stand alone installation choose both components. For a network installation one machine needs to be installed with server component and other machine needs to be installed with client component. 8. Select directory where the server components are located or needs to be installed. In a stand-alone installation, the path would be C:\Program Files\HRDPower. In a network installation, the user has to select the server path where the database is installed. 9. Select directory where the client components need to be installed. 10. Click the Next button to start installation. 11. Once installation is over, click Finish to exit HRDPower installation 10


11 Login to HRDPower Once HRDPower is installed in the system, there will be a shortcut on the desktop for the software. The user needs to double click on the icon to set foot into HRDPower. Or, the user can open HRDPower from the Programs Menu. The following splash screen window will prompt for few seconds. In this window, we can view some information about the software. After the splash screen, the following window will be prompted for the security reason. Each and every person should have a username to work in HRDPower. Only Administrator has the privilege to change/create username or password. 11

12 Applying Single Condition : Click Employee icon Click Filter button Double-click the field that you want to filter Insert the filter condition Click Assign button Click Apply button Click Close 12

13 Applying Multiple Conditions One Table : Select the first condition (as Filtering single condition). Select the next condition in the same way and apply. The second condition will appear in the Filter selection window linked by an AND. If the condition are either/or, change the AND to OR by highlighting the AND, and clicking And/Or button. Select and assign further condition as required. Click Apply button Click Close 13

14 Applying Multiple Conditions More Than One Table : Open the relevant List View of the table. Apply any filters that are relevant for this table. Select the other table from the Related Information quadrant and double-click. Assign the conditions as in filtering on one table. Click Apply button. Click Close button. Click Assign button. Click Apply button. Click Close button. 14
15 1) Employee List View Shows information in columns whose headings represent selected fields of the records. Add New Employee Click Employee icon Click New Complete the Core and User Defined Fields(if any) Click Save Click Close Modify Employee Record Click Employee icon Find the required Employee Double-click on the selected Employee to open the Quadrant View Make the changes Click Save Click Close Delete Employee Click Employee icon Find the employee you wish to delete Click Delete 15
 16")
16 ( Image 4.0 ) 16
17 2) Training program Add, Edit, Delete Add : Click Training Program icon Click New Enter details Click Save Click Close or Actions button to assign Training Program Dates, Competencies or Employees Delete : Click Training Program icon Select the Training Program Click Delete Edit : Click Training Program icon Find the required Training Program Double-click and make changes Click Save Click Close Note : Please refer to the Image 4.0 for the replica screen shot. As only Data will be changed in the modules. 17

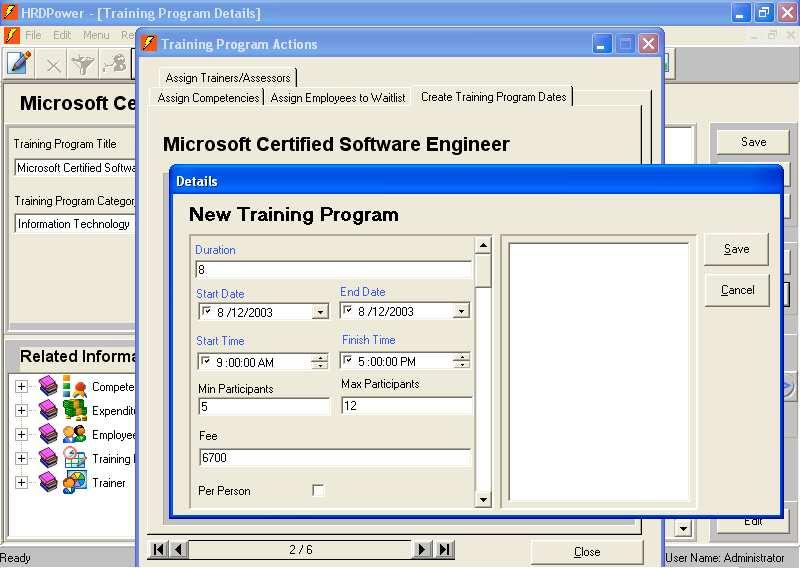
18 Creating Training Program Dates Choose any Training Program from Training Program module and double-click. Click Actions Click Create Training Program Dates tab Enter details into the Core Fields and User Defined Fields in the new window. These records can be viewed and modified in Training Program Dates Module 18
19 3) Competency Add, Edit, Delete Add : Click Competencies icon First Tier Competency Select first tier Competency and click New Click Yes Complete the Core and any User Defined Fields Click Save Click Close Second Tier Competency Select first tier Competency and click New Click No Complete the Core and any User Defined Fields Click Save Click Close Additional Tiers Select the relevant first tier Competency Expand to reveal the 2 nd tiers Select the 2 nd tier Competency Click New Complete the Core and any User Defined Fields Click Save & Click Close Delete : Click Competencies Structure View and Competencies List View icon Select the Competency in both the views Click Delete Edit : Click Competencies Structure View and Competencies List View icon Double-click the record Make changes as required Click Save & Click Close Note : Please refer to the Image 4.0 for the replica screen shot. As only Data will be changed in the modules. 19
20 4) Position Add, Edit, Delete Add : Click Position icon Click New Complete the fields as required Click Save Delete : Click Position icon Find the position you wish to delete Click Delete Edit : Click Position icon Find the required Position Double-click and make changes Click Save Click Close Note : Please refer to the Image 4.0 for the replica screen shot. As only Data will be changed in the modules. 20
21 5) Questionnaire Add, Edit, Delete Add : Click Questionnaire icon Click New Complete the fields as required Questionnaire Type Boolean: Questions with only two choices like Yes / No, True / False Numeric: Questions with a Numeric Value. The value ranges Between a Min and Max values like 1-3, 1-5, 1-9 Multiple Choice: Questions with more than 2 answers, but selection shall be only one. Delete : Click Questionnaire icon Find the questionnaire you wish to delete Click Delete Edit : Click Questionnaire icon Find the required Questionnaire Double-click and make changes Click Save Click Close 21

22 Creating Questionnaire Instance List Report : shows the content of the Questionnaire Instance Core Fields. Details Report : shows the content of Questionnaire Instance Core and User Defined Fields. Questionnaire Evaluation : shows the analysis of responses to questionnaires. The analysis will show the number of responses for each value in the range of options provided, the percentage of the total response for each value, the Mean, Median and Mode. Questionnaire Analysis Report : shows the Mean and percentage score of each question on the Questionnaire Instance. Questionnaire Summary : shows the Mean and percentage score of each Questionnaire Instance. 22
23 23
24 6) Finance Creating Budgets Group : This field identifies the current Group selected. You can establish the Group field Lookup List either in the Expenditure Details screen or in Setup, Maintenance and Lookup Lists. Once you have created a new Group, you may set up a budget for that group for the current Financial Year. Financial Year : The Financial Year field Lookup List is establish in Setup, Configuration, Financial Year tab. Once you have set up a new Financial Year, it will be available to be selected from the Lookup List in the Financial Year field. Click Budget icon Select the required Group from the Lookup List in the Group field. Select the required Financial Year from the Lookup List in the Financial Year field. Highlight the figure in the required column and enter a new figure. Click Fill Down button if you want the figure repeated down the column. 24
25 25
26 Add, Edit, Delete Expenditures Add : Click Expenditure icon Click New Complete the fields as required Click Save Delete : Click Expenditure icon Find the expenditure you wish to delete Click Delete Edit : Click Expenditure icon Find the required Expenditure Double-click and make changes Click Save & Click Close Note : Please refer to the Image 4.0 for the replica screen shot. As only Data will be changed in the modules. 26
27 7) Trainers Add, Edit, Delete Add : Click Trainers icon Click New Complete the fields as required Click Save Delete : Click Trainers icon Find the trainers you wish to delete Click Delete Edit : Click Trainers icon Find the required Trainers Double-click and make changes Click Save Click Close Note : Please refer to the Image 4.0 for the replica screen shot. As only Data will be changed in the modules. 27
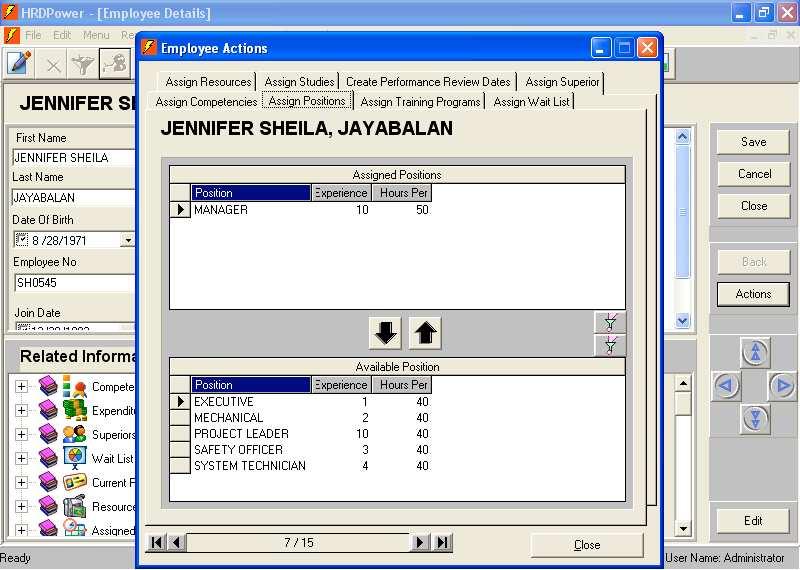
28 1) Employee Assign Training Programs Duration : the duration of the Training Program in hours. This information is used in Salary Cost calculations. This field can be overwritten if the Employee did not attend the complete program. Salary Cost : the salary cost incurred while the Employee attended training. This field can be overwritten if overtime, shift allowances or similar variations need to be taken into account. Training Program Cost : the fees charged for the Training Program. These fees may be either a total fee for the Training Program, regardless of the number of attendees, or a fee per person, depending on whether or not the Per Person Check Box was ticked in the Training Program record. Date Paid : the date the Training Program cost was paid or is to be recorded as paid in the financial records. Status : the status of an Employee in relation to the Training Program Date. Nominate to Waitlist Date Assigned : the date the Employee was assigned to the Wait List. Wait List Priority : the priority of the Employee on the Wait List. Assign Position Date Assigned : the date the position was assigned to the employee record. 28
29 Hours per week : the number of normal working hours per week for this position. Assign Competencies Date Assigned : the date the competencies were assigned to the employee record. Review Date : the date the competencies may need to be reviewed or reassessed. Current Competency Level (CCL) : the numeric value of the employee s current level of performance as opposed to a required level of performance. Priority : a priority rating for satisfying a training need. Status : the current status of the competency in terms of whether the person is competent or not. Date Required : the date by which the employee is required to be competent. 29
30 30

31 2) Training Program Assign Competencies Click Training Program icon Find the required Training Program Double-click on the selected Training Program Click Action button Select the required Competencies and click on the up arrow to assign Enter the Proposed Performance Level Click Save Click Close 31
32 3) Training Program Dates Assign Employees from Waitlist Click Training Program Dates icon Find the required Training Program Dates and double-click Click Action button Select the employee you wish to assign and click the up arrow Enter the Paid Date and click Save Assign Employees directly Click Training Program Date icon Double-click the required Training Program Date record Click Action button Select the Employees to assign Click the Up arrow Make necessary adjustments Click Save Click Close Assign Trainers Date Assigned : the date the record was assigned (optional). Assessor : if the check box is checked, it indicates that this person has been assigned as a Training Program assessor. If not checked, this person is a Trainer. 32
33 33
34 4) Competencies Assign Position Importance to Job : the numerical value of how important this competency is for the particular position. This value is used in Employee-Position matching reports to calculate a percentage match of an Employee s suitability for the Position. Required Competency Level (RCL) : the numerical value of the required or desired Competency level of competence for the particular position. The Required Competency value is used to calculate the Percentage Match. Assign Employees Date Assigned : the date the competencies were assigned to the employee record. Review Date : the date the competencies may need to be reviewed or reassessed. Current Competency Level (CCL) : the numeric value of the employee s current level of competence as opposed to a required level of Competence. Priority : a priority rating for satisfying a training need. Mode : the current status of the competency in terms of whether the person is competent or not. Date Required : the date by which the employee is required to be competent. Assign Trainers Date Assigned : the date the record was assigned (optional). 34

35 Assessor : if the check box is checked, it indicates that this person has been assigned as a Training Program assessor. If not checked, this person is a Trainer. Assign Training Programs Proposed Competency Level (PCL) : the level of Competence that the Training Program should provide for the competency. 35

36 5) Positions Assign Employees Date Assigned : the date the position was assigned to the Employee record. Hours per Week : the number of normal working hours per week for this position. This figure is used in Salary Cost calculations. Assign Competencies Importance to Job : the numerical value of how important this competency is for the particular position. This value is used in Employee-Position matching reports to calculate a percentage match of an Employee s suitability for the Position. Required Competency Level (RCL) : the numerical value of the required or required competency level of competence for the particular position. The Required competency value is used to calculate the Percentage Match. 36

37 6) Questionnaire Assign Questions Click Questionnaires Templates icon Click New on the Tool Bar Enter the Questionnaire Title, Questionnaire Type and the numbers that equal the minimum and maximum values for the responses in a Numeric type or number of choices for a Multiple type and 2 for Boolean type. Click Save Click Action Click Add Questions button and enter the count of questions to be entered then a Wizard appears and navigates you to finish the questions and choices for it. To delete a question, select a question and press Delete Question button. 37
38 Click Create Questionnaire tab Enter Short description and Long description Click Save Click Assign Questions tab and click Close 38
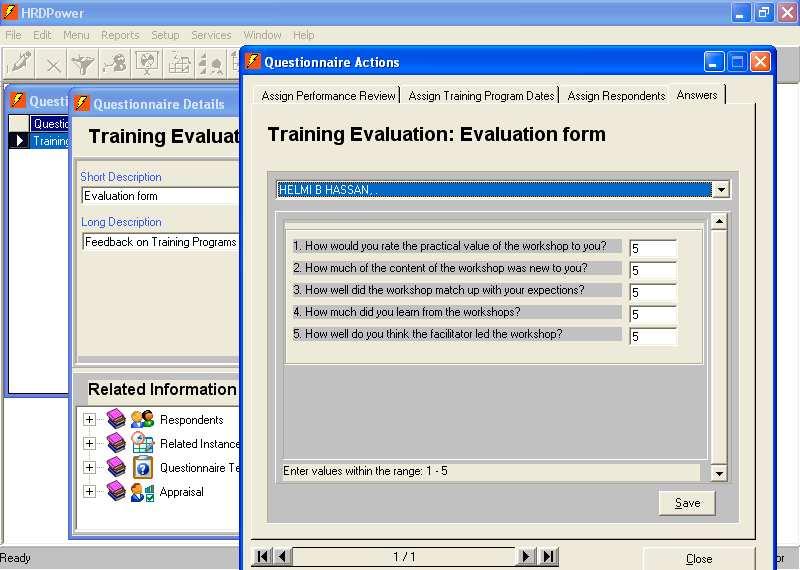
39 Assign Respondents Click Questionnaires icon Select the questionnaire and double-click Click Action button Assign the Employees as required Click on Assign Respondents tab Assign the Respondents as required This assigning of employees as respondents can be skipped when this Questionnaire is being assigned to a Training Program Instance as all the attendees of the Training Program will automatically become respondents. Assign Answers Click Questionnaires icon Select the questionnaire and double-click Click Action button Assign the Employees as required Click on Answers tab Select a Respondent from the Pull Down list Enter the answers Range for the answers are displayed at the bottom of the answers screen. Click Save Click Close 39
40 40
41 7) Budget Create Budget Group : This field identifies the current Group selected. You can establish the Group field Lookup List either in the Expenditure Details screen or in Setup, Maintenance and Lookup Lists. Once you have created a new Group, you may set up a budget for that group for the current Financial Year. Financial Year : The Financial Year field Lookup List is establish in Setup, Configuration, Financial Year tab. Once you have set up a new Financial Year, it will be available to be selected from the Lookup List in the Financial Year field. Click Budget icon Select the required Group from the Lookup List in the Group field. Select the required Financial Year from the Lookup List in the Financial Year field. Highlight the figure in the required column and enter a new figure. Click Fill Down button if you want the figure repeated down the column. 41
.")
42 8) Expenditure Assign Employees Click Expenditure icon. Find the required Expenditure record. Double-click on the selected Expenditure. Click Action button. Select the Employee to assign. Click on the Up arrow. Complete the appropriate fields. Click Save Assign Training Programs Date Assigned : the date the Training Program was assigned to the record (optional). Fee : the amount the Trainer/Assessor charges for services provided. This can be any rate, as it is for recording purposes only. The label of this field can be changed to reflect the type of rate. 42

43 Assign Training Program Dates Date Assigned : the date the Training Program was assigned to the record (optional). Fee : the amount the Trainer/Assessor charges for services provided. This can be any rate, as it is for recording purposes only. The label of this field can be changed to reflect the type of rate. Assign Trainers Date Assigned : the date the record was assigned (optional). Assessor : if the check box is checked, it indicates that this person has been assigned as a Training Program assessor. If not checked, this person is a Trainer. 43
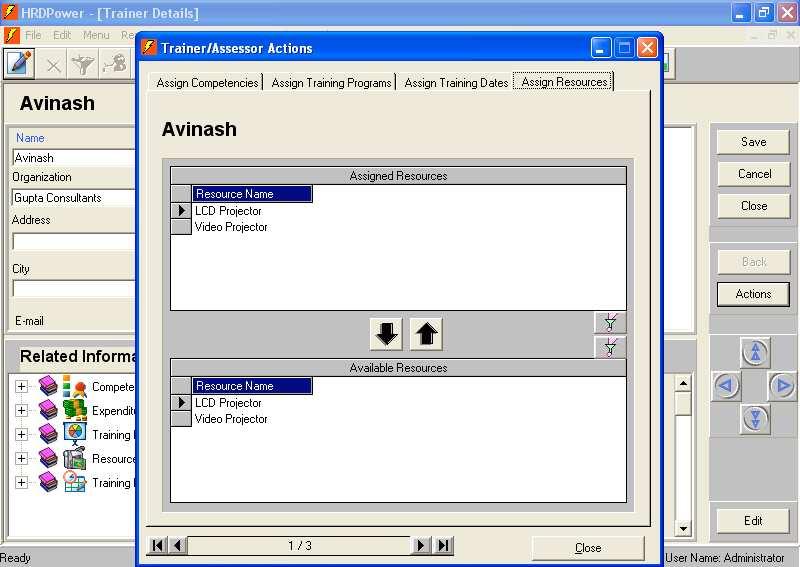
44 9) Trainers Assign Training Programs Date assigned: the date the Training Program was assigned to the record (optional) Fee: the amount the Trainer / Assessor charges for services provided. This can be any rate, as is for recording purpose only. The label of this field can be changed to reflect the type of rate. Assign Training Programs Dates Date Assigned : the date the Training Program Date was assigned to the record (optional). Assessor: to signify if the person assigned is a Trainer or an Assessor. If the box is checked, the person is an Assessor. If not checked, the person is a Trainer. Assign Resources Start Date : Starting date the resource(s) was lended. End Date : End date of actual usage of the resource(s). Start Time : Timings of the resource(s) to be used. End Time : Timings of the resource(s) usage to be terminated.. Return Date : The probable return date of the resource. 44
45 45
46 Field Placement To change the placement of fields Step 1. Click Setup >> Click Maintenance >> Click Field Placement. 46

47 Step 2. Select screen to be modified (Eg: Employee) Step 3. Click & Drag the field >> Place the Field on the screen Click Set Tab Order button Select Field and set the Tab order by moving up or down using the arrow buttons Click OK to save changes or Cancel to cancel changes 47

48 Step 4. Click Save. 48
49 Field Definitions To Add, Delete or Edit User-Defined Fields Step 1. Click Setup >> Click Maintenance >> Click Field Definitions Note : You can never add or delete a field into CORE FIELDS Area, You can only change the caption and constraints. Once a field is created, Field Type cannot be changed. You have to delete and create a new field. Step 2. To Add a new Field: Select Component to add a new field (Eg: Employee) Double-click on Component >> Click on User-Defined Fields 49

50 Step 3. Click Add button and a new window pops-up The following are the details of the window displayed, fill in the details appropriately 50
51 Step 4. Description : This is the name of the field user wants to add. Field Type: This defines the type of field user wishes to add. As soon as the user enters a description, this field will become active and they will be able to pull down a Lookup List of definitions. These are described below: Counter: This is for automatic counting using integers, which automatically increment by one at each successive use. Currency: This is for currency information. The format of the currency is taken from the Currency setting in the Windows Regional Settings in Control Panel. Date: This is a date field. The format of the date valid for this field is taken from the Windows Regional Settings in Control Panel. Decimal: Is for holding numbers with a decimal value. Folder: Allows users to group selected fields under a specific folder. This may be to their advantage if they want to keep certain fields grouped together. In the Employee record, a folder for Personnel may hold fields such as Date of Birth, Start Date, Gender; a folder for Finance, may hold Salary, 51
52 Cost Code, Hourly Rate; also a folder for Corporate, holding Division, Branch, Section, Location, etc. Memo: Can hold up to characters of text. Multiple Select Lookup: Is linked to a Lookup Table that must be previously setup. It differs from a Single Select Lookup in those users may select more than one value from this list. Number: Is for holding numbers (integers). Parent/Child: Is for values that have a tiered, nested or grouped relationship, e.g. a Parent/Child field could be Country (Parent) and City (Child). If the users select a particular country as the parent, only those cities in that country would be displayed in the child field. Question: This has values of Yes or No. These values are pre-set. Single Select Lookup: This is linked to a Lookup Table that must be previously setup. It differs from a Multiple Select Lookup in those users may only select one item from this list. Text: Holds up to 245 characters of text. Time: Allows the users to enter time values. The format of the time valid for this field is taken from the Windows Regional Settings in the Control Panel. Step 5. Select Field Type 52
53 Lookup List: Provides user with a list of Lookup lists from which they need to select for Lookup fields (either Single Select Lookup or Multiple Select Lookup) Step 6. Select Lookup Type Element Properties: Provides user with a number of options that determine the properties of the field: Are values required in this field? If user tick this Check Box, there must be an entry in this field (it cannot be left blank). If it is not ticked, the presence of an entry in this field is not mandatory. Should values in this field be unique? The ability of this field is to accept either duplicate or unique data. An example of this might be a unique code, like Passport number, where there cannot be more than one number as the same. 53
54 Should this field be indexed? This determines if the field is a key field that determines the uniqueness of a record for importing and updating data. Range: Applies to a range of values (for numeric fields, date fields or time fields) where there may need to be a minimum or maximum range of values, e.g. nos. between 1 and 9. Minimum/Maximum value: This is the place where the users have to enter the minimum and maximum values of the Range referred to above. Is Range Mandatory? This refers to whether or not the record can be saved without a value entered in the Minimum/Maximum fields. Message to be displayed if the Range is violated: 54
55 The message that should appear on the screen if values entered into the fields doesn t lie within the specified range. To Delete a Field : Step 1. Select Component to delete a field (Eg: Employee) Double-click on Component >> Click on User-Defined Fields 55

56 Step 2. Select the Field to be deleted >> Click Delete button 56
57 To Edit a Field : HRDPower Guide for Advanced Users Version 1.0 Step 1. Select Component to delete field (Eg: Employee) Double-click on Component >> Select the Field to be Modified Step 3. Click Edit button >> Change properties of the field (Field Type cannot be changed) >> Click Save >> Click Close. 57
58 58
59 Lookup Lists To Create or Delete Lookup lists and values Step 1. Click Setup >> Click Maintenance >> Click Lookup List. To add a new Lookup List : Step 2. Highlight the contents of the Lookup Heading Type in the name of the new Lookup List which is at the bottom area of the screen Click Add button 59
60 To add items to the new Lookup List : Step 3. Click the word [None] Type the first item to the new Lookup List which is at the bottom area of the screen 60
61 Step 4. Click Add To make changes : Step 1. Select the item from the list box 61

62 Step 2. Change in the Lookup Heading field which is at the bottom area of the screen Click Update To delete item from the list : Step 1. Select the item >> Click Remove >> Click Close 62
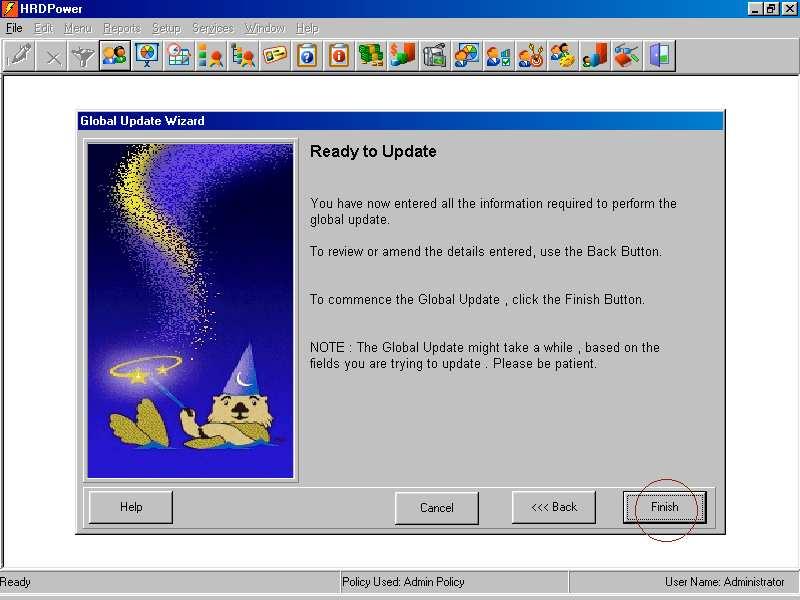
63 Global Update This option is used to change all the data of the selected records, at a stretch. Step 1: Select Setup >> Maintenance >> Global Update Step 2: Read the welcome text and note >> Click Next 63

64 Step 3: Select the component desired for update 64
65 Step 4: Select the component / link component (s) associated with the base component. Step 5: If an criteria exists, apply filter to select the particular group. 65
66 Step 6: Select Next HRDPower Guide for Advanced Users Version 1.0 Step 7: Select a field (s) from the first drop down list, select the kind of arithmetic operator being used, give the value to be updated to 66
67 Step 8: Click add button to save the criteria, this condition appears in the table above. The same process continues to add any more filter(s). Step 9: A confirmation window comes do acknowledge any wrong condition given. This is very critical as no rollback of information can be done if the update is done. So it is advised to take a database backup before update, as database can be restored back if any mishaps. Then click finish button to complete the update. 67
68 68

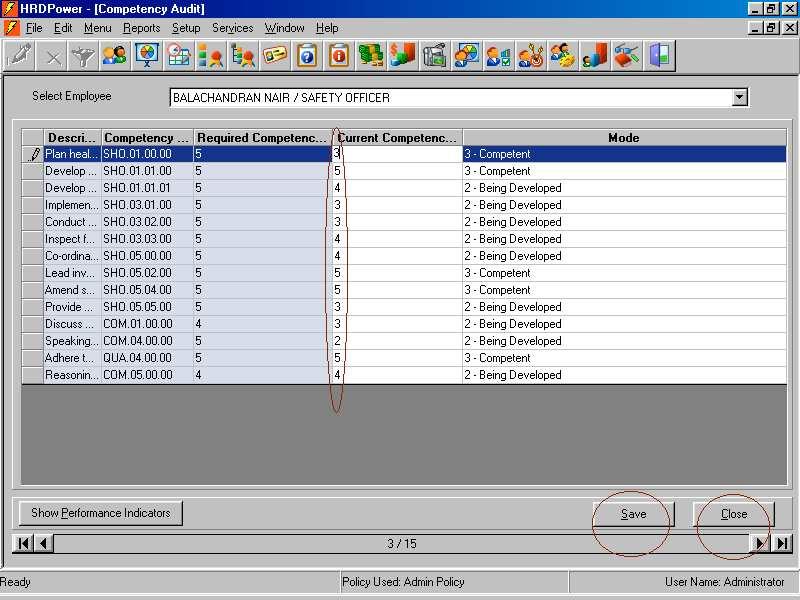
69 Competency Audit Wizard HRDPower Guide for Advanced Users Version 1.0 To enter Skill Audit forms data values in bulk Step 1: Click Setup >> Click Maintenance >> Click Competency Audit wizard A wizard appears on which instructions are visible: Step 2 : Read the text on the wizard >> Click Next 69
70 Step 3 : Select the type of audit to perform Skill Audit - Training Audit Position Audit - Trainer Audit - Study Audit - Employee Audit - Assigning of Current Competency Level for an Employee against his competencies with respect to a position (Position Competencies) Assigning of Proposed Competency Level for the competencies of a Training Program. Assigning of Required Competency Level for a Position Assigning of Accredited Level for a competency to the Trainer Assigning the Assigned Level for a competency after completing the study program. Assigning of Current Competency Level for an Employee (Personal Competencies). 70
71 Step 4: Select the fields to the edited or entered Step 5: Select the fields from the Competency Module which helps in identifying the record better. 71

72 Step 6: Apply Filter if you are have any criteria for selection of records. Step 7: Click finish button to get the set of records which you have requested for. 72

73 Step8: Select Employee from the List. Step 9: Fields with blue shade cannot be edited, only the other fields can be edited. Click Save button to save the changes made Click close button to close the window 73
74 74
75 Competency Rating wizard HRDPower Guide for Advanced Users Version 1.0 This option will be enabled only if in the configuration settings, competencies tab the option Select Tier at which competencies to be assessed should not be All. This is applicable if your competency module has a multi-tired level where you can choose the tier, for which the assessment can be carried. Step 1: Click Setup >> Click Maintenance >> Click Competency Rating wizard A wizard appears on which instruction are visible: Step 2: Read the text on the wizard Step 3: Select the type of audit to perform Skill Audit - Training Audit Position Audit - Trainer Audit - Assigning of Current Competency Level for an Employee against his competencies with respect to a position (Position Competencies) Assigning of Proposed Competency Level for the competencies of a Training Program. Assigning of Required Competency Level for a Position Assigning of Accredited Level for a competency to the Trainer 75

76 Study Audit - Employee Audit - Assigning the Assigned Level for a competency after completing the study program. Assigning of Current Competency Level for an Employee (Personal Competencies). Step 3 : Select the fields to be edited or entered. Step 4 : Select the fields from the Competency Module which helps in identifying the record better. Step 5 : Apply filter if you are have any criteria for the selection of records. Click Finish button to get the set of records which you have requested for. Fields with blue shade cannot be edited, only the other fields can be edited. Click Save button to save the changes made Click Close button to close the window 76

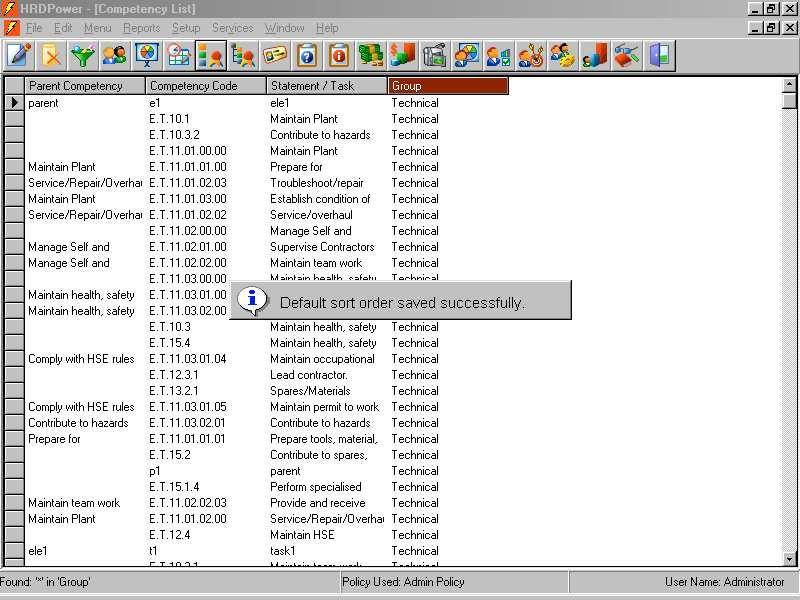
77 Save List order as Default The sort order applied for the List View of a component can be saved using the option. When the component is opened for the next time the saved order shall be retrieved. Step 1: Select Employee or Competency List view. Step2: Click Setup >> Save List order as Default 77
78 78

79 Enter Values Individually in Action Screen When multiple records are selected in Actions screen to assign, and if each record should carry different value then this option shall be checked. 79
80 Security The Security option under Setup provides the facility to Control user access to the various areas of HRDPower. This control is achieved through two steps : 1. Identifying a user. 2. Assigning access permissions specific to that user. Once these have been defined, only those users who have been provided with identification will be able to access records in HRDPower and then only according to the specific permissions assigned to them. Permission is on a Read or Write basis. Read : Means a user is only given the ability to access records for viewing. The record will not be able to be changed by the user; i.e. the Edit button will be disabled. Write : allows you to view records as well as make changes to the record. 80
81 Security Management The Security option under Setup provides the facility to Control user access to the various areas of HRDPower. Once these have been defined, only those users who have been provided with identification will be able to access records in HRDPower and then only according to the specific permissions assigned to them. Step1: Click Security Management >> Click Security Wizard A Wizard Appears which shall navigate Step 2: Policy Management A Policy is one which restricts the user according to the specific permissions assigned. I f Policy Management then you can select one of the options like Create, Modify, Clone, Delete a Policy. 81
82 Step 3: Select Policy Management 82
83 Step 4: Click Add a New Policy >> Next Step 5: Enter New Policy Name 83
 Step 6: Double Click on any component Both Core and User-Define Fields can be accessed for defining permissions.")
84 system Component All the modules/ components and link components in HRDPower (eg.employee) Step 6: Double Click on any component Both Core and User-Define Fields can be accessed for defining permissions. Simultaneously, in the left top quadrant, some options are enable like Allow Read : Means a user is only given the ability to access records for viewing. The record will not be able to be changed by the use Allow write : Allows you to view records as well as make changes to the record. If both options are unchecked, then the user has no permissions for viewing component(s) or Field(s). 84
85 Above three permissions is applicable for below listed List View, Structure View, Details View, Reports Also, Filter can be set for each component and thus you can be restrict the user from viewing other confidential records. 85
86 Edit an Existing Policy is selected or edit existing values accordingly Step 1: Select Setup >> Security Management >> Security Wizard Step2: Select Policy Mangement 86
87 Step 3: Select Edit an Existing policy >> Next Step 4: Select a Policy to Edit >> Next 87

88 Step 5: Click Finish Repeat Create policy steps. If Delete a Policy or Clone an Existing Policy is selected, a list of policies appear, select an appropriate Policy to delete or clone. 88

89 User Management- A HRDPower user can be managed using the authentication. Select one of the options like Create, Modify, Delete a User. 89
90 To Create a New User 90

91 Details Tab : User details can be entered or edited and user name and password for HRDPower Click Save 91
92 If Delete an existing User is selected, a list of users appear, select an appropriate user to delete. Policies Tab : Select an appropriate policy from available policies and assign to the user. If more than a policy is assigned then, after the login screen of HRDPower, User is provided an option to select which policy to be used. 92

93 Click Close in Details Tab. 93
94 Configuration The Configuration section enables you to customize many aspects of your system. Once set, the information provided here will be reflected in various areas of the program. To access the Configuration option, click on Setup and then Configuration. Company Information The Company name given here shall be reflected in all the Standard reports. Also address and logo of the company can be stored here. 94


95 Report Heading All the standard reports are listed here and headings and captions of the fields can be customized. 95

96 Competencies Allow greater than 100% match if this option is checked then, any employee whos match is greater than 100% shall be shown at the actual value. If the option is unchecked then any value greater than 100 will be shown as

97 Automatically assign competencies to employee when assigning a new Position? If this option is checked then, when an employee is assigned to a position, automatically all the position competencies are assigned to employee. If not checked then, manually every competency of a position should be assigned to the employee who is holding the position. 97
98 Automatically assign new competency(s) to employee(s)when it is assigned to their position? This is an enhancement to the above mentioned option. If this option is checked, in future any more competencies are assigned to the position it will automatically assign those competencies to the person holding the position. If not checked, the new competencies assigned to the position shall be manually assigned to the person who is holding the position. 98
99 Select Tier at which Competencies to be assessed - If the competencies has different tiers, then select a tier at which level the competencies should be assessed. If only single tier exist or want to assess for all the competencies select the option All. Also, select the components for which the tier filtration should be applied. 99

100 Apply tier for Related Component View - If the option is checked then, according the tier select above the display in the 4 quadrant window or the details window the the competency display is restricted. Competency Level Descriptions Here we can store the values and descriptions of the levels what the competencies speak. 100

101 Salary Information The information provided here will be considered for the expenditure module in calculations. Financial Information Click Add button and enter the new values in the boxes provided beneath and enter the currency details then, click the Save button in the same quadrant. These values will appear in the above quadrant. 101

102 Select the desired year and click make current as it becomes the current financial year for any calculations of the selected year. 102
103 Reminders HRDPower Guide for Advanced Users Version 1.0 Set a day prior to the exact day, so that you get a reminder whenever you start your HRDPower. This option can be enable from Services menu and click Reminder 103
104 Performance Review Appraisals in HRDPower can be done on five components. Personal Competencies, Position Competencies, Objective, Behaviors, Potentials. Assign an appropriate weight age for each component. 104

105 Database Backup/Restore (A very critical process) Steps for taking a Physical Backup of the Database Make sure all the users are logged out from HRDPower. Shutdown HRDpower. Click Start button, choose HRDPOwer menu and select HRDPower Database Tools option. 105

106 Choose the database ( from the open dialogue box ) Then click the option Compact and wait for the acknowledgement. ( Compress : This process will reduce the database size and is more secure in terms of possible data corruption. ) 106


107 After finishing, click Close button Go to the Database residing folder, copy the file HRDData.mdb paste it in Database backup folder 107

108 Rename the file as <date of backup> HRDData.mdb 108
 and just overwrite in the database residing")
109 Restore Copy the latest HRDData.mdb (compare the dates on the file) and just overwrite in the database residing folder after changing the name to hrddata.mdb. 109
110 Archive/Unarchive This option enables you to store unnecessary records safely to another location where they may be accessed at a later stage. This allows for a smaller and more efficient current record table. The Archive/Unarchive process is based on two record types only Employees and Training Programs. The Finish Date field is the trigger for archiving Employee records and the End Date field is the trigger date for Training Programs. You may archive either or both record types. When you archive Employee records, all the related information linked to each record is also archived. This includes : Employee and their linked : Training Programs Wait Lists Positions Study records Leave records Expenditure records Resource records Competencies Performance Reviews Questionnaires Training Program Dates and their linked : Trainers/Assessors Resources Questionnaires Expenditure Employees (attendees) 110
111 To Archieve : Click File, Archive/Unarchive. Click the Employee and/or Training Program Dates check box to identify which records you want to archive. Fill in the date fields as required. Click Start button to start the archiving process. 111

112 To Unarchive : Click the Employee and/or Training Program Dates check box to identify which records you want to unarchieve. Fill in the date fields. Click Start button to start the unarchiving process. 112
113 Salary Calculator Can perform some simple salary calculations 113

114 Calculator Can be used for simple arithmetic calculations 114

115 Web A native browser of HRDPower can be opened on clicking the Internet Browser. 115

116 Scheduler A simple scheduler is opened where you can put your To Do s, notes etc and which by default is set to today s date. 116

117 Reminder This option is to enable a reminder service in HRDPower, which has been discussed in Configuration 117
118 Sticky Note A small window where text can be typed and on closing the window all the content is destroyed 118
119 Messaging Broadcast Message This window allows user(s) to select any other user(s) and send a message alerts. 119


120 View Message This window display any message posted by other user(s) 120
121 Bulk Appraisal Wizard A wizard appears which shall lead in steps like selecting a particular group using filter(s) on a particular period. Appraisal Rating Entry Form A window appears wherein on selection of Appraisal Period, an employee and the Reviewer, Appraisal form appears with the components for which the employee is being reviewed. 121
122 Bulk Data Entry When the count of records are more for entry into the software, then this option helps you than the conventional method. Step 1 : Read the text and click the Next button 122
123 Step 2 : Select the component for the bulk data entry. Update Existing Data if this option is selected, any of the record matching the filter criteria shall be displayed in the entry / editable form. 123

124 Step 3 : Select the list of fields from the component selected to be displayed for data entry. Step 4 : Apply any filter if any criteria exists. 124

125 Step 5: A new window appears with the list of fields selected with blank rows. After entering the data click save button to store the values. Close Button to close the window. 125
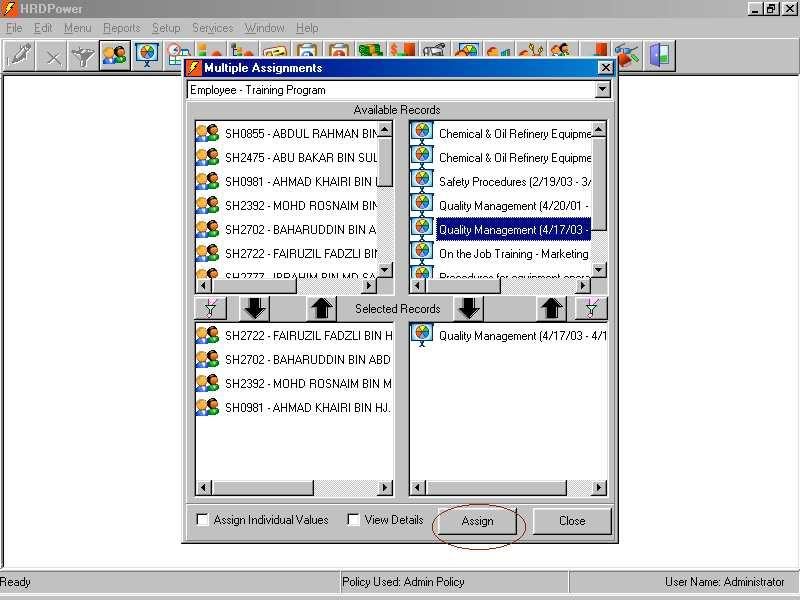
126 Multiple Assignments A four quadrant windows appears. On selection of any combination of the components from the top drop down list then, the records appear in the top two quadrants. Records can be double clicked for selection or filter(s) can be used and those records appear in the bottom quadrants respectively. 126

127 If you require more information on the record, select the record and check View Details at the bottom of the window. The same window expands to show the details of the record. The data in the expanded window cannot be modified. If the records carry different values, check Assign Individual Values option to enter different values for each record, otherwise one value shall be replicated for all the selected records. Click Assign button and fill in the details requested by the respective windows. Close to close the Multiple Assignment window. 127
128 128
129 Training Program Calendar Training Program calendar for the whole year or for selected years can be viewed. This calendar can be printed out or exported into HTML format. Step 1: Read the instructions and click next button Step 2 : Select the Range of Dates which you are looking for and click Next button. Step 3: Filter for any particular Training Programs if required and click Next button Step 4: Show months only where Training Program exists This option displays only the months where the Training Program exist and other month are suppressed. Library Free data on component (eg. Behaviors, Competencies etc) are provided by SMR with International Standards, also user can key-in the records for further use into HRDPower. Select the component, add or edit the records and select the records and click Use in System button, so the selected records shall be transferred to the respective components in HRDpower. How to use Help Help Topics : provides access to the on-line help facility. Content and Index : provides access to the on-line help facility. How Do I : provides access to the help Wizard. About : Gives details about the version of HRDPower. Tip of the Day : provides useful tips relating to the use of HRDPower when it is first started. This function may be switched off by un-checking the Check box on the Tip of the day window. Help Assistant : allows you to select a different animated help wizard. 129

130 Reports (Standard) : There are about 110 standard reports in HRDPower. These reports are available in each and every module of HRDPower. Graphs : Built-in graphs are available in the below mentioned modules. However, you can create your own graphs Employee Training Program Expenditure Trainer 130
131 Designing Reports Designing a report involves three major steps : 1. Defining the search ( What do I want to report on? ) 2. Laying out the page ( How do I want it to look? ) 3. Previewing the report ( How does it look? ) For Reportwriter help 1. Click Reports. 2. Click Report Writer Help To start Reportwriter 1. Click Reports. 2. Click Report Writer 3. Select Components and click OK button. 131
132 132
133 How to use Import in HRDPower Note: Make sure all users are logged out of HRDPower before commencing an import. Take a backup of the database before starting the import. The database is in the server and the file name is HRDData.mdb. Please take your IT persons help while doing the import. Write down the list of fields in the order as they are in the file(excel or any other file), so that mapping becomes easy in the process of Importing data. If any field is a REQUIRED field in Modules (Caption of the field is displayed BLUE in color in the respective modules), make sure the field is included in the importing, Otherwise data shall not be imported and you get an error, which can be viewed in the LOG file of import which you specify. If you have the data file to be imported in a TEXT DELIMITED FORMAT, you start from step 3. But we highly recommend CSV(comma separated values) format. 133
 Step 2.")
134 Step 1. Make sure you have an excel file to import. (The screen shot at the bottom displayed with 5 fields is an example, you can have any number of fields as what to be updated in your database) Step 2. Open EXCEL file Goto FILE menu Click SAVE AS select type as COMMA DELIMITED (.CSV) { or as a TAB DELIMITED (.TXT) } and Click SAVE. We have given the file name as employeelist and stored in desktop (employeelist.txt) or (employeelist.csv) 134


135 Step 3. Go to Start >> HRDPower >> HRDImport 135

136 Step 4. Click Ok (This screen may not pop-up for all.) Step 5 : Click the first three dotted button 136

137 Step 6 : Select the FILE or Change the file type as all files if you can t find your file. Step 7 : Select the text/csv file to be imported and click OPEN button. 137
138 step 8 : Click the second three dotted button Step 9 : Select the HRDPower database, The file shall be in server, if HRDPower is installed in a network and shared between users. The file shall reside in local computer if it s a stand-alone installation. (The file name is ---- HRDData.mdb ) to which the data is to be imported. 138
139 Step 10 : Click the Next button 139
140 Step 11 : Select the Employee component or any other relevant component in regard to the Import data. Step 12 : Select the Type of Separator (Comma or Tab or any other appropriate) from the drop down. 140
141 Step 13 : Is the first row headings? -- If you check this option the first row will be ignored during the import and display is taken off from the lower quadrant of the import screen. Step 14 : Write records not imported to a log file? -- If you check this option, Data of whatever reason is not imported into database will be recorded in a file chosen. Setting this option is recommended, as it will enable you to track down the errors (if any) during an import. Type the log file name, by clicking the Browse button. (Note: Use can also use TEXT file formats to record the details) 141
142 142
143 Step 15 : Select the column 1 from the list to your left, choose a field Associate No from the Destination Field drop down to your right side. You can take a look at the Sample Data for any comparisons with the data in import file provided at the top of the screen. 143
144 Step 16 : Is field to be used as key? -- Use this option if you want to get existing records updated and not get added, but if the record doesn t match, a new record is added. Use this option for Associate Number or any other field which has unique data and no NULL values throughout the database, otherwise there shall be mismatch of records which shall be messy to understand. 144
145 Step 17 : Select the column 2 from the list to your left, choose a field Fullname from the Destination Field drop down to your right side. You can take a look at the Sample Data for any comparisons with the data in import file provided at the top of the screen. The sequences follows the columns in the Import file (Refer to STEP 1) and accordingly map the fields in the current HRDPower database by choosing the correct fields in the Destination Field 145
146 Step 18 : Select the column 3 from the list to your left, choose a field Gender from the Destination Field drop down to your right side. You can take a look at the Sample Data for any comparisons with the data in import file provided at the top of the screen. You can notice, When you select Gender from Destination Field, Should lookups be updated? will be automatically checked. This means, that you have chosen a drop down list field. (Eg; fields like Department, Division, Section etc) 146
147 Step 19 : Select the column 4 from the list to your left, choose a field Date of Birth from the Destination Field drop down to your right side. You can take a look at the Sample Data for any comparisons with the data in import file provided at the top of the screen. 147
148 Step 20 : Select the column 5 from the list to your left, choose a field Date of Joining from the Destination Field drop down to your right side. You can take a look at the Sample Data for any comparisons with the data in import file provided at the top of the screen. Like wise you got to complete all the columns which has to be mapped to the respective fields in the HRDPower Database. NOTE : After you complete the mapping just cross check if you have mapped correctly all the columns and have chosen a correct column as a KEY to update the existing records(this applies for an Update of Records, If the import is being done for the first time in an empty database, this option may not be checked). 148
149 Step 21 : click the Next button. Then click the Yes button. Step 22 : Click the Import to begin an import. 149
150 Step 23 : A status window will display the import progress and statistics, based on this you can refer to step 14 and refer to the log file to check which are the fields which were not imported. This completes the data Import process into HRDPower. Once you complete the import, You can now login into HRDPower and check for the data updates in the corresponding components. If you have selected minimal information to be imported into HRDPower, you have to update the records in HRDPower which you did not select for Import. If you failed to import some records, take an instance from the database which you have backed up and replace the existing database and start from STEP
151 151
152 How do I sort columns in List View? 1. With the List View open, click on the column heading you want as the primary sort. 2. Continue to click on this column heading until you have the type of sort required according to the following color codes: Grey: no order Blue: ascending order Red: descending order 3. Repeat the above steps for other columns if you want to have sub-sorts. locate a record in List View? 1. With List View open, go to the column that holds the information you wish to search. 2. Click on the column heading until it is sorted into either ascending or descending order. 3. Type in the characters for the item you are locating. As you type, the record pointer will progressively move to the required record. 152
153 change the order of columns in List View? Note: This only applies to User Defined Fields. 1. On the Menu Bar, click on Setup, Maintenance and Field Definitions. 2. Select the component you require and double-click on the folder to display the Core Fields and User Defined Fields folders. 3. Click on the + of the User Defined Fields folder to display the list of User Defined Fields. 4. Click on the <Order> button to display the ordered list of User Defined Fields. 5. Select the field whose order you wish to change. 6. Click on the Up or Down arrow to change its position. 7. Repeat for other fields if necessary. 8. Click on <Save> to record your changes. 9. Click on <Close> when finished. 10. Repeat the same procedure for other components as necessary. 11. Click on <Close> when finished. 153
154 save the new list orders as default? 1. Open the relevant List View by clicking on the icon on the Tool Bar or by selecting it from the Menu option on the Menu Bar. 2. From the Menu Bar, select Setup, and Save List Order as Default. 154
155 change the display from List View to Quadrant View? 1. In List View, locate the required record. 2. Double-click on that record to open up the Quadrant View. 155
156 add new User Defined Fields? 1. From the Menu Bar, select Setup, Maintenance and Field Definitions. 2. Select the component you require and double-click on the folder to display the Core and User Defined Fields folders. 3. Click on the + of the User Defined Field folder to display the list of User Defined Fields. 4. Select and highlight the fields below that you wish to position the new field. 5. Click on the <Add> button. 6. Complete the appropriate field properties for the new field. 7. Click on the Display Settings tab to display the field in the List View and to set its order in List View. 8. Click on the Field Definitions tab and click on <Save> to record your changes. 9. Click on <Close> to return to the Field Maintenance dialog box. 10. Repeat the same procedure to add more fields. 11. Click on <Close> when finished. 156
157 edit fields? Notes: 1. You can only edit the field label for Core Fields. 2. You cannot change the Field Type property of any field. To do this, you must delete the field and add a new field with the required Field Type. 1. From the Menu Bar, select Setup, Maintenance and Field Definitions. 2. Select the component you require and double-click on the folder to display the Core and User Defined Fields folders. 3. Click on the + of the relevant fields folder to display the list of either Core or User Defined Fields. 4. Select the required field and click on the <Edit> button. 5. Make any changes in the relevant items as required. 6. Click on <Save> to record your changes. 7. Repeat the same procedure as necessary. 8. Click on <Close> when finished. 157
158 delete User Defined Fields? Notes: 1. You cannot delete Core fields. 2. You will not be asked to confirm your deletion, so make sure you have selected the correct field to delete. 1. From the Menu Bar, select Setup, Maintenance, and Field definitions. 2. Select the component you require and double-click on the folder to display the Core Fields and User Defined Fields folders. 3. Click on the + of the relevant fields folder to display the list of either Core or User Defined Fields. 4. Select the required field and click on the <Delete> button. 5. Click on <Close> when finished. 158
159 move fields? 1. From the Menu Bar, select Setup, Maintenance, and Field Placement. 2. In the Setup Controls dialog box, select the required component that holds the fields you wish to move from the list on the right hand side. 3. Click on the field you wish to move to display the resizing handles. 4. Drag the field to its new location and release the mouse button. 5. Repeat this process for the accompanying field label and any other fields. 6. Change the Tab order if required. 7. Click on <Save> to record your changes. 8. Repeat for other components as necessary. 9. Click on <Close> when finished. 159
160 resize fields? 1. From the Menu Bar, select Setup, Maintenance, and Field Placement. 2. In the Setup Controls dialog box, select the required component that holds the fields you wish to move from the list on the right hand side. 3. Click on the field you wish to resize to display the resizing handles. 4. Resize the field to your requirements by dragging on the appropriate resizing handle. 5. Repeat this process for the accompanying field label and any other fields. 6. Click on <Save> to record your changes. 7. Repeat for other components as necessary. 8. Click on <Close> when finished. 160
161 create a new Lookup List? 1. From the Menu Bar, select Setup, Maintenance, and Lookup Lists. 2. In the Lookup Headings field, highlight the existing Lookup List name and type in the name of your new Lookup List. 3. Click on the word [None] in the list contents box and type in the first value of your new Lookup List in the Lookup Value field. 4. Click on <Add> to enter the new item. 5. Repeat the same procedure for additional items. 6. Click on <Close> when finished. 161
162 add a new item to a Lookup List (direct method)? 1. From the Menu Bar, select Setup, Maintenance, and Lookup Lists. 2. In the Lookup Lists pulldown list, select the Lookup List you wish to add an item to. 3. Select an existing item from the displayed list. 4. Type in the new item in the Lookup Values field. 5. Click on the <Add> button. 6. Repeat the same procedure for additional items. 7. Click on <Close> when finished. 162
163 add a new item to a Lookup List from Quadrant View (User Defined Fields)? 1. In Quadrant View, double-click on the field that has the Lookup List attached. 2. Tick the Check Box marked Add new Lookup Value. 3. Add the new item in the displayed field and click on <Save>. 4. Click on <Ok> to record the change. 163
164 add a new item to a Lookup List from Quadrant View (Core Fields)? 1. In Quadrant View, click on the button beside the Lookup List field. 2. Add the new item in the displayed blank field and click on <Save> to record the change. 3. Click on <Close> when finished. 164
165 edit a Lookup List item? 1. From the Menu Bar, select Setup, Maintenance, and Lookup Lists. 2. In the Lookup Lists pulldown list, select the Lookup List that contains the field you wish to edit. 3. Select the required item from the displayed list. 4. Type in the new item in the Lookup Values field. 5. Click on the <Update> button. 6. Repeat the same procedure additional items. 7. Click on <Close> when finished. 165
166 delete an item from a Lookup List? 1. From the Menu Bar, select Setup, Maintenance, and Lookup Lists. 2. In the Lookup Lists pulldown list, select the Lookup List that contains the field you wish to edit. 3. Select the required item from the displayed list. 4. Click on the <Remove> button. 5. Repeat the same procedure additional items. 6. Click on <Close> when finished. 166
167 assign competencies to an Employee? 1. Open the Employees table by clicking on the Employees icon on the Tool Bar. 2. Locate the required employee from List View. 3. Double-click on this record to display the Quadrant View. 4. Click on the <Actions> button. 5. Select the required Competencies from the lower half of the Assign Competencies tab (you can display the Structure View of Competencies by clicking on the <Structure View> button first, if required). 6. Assign the Competencies by clicking on the Up arrow. 7. Complete the relevant fields in the Details dialog box and click on <Save>. These details apply to all assigned competencies. 8. Click on <Close> when finished. 167
168 assign an Employee to a Position? 1. Open the Positions table by clicking on the Positions icon on the Tool Bar. 2. Locate the required Position from List View. 3. Double-click on this record to display the Quadrant View. 4. Click on the <Actions> button. 5. Click on the Assign Employees tab. 6. Select the required Employee(s) from the lower half of the Assign Employees tab. 7. Assign the Employee(s) by clicking on the Up arrow. 8. Complete the relevant details in the details dialog box and click on <Save>. These details apply to all assigned employees. Note: When an Employee is assigned to a Position, that Position s competencies are automatically assigned to the Employee. The rules for this assignment are as follows: If the Employee already has the competency at the same or a higher Current Performance Level than the Position s Required Performance Level, then that competency will not be assigned. If the Employee already has the competency, but at a lower Current Performance Level than the Position s Required Performance Level, then the Employee s Current Performance Level will acquire the Position s Required Performance Level and the Status will be changed to Training Need, regardless of the Employee s current Status. If the Employee does not have the competency recorded, then it will be recorded with a Status of Training Need and an Current Performance Level 168
169 the same as the Required Performance Level of the Position. The Priority field will default to Click on <Close> when finished. 169
170 assign Employees to a Training Program Date? 1. Open the Training Program Dates table by selecting Training Program Dates from the Menu item on the Menu Bar. 2. Locate the required Training Program Date from the List View. 3. Double-click on this record to display the Quadrant View. 4. Click on the <Actions> button. 5. Select the required Employee(s) from the lower half of the Assign Employees tab. 6. Assign the Employee(s) by clicking on the Up arrow. 7. Complete the relevant fields on the Details dialog box. These details apply to all assigned employees. 8. Click on <Save> to complete the process. 9. Click on <Close> when finished. 170
171 assign an Employee to a Wait List? To assign an Employee to a Wait List, assign the Employee to a Training Program rather than a Training Program Date. 1. Open the Training Programs table by clicking on the Training Programs icon on the Tool Bar. 2. Locate the required Training Program from the List View. 3. Double-click on this record to display the Quadrant View. 4. Click on the <Actions> button. 5. Select the required Employee(s) from the lower half of the Assign Employees tab. 6. Assign the Employee(s) by clicking on the Up arrow. 7. Complete the relevant fields on the Details dialog box. These details apply to all assigned employees. 8. Click on <Save> to complete the process. 9. Click on <Close> when finished. 171

172 transfer Employees from the Wait List to a Training Program Date? To assign an Employee who is recorded on a Wait List for a Training Program to a Training Program Date: 1. Open the Training Program Dates table by clicking on Menu and then Training Program Dates. 2. Find the required Training Program Date and open up the Quadrant View by double clicking on it. 3. Click on the <Actions> button to display the Training Program Dates Actions dialog box. 172
Web TimeSheet Integration Manager for Microsoft Project Server. Version 2.6 USER GUIDE
 Web TimeSheet Integration Manager for Microsoft Project Server Version 2.6 USER GUIDE Notices 2004-2006 Replicon, Inc. All rights reserved. All parts of this manual are the property of Replicon Inc. No
DATABASICS Time User s Guide v3.1
 DATABASICS Time User s Guide v3.1 A Guide to CALIBRE s Time Reporting Website July 2016 CALIBRE 6354 Walker Lane, Suite 300 Alexandria VA 22310 1 Table of Contents Before You Get Started... 3 Accessing
Version /2/2017. Offline User Guide
 Version 3.3 11/2/2017 Copyright 2013, 2018, Oracle and/or its affiliates. All rights reserved. This software and related documentation are provided under a license agreement containing restrictions on
TPN INVOICING SYSTEM. This system allows depots using the TPN depot system to raise client invoices by reading data already held.
 TPN INVOICING SYSTEM This system allows depots using the TPN depot system to raise client invoices by reading data already held. Updated 11 th July 2014 Prepared by and Copyright of ZiPZAP Computers Limited
Skills Management Training Manager for Genesys WFM Administrator Guide
 Skills Management 9.0.0 Training Manager for Genesys WFM Administrator Guide Information contained herein is proprietary and confidential and cannot be disclosed or duplicated without the prior written
Microsoft Dynamics GP. Personal Data Keeper
 Microsoft Dynamics GP Personal Data Keeper Copyright Copyright 2010 Microsoft. All rights reserved. Limitation of liability This document is provided as-is. Information and views expressed in this document,
Productivity. PPS Cart: PulseNet Production Systems. Powerful Tools for Better Performance
 Productivity : PulseNet Production Systems Powerful Tools for Better Performance This page intentionally left blank. I Contents Introduction 1 What is 1 Using this Manual 1 System Setup 2 Open PPS Monitor
ACTAtek Timesheet User Manual
 ACTAtek Timesheet User Manual Version 1.1 30 October 2008 ACTAtek UK Limited Revision History Revision Date Description Author 1.0 7 July 2008 Initial Release Nicola 1.1 16 October 2008 Sage Integration
PlatinumPay Xpress. User Manual. Created: Thursday, November 01, Copyright Execupay Software, LLC.. All Rights Reserved.
 PlatinumPay Xpress User Manual Created: Thursday, November 01, 2012 Copyright Execupay Software, LLC.. All Rights Reserved. 1 Contents Getting Started... 4 System Requirements... 5 Signing In... 5 The
CCC Wallboard Manager User Manual
 CCC Wallboard Manager User Manual 40DHB0002USBF Issue 2 (17/07/2001) Contents Contents Introduction... 3 General... 3 Wallboard Manager... 4 Wallboard Server... 6 Starting the Wallboard Server... 6 Administering
Or, from the View and Manage RFx(s) page, click the Create RFx button. Create New RFx - Use this button to create an RFQ from scratch.
 page, click the Create RFx button. Create New RFx - Use this button to create an RFQ from scratch.") Request for Quote How to Create Create an RFQ To create any RFx (RFI, RFQ, RFP, Auction or Buyer Survey), from the View and Manage RFx(s) page, click on the Create RFx button. Follow the steps below to
Request for Quote How to Create Create an RFQ To create any RFx (RFI, RFQ, RFP, Auction or Buyer Survey), from the View and Manage RFx(s) page, click on the Create RFx button. Follow the steps below to
SECURITY SETUP. Version 5.5
 SECURITY SETUP Version 5.5 User Accounts This document offers step-by-step instructions to create and maintain user accounts for SmartLinx. It also contains a complete list of the permissions and definitions
Contents OVERVIEW... 3
 Contents OVERVIEW... 3 Feature Summary... 3 CONFIGURATION... 4 System Requirements... 4 ConnectWise Manage Configuration... 4 Configuration of Manage Login... 4 Configuration of GL Accounts... 5 Configuration
ACD MIS Supervisor Manual
 Notice Note that when converting this document from its original format to a.pdf file, some minor font and format changes may occur. When viewing and printing this document, we cannot guarantee that your
Getting Started Guide
 Getting Started Guide OAS Freight v 3.2 Welcome Thank you for selecting OAS Freight. This guide is designed to help you become familiar with the OAS Freight software. This guide is not designed to be a
ServicePRO + PartsPRO User Guide
 ServicePRO + PartsPRO User Guide ServicePRO Version 2.0 PartsPRO Version 1.0 Page 1 of 82 1 WHAT IS SERVICEPRO + PARTSPRO?... 4 1.1 What is ServicePRO?... 4 1.2 What are the benefits of using ServicePRO?...
Table of Contents. 2 P a g e
 Skilldex Training Manual October 2012 Table of Contents Introduction to Skilldex... 3 Skilldex Access... 4 Sections of Skilldex... 5 Current Program... 6 Toolbox... 7 Employers... 8 New Employer... 9 All
Invoice Manager Admin Guide Basware P2P 17.3
 Invoice Manager Admin Guide Basware P2P 17.3 Copyright 1999-2017 Basware Corporation. All rights reserved.. 1 Invoice Management Overview The Invoicing tab is a centralized location to manage all types
Hiring Center User Guide for Managers
 Updated 11/19/2018 Hiring Center User Guide for Managers Table of Contents Open a Requisition... 2 Introduction... 2 Getting Started... 2 Opening a Requisition... 2 Assign a Requisition... 4 Introduction...
Personnel Master Data & Terminal
 Personnel Master Data & Terminal Explanation on beas Personnel Master Data & Terminal Boyum Solutions IT A/S Beas Tutorial TABLE OF CONTENTS 1. INTRODUCTION... 3 2. PROCESS... 3 2.1. Header from Master
Contents OVERVIEW... 3
 Contents OVERVIEW... 3 Feature Summary... 3 CONFIGURATION... 4 System Requirements... 4 ConnectWise Manage Configuration... 4 Configuration of a ConnectWise Manage Login... 4 Configuration of GL Accounts...
ExpressMaintenance Release Notes
 ExpressMaintenance Release Notes ExpressMaintenance Release 9 introduces a wealth exciting features. It includes many enhancements to the overall interface as well as powerful new features and options
BillQuick-QuickBooks Advanced Integration Guide 2016
 BillQuick-QuickBooks Advanced Integration Guide 2016 CONTENTS INTRODUCTION 1 HOW TO USE THIS GUIDE 1 SOFTWARE EDITIONS SUPPORTED 2 HOW INTEGRATION WORKS 2 MODES OF SYNCHRONIZATION 3 INTEGRATION RULES 4
Contents OVERVIEW... 3 CONFIGURATION... 4
 Contents OVERVIEW... 3 Feature Summary... 3 CONFIGURATION... 4 System Requirements... 4 ConnectWise Manage Configuration... 4 Configuration of Manage Login... 4 Configuration of GL Accounts... 5 Configuration
Findmyshift - Getting started with Findmyshift
 Findmyshift - Getting started with Findmyshift Managers Creating your first schedule Adding employees to your team Inviting your employees to log in Choosing your settings Entering shifts Publishing shifts
PIMS User Guide USER GUIDE. Polaris Interview Management System. Page 1
 USER GUIDE Polaris Interview Management System Page 1 September 2017 Additional PIMS Resources Job Aid: Competency Identification Worksheet Job Aid: Legal Considerations When Interviewing Video: How to
ACD MIS SUPERVISOR S GUIDE
 Notice Note that when converting this document from its original format to a.pdf file, some minor font and format changes may occur. When viewing and printing this document, we cannot guarantee that your
Connecting Time Matters/Billing Matters and QuickBooks. 35*45 Consulting - Global 7 Second System
 Why Choose QuickBooks... 3 Why Use Billing Matters... 3 Question to Ask... 3 Getting Started in Billing Matters... 4 Getting Started in QuickBooks... 11 Linking Billing Matters and QuickBooks... 14 Using
Version Countries: US, CA Setup and User Manual
 Version 1.0.2.1 Countries: US, CA Setup and User Manual For Microsoft Dynamics 365 Business Central Last Update: January 31, 2019 Contents Description... 4 Business Central Editions... 4 Features... 4
Call Management Version 6.6 User Guide
 Call Management Version 6.6 User Guide Overview Call Management is purpose built software for all PBXs. It provides a complete communications management suite for all users of the system. Users are able
Payroll Processing User Guide. isolved. Payroll Processing Guide
 isolved Payroll Processing Guide Table of Contents My Payroll Processing Calendar... 2 Next Scheduled Payroll... 2 Client Run Schedule... 3 Payroll Entry Setup... 4 Time Entry Templates... 4 Client Time
IBM TRIRIGA Version Getting Started User Guide
 IBM TRIRIGA Version 10.3.1 Getting Started User Guide Note Before using this information and the product it supports, read the information in Notices on page 82. This edition applies to version 10, release
Optus Business Corporate Usage Alerts
 Page 1 P a g e 1 Optus Business Corporate Usage Alerts Customer Admin Portal Administrator Guide February 2016 Version 1.2 Page 2 P a g e 2 Contents Contents... 2 Preface... 4 How This Guide Is Organised...
ALLDAY TIME SYSTEMS LTD. Allday Time Manager Lite User Guide
 Allday Time Manager Lite User Guide 1 Table of Contents Table of Contents... 2 Starting Allday Time Manager... 3 Logging In... 3 Adding a New Employee... 4 Viewing / Editing an Employees Record... 5 General
Chapter Contents. Manage Employers Option Screen
 16: Manage Employers Chapter Contents Create an Employer Account (Registration)... 16-2 Add Employer Locations... 16-6 Assign a Case Manager... 16-8 Add Contacts... 16-9 Assist an Employer... 16-13 Search
Taleo Talent Management System Training. Student Workers. 10/10/ P a g e
 Taleo Talent Management System Training Student Workers 10/10/2017 taleohelp@temple.edu 1 P a g e Table of Contents Navigation..... 3 My Set-up 6 Quick Filters..7 Requisition... 9 Creating a Requisition
Remote Entry. Installation and User Guide
 Remote Entry Installation and User Guide S OFTWARE M ANUAL VERSION 1.0 Copyright? 2003 by Sundial Time Systems Code copyright? 2003 by Sundial Time Systems Sundial Time Systems makes no representation
2005 National Information Services - QuickBill for Easy Dental version 3.0. QuickBill. for Easy Dental. Version 3.0
 QuickBill for Easy Dental Version 3.0 727 E. Utah Valley Dr., Ste. 750 American Fork, UT 84003 Tel: (800) 734-5561 Fax: (801) 847-3800 1 SEPTEMBER 2005 COPYRIGHT 2005 Easy Dental Systems, Inc. and National
Solutions Implementation Guide
 Solutions Implementation Guide Salesforce, Winter 18 @salesforcedocs Last updated: November 30, 2017 Copyright 2000 2017 salesforce.com, inc. All rights reserved. Salesforce is a registered trademark of
, Pacific Timesheet. Timesheet Help.
 Timesheet Help www.pacifictimesheet.com p1 Table of Contents Introduction 4 System Requirements 5 Setup Quick Start 7 Home 10 Change Password 11 My Account 12 Preferences 13 Announcements 15 My Timesheet
AMI AutoAGENT Shop Floor Manager
 AMI AutoAGENT Shop Floor Manager Contents Introduction... 2 Introduction... 3 What's In This Manual... 4 Symbols and Conventions... 5 Shop Floor Manager Navigation Tips... 6 Part 1: Shop Floor Manager
User Guide. Introduction. What s in this guide
 User Guide TimeForce Advanced Scheduling is the affordable employee scheduling system that lets you schedule your employees via the Internet. It also gives your employees the ability to view and print
EMPCENTER 9.6 USER GUIDE
 January 2016 Oregon State University EMPCENTER 9.6 USER GUIDE Policy Profile Students/Temps Hourly Table of Contents EmpCenter Overview... 3 Accessing EmpCenter... 3 Employee Dashboard... 3 Employee Timesheet
Table of Contents. HVAC Remote Manual 2010
 Table of Contents Installation and Upgrades Download of Remote Technician Program Installation of Remote Technician Program Update of Remote Technician Program Using the Update Program Getting Started
Remote Payroll Entry Getting Started Guide IRIS Payroll
 18/02/2014 Remote Payroll Entry Getting Started Guide IRIS Payroll April 2018 Contents IRIS Remote Payroll Entry (RPE)... 3 Introduction... 3 Remote Payroll Entry App... 3 Getting Started with Remote Payroll
Taleo Enterprise. Taleo Compensation Manager Guide
 Taleo Enterprise Taleo Compensation Feature Pack 12B August 31, 2012 Confidential Information and Notices Confidential Information The recipient of this document (hereafter referred to as "the recipient")
Spider Attendance Flow
 Spider Attendance Flow Introduction PCSchool has now made all areas of student attendance available via the PCSchool Web App Spider. This document outlines the new Attendance Flow control and how to use
Manager Dashboard User Manual
 Manager Dashboard User Manual Manager User Guide The Manager User Guide is designed to provide a supervisor or a manager with step-by-step instructions for their daily tasks. Although every database will
Introduction to IBM Cognos for Consumers. IBM Cognos
 Introduction to IBM Cognos for Consumers IBM Cognos June 2015 This training documentation is the sole property of EKS&H. All rights are reserved. No part of this document may be reproduced. Exception:
e-invoicing on the e-prior Supplier Portal
 EUROPEAN COMMISSION DIRECTORATE-GENERAL INFORMATICS Information Systems Directorate e-invoicing on the e-prior Supplier Portal User Manual Version 1.42 Date: 29/02/2012 Author: European Commission, Directorate-
RELEASE NOTES MEX V (Build ) MEX Ipswich Road Annerley QLD PO BOX 6118 Buranda QLD 4102
 MEX Ipswich Road Annerley QLD PO BOX 6118 Buranda QLD 4102") RELEASE NOTES MEX V14.0.2.0 (Build 1.0.0.0) MEX 320-326 Ipswich Road Annerley QLD 4103 PO BOX 6118 Buranda QLD 4102 Ph: +61 7 3392 4777 Fax: +61 7 3392 4888 support@mex.com.au www.mex.com.au 1 MEX Version
RELEASE NOTES MEX V14.0.2.0 (Build 1.0.0.0) MEX 320-326 Ipswich Road Annerley QLD 4103 PO BOX 6118 Buranda QLD 4102 Ph: +61 7 3392 4777 Fax: +61 7 3392 4888 support@mex.com.au www.mex.com.au 1 MEX Version
NorthClark Computing, Inc. Capacity Planning User Guide
 ERP Consulting Web Development Custom Programming Solutions Desktop & Web Applications for Manfact NorthClark Computing, Inc. Capacity Planning User Guide Web and Desktop Applications for Manfact by Epicor
Hiring - Pre-Selection
 Hiring - Pre-Selection Contents Page 3 Page 4 Page 5 Page 6 Page 6-7 Page 7-9 Page 7 Page 8 Page 8-9 Page 10-12 The Hiring Process Candidate Selection Page - Overview Display Candidates Page - Overview
Integrating PPC s SMART Practice Aids with Engagement CS (Best Practices)
") Integrating PPC s SMART Practice Aids with Engagement CS (Best Practices) Select a SMART Practice Aids client engagement for the first time in Engagement CS Prior to launching SMART Practice Aids, open
Integrating PPC s SMART Practice Aids with Engagement CS (Best Practices) Select a SMART Practice Aids client engagement for the first time in Engagement CS Prior to launching SMART Practice Aids, open
PAYGLOBAL EXPLORER USER GUIDE
 PAYGLOBAL EXPLORER USER GUIDE Table of Contents Revised March 2002 by Ian Johnson (PayGlobal Pty Ltd) to include changes for rate over-rides and breaks. Revised June 2002 by Ian Johnson (PayGlobal Pty
Requisition line View New Change Cancel... 60
 User Manual erequisitions - Table of Contents How to use this manual... 4 Overview... 4 to erequisitions... 5 Overview... 5 Navigation... 6 How to access and exit erequisitions... 7 How to change password
M.E.PRO PLUS II V.4.18
 M.E.PRO PLUS II V.4.18 11/17/2016 1 Table of Contents Getting Started ------------------------------------------------------------------------------- 3 Configure and Verify Sign/Site controller ---------------------------------------
TC10. Piecework for Payroll & TimeCard TC-1010
 DSD Business Systems Sage 100 Enhancements TC10 Piecework for Payroll & TimeCard TC-1010 Version 5.40 2 Piecework for Payroll & TimeCard Information in this document is subject to change without notice.
Alberta Prorate IRP System. Online Services User Guide
 Alberta Prorate IRP System Online Services User Guide Document Version: 1.1 Status: Final Date: February 7, 2012 Amendment History - Document Status (e.g. Draft, Final, Release #): Version Modified Date
PeoplePlus Payroll User Guide
 PeoplePlus Payroll User Guide Version : 1.2 Date Issued : September 2011 1 Table of Contents Table of Contents... 2 Introduction... 3 Logging In... 3 PeoplePlus Welcome page... 4 PeoplePlus Payroll Basics...
KeyedIn Projects Project Manager User Guide
 KeyedIn Projects Project Manager User Guide Version 2.0 July 27, 2012 Project Manager User Guide 1 2012 KeyedIn Solutions, Inc. Welcome to the Project Manager User Guide. This user guide will provide you
OpenInvoice Supplier Link. User Guide
 OpenInvoice Supplier Link User Guide December 26, 2017 Contents Introduction Dashboard..................................................................... 3 Using QuickBooks Online Configuration...................................................................
ArchiOffice QuickBooks Integration
 Office and Project Management Solution ArchiOffice QuickBooks Integration Integration Guide BQE Software, Inc. 2601 Airport Drive Suite 380 Torrance CA 90505 Support: (310) 602-4030 Sales: (888) 245-5669
ANZ TRANSACTIVE USER GUIDE
 TRANS-TASMAN ANZ TRANSACTIVE USER GUIDE AUSTRALIA AND NEW ZEALAND 02.2013 Version 1.03 Simplifying and connecting your transaction banking across Australia and New Zealand contents INTRODUCTION TO THE
Performance Manager 5.0.6
 RELEASE NOTES Performance Manager 5.0.6 Release Date: December 10, 2015 Table of Contents Introduction... 3 System Requirements... 3 Release Details... 5 New Feature HealthcareSource Leadership Assessment...
Decor Fusion Inventory Handheld Gun Usage Guide Version Date [Publish Date]
![Decor Fusion Inventory Handheld Gun Usage Guide Version Date [Publish Date]](/thumbs/89/99422607.jpg "Decor Fusion Inventory Handheld Gun Usage Guide Version Date [Publish Date]") Decor Fusion Inventory Handheld Gun Usage Guide Version 1.2.8.41 Date [Publish Date] Revision 1.0.0.0 Revision Date 10/30/2018 Overview Details: The purpose of this document is to provide instructions
Decor Fusion Inventory Handheld Gun Usage Guide Version 1.2.8.41 Date [Publish Date] Revision 1.0.0.0 Revision Date 10/30/2018 Overview Details: The purpose of this document is to provide instructions
ConnectWise-Sage 50 Accounts User Guide
 ConnectWiseSupport@mobiusworks.com www.mobiusworks.com ConnectWise-Sage 50 Accounts Version 3.0.0.7 September 11, 2015 Table of Contents Table of Contents... 2 INSTALLATION AND CONFIGURATION... 4 Introduction...
BillQuick QuickBooks Integration
 Time Billing and Business Management Software Built With Your Industry Knowledge BillQuickQuickBooks Integration Advanced Integration Guide BQE Software, Inc. 2601 Airport Drive Suite 380 Torrance CA 90505
, Pacific Timesheet. Timesheet Help.
 Timesheet Help www.pacifictimesheet.com p1 Table of Contents Introduction 5 System Requirements 6 Setup Quick Start 8 Home 11 Change Password 12 My Account 13 Preferences 14 Announcements 16 My Timesheet
Contents OVERVIEW... 3
 Contents OVERVIEW... 3 Feature Summary... 3 CONFIGURATION... 4 System Requirements... 4 ConnectWise Manage Configuration... 4 Configuration of Manage Login... 4 Configuration of GL Accounts... 5 Configuration
CASELLE Classic Cash Receipting. User Guide
 CASELLE Classic Cash Receipting User Guide Copyright Copyright 1987-2008 Caselle, Inc. All rights reserved. This manual has been prepared by the Caselle QA documentation team for use by customers and licensees
Time Clock Time Clock
 The Last option on the Times/Commissions menu is the Time Clock button. The Time Clock feature allows you to track employees hours. Employees clock in and out, and the system tracks their hours. Employees
Croner Simplify. Croner Simplify. ~ Manager Training Workbook ~ Version 5.0. P a g e 1. January 17
 ~ Manager Training Workbook ~ Version 5.0 P a g e 1 Manager View Managers can see information about themselves and their teams. Their role within Croner Simplify is to complete certain tasks for their
Croner Simplify. Croner Simplify. ~ Manager Training Workbook ~ Version 6.0. P a g e 1
 ~ Manager Training Workbook ~ Version 6.0 P a g e 1 Manager View Managers can see information about themselves and their teams. Their role within Croner Simplify is to complete certain tasks for their
INPEX CONTRACT MANAGEMENT SYSTEM
 INPEX CONTRACT MANAGEMENT SYSTEM Contractors Manual - Prequalification Document No.: PROCON-00256 Document no.: PROCON-00256 Page 1 1 RECEIVING & VIEWING A PREQUALIFICATION INVITATION... 4 2 LOGGING INTO
Manager Training Package. Goal: To accurately and efficiently manage employees time
 Goal: To accurately and efficiently manage employees time Manager Training Package Table of Contents Pre-Payroll Processing Checklist... 2 Reviewing Time:...3 Viewing Employee Time:... 3 ManagingTime:...
Unit4 PSA Suite Business Performance Edition
 for Microsoft Dynamics CRM Unit4 PSA Suite Business Performance Edition Release Notes Unit4 PSA Suite Business Performance Edition July 2017 v.31.07.2017 - MvB (C) Copyright 2017 Unit4 Table of Contents...
User Guide Version
 User Guide Version 2017.1 Copyright 2016 SilkRoad Technology, Inc. All rights reserved. This material is proprietary to SilkRoad Technology, Inc. It contains confidential information owned by SilkRoad
Table of Contents TRIM-P.O.S. Software Corp. (519) FLASHPOINT P.O.S. Software
 FLASHPOINT P.O.S. Software") Table of Contents TIME CLOCK...2 PUNCH IN / OUT...2 CLOCK IN / OUT BREAK...2 DAILY WAGE COST...3 Wage Cost Log...4 Wage Cost Setup...4 TODAY S TIME TOTALS...5 PAY PERIOD REPORT...5 PAY PERIOD SUMMARY REPORT...5
Table of Contents TIME CLOCK...2 PUNCH IN / OUT...2 CLOCK IN / OUT BREAK...2 DAILY WAGE COST...3 Wage Cost Log...4 Wage Cost Setup...4 TODAY S TIME TOTALS...5 PAY PERIOD REPORT...5 PAY PERIOD SUMMARY REPORT...5
Requisitioning Method of Inventory Control
 Requisitioning Method of Requisitioning Method of Course description: Learn how to use emaint Online for inventory tracking, from establishing your inventory records and generating reorder lists through
The Human Resources Information System DATA WAREHOUSE
 The Human Resources Information System DATA WAREHOUSE September 2010 First Edition: 1999 Second Edition: October, 2004 Third Edition: March 2007 Current Edition: September, 2010 Oregon State University,
Schedule Management User Guide
 Schedule Management User Guide Version 18 October 2018 Contents About This Guide... 7 Schedule Overview... 7 Create a Project for Schedule Management... 7 Project Templates Overview... 8 Add a Project
BillQuick QuickBooks Integration
 Time Billing and Business Management Software Built With Your Industry Knowledge BillQuickQuickBooks Integration Integration Guide BQE Software, Inc. 2601 Airport Drive Suite 380 Torrance CA 90505 Support:
Tabs3 Quick Start Guide
 Tabs3 Quick Start Guide Tabs3 Quick Start Guide Copyright 2017 Software Technology, LLC 1621 Cushman Drive Lincoln, NE 68512 (402) 423-1440 Tabs3.com Tabs3, PracticeMaster, and the pinwheel symbol ( )
UC LEARNING CENTER Manager Guide
 UC LEARNING CENTER Manager Guide Table of Contents Introduction 3 UCLC Overview 3 Browser Capability 3 Obtaining a Logon ID 4 Logging into the UC Learning Center 4 Help Contact 4 Navigation 5 Home Page
Ariba Network Online Invoice Guide
 Ariba Network Online Invoice Guide Introduction Regions Financial Corporation Specifications Your Ariba Network Account Invoices Accessing Your Account Account Navigation Account Configuration Settlement/Remit-To
Your business always on. 1. Booking Management
 Your business always on 1. Booking Management 1 CONTENTS CONTENTS... 2 1. INTRODUCTION... 3 About this Document... 3 Overview... 3 Payment & Account Cancellation... 5 2. BOOKINGS... 6 Login & Logout...
Mobile for Android User Guide
 Version 1.7 Copyright 2013, 2017, Oracle and/or its affiliates. All rights reserved. This software and related documentation are provided under a license agreement containing restrictions on use and disclosure
Performance Management System Reference Guide Administrators
 Performance Management System Reference Guide Administrators Administration 6 Manage Company Information... 6 Navigation... 6 Company Data... 6 Company Logo... 6 Password Settings... 6 Review Settings...
Creating Requisitions
 Creating Requisitions Users Guide REVISED 1/27/10 DEL MAR COLLEGE, PURCHASING DEPARTMENT TABLE OF CONTENTS TABLE OF CONTENTS... 2 LOGGING INTO DATATEL - COLLEAGUE... 3 PROCESS FLOW... 5 CREATING A NEW
User s Manual. esims Web. Synthes Information Management Suite.
 User s Manual esims Web. Synthes Information Management Suite. Table of Contents Navigation and Interface Structure of the User Interface 1 Getting Around 2 Search and Edit Search 3 Cycle Count Recording
Transportation Management Accounting Portal Invoice Upload
 Transportation Management Accounting Portal Invoice Upload USER REFERENCE V.5 To help facilitate the submission of transportation invoices for payment, Crowley has designed a solution for the carrier to
USOE. Elementary Grade Book
 USOE Elementary Grade Book Updated - 2009 Table of Contents Introduction... 4 Logging In... 4 Attendance Application... 5 Attendance entry... 6 Grade Book Setup... 7 Define Subject Template... 7 Academic
Pepperi Plugin for SAP Business One
 Pepperi Plugin for SAP Business One April. 2015 Ver 1.1 Contents 1 Introduction...4 1.1 System Requirements... 4 1.2 Glossary... 4 2 System Architecture...5 3 Overview...6 3.1 Installation and Setup...
Retail POS Manual. User Guide - Table of Contents Fall Edition
 2016 - Fall Edition Retail POS Manual User Guide - Table of Contents Overview Use Case(s) Accessing the Tool Opening a Ticket Navigating the POS Screen POS Main Button Functionality Lookup Item Remove
NOVAtime 5000 User Guide
 NOVAtime 5000 User Guide Table of Contents Logging In... 4 Terminology... 4 Dashboard... 5 3.1 The Dashboard Gadgets...5 Changing Timesheet Status... 7 Changing Pay Periods... 8 Timesheet Icons Definitions...
User Manual NSD ERP SYSTEM Customers Relationship Management (CRM)
") User Manual Customers Relationship Management (CRM) www.nsdarabia.com Copyright 2009, NSD all rights reserved Table of Contents Introduction... 5 MANAGER S DESKTOP... 5 CUSTOMER RELATIONSHIP MANAGEMENT...
User Manual Customers Relationship Management (CRM) www.nsdarabia.com Copyright 2009, NSD all rights reserved Table of Contents Introduction... 5 MANAGER S DESKTOP... 5 CUSTOMER RELATIONSHIP MANAGEMENT...
Global Settings. SIMMS Inventory Management Software February 1, 2012
 Global Settings SIMMS Inventory Management Software 2012 February 1, 2012 Contents Global Settings................... 1 General..................... 1 Item & Stock.................... 4 Purchase.....................
Web TimeSheet Integration Manager for Microsoft Project Standard/Professional. Version 4.2 USER GUIDE
 Web TimeSheet Integration Manager for Microsoft Project Standard/Professional Version 4.2 USER GUIDE Notices 2004-2008 Replicon, Inc. All rights reserved. All parts of this document are the property of
Table of Contents. Contents. Introduction. Program Setup. Locations. Warehouses. Company Settings. PM Schedule Templates.
 Contents I Table of Contents Introduction...1 Program Setup...1 Locations...1 Warehouses...3 Company Settings...5 PM Schedule Templates...8 Adding Equipment...13 Configuring Last...15 PM Data The Home