Expedient User Manual Workflow
|
|
|
- Piers Nelson Mason
- 6 years ago
- Views:
Transcription
1 Volume Expedient User Manual Workflow 33 Gavin Millman & Associates Pty Ltd 281 Buckley Street Essendon, VIC 3040 P: W:
2 Table of Contents Contents Introduction...5 Stage One...5 Stage Two...6 Guided Tour Import Workflow...7 Import Job Registration...7 Import Workflow Set up...9 Import Job Milestones...9 Customer Import Milestones Job Milestone Selection / Entry Job Milestone set up Exception Events Options Menu Customer Set Up Customer Level Job Tracking Customer Groups Customer Group Overrides Customer Import Milestone Exemptions Import Workflow Administration Input Workflow Role Categories Input Workflow Work Groups Stream Roles Workflow Job Selection Update User Workflow Groups Input Customer Group Overrides Input Ports For Branches Workflow Sort Workflow Colour Mapping Import Job Status Enquiry Search Screen
3 Results Fields Colours Actions Import Workflow Screen Workflow Screen Results Columns Colours Actions Import Workflow Processes Suppliers Invoice Completed/Parts Classified/CP Questions Answered Import Workflow Reporting Import Job Enquiry Import Job Exceptions CSV Active Events by User Report Import Workflow Options Guided Tour Export Workflow Air Export Job Registration Export Workflow Screen Colours Export Workflow System Set up Export Job Milestones Customer Export Milestones Job Milestone Selection Customer Set Up Customer Level Export Job Tracking Customer Groups Customer Export Milestone Exemptions Workflow Administration Export Workflow Role Categories Export Workflow Work Groups Update User Workflow Groups Export Customer Group Overrides Input Ports for Branches Export Workflow Sort Export Workflow Colour Mapping Export Workflow Processes Export Workflow Reporting Export Job Enquiry
4 Export Job Exceptions CSV Active Events by User Report Export Workflow Options Guided Tour Consol Workflow Air Import Consol Registration Sea Import Consol Registration Workflow Screen Consol Workflow System Set up Consol Milestones Consol Milestone Selection Consol Workflow Administration Input Consol Workflow Role Categories Workflow Regions Workflow Groups Processes
5 Introduction The Expedient Job Tracking and Workflow Module are in two stages: Stage One Set Up Job Tracking 1. Allocate a sequence of steps or events that are required to be completed on a job from creation to completion. These are the job milestones located within Administration> Job Tracking Menu. These milestones are defined by you to suit your internal operational process and procedures, and can be defined by the job profile. Job Profile is described by the following characteristics: Department Job Type o Customs Only o Forwarding and Customs o Customs and Transport o Forwarding, Customs and Transport o Forwarding Only o Forwarding and Transport o Transport Only o All Mode Type (Sea, Air, etc.) Container Class (FCL, LCL, etc.) Milestones can be selected from a comprehensive list of system or manual event types. These event types already exist in Expedient. The system events are recorded automatically when a user performs an action through the menus or when a background process executes, such as an interface. Setting up milestones is done by nominating which of these events are considered imperative to the best practice completion of an import job. 2. Track a status against each Job that is updated automatically based on the last milestone that was completed. 3. Define an exception condition against each milestone. This allows you to define when a milestone will be considered to be in exception if it has not been completed within a particular time frame from another date (eg ETA, Job Registration, Sea Cargo Lodgement). 4. Assign each milestone to a category. This category is a classification of the type of work of the milestone (eg. Forwarding, Accounting, Customs, Transport). 5. Various Job Status Enquiry screens allow for a high level real-time view of the number of jobs at each status or in exception with drill-down capacity describing the precise exception condition that has been breached with direct access to the Job Registration screen. 6. Various Job Status and Exception reports. 5
6 So far the above describes the job tracking functionality. It is recommended that the above functionality be used initially to refine the job milestones and exceptions. The next stage is Workflow. Stage Two WorkFlow This stage of implementing workflow extends the job and consol tracking functionality so that jobs and consols can appear in a user s workflow screen in order showing them the task that they are required to complete. This involves: Allocating milestone categories to personnel roles and using this to create workflow teams. 6

. This is the status of the job which is the last milestone that was completed (by sequence).")
7 Guided Tour Import Workflow Let us begin by taking a guided tour of the Expedient Software Import Job Tracking and Import Work Flow module. Import Job Registration When Job Tracking is enabled each job will be allocated a set of milestones. In the Job Registration Screen the first thing that you will notice is that each job will have a status displayed in the top right hand corner (Milestone). This is the status of the job which is the last milestone that was completed (by sequence). In the job registration screen these can be accessed by the Milestones toolbar option 7
8 Field Name Description Validation Default Type This is the event code. Display Only None Description This is the event description. Display Only None N/A Completed Date This check-box allows the user to mark a milestone as not applicable. Unlike a Completed Manually milestone, a milestone that is marked as N/A will not be used to update the job status. NOTE: When this check box is ticked and unticked, both of these actions will be logged in the Events Table. This field is only modifiable for manual milestones. When a completed date is entered for a manual milestone, an actual event is also created. This can be viewed in Options, View/Add Events. Display Only Unchecked Time This is the Time the Milestone was completed. Display Only None User ID This is the Users ID that is completing the Milestone. This column is hidden by default. Display Only None User This is the Users Name that completed the Milestone. Display Only None Completed Manually This check-box allows the user to complete a milestone manually. If this is the last milestone that is completed in the milestone sequence for this job then this event type is used to update the job status. Unchecked A milestone that is checked as Completed Manually can be unchecked by the user. This will cause the status of the job to revert to the last completed milestone. Repeating This is show whether the Milestone is a repeating Milestone. This column is hidden by default. Display Only None Checked Mark this box when the Milestone has been checked. Unchecked Checked Date / Time This is the date that the Milestone was checked. This column is hidden by default. Display Only Check User ID This is the User that checked the Milestone. This column is hidden by default. Display Only None Check User This field displays the name of the user that checked the milestone. This column is hidden by default. Display Only None Check Count This will display the number of times the Milestone was checked. This column is hidden by default. Display Only None Category This will display the category the Milestone is assigned to. Display Only None 8
9 Import Workflow Set up Import Job Milestones Administration > Job Tracking > Import Job milestones The first step in implementing workflow is to define the sequence of steps or events that are required to be completed on an import job from creation to completion. These are the job milestones. These milestones are defined by you to suit your internal operational process and procedures, and can be defined by job profile. Job Profile is described by the following characteristics: Department Job Type o Customs Only o Forwarding and Customs o Customs and Transport o Forwarding, Customs and Transport o Forwarding Only o Forwarding and Transport o Transport Only o All Mode Type (Sea, Air, etc) Container Class (FCL, LCL, etc) Step One Two Description This is the time to sit down with your staff and understand your own internal process for each job type. It is a great time to standardise your processes. It is a good idea to document what are the tasks performed by staff for import jobs taking note of : The differences between job profiles as defined above. The conditions that are used to determine when a job is in exception. It may be helpful to look at an example of each type of job that is commonly processed by your staff and to examine the events that get generated by the system for the various processes. To do this use: Job Registration, Options View/Add Events The codes used in the Type field are the Event Codes that can be used as milestones. To see a full description of each event code, how and when it is created by the system, select Add on the View/Add Events screen, Zoom on the Event Type field and use the Details button to display full information on each event. 9


10 Three Start Adding your milestones into the system. Administration > Job Tracking > Import Job Milestones 10

11 n Field Name Description Validation Default Department Enter or press Zoom to select a valid department or ALL for all departments. ALL Job Type Enter or select a valid job type from the drop down list. A valid job type can be selected from: o o o o o o o o Customs Only Forwarding and Customs Customs and Transport Forwarding, Customs and Transport Forwarding Only Forwarding and Transport Transport Only All Some Helpful Hints What does a job type of Customs mean? A job type of Customs means that the customs work for these jobs is being done by your company. Within the Expedient System this means that the Customs Broker that you have entered in the Import Job Registration screen is defined in the Customer Master file as Own Company. Note: The job type Customs means Customs Only. That is, the freight forwarding and Transport is not done by your company. 11
12 Field Name Description Validation Default Some Helpful Hints What does a job type of Freight Forwarding mean? A job type of Freight Forwarding means that the freight forwarding work for these jobs is being done by your company. Within the Expedient System this means that the Forwarder that you have entered in the Import Job Registration screen is defined in the Customer Master file as Own Company. Note: The job type Freight Forwarding means Freight Forwarding Only. That is, the customs and Transport work is not done by your company. Some Helpful Hints What does a job type of Transport mean? A job type of Transport means that the Responsible for Transport indicator is set to Yes in the Import Job Delivery Tab. This indicates to the system that your company is responsible for transport. This can be set up in the Customer Masterfile within the Delivery Address > Address Configuration Tab. It is also recommended you set up the Preferred Carriers for the customer in the Customer Masterfile > Options > Preferred Carriers field. Some Helpful Hints What does a job type of Both Customs and Freight Forwarding mean? A job type of Both Customs and Freight Forwarding means that the customs and the freight forwarding work for these jobs is being done by your company. Within the Expedient System this means that the Broker and the Forwarder that you have entered in the Import Job Registration screen is defined in the Customer Master file as Own Company. Mode Type Enter or select a valid mode type from the drop down list. Valid mode types include Sea, Air and All. The list of mode types is equivalent to the Zoom list in the Job Type field in the Import Job Registration Screen. Container Class Enter or select a valid container class from the drop down list. Valid container types include FCL, LCL and All Container Types. The list of mode types is equivalent to the drop down list in the Job Class field in the Import Job Registration Screen. Relevant to Sea freight only. For Air freight use All Container Types. 12

13 Customer Import Milestones Administration > Job tracking > Customer Import Milestones Import job milestones that are specific to a customer can be defined on this screen. Customer specific milestones are searched first to find a match for the job profile before going back to the import job milestone set-up. The milestone selection rules as defined below are the same for customer specific milestones and job milestones. 13


14 The below are options availlable from the Options pull down menu in the screen. Revise Registered Jobs Any modifications made to the job milestone set-up are only reflected in any jobs created after those modifications have been saved. If you want the modifications to apply to jobs created before the modifications were made then use this option. This option will revise the job milestones for all jobs that match the job profile of the currently displayed set of milestones for this customer. Revising milestones will recreate the milestones but preserve any completed or not applicable updates that have been made by the user to milestones that did not change. The following screen will be displayed: Field Name Customer Code Registration From and To Dates ETA From and To Dates Validation Display Only from Customer Milestone options but either this or the ETA date range must be entered but either this or the Registration date range must be entered A limit of 120 days on the date range is applied. Copy Customer Milestones This option allows you to copy the currently displayed set of milestones. When selecting this option you will be required to enter the new Customer and Job Milestone profile information. 14
15 Note: You can set up a different set of job milestones for different job profiles. That is, you can set up a different set for Air Freight, a different set for Sea Freight FCL etc. As a catch all for any job that does not match any of the specific profiles that you have set up, there is the ALL group. This is the default group and has the following values: Job Milestone Selection / Entry Job Milestones are allocated to each import job on creation and update. The selection of which milestones will be allocated to a job occurs in the order defined in the table below. You will notice that the process proceeds from an attempt to make an exact match on the job profile progressively to a more general match on job profile. Match Attempt Dept Job Type Mode Type Container Class 1 Exact Match Exact Match Exact Match Exact Match 2 Exact Match Exact Match Exact Match All Container Types 3 Exact Match All Job Types Exact Match Exact Match 4 Exact Match Exact Match All Mode Types Exact Match 5 Exact Match All Job Types All Mode Types Exact Match 6 Exact Match Exact Match All Mode Types All Container Types 7 Exact Match All Job Types All Mode Types All Container Types 8 All Departments Exact Match Exact Match Exact Match 9 All Departments Exact Match Exact Match All Container Types 10 All Departments All Job Types Exact Match Exact Match 11 All Departments Exact Match All Job Types Exact Match 12 All Departments All Job Types All Job Types Exact Match 13 All Departments Exact Match All Job Types All Container Types 14 All Departments All Job Types Exact Match All Container Types 15 All Departments All Job Types All Job Types All Container Types 15

16 Helpful Hint: When setting up milestones for the first time you can start out by setting up the last two profiles and then progressively add more specific milestones. 1 All Departments All Job Types Sea Freight All Container Types 2 All Departments All Job Types Air Freight All Container Types 3 All Departments All Job Types All Mode Types All Container Types Please note that you will only be able to enter milestone header values that match one of the above 15 templates. If you enter a milestone profile that is different, the validation will display the following message: Job Milestone set up Field Name Description Validation Default Milestone Enter or use the Zoom button to select an event code. Some Helpful Hints The first milestone must always be JOBA. This event is created automatically by the system when a job is added via job registration or any other process that adds jobs into the system. 16
17 Field Name Description Validation Default Some Helpful Hints The last milestone must always be JCOM. This event is completed automatically by the system when all the previous milestones have been completed or marked as non-applicable. Since this is the last milestone, it is always a good idea to give it a high sequence number like Description This displays the description of the event. None Display Only Sequence Status A positive number indicating the numeric sequence in which the milestones are expected to be completed. NOTE: Milestones can be completed out of sequence. Active - A milestone must be marked as active in order to be allocated a job when it is created. Inactive A milestone marked as Inactive will not display in the job milestone screen. Exception - If a milestone is marked as an Exception milestone, then it is not added to the milestones allocated to any particular job until the exception occurs. For a full list of Exception Milestones please see below. Y Manual Event Manual milestones are milestones that are marked as completed by the user. There is no system process that creates this event automatically (and hence completes the milestone). These are usually used for tasks that need to be completed outside of the Expedient system. Once the task is complete, the user will go into the Milestones screen from Job Registration and tick the checkbox to say that the milestone is completed or enter a date and time of completion. None Display Only NA By Default Some Helpful Hints Transhipment Event Milestones marked NA by default will be created against the job with the Not Applicable flag set to Y. This means that the milestone will not affect the status of the job unless the user elects to untick it and make it applicable. If you use the MDEL [Multiple deliveries] milestone and mark is as N/A by default, this milestone will be marked as applicable for the job if it is an Ocean FCL job with more than 1 container when the job is added or updated in the job registration screen. This indicates that this milestone is only applicable to jobs where the Vessel on the job registration screen is on a transhipment vessel. N N 17

18 Field Name Description Validation Default Some Helpful Hints What makes a job a transhipment? In the job registration screen, if the vessel code entered has a vessel name of TRANSHIPMENT in the Vessels Master file. Some Helpful Hints What is special about transhipment milestones? When a transhipment job is updated so that it is no longer on a transhipment vessel, then the transhipment milestones are removed from job s milestones. Hours, Condition, Event/Date These fields are used for specifying exceptions on a milestone. Enter the number of hours and click on the Zoom button that appears. This will show you the list of conditions that can be used for specifying exceptions. Sea Freight: Generally Use 24/48 hours to indicate days Air Freight: Generally use actual hours, e.g. Cargo Report required 3 hrs prior to 1 st arrival. The exception conditions should be read as follows: Should be completed X Hours PRIOR TO <Event Date> Eg. Should be completed 24 Hours PRIOR TO ETA Should be completed NO LATER THAN X Hours AFTER Event Date Eg. Should be completed NO LATER THAN 48 Hours After Job Registration Category Expedient can ensure that Exceptions do not fall on weekends if required. Please contact Expedient Software if you would like to stop exceptions falling on Saturdays and Sundays This is the category of the milestone. Select a category from the drop down list. Refer : Definition of Milestone Categories This is used to indicate the type of work of the milestone. 18
19 Field Name Description Validation Default Repeat Milestones Marked as repeating milestone will allow you to manually check the milestone at job level. Example: If you are checking for Transhipment Vessel details, marking this Repeat field will allow you to mark the milestone as checked at job level. Exception Events Module Exception Event Milestone to be Added Condition for milestone being added against the job Customs CRL Customs Red Line CRLC Customs Red Line Cleared Customs AQH AQIS Hold AQC AQIS Cleared Customs IFIP Import Food IFIS Import Food Inspection Inspection Service Program Hold Helpful Hint 19 Customs Entry response is HOLD for Red Line Customs Entry response is HOLD for AQIS Customs Entry response is HOLD for Food Inspection The CRL, AQH, IFIP events will be generated if this status is returned from Customs. The associated Cleared milestone should be added to your milestone setup as an Exception milestone in order for it to be added to the job milestone when the exception condition occurs. See example below. Example: Import Milestone AQC AQIS Cleared is set up as an exception milestone. Job goes on AQIS Hold, AQH event is populated in to the job events - as a result, the AQC milestone is added into the job milestones to be actioned. Accounting CODR COD CODR COD Customer Invoice Payment Terms: Required Full Required Full Disbursement=0,Final=0 Disbursement Disbursement Accounting CODP COD Full Disbursement Paid Accounting DCOD Disbursement COD Accounting DCOP Disbursement COD Paid Accounting CRDI Disbursement invoice Created Accounting DISP Disbursement Invoice Paid CODP COD Full Disbursement Paid DCOD Disbursement COD DCOP Disbursement COD Paid CRDI Disbursement invoice Created DISP Disbursement Invoice Paid Customer Invoice Payment Terms: Disbursement=0, Final=0 Customer Invoice Payment Terms: Disbursement=0,Final>0 Customer Invoice Payment Terms: Disbursement=0,Final>0 Customer Invoice Payment Terms: Disbursement>0,Final>0, Disbursement<> Final Customer Invoice Payment Terms: Disbursement>0, Final>0,Disbursement <> Final This event is created when a disbursement invoice for the job is fully receipted & posted from Debtors Receipts Screen.

20 Accounting CRFI Final Invoice Created CRFI Final Invoice Created When not using accounting this will need to be manually completed by the user. Customer Invoice Payment Terms: Disbursement>=0,Final>0 Accounting DFIP Final Invoice Paid DFIP Final Invoice Paid Customer Invoice Payment Terms: Disbursement>=0,Final>0 This event is created when a final invoice for the job is fully receipted & posted from Debtors Receipts Screen. When not using accounting this will need to be manually completed by the user. Forwarding Forwarding Job level Sea freight Job Level Air Freight UCMV Container Underbond AMOV Air Underbond Move Job Level Underbond Milestone can be set up for LCL / FAK & Co-load when the job destination port is different to the consol destination port Job Level Underbond Milestone can be set up for Air Jobs when the job destination port is different to the consol destination port Options Menu The below are options available from the Options pull down menu in the screen Option Copy Milestones Description This option allows you to copy the currently displayed set of milestones. When selecting this option you will be required to enter the new Job Milestone profile information. 20


21 Option Revise Registered Jobs Description Any modifications made to the job milestone set-up are only reflected in any jobs created after those modifications have been saved. If you want the modifications to apply to jobs created before the modifications were made then use this option. This option will revise the job milestones for all jobs that match the job profile of the currently displayed set of milestones. Revising milestones will recreate the milestones but preserve any completed or not applicable updates that have been made by the user to milestones that did not change. The following screen will be displayed: Field Name Customer Code Validation Registration and To Dates From but either this or the ETA date range must be entered ETA From and To Dates but either this or the Registration date range must be entered A limit of 120 days on the date range is applied. Copy to Customer Milestones This option allows you to copy the currently displayed set of milestones to a specific customer. These milestones can then be updated in the Customer Import Milestones screen. When selecting this option, you will be required to enter a valid customer code. 21

22 Customer Set Up Customer Level Job Tracking Now that you have set up your import job milestones, it is time to turn on the Job Tracking module. The first decision you have to make is whether to use job tracking for all customers and all jobs or to only enable it on a customer by customer basis. The system default is ALL Customers however, if you elect to enable on a customer by customer basis please contact Expedient & request the job tracking set at customer level, then you will be able to turn job tracking on for those customers in the Customer Master file. Field Name Description Validation Default Import Job Tracking Allow Enable Import Job Tracking When Import Job Tracking is enabled, import jobs created for this customer will be allocated milestones. No Note: This flag is only used when job tracking is set at the customer level instead of system wide. Export Job Tracking Allow Enable Export Job Tracking When Export Job Tracking is enabled, export jobs created for this customer will be allocated milestones. No Note: This flag is only used when job tracking is set at the customer level instead of system wide. 22

23 Customer Groups Administration > Job tracking > Customer Groups This screen holds all valid customer groups. This is where you can add specialised customer groups if required. Sometimes, the needs of some customers are specialized so that their jobs are processed by a particular group of staff with expertise in that area. For instance AUTO for Automotive or PHARMA for Pharmaceuticals. This group can be used so that jobs for these customers are only shown in the workflow of those staff that specialise in this area. A customer group can be overridden by destination port enabling the handling of the customer s jobs to be handled differently in different states if required. Please refer to the section below on Customer Group Overrides. Administration > Job Tracking > Customer Groups Field Name Description Validation Default Customer Group Enter a customer group code (up to 10 char) Group Name Enter a customer group name Once your specialised groups are set up you can assign customers to the specialised groups using Customer Group Overrides See below. 23

24 Customer Group Overrides In the customer masterfile you can assign customers to specific specialised groups. If the groups are blank, the customers will fall into the normal workflow teams. Field Name Description Validation Default Import Air Forwarding Group A valid customer group that is used to categorize this customer for the purposes of import air forwarding workflow. Import Air Customs Group A valid customer group that is used to categorize this customer for the purposes of import air customs workflow. Import Sea Forwarding Group A valid customer group that is used to categorize this customer for the purposes of import sea forwarding workflow. Import Sea Customs Group A valid customer group that is used to categorize this customer for the purposes of import sea customs workflow. Import Transport Group A valid customer group that is used to categorize this customer for the purposes of transport workflow. Billing Group A valid customer group that is used to categorize this customer for the purposes of billing workflow. Customer Service Operator A valid user that is the assigned customer service operator for this customer. 24

25 Customer Import Milestone Exemptions Now, remember when we set up job milestones we did this by job profile. So we set up the milestones that we thought we needed for different types of jobs like Sea Freight LCL or Air Freight. Sometimes some of these milestones are just not applicable for some customers. To exempt some milestones for some customers use the Customer Milestone Exemptions screen. Administration > Job Tracking > Import Milestones Exemptions To enter a customer exemption: Select F ind from the Toolbar Enter or select a valid customer code from the Zoom List. Hit Enter. Select U pdate from the Toolbar. The cursor will move to the details portion of the screen. Field Name Description Validation Default Dept Enter a valid department or select a department from the Zoom list or enter ALL for all departments. Job Type Enter or select a valid job type from the drop down list. A valid job type can be selected from: Mode Type Customs Only Forwarding & Customs Customs & Transport Forwarding, Customs & Transport Forwarding & Transport Transport Only All Enter or select a valid mode type from the drop down list. Valid mode types include Sea, Air and All. The list of mode types is equivalent to the Zoom list in the Job Type field in the Import Job Registration Screen. 25
26 Field Name Description Validation Default Container Class Enter or select a valid container class from the drop down list. Valid container types include FCL, LCL and All Container Types. The list of mode types is equivalent to the drop down list in the Job Class field in the Import Job Registration Screen. Milestone Enter or select a valid event type from Zoom List. 26
 at a high level. We can then assign a role to a user within a particular work group/team.")
27 Import Workflow Administration Input Workflow Role Categories Workflow > Workflow Administration > Import Workflow Administration > Role Categories What this does is tie job milestones to a user role (i.e. who does what) at a high level. We can then assign a role to a user within a particular work group/team. Field Name Description Validation Default User Role Select a role from the drop-down list. A default set of user roles are loaded as part of the Expedient system. If you require further user roles please raise and Expedient Support Ticket. Category Line Details Select from the drop-down list one or more Milestone Categories. This drop down list is the same as that used in the Import Job Milestones screen when assigning a category to a milestone. This section will show the details of all active job milestones and consol milestones that fall into the categories defined for the roles. Some Hints Helpful The manager role should include all milestone categories. Select Find from the Toolbar options. 27

28 Select a role from the drop-down list. Select Update from the Toolbar options. Select from the drop-down list one or more Milestone Categories. This drop down list is the same as that used in the Import Job Milestones screen when assigning a category to a milestone. Input Workflow Work Groups So far you will have completed the following steps: 1. Set up milestones and given each milestone a category. 2. Set up user roles and given each role one or more milestone category. Now you want to tell the System how your office works. Which section of your operation does what kind of work and who within that section does what parts of that work. You may have multiple offices or one office with different sections, or just one office with a small group of staff that do all work for all jobs for all customers. This screen allows you to define a workflow team. When defining a team you are really refining the type of jobs that will appear on the workflow screen of the users that are within those teams. Workflow > Workflow Administration > Import Workflow Administration > Work Groups 28
29 Field Name Description Validation Default Work Group Name A free text name for this work group or team. This can be up to a maximum of 10 characters in length. Branch Enter or select a branch from the zoom list. Dept Enter or select a department from the zoom list. When not entered, all departments within the branch will be included in the user workflow search. Mode Type Select the required Mode Type. If you are selecting Both Sea and Air Freight The Import Air and Import Sea Customer Groups must be the same for the client in the Customer Masterfile configuration tab for them to appear in Workflow. If a Department is selected with Both Sea and Air Freight is selected as the Mode Type the Department will take precedence in the search for jobs to show in Workflow. Active You can set a group up as inactive until you are ready to enable it. Include Consol Workflow You can select to include consol workflow milestones to appear in this work groups workflow. Container Class This section will appear if the Mode Type selected is Sea Freight or Both Sea and Air Freight. Specify which container classes apply to the workgroup or leave the section blank to apply the workflow group to all container classes. Users Detail User Enter or select a valid Users ID. Role Enter or select a valid user role. A user can have more than one role within a team and can be a member of more than one team. Stream Role Using Stream Roles will determine when the job appears in the user s workflow. See below for more details. If you want stream role turned on at your site please contact Expedient. 29
30 Field Name Description Validation Default Cherry Pick When this is set to YES, the user can elect to work on any job in their workflow. When this is set to NO, the user must work on the jobs in their workflow in ETA order. Modified By, On Shows the user that last performed an update on this row Some Helpful Hints It is a good idea to allow cherry picking for all users initially. Job Workflow Tab Group Type This field is for defining the jobs that will be shown in the workflow Group Code Enter a Customer Group. This will limit the workflow for this workflow group to customers with the same customer group in the customer masterfile configuration tab. Origin Region Code This can be used for Work Groups that are looking after certain origin trade lanes / regions. Origin Region Name This is the Name of the selected Origin Region View Level This option can display all jobs Or only jobs for customers not assigned a group Job Filter This option allows additional filtering criteria including Department / Branch / Port. 30
31 Field Name Description Validation Default Filter By Select from one of the following: 1. User Branch Destination Port Only When this option is selected the department in the work group setup is ignored and all jobs for the user s destination ports are displayed in workflow. 2. Department Only When this option is selected all jobs for the work group department or branch are displayed in workflow regardless of destination port. 3. User Branch Destination Port and Department - When this option is selected all jobs for the user s destination ports are displayed in workflow for the work group department or branch. 4. None The same as Department Only Show Jobs When This combination of fields allows you to set up a condition for when jobs will appear in the workflow that is only dependent on there being an outstanding step for the job that the user is responsible for and the show when condition. When this option is used, the normal condition of the user must be responsible for the next step or for any skipped step in the workflow of the job is overridden. Any outstanding step anywhere in the workflow of a job for which the user is responsible (skipped, next or future) will allow the job to appear in the workflow as long as the show when condition is met. When the Show When condition is based on ETA, jobs with blanks ETA dates are always shown (so as not to be missed). Showing blank ETA dates can be disabled at the system level if required. This is done in the Workflow Options screen. Modified By, On Some Helpful Hints Shows the user that last performed an update on the screen Enter the Show When Days and click on the ZOOM button to select the show when condition. 31
32 Field Name Description Validation Default Some Helpful Hints Some Helpful Hints What is User Branch Destination Port Only used for? If a site has multiple offices (branches) but some customers jobs or some part of all jobs are always processed in one of the branches (i.e. transport) then this is a useful way of configuring the system so that the jobs appear in the correct workflow. Where do I map destination ports to branches? Use the Import Ports For Branches screen to map which ports are handled by which branch. 32

33 Stream Roles Using stream roles will determine when the job appears in the user s workflow. See below for more details. No stream role If no stream role is entered for your role, you will see the job in your workflow only when your milestone is the next milestone to be completed, or if your milestone has been skipped. Using the Same role as your stream role When the stream role is your own role, you will see jobs in your workflow immediately. Other milestones do not need to be completed before your milestone appears into your workflow. Using a larger stream role If the stream role is a larger role (the stream role includes more categories including your role) the job will appear in your workflow as soon as the last milestone of the stream role is completed. Example: If Rego and Transport were included into a role & this was added as the stream role for Transport Role, Transport will see the job in their workflow as soon as the last Rego Milestone was completed. Stream role enables you to skip milestones that do not belong to the stream role. In the below example, after the Pre Alert milestone is actioned, the job will go in to the workflow for Transport even if the brokers milestones are not completed. 33

34 If you want stream role turned on at your site please contact Expedient. ` 34
35 Here is an example of how workflow can be set up. MILESTONES CATEGORY ROLE WORK GROUP USERS AN ARRIVAL NOTICE CSLA CONSOL ADD SCAL SCA SUBMITTED FORWARDING taniab FFRT FORWARDING RATE PREP DOD DATE OF DELIVERY IMPORT AIR MELAIR IPRN INVOICE PRINTED scottc ACCOUNTING IPST INVOICE POSTED 35
36 Workflow Job Selection Customer Group View Level Filter By Customer Group Overrides Jobs displayed in work flow ALL None or Department Only General None or Department Only ALL User Branch Destination Port Only General User Branch Destination Port Only ALL User Branch Destination Port and Dept. General User Branch Destination Port and Dept. Yes or No Yes or No Yes or No Yes or No Yes or No Yes or No All jobs for mode and branch/department where the next step required to be done is within the user s role. All jobs for mode and branch/department where the next step required to be done is within the user s role. Only includes jobs for customers where the customer group is blank. Excludes any jobs for customers that have a customer group override for department/destination port. All jobs for mode where the next step required to be done is within the user s role and the destination port is one of the user s branch ports. All jobs for mode where the next step required to be done are within the user s role and the destination port is one of the user s branch ports. Only includes jobs for customers where the customer group is blank. Excludes any jobs for customers that have a customer group override for department/destination port. All jobs for mode and branch/department where the next step required to be done is within the user s role and the destination port is one of the user s branch ports. All jobs for mode and branch/department where the next step required to be done is within the user s role and the destination port is one of the user s branch ports. Only includes jobs for customers where the customer group is blank. Excludes any jobs for customers that have a customer group override for department/destination port. 36
37 Customer Group View Level Filter By Customer Group Overrides Jobs displayed in work flow Non- N/A None/Departm ent Only Non- N/A User Branch Destination Port Only Non- N/A User Branch Destination Port and Dept. Yes or No Yes or No Yes or No All jobs for mode and branch/department where the next step required to be done is within the user s role. Only includes: 1. Jobs for customers where the customer group matches the workgroup customer group. 2. Jobs for customers that have a customer group override for department/destination port and customer group matches the workgroup customer group. All jobs for mode where the next step required to be done is within the user s role and the destination port is one of the user s branch ports. Only includes: 1. Jobs for customers where the customer group matches the workgroup customer group. 2. Jobs for customers that have a customer group override for department/destination port and customer group matches the workgroup customer group. All jobs for mode and branch/department where the next step required to be done is within the user s role and the destination port is one of the user s branch ports. Only includes: 1. Jobs for customers where the customer group matches the workgroup customer group. 2. Jobs for customers that have a customer group override for department/destination port and customer group matches the workgroup customer group. 37

38 Update User Workflow Groups This screen is a reverse view of the previous screen. It allows you to see all the workgroups of which a user is a member and to add or remove the user from work groups. Workflow > Workflow Administration > Import Workflow Administration > User Workflow Groups The following details can be updated on current groups: 1. Role 2. Cherry Pick Field Name Description Validation Default User Enter or select a valid user Work Group A free text name for this work group or team. This can be up to a maximum of 20 characters in length. Transport Group Indicates if the Group is for Transport Display Only Branch Enter or select a branch from the zoom list. Display Only Dept Enter or select a department from the zoom list. When not entered, all departments within the branch will be included in the user workflow search. Display Only Mode Select Sea Freight or Air Freight from the drop down list. Display Only Container Type Indicates what Container type the Group is for Display Only Active You can set a group up as inactive until you are ready to enable it. Display Only 38
39 Field Name Description Validation Default Customer Group Enter a customer group. This will limit the workflow for this workflow group to customers with the same Customer Group in the Customer Master File Configuration tab. Display Only Transport Group Indicates which Transport Group the work group is linked to Display Only View Level Select All or General Group. This field is only required where the Customer Group is blank. Display Only 1. All If you are a user in this team then you will see all jobs that match the other criteria for this group including customers that are classified into a particular customer group. 2. General Group - If you are a user in this team then you will see all jobs that match the other criteria for this group excluding customers that are classified into a particular customer group. Role Enter or select a valid user role Cherry Pick When this is set to YES, the user can elect to work on any job in their workflow. When this is set to NO, the user must work on the jobs in their workflow in ETA order. 39

40 Input Customer Group Overrides In the Customer Masterfile screen we had the ability to add a customer group against the customer. Sometimes a further level of override is required on the customer group. This allows a customer s jobs to be redirected to a specific workflow based on customer group, job type or department and destination port. Workflow > Workflow Administration > Import Workflow Administration > Customer Group Overrides Field Name Description Validation Default Client Code Enter a valid customer code or wildcard when using the Find toolbar option. Has Overrides? Indicates if overrides exists N/A N/A Job Type Enter or select a valid job type. Dept Enter or select a valid department for the job type. The user can enter an override for all departments for a job type by leaving the department blank. When there is an override for all departments then an overrides for a specific department for the same job type is not allowed. Dest Port Enter or select a valid destination port. Customer Group Enter a valid customer group 40

41 Input Ports For Branches This screen determines which ports belong to a Branch within Workflow. Workflow > Workflow Administration > Import Workflow Administration > Ports for Branches Field Name Description Validation Default Branch Code Enter or select a valid branch code when using the Find toolbar option. Port Enter of select a valid port code. Workflow Sort The screen provides the ability to set the order for the jobs listed in the workflow screen. Workflow > Workflow Administration > Import Workflow Administration > Workflow Sort The first, second and third level sorts can be set. If Job Type is selected as a sort order an additional table will appear allowing the Job Types to be sorted as a sub set, e.g. Air Jobs can be shown above FCL jobs to encourage users to deal with these more urgently. 41

42 Field Name Description Validation Default Sort Profile Name This is the name of the sort profile. Select a profile from the pull down list DEFAULT Sort Field 1 Select the type of information for the first level sort of the jobs and select whether the information is sorted in ascending or descending order Sort Field 2 Select the type of information for the second level sort of the jobs and select whether the information is sorted in ascending or descending order Sort Field 3 Select the type of information for the third level sort of the jobs and select whether the information is sorted in ascending or descending order 42

43 Field Name Description Validation Default Sub-Sort Job Type Where Job Type is selected as a Sort Field the Sub- Sort table will appear. Select a sort order with the list of job types Modified By This is the user than last updated the Sort Profile N/A System Generated On This is the date the Sort Profile was last updated N/A System Generated Workflow Colour Mapping The screen allows you to assign colour coding to the Workflow screen. This means you can colour code sea and air import jobs that are closer to ETA and further from ETA making priorities easier to identify in Workflow. The Workflow > Workflow Administration > Import Workflow Administration > Workflow Colour Mapping screen allows you to configure the colour coding. The red colour used to indicate overdue milestones, and the yellow colour used to indicate skipped steps will overwrite the colours configured in the screen below. Field Name Description Validation Default Mode Type Select if the colour mapping applies to Air or Sea jobs Day Prior to ETA This is the number of days before ETA destination in the Job that the colour applies to Conditional: if a Mode Type is selected 43

44 Field Name Description Validation Default Colour This is the name of the colour to be applied. Click on the zoom to select a colour. On OK the actual colour will be displayed in the screen Conditional: if a Mode Type is selected Last Updated This is the date the colour mapping was last modified N/A N/A User This is the user who last update the colour mapping N/A N/A Import Job Status Enquiry Search Screen Enquiry Only > Job Tracking > Import Jobs Status Enquiry This screen allows you to search for import jobs using fields such as job status and milestone category. Field Name Description Validation Default 44
45 Field Name Description Validation Default Customer Code Enter or select a valid customer code or a wildcard. Department Enter or select a valid department. Job Status Enter or select a valid job status (event code) or a wildcard. Responsible For Enter or select a valid user from the Zoom list. Using this field to search will look for jobs for customers that this user is entered as the responsible person in the customer master file Debtors tab. Broker Code Enter or select a valid customer code (broker) or a wildcard. Forwarder Code Enter or select a valid customer code (forwarder) or a wildcard. Consol No Enter a valid consol number or wildcard. Customs / Forwarding Group Enter a valid Customs or Forwarding group or wildcard. Using this field to search will look for jobs for customers where this Customs / Forwarding group matches the Import Air Customs / Forwarding Group or the Import Sea Customs / Forwarding Group in the customer master file Configuration tab. ETA Date Range Enter a valid date range Exclude Completed Jobs When this is checked, then completed jobs are excluded from the search results. Checked Some Helpful Hints What is a completed job? A job is completed when all the milestones are completed or marked as non-applicable. A completed job has a status of JOB COMPLETE (JCOM). Only Show Exceptions When this is checked, then only jobs for which there is an outstanding exception condition or for which there are skipped events are shown in the search results. Unchecked Some Helpful Hints What is an exception? Exception conditions are set up in the job milestones set-up screen. A job is in exception if a milestone has not been completed within a specified time frame. 45
46 Field Name Description Validation Default Some Helpful Hints What is a skipped event? When you set up your milestones, you must enter the sequence in which you expect them to be completed for any given job. Although there is nothing precluding the milestones from being completed out of sequence, it may be useful for you to know this as it may indicate that steps are constantly being overlooked. Order Jobs By Select the order of the search results from the drop down list: ETA Date ETA DATE or Job Number Filter For Select a milestone category from the drop down list. This option is best used with Only Show Exceptions checked. When a filter for category is selected, only jobs with milestones of this category that are in exception are shown in the results. Origin Port Enter or select a valid origin port or wildcard. Destination Port Enter or select a valid destination port or wildcard. Discharge Port Enter or select a valid discharge port or wildcard. View Exceptions / F5 Button In Search Results Hide/Show Criteria Button New Search Button Refresh Button Output to CSV Button When used in the search results screen, this button will pop-up a new screen with the jobs relating to the selected line in the results but will only show those jobs that have an exception or that have a skipped step. After the search results have been displayed, use this button to hide the search criteria part of the screen, showing more of the results. When the search criteria are hidden, the button is renamed to Show Criteria and has the opposite effect. This button allows you enter new search criteria. This button will rerun the current search. This button will create a CSV file with the current results. 46

47 Results Fields Field Job Status #Jobs #Exceptions #Skipped Events Description Job Status A count of all the jobs currently at the displayed job status. A count of the total number of exceptions for the displayed jobs. Each job may have zero or more exceptions. A count of the total number of skipped events for the displayed jobs. Each job may have zero or more skipped events. Colours Colour No Colour Yellow Red Description These jobs have no exceptions and no skipped events These jobs have skipped events but no exceptions. These jobs have exceptions. They may also have skipped events. 47


48 Actions Action Double Click/Enter Description Double Click the left mouse button or hit enter on a results line will open a new window with details of those jobs. Double Click/Enter Opens the import job registration screen for the selected job. Sort Mode button This button will put the screen into sort mode. This will allow you to sort the results by any column by clicking on it and allow you to output the results to a CSV file. When in Sort Mode, the Browse Mode button will take you back to the previous screen. Milestones Button This button will display the milestones for the highlighted job. View Exceptions / F5 Selecting View Exceptions, or by hitting the F5 button on any job with exceptions or skipped events will show you the exact exception conditions that exist. 48


49 Import Workflow Screen Workflow > Import Job Workflow Workflow Screen Results This screen displays the user s workflow. Jobs are displayed in ascending ETA date order by default. However, the screen can be sorted by any column by clicking on the column heading. Manager View Columns Field Name Description Validation Default Client Ref The Client / Cust. reference number from the job Display Only N/A Consol The Consol number Display Only N/A Job The Job Number Display Only N/A External Code This is the External Code from the job Display Only N/A 49
50 Field Name Description Validation Default Job Type The Job Type (LCL/FCL / Air etc.) Display Only N/A House The House Bill Number Display Only N/A Master The Master Bill Number Display Only N/A Dept The Job Department Display Only N/A Customer The Customers Name Display Only N/A Business Unit The Customers Business Unit, from the job Display Only N/A Vessel/Airline The Vessel / Airline Display Only N/A Voyage/Flight The Voyage / Flight Display Only N/A Last Step The last milestone that was completed on the job. This is synonymous with the job status Display Only N/A Orig The Port of Origin Display Only N/A Disc The Port of Discharge Display Only N/A Dest The Port of Destination Display Only N/A ETA The Estimated Date of Arrival of the job Display Only N/A ETA Time The Estimated Time of Arrival Display Only N/A ATA The Actual Date of Arrival Display Only N/A ATA Time The Actual Time of Arrival Display Only N/A Exceptions The number of exceptions for this job. If this is greater than zero, the line is shown in red. Display Only N/A Skipped The number of skipped events for this job. If this is greater than zero, the line is shown in yellow. Display Only N/A Required Step This is the step that is required to be performed by this user on this job. Display Only N/A Docs The number of documents that have been attached to this job. Display Only N/A 50
51 Field Name Description Validation Default Some Hints Helpful How do I get to the Documents Screen? From Job Registration > Documents Tab, or, from the Workflow Screen select the Documents Button, or press D Documents Count Display can be disabled within Workflow options HB This Y/N flag indicates if the Original Bill has been marked as received in the Documents Screen for the job. Display Only N/A CI This Y/N flag indicates if the Supplier Inv has been marked as received in the Documents Screen for the job. Display Only N/A PD This Y/N flag indicates if the Packing Dec. has been marked as received in the Documents Screen for the job. Display Only N/A Entry Status This is the status of the entry as displayed in the Nature 10/20 screen (AU & NZ) Display Only N/A Multi When the job meets the criteria for a Multi Job, MU will be shown in this column. When a Multi Job Entry is created, ME will be displayed in this column. Display Only N/A Vessel Available The Available date of the Vessel Display Only N/A OWENC The Bill of Lading Type Display Only N/A Forwarder The Forwarder code from the job Display Only N/A Forwarder Name The Forwarder Name from the job. This is a system option that can be turned on. Display Only N/A Ship Co The Shipping Company from the job Display Only N/A Ship Co Name The Shipping Company Name Display Only N/A DTVA The Date of Valuation from the job / Bill Cut Date Display Only N/A Field 1 The data stored in Field 1 in the Job, Various Information Tab Display Only N/A Supplier The Supplier Code Display Only N/A Supplier Name The Name of the Supplier Display Only N/A First Arrival The First Arrival date form the job Display Only N/A 51
52 Field Name Description Validation Default Registration Date The Date of the Job Registration. Display Only N/A Broker The Broker from the job Display Only N/A Broker Name The Brokers full name Display Only N/A Bond/Depot The code of the Bond/Depot from the job Display Only N/A Last checked on This is the date the Milestone was last checked Display Only N/A ICS Summary The Customs Status Summary Display Only N/A Field 2 The data stored in Field 2 in the Job, Various Information Tab Display Only N/A INCO The Incoterms of the job Display Only N/A Delivery Date The Delivery Date Display Only N/A Customs Representative The Customers Customs Representative Display Only N/A 52
53 Field Name Description Validation Default Locked By/Allocated To The user name of the user that is currently working on this job. The user s name will be displayed against a job when either: Display Only N/A 1. He/she has gone to the job registration screen from the workflow screen. 2. The Lock/Unlock (F6) button is pressed on a job that is currently not allocated or being worked on by someone else. It serves as a way for staff who may be working on the same set of jobs to know if someone is already working on one of them. The user s name will be cleared from the job when either: 1. The required step is completed. 2. The Lock/Unlock (F6) button is pressed releasing the job back into the workflow pool. If a user has allocated a job to a particular user, that users name will appear next to the job as well. The locking of the jobs is a systems option which can be set up for your company based on All Jobs or Jobs when there is a Show When condition in that work group Role This is the role of the user in relation to this job. A user can have one or more roles in different work groups. Display Only N/A CSU The Customer Service operator listed within the Customer Masterfile > Job Tracking/ Workflow tab, when the job is created. Display Only N/A External Code 2 This is the 2 nd External Code from the job Display Only N/A Weight This is the Actual Weight of the job Display Only N/A Volume This is the Volume of the job Display Only N/A 53
54 Field Name Description Validation Default Field 3 The data stored in Field 3 in the Job, Various Information Tab Display Only N/A DG/Refrigeration The DG/Refrigeration from the job Display Only N/A T/S ETA The Transhipment ETA date from the job Display Only N/A T/S ETD The Transhipment ETD date from the job Display Only N/A T/S Vessel The Transhipment Vessel from the job Display Only N/A Terminal The Terminal Code from the job Display Only N/A Resp. for Transport The Responsible for Transport indicator from the job (Will display as Yes or No) Display Only N/A First Arrival Time The first arrival time from the job Display Only N/A Available Date The Available Date from the job Display only N/A Delivery Time The Delivery Time from the job Display only N/A Check Count The check count of the milestone Display Only N/A ETA Disch Time The ETA Discharge from the job Display only N/A Field 4 The data stored in Field 4 in the Job, Various Information Tab Display Only N/A Field 5 The data stored in Field 5 in the Job, Various Information Tab Display Only N/A Field 6 The data stored in Field 6 in the Job, Various Information Tab Display Only N/A Colours Colour Description No Colour Yellow Red These jobs have no exceptions and no skipped events These jobs have skipped events but no exceptions These jobs have exceptions. They may also have skipped events 54

55 Actions Button Double Click/Enter Refresh Documents Milestones Description Double-clicking on the mouse or hitting the ENTER key on a selected row will open the job registration screen for the selected row. This will disable the workflow screen until the user closes the job registration screen. If you want the workflow screen to remain active after the job registration screen has been opened please contact Expedient Support as this is a system level option that can be enabled This will refresh the workflow screen, by re-running the search for the users jobs This will show the same documents screen as displayed in the Job Registration screen. This allows the user to view and attach documents to the job. Multiple rows can be selected on the screen before this option is used Milestones Button This button will display the milestones for the highlighted job Lock/Unlock( F6) Exc/Skipped (F5) Output to CSV Consol Show Multi Suppliers Invoice Customs Entry The user uses this button to indicate that they are currently working on this job. Their user name is displayed next to the job on the screen. The button is a toggle key to lock/unlock the job. Multiple rows can be selected on the screen before this option is used When used in the search results screen, this button will pop-up a new screen with the jobs relating to the selected line in the results but will only show those jobs that have an exception or that have a skipped step. Multiple rows can be selected on the screen before this option is used. When multiple jobs are selected, all the exceptions for the selected jobs are displayed in one window Output the full results of this user s workflow screen to a CSV file When the job is attached to a consol, by selecting the Consol action you will be directed to the consol of the job When the job is a Multi Job, by selecting this action your workflow screen will display the other related Multi Jobs. When you select Cancel, the regular workflow view will resume This action will take you to the jobs Suppliers Invoices This action will take you to the jobs Customs Entry 55

56 Button Notes Container Management Enquiry (F7) Description This displays the Job Notes for the Job Number selected. Select N (Hot Key) to access the Job Notes. This action will take you to the Container Management Screen This button will display an Enquire Import User Workflow screen Job Number Enter a job number or wild card Container Number Enter a container number or wildcard Consol Number Enter a consol number or wildcard MAWB Enter a master bill number or wild card HAWB Enter a house bill or wild card Customer Group Enter a customer group or wild card. This will show all jobs for customers with this customer group in the Customer Master File Configuration tab Customer Code Enter or select a customer code or wild card User Name Enter or select a user name or wild card. This will show jobs that are currently locked by or allocated to the entered user Exclude Completed Jobs When checked will exclude completed jobs from search results. Extn. Code Enter your global system reference for the job or wild card Extn. Code 2 - Enter your global system 2 nd reference for the job or wild card Customer Service Operator Enter the customer service user name The search results will display in a new workflow screen. NOTE: Not all the actions are available in the search results screen. 56
57 Button Enquire Group Enquire Role Enquire User Show Allocated Show Work Allocate Move Job Description When this button is selected, the user can select a work group and user role from the drop-down lists (both must be selected). This will refresh the workflow screen with the workflow results for the selected work group and role. To return to their own workflow, the user will hit the Escape button or select My Workflow from the drop-down list. When this button is selected, the user can select a user role from the drop-down list. This will refresh the workflow screen with the workflow results for the selected role within the current user s work groups. That is, if the current user s role is Broker for department VCA, and enquires on the role of Compiler then all jobs which require something to be done by a compiler in department VCA will be displayed. To return to their own workflow the user hits the Escape button or select My Workflow from the drop-down list. When this button is selected, the user can enter a user id or select a user id from the zoom option. This will refresh the workflow screen with the workflow results for the selected user as they would see it on their screen. This is particularly useful when a staff member is absent. To return to their own workflow the user hits the Escape button or select My Workflow from the drop-down list. Management Role Only A manager can use this option to display any user/role combinations that have been allocated to the job. Management Role Only A manager can use this option to display how much time was spent working on the job. This is strictly just start and end time between a job being locked by a user and the job being released by the user. If the Stopped column is empty against a specific line item, the Unlock button is displayed and you are then able to unlock the Job. Management Role Only A manager can use this option to allocate a job to a specific user and role. Management Role Only A manager can use this option to move a job into a specific work-group. When a job has been moved into another work-group it is only seen by users assigned to that group. The outstanding milestones are still only displayed to the appropriate role(s) within that work group. 57

58 Import Workflow Processes Process Description Run Via Auto-Update Date Of Delivery The DOD (Date of Delivery) Event and Milestone will be completed when: An actual delivery date is entered when a delivery document is printed. An actual delivery date is entered in the Various Information tab. When the Auto Import Delivery Date Update process runs if it has been enabled in the Customer Master File Configuration tab. Cron Archive Milestones Auto-Complete Jobs For Customs Sites: When Auto-update days have elapsed after Clearance, the delivery date on the job is set to the Clearance date for jobs not yet delivered for this customer. For Non-Customs Sites: When Auto-update days have elapsed after ETA, the delivery date on the job is set to the ETA date for jobs not yet delivered for this customer. This is generally used for customers for whom you do not do deliveries. Milestones should be regularly archived. This process moves job milestones into an archive table. Once they have been moved, they can still be viewed using all Milestone options but cannot be edited. Only completed jobs will have their milestones archived. Job Milestones will be archived a selected number of days after the job is completed (i.e. after all milestones are completed). The number of days is configurable on a site by site basis. A job does not move to Job Completed status until all the milestones are completed or marked as N/A. This process allows all uncompleted job milestones to be completed a selected number of days after a selected milestone has been completed. For instance, 10 days after the delivery milestone has been completed. The number of days and the selected milestone is configurable on a site by site basis. 58 Cron Cron
59 59
60 Suppliers Invoice Completed/Parts Classified/CP Questions Answered There may be multiple import supplier s invoices added for an import job before the Suppliers Invoice Completed task is considered complete. Additionally, all parts for all invoices for the import job may be classified by a different user role and may be done after all invoices are entered. For Australian sites, the same will apply for answering CP questions. Milestone SICC, PARC,CPQA PARC CPQA (AU Only) Description SICC Supplier Invoices Completed PARC Parts Classified CPQA CP Questions Answered (AU Only) The SICC milestone is checked when: When: An invoice is added or an invoice is modified or Specify Quantities option is selected AND The entered and calculated amounts are the same, and There are no unspecified quantities. There is an SICC milestone against the job and it has not been completed. Ask user question: Do you have additional invoices to add to this clearance? (NOTE: this question is only asked if the system switch has been enabled to do so. Please let us know if you want this enabled) If the user answers NO then re-evaluate the following events and create if the required criteria are met: SICC All invoices for the job meet 1) and 2) criteria above. PARC All parts are classified for all invoices for the job CPQA All CP Questions are answered for all invoices for the job Checked When: The SICC milestone is checked (as above) After the user selects the Classify option from within the invoice or any of the reset options. Checked When: The SICC milestone is checked (as above) After the user selects the Answer CP Questions option After the user selects the Classify option from within the invoice or any of the reset options. 60
61 Import Workflow Reporting Import Job Enquiry Please refer to the Query Module User Manual Import Job Exceptions CSV Please refer to the Query Module User Manual Active Events by User Report This report will display a count of events performed by user for a specific date range. This can be run as a standard report or as a CSV file and can be an autoreport. 61

62 Import Workflow Options The following system options can be enabled/disabled in the Workflow > Workflow Administration > Import Workflow Administration > Workflow Options screen: 62
63 63
64 Option Description Default Always show blank date? Disable document count display? Disable lock in workflow? Warn only when line is locked? Workflow screen waits while user in the registration? Show jobs with invalid customer codes and consols with invalid O/S Agent codes? Refresh workflow screen after return from registration screen? Keep user sort on refresh? Auto-initiate workflow screen for users? This only applies to non-transport work groups with a Show When condition. The blank date applies to the date used in the Show When condition. Jobs or consols that have been allocated manually to a user or work group are always shown in the workflow regardless of date. When disabled, the Docs column is hidden and a count of the physical documents is not performed. This should be disabled when there is an issue with the documents server. Do not mark the job or consol as locked by the user when going to a registration screen from workflow. When this option is used, cherry picking cannot be turned off. This means that the screens Workflow/Workflow Administration/Input Workflow Work Groups and Workflow/Workflow Administration/Update User Workflow Groups will not allow the Cherry Picking flag to be updated to N o. Allow users to go to a registration screen from workflow for a job or consol locked by another user in workflow, they are given a warning only and not prevented from going to the registration screen. The workflow screen is disabled when the user selects a line and is directed to the registration screen. The workflow screen becomes active again when the registration screen is closed. Show jobs in workflow that have customer codes that are not in the Customer Master File and show Consol that have invalid Overseas Agent codes. This is useful when jobs and consols are created via an interface and the codes are sometimes not recogised in Expedient. The workflow screen is refreshed automatically when a user closes the registration screen (that was opened from workflow). Keep the user s column sort when refreshing the workflow screen. The workflow screen is initiated from login. This only applies to sites with the Workflow module, where the user has been added to an active work-group. This option is for users that are not managers. No No No No Yes No Yes No No 64
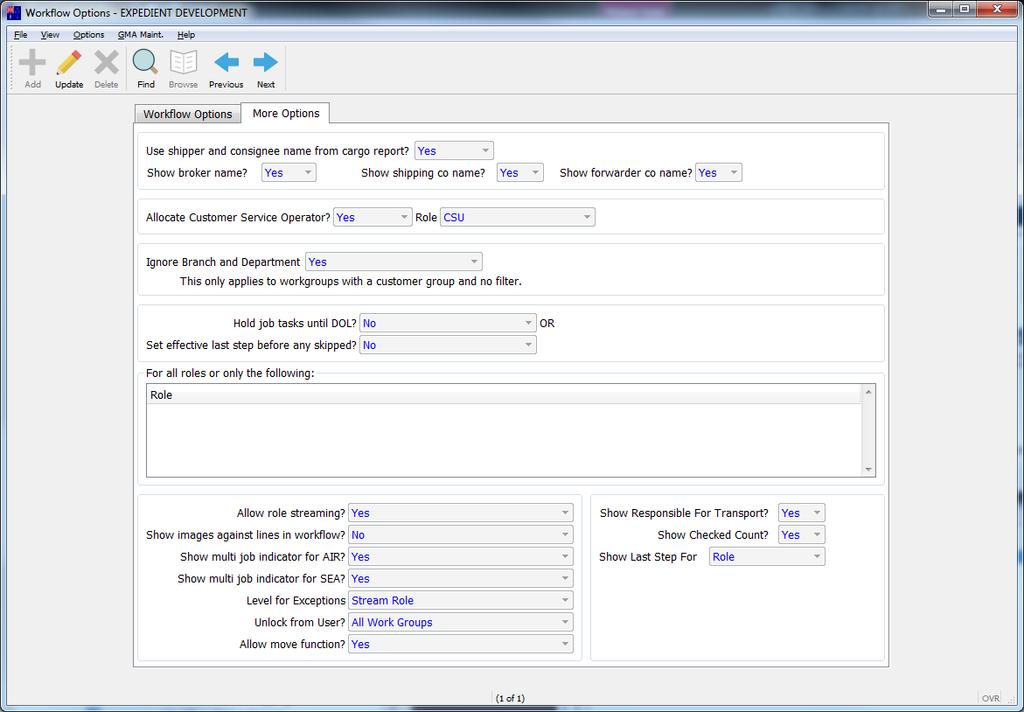
65 Maximum number of lines shown on workflow screen for users Auto-initiate workflow screen for managers? Maximum number of lines shown on workflow screen for managers Use shipper and consignee name from cargo report? Show broker name Show Shipping Co Name Show forwarder co name Allocate Customer Service Operator Ignore Branch and Department Hold job tasks until DOL? The maximum number of lines shown on the workflow screen for users that are not managers. Please note that increasing this parameter may have an impact on the workflow screen speed. The workflow screen is initiated from login. This only applies to sites with the Workflow module, where the user has been added to an active work-group. This option is for users that are managers. The maximum number of lines shown on the workflow screen for users that are managers. Please note that increasing this parameter may have an impact on the workflow screen speed. More options Tab This is only available for sites with the FORWARDING module enabled. When jobs with invalid customer codes are displayed the customer and supplier name will be taken from the air or sea cargo report (if present). This option controls if the full broker name is available as a workflow column. Showing the name can slow down workflow. Showing the Broker code is quicker. This option controls if the shipping companies name is available as a workflow column. Showing the name can slow down workflow. This option controls if the forwarders name is available as a workflow column. Showing the name can slow down workflow. When a job is created, the CSU role will be allocated to the customer service operator that has been set up in the customer master file for the job s customer code. Tasks with a category that has been allocated to the CSU role will be assigned to that specific operator. This option is linked to the DOCA (Documents Attached) event and the DOCM (Documents Missing) event. When the DOCA event is created, the CSU operator assigned to the job will be unassigned. When the DOCM event is created, the CSU operator will be assigned to the job. Ignore the job department and user s branch when selecting jobs to show in workflow when the work group has a customer group. This is only available for sites with the CUSTOMS module enabled. Jobs with tasks to be done after DOL (Date of Lodgement) in the milestone sequence will not be shown to the associated roles until the DOL milestone is completed (even if considered to be skipped). 800 No 2000 No No No No No No 65
66 Hold job tasks until DOL for the following roles Set effective last step before any skipped Allow Role Streaming Show images against lines in workflow Show multi job indicator for AIR Show multi job indicator for SEA Level for exceptions Unlock from user Allow move function Show responsible for transport Show checked count Show last steps for The roles for which the Hold job tasks until DOL? option applies. This option will display the last completed step without any prior skipped steps as the effective last completed step. This option will allow role streaming This option controls if images are available as a workflow column. This option controls if the multi job indicator is available as a workflow column for air jobs. This option controls if the multi job indicator is available as a workflow column for sea jobs. This option controls if exceptions are shown at role level or stream role level. This option controls when to unlock from user role for all work groups, workgroups with show when conditions, or not unlock. This option controls whether the move function is allowed for managers. This option controls if the responsible for transport flag is available as a workflow column. Showing the name can slow down workflow. This option controls if the checked count is available as a workflow column. Showing the name can slow down workflow. This option controls if the last step is displayed for the job, the users role or the users stream role. No No No No Yes Yes Role No Yes No No Job 66

.")
67 Guided Tour Export Workflow Let us begin by taking a guided tour of the Expedient Software Export Job Tracking and Export Work Flow module. Air Export Job Registration When Job Tracking is enabled each job will be allocated a set of milestones. In the Job Registration Screen the first thing that you will notice is that each job will have a status displayed in the top right hand corner (Milestone). This is the status of the job which is the last milestone that was completed (by sequence). In the job registration screen these can be accessed by the Milestones toolbar option Field Name Description Validation Default Type This is the event code. Display Only Description This is the event description Display Only None None 67

68 Field Name Description Validation Default N/A Completed Date This check-box allows the user to mark a milestone as not applicable. Unlike a Completed Manually milestone, a milestone that is marked as N/A will not be used to update the job status. NOTE: When this check box is ticked and unticked, both of these actions will be logged in the Events Table. This field is only modifiable for manual milestones. When a completed date is entered for a manual milestone, an actual event is also created. This can be viewed in Options, View/Add Events. Unchecked Completed Time This field is only modifiable for manual milestones. User Completed Manually This field displays the name of the user that completed the milestone. This check-box allows the user to complete a milestone manually. If this is the last milestone that is completed in the milestone sequence for this job then this event type is used to update the job status. A milestone that is checked as Completed Manually can be unchecked by the user. This will cause the status of the job to revert to the last completed milestone. Display Only Unchecked Export Workflow Screen Workflow > Export Job Workflow This screen displays the user s workflow. Jobs are displayed in ascending ETD date order by default. However, the screen can be sorted by any column by clicking on the column heading. Field Name Description Validation Default Shipper Ref The shipper reference Display Only N/A Job The job number Display Only N/A 68
69 Field Name Description Validation Default External Code Job Type The corporate job number Enabled for sites that use a corporate system job interface The job type. For export sea jobs will show the container type (FCL, LCL, FCX, BREAK BULK etc) For export air jobs will show AIR. Display Only Display Only House The house bill Display Only N/A Master The master bill number Display Only N/A Dept The department Display Only N/A Shipper The shipper s name Display Only N/A Business Unit Vessel/Airline The name of the client business unit Applicable to sites using business units The name of the vessel for Sea jobs. The name of the airline for Air jobs. Display Only Display Only Voyage/Flight The Voyage id or flight number Display Only N/A Last Step The last milestone that was completed on the job. This is synonymous with the job status. Display Only Orig The port or origin. Display Only N/A Disc The discharge port Display Only N/A Dest The destination port. Display Only N/A ETD The Estimated Date of Departure of the job Display Only N/A Recv Start Date The receiving start date for Ocean jobs Display Only N/A Recv Start Time The receiving start time for Ocean jobs Display Only N/A Cut-Off Date The cut-off date for Ocean jobs Display Only N/A Cut-Off Time The cut-off time for Ocean jobs Display Only N/A Exceptions Skipped Required Step Docs The number of exceptions for this job. If this is greater than zero, the line is shown in red. The number of skipped events for this job. If this is greater than zero, the line is shown in yellow. This is the step that is required to be performed by this user on this job. The number of documents that have been attached to this job. Display Only Display Only Display Only Display Only Cargo Status The IATA FWB status for air jobs. Display Only N/A Field1 Field 1 in the Additional Information tab in the job registration screen Display Only N/A N/A N/A N/A N/A N/A N/A N/A N/A N/A 69
70 Field Name Description Validation Default Consol The consol number where applicable Display Only N/A Consignee The consignee code Display Only N/A Consignee Name Registration Date The consignee name Display Only N/A The date of job registration Display Only N/A O/S Agent The O/S Agent Code Display Only N/A Shipping Line The shipping line code Display Only N/A Terminal/Depot The terminal or depot code Display Only N/A ETA The Estimated date of arrival Display Only N/A Delivery Date The delivered date Display Only N/A Bill To Name The bill to name Display Only N/A Locked By/Allocated To Role The user name of the user that is currently working on this job. The user s name will be displayed against a job when either: He/she has gone to the job registration screen from the workflow screen. The Lock/Unlock (F6) button is pressed on a job that is currently not allocated or being worked on by someone else. It serves as a way for staff who may be working on the same set of jobs to know if someone is already working on one of them. The user s name will be cleared from the job when either: The required step is completed. The Lock/Unlock (F6) button is pressed releasing the job back into the workflow pool. If a user has allocated a job to a particular user, that users name will appear next to the job as well. This is the role of the user in relation to this job. A user can have one or more roles in different work groups. Display Only Display Only N/A N/A 70


71 Colours Colour No Colour Yellow Red Description These jobs have no exceptions and no skipped events These jobs have skipped events but no exceptions. These jobs have exceptions. They may also have skipped events. The above are default colours when no site specific colours relating to ETD have been configured. Button Refresh Documents Milestones Description This will refresh the workflow screen, by re-running the search for the users jobs. This will show the same documents screen as displayed in the Job Registration screen. This allows the user to view and attach documents to the job. Multiple rows can be selected on the screen before this option is used. Milestones Button This button will display the milestones for the highlighted job. Lock/Unlock( F6) Exc/Skipped (F5) The user uses this button to indicate that they are currently working on this job. Their user name is displayed next to the job on the screen. The button is a toggle key to lock/unlock the job. Multiple rows can be selected on the screen before this option is used. This button shows any exceptions or skipped events on the current job. Output to CSV Output the full results of this user s workflow screen to a CSV file. 71

72 Button Double Click/Enter Enquiry (F7) Description Double-clicking on the mouse or hitting the ENTER key on a selected row will open the job registration screen for the selected row. This will disable the workflow screen until the user closes the job registration screen. If you want the workflow screen to remain active after the job registration screen has been opened please contact Expedient Support as this is a system level option that can be enabled. This button will display a Workflow Enquiry Screen. Enquire Role Job Number Enter a job number or wild card. Master Enter a master bill or wild card. House Enter a house bill or wild card. Customer Group Enter a customer group or wild card. This will show all jobs for customers with this customer group in the Customer Master File Configuration tab. Customer Code Enter or select a customer code or wild card. User Name Enter or select a user name or wild card. This will show jobs that are currently locked by or allocated to the entered user. Exclude Completed Jobs When checked will exclude completed jobs from search results. The search results will display in a new workflow screen. NOTE: Not all the actions are available in the search results screen. When this button is selected, the user can select a user role from the drop-down list. This will refresh the workflow screen with the workflow results for the selected role within the current user s work groups. To return to their own workflow the user hits the Escape button or select My Workflow from the drop-down list. 72
73 Button Enquire Group Enquire User Notes Allocate Show Allocated Show Work Move Job Description When this button is selected, the user can select a work group and user role from the drop-down lists (both must be selected). This will refresh the workflow screen with the workflow results for the selected work group and role. To return to their own workflow the user hits the Escape button or select My Workflow from the drop-down list. When this button is selected, the user can enter a user id or select a user id from the zoom option. This will refresh the workflow screen with the workflow results for the selected user as they would see it on their screen. This is particularly useful when a staff member is absent. To return to their own workflow the user hits the Escape button or select My Workflow from the drop-down list. This displays the Job Notes for the Job Number selected. Select N (Hot Key) to access the Job Notes. Management Role Only A manager can use this option to allocate a job to a specific user and role. Management Role Only A manager can use this option to display any user/role combinations that have been allocated to the job. Management Role Only A manager can use this option to display how much time was spent working on the job. This is strictly just start and end time between a job being locked by a user and the job being released by the user. If the Stopped column is empty against a specific line item, the Unlock button is displayed and you are then able to unlock the Job. Management Role Only A manager can use this option to move a job into a specific work-group. When a job has been moved into another work-group it is only seen by users assigned to that group. The outstanding milestones are still only displayed to the appropriate role(s) within that work group. Export Workflow System Set up Export Job Milestones The first step in implementing workflow is to define the sequence of steps or events that are required to be completed on an export job from creation to completion. These are the job milestones. These milestones are defined by you to suit your internal operational process and procedures, and can be defined by job profile. Job Profile is described by the following characteristics: 73

74 Department Job Type (Prepaid, Collect or All) Mode Type (Sea, Air, etc) Container Class (FCL, LCL, etc) Step One Two Description This is the time to sit down with your staff and understand your own internal process for each job type. It is a great time to standardise your processes. It is a good idea to document what are the tasks performed by staff for export jobs taking note of : The differences between job profiles as defined above. The conditions that are used to determine when a job is in exception. It may be helpful to look at an example of each type of job that is commonly processed by your staff and to examine the events that get generated by the system for the various processes. To do this use: Job Registration, Toolbar Option Events The codes used in the Type field are the Event Codes that can be used as milestones. To see a full description of each event code, how and when it is created by the system, select Add on the View/Add Events screen, Zoom on the Event Type field and use the Details button to display full information on each event. Three Start Adding your milestones into the system. Administration > Job Tracking > Export Job Milestones 74

75 Field Name Description Validation Default Department Job Type Some Helpful Hints Mode Type Container Class Enter or press Zoom to select a valid department or ALL for all departments. Enter or select a valid job type from the drop down list. A valid job type can be selected from: Collect Prepaid All What does a job type of All mean? A job type of All applies to all jobs. Enter or select a valid mode type from the drop down list. Valid mode types include Sea, Air and All. Enter or select a valid container class from the drop down list. Valid container types include FCL, LCL and All Container Types. The list of mode types is equivalent to the drop down list in the Job Class field in the Export Sea Job Registration Screen. ALL 75

76 Field Name Description Validation Default Some Helpful Hints What container class is applicable to AIRFREIGHT? The Container class is only relevant to SEAFREIGHT, so for all other mode type use All Container Types. Customer Export Milestones Export job milestones that are specific to a shipper can be defined on this screen. Customer specific milestones are searched first to find a match for the job profile before going back to the export job milestone set-up. The milestone selection rules as defined below are the same for customer specific milestones and job milestones. Administration > Job Tracking > Customer Job Milestones Below are the options available from the Options pull down menu in the screen 76


77 Revise Registered Jobs Any modifications made to the job milestone set-up are only reflected in any jobs created after those modifications have been saved. If you want the modifications to apply to jobs created before the modifications were made then use this option. This option will revise the job milestones for all jobs that match the job profile of the currently displayed set of milestones for this customer. Revising milestones will recreate the milestones but preserve any completed or not applicable updates that have been made by the user to milestones that did not change. The following screen will be displayed: Field Name Customer Code Registration From and To Dates ETD From and To Dates Validation Display Only but either this or the ETD date range must be entered but either this or the Registration date range must be entered Copy Customer Milestones A limit of 120 days on the date range is applied. This option allows you to copy the currently displayed set of milestones. When selecting this option you will be required to enter the new Customer and Job Milestone profile information. 77
78 As you can probably tell by now, you can set up a different set of job milestones for different job profiles. That is, you can set up a different set for Air Freight, a different set for Sea Freight FCL etc. As a catch all for any job that does not match any of the specific profiles that you have set up, there is the ALL group. This is recommended to ensure that no jobs are excluded from workflow. This is the default group and has the following values: Job Milestone Selection Job Milestones are allocated to each export job on creation. The selection of which milestones will be allocated to a job occurs in the order defined in the table below. You will notice that the process proceeds from an attempt to make an exact match on the job profile progressively to a more general match on job profile. Match Attempt Dept Job Type (Prepaid, Collect, All) Mode Type (Sea Freight, Air Freight etc) Container Class (FCL, LCL etc.) 1 Exact Match Exact Match Exact Match Exact Match 2 Exact Match All Job types Exact Match Exact Match 3 Exact Match Exact Match Exact Match All Container Types 4 Exact Match Exact Match All Mode Types All Container Types 5 Exact Match Exact Match All Mode Types Exact Match 6 All Departments All Job Types All Mode Types All Container Types When setting up milestones for the first time you can start out by setting up the last two profiles and then progressively add more specific milestones. 1 All Departments All Job Types Sea Freight All Container Types 2 All Departments All Job Types Air Freight All Container Types 3 All Departments All Job Types All Mode Types All Container Types Please note that you will only be able to enter milestone header values that match one of the above 9 templates. If you enter a milestone profile that is different, the validation will display the following message: 78
79 Field Name Description Validation Default Milestone Some Helpful Hints Some Helpful Hints Enter or use the Zoom button to select an event code. The first milestone is always JOBA. This event is created automatically by the system when a job is added via job registration or any other process that adds jobs into the system. The last milestone is always JCOM. This event is completed automatically by the system when all the previous milestones have been completed or marked as nonapplicable. Since this is the last milestone, it is always a good idea to give it a high sequence number like Description This displays the description of the event. None Display Only Sequence Status Manual Event NA By Default Transhipment Event A positive number indicating the numeric sequence in which the milestones are expected to be completed. NOTE: Milestones can be completed out of sequence. A milestone must be marked as active in order to be allocated a job when it is created. Manual milestones are milestones that are marked as completed by the user. There is no system process that creates this event automatically (and hence completes the milestone). These are usually used for tasks that need to be completed outside of the Expedient system. Once the task is complete, the user will go into the Milestones screen from Job Registration and tick the checkbox to say that the milestone is completed or enter a date and time of completion. Milestones marked NA by default will be created against the job with the Not Applicable flag set to Y. This means that the milestone will not affect the status of the job unless the user elects to untick it and make it applicable. This indicates that this milestone is only applicable to jobs where the Vessel on the job registration screen is on a transhipment vessel. None Y Display Only N N 79
80 Field Name Description Validation Default Some Helpful Hints Some Helpful Hints Hours, Condition, Event/Date Category What makes a job a transhipment? In the job registration screen, if the vessel code entered has a vessel name of TRANSHIPMENT in the Vessels Master file. What is special about transhipment milestones? When a transhipment job is updated so that it is no longer on a transhipment vessel, then the transhipment milestones are removed from job s milestones. These fields are used for specifying exceptions on a milestone. Enter the number of hours (usually in 24 hour amounts) and click on the Zoom button that appears. This will show you the list of conditions that can be used for specifying exceptions. The exception conditions should be read as follows: Should be completed X Hours PRIOR TO <Event Date> E.g. Should be completed 24 Hours PRIOR TO ETA Should be completed NO LATER THAN X Hours AFTER Event Date E.g. Should be completed NO LATER THAN 48 Hours After Job Registration Expedient can ensure that Exceptions do not fall on weekends. Please contact Expedient Software if you would like to stop exceptions falling on Saturdays and Sundays This is the category of the milestone. Select a category from the drop down list. Refer : Definition of Milestone Categories This is used to indicate the type of work of the milestone. 80


81 The following options are available from the Options pull down menu in the screen Option Copy Milestones Description This option allows you to copy the currently displayed set of milestones. When selecting this option you will be required to enter the new Job Milestone profile information. 81

82 Customer Set Up Customer Level Export Job Tracking Now that you have set up your export job milestones, it is time to turn on the Export Job Tracking module. The first decision you have to make is whether to use job tracking for all customers and all jobs or to enable it on a customer by customer basis. If you elect to enable on a customer by customer basis then you need to turn job tracking on for those customers in the Customer Master file. Field Name Description Validation Default Export Job Tracking Allow Export Air Customer Group Export Sea Customer Group Enable Export Job Tracking When Export Job Tracking is enabled, export jobs created for this customer will be allocated milestones. Note: This flag is only used when job tracking is set at the customer level instead of system wide. A valid customer group that is used to categorize this customer for the purposes of export air workflow. More details on the use of this field are described in the section below on workflow groups. Sometimes, the needs of some customers are specialized so that their jobs are processed by a particular group of staff with expertise in that area. For instance AUTO for Automotive or PHARMA for Pharmaceuticals, or AUTO for Automotive. This group can be used so that jobs for these customers are only shown in the workflow of those staff that specialize in this area. A customer group can be overridden by destination port enabling the handling of the customer s jobs to be handled differently in different states if required. Please refer to the section below on Customer Group Overrides. A valid customer group that is used to categorize this customer for the purposes of export sea workflow. More details on the use of this field are described in the section below on workflow groups. No 82

83 Field Name Description Validation Default Export Transport Group Customer Service Operator A valid customer group that is used to categorize this customer for the purposes of transport workflow. More details on the use of this field are described in the section below on workflow groups. A valid user that is the assigned customer service operator for this customer. Customer Groups This screen holds all valid customer groups. Administration > Job Tracking > Customer Groups Field Name Description Validation Default Customer Group Enter a customer group code (up to 10 char) Group Name Enter a customer group name 83

84 Customer Export Milestone Exemptions Now, remember when we set up job milestones we did this by job profile. So we set up the milestones that we thought we needed for different types of jobs like Sea Freight LCL or Air Freight. Sometimes some of these milestones are just not applicable for some customers. To exempt some milestones for some customers use the Customer Milestone Exemptions screen. Administration > Job Tracking > Export Milestone Exemptions To enter a customer exemption: Select F ind from the Toolbar Enter or select a valid customer code from the Zoom List. Hit Enter. Select U pdate from the Toolbar. The cursor will move to the details portion of the screen. Field Name Description Validation Default Dept Job Type Mode Type Container Class Enter a valid department or select a department from the Zoom list or enter ALL for all departments. Enter or select a valid job type from the drop down list. A valid job type can be selected from: Prepaid Collect All Enter or select a valid mode type from the drop down list. Valid mode types include Sea, Air and All. Enter or select a valid container class from the drop down list. Valid container types include FCL, LCL and All Container Types. The list of mode types is equivalent to the drop down list in the Job Class field in the Export Sea Job Registration Screen. Milestone Enter or select a valid event type from Zoom List. 84

85 Workflow Administration Export Workflow Role Categories Workflow > Workflow Administration > Export Workflow Administration > Workflow Role Categories Field Name Description Validation Default User Role Category Line Details Some Helpful Hints Select a role from the drop-down list. A default set of user roles are loaded as part of the Expedient system. If you require further user roles please raise and Expedient Support Ticket. Select from the drop-down list one or more Milestone Categories. This drop down list is the same as that used in the Export Job Milestones screen when assigning a category to a milestone. This section will show the details of all active milestones that fall into the categories defined for the roles. The manager role should include all milestone categories. Select Find from the Toolbar options. Select a role from the drop-down list. 85
 at a high level.")
86 Select Update from the Toolbar options. Select from the drop-down list one or more Milestone Categories. This drop down list is the same as that used in the Export Job Milestones screen when assigning a category to a milestone. What this does is tie job milestones to a user role (i.e. who does what) at a high level. We can then assign a role to a user within a particular work group/team. Export Workflow Work Groups Workflow > Workflow Administration > Export Workflow Administration > Workflow Work Groups So far you will have completed the following steps: 1. Set up milestones and given each milestone a category. 2. Set up user roles and given each role one or more milestone category. Now you want to tell the System how your office works. Which section of your option does what kind of work and who within that section does what parts of that work? You may have multiple offices or one office with different sections, or just one office with a small group of staff that do all work for all jobs for all customers. This screen allows you to define a workflow team. When defining a team you are really refining the type of jobs that will appear on the workflow screen of the users that are within those teams. 86
87 Field Name Description Validation Default Is this a Transport Group? Work Group When Yes, the Customer Master File, Export Transport Group field is used for evaluating the jobs that will be shown in the workflow. When No, the Customer Master File, Export Customer Group (Air or Sea) field is used for evaluating the jobs that will be shown in the workflow. A free text name for this work group or team. This can be up to a maximum of 10 characters in length. Branch Enter or select a branch from the zoom list. Dept Mode Type Active Customer Group Transport Group Enter or select a department from the zoom list. When not entered, all departments within the branch will be included in the user workflow search. Select the required Mode Type. If you are selecting Both Sea and Air Freight The Export Air and Export Sea Customer Groups must be the same for the client in the Customer Masterfile configuration tab for them to appear in Workflow. If a Department is selected with Both Sea and Air Freight is selected as the Mode Type the Department will take precedence in the search for jobs to show in Workflow. If a container class is selected Expedient will find Air jobs and Sea jobs matching the container class e.g. FCL and Air Export Jobs You can set a group up as inactive until you are ready to enable it. Enter a customer group. This will limit the workflow for this workflow group to customers with the same Customer Group (Air or Sea) in the Customer Master File Configuration tab. This field is only shown when the Is this a Transport Group field is No. Enter a transport group. This will limit the workflow for this workflow group to customers with the same Export Transport Group in the Customer Master File Configuration tab. This field is only shown when the Is this a Transport Group field is Yes. 87
88 Field Name Description Validation Default View Level Filter By Show Jobs When Modified By, On Some Helpful Hints Select All or General Group. This field is only required where the Customer Group is blank and is not used when the Customer Group is not blank. All If you are a user in this team then you will see all jobs that match the other criteria for this group including customers that are classified into a particular customer group. General Group - If you are a user in this team then you will see all jobs that match the other criteria for this group excluding customers that are classified into a particular customer group. Select from one of the following: User Branch Origin Port Only When this option is selected the department in the work group setup is ignored and all jobs for the user s origin ports are displayed in workflow. Department Only When this option is selected all jobs for the work group department or branch are displayed in workflow regardless of destination port. User Branch Destination Port and Department - When this option is selected all jobs for the user s origin ports are displayed in workflow for the work group department or branch. None The same as Department Only This combination of fields allows you to set up a condition for when jobs will appear in the workflow that is only dependent on there being an outstanding step for the job that the user is responsible for and the show when condition. When this option is used, the normal condition of the user must be responsible for the next step or for any skipped step in the workflow of the job is overridden. Any outstanding step anywhere in the workflow of a job for which the user is responsible (skipped, next or future) will allow the job to appear in the workflow as long as the show when condition is met. When the Show When condition is based on a date, jobs with blanks dates are always shown (so as not to be missed). Showing blank dates can be disabled at the system level if required. This is done in the Export Workflow Options screen. Shows the user that last performed an update on the screen Enter the Show When Days and click on the ZOOM button to select the show when condition. 88
89 Field Name Description Validation Default Some Helpful Hints Some Helpful Hints What is User Branch Destination Port Only used for? If a site has multiple offices (branches) but some customers jobs or some part of all jobs are always processed in one of the branches (ie transport) then this is a useful way of configuring the system so that the jobs appear in the correct workflow. Where do I map destination ports to branches? Use the Ports For Branches screen to map which ports are handled by which branch. User(Detail) Enter or select a valid user Role (Detail) Cherry Pick (Detail) Modified By, On Some Helpful Hints Enter or select a valid user role. A user can have more than one role within a team and can be a member of more than one team. When this is set to YES, the user can elect to work on any job in their workflow. When this is set to NO, the user must work on the jobs in their workflow in ETD order. Shows the user that last performed an update on this row It is a good idea to allow cherry picking for all users initially. Update User Workflow Groups This screen is a reverse view of the previous screen. It allows you to see all the workgroups of which a user is a member and to add or remove the user from work groups. Workflow > Workflow Administration > Export Workflow Administration > User Workflow Groups The following details can be updated on current groups: 1. Role 2. Cherry Pick 89

90 Field Name Description Validation Default User Enter or select a valid user Work Group Workgroup name Branch Branch Display Only Dept Department Display Only Mode Type Sea Freight, Air Freight or Both Sea and Air Freight Display Only Active Determines if the workgroup is active or inactive Display Only Customer Group Customer Group Display Only View Level Select All or General Group. This field is only required where the Customer Group is blank. All If you are a user in this team then you will see all jobs that match the other criteria for this group including customers that are classified into a particular customer group. General Group - If you are a user in this team then you will see all jobs that match the other criteria for this group excluding customers that are classified into a particular customer group. Display Only Role Enter or select a valid user role Cherry Pick When this is set to YES, the user can elect to work on any job in their workflow. When this is set to NO, the user must work on the jobs in their workflow in ETD order. 90

91 Export Customer Group Overrides In the Customer Masterfile screen we had the ability to add a customer group against the customer. Sometimes a further level of override is required on the customer group. This allows a customer s jobs to be redirected to a specific workflow based on customer group, job type or department and origin port. Workflow > Workflow Administration > Export Workflow Administration > Customer Group Overrides Field Name Description Validation Default Client Code Enter a valid customer code or wildcard when using the Find toolbar option. Job Type Enter or select a valid job type. Dept Enter or select a valid department for the job type. The user can enter an override for all departments for a job type by leaving the department blank. When there is an override for all departments, an override for a specific department for the same job type is not allowed. Origin Port Enter or select a valid origin port. Customer Group Enter a valid customer group 91

92 Input Ports for Branches This screen determines which ports belong to a Branch within Workflow. Workflow > Workflow Administration > Export Workflow Administration > Ports for Branches Field Name Description Validation Default Branch Code Enter or select a valid branch code when using the Find toolbar option. Origin Port Enter of select a valid port code. Export Workflow Sort The screen provides the ability to set the order for the jobs listed in the workflow screen. Workflow > Workflow Administration > Export Workflow Administration > Workflow Sort The first, second and third level sorts can be set. If Job Type is selected as a sort order an additional table will appear allowing the Job Types to be sorted as a sub set, e.g. Air Jobs can be shown above FCL jobs to encourage users to deal with these more urgently. 92

93 Field Name Description Validation Default Sort Profile Name Sort Field 1 Sort Field 2 Sort Field 3 Sub-Sort Job Type This is the name of the sort profile. Select a profile from the pull down list Select the type of information for the first level sort of the jobs and select whether the information is sorted in ascending or descending order Select the type of information for the second level sort of the jobs and select whether the information is sorted in ascending or descending order Select the type of information for the third level sort of the jobs and select whether the information is sorted in ascending or descending order Where Job Type is selected as a Sort Field the Sub- Sort table will appear. Select a sort order with the list of job types DEFAULT Modified By This is the user than last updated the Sort Profile N/A System Generated On This is the date the Sort Profile was last updated N/A System Generated 93

94 Export Workflow Colour Mapping The screen allows you to assign colour coding to the Workflow screen. This means you can colour code sea and air export jobs that are closer to ETD and further from ETD making priorities easier to identify in Workflow. The Workflow > Workflow Administration > Export Workflow Administration>Workflow Colour Mapping screen allows you to configure the colour coding. The red colour used to indicate overdue milestones, and the yellow colour used to indicate skipped steps will overwrite the colours configured in the screen below. Field Name Description Validation Default Mode Type Day Prior to ETD Colour Last Updated Select if the colour mapping applies to Air or Sea jobs This is the number of days before ETD in the Job that the colour applies to This is the name of the colour to be applied. Click on the zoom to select a colour. On OK the actual colour will be displayed in the screen This is the date the colour mapping was last modified Conditional: if a Mode Type is selected Conditional: if a Mode Type is selected User This is the user who last update the colour mapping N/A N/A N/A N/A 94
95 Export Workflow Processes Process Description Run Via Archive Milestones Milestones should be regularly archived. This process moves job milestones into an archive table. Once they have been moved, they can still be viewed using all Milestone options but cannot be edited. Only completed jobs will have their milestones archived. Job Milestones will be archived a selected number of days after the job is completed (i.e. after all milestones are completed). The number of days is configurable on a site by site basis. Export Workflow Reporting Export Job Enquiry Please refer to the Query Module User Manual Export Job Exceptions CSV Please refer to the Query Module User Manual Active Events by User Report This report will display a count of events performed by user for a specific date range. This can be run as a standard report or as a CSV file and can be an autoreport. Cron 95
96 96

97 Export Workflow Options The following system options can be enabled/disabled in the Workflow Administration > Export Workflow Administration > Export Workflow Options screen: 97

98 Option Description Default Always show jobs with blank date? Disable document count display? This only applies to non-transport work groups with a Show When condition. The blank date applies to the date used in the Show When condition. Jobs that have been allocated manually to a user or work group are always shown in the workflow regardless of date. When disabled, the Docs column is hidden and a count of the physical documents is not performed. This should be disabled when there is an issue with the documents server. No No 98
99 Disable lock of job in workflow? Warn only when job is locked? Workflow screen waits while user in job registration? Show jobs with invalid shipper codes? Refresh workflow screen after job registration? Keep user sort on refresh? Auto-initiate workflow screen for users? Maximum number of jobs shown on workflow screen for users Auto-initiate workflow screen for managers? Maximum number of jobs shown on workflow screen for managers Show O/S Agent name Do not mark the job as locked by the user when going to job registration from workflow. When this option is used, cherry picking cannot be turned off. This means that the screens Workflow/Workflow Administration/Input Workflow Work Groups and Workflow/Workflow Administration/Update User Workflow Groups will not allow the Cherry Picking flag to be updated to N o. Allow users to go to job registration from workflow for a job locked by another user in workflow, they are given a warning only and not prevented from going to the export job registration screen. The workflow screen is disabled when the user selects a job and is directed to the job registration screen. The workflow screen becomes active again when the job registration screen is closed. Show jobs in workflow that have shipper codes that are not in the Customer Master File. This is useful when jobs are created via an interface and the shipper codes are sometimes not valid. The workflow screen is refreshed automatically when a user closes the job registration screen (that was opened from workflow). Keep the user s column sort when refreshing the workflow screen. The workflow screen is initiated from login. This only applies to sites with the Workflow module, where the user has been added to an active work-group. This option is for users that are not managers. The maximum number of jobs shown on the workflow screen for users that are not managers. Please note that increasing this parameter may have an impact on the workflow screen speed. The workflow screen is initiated from login. This only applies to sites with the Workflow module, where the user has been added to an active work-group. This option is for users that are managers. The maximum number of jobs shown on the workflow screen for users that are managers. Please note that increasing this parameter may have an impact on the workflow screen speed. This option controls if the full O/S Agent name is available as a workflow column. Showing the name can slow down workflow. No No Yes No Yes No No 800 No 2000 No 99
100 Show Shipping Line Name Show Depot/Terminal Name Show FWB Status Show Bill To Name Ignore Branch and Department Set effective last step before any skipped? Set effective last step before any skipped for the following roles This option controls if the full Shipping line name is available as a workflow column. Showing the name can slow down workflow. This option controls if the full Depot/Terminal Name is available as a workflow column. Showing the name can slow down workflow. This option controls if the FWB status is shown on the screen. This option controls if the full Bill To name is available as a workflow column. Showing the name can slow down workflow. Ignore the job department and user s branch when selecting jobs to show in workflow when the work group has a customer group. The job will considered to be at the status of the last milestone completed before any milestones were skipped. This prevents skipped steps from being allocated to workflow users. The roles for which the Set effective last step before any skipped? option applies. No No No No No No No 100

. This is the status of the consol which is the last milestone that was completed (by sequence).")
101 Guided Tour Consol Workflow Let us begin by taking a guided tour of the Expedient Software Consol Tracking and Consol Work Flow module. Air Import Consol Registration When Consol Tracking is enabled each consol will be allocated a set of milestones. In the Air Consol Registration Screen the first thing that you will notice is that each consol will have a status displayed in the top right hand corner (Milestone). This is the status of the consol which is the last milestone that was completed (by sequence). In the consol registration screen these can be accessed by the Milestones toolbar option 101
102 Field Name Description Validation Default Type This is the event code. Display Only Description This is the event description Display Only N/A Completed Date This check-box allows the user to mark a milestone as not applicable. Unlike a Completed Manually milestone, a milestone that is marked as N/A will not be used to update the consol status. NOTE: When this check box is ticked and unticked, both of these actions will be logged in the Events Table. This field is only modifiable for manual milestones. When a completed date is entered for a manual milestone, an actual event is also created. This can be viewed in Options, View/Add Events. None None Unchecked Completed Time This field is only modifiable for manual milestones. User Completed Manually Checked Checked Date Check User Category This field displays the name of the user that completed the milestone. This check-box allows the user to complete a milestone manually. If this is the last milestone that is completed in the milestone sequence for this consol then this event type is used to update the consol status. A milestone that is checked as Completed Manually can be unchecked by the user. This will cause the status of the consol to revert to the last completed milestone. This check-box allows the user to indicate that a milestone has been checked without completing the milestone. When checked, it will set a checked date and time and checked user against the milestone. This check-box is only available for milestones that have been set up as Repeat. Will display the last checked date and time for this milestone. Will display the user name of the user who last checked this milestone. The milestone category that was assigned to the milestone at the time of consol creation. Display Only Display Only Display Only Display Only Unchecked Unchecked Category 102

103 Sea Import Consol Registration Workflow Screen The workflow screen is the current import workflow screen. The following new fields have been added for consol workflow: Field Name Description Validation Default ETA Disc The date of discharge at the consol Display Only N/A O/S Agent Code The overseas agent code Display Only N/A O/S Agent Name The name of the overseas agent Display Only N/A Storage Date The storage date from the air consol screen Display Only N/A Bond/Depot Co Loader/ Master Loader The bond code for Air consols, the unpack depot for Sea consols. The co-loader for Air consols, the master loader for Sea consols. Display Only Display Only N/A N/A The workflow screen will show a combination of job level tasks and consol level tasks depending on the user s role(s). The consol level tasks will not have a value in the job column. 103


104 Button Documents Milestones Description This button will show the consol level documents on consol level lines. Milestones Button This button will display the milestones for the highlighted consol for consol level lines. Exc/Skipped (F5) Double Click/Enter This button shows any exceptions or skipped events on the current consol on consol lines. Double-clicking on the mouse or hitting the ENTER key on a selected row will open the appropriate consol registration screen for consol lines. 104
105 Button Enquiry (F7) Description This button will display a Workflow Enquiry Screen. The consol number has been added to the enquiry screen. Notes This displays the Consol Notes on consol lines. Consol Workflow System Set up Consol Milestones The first step in implementing workflow is to define the sequence of steps or events that are required to be completed on an import consol from creation to completion. These are the consol milestones. These milestones are defined by you to suit your internal operational process and procedures, and can be defined by consol profile. Consol Profile is described by the following characteristics: Department Mode Type (Sea, Air, etc) Container Class (FCL, LCL, etc) This screen is found in the Administration > Consol Tracking > Import Consol Milestones menu option 105

106 Field Name Description Validation Default Department Mode Type Container Class Some Helpful Hints Enter or press Zoom to select a valid department or ALL for all departments. Enter or select a valid mode type from the drop down list. Valid mode types include Sea, Air and All. Enter or select a valid container class from the drop down list. Valid container types include FCL, LCL and All Container Types. The list of mode types is equivalent to the drop down list in the Job Class field in the Import Sea Consol Registration Screen. What container class is applicable to AIRFREIGHT? The Container class is only relevant to SEAFREIGHT, so for all other mode type use All Container Types. ALL Consol Milestone Selection Consol Milestones are allocated to each import consol on creation. The selection of which milestones will be allocated to a consol occurs in the order defined in the table below. You will notice that the process proceeds from an attempt to make an exact match on the consol profile progressively to a more general match on consol profile. Match Attempt Dept Mode Type (SEAFREIGHT, AIRFREIGHT etc.) Container Class (FCL, LCL etc.) 1 Exact Match Exact Match Exact Match 2 Exact Match Exact Match All Container Types 3 Exact Match All Mode Types Exact Match 106
107 Match Attempt Dept Mode Type (SEAFREIGHT, AIRFREIGHT etc.) Container Class (FCL, LCL etc.) 4 Exact Match All Mode Types All Container Types 5 All Departments Exact Match All Container Types 6 All Departments All Mode Types All Container Types Please note that you will only be able to enter milestone header values that match one of the above 6 templates. If you enter a milestone profile that is different, the validation will display the following message: Field Name Description Validation Default Milestone Some Helpful Hints Some Helpful Hints Enter or use the Zoom button to select an event code. The first milestone is always CSLA. This event is created automatically by the system when a consol is added via consol registration or any other process that adds consols into the system. The last milestone is always CCOM. This event is completed automatically by the system when all the previous milestones have been completed or marked as nonapplicable. Since this is the last milestone, it is always a good idea to give it a high sequence number like Description This displays the description of the event None Display Only Sequence Status A positive number indicating the numeric sequence in which the milestones are expected to be completed. NOTE: Milestones can be completed out of sequence. A milestone must be marked as active in order to be allocated a consol when it is created. Y 107
108 Field Name Description Validation Default Manual Event NA By Default Transhipment Event Hours, Condition, Event/Date Manual milestones are milestones that are marked as completed by the user. There is no system process that creates this event automatically (and hence completes the milestone). These are usually used for tasks that need to be completed outside of the Expedient system. Once the task is complete, the user will go into the Milestones screen from Consol Registration and tick the checkbox to say that the milestone is completed or enter a date and time of completion. Milestones marked NA by default will be created against the consol with the Not Applicable flag set to Y. This means that the milestone will not affect the status of the consol unless the user elects to untick it and make it applicable. This indicates that this milestone is only applicable to jobs where the Vessel on the consol registration screen is on a transhipment vessel. These fields are used for specifying exceptions on a milestone. Enter the number of hours (usually in 24 hour amounts) and click on the Zoom button that appears. This will show you the list of conditions that can be used for specifying exceptions. The exception conditions should be read as follows: Should be completed X Hours PRIOR TO <Event Date> E.g. Should be completed 24 Hours PRIOR TO ETA Should be completed NO LATER THAN X Hours AFTER Event Date E.g. Should be completed NO LATER THAN 48 Hours After Consol Registration Expedient can ensure that Exceptions do not fall on weekends. Please contact Expedient Software if you would like to stop exceptions falling on Saturdays and Sundays None Display Only N N 108


109 Field Name Description Validation Default Category Repeat This is the category of the milestone. Select a category from the drop down list. Refer: Definition of Milestone Categories This is used to indicate the type of work of the milestone. This milestone will be able to be ticked as Checked against the consol multiple times until the milestone is completed. No The following are available from the Options menu in the screen Option Copy Milestones Description This option allows you to copy the currently displayed set of milestones. When selecting this option you will be required to enter the new Consol Milestone profile information. 109

110 Option Revise Registered Consols Description Any modifications made to the consol milestone set-up are only reflected in any consols created after those modifications have been saved. If you want the modifications to apply to consols created before the modifications were made then use this option. This option will revise the consol milestones for all consols that match the consol profile of the currently displayed set of milestones. Revising milestones will recreate the milestones but preserve any completed or not applicable updates that have been made by the user to milestones that did not change. The following screen will be displayed: Field Name Registration From and To Dates ETA From and To Dates Validation but either this or the ETA date range must be entered but either this or the Registration date range must be entered A limit of 120 days on the date range is applied. 110

111 Consol Workflow Administration Input Consol Workflow Role Categories Workflow > Workflow Administration > Import Workflow Administration > Workflow Role Categories Field Name Description Validation Default User Role Category Line Details Select a role from the drop-down list. A default set of user roles are loaded as part of the Expedient system. If you require further user roles please raise and Expedient Support Ticket. Select from the drop-down list one or more Milestone Categories. This drop down list is the same as that used in the Import Consol Milestones screen when assigning a category to a milestone. This section will show the details of all active milestones that fall into the categories defined for the roles. There will be a separate tab for consol milestones. Select Find from the Toolbar options. Select a role from the drop-down list. Select Update from the Toolbar options. 111

112 Select from the drop-down list one or more Milestone Categories. This drop down list is the same as that used in the Import Consol Milestones screen when assigning a category to a milestone. Workflow Regions This screen allows you to add workflow regions and assign countries to these regions. These are used for origin region when setting up consol workflow option for work groups. 112

113 Workflow Groups Workflow > Workflow Administration > Input Workflow Administration > Workflow Work Groups When consol workflow is enabled, your work group screen will show consol workflow specific options and include container classes that can be used on the consol screens. The options specific to consol workflow are: Field Name Description Validation Default Include Consols Origin Region Should consol level milestones be included in this group? Only show consols with a load port in this region. Regions are set up in the Workflow Regions screen. Y Y N 113


114 Field Name Description Validation Default Has Shipping Line Y Has Co- Loader/Master Loader No Shipping Line Only show Sea consols where there is no shipping line entered on the consol. No Shipping Line or Without Web Access - Only show Sea consols where there is no shipping line entered on the consol or where the shipping line entered does not have a website entered in the customer master file. Shipping Lines Without Web Access - Only show Sea consols where the shipping line entered does not have a website entered in the customer master file. Shipping Lines With Web Access - Only show Sea consols where the shipping line entered has a website entered in the customer master file. Any/ Shipping line is not considered. Y Yes Only show consols with a co-loader or master loader. No Only show consols without a co-loader/master loader. Any/ Co-Loader/Master Loader is not considered. 114
Expedient User Manual Container Management
 f Volume Expedient User Manual Container Management 13 Gavin Millman & Associates (Aust) Pty Ltd 281 Buckley Street Essendon VIC 3040 Phone 03 9331 3944 Web www.expedientsoftware.com.au Table of Contents
Expedient User Manual NZ Customs Module (Imports/Exports)
") Volume Expedient User Manual NZ Customs Module (Imports/Exports) 7 Gavin Millman & Associates Pty Ltd 281 Buckley Street Essendon VIC 3040 P: 03 9331 3944 W: www.expedientsoftware.com.au Table of Contents
Volume Expedient User Manual NZ Customs Module (Imports/Exports) 7 Gavin Millman & Associates Pty Ltd 281 Buckley Street Essendon VIC 3040 P: 03 9331 3944 W: www.expedientsoftware.com.au Table of Contents
YearOne PowerLink 3.20 Job Costing
 YearOne PowerLink 3.20 Job Costing User Guide October 2012 Publication Date Product Version October 2012 YearOne PowerLink 3.20 YearOne Software Australia Pty Ltd ACN 011 002 038 ABN 36011002038 147 Ross
YearOne PowerLink 3.55 Job Costing
 YearOne PowerLink 3.55 Job Costing User Guide September 2014 Publication Date Product Version September 2014 YearOne PowerLink 3.55 YearOne Software Australia Pty Ltd ACN 011 002 038 ABN 36011002038 147
Getting Started Guide
 Getting Started Guide OAS Freight v 3.2 Welcome Thank you for selecting OAS Freight. This guide is designed to help you become familiar with the OAS Freight software. This guide is not designed to be a
PRACTICE MANAGEMENT Version and above 2016 YEAR END / NEW YEAR & MATTER ROLLOVER NEW ZEALAND
 PRACTICE MANAGEMENT Version 9.1.3.1 and above 2016 YEAR END / NEW YEAR & MATTER ROLLOVER NEW ZEALAND Disclaimer Every effort has been made to ensure the accuracy and completeness of this manual. However,
MYOB Exo Distribution Advantage. User Guide
 MYOB Exo Distribution Advantage User Guide 2018.3 Table of Contents On-Demand vs. Forecast Purchase Orders... 2 End-User Scenarios... 2 Viewing Statuses... 3 On-Demand Purchase Orders Setup... 3 On-Demand
Landed Cost Version 7.2
 Star System Solutions Pty Ltd Landed Cost Version 7.2 User Guide elanded Cost About This Guide iv Landed Cost Definition v Landed Cost Data Flow vi Chapter 1: Landed Cost Utilities 1 Configuration 2 Task
Manager Dashboard User Manual
 Manager Dashboard User Manual Manager User Guide The Manager User Guide is designed to provide a supervisor or a manager with step-by-step instructions for their daily tasks. Although every database will
MYOB EXO DISTRIBUTION ADVANTAGE
 MYOB EXO DISTRIBUTION ADVANTAGE User Guide EXO BUSINESS M YO B ENT ERPRI S E S O L U T I O N S Important Notices This material is copyright. It is intended only for MYOB Enterprise Solutions Business Partners
MYOB EXO DISTRIBUTION ADVANTAGE
 MYOB EXO DISTRIBUTION ADVANTAGE User Guide EXO BUSINESS MYOB ENTERPRISE SOLUTIONS Important Notices This material is copyright. It is intended only for MYOB Enterprise Solutions Business Partners and their
YearOne PowerLink 3.10 Manufacturing and Bill of Materials
 YearOne PowerLink 3.10 Manufacturing and Bill of Materials User Guide June 2012 Publication Date Product Version June 2012 YearOne PowerLink 3.10 YearOne Software Australia Pty Ltd ACN 011 002 038 ABN
Sage 100 ERP 2015 What s New
 Sage 100 ERP 2015 What s New Global Enhancements Migration Changes If you are converting data for a company using the Purchase Order module, a message appears asking if you want to retain purchase order
Vilden Associates, Inc. Accounts Receivable. Manual
 Vilden Associates, Inc. Accounts Receivable Manual 1 ACCOUNTS RECEIVABLE MENU... 3 Cash Receipts Entry... 4 Adjustment Entry & Processing... 10 Processing a Batch Inquiry... 12 Creating a New Batch...
Supply Chain Tracking
 Supply Chain Tracking User Manual Version 2.0 Ananda Kumary 2/10/2016 This document defines the user manual for Supply Chain Tracking portal, which enables system based acceptance/rejection of Purchase
Version No: 3.0, Build No: 3. Portal Release Notes V3B3
 Version No: 3.0, Build No: 3 Portal Release Notes V3B3 Table of Contents Important Note: The current version of V3B3 is supported with Compatibility View Settings OFF for IE (Internet Explorer) browsers....
Contents OVERVIEW... 3
 Contents OVERVIEW... 3 Feature Summary... 3 CONFIGURATION... 4 System Requirements... 4 ConnectWise Manage Configuration... 4 Configuration of a ConnectWise Manage Login... 4 Configuration of GL Accounts...
Bridge. Billing Guide. Version
 Bridge Billing Guide Version 2.5.112 Table of Contents Page i Table of Contents Table Of Contents I Introduction 2 Managing Bill To Parties 3 Creating a New Bill to Party 3 Viewing and Navigating Bill
AMS and U.S. HBL Manual
 AMS and U.S. HBL Manual 1 Table of Contents Logging into AWS AMS Transmission and Online Bill of Lading System... 3 Selecting the Type of B/L you wish to create... 3 Creating U.S. HBL... 4 Create B/L...
TLP-BREEZE ONLINE. User Guide. Version 2.3 February 2017 BREEZE LOGISTICS AUSTRALIA PTY LTD. Bldg 1 / Boundary Road, BRAESIDE VIC 3195
 TLP-BREEZE ONLINE User Guide Version 2.3 February 2017 BREEZE LOGISTICS AUSTRALIA PTY LTD Bldg 1 / 54-56 Boundary Road, BRAESIDE VIC 3195 560 Clayton Road Clayton VIC 3168 PO BOX 1055 Clayton Business
Purchase Order, Requisitions, Inventory Hands On. Workshop: Purchase Order, Requisitions, Inventory Hands On
 Workshop: Purchase Order, Requisitions, Inventory Hands In this follow up session to the Operations Changes in Purchase Order, Requisition, and Inventory Theory course, this hands on session will look
Processing ISF Transactions Table of Contents
 Processing ISF Transactions Table of Contents Processing ISF Transactions Table of Contents... 1 Overview of Processing ISF Transactions... 3 Entering a New ISF Transaction... 5 Finding an Existing Transaction...
DRM DISPATCHER USER MANUAL
 DRM DISPATCHER USER MANUAL Overview: DRM Dispatcher provides support for creating and managing service appointments. This document describes the DRM Dispatcher Dashboard and how to use it to manage your
CHAPTER 4A SALES ORDERS MAINTENANCE
 CHAPTER 4A SALES ORDERS MAINTENANCE Chapter 4A Maintenance...1 Sales Order Maintenance...2 Sales Order Maintenance...3 Creating a New Sales Order...5 Manually Creating a New Sales Order...5 Copying an
Utilizing the Employee Training Module and ESS Munis: Human Resources
 [MU-HR-7-A] [MU-HR-14-A] Utilizing the Employee Training Module and ESS Munis: Human Resources CLASS DESCRIPTION This session will be an exploration of how Employee Self Service can be used in conjunction
Requisitioning Method of Inventory Control
 Requisitioning Method of Requisitioning Method of Course description: Learn how to use emaint Online for inventory tracking, from establishing your inventory records and generating reorder lists through
L Y R A P A Y M E N T L E D G E R U S E R M A N U A L
 L Y R A P A Y M E N T L E D G E R U S E R M A N U A L Table of Contents Release Notes... 1 1. Overview... 2 2. Authorizations... 2 3. Customization... 2 3.1. Default a specific site in Payment Ledger module...
Bill of Lading Manual
 Bill of Lading Manual 1 Table of Contents Logging into AWS Online Bill of Lading System... 3 Selecting the Type of B/L you wish to create... 3 Creating BL... 5 Create B/L... 5 B/L Report... 10 Edit and
Aviation Specialties Unlimited 1. Contract (Fixed Price Contract)
") Aviation Specialties Unlimited 1. Contract (Fixed Price Contract) Overview Key Setup Setup Customer Setup Quote Create Sales Order Setup Contract (Project) Setup Advance Billing (Deposit) Acquire Inventory
Aviation Specialties Unlimited 1. Contract (Fixed Price Contract) Overview Key Setup Setup Customer Setup Quote Create Sales Order Setup Contract (Project) Setup Advance Billing (Deposit) Acquire Inventory
Accounts Payable Users Guide
 Accounts Payable Users Guide Updated 05/28/2014 Page 1 of 9 Accounts Payable The accounts payable application is used to enter records that require cash disbursement (computer check, manual check, virtual
Opera II Accreditation Course. Invoicing / SOP. Pegasus Training & Consultancy Services File Name : OIISOP001
 Invoicing / SOP Pegasus Training & Consultancy Services File Name : OIISOP001 Pegasus Training & Consultancy Services File Name : OIISOP001 Table of Contents Introduction... 1 Invoicing Module Menu...
V9 Jobs and Workflow Administrators Guide DOCUMENTATION. Phone: Fax:
 V9 Jobs and Workflow Administrators Guide DOCUMENTATION Phone: 01981 590410 Fax: 01981 590411 E-mail: information@praceng.com CHANGE HISTORY ORIGINAL DOCUMENT AUTHOR: MICHELLE HARRIS DATE: APRIL 2010 AUTHOR
Getting Started Tutorial
 Getting Started Tutorial Welcome This tutorial will introduce you to the main functions of your MYOB accounting software. You can use this tutorial with the current versions of MYOB Accounting, MYOB Accounting
IQ STOCK PRICE LIST Ver 2
 IQ STOCK PRICE LIST Ver 2 P R E F A C E This is the IQ Stock Price List reference guide for IQ Enterprise & IQ Business software systems. The document will aid in the understanding and configuration of
Contents OVERVIEW... 3
 Contents OVERVIEW... 3 Feature Summary... 3 CONFIGURATION... 4 System Requirements... 4 ConnectWise Manage Configuration... 4 Configuration of Manage Login... 4 Configuration of GL Accounts... 5 Configuration
VIOLATION BATCH ACTIONS
 Page 1 VIOLATION BATCH ACTIONS CONTENTS Overview... 2 Workflow: Batch Process Violation Tickets... 2 Actions: Batch Process Violation Tickets... 2 Examples of Enhanced Violation Tickets Workflows... 3
At the end of this module, you will be able to:
 1 At the end of this module, you will be able to: Outline the principles of the Multiple UoM solution and its advantages. Define the basic Multiple UoM definitions. Describe how Multiple UoM are used across
Sales Ledger - Version 1.00 SALES LEDGER. Page-1
 SALES LEDGER Page-1 Document Version History Version 1.00 Description Draft Author Des Cullen Page-2 Table of Contents Introduction... 7 File Menu... 8 New... 8 Invoice... 8 Creating a New Customer...
C o n n X T i m e s h e e t s TIMESHEETS IMPLEMENTATION MANUAL VERSION ConnX Pty Ltd 1 of 206
 TIMESHEETS IMPLEMENTATION MANUAL VERSION 5.2 2005-2018 ConnX Pty Ltd 1 of 206 Copyright 2005-2018 ConnX Pty Ltd ABN 46 108 567 960 Reproduction in whole or in part by electronic, mechanical or chemical
1099 Processing Users Guide
 1099 Processing Users Guide Page 1 of 6 Tracking and printing of laser 1099 forms and reports are automated utilizing 1099 flagging of accounts payable invoices. The printing of these forms is designed
Introduction to Mainchain 3 Site Navigation... 5 Favorites... 5 Quick Track... 5 Dashboard & Widgets... 6 Searches
 User Guide Table of Contents Introduction to Mainchain 3 Site Navigation... 5 Favorites... 5 Quick Track... 5 Dashboard & Widgets... 6 Searches... 9 Track and Trace... 9 Domestic Consignment Tracking...
Warehouse Management System for Adagio Accounting
 Warehouse Management System for Adagio Accounting 1. Create PO in Purchase Orders for Adagio Receiving 2. Import PO from Purchase Orders for Adagio into WMS using ERP Light for Adagio Console 3. Check
New Degree Day History Screen
 This document describes the various enhancements and modifications to DRM Windows that occurred between versions 9.1.270 and 10.2.280. New Degree Day History Screen This screen compares the current heating
USING QUANTIFY WITH QUICKBOOKS
 USING QUANTIFY WITH QUICKBOOKS Quantify and QuickBooks communicate with each other seamlessly, eliminating the need to manually enter invoices into QuickBooks. Jobs and Customers associated with Quantify
Microsoft Dynamics GP. Shipping Documents
 Microsoft Dynamics GP Shipping Documents Copyright Copyright 2011 Microsoft Corporation. All rights reserved. Limitation of liability This document is provided as-is. Information and views expressed in
Banking for GL VERSION: 9/22/2014
 Banking for GL VERSION: 9/22/2014 Table of Contents 1 Bank Reconciliation 3 Overview of Bank Reconciliation 4 Entering Bank Statement Information 7 Running the Automated Reconciliation Process 11 Running
Table of Contents. Contents. Introduction. Program Setup. Locations. Warehouses. Company Settings. PM Schedule Templates.
 Contents I Table of Contents Introduction...1 Program Setup...1 Locations...1 Warehouses...3 Company Settings...5 PM Schedule Templates...8 Adding Equipment...13 Configuring Last...15 PM Data The Home
TIM MANUAL FOR TIM MANAGERS AND TIM ADMINISTRATORS
 TIM MANUAL FOR TIM MANAGERS AND TIM ADMINISTRATORS November, 2016 INTRODUCTION TO TIM... 1 TIM Manager... 1 TIM Administrator... 1 LOGGING IN & SIGNING OUT... 3 NAVIGATING TIM... 6 A Few Tips for Displaying
HealthEquity Employer Portal Guide HealthEquity All rights reserved.
 HealthEquity Employer Portal Guide 2013-2015 HealthEquity All rights reserved. INTRODUCTION 09 ACCESSING PENDING PAYMENTS 01 LOGIN PROCESS 09 MODIFYING EMPLOYER INFORMATION 01 ADDING INSURANCE INFORMATION
Data Exchange Module. Vendor Invoice Import
 Data Exchange Module Vendor Invoice Import Information in this document is subject to change without notice and does not represent a commitment on the part of Dexter + Chaney. The software described in
Tivoli Workload Scheduler
 Tivoli Workload Scheduler Dynamic Workload Console Version 9 Release 2 Quick Reference for Typical Scenarios Table of Contents Introduction... 4 Intended audience... 4 Scope of this publication... 4 User
Invoice Manager Admin Guide Basware P2P 17.3
 Invoice Manager Admin Guide Basware P2P 17.3 Copyright 1999-2017 Basware Corporation. All rights reserved.. 1 Invoice Management Overview The Invoicing tab is a centralized location to manage all types
Customers POS User Guide
 Customers POS User Guide Page 1 of 14 Table of Contents Customers... 3 Bring Student and Staff Information into Identity File (Updates Current Identities)... 3 Set Current Student and Staff as Customers...
Working With Contingency Matters
 Working With Contingency Matters Contents About Working with Contingency Matters Adding Contingency Matter Bill Settings Layouts Adding Contingency Matters Posting Time Creating Lists for Contingency Matters
Requisition line View New Change Cancel... 60
 User Manual erequisitions - Table of Contents How to use this manual... 4 Overview... 4 to erequisitions... 5 Overview... 5 Navigation... 6 How to access and exit erequisitions... 7 How to change password
Program Change Log. Minor: Case #9730
 Program Change Log NexGen FMS ver. 3.5.485 September 2018 Minor: Case #9955 Unit Hours Detail Report - Changed the Unit Hours Detail Report to mirror the fields recently added to the Unit Meter Tab Minor:
Next select the Add button. Then select Add Blank button. The following screen will appear. Chemical Scheduling-1
 Setting up CLIP for Chemical Applicators Overview Using CLIP for Chemical applications is similar to using CLIP for normal service companies with a few exceptions. We will briefly discuss what the differences
Citizen Self Service User Guide
 Citizen Self Service User Guide 2018.1 Contents 1 CITIZEN SELF SERVICE... 5 1.1 Citizen Self Service Users... 5 1.2 Home Page... 6 1.2.1 User Name/Account Settings... 7 1.2.2 Linked Accounts... 8 1.2.3
Current Attractions: Get in the Know on Sage BusinessVision v7.2
 Current Attractions: Get in the Know on Sage BusinessVision v7.2 Session Code: VAL04 Product Line: Sage BusinessVision Presenter: Edward Klapatiuk, Sage BusinessVision Description Sage BusinessVision v7.2
Evolution M Core Training Purchase and Subcontract Processing Issue 2
 Evolution M Core Training Purchase and Subcontract Processing Issue 2 Contents Training............................................................................................ 1 Maintenance..........................................................................................
ConnectWise-Sage 50 Accounts User Guide
 ConnectWiseSupport@mobiusworks.com www.mobiusworks.com ConnectWise-Sage 50 Accounts Version 3.0.0.7 September 11, 2015 Table of Contents Table of Contents... 2 INSTALLATION AND CONFIGURATION... 4 Introduction...
Data Exchange Module. Vendor Invoice Import
 Data Exchange Module Vendor Invoice Import Information in this document is subject to change without notice and does not represent a commitment on the part of Dexter + Chaney. The software described in
Slaughtering Softproviding Meat User Documentation
 Great ideas are always simple Softproviding simply makes them happen. Slaughtering Softproviding Meat User Documentation Version: 1.00 Date: 24. August 2017 Release: v5.50 Softproviding AG Riehenring 175
DHL IMPORT EXPRESS ONLINE USER GUIDE FOR IMPORTERS WE COORDINATE EFFECTIVE COMMUNICATION BETWEEN YOUR SHIPPERS AND YOU FOR YOU. dhl-usa.
 DHL IMPORT EXPRESS ONLINE USER GUIDE FOR IMPORTERS WE COORDINATE EFFECTIVE COMMUNICATION BETWEEN YOUR SHIPPERS AND YOU FOR YOU. dhl-usa.com/ieo CONTENTS Importer Manage Your Imports 3 Helpful Guide Information
Work Orders Quick Reference
 Work Orders Quick Reference Header tab Ordering location the distributor location ordering the item that is being built on this work order. Locations are set up in Location Master Maintenance. You can
External Invoicing Reporting & Approvals
 External Invoicing Reporting & Approvals ACCOUNTS RECEIVABLE REPORTING... 2 REPORTING MENU... 2 CUSTOMIZABLE REPORTS... 4 PINNED REPORTS... 6 PINNED REPORTS SCHEDULER... 10 INVOICE APPROVALS... 11 REASSIGNING
Dealer Business System (DBS) Helping Dealers do business AMSOIL INC. 5/16/2014
 Helping Dealers do business AMSOIL INC. 5/16/2014") Dealer Business System (DBS) Helping Dealers do business AMSOIL INC. 5/16/2014 Table of Contents Activation... 6 Business Information... 6 Shipping Setup... 6 Charge Shipping on Pickup Orders: Checking
Dealer Business System (DBS) Helping Dealers do business AMSOIL INC. 5/16/2014 Table of Contents Activation... 6 Business Information... 6 Shipping Setup... 6 Charge Shipping on Pickup Orders: Checking
Copyright Basware Corporation. All rights reserved.. Vendor Portal User Guide Basware P2P 17.3
 Copyright 1999-2017 Basware Corporation. All rights reserved.. Vendor Portal User Guide Basware P2P 17.3 Table of Contents 1 Vendor Portal Registration... 4 1.1 Register for Vendor Portal...4 2 Vendor
Process Map. Pickerings Auto Group. Parts Module Process Code: P220 Purchase Order Creation & Maintenance
 Process Map Pickerings Auto Group Parts Module Process Code: P220 Purchase Order Creation & Maintenance 2 Contents High Level Process Definition... 3 Business Policies... 4 Procedures... 5 Create a New
Sales Orders User Manual
 Sales Orders User Manual This manual is designed to guide you through the Sales Orders Module in ipoint Control. The Sales Orders Module is where you keep track of all your Sales Orders for your various
Navistar Direct Ship isupplier Portal Supplier User Guide (v1 9/26/2012)
") 1 Navistar Direct Ship isupplier Portal Supplier User Guide (v1 9/26/2012) Navistar Direct Ship isupplier Portal https://dhp.navistar.com/oa_html/appslogin Navistar Direct Ship isupplier Portal Online
1 Navistar Direct Ship isupplier Portal Supplier User Guide (v1 9/26/2012) Navistar Direct Ship isupplier Portal https://dhp.navistar.com/oa_html/appslogin Navistar Direct Ship isupplier Portal Online
BlueCross BlueShield of Montana. Consumer ebilling Training Guide
 BlueCross BlueShield of Montana Consumer ebilling Training Guide Table of Contents System Information...3 Logging in to the System...3 At Home with ebilling...6 Main Buttons...7 Navigation Tabs...7 Home
User Guide. User Guide to Recurring Billing and Storage. Setting up and using the Recurring Billing system
 User Guide User Guide to Recurring Billing and Storage Setting up and using the Recurring Billing system Version 3.7 (Fall 2008) User Guide to Recurring Billing and Storage Copyright Copyright 1997-2009
Release Notes
 + Release Notes 18.01.01 Release Date: 3/2/2018 Product Version: 18.01.01 Previous Version: 17.12.01 New Features and Enhancements PBI 2138 Allow User to set a company default for Adjustment Reason Code
EZ-FREIGHT SOFTWARE OPERATIONS MANUAL
 Page 1 of 102 BUSINESS SOFTWARE SOLUTIONS sales@venex.com 7220 N.W. 36 th Street Suite 616 Miami, Florida. 33166 Tel. (305) 477-5122 Fax (305) 477-5851 EZ-FREIGHT SOFTWARE OPERATIONS MANUAL Manual includes
International Institute of Tropical Agriculture
 ORACLE FINANCIALS USER GUIDE International Institute of Tropical Agriculture Accounts Payable Author: Oracle Implementation Team Creation Date: October 27, 2001 Last Updated: October 27, 2001 Control Number:
MYOB Viztopia Practice Management Assignment Budgeting and Workflow. How To Guide Version 1.0
 MYOB Viztopia Practice Management Assignment Budgeting and Workflow How To Guide Version 1.0 2006 MYOB Technology Pty Ltd Disclaimer MYOB has made every attempt to ensure the accuracy, relevance and completeness
HDPOS EASY. Hyper Drive Information Technologies (P) Ltd
 Ltd") HDPOS EASY Chapters 1. Getting Started 1.1. Download & Installation 1.2. Application Registration 2. Database 2.1. Sample database 2.2. Blank Database 2.2.1. Back up database 2.2.2. Restore database 3.
HDPOS EASY Chapters 1. Getting Started 1.1. Download & Installation 1.2. Application Registration 2. Database 2.1. Sample database 2.2. Blank Database 2.2.1. Back up database 2.2.2. Restore database 3.
Sage 200c Commercials Datasheet
 Sage 200c Commercials Datasheet Sage 200c Commercials automates the delivery of your customer orders with effective stock management. By responding to product and pricing demands quickly and effectively
TRAINING DOCUMENT Internet Expenses Administrator
 TRAINING DOCUMENT Internet Expenses Author: William Arthur Green, Jr. Creation Date: March 26, 2007 Last Updated: September 28, 20 Control Number: Version: 1 Approvals: William Green Document Control Change
Program Change Log NexGen FMS ver October 2018 NexGen FMS ver October 2018 NexGen FMS ver October 2018
 Program Change Log NexGen FMS ver. 3.5.497 October 2018 Minor: Case #10380 E-Mail Setting - When choosing MAPI in e-mail setting changed the URL text field to a checkbox called Extended Protocol Minor:
KeyedIn Projects 5.6 User Guide
 KeyedIn Projects 5.6 User Guide Highlights Combination Reports Security Model Simplification Task Planning Improvements New Timesheet Notifications Home Screen Improvements Billing Improvements Russian
Payroll Processing User Guide. isolved. Payroll Processing Guide
 isolved Payroll Processing Guide Table of Contents My Payroll Processing Calendar... 2 Next Scheduled Payroll... 2 Client Run Schedule... 3 Payroll Entry Setup... 4 Time Entry Templates... 4 Client Time
AvaTax Magento 1 Extension. User Guide
 AvaTax Magento 1 Extension User Guide Table of Contents About Avatax extension Flow and integration with StoreFront Installation Connection Settings Typical Installation Process Installation Process for
Further Processing Softproviding Core User Documentation
 Great ideas are always simple Softproviding simply makes them happen. Further Processing Softproviding Core User Documentation Version: 1.00 Date: 28 June 2017 Release: v2.50 Softproviding AG Riehenring
MSI Accounts Payable Version 7.5
 MSI Accounts Payable Version 7.5 User s Guide Harris Local Government 1860 W. Winchester Road, Ste 204 Libertyville, IL 60048 Phone: (847) 362-2803 Fax: (847) 362-3347 Contents are the exclusive property
Release Notes. November Version 141
 Release Notes November 2016 Version 141 Stock Control: We have found Merlin to be a major benefit to our business. It frees up the purchasing departments time, improving productivity and saving money for
DCC Kronos Supervisor Handbook
 Logging in You can log into Kronos through MYDCC. Select the Working @ DCC tab and then click on the Kronos link located in the upper left hand corner of the screen. If you use the MYDCC portal, you will
ClubSelect Accounts Receivable Special Charges Overview
 Webinar Topics Special Charges Billing... 2 Special Charges... 4 Special Credits... 8 Surcharges... 13 Calculate Automatic Billing Plans... 18 Special Charges Billing ClubSelect AR allows you to easily
Infusion Software v8.450 Upgrade Notes
 Admin When selecting to Show Costs/Profit on Customer Quotes, Customer Invoices and Job screens, it is now possible to display either the Mark-Up or Margin. The setting for this is under Manage Customer
Autosoft Ford DOW Interface
 Autosoft Ford DOW Interface FLEX DMS Parts Module This document provides instructions for using the Autosoft Ford DOW Interface. The interface allows you to pull parts orders and generate an XML file you
CONNECTICUT DSS ELECTRONIC VISIT VERIFICATION (EVV): TPL UPDATE. ABN Detail Entry
: TPL UPDATE. ABN Detail Entry") CONNECTICUT DSS ELECTRONIC VISIT VERIFICATION (EVV): TPL UPDATE ABN Detail Entry AGENDA 1. Program Updates 2. Third Party Liability Security Group Permissions Manually Importing Payers Ranking Payers Add
CONNECTICUT DSS ELECTRONIC VISIT VERIFICATION (EVV): TPL UPDATE ABN Detail Entry AGENDA 1. Program Updates 2. Third Party Liability Security Group Permissions Manually Importing Payers Ranking Payers Add
DHL PROVIEW CUSTOMER USER GUIDE
 DHL PROVIEW CUSTOMER USER GUIDE INDEX Introduction Accessing ProView / Registration Detailed Shipment Information Notifications Quick Reference / Review Contacts 2 INTRODUCTION Placement of ProView ProView
Defect Repair Report as of 9/12/2014
 27.04 Page 1 of 16 Release Notes By Module Framework The system no longer bans you from the EFI Pace refresh screen. 27.04-512 Framework The system now recognizes the Log In Automatically setting on the
Juniper Newsletter. User Manual Booking Engine - Update August th of July, Juniper Innovating Travel Technology
 Juniper Newsletter User Manual Booking Engine - Update August 2013 30th of July, 2013 www.ejuniper.com Juniper Innovating Travel Technology Content 1. Accommodation 3 1.1. Sales Volume Commission and Marketing
... Evo-Remote User s Manual
 Evolution By.......... Evo-Remote User s Manual EVO-REMOTE 4. Reporting 1. Employee Maintenance 4 EASY STEPS TO A SUCCESSFUL PAYROLL 3. Pre- Process/Submit 2. Entering Payroll Legend UPPER CASE BOLD =
WSIPC Guide to Time Off
 WSIPC Guide to Time Off Contents Contents i About This Guide 1 What You Should Know Before You Start 2 Be Sure You re Signed In 2 How to Use This Guide 2 Navigation Paths 2 Getting Around 2 Screen Shots
A Beginners Guide to Sage 200. Part 1: The Financials Modules
 A Beginners Guide to Sage 200 Part 1: The Financials Modules Introduction A Beginners Guide to Sage 200 s Financial Modules Whether you ve been using Sage products for years or are a complete newbie,
Voucher Build Request
 Running the Voucher Build for Payroll Federal Tax Vouchers - 10a Purpose: Use this document as a reference for how to run the Accounts Payable process for Running a Voucher Build for Payroll Federal Tax
Version Countries: US, CA. Setup and User Manual (include user demo scenarios in red) For Microsoft Dynamics 365 Business Central
 For Microsoft Dynamics 365 Business Central") Version 1.0.0.0 Countries: US, CA Setup and User Manual (include user demo scenarios in red) For Microsoft Dynamics 365 Business Central Last Update: January 11, 2019 Contents App Description... 3 Demo
Version 1.0.0.0 Countries: US, CA Setup and User Manual (include user demo scenarios in red) For Microsoft Dynamics 365 Business Central Last Update: January 11, 2019 Contents App Description... 3 Demo