User s Guide for Security Administrators. PeopleSoft 9.2. GeorgiaFIRST. GeorgiaFIRST Financials University System of Georgia
|
|
|
- Magdalene Amice Thornton
- 6 years ago
- Views:
Transcription

1 GeorgiaFIRST Financials University System of Georgia User s Guide for Security Administrators PeopleSoft 9.2 GeorgiaFIRST
2 (This page is intentionally left blank for printing purposes.) 2
3 TABLE OF CONTENTS INTRODUCTION: PEOPLESOFT SECURITY BASICS... 6 SECURITY DESIGN STRATEGY (OPTIONAL)... 6 DYNAMIC ROLES... 7 PERMISSION LISTS... 7 WORKFLOW ROLES... 8 CHAPTER 1: SECURITY ADMINISTRATION... 9 CHAPTER 2: MANAGING USER SECURITY USER PROFILES GENERAL TAB PERMISSION LISTS USER ROLES TAB DETERMINING ACCESS Activity 1: INSTITUTION-SPECIFIC JOB AIDS AND FORMS WORKFLOW TAB SELF-REGISTRATION Activity 2: CHAPTER 3: MANAGING USER PREFERENCES GENERAL PREFERENCE OLE INFORMATION AND PROCESS GROUP ASSET MANAGEMENT USER PREFERENCES GENERAL LEDGER USER PREFERENCES JOURNAL ENTRY OPTIONS ONLINE JOURNAL EDIT DEFAULTS JOURNAL POST DEFAULTS BUDGET POST OPTIONS PAYCYLE USER PREFERENCES PROCUREMENT PAYABLES ONLINE VOUCHERING RECEIVER SETUP PURCHASE ORDER AUTHORIZATIONS BUYERS USER AUTHORIZATION (OPTIONAL) SUPPLIER PROCESSING AUTHORITY DOCUMENT TOLERANCE AUTHORIZATIONS REQUISITION (REQ) AUTHORIZATIONS Activity 3: CHAPTER 4: WORKFLOW MANAGEMENT WORKFLOW ADMINISTRATION
4 APPROVAL ROLES VS. ROUTING ROLES CHAPTER 5: MANAGING MODULE SPECIFIC SECURITY ACCOUNTS PAYABLE Activity 4: ACCOUNTS RECEIVABLE BENEFIT RECONCILIATION MODULE BOR PAYROLL MODULE BUDGET PREPARATION (BUDGET PREP) COMMITMENT CONTROL Activity 5: EXPENSES Activity 6: GENERAL LEDGER PURCHASING BUYER ROLES BUYER SETUP Activity 7: CHAPTER 6: EPROCUREMENT (EPRO) TYPES OF ROLES INVOLVED REQUESTER SECURITY ROLES REQUESTER SETUP HOW DO APPROVALS WORK? APPROVAL STAGES APPROVAL TIME LIMITS EPRO ADMINISTRATORS EPRO APPROVER SETUP SPECIAL ITEM APPROVER SECURITY ROLES DEPARTMENT MANAGER ID ADDITIONAL DEPARTMENT MANAGERS PROJECT MANAGER ID Activity 8: CHAPTER 7: MANAGING QUERY SECURITY NAVIGATION TO QUERY MANAGER COMPONENTS ROW-LEVEL SECURITY USING QUERY VIEWER CHAPTER 8: IT AUDIT NEW HIRES TERMINATED USERS TERMINATED USER QUERY Activity 9:
5 CURRENT USERS DOCUMENTATION AND APPROVALS MONITORING SEGREGATION OF DUTIES QUERY Activity 10: Activity 11: Activity 12: INSTITUTION AUDIT CHECKLIST FREQUENTLY ASKED QUESTIONS

6 Introduction: PeopleSoft Security Basics Security Design Strategy (Optional) Before we focus on security, we will begin with an overview of the PeopleSoft Financials security design philosophy. The three components of this system are Users, Roles, and Permission Lists. User Profiles, i.e., the user, refers to any employee set up to use the system. Each user is assigned one or more roles. These roles, sometimes called Model Roles because we deliver most roles to schools rather than allowing them to create their own, then determine which business processes a particular user is allowed to perform. The business processes are contained in Permission Lists (see chart above). Roles are granular, which means that each role is based upon a specific business process. Therefore, access needed to complete a business process is mapped into corresponding role/roles. For example, if you assign a user the Voucher Entry role, that user automatically has access to Add Vouchers. 6
7 Some business processes require only one role to complete. More complex business processes, such as running a pay cycle under Accounts Payable, may require multiple roles to complete. Our granular approach promotes flexibility across institutions and reduces the risk of segregation of duties issues. ITS designs and creates the roles and permission lists and allows institutions to administer the delivered roles to their individual users through a distributed user profile. We will cover this more in the security administration area of this document. Dynamic Roles To make role assignment faster and more efficient, the GeorgiaFIRST model utilizes the dynamic roles functionality within PeopleSoft. Dynamic roles allow administrators to assign roles based on preset permissions. Roles can be assigned dynamically using several different methods. One method is by creating a query that says, If a user has access to role X, then automatically give them role XX as well. In addition, if a user has access to page X, then role X can also be assigned. The benefit of creating a dynamic role is that, when role X is removed, role XX is also removed. Queries, PeopleCode, or Directories can be used to assign dynamic roles. Currently, ITS has only one Dynamic Role: the BOR_EX_APPROVAL role. Any user who is on the Expenses Approver Assignments page automatically gets this role. As a result, they also receive permission to approve expense transactions. Upon termination, the user should be removed from the Expenses Approver Assignments page. The Dynamic Role will automatically be removed from their user profile. Permission Lists Permission Lists, building blocks of end-user security authorizations, control what a user can and cannot access. A user inherits permissions through the role or roles the security administrator assigns to them. In the chart above, notice that permission lists are assigned to roles, which are then assigned to user profiles. A role may contain numerous permissions and a user profile may have numerous roles assigned to it. Because permission lists are applied to users through roles, a user inherits all the permissions assigned to each role to which the user belongs. The user's access is determined by the combination of all of the roles assigned. A Permission List may contain any number of the following permissions: sign-on times, page permissions, component interface permissions, web libraries, and so on. Although a permission list may contain one or more 7
8 permissions, the smaller the number of permissions within a particular permission list, the more flexible and scalable that permission list is. Please note: Data permissions are assigned directly to the User Profile either through a Primary Permissions list or Row Security Permissions list (this will vary in HR or Finance). Navigator Homepage and Process Profile permission lists are also assigned directly to the user profile. All permission lists start with the module, i.e., GL for General Ledger, and are then followed by the name of the permission list. For example, GL_PAY_INTERFACE is a General ledger permission list. Tools version 8.4+ allows you the naming length of 30 characters for a permission list. There are two tables that contain information on permission lists: PSCLASSDEFN - Permissions Lists Definition PSAUTHITEM - Authorized Menu Item Workflow Roles When enabled, some delivered business processes provide for the routing of work through an automated process called workflow. For example, when an Accounts Payable clerk enters a voucher, and an Accounts Payable manager needs to approve it, the system will automatically route the transaction to the manager using workflow. Each business process needs to be configured to include a rule set to route the work to the appropriate users. In some cases, this is a role assigned to the user profile. Roles used in this manner will be designed and created to allow for the routing of work and provide only this function. They will be different from other roles in that they are shell roles, with no page access. 8
9 Chapter 1: Security Administration System security involves protecting financial data against modification, loss, theft, and unauthorized disclosure. To ensure the safety of data, GeorgiaFIRST has a security framework with several key areas of control, such as data access, password management, user account management, authorization management, and audit logs. Security administration is distributed to each institution, and it is that institution s responsibility to administer, update, and maintain it. This is done through role grant and distributed user profiles. Since ITS creates the roles and permissions, each institutional security administrator must have a security role that allows access to the delivered roles. This role is BOR_LOCAL_SEC_ADMIN and contains all the delivered roles that are not institution specific. In addition, for institution-specific roles such as BOR_EP_ADMINXX, BOR_PO_ADMINXX, etc., the administrator also needs BOR_LOCAL_SEC_ADMINXX (XX is the first two digits of the institution ID). The core job functions of the security administrator at the campus level include but are not limited to: User Profile Management o Core Security Roles Management o EMPLID Management o Address Management o Password Reset o Account Lock Out/Reset o Commitment Control Security o User Preferences o Approval Setup Security Monitoring (will be covered more in the IT Audit section below) o New Users o Terminated Users o Position Changes 9

10 Chapter 2: Managing User Security User Profiles define individual PeopleSoft users. You begin the security process by defining User Profiles and then linking each User to roles. Normally, a User Profile is linked to at least one role in order for it to be a valid profile; however, it is possible to have a User Profile with no Roles if, for example, a user who is not allowed access to the PeopleSoft application needs to receive workflow-generated s. As we explained in the Introduction, the majority of permissions (values) that make up a user profile are inherited from the linked roles. User Profiles The first thing you must do to set up a User Profile is create a User ID by entering appropriate values, such as user password, work (.edu) address, employee ID, and so on. To set up a User Profile, follow the navigation: PeopleTools > Security > User Profiles > Distributed User Profiles. There are three ways to manually create a new User Profile. First, you can click on the Add a New Value tab and add a User ID. The User ID should be unique and not contain white space or any of the following special 10
11 characters: ; : &, < > \ / " [ ] ( ). People Tools version 8.5+ allows you the naming length of up to 30 characters. (Some institutions prefer that the User ID not be tied to the user s name. Check your institution to see if they have a preferred style for User IDs.) Click the Add button. The second way to create a new Profile is to use the Copy User Profile feature to duplicate a similar profile. The benefit of using this method is that, if you have a core user with 50 roles and hire another user who needs the same 50 roles to replace them, you either have to manually add the 50 roles or do the Copy User Profile, which copies the roles. To copy a User Profile, follow the navigation: PeopleTools > Security > User Profiles > Copy User Profile. The name of your new profile will need to be different from the one you are about to copy. Please note: The third way to create a User Profile is to have the user self-register. This method is explained on page
.")
12 General Tab Now that you have created a new User ID, you can enter the user s values into fields located under the General tab. 1. Start by entering the Symbolic ID. Click the down arrow and select the system default (SYSADM1). (Users who will only be authenticating through a Directory will not need a Symbolic ID for access into the system.) 12

13 2. Enter a password and then confirm it by entering it again in the Confirm Password field. This password should conform to existing password constraints set in the system. See chart below. When a password is entered, the system will automatically make the password longer and return dots, then save the profile. 13
14 The only other fields that may be required on the General tab are the Process Profile and Primary fields in the Permission Lists portion of the page. Permission Lists The Process Profile can control which processes a user is allowed to run. In the GeorgiaFIRST model, processes are not grouped into different process groups. If a user has security to a page, he or she can run the process because all processes have been consolidated into one group. To add a process, type PT_PRCSPRFL into the Process Profile. Please note: This is the only instance where a permission list is attached directly to the User Profile. The Primary permission list is what controls which institution s data the user can access, update, and inquire on. For example if a university s Business Unit is XXXXX, the user s primary permission list is BOR_BU_XXXXX. This list enforces row level security and allows users to see data only from their institution. To give permission for a Primary level, 1. Click on the Search symbol beside the Primary key field. 2. Click the number that corresponds to your organization. 3. Click Add. If the local security administrator creates the profile manually, the process profile defaults from the local security administrator s profile. 14

15 The next tab on the User Profile is the ID tab. This tab is used to set the ID type for the user. For end users who are employees, this will be set to Employee. After setting the ID type to Employee, the Attribute field will be activated. You will be required to complete the Attribute Value field before you can save the Profile. This field should match the User ID from the first page on the profile. For quick look up and validation, type in the first several digits and click the Search button. The description field should match the name of the user. User Roles Tab Use the User Roles tab to attach the functional and system roles you need to complete the profile definition. 15
16 The business processes you are trying to complete determine what roles you need. For example, if the business process is Enter a PO Voucher, then you look up the role associated with that process, such as BOR_AP_VOUCHER_ENTRY. Because all roles are not intuitive, you may need to consult Job Aids on the GeorgiaFirst website ( Once the appropriate roles are attached, click the Save button to complete your profile. Determining Access One of the most difficult tasks for security administrators is determining what access and what level of access an end user needs. This can vary by institution because of the hundreds of roles and other aspects of security. We will address a few of the tools and queries that can be used to determine what access a role has and what access an individual needs. The first one is PT_SEC_ROLE_PAGES, which is run by role. To reach Query Manager, follow the navigation: Reporting Tools > Query > Query Manager. Enter your Query Name and click on Search. 16

17 Click run and enter your search criteria. Select OK. 17

18 The query results return menu names down to page names. Because distinguishing what the Page actually is may be difficult, you need to run the BOR_PORTAL_PERMISSIONS query: 18
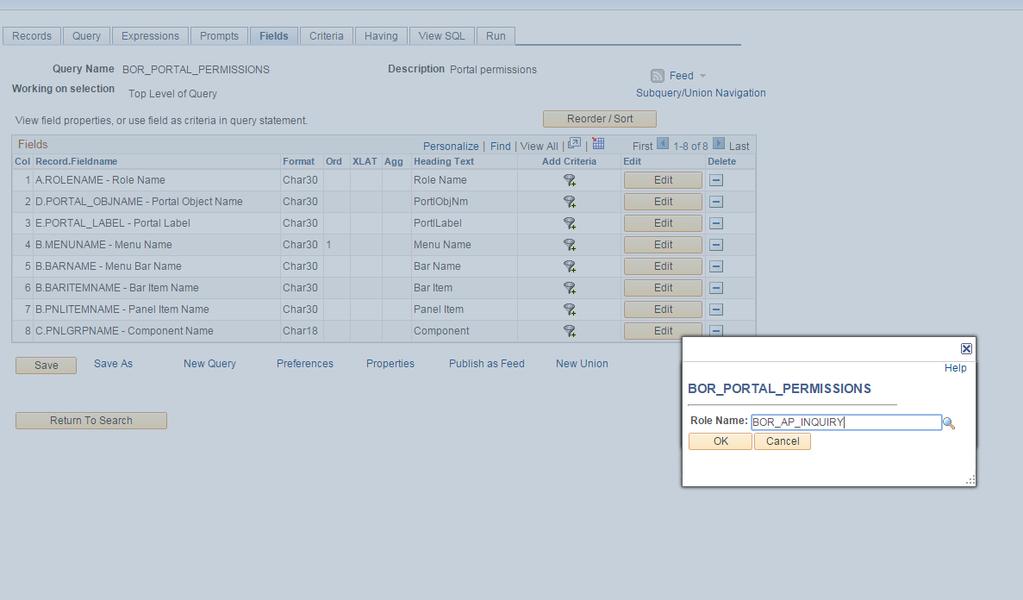
19 19

20 As you can see, the query results contain the Portal Label, which is sometimes much more intuitive than the page name itself. These two queries are helpful if you want to see what access a specific role contains. This query could be modified to remove the prompt for the Role Name field. Removing the prompt would allow you to run the query for all delivered roles. Security Matrix for 9.2, a list of all delivered BOR roles, and spreadsheets broken out by business processes and roles are available on the GeorgiaFIRST website. 20

21 Activity 1: You have a request to add security to a user and this user needs to be able to enter a voucher. 1. What role should you give them? 2. Are there any other considerations you need to look at for this user? If so list them here: You have another request for a user to be able to Run depreciation on an asset. 3. What role is required? 4. Are there any other considerations you need to look at for this user? If so, list them here: 21
22 Institution-Specific Job Aids and Forms As discussed before, one of the best ways to determine what access your employees need is to create custom security job aids by job functions. The GeorgiaFIRST website has sample job aids ( however, job functions will vary across institutions. Look for common job titles between various departments at your institution. Then if the job duties are the same, or even have only a few exceptions, document the security for that job duty and note the exception roles and preferences. As new hires come along and are placed in those job functions, you will have the security assignments documented. For instance, some institutions have a directory on their campus website that lists each department and may also include names and job titles. If your Budget Office has a Director, Assistant Director, and Budget Analyst, for example, you could look at the job functions for each and determine what security requirements are needed and document them. It may be that the Director and Assistant Director need the same security, so only one job aid would be needed. If only a few roles differ, you could use the same job aid and note the differences. The Budget Analyst would not need as much security, however, so I would expect to see a different job aid for that role. Another example might involve the Purchasing Department. If you have a director, a senior buyer, a buyer, and a purchasing staff, you should divide these into different job aids. The director probably needs the most supervisory access, so that may be one job aid. Because the senior buyer and buyer need less security, they should probably be on the same job aid, and the Staff member, who needs even less security, should be on a separate job aid. This will help with Auditing purposes, documentation and ease of administration. 22
23 Workflow Tab 1. The Workflow tab is where you define routing preferences or workflow attributes. For Routing Preferences, select Worklist User if the user is an approver or may receive a system notification in their worklist. This is selected by default, and I suggest leaving it checked for active employees. 2. The User checkbox allows end users to receive system notifications via work (.edu). These notifications will be sent to the address on the user s General Tab. This box is selected by default, and I suggest leaving it checked for active employees. 3. The Workflow Attributes section allows a user to have an alternate approver defined. If a user defined as an approver is going to be out of the office for a predefined time, you can redirect approvals to a specified User ID for a date range. The Reassign Work To section allows the security administrator to reassign ALL transactions in this individual s worklist to a new approver. To redirect approvals, search for new approver and click on the User ID. Then click SAVE. Please Note: This will reassign EVERYTHING. If this person is an epro Approver and a General Ledger Approver, it will send all Requisition and Journal approvals to the person you identify. It cannot separate them out. If the 23

24 General Ledger transactions need to go to a different approver than the epro transactions, use the Monitor Worklist page to reassign these transactions individually. One other point to consider is that, reassigning work can cause issues if the date range expires. If the person listed as the alternate leaves the institution and goes to a different institution, it can cause a multi-campus user error to flag on this user profile the next time it is changed. In addition, the system may continue routing to the alternate even after the date range has expired. I suggest running a query to identify all of your alternate users and clearing them out after the date has expired. Self-Registration The third way to manually create a new User Profile is self-registration. For institutions at which many employees travel and, therefore, use travel and expenses, users may self-register so that they receive a user ID and basic rights to file an expense report. For large schools that have thousands of employees who travel, having users selfregister saves you the time it takes to create multiple accounts. However, if the user needs other module functionality, then you must add the additional roles. 1. Login to the self-service site at fprod-selfservice.gafirst.usg.edu. 2. Click on Register for My Account. 24

25 3. Fill in the required fields on the next screen: 4. The system will display the job row for the employee who is self-registering. They need to click the box beside the active job row and select next. At this point, the user can create his or her own User ID and setup a password and address. At this point, registration is complete. They have to sign out and sign in with their newly created user ID and password. This provides the employee with basic sign-in rights, and if their institution uses expenses, it assigns the basic expenses access required to create and print expense transactions. No security form is required for selfregistered individuals until they need additional roles. At that point, approvals and documentation are required. Activity 2: 1. Login to FPLAY with your User ID and password that you use in current production. 2. Create a new User ID and assign it the following roles: BOR PeopleSoft User, BOR_FN_ADMIN_REPORTING, ReportSuperUser, BOR_EP_REQUESTER, BOR_EP_MAINT_REQ, BOR_EP_MAINT_REQ_SCI, BOR_PT_QRY_PUBLIC,and BOR_PT_QRY_ALLACCGRPS. 3. Save the user profile and write down the user name/password you created. 25

26 Chapter 3: Managing User Preferences Each functionality in PeopleSoft Financials System relies on every user having access (and not having access) to carry out certain actions in order for the system to function correctly and avoid costly errors. Institution security administrators and designates are responsible for setting up correct user preferences, which determine which actions the user can take. To set up a user preference, follow the navigation: Setup Financials/Supply Chain > Common Definitions > User Preferences > Define User Preferences. 1. Enter the User ID 2. Click the Search Button. 3. Click on the user s name. General Preference General user preferences provide certain user access that is cross modular rather than being tied to a specific module. As a result, administrators need to assign these user preferences at the beginning of reviewing user preferences for a particular user. 26
27 The first General Preference, the Overall Preference, is the business unit/setid and is required. Entering this information defaults the business unit on all user transaction pages. For example, in General Ledger, when a user adds a journal entry, the business unit defined here will default on the journal entry so that the user does not have to enter their institution ID for each transaction. To set up the user s Overall Preferences, click on Overall Preference link in the left-hand bar. 27
28 1. Enter the User ID and Name fields default. 2. Enter the default Business Unit 3. Enter the default SetID field. 4. As of Date displays the default date for the Combo Edit process. 5. Enter USA in the Localization Country field. 6. Do not select Alternate Character Enabled to activate alternate description buttons or links. GeorgiaFIRST does not use this feature. 7. Do not select Display Debit/Credit Amounts in Subsystem, which displays debit and credit amounts of the default business unit on journal entry and inquiry pages. GeorgiaFIRST does not use this feature. 8. Select the Save button. OLE Information and Process Group When you return to the User Preferences tab, you will see two more choices on the left-hand bar. The first one is OLE Information. No setup is required. 28
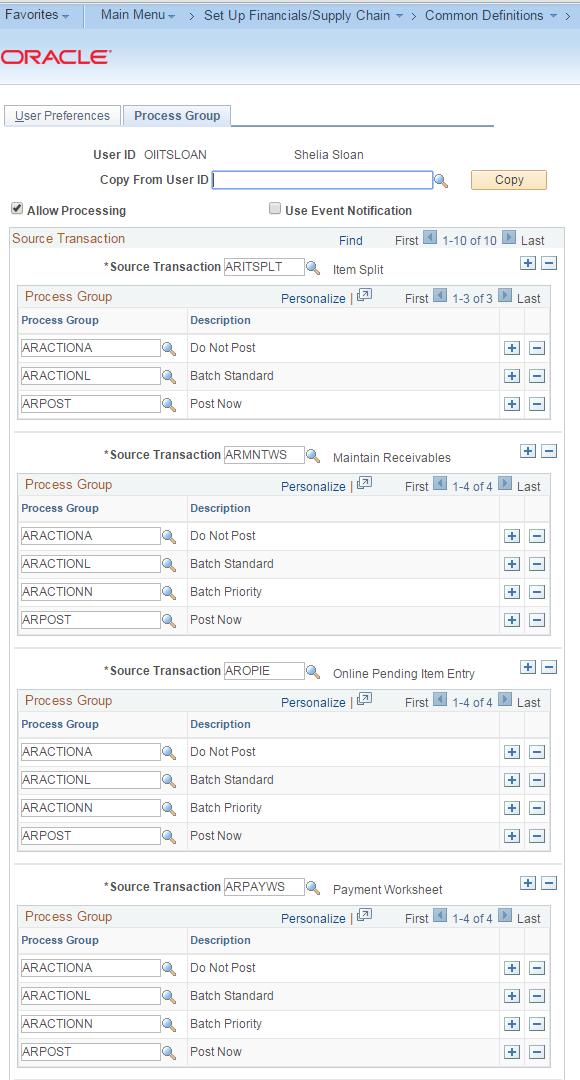
29 The second choice is Process Group. This is set up by Security and controls the on-demand features on transaction pages. For instance, a user who enters a voucher may want to run budget check and voucher post directly on the voucher entry page. This transaction would be controlled and enabled through process groups. The Allow Processing checkbox must be selected. Once you click Save, you will see a list of process groups that are enabled for different source transactions within the system. (You can also copy these source transactions from another user.) 29
30 30
31 For example, if you have a super user who wants to run all voucher processes at once, including Budget Checking, Document Tolerance, Matching, and Voucher Post, assign the VCHR_STM process group in Source Transaction. If the user needs to run these processes on the voucher individually, then assign the Source Transaction of Voucher 31

32 individually. You then choose which one you want to run or, if you want to run all of them, you click Post Voucher (PST_VCHR). The screen shot below shows the screen an Accounts Payable user would see if assigned the VOUCHER process group. Asset Management User Preferences To set User Preferences for the Asset Management module, return to the User Preferences tab and click on Asset Management under Product Preference. 32
33 If you are an Asset Management User, you need to make sure that your security administrator has given you the following options: 1. Select a drill-down group to be used by online reporting when filtering data. 2. Supply a default date on which you want this transaction distributed to the general ledger. The accounting date is validated against the open periods that you establish for Asset Management in the FIN_OPEN_PERIOD table to determine to which period the system posts. (The difference between the transaction date and the accounting date determine whether any prior period depreciation must be calculated. For example, suppose that a computer was acquired and placed in service on 3/16 but was not entered into Asset Management until 8/1. All general ledger periods prior to August are closed. In this case, Asset Management automatically calculated depreciation starting in March and posts it to the general ledger in August.) 3. Click on Asset Management Integration to add transactions from Maintenance Management to the transaction loader process. 4. Under Edit Options for Interface Table, choose the following information: o Edit Financial Information: ALL: Select to allow this user to make edits to all financial transaction table entries. Date: Select to allow this user to make edits to transaction and accounting dates on the financial transaction table. None: Select to disallow this user to make edits to any financial transaction table entries. o Edit Phy A Information: ALL: Select to allow this user to make edits to all physical A table entries. 33
34 None: Select if this user is not allowed to make any edits to any physical A table entries. o Edit Phy B Information: ALL: Select to allow this user to make edits to all physical B table entries. None: Select if this user is not allowed to make any edits to any physical B table entries. 5. Enter the Business Unit. 6. Select the Default Unit of Measure to access when a user is working with space allocations. 7. Select the Property Class to be commonly used by default for this user ID: Site, Building, Floor, Area, or Space. 8. Click SAVE. 34
35 General Ledger User Preferences To set User Preferences for the General Ledger module, return to the User Preferences tab and click on General Ledger under Product Preference. 1. The User ID and Name fields default. 2. Select the ACTUALS Ledger. 3. Select the ACTUALS Ledger Group. 4. Select a default Source (ONL) Journal Entry Options 1. Change Date on Correction Journals: Select to allow the user to change the date on correction journals. 2. Use Next Journal ID: If selected, the Journal ID field becomes unavailable, and the user cannot manually enter a journal ID on the journal entry page. 3. Change Journals from Journal Generator: Select to allow the user to update the ChartField and amounts on the Journal Entry page for a journal created by the Journal Generator process. Please note: If Change Journal from Journal Generator is selected, and the ChartField values are changed 35
36 and the journal reedited, inconsistencies between the subsystem data and the general ledger data can be created. 4. Enter Adjustment Type Journal: Select to allow a user to enter a book code adjustment type journal. 5. Save Journal Incomplete Status: This option enables the user to save journal entry transactions with an incomplete status and prevents them from being edited or posted until they are complete. 6. Allow GL Entry Event Bypass: Select to enable the user to bypass selecting entry events in PeopleSoft General Ledger journal entry, even if they are required on the Installation Options Entry Event page. Online Journal Edit Defaults 1. Re-Edit Previously Edited: Select this button to allow users to reedit journals marked as valid. (When this option is cleared, valid journals are not edited again when running Journal Edit from the Journal Entry page by clicking the Edit button.) 2. Mark Journal(s) to Post: DO NOT SELCT THIS OPTION as it bypasses Journal Workflow. 3. Recalc Currency Exchange Rates: Not applicable to USG. Journal Post Defaults 1. Skip Open Item Reconciliation: Select to bypass open items during the journal post process, allowing you to reconcile the open items at a later time by using the Open Item Maintenance page. 2. Skip Summary Ledger Update: Select to bypass summary ledger updates for this User ID when posting by clicking the Post Button during Online Journal entry. 3. Skip Essbase Incremental Load: Select to bypass the Essbase Incremental Load for a specific user ID during the online journal post process. Budget Post Options 1. Skip Entry Event Processing: Select to enable a user to post the budget that is associated with a journal entry or allocation without generating entry events through the Entry Event Processor. This may occur when an error occurs in a transaction; however, the entry event processing is correct. 36
 option on the Commitment Control-Budget Journals-Enter Budget Journals-Budget Header page acts.")
37 2. Parent Budget Generation: Select to enable a user to generate parent budget impacts when posting child budget journals. This option determines how the Generate Parent Budget(s) option on the Commitment Control-Budget Journals-Enter Budget Journals-Budget Header page acts. o Always Generate: Select this option to always generate parent budget impacts. When this option is selected, the Generate Parent Budget(s) option on the Budget Header page is also selected and the field is unavailable and cannot be changed. o Never Generate: Select this option when you never want to generate parent budget impacts. When this option is selected, the Generate Parent Budget(s) option on the Budget Header page is cleared and the field is unavailable and cannot be changed. o User Specified: Select this option to choose whether to generate parent budget impacts for each budget journal. When this option is selected, the Generate Parent Budget(s) option on the Budget Header page is available for the user to choose. PayCyle User Preferences To set User Preferences for PayCycle, return to the User Preferences tab and click on Paycycle under Product Preference. Select the PSUNX server on the user that runs the pay cycle at your institution. The ID is the From account used for the ACH Payment Notifications. 37
38 Procurement To work with the Procurement module, return to User Preferences and click on Procurement under Product Preference. 1. Enter the User and Name default. 2. Enter the default Location where requested items should be delivered when they are received. 3. Enter the default Origin. 4. Enter the Department (optional). 5. Enter the Ship to Location (optional). 6. Enter the Requester: This is Required if the user is a requester. 7. Enter the Buyer authorized to enter Purchase Orders (PO s) (optional). 8. Click the Save button. 9. Select the Payables Online Vouchering link. 38
39 Payables Online Vouchering 1. Enter the User ID and Name default. 2. Default Values: Select a voucher Origin. 3. Operator Voucher Authorities o o o o Pay Unmatched Vouchers: This gives users the authority to pay vouchers that have not been matched up to the maximum amount that is specified in the Pay Unmatch Amt field. Authorized users must select the Pay UnMatched Voucher checkbox on the Voucher Attributes page in the Voucher component for the system to select the voucher during the Pay Cycle Process. Copy Matched and Closed PO: Select to enable a user to copy matched and closed POs. Override Accounting Date Edit: Select to override the accounting date edit option on the Procurement Control_General Controls page. Pay Unmatch Amt: If you select Pay Unmatched Vouchers, you can use this field to specify an amount limit. 39
40 o Security for Voucher Styles: Click to access the Voucher Styles page. The selected voucher style defines authority for each of the voucher styles checked. Select the appropriate authorized voucher styles based upon responsibilities. Click OK. 4. Online Voucher Processing o o o Do Not Check Voucher Amount and Check Voucher Amount: Select one of these options to determine whether the system performs an edit during the online voucher entry against the voucher gross amount. If you selected Check Voucher Amount, specify the voucher entry limit amount for this user. When you specify the entry limit, you must also specify its currency and a rate type. If this user has the authority to prepay vouchers, you can specify a maximum amount for each prepayment that the user can enter. You must also specify a currency and a rate type for the prepayment. Enter Vouchers Only in Groups: Select to enable the user to enter only vouchers that are attached to a control group ID as defined on the control group information page. Post Vouchers: Select to enable the user to post approved vouchers. 40
41 o Manually Schedule Payments: Select to enable the user to override the system s automatic payment scheduling. If the option is not selected, the scheduled payment information on the Voucher Payments page cannot be modified. o Authority to Override Match: Select to enable the user to override the match status of a voucher. If the voucher requires matching, the voucher match status can be changed to Not Applicable. o Record Payment: Select to enable the user to manually record payments for a voucher. If this option is not selected, the payment action on the Payments page of the Voucher component cannot specify record. (Please note: The Manually Schedule Payments option must be selected to record payments on a voucher.) o Override Withhold Calculation: Select to enable the user to override the timing of the withholding calculation on the withholding page of the voucher component. Withholding calculation can be at payment time or voucher posting time, based on the withholding entity setting. 5. Quick Invoice Configuration o Req. Valid Chart Field Combo's: Select this for the system to automatically validate ChartField combinations on the quick invoice vouchers. If the ChartField combination is invalid, the system prevents the user from saving the voucher. o Require Balanced Invoice: Select this check box for the system to automatically perform balancing algorithms on quick invoice vouchers. If the vouchers are out of balance, the system prevents the user from saving the voucher. 6. Click OK. 7. Select the Receiver Setup link. 41
42 Receiver Setup 1. Enter the User and Name default. 2. Change Non PO Receipt Price: Select to enable the user to change the receipt price for an item on a non-purchase order receipt. 3. Interface Receipt: Select to automate the passing of inventory and asset information through the Receiver Interface Push process. 4. Run Close Short: Select to call the close short process automatically during the receiver interface push processing. 5. Subcontract Streamline: Select this check box if you want the subcontract streamline check box to appear selected by default for a subcontracted purchase order receipt for this user. The user will be able to override this field setting for a subcontracted purchase order receipt. The system determines whether to perform subcontract streamlining (purchase order receipt and production completion for the production ID in a single step) from the receipt. Streamlining processing for subcontract RTVs enables you to process RTVs if the completions have been performed on the associated receipt. The 42
43 system includes negative production completion and production scrap for operations being returned against the subcontract. If this box is deselected, the subcontract streamline check box ill appear deselected for a subcontracted purchase order receipt for this user. This user will not be able to change this field setting for the subcontracted purchase order receipt. That is, this assumes subcontract streamlining is not enabled for this user. 6. Blind Receiving Only: Select to prevent the receiver from seeing the order quantity or the remaining quantity from the purchase order. The receiver needs to count the items before entering the quantity received. When you select this box, the No Order Qty, Ordered Qty, and the PO Remaining Qty check boxes are deselected. 7. No Order Qty: Select to prevent the receiver from seeing the purchase order quantity. The receiver must specify the actual quantity that is received by doing a live count of the items. 8. Ordered Qty: Select to use the purchase order quantity as the default quantity received. 9. PO Remaining Qty: Select to use the remaining quantity (original order quantity minus previously received quantities) on the purchase order as the default quantity received. 10. Days +/- Today: Enter the number of days plus or minus the current system date to be used as default search criteria on receiving pages when you are selecting purchase order schedules against which to receive. 11. Return to Vendor (RTV) Dispatch Option: Select the dispatch method as this user's preference for the return to vendor functionality. This functionality provides a default value for dispatching the RTV to the Supplier. o RTV dispatch option values include: Default to Business Unit: Select to use the dispatch option that is defined at the business-unit level. You define the business unit RTV dispatch option value using the Business Unit Options tab on the Purchasing Definition page. When processing RTV options, the system initially checks the user preference and then the business unit when you select the Default to Business Unit option. Manual: Select to indicate that the Dispatch processing for the RTV must be performed manually. 43
44 Often collaboration must take place between procurement personnel and another group before a RTV line can be dispatched. For example, you might have to verify the disposition of goods with warehouse personnel before dispatching the RTV. 12. RTV Inventory Ship Options: Select the return to vendor ship option that you want to use as this user's default value for the Inventory Process field on the RTV line. This option will only be used by the RTV function when the disposition on the RTV line has a value of Ship. The system determines the ship option default value by first checking the user preference ship option value. If the user preference value is Manual, Express, or Fulfillment, then the system uses the value as the default value. If the user preference value is Default to Business Unit, the system uses the ship option value defined at the business-unit level. o RTV Inventory ship option values are: Default to Business Unit: Select to use the inventory ship option that is defined at the business-unit level. Express: Select to use the RTV express option to process Purchasing and Inventory data collection transactions at the same time. This means that the user can perform Inventory issue (automatic issue) action from within the Purchasing RTV component. If the RTV line disposition is Ship, the system creates a material stock request with a status of Shipped to update inventory. Please Note: The value of Express will not be defaulted onto the RTV line if the RTV line is associated with an Inventory business unit which is defined as a Warehouse Management System (WMS) type. You define the warehouse setting using the Use External Warehouse Control check box on the Business Unit Options page for Inventory. Fulfillment: Select to set the user's preference to perform Inventory fulfillment processing for RTV transactions. This enables the user to create an Inventory material stock request transaction and to process it through Inventory fulfillment processing. The Fulfillment value is only valid for RTV processing when RTV line disposition is Ship. Manual: Select to indicate that the RTV ship transaction must be completed manually. This option requires that the inventory Express Issue function be used to ship the items to the supplier. When you use the Manual Inventory Ship option, the system does not perform RTV 44
45 express functions. The user must use the Inventory Express Issue component to issue inventory returns that are being shipped to the vendor. 13. RTV Inventory Destroy Options: Select the return to vendor destroy option that you want to use as this user's default value for the Inventory Process field on the RTV line. This option is only used by the RTV function when the disposition on the RTV line has a value of Destroy. The system determines the destroy option default value first by checking the user preference destroy option. If the user preference value is Manual or Express, then the system uses that default value. If the user preference value is Default to Business Unit, the system uses the destroy option defined at the business-unit level. RTV Inventory destroy option values are: o Default to Business Unit: Select to use the inventory destroy option setting at the business-unit level. o Express: Select to use the RTV express option to process Purchasing and Inventory data collection transactions at the same time. This means that the user can perform Inventory adjustment (automatic adjustment) actions from within the Purchasing RTV component. o Manual: Select to indicate that the RTV destroy transaction must be completed manually. This option requires that the Inventory Adjustment function be used to update inventory for the items being returned to the vendor. 14. Select OK 15. Select Purchase Order Authorizations link. 45
46 Purchase Order Authorizations 1. The User and Name default. 2. Can Work Approved POs: Select to change a purchase order that has already been approved or dispatched. 3. Can Dispatch Un-Approved POs: Select to enable a user to dispatch purchase orders with a status of pending approval. 4. Full Authority for All Buyers: Select to add, update, cancel, and close purchase orders for all buyers 5. Override Non-Qualified POs for Close: Select to close unqualified purchase orders. 6. Enter View Only for the Rebate ID Security Control. 7. Select Approval if the user is Purchase Order Approver. Buyers User Authorization (Optional) 1. Enter Buyers User Authorized For the buyers for whom this user can enter purchase orders. o 2. Click OK Select Add, Update, Cancel, Close and Reopen only if the full authority is not selected. 3. Select the Vendor Processing Authority link. 46
47 Supplier Processing Authority 1. The User and Name default. 2. Authority to Enter: Select to allow user to enter a new supplier. 3. Authority to Approve: Select to allow user to approve a supplier. 4. Authority to Inactivate: Select to allow user to inactivate a supplier. 5. Supplier Audit: The Supplier Audit check box is selected by default. You can set up audit at set ID level or supplier level if the check box is selected. If the check box is not selected, then users cannot set up audit but can inquire the supplier audit and run the audit log report. 6. Supplier Audit Configuration Template: Select the desired fields to audit and set the Reason flag, which requires Reason Code and comments to be captured. 7. Supplier Audit Template: Includes H-Grid (Hierarchical Grid) for Supplier Address, Phone Information, and Supplier Contact Phone fields and allows the user to enable and disable the audit and reason flag for the main field. When saved, it will enable the audit and reason flag for dependent fields attached to main field. One default template ID is allowed per set ID. 8. Click OK. 9. Click the Doc Tolerance Authorizations link. 47
48 Document Tolerance Authorizations 1. Override Purchase Order to Requisition Exceptions: Enables you to override document tolerance exceptions that are generated when an encumbrance exceeds the pre-encumbrance during document tolerance checking. 2. Override Voucher to Purchase Order Exceptions: Enables you to override document tolerance exceptions that are generated when an expenditure exceeds the encumbrance during document tolerance checking. 3. Select OK 4. Click the Requisition Authorizations link. 48
49 Requisition (Req) Authorizations 1. Can Work Approved Req s: Select to enable a user to change a requisition that has already been approved. 2. Full Auth for All Requesters: Select to give the user authority to add, update, cancel, delete, and close requisitions for all requesters. 3. Override Preferred Supplier: Select to enable a user to change the default supplier on a requisition line. If this authority is not selected, the user is unable to manually suggest a supplier. 4. Override RFQ Required Flag: Select to enable a user to override the RFQ Required Rule option that was previously specified for a requisition in the requisition component. 5. View/Override VAT Details: Select to view and override VAT details within the requisition component. 6. Override Non-Qualified Requisitions for Close: Select to enable a user to close requisitions that are nonqualified for close. 7. Approval: Allows a user to Approve Requisitions. 8. Cancel/Delete/Close/ReOpen: Allows users to cancel/delete/close or reopen requisitions. 49
50 9. Requesters User Auth For: Requesters for whom this user can work requisitions. Select the requester that you want to designate as the user's default requester by selecting the check box to the left of the requester's name. 10. Add/Update/Cancel/Close/Delete/Reopen: Select to enable the user to add, update, cancel, delete, close, and reopen requisitions for this requester. 11. Select OK 12. Click Save. In the previous chapters, you learned to set up users and assign general roles and permissions. In the next chapter, you will learn about workflow. Activity 3: 1. Login to FPLAY with your User ID and password from fprod (not the one you created). 2. Navigate to Setup Financials Supply Chain > Common Definitions > User Preferences > Define User Preferences. 3. Pull up the user ID you created in Activity Add Overall Preferences and give them Requisition Authorization user preferences. 5. Give them full authority for all requesters and save. 50
51 Chapter 4: Workflow Management Many of the daily tasks that you perform are part of larger tasks that involve several steps and several people working together. For example, when you enter an invoice, you initiate an approval and payment process: someone else reviews and approves it, and a third person submits payment to the vendor. The term workflow refers to this larger process. Workflow approval enables transactions that are initiated by End Users to be routed through the system to pre-defined Approvers. Each of the Approvers is assigned to a specific workflow approval level. As the transaction is passed through each workflow approval level, the Approver is responsible for verifying the information on the transaction. The actions available to an approver through Approval Framework include approve, deny, hold, and push back. Transactions can be approved at the header level, line level, or a combination of the two. All required Approvers must approve the transaction to make the status approved. A denied transaction sends the transaction back to the user who submitted it into workflow. For example, if a requisition is denied, it will be sent back to the requester. Putting a transaction on hold gives the approver time to gather additional information before making the choice to approve or deny and gives others visibility into why a transaction is taking longer than anticipated. Push back functionality allows the approver to send the transaction back to the prior approver for additional review. For example, if the approver learned of additional information that they believe the first approver was unaware of, they could send the transaction back. 51

52 Workflow Administration Each Institution needs one or more Workflow Administrators. They are responsible for Routing Management and Transaction Rerouting. Transactions missing approver assignments or transactions that have escalated due to no approvals will need to be redirected to the appropriate approvers by the administrator. Escalation and Notification Days are configured by Module and can be institution specific. Each institution must determine the number of days workflow has to notify the approver that they have not approved the transaction and the number of days before it escalates the transaction to the Workflow Administrator. Approval Roles vs. Routing Roles We discussed this process in the Introduction; however, it is important to mention it here as well. Because many types of roles exist, approvers will need permission for several different roles to be able to facilitate various types of approvals and workflows. An Approval role, i.e., BOR_EP_REQ_APPROVE, contains the pages in the system where the approver would go to approve the transaction. However, workflow needs to know who to route the transactions to. There are several ways to configure this. One way to route a transaction is by role. This role, i.e., BOR_ASSET_APPR, has no page access and no permissions. It is used by workflow only for routing purposes. Other ways to route transactions are by query, by SQL, by Employee ID and, for expenses, by User ID. 52
53 Chapter 5: Managing Module Specific Security Now that you have set up the user and assigned general roles and permissions, you are ready to assign modulespecific roles. In this chapter, modules are listed in alphabetical order, except for epro, which is addressed in Chapter 6. Please note: Since the University System of Georgia has 28 different Business Units, it has to deliver security in a flexible manner. To help institutions segregate duties and define requirements that fit their needs, ITS has created job aids by job function that each institution can use as a guide to create their own version. (They can be downloaded from the GeorgiaFIRST Website: The benefit of creating institution-specific job aids is that security administrators can use them to set up user accounts for a specific function without guessing which roles they need each time, segregate duties, and define requirements. Accounts Payable The Accounts Payable module contains voucher security, pay cycle security, 1099 security, workflow security, user preferences, setup and budget, and budget date override security considerations. Tying roles and user preferences to each other provides the full-level access that an end user will need. For example, if you recall in the user preferences section on Procurement/Payables Online Vouchering (Chapter 3), there is a checkbox that says, Enter Vouchers Only in Groups. If this is selected, then one of your users will have to have the BOR_AP_CNTRL_GRPS_MAINT role to setup and approve Control Groups. Please note: When assigning user roles and security preferences, keep segregation of duties issues in mind. For example, a user should not be able to enter a voucher, approve it, run a pay cycle, and then approve it. If your institution uses voucher workflow, the following roles will need to be assigned to the appropriate users: BOR_VOUCHER_BUD_REF_APPR is the approval role for vouchers with Budget Reference differences. BOR_VOUCHER_ASSET_APPR is approval role for vouchers with Asset Issues. BOR_AP_ADMINXX (first two digits of institution id) is for escalations or routing issues. 53

54 Keep in mind that these three roles are used only to route transactions to users. They do not contain page access. An approver will also have to have the BOR_AP_APPROVE_VCHR role to approve a voucher at any of the above levels. This role gives them the page access needed to get to the voucher to approve it. If your institution makes ACH payments and would like all of the from addresses to be a generic address such as accountspayable@xxx.edu, then you must configure a new user preference and setup page. The person who normally runs the pay cycle can enter the generic address on their user preferences on the screen below. This process must be implemented for only one user. Follow the navigation: Set Up Financials/Supply Chain > Common Definitions > User Preferences > Define User Preferences. 1. Click on PayCycle. 2. Enter the generic ID. 3. Click on Save. 54

55 Now go to the PayCycle Selection Criteria page. Follow the navigation: Accounts Payable > Payments > Pay Cycle Processing > Payment Selection Criteria. Enter the same user ID under Payment Advice User ID. If your Accounts Payables users want to take advantage of the new dashboard/workcenter features, they will need the following roles: BOR_AP_DASHBOARD BOR_AP_WORKCENTER BOR_WORKCENTER_USER role Other Accounts Payable considerations include the user preferences mentioned in the User Preference Section. These include Process Groups, which allow a user to run budget check, document tolerance, voucher post, and matching directly from the voucher pages, without relying on batch. This also includes Matching process groups that allow a user to override a match exception. Please note: Check user s commitment control rules for AP. If your user needs to override a Budget Date or a Budget Exception error on a Voucher, they will need OVRD_AP and/or BUDG_DT_AP commitment control rules. These are located under Commitment Control > Define Budget Security > Assign Rule to a User. See Commitment Control Section below. Run the request build process after assigning the rules to the user or the 55
56 change will not take effect. (If you forget to run the request build process, the BORBATCH process that runs every night will run it for you.) Activity 4: 1. Login to FPLAY with your User ID and password from fprod (not the one you created). 2. Navigate to PeopleTools > Security > User Profiles > Distributed User Profiles. Create a Payables User ID with the following roles: BOR PeopleSoft User, BOR_FN_ADMIN_REPORTING, ReportSuperUser, BOR_WORKCENTER_USER, BOR_AP_DASHBOARD, BOR_AP_WORKCENTER, and BOR_AP_VOUCHER_ENTRY. Then navigate to user preferences for this user and fill in Overall Preferences and payables preferences. Choose ONL as Origin. 3. Write down User name and password. Accounts Receivable PeopleSoft Receivables enables you to: Enter and track all of your receivables. Receive and apply payments. Manage outstanding receivables, enabling your organization to collect money quickly. Currently only USO is using this module. Benefit Reconciliation Module Benefit Reconciliation in PS Financials includes the creation of accounting entries, reconcilement tools and reporting data for active and retired employees with benefits. The Benefit Reconciliation module also provides tools for monitoring COBRA participants and employees on leave of absence. The functionality of Benefits Reconciliation serves as a source for monthly, quarterly, and annual reporting. Only the following roles should be used for Benefits Reconciliations role assignment. The Security Administrator should only assign roles for General Ledger (GL) based upon the employee s job duties and audit consideration for separation of duties. 56
57 Description Comments BOR PeopleSoft User FN Base PeopleSoft User Each user MUST have a base role. BOR PeopleSoft User-no exp BOR PeopleSoft User-no exp Each user MUST have a base role. BOR PeopleSoft User No Tauth Base role without travel auths Each user MUST have a base role. BOR_ADP_PAYROLL_ADJ Payroll Adjustments This role allows users to enter Payroll Adjustment journal. BOR_ADP_RET_BEN_ACCTG Retirement Benefits Accounting This role allows access to the users to run the retirement. Benefit accounting processes BOR_ADP_SUPP_PDR Supplemental PDR This role allows users to run SUPPDR accounting processes. BOR_GL_ADP_REPORT BOR_GL_JOURNAL_ENTRY BOR_GL_JOURNAL_PROCESSING Benefit Payment/Accrual Recon Process Jrnls-Maintain This role allows users to run Reconcilement processes and Reports. This role limits users to the Edit, Submit and Post processes. This role is necessary for users performing journal entry. BOR_GL_JRNL_APPR Journal Approval This role allows users to Approve journals submitted and will appear in the approvers Workflow list. The approver role may also Post journals after approving the journal entry. BOR_GL_JOURNAL_GENERATION Journal Generator Process This role allows users to journal generate GL entries. BOR_GL_PAY_INTERFACE Payroll GL Budget Validation This role allows users to complete Payroll interface and budget Validations. BOR_Reconciliation_User BOR Reconciliation User This role allows access to the BOR Reconciliation Processes and Inquiry related menus. BOR_QRY_SENSDATA Query Sensitive Data This role allows access to employee sensitive data included in queries and reports. Please note: Each individual may have different job duties. The above is meant for recommendation only. Adjust security to meet the individual s job responsibility without introducing segregation of duties issues. 57
58 BOR Payroll Module BOR Payroll in PS Financials houses the functionality for users to further process payroll data from the source payroll system. Processes include but are not limited to TIGA reporting of salaries, Year End payroll accruals, payroll interfaces for payroll actuals, encumbrances, pay distribution codes, project and department, zero personal services, and a data purge process. The online reporting functionality provides an array of online queries readily available for institutional reference and reconcilement. Only the following roles should be used for BOR Payroll role assignment. The Security Administrator should only assign roles for General Ledger (GL) based upon the employee s job duties and audit consideration for separation of duties. Role Name Description Comments BOR PeopleSoft User FN Base PeopleSoft User Each user MUST have a base role. BOR PeopleSoft User-no exp BOR PeopleSoft User-no exp Each user MUST have a base role. BOR PeopleSoft User No Tauth Base role without travel auths Each user MUST have a base role. BOR_ADP_PAYROLL_FYE_REPORT ADP Payroll Year End Reporting This role allows access to the BOR Payroll data for FYE reports. BOR_GL_FN_UTILITY Utility Processes This role allows users to run the 3 rd Party Purge process. BOR_GL_JOURNAL_ENTRY BOR_GL_JOURNAL_PROCESSING Process Jrnls-Maintain This role limits users to the Edit, Submit, and Post processes. This role is necessary for users performing journal entry. BOR_GL_JRNL_APPR Journal Approval This role allows users to approve journals submitted and will appear in the approvers Workflow list. The approver role may also Post journals after approving the journal entry. BOR_GL_JOURNAL_GENERATION Journal Generator Process This role allows users to journal generate GL entries. BOR_GL_PAY_INTERFACE Payroll GL Budget Validation This role allows users to complete Payroll interface and budget validations. BOR_GL_PROCESSING BOR GL Processing This role allows access to the BOR Payroll Processes and Inquiry related menus. 58
59 BOR_GL_TIGA_PROCESSING TIGA Processing This role allows users to process data for the Transparency in Government Act. BOR_QRY_SENSDATA Query Sensitive Data This role allows access to employee sensitive data included in queries and reports. Budget Preparation (Budget Prep) Each year, University System of Georgia institutions complete the development of their proposed budgets for the upcoming fiscal year. This process includes the budgeting of personal services, fringe benefits, and non-personal services. The process should conclude with the reconciliation of the budget to the final allocation by the Regents and the preparation of summary schedules identified by the Regents. This reconciliation process should utilize queries and reports in the financial system. The Budget Prep module is used to develop this budget by extracting all budget-related information from the PS Financials module. It then loads personal Services information from the ADP EV5 data file (epoh009.txt). Within the Budget Prep module itself, users can manipulate the data. Budget Prep then exports the new budget information back to ADP and PeopleSoft Financials. There are six different security roles for Budget Prep. They all begin with BOR_BP and include inquiry and reporting, processing, setup pages, updates and grants. Common Remitter Common Remitter in PS Financials provides a single-source solution for the collection, reconcilement and remittance of Retirement and Tax Sheltered Annuity payroll deductions. The functionality of the Common Remitter reporting provides data required for monthly, quarterly and annual reporting required for Retirement and Tax Sheltered Annuities for all Board of Regents approved providers. The process is a joint effort of the individual Business Units, Shared Services, and Information Technology Services. For Common Remitter, the user role is BOR_CR_USER. Commitment Control Commitment Control enables you to control expenditures against predefined, authorized budgets. In particular, Commitment Control enables you to: 59
60 Create and maintain control budgets. Check actual transactions (such as actual expenditures and revenues) against control budgets. Check imminent future financial obligations (pre-encumbrances and encumbrances) against control budgets. Check recognized revenue against revenue estimate budgets. When institutions set up control budgets, they associate them with a particular General Ledger business unit. They also define the kinds of transactions users check against control budgets. Once their budgets are established, they can check these transactions against their budgets, the passing or failing of the transactions depending on the remaining available budget amount and the degree of budgetary control they set up for their budgets. Depending on how you set up Commitment Control security, users can adjust a transaction that fails budget checking or adjust the budgets that the transaction failed against and budget-check the transaction again. Also, if you grant users the authority, they can override budget checking and allow a transaction to exceed the budget. The Commitment Control Budget Security rules are defined in this section. To get to them, you need the BOR_KK_SETUP role. Once the rules are established on a User ID, the Request Build process has to be run for the changes to take effect. The BOR_KK_PROCESSES role contains access to this process. To assign Commitment Control Security Rules to the user, follow the navigation: Commitment Control > Define Budget Security > Assign Rule to User ID > Assign Commitment Control Security Rule to User ID. 60

 and BUD_XFER (enter budget transfers only).")
61 Please note: A user must be tied to an employee ID to be selected on this page. Below are the available rules, Budget Date Override, Budget Override, and Bypass Budget broken out by module, as well as two rules that were part of the 9.2 upgrade: BUD_ENTRY (enter budget journals) and BUD_XFER (enter budget transfers only). If a user needs permission to enter both budget Journals and budget transfers, they need both security rules. 61
62 To run the Request Build process, follow the navigation: Commitment Control > Define Budget Security > Assign Rule to User ID > Request Build. ITS has implemented an optional Workflow for Commitment Control Budget Journals. Institutions wishing to implement this workflow need to give their approvers the BOR_KK_BUD_APPR role. In addition, someone at the institution will need the BOR_KK_ADMINXX role (first two digits of institution ID) for escalations or routing issues. Activity 5: 1. Login to FPLAY.gafirst.usg.edu with your fprod User ID and password. 2. Use the Buyer User ID you created above. **** Use Activity 1 User ID instead. 3. Navigate to Commitment Control > Define budget Security > Assign Rule to User ID. 4. Give them the BUDG_DT_PO, BUDG_DT_RQ, OVRD_PO and OVRD_RQ rules. 5. Then you must run the process. Expenses The Expenses Module allows employees to enter expense reports, travel authorizations, and cash advances for travel-related purposes. Basic self-service access can be granted by self-registering for a user account, which allows travelers to login to the self-service portal from anywhere and complete their expense reports. The Base role of a BOR PeopleSoft User contains expenses access in self-service for expense reports and travel authorizations. (Cash advances are administered via a separate role.) If your institution chooses not to use travel authorizations, the base role would be BOR PeopleSoft User no tauth. If your institution doesn t use expenses at all, the base role would be BOR PeopleSoft User no exp. 62
63 Because this module requires more setup than others, Expenses should have an overall administrator whose role is The BOR_EX_ADMINISTRATION. This individual would maintain default ChartFields and bank accounts for travelers, update delegates, update designates, and potentially maintain approver assignments for workflow. Expenses uses workflow, although it is setup differently from most modules and lacks flexibility. It does not route via a role, as the other modules do; instead, it routes to the individual who is defined on the approver assignments pages. The approvers in Expenses need the BOR_EX_APPROVAL role. This role is the only role in the system for which we use the Dynamic role assignment. In other words, do not manually assign this role to a user. Once you place the User ID on the approver assignments pages, he or she is automatically assigned that role via a role query in the background. In addition to the approvers that are assigned on the approver assignments pages, an expenses administrator is needed; this individual will need the BOR_EX_ADMINXX role (XX is the first two digits of your institution ID). This individual will receive transactions that can t find an approver or have escalated. To get to the Approver Assignment page, follow the navigation: Setup Financials/Supply Chain > Product Related > Expenses > Management > Approval Setup > Approver Assignments. 63
64 It is important to note that with Expenses and some of the other modules, many employee notifications are sent to the address listed on the User ID of the employee. Therefore, the checkbox on the User Profile, Workflow tab must be selected for the individual to receive notifications. As with Accounts Payable, you must check user s commitment control rules for Expenses. If your user needs to override a Budget Date or a Budget Exception error on an Expenses Transaction, he or she will need OVRD_EX and/or BUDG_DT_EX commitment control rules, located under Commitment Control > Define Budget Security > Assign Rule to a User. Also, don t forget to run the Request Build after assigning the rules to the user, or the change will not take effect. (If you forget to run the Request Build Process, the BORBATCH process that runs every night will run it for you.) Activity 6: 1. Login to FPLAY-selfservice.gafirst.usg.edu with the User ID you created in Activity Navigate to Employee Self Service > Travel and Expenses Center and confirm you can see Create Expense Report. General Ledger The General Ledger is the heart of an organization's financial system as it is the central repository for accounting activity. Organizations record their business activity through journal entries (or through subsystem accounting entries, such as Payables), which are posted to the general ledger using a collection of accounts, departments and so on. This collection of accounts is often referred to as a chart of accounts, which enables companies to classify financial (and statistical) data that is used for analyzing and reporting worth and profitability. Journal entries for actual transactions are made in a double entry system, in accordance with Generally Accepted Accounting Principles (GAAP), where debits equal credits. The true test of a general ledger system is in the way it accepts and processes these journal entries. PeopleSoft General Ledger provides journal entry formats that enable you to enter any type of transaction quickly and easily without losing the control you need to ensure accuracy. PeopleSoft General Ledger also includes other aspects, such as allocating shared assets and expenses, maintaining budgets, and reporting. 64
65 In 9.2, ITS updated Workflow for General Ledger Journals so that it could take advantage of the new approval process instead of using route controls. To do this, institutions need to give their approvers the BOR_GL_JRNL_APPR role. Someone at the institution will also need the BOR_GL_ADMINXX role (first two digits of institution ID) for access to escalations or routing issues. If you want to take advantage of the new dashboard/workcenter features, users will need the BOR_GL_DASHBOARD role, the BOR_GL_WORKCENTER role, and the BOR_WORKCENTER_USER role. Other General Ledger considerations include user preferences, as mentioned in the User Preference Section. Don t forget to check user s commitment control rules for GL. If users need to override a Budget Date or a Budget Exception error on a Journal, they will need OVRD_GL and/or BUDG_DT_GL commitment control rules. To assign this rule, follow the navigation: Commitment Control > Define Budget Security > Assign rule to a User. See Commitment Control Section above. You must run the Request Build process after assigning the rules to the user or the change will not take effect. (If you forget to run the Request Build process, the BORBATCH process that runs every night will run it for you.) The General Ledger module contains security for Year End processes and reports, TIGA Processing, ChartField Configuration, and journal entry/processing. Purchasing The Purchasing module encompasses Purchase Orders, Suppliers, Receiving, etc. In this module, we will also cover Buyer setup and configuration. Purchasing in 9.2 is now configured with Workflow using the approval process instead of route controls as was delivered in 8.9. We will cover delivered Purchasing workflow in this section as well. Buyer Roles Buyers are individuals who, in addition to creating their own requisitions, process requisitions from others and perform purchasing-related maintenance tasks. They are also responsible for sourcing requisitions into purchase orders, processing purchasing transactions, running purchasing-related reports, and maintaining purchasingrelated configuration. The table below contains the buyer security roles. 65
66 Role Name BOR PeopleSoft User BOR_AD_HOC_APPROVE BOR_EP_REQUESTER BOR_EP_BUYER_CENTER BOR_EP_INQUIRY BOR_EP_PROCESSES BOR_EP_REQ_APPROVE BOR_PO_REQ_WORKBENCH BOR_PO_INQUIRY BOR_PO_MAINTAIN BOR_PO_PROCESS BOR_PO_REPORTS BOR_PO_REQ_PROCESS BOR_PO_SETUP_CONFIG BOR_PO_VENDORS_MAINT BOR_EP_MAINT_REQ and BOR_EP_MAINT_REQ_SCI BOR_BUYER_APPR BOR_CAT_Requester BOR_PO_APPROVE BOR_PO_BUYER_APPR Purpose Basic PeopleSoft User access Enables the Buyer to insert additional approvals into the Workflow when necessary Enables the Buyer to create their own requisitions Enables the Buyer to access the Buyer Center in order to expedite requisitions Enables the Buyer to run inquiries on requisitions Enables the Buyer to run requisition processes Enables the Buyer the ability to approve requisitions that are assigned to him/her Enables the Buyer to use the Workbenches for requisitions Enables the Buyer to run inquiries on purchase orders Enables the Buyer to perform maintenance on existing POs Enables the Buyer to run purchasing processes Enables the Buyer to run purchasing reports Enables the Buyer to process requisitions thru Purchasing Enables the Buyer to configure the system for purchasing Enables the Buyer to add or maintain suppliers in the system Enables the Requester to edit/track requisitions in the system. If your institution is implementing the GeorgiaFIRST Marketplace, use BOR_EP_MAINT_REQ_SCI. If your institution is not implementing the GeorgiaFIRST Marketplace, use BOR_EP_MAINT_REQ. Enables the Buyer to approve requisitions, update the requisitions, and not restart Workflow Enables the Buyer to shop and create requisitions in the GeorgiaFIRST Marketplace Enables the Buyer to approve Purchase Orders. Enables Purchase order workflow to route purchase orders to this buyer. Buyer Setup Just as a Requester must be set up in the system, you must also set up your Buyers in the system after you have added their Security roles. After setting up a user as a Buyer, you will then be able to add user preferences. To do this, follow the navigation: Set Up Financials/Supply Chain > Product Related > Procurement Options > Purchasing > Buyer Setup. 66
67 1. Select the Add a New Value tab. 2. Enter the buyer s User ID in the Buyer field. 3. Click the Add button. 1. Ensure the status is set to Active. 2. In the Department SetID field, enter/select your institution s SetID. 3. If the buyer only processes transactions for one department, you can enter/select that department in the Department field. However, if the buyer processes transactions for multiple departments, leave this field blank. 67
68 4. In the ShipTo SetID field, enter/select your institution s SetID. 5. In the ShipTo field, enter/select this Buyer s default Ship to location. 6. In the Location SetID field, enter/select your institution s SetID. 7. In the Location field, enter/select this Buyer s primary location. 8. In the PO Origin SetID field, enter/select SHARE. 9. In the Origin field, enter/select ONL. 10. If desired, enter a phone and fax number. 11. Set the Default PO Status to Pending Approval/Approved. 12. Click the Save button. Please note: If the Buyer will also be creating Requisitions, they must be set up on the Requester Setup Page also. See epro chapter below. Receiving can be configured to do not receive, optional or required. Users can take advantage of desktop receiving or use the traditional way of central receiving. The user role for Receiving through Purchasing is BOR_PO_RECEIVING. If users want to use desktop receiving, they must have the BOR_PO_RECV_EPRO role. ITS has reduced the number of roles associated with Supplier activity and controlled it with user preferences. Now there are only two user roles: BOR_PO_VENDORS_APPROVE and BOR_PO_VENDORS_MAINT. Security administrators can control what actions the user takes on the supplier through user preferences. For instance, if you want a user to be able to modify an existing supplier but not add a supplier, they would get the BOR_PO_VENDORS_MAINT role, but not the Add User Preference. See more details in the User Preferences section above. In 9.2, Purchasing workflow changed from using Route Controls to using the Approval Framework. The approval role for Purchase Orders with Budget Reference differences is BOR_PO_BUD_REF_APPR. The approval role for Purchase Orders with Asset Issues is BOR_PO_ASSET_APPR. The role for escalations or routing issues is BOR_PO_ADMINXX (XX is the first two digits of institution ID). Keep in mind that these three roles are used only to route transactions to users. They do not contain page access. An approver will also have to have the BOR_PO_APPROVE role to approve a purchase order at any of the above levels. This role gives them the page 68
69 access needed to get to the purchase order to approve it. See Workflow Stage documents on the GeorgiaFIRST website. Activity 7: 1. Login to FPLAY.gafirst.usg.edu with your fprod User ID and password. 2. Create a new Buyer User ID, with the roles listed above in this section. 3. Navigate to Product Related, Procurement Options, Purchasing, and Buyer Setup and set them up as a buyer for your business unit. 4. Then Navigate to User Preferences and add their User ID under the buyer box on Procurement User Preferences, giving them full authority for all buyers as well as the approval User preference. 69
70 Chapter 6: eprocurement (epro) The eprocurement module features many different security components. Not only does it have Regular Page Access roles and Workflow Roles, but it also has Role Action roles. The Security Job Aids by Job Functions outline many of the epro roles and responsibilities, and the Workflow Stage Documents explain the workflow options as well. Types of Roles Involved For the epro and GeorgiaFIRST Marketplace functionality to work properly, users are set up with specific roles and responsibilities. They include: Shoppers: These users select items in the GeorgiaFIRST Marketplace. Browsers: Users without any GeorgiaFIRST Marketplace roles assigned will default to a Marketplace Browser. Browsers can view items, contracts, and prices in the Marketplace but cannot shop or create requisitions. Requesters: These users take the shopping carts created by Shoppers and turn them into epro Requisitions or build their own shopping carts. Approvers: These users are set up to approve epro requisitions. Buyers: These users are responsible for ensuring that approved requisitions are sourced into a purchase order and dispatched to the vendor. AP Personnel: The AP office processes the resulting invoice from the vendor. epro Administrator: This user monitors the approval workflow to make sure requisitions are worked in a timely fashion. Local Security Administrator: This user is responsible for setting up other users in their appropriate roles. As the Local Security Administrator, you are primarily responsible for setting up users with the proper roles and access. In addition, you occasionally need to work with the epro Administrator to perform maintenance, such as updating addresses, on these users. In addition, because Workflow is such a critical piece of eprocurement, the user setup is very important. 70
71 Requester Security Roles The first step in epro is setting up security roles for requesters, users who create epro requisitions either from Special Request items or from shopping carts in the GeorgiaFIRST Marketplace. The Requester position (as well as many additional roles for epro) requires the proper maintain role to maintain requisitions. The role that you choose is dependent on whether or not your institution is implementing SciQuest, also known as the GeorgiaFIRST Marketplace. The BOR_EP_MAINT_REQ and BOR_EP_MAINT_REQ_SCI roles are the same, except the BOR_EP_MAINT_REQ_SCI role has access to the Web tab for access to the GeorgiaFIRST Marketplace. The BOR_EP_MAINT_REQ role will not have access to the Web tab to enter and maintain Marketplace requisitions. Role Name BOR PeopleSoft User BOR_CAT_Requester* BOR_EP_REQUESTER BOR_EP_REQUESTER_YE_CUTOFF** BOR_AD_HOC_APPROVE BOR_EP_MAINT_REQ BOR_EP_MAINT_REQ_SCI BOR_EP_MAINT_REQ_YE_CUTOFF** BOR_EP_MAINT_REQ_YE_CUTOFF** Purpose Basic PeopleSoft User access Enables the Requester to create requisitions from GeorgiaFIRST Marketplace shopping carts, as well as create their own shopping carts (this role is not needed if the institution is not implementing the GeorgiaFIRST Marketplace) Enables the Requester to be set up as a Requester in the system Enables the Requester to insert additional approvers in the approval Workflow when needed Enables the Requester to edit and track requisitions in the system. If your institution is implementing the GeorgiaFIRST Marketplace, use BOR_EP_MAINT_REQ_SCI and BOR_EP_MAINT_REQ. If your institution is not implementing the GeorgiaFIRST Marketplace, use BOR_EP_MAINT_REQ only. Please note: If the requester will also be a Shopper, give them the BOR_CAT_Requester role only. Users should not have multiple BOR_CAT roles. Please note: If you want to cut off your requester s access to create requisitions at year end, give them roles with the _YE_CUTOFF at the end, instead of the regular roles. Then on a date in June determined by USO, access to create requisitions is removed from those roles. This access is re-established in early July. 71
72 Requester Setup After setting up the security roles for a Requester, you then set up the individual as a Requester. If you have a user who is only a Shopper, he or she will still need the Requester Setup page completed so that the person they assign their carts to can choose them as the requester once the item in their cart is turned into a requisition. To set up a Requester, follow the navigation: Set Up Financials/Supply Chain > Product Related > Procurement Options > Purchasing > Requester Setup. 1. Select the Add a New Value tab. 2. Enter the requester s User ID in the Requester field. 3. Click the Add button. 72
73 1. Ensure the status is set to Active. 2. In the ShipTo SetID field, enter your institution s SetID. 3. In the ShipTo field, enter/select the default Ship To address for this Requester. 4. In the Location SetID field, enter your institution s SetID. 5. In the Location field, enter/select the default Location for the Requester. 6. In the PO Origin SetID field, enter/select SHARE. 7. In the Origin field, select ONL. 8. In the Currency field, enter/select USD. 9. Enter a phone and fax number if desired. 10. Select the Pending option in the Requisition Status box. 11. In the GL Unit field, enter/select your institution s business unit. 12. In the Fund field, enter/select this Requester s Default Fund Code. 13. In the Dept field, enter/select this Requester s default Department. 14. In the Program field, enter/select this Requester s default Program Code. 15. In the Class field, enter/select this Requester s default Class Field. 16. In the Project field, enter/select this Requester s default Project ID (if any). 17. In the Bud Ref, enter/select the current budget year. 18. Leave the Account field blank. 19. In the Catalog Information section, select the Default checkbox. 73
74 20. In the SetID field, enter/select SHARE. 21. In the Catalog ID field, enter/select NIGP_TREE. 22. Leave the Use Only Assigned Catalogs checkbox blank. 23. Save the page. Don t forget to set up user preferences as well. These were defined in an earlier user preference section. You also have buyer set up to complete, but we will cover that in the next section, which is covered in the Purchasing section of the previous chapter. A critical component of the whole eprocurement process is the ability to submit requisitions for approval electronically. Because approvals are handled online within the PeopleSoft Financials system, each institution can customize the approval process to their own specifications. In this chapter, we are going to outline the possible approval stages that your institution may choose to use. How Do Approvals Work? When a Requester builds a requisition in epro, each item on a requisition is placed on its own requisition line. Theoretically, each line in a requisition can be charged to a different set of ChartFields. As a result, each line on a requisition may have different approval paths. The approval path is determined by a number of factors. At a minimum, each requisition line will go to the Department Manager and Project Manager (if a Project is to be charged). These are the managers who are tied into the Department and Project ChartFields on that requisition line. Depending on how your institution has set up approvals for eprocurement, the requisition line may go to many additional approvers, such as approvers for assets, Information Technology (IT) items, and items above a certain amount. Below is a summary of all of the approval stages and paths available for eprocurement. To determine what stages and paths your institution is using, check with your Purchasing Department or Local Security Administrator. 74
75 Approval Stages Overall, five approval stages can be used for eprocurement requisitions. Keep in mind that each one has different security workflow roles that control the routing of the transaction. Each approver will still need the BOR_EP_REQ_APPROVE role in addition to the workflow roles, since it contains the page access to allow approval. The approval stages are as follows: Stage 1: Department and Project Approval Each requisition line must be charged to a Department. In addition, they can also can be charged to a Project. The requisition line is routed to the Department Manager (as entered in PeopleSoft) for approval. If the Project ChartField is used on the requisition line, the system also routes it to the Project Manager. Stage 2: Fund Approvals There are three approvals in this stage, all of which are optional. These approvals are all based on the Fund Code entered on the transaction. The first one is the Agency Fund Approval. It is set up so that any requisition line charged to an Agency Fund Code must go to an individual specified for Agency Fund Approvals. Agency funds are used to account for resources held by an institution as custodian or fiscal agent for individual students, faculty, staff members, or other organizations. Agency Fund Codes include 60000, 61000, and Each Agency Fund Approver will have the role BOR_AGENCY_FUND_APPR. The next option is the Tech Fee Approval. Any requisition that has fund code would route to an approver with the role BOR_TECH_FEE_APPR role. The last fund approval option is the Grant Approval, available to institutions that route requisitions that have Fund Code to a user with the BOR_GRANT_APPR role. This individual/s can be different from the individual on the project ChartField. If your institution employs any of these approval stages, then multiple approvers can be set up. The institution will determine whether all approvers must approve the requisition or whether only one from the group of 75
76 multiple approvers has to approve it. If the corresponding fund code is not used on a requisition line, the system bypasses this approval stage. Stage 3: Amount Approval The Amount Approval stage is also an optional one. This stage is for all requisitions that were built from the GeorgiaFIRST Marketplace and have a monetary amount of $10,000 or more. Again, your institution may set up multiple approvers to serve as the Amount Approver. Each Amount Approver will have the role BOR_CAT_AMOUNT_APPR. The institution will determine whether all amount approvers must approve the requisition or whether only one from the group of multiple approvers has to approve it. The institution also does not have to use the $10,000 threshold and can edit this if needed. If the requisition was not generated from the GeorgiaFIRST Marketplace, it will bypass this approval stage (this can be changed by the institution). If the requisition is below the set threshold and was generated from the GeorgiaFIRST Marketplace, it will also bypass this approval stage. Stage 4: Item-Type Based Approvals In approval stage four, approvals are based upon the type of item being requested. Within this stage, there are seven potential approval paths, all optional. Stage 4, Path 1: Asset Approval If the item on a Requisition line is an asset and charged to an Asset Account, it will be routed to the person set up as the Asset Approver. The accounts included in this path are , , and through An Asset Approver must have the role BOR_ASSET_APPR. If your institution chooses to use the Asset Approver path, there can be multiple asset approvers. The institution will determine whether all asset approvers must approve the requisition or whether only one from the group of multiple approvers has to approve it. In addition, institutions may identify additional account codes for asset approval, and they may add monetary amount criteria (i.e., item charged to Account and is greater than $5,000). 76
77 Stage 4, Path 2: Audio Visual Approver This is an optional approval path for any item on a requisition line that contains an NIGP code related to Audio Visual items or services. NIGP stands for National Institute of Governmental Purchasings Commodity Services Code. The NIGP Code is a coding classification used primarily to classify products and services procured by state and local governments. In PeopleSoft, the Category ID is tied into the NIGP Code. In the GeorgiaFIRST Marketplace, the NIGP code is already tied into the item. For requisition line items not generated from the Marketplace, the Requester enters the proper Category ID. For line items that have an NIGP Code related to Audio Visual items and services, the system will route the requisition line to the Audio Visual Approver. An Audio Visual Approver must have the role BOR_AUDIO_VIS_APPR. If your institution chooses to use the Audio Visual (AV) Approver path, there can be multiple AV approvers. The institution will determine whether all AV approvers must approve the requisition or whether only one from the group of multiple approvers has to approve it. In addition, institutions may identify additional NIGP codes for audio visual approval, and they may add monetary amount criteria (i.e., item has an NIGP code of and is greater than $1,000). Stage 4, Path 3: Chemical Approver This path, also an optional one, is for any requisition line with an NIGP code associated with chemicals. If the NIGP code for the requisition line is associated with a chemical purchase, the line will route to the Chemical Approver. A Chemical Approver must have the role BOR_CHEMICAL_APPR. If your institution chooses to use the Chemical Approver path, there can be multiple Chemical Approvers. The institution will determine whether all chemical approvers must approve the requisition or whether only one from the group of approvers must approve it. In addition, institutions may identify additional NIGP codes for chemical approval and may add monetary amount criteria. 77
78 Stage 4, Path 4: Facilities Planning and Design Approver This optional path is for any requisition line with an NIGP code associated with the facilities planning and design. A Facilities Planning and Design Approver must have the role BOR_FACILITIES_APPR. If your institution chooses to use the Facilities Planning and Design Approver path, it may have multiple approvers in this path. The institution will determine whether all Facilities Planning and Design approvers must approve the requisition or whether only one from the group of approvers must approve it. In addition, institutions may identify additional NIGP codes for facilities planning and design approval, and they may add monetary amount criteria. Stage 4, Path 5: IT Approver This approval path is for any IT hardware or software approvals and is also optional. The system routes any requisition line for a computer hardware or software purchase or service (based on NIGP Code) to the IT Approver. An IT Approver must have the role BOR_IT_APPR. If your institution chooses to use the IT Approver path, it can have multiple approvers. The institution will determine whether all IT Approvers must approve the requisition or whether only one from the group of approvers must approve it. In addition, institutions may identify additional NIGP codes for IT approval, and they may add monetary amount criteria. Stage 4, Path 6: University Relations Approver The sixth approval path in stage 4, also optional, is for the University Relations Approver. The system routes any requisition line that relates to media contact, logo use or copyright items (based on NIGP code) to the University Relations Approver. The University Relations Approver must have the role BOR_UNIVREL_APPR. If your institution chooses to use the University Relations Approver path, it can assign multiple approvers. The institution will determine whether all University Relations Approvers must approve the requisition or whether only one 78
79 from the group of approvers must approve it. In addition, institutions may identify additional NIGP codes for University Relations approval, and they may add monetary amount criteria. Stage 4, Path 7: Default NIGP Code The seventh approval path in stage 4 will route to a Buyer Approver in the event that a GeorgiaFIRST Marketplace Requisition line does not have an NIGP code. If the line item does not have an NIGP code, it will default to the NIGP code, which will automatically route the line to a Buyer Approver for correction. Stage 4, Path 8: Furniture Approver The Furniture Approver must have the role BOR_FURNITURE_APPR. If your institution chooses to use the Furniture Approver path, it can assign multiple approvers. The institution will determine whether all Furniture Approvers must approve the requisition or whether only one from the group of approvers must approve it. In addition, institutions may identify additional NIGP codes for Furniture approval, and they may add monetary amount criteria. Stage 4, Path 9: Human Resource Approver The Human Resource Approver must have the role BOR_HUMAN_RES_APPR. If your institution chooses to use the Human Resource Approver path, it can assign multiple approvers in this path. The institution will determine whether all Human Resource Approvers must approve the requisition or whether only one from the group of approvers must approve it. In addition, institutions may identify additional NIGP codes for Human Resource approval, and they may add monetary amount criteria. Stage 4, Path 10: Pharmaceutical Drug Approver The Pharmaceutical Drug Approver must have the role BOR_PHARM_DRUG_APPR. If your institution chooses to use the Pharmaceutical Drug Approver path, it can assign multiple approvers in this path. The institution will determine whether all Pharmaceutical Drug Approvers must approve the requisition or whether only one from the group of approvers must approve it. In addition, institutions may identify additional NIGP codes for Pharmaceutical Drug approval, and they may add monetary amount criteria. 79
80 Stage 4, Path 11: Budget Reference Approver Any requisition line where the budget reference does not equal the fiscal year will route to a Budget Reference Approver. This approver must have the BOR_EP_BUD_REF_APPR security role. Stage 5: Buyer Approval In Approval Stage 5, the system will route all special request requisitions (those requisitions not built from the GeorgiaFIRST Marketplace) to the person designated to give buyer approval. This stage is primarily used for Special Request Requisitions since they are not built from contract-approved catalogs. The Buyer Approver can then ensure the line item meets all procurement policies. Institutions may choose to have multiple Buyer Approvers. In addition, the institution can also choose whether all Buyer Approvers must approve the requisition or whether only one needs to act on it. Finally, the institution may choose to inactivate this stage or include it for all requisitions. This user will need the BOR_BUYER_APPR role. Approval Time Limits An approver has built-in deadlines by which he or she must act on the requisition. This ensures that epro requisitions do not sit around waiting for an approver for an indefinite amount of time. When a requisition is submitted for approval, the system sends it to the first approver s Worklist in PeopleSoft Financials. The Worklist is a queue that holds items waiting for approval. Once an approver works a transaction, it is removed from that Worklist. Once the requisition hits an Approver s Worklist, that approver has a predetermined amount of days to either approve or deny it before they get a reminder notification from the system. If the requisition sits in an Approver s Worklist past those days without being approved or denied, the system removes the requisition from that Approver s Worklist, routes it to the epro Administrator, and the epro Administrator reassigns the transaction to another approver. After the Approver has approved the requisition, the system automatically moves it onto the next Approver s Worklist. If an Approver denies a requisition, the system returns it to the Requester. Denied requisition lines can be edited and resubmitted for approval. 80
81 If an approver plans to be out of the office for an extended period of time and, therefore, unable to work requisitions, they have the ability to assign an alternate to serve in their place. This way, their Worklist does not build up while they are out of the office, and requisition approval is not delayed (see Chapter 3). Each institution is able to customize the number of days as to when the system will send reminder s and escalate a requisition. epro Administrators epro Administrators must be set up in the system with the correct security roles to enable them to set up eprocurement components, including: Approver Setup Requester Setup Reassigning Worklist Items Assignment of Alternate Users The epro Admin is also responsible for working with the Security Administrator to understand the necessary user security needs relative to security roles, role actions, and routing controls. The epro Admin Security Roles are as follows: Role Name BOR PeopleSoft User BOR_EP_ADMINXX BOR_EP_CONFIG_SETUP BOR_EP_REASSIGN Purpose Basic PeopleSoft User access Enables the epro Admin to manage epro Workflow; XX is the institution s first two digits in their SetID Enables the epro Admin to configure the system for eprocurement Enables the epro Admin to reassign requisitions that are routed to them due to escalation or Workflow errors epro Approver Setup All epro Approvers must be set up with specific security roles. In addition, depending on the type of approver they are, they will need to have a specific security role to match their approver type. For example, Department and Project approvers simply need the basic security roles for an approver. Special Item Category approvers need 81
82 the basic security roles, along with their specialized approver role (i.e., BOR_IT_APPR for your institution s IT approvers). The Basic Approver Security Roles are as follows: Role Name BOR PeopleSoft User BOR_AD_HOC_APPROVE BOR_EP_REQ_APPROVE BOR_EP_MAINT_REQ or BOR_EP_MAINT_REQ_SCI Purpose Basic PeopleSoft User access Enables the Approver to insert additional approvals into the Workflow when necessary Enables the Approver to approve/deny requisitions Enables the Requester to edit and track requisitions in the system. If your institution is implementing the GeorgiaFIRST Marketplace, use BOR_EP_MAINT_REQ_SCI. If your institution is not implementing the GeorgiaFIRST Marketplace, use BOR_EP_MAINT_REQ. Special Item Approver Security Roles In addition to the security roles in each section above, there are certain users that may need role action type roles. The following two roles already contain role actions. The BOR_ASSET_APPR security role contains the role action of Can Change Distrib and Can Change Schedule. This allows the approver to change any field on the requisition distribution or schedule without restarting the approval process on requisitions that are not fully approved. The BOR_BUYER_APPR security role contains the role action of Can Change All. This allows the approver to change any field on the requisition, including quantity and price, without restarting the approval process on requisitions that are not fully approved. If any other approver needs a role action, you can assign the following to individual users. These role actions are also added under the Distribution User Profile > User Roles tab. 82
83 Role Name BOR_EP_RA_CHANGEALL BOR_EP_RA_CHANGEDISTRIB BOR_EP_RA_CHANGEHDR BOR_EP_RA_CHANGELINE BOR_EP_RA_CHANGESCHED Purpose Allows the Approver to update any portion of the requisition without restarting Workflow on requisitions that are not fully approved. If the Requisition has been approved and the approver makes a change, the requisition will re-route back through Workflow. Allows the Approver to update the distribution of the requisition without restarting Workflow on requisitions that are not fully approved. If the Requisition has been approved, and the approver makes a change, the requisition will re-route back through Workflow. Allows the Approver to update the header of the requisition without restarting Workflow on requisitions that are not fully approved. If the Requisition has been approved and the Approver makes a change, the Requisition will re-route back through Workflow. Allows the Approver to update the line of the requisition without restarting workflow on requisitions that are not fully approved. If the Requisition has been approved and the approver makes a change, the requisition will re-route back through Workflow. Allows the approver to update the schedule of the requisition without restarting Workflow on requisitions that are not fully approved. If the Requisition has been approved and the approver makes a change, the requisition will re-route back through Workflow. Without any of the above role action roles assigned, if an approver updates information on the requisition, such as ChartField information, the requisition will have to be re-routed back through the approval levels. In addition to setting up security roles and user preferences for department and project managers, you also need to set up the department and project ChartFields with the correct manager User ID. Department Manager ID In the Department ChartField, you need to indicate who the Department Manager is. This field is what Workflow uses for requisitions. When a requisition is charged to a particular department, Workflow is designed to route that requisition to the manager listed on the ChartField definition. 83
84 When updating the Department ChartField, you need to make sure that the department s status is Active. When you complete the Manager ID field, the Manager Name field should populate as well, once you tab out of the field. To update a department manager ID, follow the navigation: Set Up Financials/Supply Chain > Common Definitions > Design ChartFields > Define Values > ChartField Values > Department. 1. On the Find an Existing Value page, enter/select the Department ID in the Department field. 2. Click the Search button. 3. Select the Department you want to update. 1. Ensure the Department status is Active. 2. Click the Correct History button. 3. Select the Manager ID look up icon. 84

85 4. Enter the last name of the Department Manager in the Last Name field. 5. Click the Look Up button. 6. Select the correct User ID for the Department Manager. 7. Click the Save button. Additional Department Managers The way Workflow is initially setup, you can specify only one User ID for your department manager. If your institution wishes to have multiple department approvers, you must use the Department Approver page to specify additional department managers. These additional department managers must also have their security roles and user preferences completed for them. Please note: Before using this page for the first time, contact ITS to make a change to your institution s Workflow configuration. On the Department Approver page, you can add multiple approvers for multiple departments. The first time you add multiple approvers, you need to select the Add a New Value tab and add your institution s SetID. After adding your institution for the first time, you can add additional approvers through the Find an Existing Value tab (using your SetID). For each additional approver, you need to specify the department. Then, you select the User ID of the additional approver. To add additional approvers, you can select the Add a New Row button and continue to add approvers for the necessary departments. 85
86 To update additional department managers, follow the navigation: Set Up Financials/Supply Chain > Common Definitions > Design ChartFields > Define Values > Department Approver. 1. If this is the first time you are adding an additional Department Manager for your institution, select the Add a New Value tab. If this is not the first time, select the Find an Existing Value tab. 2. Enter/select your institution s SetID and click Add or Search. 3. On a blank row, enter/select the Department ID for the Department you want to add an additional approver for. 4. Enter/select the additional Approver s UserID in the Approver ID field. Tab out of the field to populate the Approver field. 5. To insert additional approvers, select the Add a New Row button and repeat steps 8 & Click the Save button. Project Manager ID In the Project ChartField, you need to indicate who the Project Manager is. This field is what Workflow uses for requisitions. When a requisition is charged to a particular project, Workflow is designed to route that requisition to the manager listed on the ChartField definition. When updating the Project ChartField, you need to make sure that the Project s Status is Active. Once you complete the Manager ID field, the Manager Name should populate as well, once you tab out of the field. To update a project manager ID, follow the navigation: Set Up Financials/Supply Chain > Common Definitions > Design ChartFields > Define Values > ChartField Values > Project. 86

87 1. On the Find an Existing Value page, enter/select the Project ID in the Project field. 2. Click the Search button. 3. Select the Project you want to update. 4. Ensure the Project status is Active. 5. Click the Correct History button. 6. Select the Manager ID look up icon. 7. Enter the last name of the Project Manager in the Last Name field. 8. Click the Look Up button. 9. Select the correct User ID for the Project Manager. 10. Click the Save button. Activity 8: Login to FPLAY.gafirst.usg.edu with your fprod User ID and password. Once logged in, use the User ID you created in Activity 1 and do the following: 1. Navigate to Product Related > Procurement Options > Purchasing > Requester Setup and set the user up as a requester for your business unit. 2. Then Navigate to User Preferences and add their User ID under the requester box on Procurement User Preferences. 87
88 Chapter 7: Managing Query Security One of the most important areas of security is PeopleSoft Query (Query) because queries give administrators control over the processes and data to which users have access. Three levels of security exist: Table-level security is set by using PeopleSoft Query to build SQL queries to specify the records (tables) the user is allowed to access when building and running queries. Row-level security controls access to individual rows of data stored within application database tables through security views and enables you to specify the data that a particular user is permitted to access. Field-level security is set using PeopleCode, the proprietary language used in the development of PeopleSoft applications, to restrict access to particular fields or columns within application tables. Query helps you build SQL statements to retrieve information from application tables by taking advantage of a user's security settings, row-level security, and primary permission list. The Query Profile defines what features of Query operations the user has. The table below explains the five levels of Query Operations: Level I Level II Level III Level IV Level V Query Viewer-User has the ability to view all public queries for records that the user has access to through Access Group security. Query Manager-User has the ability to create and run Private queries and run Public queries. The user will only be able to create and run queries on records that they have access to through Access Group security. Query Manager-User has the ability to run only Public queries. The user will only be able to run those Public queries on records that they have access to through Access Group security. Query Manager-User has the ability to create and run both Private and Public queries. The user will only be able to create and run those queries on records that they have access to through Access Group security Query Manager/Monitor-User has the ability to create and run both Private and Public queries. The user will be able to create and run only queries on records that they have access to through Access Group security. Query monitor allows a user to gather statistics on Query use. BOR_PT_QRY_VIEWER BOR_PT_QRY_PRIVATE Not applicable to USG BOR_PT_QRY_PUBLIC BOR_PT_QRY_ADMIN 88
89 For a user to run a query, they must have authorization to access the records behind the query. Most records are included in the role BOR_PT_QRY_ALLACCGRPS. However, certain records have been broken out into other roles for sensitive data considerations. BOR_QRY_SENSDATA and BOR_PT_BUD_PREP are examples. If a user tries to pull up a query in Query Manager and cannot see it, they probably do not have access to the records in that query. To gain access, the security administrator has to give them access to one of the sensitive data roles. Navigation to Query Manager Components To perform query operations, follow the navigation: Reporting Tools > Query > Query Manager. Query components will be enabled for the user to match the level of query operations for which they are authorized through the query profile permissions. Row-Level Security With row-level security, users can have access to a table without having access to all rows on that table. This type of security is typically applied to tables that hold sensitive data. For example, if you want users to review personal data for employees in their department but not for people in other departments, you assign access to the PERSONAL_DATA table but enforce row-level security so that users see only rows where the DEPTID matches their own. PeopleSoft applications implement row-level security by using a SQL view that joins the data table with an authorization table. When a user searches for data in the data table, the system performs a related record join 89
90 between the view and the base table rather than searching the table directly. The view adds a security check to the search, based on the criteria you set up for row-level security. For example, to restrict user access to data from their own department, the view would select rows only from the underlying table in which the DEPTID matches the user s DEPTID rows. Using Query Viewer Query Viewer is a read-only version of Query Manager. It allows security administrators an easy way to limit some users to read-only access to users who should only view or print queries. Query Viewer enables you to: Search for a query: To preview a query, click the name of the required query. Preview a query (which displays results in current browser window): From the Preview page, view results of your query, rerun the query, and download results to Excel. Run a query (which displays results in a new browser window): Once you run your query, you can download the results to an Excel spreadsheet or a CSV Text file. Print a query: To print query results, you must first run the query and display the results in your browser. Click the Print button from your browser, or select File, Print from you browser menu. The query prints on your default printer. If you choose to download the query in Excel or another tool, you can print the query using their print functions. Schedule a query: From the Search results page, click the Schedule link associated with the required query. Query Viewer interacts with PeopleSoft Process Scheduler to give users the ability to schedule queries. You can submit requests to schedule a query, check the status of your request using Process Monitor, and view your output using Report Manager. 90
91 Chapter 8: IT Audit The security process for new hires and terminations should be handled on an as needed basis, as personnel are hired or terminated. Steps should be put in place to ensure that 1) accounts are being locked in a timely manner, 2) accounts are being setup with the appropriate access for new hires, and 3) the appropriate authorization has been provided and documented. Each campus may have its own business process for handling each of these procedures; however, the procedures should be documented and followed. Procedural guidelines for setting up and terminating accounts are outlined below. New Hires 1) Determine the level of access the individual needs and complete a security request form. 2) If the account is set up manually, set a generic password and set it to expire upon login. 3) Have the security request form authorized by two individuals, 1) the person requesting the user have access and 2) the security administrator. 4) Have the user sign the security request form. 5) Or you can have the user self-register or create his or her account manually. 6) Ensure that there is no segregation of duties issue. 7) Ensure you setup all roles, user preferences, budget security, etc. Terminated Users 1) Terminations should be reviewed often, at least monthly, and users who have terminated should have their user account locked and base role removed. 2) Remove any workflow related roles. 3) Change the ID Type on the ID page to None instead of employee. 91
92 4) Place the employee ID on the General tab under the User ID alias field and attach the User ID beside it. 92
93 5) Update the user s security request form to a terminated status and document the appropriate signatures. 6) If the user was a requester/buyer for epro or Purchasing, go to his or her requester/buyer setup and inactivate it (only after all requisitions and purchase orders that this person was responsible for are complete). 7) For Approvers, go to the user profile > workflow tab and uncheck the worklist/ user checkbox. If the person was an expenses approver, remove them from the approver assignments pages. If the person was an epro approver for a department or project, remove their employee ID from the ChartField setup page. 8) If the person had budget security, remove the commitment control security rules and run the request build process. Terminated User Query To run a terminated user query, follow the navigation: Reporting Tools > Query > Query Manager > BOR_SEC_TERMINATED_USERS. This query will return users in the PeopleSoft Financials system that have an unlocked User ID and a termination row in the Job record. ITS strongly recommends that security administrators query PSOPRDEFN to ensure that the user is not a multicampus user and that the termination row in PS_JOB is for their campus. Also, query PS_JOB to ensure that the user is truly terminated. If so, security administrators will need to lock the account and remove the base role. This query is meant to be a secondary tool for identifying terminated users. The primary tool is the source HR system. 93
94 Activity 9: Login to fplay using your prod user name and password. 1. Go to the Query Manager under Reporting Tools and run the BOR_TERMINATED_USERS_QUERY. 2. Follow the procedures above if you have any results on the query. Pick only one user. Current Users When a user s job function changes, the security administrator will need to update the user s security request form, get authorization from the user s manager, and change his or her access within the PeopleSoft Financials system. Security administrators are responsible for unlocking user accounts and resetting passwords if they expire. Documentation and Approvals Whether your institution requires a printed copy of a security request form or has an electronic system to track security requests and approvals, you must periodically review the requests and recertify users. The main message here is that you cannot have a verbal request for security access with no backup documentation. It must have a signature or electronic approval that can be audited. Monitoring ITS recommends that at least once a year, all user accounts set up at your institution are reviewed for: Level of access (too much or not enough) Type of access (have they changed job functions) Need of access (do they still need access) The person who reviews the security request forms should maintain signed documentation that the user accounts were reviewed. These forms should be stored on top of the security request form on file for audit purposes or stored electronically and should include items such as segregation of duties review, user preferences review, and budget security reviews. 94
95 Segregation of Duties Query To run a segregation of duties query, follow the navigation: Reporting Tools > Query > Query Manager > SEGREGATE_DUTY_BOR. This query is based on a Segregation of Duties (SOD) spreadsheet provided by the auditors, which is based on Process/Functions and role names that may be considered a segregation of duties issue. If a user appears on this query, it does not necessarily mean that they are in violation. However, the campus security administrator should do further research to ensure that the user s access is not a violation and should then annotate the research for the auditors. If it is a violation, the security administrators should work with the Business Office to determine what access to remove from the user. 95

96 Activity 10: Login to fplay using your prod user name and password. 1. Go to the Query Manager under Reporting Tools and run the SEGREGATE_DUTY_BOR query. 2. Choose Create Requisition. 3. Make note of user. The User Preference Report is located at Set Up Financials/Supply Chain > Common Definitions >User Preferences > User Preferences Report. It can be run for an individual user or for all users. 96
eprocurement and GeorgiaFIRST Marketplace User s Guide for Local Security Administrator
 eprocurement and GeorgiaFIRST Marketplace User s Guide for Local Security Administrator This page left blank for printing purposes. Table of Contents Table of Contents Table of Contents... 3 Introduction...
eprocurement and GeorgiaFIRST Marketplace
 eprocurement and GeorgiaFIRST Marketplace User s Guide for Accounts Payable Information Technology Services Version 1.1 Last Updated: 10/16/2012 Table of Contents Table of Contents Table of Contents...
PSFIN V8.9 Upgrade Training
 PSFIN V8.9 Upgrade Training eprocurement Participant Guide Athens, August 29, 2008 Fort Valley, September 12, 2008 Office of Information and Instructional Technology Version 1.1 08/20/2008 Table of Contents
eprocurement and GeorgiaFIRST Marketplace User s Guide for Buyers
 eprocurement and GeorgiaFIRST Marketplace User s Guide for Buyers Table of Contents Table of Contents Table of Contents... 2 Introduction... 5 Chapter 1: eprocurement and GeorgiaFIRST Marketplace Overview...
Procurement Services Training Manual. An Introduction to eprocurement and GeorgiaFIRST Marketplace
 Procurement Services Training Manual An Introduction to eprocurement and GeorgiaFIRST Marketplace 1 TABLE OF CONTENT Chapter 1: eprocurement and GeorgiaFIRST Marketplace Overview... 3 Benefits of epro
February 6, :00 5:00 PM Shelia Sloan
 February 6, 2015 9:00 5:00 PM Shelia Sloan 8:30 9:00 10:15 10:30 12:00 1:00 2:45 3:00 4:15 4:30 Setup and Socialize Security Overview Break Workflow Overview Lunch Lab Activities Break Lab Activities Recap
Manage Employee Access
 University of Maine System PeopleSoft Financials 8.4 Manage Employee Access General Ledger Page 1 of 33 GL Inquiry Pages TABLE OF CONTENTS 1. OVERVIEW...3 2. EMPLOYEE ACCESS TO FINANCIALS...3 3. SETTING
PURCHASING INQUIRY 8.9 TABLE OF CONTENTS
 PURCHASING INQUIRY 8.9 TABLE OF CONTENTS CONTENTS: PAGE: Review Requisition 3 Document Status 11 Approval Status 17 Receipt Inquire 22 Change Order History 27 Updated 8/01/2007 Purchasing -- Inquiry Page
PeopleSoft Financials epro Process Guide
 epro Process Guide General Stores Requisitions Information Management Client Support Services DCATS 210 567 7777 / Option 5 epro Process Guide Version 2 May 2011 Introduction to the PeopleSoft Financials
PeopleSoft esupplier Connection 9.1 PeopleBook
 PeopleSoft esupplier Connection 9.1 PeopleBook January 2012 PeopleSoft esupplier Connection 9.1 PeopleBook SKU fscm91fp2sesp-b0112 Copyright 1992, 2012, Oracle and/or its affiliates. All rights reserved.
GENERAL INFORMATION MODULE-SPECIFIC INFORMATION ACCOUNTS PAYABLE (AP) MODIFICATIONS TO EXISTING BOR PROCESSES AND REPORTS AP Voucher Save
 MODIFICATIONS TO EXISTING BOR PROCESSES AND REPORTS AP Voucher Save") GENERAL INFORMATION Purpose These Release Notes are to inform PeopleSoft Financials technical staff and functional users of the scheduled 2.20 release of BOR functional application enhancements. NOTE:
GENERAL INFORMATION Purpose These Release Notes are to inform PeopleSoft Financials technical staff and functional users of the scheduled 2.20 release of BOR functional application enhancements. NOTE:
PSFIN V8.9 Upgrade Training
 PSFIN V8.9 Upgrade Training Accounts Payable Participant Guide Athens, August 25 th 26 th, 2008 Fort Valley, September 8 th 9 th, 2008 Office of Information and Instructional Technology Version 1.2 8/13/2008
Purchase Requisitions and Receiving
 Purchase Requisitions and Receiving VERSION: February 2018 Table of Contents About the Purchasing Process 3 Working With Requester Preferences 5 Creating a New Purchase Requisition 9 Reporting a Misuse
ARC System Upgrade. What s New with 9.2. Presentations: January & February 2017
 ARC System Upgrade What s New with 9.2 Presentations: January & February 2017 Welcome and Introductions Presenters: Kate Sheeran, Executive Director, Finance HR, Training & Change Management Paul Reedy,
Financial System Procurement. Reference Guide
 Financial System Procurement Table of Contents How to use this... 4 Introduction to Procurement... 5 Module Objectives... 5 Unit I: General System Process... 6 Unit Objectives... 6 Chapter 1: General System
GeorgiaFIRST Financials Production Update WebEx
 GeorgiaFIRST Financials Production Update WebEx Tuesday, November 14, 2017 10:00am- 11:30am Agenda Annual Oracle Maintenance Release 5.30 Release Schedule FPLAY Database Refresh Supported Browsers User
REQUISITIONS, PURCHASE ORDERS, AND REVIEWING PAYMENT INFORMATION
 REQUISITIONS, PURCHASE ORDERS, AND REVIEWING PAYMENT INFORMATION TABLE OF CONTENTS OVERVIEW... 2 CREATE A REQUISITION... 2 CREATE A BLANKET REQUISITION... 15 CREATE A REQUISITION FOR THE COMPUTER DEPOT...
Requisition line View New Change Cancel... 60
 User Manual erequisitions - Table of Contents How to use this manual... 4 Overview... 4 to erequisitions... 5 Overview... 5 Navigation... 6 How to access and exit erequisitions... 7 How to change password
System Administration User Guide. PowerSchool efinanceplus
 PowerSchool efinanceplus Released November 16, 2017 Document Owner: Documentation Services This edition applies to Release 5.2 of the efinanceplus software and to all subsequent releases and modifications
Release Notes. General Information. Technical Information. Known Issues. Database
 Release Notes The purpose of these Release Notes is to inform PeopleSoft Financials technical staff and functional users of the scheduled 4.40 release of BOR functional application enhancements. These
Certify User Guide INVOICE REPORTS
 Certify User Guide INVOICE REPORTS Copyright 2018 All Rights Reserved This version is current as of July 1, 2018 For continuously updated instructions, please visit our Help Center within the Certify Support
Contents OVERVIEW... 3
 Contents OVERVIEW... 3 Feature Summary... 3 CONFIGURATION... 4 System Requirements... 4 ConnectWise Manage Configuration... 4 Configuration of Manage Login... 4 Configuration of GL Accounts... 5 Configuration
Question: 1 Which four statements are true about modifying a payment batch? (Choose four.)
") Question: 1 Which four statements are true about modifying a payment batch? (Choose four.) A. You can create a zero-amount payment for a supplier site. B. You can remove all invoices for a particular supplier
Question: 1 Which four statements are true about modifying a payment batch? (Choose four.) A. You can create a zero-amount payment for a supplier site. B. You can remove all invoices for a particular supplier
PeopleSoft Financials Course Content. Introduction to PeopleSoft 9.1
 PeopleSoft Financials Course Content Introduction to PeopleSoft 9.1 Navigating PeopleSoft Applications Signing into PeopleSoft Applications Identifying PeopleSoft Internet Application (PIA) components
University of Maine System
 University of Maine System Accounts Payable/Purchasing Inquiries Reference Manual UMS Financials Page 1 of 44 Inquiries Reference TABLE OF CONTENTS 1 Introduction...3 2 Requisitions and Receiving Inquiries...3
REQUISITIONS, PURCHASE ORDERS, AND REVIEWING PAYMENT INFORMATION USER GUIDE
 REQUISITIONS, PURCHASE ORDERS, AND REVIEWING PAYMENT INFORMATION USER GUIDE Please note: This user guide is intended for online use, and has a number of embedded links. Printing of these documents is discouraged,
Payroll Guide Guru Guide Version
 Payroll Guide Guru Guide Version 2017.01.13 Copyright 2017 PeopleGuru, Inc. All rights reserved. Information in this document is subject to change without notice. The software described in this document
International Institute of Tropical Agriculture
 ORACLE FINANCIALS USER GUIDE International Institute of Tropical Agriculture Accounts Payable Author: Oracle Implementation Team Creation Date: October 27, 2001 Last Updated: October 27, 2001 Control Number:
Microsoft MB6-871 Exam Questions & Answers
 Microsoft MB6-871 Exam Questions & Answers Number: MB6-871 Passing Score: 700 Time Limit: 180 min File Version: 40.2 http://www.gratisexam.com/ Microsoft MB6-871 Exam Questions & Answers Exam Name: Microsoft
Fiscal Year-End 2017 Sub-Module Cleanup and Processing. epro, Purchasing, Accounts Payable, Travel & Expenses
 Fiscal Year-End 2017 Sub-Module Cleanup and Processing epro, Purchasing, Accounts Payable, Travel & Expenses (This page is left blank for printing purposes.) TABLE OF CONTENTS Submodule Transaction Overview...
1 About Deskera ERP 9. 2 Getting Started with Deskera ERP 10
 Table of Contents 1 About Deskera ERP 9 2 Getting Started with Deskera ERP 10 2.1 Basic Settings 11 2.1.1 Create Users 12 2.1.2 Manage Application Access 13 2.1.3 Configure Company Settings 14 2.1.4 Import
WHAT S NEW IN PASTEL EVOLUTION VERSION 6.60
 WHAT S NEW IN PASTEL EVOLUTION VERSION 6.60 Softline Pastel s continuous investment in research and development ensures that you are kept up to date with the latest and most cutting-edge business management
Reports Accounts Payable Reports - 10h...98 Generate a Sales and Use Tax Report - 10h...101
 ACCOUNTS PAYABLE Table of Contents Vouchers 10... 4 Approving Vouchers - 10a... 5 Budget Checking a Voucher Ad Hoc - 10a... 7 Creating a Voucher from a PO... 8 Creating a Quick Invoice - 10a...13 Entering
PeopleSoft PO BILLING--> Peoplesoft FSCM Course Content details
 Peoplesoft FSCM Course Content details BILLING--> Maintain customers Enter bills online Create consolidated bills Work with billing interfaces Create recurring bills Copy a group of bills Research bills
HOW INTEGRATION WORKS...
 Contents INTRODUCTION... 1 How to Use This Guide... 1 Software Editions Supported... 2 HOW INTEGRATION WORKS... 3 INTEGRATION RULES... 4 SYNC SETTINGS... 7 General Settings... 7 Send Settings... 8 Get
Updated: 3/10/15 3:00pm. Tuesday, March 10, :30am 11:30am
 Updated: 3/10/15 3:00pm Tuesday, March 10, 2015 10:30am 11:30am Upgrade Status Upgrade Cutover Calendar Upgrade Go-live/Cutover Process Training Updates Early Access to 9.2 Upgraded Environments Future
PeopleSoft Purchasing / Payables Accelerated Rel 9.2
 PeopleSoft Purchasing / Payables Accelerated Rel 9.2 Duration: 5 Days What you will learn This PeopleSoft Purchasing / Payables Accelerated Rel 9.2 training explores both applications, beginning with the
State of Connecticut Core-CT. Telecommunications Requisitioning
 State of Connecticut Core-CT Telecommunications Requisitioning 1 Agenda Overview TSR Requester Responsibilities Creating Requisitions Core-10 TSRs Favorites Templates Special Requests Copy Requisitions
PeopleSoft Requisition Manual Using the PeopleSoft Requisition System
 PeopleSoft Requisition Manual Using the PeopleSoft Requisition System V8.9 September 2014 Table of Contents OBJECTIVES... 3 OVERVIEW... 3 CUSTOMIZING SCREEN... 4 MODULE 1: ENTERING A REQUISITION... 5 Navigating
PeopleSoft Financials epro Process Guide
 epro Process Guide Basic Requisitions Information Management Client Support Services DCATS 210 567 7777 / Option 5 epro Process Guide Version 2 May 2011 Introduction to the PeopleSoft Financials Web Requisition
Release Notes. Accounts Payable (AP) Reports/Queries
 Reports/Queries") Release Notes The purpose of these Release Notes is to inform PeopleSoft Financials technical staff and functional users of the scheduled 5.22 release of BOR functional application enhancements. These
Release Notes The purpose of these Release Notes is to inform PeopleSoft Financials technical staff and functional users of the scheduled 5.22 release of BOR functional application enhancements. These
eprocurement Requisitions
 UNIVERSITY OF LOUISVILLE TRAINING MANUAL eprocurement Requisitions The University of Louisville Updated 1/23/13 This document will walk you through how to create non catalog and catalog orders, save Requestor
Prepayment Receipt Creation Setup and process steps
 2012 Prepayment Receipt Creation Setup and process steps The required setups to be able to create a prepayment receipt for customer from order management. Mohammad Fawzy Oracle Application Express 1/1/2012
MSI Purchase Orders Version 4.0
 MSI Purchase Orders Version 4.0 User s Guide Municipal Software, Inc. 1850 W. Winchester Road, Ste 209 Libertyville, IL 60048 Phone: (847) 362-2803 Fax: (847) 362-3347 Contents are the exclusive property
Reports Accounts Payable Reports - 10h...93 Generate a Sales and Use Tax Report - 10h...96 AP Supplier Liability Aging Report - 10h...
 ACCOUNTS PAYABLE Table of Contents Vouchers 10... 4 Approving Vouchers - 10a... 5 Budget Checking a Voucher Ad Hoc - 10a... 7 Creating a Quick Invoice - 10a... 8 Entering Regular Vouchers - 10a...11 Posting
BillQuick 2015 Update Log
 BillQuick 2015 Update Log List of Items addressed in release 16.0.20.0 February 10, 2016 (SP3A) 1. BillQuick QuickBooks sync was not working due to certification issue. This was fixed. List of Items addressed
BillQuick-QuickBooks Advanced Integration Guide 2016
 BillQuick-QuickBooks Advanced Integration Guide 2016 CONTENTS INTRODUCTION 1 HOW TO USE THIS GUIDE 1 SOFTWARE EDITIONS SUPPORTED 2 HOW INTEGRATION WORKS 2 MODES OF SYNCHRONIZATION 3 INTEGRATION RULES 4
BillQuick MYOB Integration
 Time Billing and Business Management Software Built With Your Industry Knowledge BillQuickMYOB Integration Integration Guide BQE Software, Inc. 2601 Airport Drive Suite 380 Torrance CA 90505 Support: (310)
Instructor Introduction Training Facility Orientation Ground Rules Participant Introduction
 Instructor Introduction Training Facility Orientation Ground Rules Participant Introduction 2 History of Core-CT Modules Navigation Security Workflow Training Help Desk Reporting WorkCenters 9.2 Website
Contents OVERVIEW... 3
 Contents OVERVIEW... 3 Feature Summary... 3 CONFIGURATION... 4 System Requirements... 4 ConnectWise Manage Configuration... 4 Configuration of a ConnectWise Manage Login... 4 Configuration of GL Accounts...
Employee Management Training Guide. P130 Employee Management: Basic
 Employee Management Training Guide P130 Employee Management: Basic Certification Course Prerequisites This course consists of a hands- on guide that will walk you through the specifics of Acumatica s Employee
Call: Peoplesoft Financial Course Content:35-40hours Course Outline PURCHASE ORDER
 Peoplesoft Financial Course Content:35-40hours Course Outline PURCHASE ORDER Overview of Purchasing Purchasing Table setup Establishing a PO Business unit Creating a PO Business unit Purchasing processing
IBM Maximo Mobile Suite Version 7 Release 5.1. User Guide
 IBM Maximo Mobile Suite Version 7 Release 5.1 User Guide Note Before using this information and the product it supports, read the information in Notices on page 39. This edition applies to version 7, release
Exact Globe Next Purchase. User Guide
 Exact Globe Next Purchase User Guide Exact Globe Next Purchase Despite the continued efforts of Exact to ensure that the information in this document is as complete and up-to-date as possible, Exact cannot
AMI AutoAGENT Shop Floor Manager
 AMI AutoAGENT Shop Floor Manager Contents Introduction... 2 Introduction... 3 What's In This Manual... 4 Symbols and Conventions... 5 Shop Floor Manager Navigation Tips... 6 Part 1: Shop Floor Manager
MONTH END CLOSING INSTRUCTIONS FOR ACTUALS LEDGER
 MONTH END CLOSING INSTRUCTIONS FOR ACTUALS LEDGER Revised by Financial Operations 05/20/2009 Month End Closing Instructions for ACTUALS Ledger CONTENTS: OVERVIEW 3 HELP 5 DETERMINING IF A BUSINESS UNIT
Approver Responsibilities Within PeopleSoft. A Quick Reference Guide for Approving in PeopleSoft Procurement May 2016
 Approver Responsibilities Within PeopleSoft A Quick Reference Guide for Approving in PeopleSoft Procurement May 2016 Today s Agenda Why is the Approver Role so Important How to Receive the Approval Role
Welcome to the course on the working process across branch companies.
 Welcome to the course on the working process across branch companies. In this course we will review the major work processes across branch companies. We will start with the intercompany trade process.
University of Wisconsin System SFS Business Process epro.1.03 Buyer Role Documentation. eprocurement Buyer Role... 2
 CONTENTS eprocurement Buyer Role... 2 Buyer WorkCenter (New feature in 9.2)... 3 Options to Review Requisition for Approval... 4 Email... 4 Worklist... 5 Manage Requisition Approvals Page... 6 Buyer WorkCenter...
Activant Prophet 21 Version 12.0: Order Area New Features
 Activant Prophet 21 Version 12.0: Order Area New Features New Features Suite Course 2 of 5 This class is designed for Sales managers System Administrators Objectives Discuss v12.0 Order Area new features
Overview Invoices to be entered through this program are invoices that do not have supporting purchase order or contract documents.
 Invoice Entry Invoice Entry Objective This document provides instructions on how to enter an invoice into Munis that is not associated with a purchase order or a contract (i.e. a direct payment). It is
Infor VISUAL 9 Features & Benefits through VE 9 R3. Copyright Infor. All Rights Reserved.
 Infor VISUAL 9 s & Benefits through VE 9 R3 1 Core Business s 2 Lifecycle Notifications s Send e-mail notification when sales and purchasing events occur Determine notification points at the business partner
Munis Accounts Payable
 Munis Accounts Payable Procedural Documentation For more information, visit www.tylertech.com. TABLE OF CONTENTS Vendors... 4 Invoice Entry... 29 Request for Check... 38 Invoice Entry Full PO/Contract
CENTRAL SUSQUEHANNA INTERMEDIATE UNIT Application: Fund Accounting
 CENTRAL SUSQUEHANNA INTERMEDIATE UNIT Application: Fund Accounting PO & Requisition Entry Learning Guide Copyright 2011 Central Susquehanna Intermediate Unit, USA Table of Contents Introduction...1 PO
TRAINING DOCUMENT Internet Expenses Administrator
 TRAINING DOCUMENT Internet Expenses Author: William Arthur Green, Jr. Creation Date: March 26, 2007 Last Updated: September 28, 20 Control Number: Version: 1 Approvals: William Green Document Control Change
Shipping. User Guide
 Shipping User Guide The information in this document is subject to change without notice and does not represent a commitment on the part of Horizon. The software described in this document is furnished
Release Notes. General Information. Technical Information. Release Known Issues. Database
 Release Notes The purpose of these Release Notes is to inform PeopleSoft Financials technical staff and functional users of the scheduled 4.30 release of BOR functional application enhancements. These
USER MANUAL. Inventory Manager TABLE OF CONTENTS. Version: 3.0. Compatibility:
 USER MANUAL TABLE OF CONTENTS Introduction... 1 Benefits of Inventory Manager... 1 Prerequisites... 2 Installation & Configuration... 2 Installation Steps... 2 Configuration Steps... 5 Procedure... 10
Contents OVERVIEW... 3
 Contents OVERVIEW... 3 Feature Summary... 3 CONFIGURATION... 4 System Requirements... 4 ConnectWise Manage Configuration... 4 Configuration of Manage Login... 4 Configuration of GL Accounts... 5 Configuration
Table of Contents 9.0 Training Materials For New Users. Table of Contents 1
 HSC - Requisitions Purchasing Contact: 405-325-2811 Website: www.ou.edu/purchaing Table of Contents 9.0 Training Materials For New Users Table of Contents 1 Create Requisitions Maintain Requisition Page
Sage ERP Accpac 6.0A. SageCRM 7.1 I Integration Update Notice
 Sage ERP Accpac 6.0A SageCRM 7.1 I Integration Update Notice 2011 Sage Software, Inc. All rights reserved. Sage, the Sage logos, and all Sage ERP Accpac product and service names mentioned herein are registered
Campus Vouchers NEW VERSION: 8/28/2014
 Campus Vouchers NEW VERSION: 8/28/2014 Table of Contents 1 Campus Vouchers 3 Understanding Campus Vouchers 5 Creating a Campus Voucher 7 Running a Voucher Inquiry 21 1 1 Campus Vouchers 1 Campus Vouchers
SUBJECT: Additional Information Related to Requisitions Page 1 of 29 TABLE OF CONTENTS. Overview of the Requisition Structure... 2
 SUBJECT: Additional Information Related to Requisitions Page 1 of 29 TABLE OF CONTENTS Overview of the Requisition Structure... 2 Supporting Documentation Required for Requisitions... 3 Signatures Required
PeopleSoft Enterprise Basics
 WebLearning PeopleSoft & JD Edwards Enterprise Curriculum PeopleSoft Enterprise Basics The PeopleSoft Enterprise Basics module describes some general features that are universal to all PeopleSoft Enterprise
Key Changes: Add/Update Purchase Order
 Key Changes: Add/Update Purchase Order The purpose of this job aid is to provide a visual overview of the Add/Update Purchase Order pages in PeopleSoft version 9.2. The numbers on the images are associated
How to Configure the Initial Settings in SAP Business One
 SAP Business One How-To Guide PUBLIC How to Configure the Initial Settings in SAP Business One Applicable Release: SAP Business One 8.8 European Localizations English July 2009 Table of Contents Introduction...
Creating Early Entry Requisitions Job Aid
 State of Wisconsin Department of Administration Creating Early Entry Requisitions Job Aid Version 1.0 Version History Version Date Editor Description 1.0 5/5/16 Will Kammerait Initial Release 2.0 5/11/16
Banking for GL VERSION: 9/22/2014
 Banking for GL VERSION: 9/22/2014 Table of Contents 1 Bank Reconciliation 3 Overview of Bank Reconciliation 4 Entering Bank Statement Information 7 Running the Automated Reconciliation Process 11 Running
Saint Louis University. Business and Finance
 Saint Louis University Finance Navigation, Requisitioning, & Approvals Business and Finance Office of the Controller Financial Services Salus Center 5 th Floor April 27, 2009 Table of Contents Chapter
Contents OVERVIEW... 3 CONFIGURATION... 4
 Contents OVERVIEW... 3 Feature Summary... 3 CONFIGURATION... 4 System Requirements... 4 ConnectWise Manage Configuration... 4 Configuration of Manage Login... 4 Configuration of GL Accounts... 5 Configuration
PeopleSoft General Ledger 9.1 Journal Processing Training Manual Contact Information:
 PeopleSoft General Ledger 9.1 Journal Processing Training Manual Contact Information: SpearMC Consulting, Inc. 1-866-SPEARMC info@spearmc.com www.spearmc.com TABLE OF CONTENTS PURPOSE... 4 CHAPTER 1 -
Differences from Classic USAS
 Differences from Classic USAS Draft This page is a draft and may contain incomplete or inaccurate information Enhanced Queries and Grids Dynamic Reporting Capabilities Classic vs. Redesign Report Comparisons
BillQuick-Sage 50 Integration Guide 2017
 BillQuick-Sage 50 Integration Guide 2017 (866) 945-1595 www.bqe.com info@bqe.com CONTENTS INTRODUCTION 1 HOW TO USE THIS GUIDE 1 SOFTWARE EDITIONS SUPPORTED 1 HOW INTEGRATION WORKS 2 INTEGRATION RULES
Work Instructions for using the Specials Requests functionality in eprocurement
 Work Instructions for using the Specials Requests functionality in eprocurement All purchase requisitions can be entered using the epro system. If the vendor that you are trying to place a requisition
BillQuick MYOB Integration
 Time Billing and Business Management Software Built With Your Industry Knowledge BillQuickMYOB Integration Integration Guide BQE Software, Inc. 2601 Airport Drive Suite 380 Torrance CA 90505 Support: (310)
END-USER GUIDE. The Procure-to-Pay Process
 END-USER GUIDE The Procure-to-Pay Process Version 1.1 June 30, 2016 Contents 1 The E-Procurement Process... 2 2 Creating Requests... 4 2.1 Shopping Catalogs... 4 2.2 Shop Off-Catalog... 7 2.3 Shopping
ExpressMaintenance Release Notes
 ExpressMaintenance Release Notes ExpressMaintenance Release 9 introduces a wealth exciting features. It includes many enhancements to the overall interface as well as powerful new features and options
Table of Contents 9.2 Training Materials For New Users. Table of Contents 1
 HSC - Requisitions Purchasing Contact: 405-325-2811 Website: www.ou.edu/purchasing Table of Contents 9.2 Training Materials For New Users Table of Contents 1 Create Requisitions Maintain Requisition Page
Table of Contents 9.2 Training Materials For New Users. Table of Contents 1
 HSC - Requisitions Purchasing Contact: 405-325-2811 Website: www.ou.edu/purchasing Table of Contents 9.2 Training Materials For New Users Table of Contents 1 Create Requisitions Maintain Requisition Page
Bridge. Billing Guide. Version
 Bridge Billing Guide Version 2.5.112 Table of Contents Page i Table of Contents Table Of Contents I Introduction 2 Managing Bill To Parties 3 Creating a New Bill to Party 3 Viewing and Navigating Bill
Invoice Manager Admin Guide Basware P2P 17.3
 Invoice Manager Admin Guide Basware P2P 17.3 Copyright 1999-2017 Basware Corporation. All rights reserved.. 1 Invoice Management Overview The Invoicing tab is a centralized location to manage all types
Aviation Specialties Unlimited 1. Contract (Fixed Price Contract)
") Aviation Specialties Unlimited 1. Contract (Fixed Price Contract) Overview Key Setup Setup Customer Setup Quote Create Sales Order Setup Contract (Project) Setup Advance Billing (Deposit) Acquire Inventory
Aviation Specialties Unlimited 1. Contract (Fixed Price Contract) Overview Key Setup Setup Customer Setup Quote Create Sales Order Setup Contract (Project) Setup Advance Billing (Deposit) Acquire Inventory
GENERAL INFORMATION PREREQUISITES. Releases 1.01 through 1.11A Releases 2.01 through 2.05 TECHNICAL IMPACT MODULE-SPECIFIC INFORMATION
 GENERAL INFORMATION Purpose Model Changes These Release Notes are to inform PeopleSoft Financials technical staff and functional users of the scheduled 2.06 release of BOR functional application enhancements.
Sage ERP Accpac 6.0A. SageCRM 7.0 I Integration Update Notice
 Sage ERP Accpac 6.0A SageCRM 7.0 I Integration Update Notice 2010 Sage Software, Inc. All rights reserved. Sage, the Sage logos, and all Sage ERP Accpac product and service names mentioned herein are registered
What s new in Pastel Evolution Version New Add-On Module. New Features. Branch Accounting. Business Intelligence Centre Excel Genie
 What s new in Pastel Evolution Version 6.50 Pastel Evolution Version 6.50 is packed with exciting new features. In fact it s the most significant change we ve made to Pastel Evolution since its launch
Version Countries: US, CA. Setup and User Manual (include user demo scenarios in red) For Microsoft Dynamics 365 Business Central
 For Microsoft Dynamics 365 Business Central") Version 1.0.0.0 Countries: US, CA Setup and User Manual (include user demo scenarios in red) For Microsoft Dynamics 365 Business Central Last Update: January 11, 2019 Contents App Description... 3 Demo
Version 1.0.0.0 Countries: US, CA Setup and User Manual (include user demo scenarios in red) For Microsoft Dynamics 365 Business Central Last Update: January 11, 2019 Contents App Description... 3 Demo
IBackOffice 7.3 Release Notes IBackOffice Global
 IBackOffice 7.3 Release Notes IBackOffice Global New Features 1 Change Company 2 Security Groups 2 Explorer Views 3 Zoom in Report Parameters Window 3 Accounts Payable 3 Accounts Receivable 5 General Ledger
Working with Voucher Templates
 Working with Voucher Templates VERSION: March 2018 Creating a Template for Vouchers What Is a Voucher Template? You have the option to create templates for vouchers you create on a regular basis, such
Accounts Payable Setup & Processing
 SedonaOffice Users Conference San Francisco, CA January 21 24, 2018 Accounts Payable Setup & Processing Presented by: Lisa Gambatese & Kaitlyn Denninger This Page Intentionally Left Blank Page 2 of 30
Procurement Services Training Manual. An Introduction to eprocurement and GeorgiaFIRST Marketplace
 Procurement Services Training Manual An Introduction to eprocurement and GeorgiaFIRST Marketplace 1 TABLE OF CONTENT Chapter 1: eprocurement and GeorgiaFIRST Marketplace Overview...4 Benefits of epro and