MIAOP PCG Claiming System User Guide March 2015
|
|
|
- Griselda Parrish
- 6 years ago
- Views:
Transcription

1 MIAOP PCG Claiming System User Guide
2 Table of Contents I. Introduction to the Staff Pool List (SPL)... 4 Final notes on the Staff Pool List:... 7 II. Accessing the PCG Claiming System... 8 First Time Registration... 8 Resetting Passwords... 8 Registered User Login III. Navigating the Home Screen IV. Updating Contacts V. Entering Shifts To enter shifts: VI. Calendar Completion To enter staff days off: VII. Creating/Updating the Staff Pool List Filtering the Staff Pool List Adding a New Job Position Adding a New Vacancy Position Filling a New Position with an Existing Staff Deleting a Staff Person and a Position Reactivating a Job Position Allowable Actions During a Quarter Replacing a Staff Person Long-Term Subs Editing a Staff Person Exporting and importing the SPL VII. Certifying the Staff Pool List ISD Certification of Staff Pool List IX. Financials Payroll Staff vs Contracted District Payroll Staff Edit Checks and Warnings Page 2
3 Contracted Staff Adding Support Staff Positions Reporting Costs for Direct Support Staff Quarterly Summary and Certification Page 3
4 The foundation of the Michigan Administrative Outreach Program (MIAOP) and Fee for Service (FFS) programs is the Staff Pool List (SPL). The SPL consists of four (4) cost pools: AOP only (AOP), AOP and FFS/Direct Medical Services (DS), Case Manager (CM), and Personal Care (PC). The ISD and Coordinator (staff assigned to a Staff Pool List and/or PCG Claiming System responsibilities) are responsible for accessing the PCG Claiming System website: routinely. The PCG Claiming System website allows the Coordinator to edit and monitor their Staff Pool List and manage their calendar. Coordinators will also submit expenditures for staff included on their staff pool list. The participants will access the site through a link received in the notification that will take them directly to their moment. This User Guide will provide the following details: Who to include on the SPL; How to access the PCG Claiming System website; How to create shifts; How to update and submit calendars; How to edit, submit, and certify the SPL; How ISD/Coordinators can monitor their LEAs. How to submit costs for staff pool participants; and How to add and submit costs for direct support staff I. Introduction to the Staff Pool List (SPL) The creation of the SPL is the first step in the claiming process. It is important for LEAs to have an accurate SPL, as the information will be used to claim the costs associated with the staff on this list. In order to verify the information included in the SPL it is important for coordinators to routinely work with LEA staff responsible for the financial duties. The participants in the AOP, DS, CM, and PC cost pools consist of staff performing Medicaid outreach and direct service activities in the MIAOP and FFS programs respectively at participating ISDs/LEAs. Coordinators update their SPLs once per quarter using the web-based PCG Claiming System. Who should be included on the Staff Pool List? The AOP Only (AOP) cost pool is comprised of administrative claiming staff only. Eligible participants include: Administrators Counselors Page 4
5 Early Identification/Intervention Personnel Physician Assistants Teacher Consultants Teachers of Speech and Language Impairments (without their American Speech-Language- Hearing Association Certificate of Clinical Competence) School Psychologists (certified by the Michigan Department of Education but without Michigan licensure) School Social Workers (certified by the Michigan Department of Education but without Michigan licensure) The AOP and FFS/Direct Medical Services (DS) Cost Pool is comprised of staff that conduct both direct service and administrative activities, and staff that perform direct services only. Staff included in the Direct Service and Administrative Providers cost pool must meet the participant credential and license requirements to bill. Eligible participants include: American Speech-Language-Hearing Association (ASHA) certified Speech Language Pathologists (Includes a Teacher of Students with Language Impairments under the direction of an ASHA certified SLP or audiologist) Audiologists Licensed Practical Nurses (LPNs) and Registered Nurses (RNs) Occupational Therapists (OTR) and Occupational Therapist Assistants (OTA) Orientation and Mobility Specialists (Academy for Certification of Vision Rehabilitation and Education Professionals certified) Licensed Physical Therapists (LPT) and Physical Therapist Assistants (PTA) Physicians and Psychiatrists Psychologists State Licensed, supervised Limited-Licensed, or supervised Temporary Limited-Licensed Social Workers State Licensed or supervised Limited-Licensed Speech Language Pathologists ASHA CCC or supervised non-asha CCC SLP or supervised Teacher of Speech and Language Impaired (TSLIs) The Case Manager (CM) Cost Pool eligible participants include: Page 5
6 RN with a Michigan license Bachelor Degree with a major in a specific special education area Earned credit in course work equivalent to the above mentioned degree Minimum of three years personal experience in the direct care of individuals with special needs (qualified and professional) Case Managers must also have knowledge of all of the following: Services to infants and toddlers who are eligible under IDEA law as appropriate Part C of the IDEA law and associated regulations Nature and scope of services under IDEA, as well as systems of payments for services and other pertinent information Provisions of direct care services to individuals with special needs Provisions of culturally competent services within the community being served The Personal Care (PC) Cost Pool eligible participants include: Personal care services are a range of human assistance services provided to persons with disabilities and chronic conditions, which enables them to accomplish tasks that they would normally do for themselves if they did not have a disability. Assistance may be in the form of hands on assistance or cuing so that the person performs the task by him/her self. Personal Care Services must be medically necessary and the need for the service documented in the IEP/IFSP. Each Child s school clinical record must contain a completed, signed and dated monthly activity checklist. In accordance with 42 CFR , authorization for Personal Care Services (PCS) may be done by a physician or other licensed practitioner operating within the scope of their practice. The state definition of other licensed practitioner consists of Registered Nurse (RN), Registered and Certified Occupational Therapist (OT), Licensed Physical Therapist (LPT), Master of Social Worker (MSW), or ASHA-CCC Speech Language Pathologist (SLP). It is expected that personal care services will be authorized by the appropriate practitioners. Personal Care services are not covered if they are: Provided by a family member. A family member is described by the Centers for Medicare & Medicaid services (CMS) to be legally responsible relatives ; thus, spouses of beneficiaries Page 6
7 and parents of minor beneficiaries (including stepparents who are legally responsible for minor children). Not documented in the IEP/IFSP Educational in focus, such as tutoring, preparation of educational materials or Braille interpretation. Performed as a group service; however, one or more students may be served one at a time sequentially. Important notes regarding adding staff onto the Staff Pool List: Consider each staff member and their job duties individually. Staff should conduct reimbursable activities on a regular basis or a regular part of their job. A Coordinator should verify that each staff meets the criteria prior to adding to the SPL. The Coordinator should submit an accurate and complete SPL. Final notes on the Staff Pool List: SPLs must be submitted and certified in the PCG Claiming System on a quarterly basis A staff member can only be included in one cost pool. Do not include any participants who are 100% federally funded in any of the cost pools. Staff must be included in a SPL in order for costs to be included in the quarterly financial collection. Each staff person should be considered individually for the SPL-- a job title does not automatically qualify a staff person for the program. Once LEAs have decided who to include on their SPLs, they will log in to the PCG Claiming System site to create and submit this list. The next few sections will explain how to access the site and how to edit, submit, and certify the SPL. Page 7


8 PCG CLAIMING SYSTEM II. Accessing the PCG Claiming System First Time Registration Once staff are added to the PCG Claiming system they will receive an with the subject New Account Registration from First time users need to click the web link in the and will then be brought to the page below to enter their password in the Password and Confirm Password fields. Users then click the Complete Registration button and they will be brought back to the main page to enter the and new password to log into the site. Resetting Passwords User passwords will never expire but they can be reset as needed. If a coordinator needs a new password, or has forgotten his/her login information, he/she may click on the Forgot Password link located next to Log in. Page 8

9 The user will then be sent to the screen below and will need to enter their address that is associated with the system along with the text that is displayed in the image field and then click the Forgot Password button. The user will then be sent an with the subject Reset Password Request from The will contain a link to the page below for users to reset their password. Page 9

10 Enter the new password in the Password and Confirm Password fields and click the Reset Password button. Users will then be brought back to the main page to enter the and new password and log into the site. Users may also contact or call , extension 2 for assistance. Registered User Login 1. To enter the PCG Claiming System website after registering, a coordinator will open an internet browser and enter: 2. Enter and password. Be sure to enter password exactly as created, using appropriate letter cases and symbols. Page 10

11 3. Click the Log in button after entering the and password. Page 11

12 III. Navigating the Home Screen Below is the home screen available after logging into the website. The home screen contains links to all of the functionality within the system, including links to People, Calendars, Financials, Reports and Configuration. Use the links to each of the sections to navigate through the system. The links are circled in red below. The home screen also contains data fields known as widgets that will display information regarding the quarterly milestone summary, announcements, calendar compliance, staff pool compliance, moment status, and resources uploaded by PCG. Users will have access only to the LEAs or the ISD where they are associated in the system. The desired quarter needs to be selected by clicking on the Quarter dropdown at the top of the home screen to edit or monitor information pertaining to that quarter. Click on the Home link at any time to return to the home screen shown below. ISD Tip: Navigating the LEAs ISDs will have access to all their LEAs, to select a particular LEA choose from the dropdown menu next to quarter. Page 12
 by selecting the identifying menu (LEA Users, ISD and LEA, or ISD users).")

13 a. Breaking down the Green Menu Bar The People dropdown is where Coordinators can add additional users to the system (ISD users will be able to view and update users for the ISD and LEAs, LEA users will be able to view ISD users and update LEA users) by selecting the identifying menu (LEA Users, ISD and LEA, or ISD users). Coordinators will be able to edit the staff pool list by selecting Staff Pool Positions from the dropdown menu. Coordinators can add/delete/edit direct support staff that can be claimed in the quarterly financial submission by selecting Direct Support Positions in the People menu. This will be further discussed in the financial submission section of the guide. The Calendar dropdown is where Coordinators update their calendar information. The Configuration dropdown is where Coordinators update their shifts. Page 13
. b.")

14 The Reports menu is where coordinators can select and run a report for a particular quarter. Only reports that are available to the user will appear. These reports are also available through a link on the reports widget (described in the next section). b. Breaking down the widgets Widgets are available in each quarter and keep real time data for coordinators at the LEA and ISD levels for easy tracking. The Announcements widget will display for all users and give any PCG important deadlines and info. The ' Quarterly Milestone Summary on the left of the Home screen displays where the status of the claiming process for each quarter. LEAs are only responsible for tasks that are light blue. Tasks that are green, blue, and white are completed by PCG. Page 14


15 The Resources widget is where PCG will post training guides and other LEA resources. The Reports widget displays all available reports for a coordinator. The quarter desired for the outcomes on the report as well as either the ISD or appropriate LEA must be selected before clicking the report link. Page 15


16 The Moment Compliance widget describes for each LEA or ISD the number of moments that have occurred, how many have been completed, and how many are not done. Calendar and Staff Pool Compliance Widgets display certification status for the LEAs in the ISD. IV. Updating Contacts The ISD and LEA coordinators now have access to manage their contacts within the site. To view, edit, delete, or add users, click on People from the Green Menu Bar and then either ISD Users, LEA Users, or ISD and LEA (available to ISD level users). Page 16


17 All users that are available in the selected LEA or ISD will display. Select Available Filters for selection options if trying to locate a particular user. To add a new user, select the green button Add New User from the top left of the screen and a fill in screen will appear to add the user s information. Page 17

18 Enter in all of the required information (in red), the location (district) the contact will have access to (only locations the user has access to will appear), and user type. Then select the check box for Is Contact if the user should receive program and system information and Is CC if the user should receive RMTS late notifications for participants at the assigned location. Once all of the information has been entered click Create New User to save the information in the site. The site will then send the user an with instructions to access the system. User Types ISD Admin: ISD level staff person with access to all LEAs and certification/edit permissions for both Staff Pool List and Financials. This user type can also unlock LEA calendars, staff pool lists, and financials for further editing before PCG approval. This user type can manage all users in the system. LEA Admin: LEA level staff person with access to one or more assigned LEAs with certification and edit permissions for both Staff Pool List and Financials. This user type can manage all LEA user types. Page 18
19 LEA RMTS: LEA level staff person with access to one or more assigned LEAs with certification and edit permissions for Staff Pool List functions. This user type has view access to financials. This user type can manage LEA user types. LEA Financials: LEA level staff person with access to one or more assigned LEAs with certification and edit permissions for Financials. This user type has a view access to Staff Pool List functions. This user can manage LEA user types. LEA Financials Editor: LEA level staff person with access to one or more assigned LEAs with edit permissions for Financials. This user type does not have certification permission. This user type has a view access to Staff Pool List functions. LEA View Only: LEA level staff person with access to one or more assigned LEAs with view permissions only for both Staff Pool List and Financials. Page 19
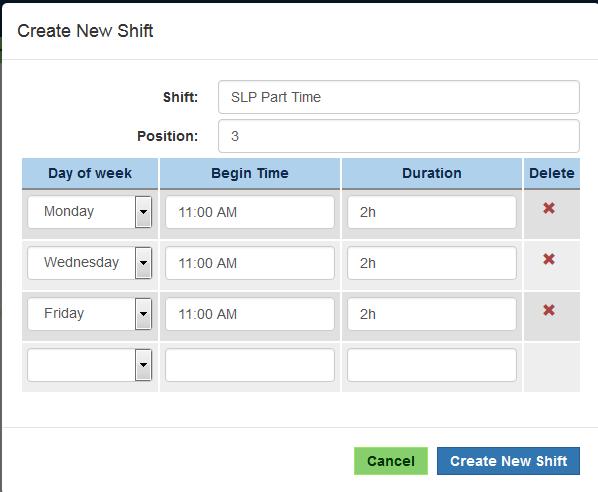
20 V. Entering Shifts PCG recognizes that not every LEA or school on the staff pool list begins and ends their work day at the same time. The creation of shifts in the new system allows for differences in schedules per LEA or school to be created within each LEA to capture the truest working time for each participant. An LEA can create multiple shifts for staff that have set schedules. If an LEA has a part time staff person, but their schedule is flexible, that participant must be assigned the full time shift. At a minimum, an LEA must have a full time shift that encompasses the contracted work time. Other examples of shifts the LEA may set are: Shift for high schools Shift for elementary schools Shift for administrators contract time Shift for a part time staff that have a set schedule (M-F 8-12, etc.) To enter shifts: 1. Go to the Configuration drop down on the home screen and select Shift. 2. Click on Add New Shift. 3. Type in a Name for the shift being created. Naming conventions should be easy to identify so that a correct shift can be selected for a staff person. Naming convention examples: M-F 8-12 T, W, TH 8-3 Full Time HS 8-3:30 Full Time Toyon Elementary school Page 20

21 4. The Position is there to indicate the order you want your shifts to appear in the drop down for your staff pool (Positions.) 5. Choose the day of the week for your shift from the drop down. Each day must be added to the shift separately. If the shift is 2 or more days, steps 5-7 will be repeated until the full shift has been identified. 6. Enter the starting time in the following format 8:00 AM/PM or military time (13:00 = 1:00 PM.) Note: LEAs will not enter the end time. 7. Enter the duration of the shift in the following format #h #m (substituting # for the actual duration of hours and minutes) This is not the ending time, but instead is the length of the shift. The system will determine the ending time based on the start time entered in step 6 and the duration of the shift entered in this step. 8. Repeat steps 5 7 for each of the days which are associated with this shift and click Create New Shift to save it in the system. 9. The shift will then be saved in the system and can be assigned to job positions. Page 21
22 Page 22
, then LEAs will be able to complete their calendars.")
23 VI. Calendar Completion LEAs enter their non-work days directly into the PCG Claiming system to prevent staff from being selected for a moment on days that they do not work. ISDs must complete the ISD calendar first (it can be certified blank), then LEAs will be able to complete their calendars. If an LEA does not certify a calendar, the system will default that LEA to the ISD calendar. In these situations, an ISD must have certified a calendar with days off. To enter staff days off: 1. Click the Calendars link at the top of the home page. 2. Holiday/Non-Work Day is the only selection that indicates non work days for staff. The Teacher Inservice Work Day and Early Release Day-Optional selections can both be used if the LEA wishes to indicate them on the calendar, but they will not be days that are removed from the time study. Select Holiday/Non-Work Day and then click on the days on the calendar that correspond to the days off for the district. If a day is selected in error, simply click it again to refresh. Page 23

24 The ISD must certify the ISD calendar before any LEAs can update calendars. Any days the ISD selects will appear as inherited days off on the LEA calendar. An LEA can choose to keep those days and add to them by selecting additional days off. Or, if an LEA actually has a working day on an ISD off day, they simply click it to unselect it. 3. Once all updates have been made, click Save Changes to lock in the non-work days and then click certify calendar. If an error was made after certification, the ISD can unlock the LEA calendar to allow for further changes. The ISD coordinator will click on the uncertify calendar button on the Calendars tab for the particular LEA. Once a calendar is certified, it locks and the snow day selection is displayed. Use this throughout the quarter to identify any days off that the district has unexpectedly. PCG will use this information to assist in completing moments. Page 24


25 VII. Creating/Updating the Staff Pool List To view, create, and/or update the SPL, click on the People link on the home screen and select Staff Pool Positions. The two main components of the Staff Pool page are the Add New Job Position and Certify Staff Pool buttons. The Add New Job Position button is how users can add new job positions to their staff pool list. The Certify Staff Pool button is the button that users click to certify and lock their staff pool in the Claiming system once all updates have been made. On the following page is the screen that will appear after clicking on the Staff Pool Positions link on the People' dropdown. All current active job positions included in the staff pool will appear with the following information: Agency (the LEA) if viewing from the ISD level Cost Pool (AOP, DS, CM, or PC) Full Name Job Category Job Title Page 25
26 Filtering the Staff Pool List It is possible to filter the SPL by clicking Available Filters. Select the desired cost pool, job category, , first name, or last name, either individually or in combination with each other. Once the desired criteria has been selected, click Filter to display the results for all participants. The staff that match the search criteria will display. The staff members that meet the search criteria selected will be displayed. Adding a New Job Position 1. From the Staff Pool Positions screen, click on the Add New Job Position button located on the upper left of the screen to add a new Job Position. The job position is created first and then a staff person assigned to it. Page 26
27 2. The required fields below will appear: Cost Pool: A drop down menu with the cost pools allowed. Job Category: A drop down menu with job categories allowed in that cost pool. Shift Type: A drop down menu with all shifts listed created by the LEA. Job Title: Job title used by the district to describe the position. 3. Enter the required information and then select the action. When adding a new staff person, select the action, Fill With New from the drop down. Page 27
28 4. Complete the new staff person information by entering: Start Date: Use the first day of the quarter being updated. For example 10/01/2014 for the Oct-Dec quarter staff pool list update. Employment Type: Select either district payroll or contracted from the dropdown menu address or Employee ID o If the LEA receives paper notifications for this job position and no electronic notifications, select the check box No . This will prompt the LEA to enter an employee ID instead. This must be a unique entry and should not be the social security number of the employee. Note: This box should only be checked if no electronic notification is sent. If the district receives both, please enter an address and do not select the check box. First Name Middle Name (optional) Last Name Suffix (optional) Phone (optional but recommended) CC person: select from the dropdown the contact that will receive this participant s RMTS late notifications 5. Click Create New Job Position or cancel to abort new job position and return to the SPL Page 28
29 Adding a New Vacancy Position 1. From the Staff Pool Positions screen, click on the Add New Job Position button located on the upper left of the screen to add a new Job Position. The job position is created first and then a staff person assigned to it. 2. The required fields below will appear: Cost Pool: A drop down menu with the cost pools allowed. Job Category: A drop down menu with job categories allowed in that cost pool. Shift Type: A drop down menu with all shifts listed created by the LEA. Job Title: Job title used by the district to describe the position. Note: This field can be used to enter further identifying information such as school building, room number, etc. Enter the required information and then select the action. When adding a vacancy, select the action, Create as Vacancy from the drop down. Page 29
30 Once create as vacancy is selected, no other information about the participant is entered. 3. Click Create New Job Position or cancel to abort new job position and return to the SPL Filling a New Position with an Existing Staff 1. From the Staff Pool Positions screen, click on the Add New Job Position button located on the upper left of the screen to add a new Job Position. The job position is created first and then a staff person that is inactive (not assigned to a job position) is assigned to it. 2. The required fields below will appear: Cost Pool: A drop down menu with the cost pools allowed. Job Category: A drop down menu with job categories allowed in that cost pool. Shift Type: A drop down menu with all shifts listed created by the LEA. Job Title: Job title used by the district to describe the position. Page 30
31 3. Enter the required information and then select the action. When selecting an existing staff, select the action Fill With Existing. Note: Only staff that are inactive and not assigned to another position can be selected to fill a position. If changing a staff person from one cost pool to another and not backfilling the original position, the cost pool can be edited rather than using an action. If the desire is to move a staff from one cost pool to another and then fill the original position, then either create a vacancy, fill with new, or fill with existing. The staff person will be deleted from that position and made inactive. A new position can then be added and the staff person added from the action Fill with existing. 4. Search for the staff person by entering specific criteria in the search fields All staff, both inactive and active, will appear in the search results based on the criteria selected. Yes under the column header inactive means the participant is inactive (not currently filling a job position) and can be selected to fill the position. No in the inactive column means the staff is active in the district and filling another job position. Only a participant that is not assigned to a current position (having a yes in the column, inactive ) can be selected. Select the Back button to redo search criteria or to return to the adding participant screen. Page 31

32 5. Click the Fill button once the desired staff is located to populate the job position. Enter the start date that the existing staff person is beginning the new position. The system will default to the first day of the quarter. 6. Then select Create New Job Position to save it. Deleting a Staff Person and a Position 1. Select the name of the staff person and position to delete. Page 32

33 2. Select the Action Delete from the menu. Then enter the date the staff person left the position and select the check box located next to the statement Are you sure you want to delete this position? Then select save changes. This will inactivate the participant and delete the position from the staff pool list being updated. Only do this if the position is no longer available at the district to fill. Reactivating a Job Position Job positions cannot be reactivated. If a position is once again available at a district, that position should be added as a new position. If a staff person returns to a position at the district, they can be added by being selected as a replacement (fill with existing) to a position where another staff is vacating, or they can be added to a newly created position by selecting fill with existing. This is the same process as the Adding a New Job Position process that was described earlier in this guide. For example, in one quarter there were three Speech Therapists and then the following quarter only two, in order to add one back this quarter, a new position must be created. Allowable Actions During a Quarter Once the quarter has begun, the Action menu allows users to make the position a vacancy (if the participant has left the position), or replace the participant with another staff (existing or new) during the quarter. This will allow users to track specific dates that participants were in the position for financial claiming and allow new participants to be notified of moments that occurred while they are in the position. Page 33


34 Replacing a Staff Person 1. Select the link on the name of the staff person to replace. 2. Scroll to the Action Dropdown box to make a selection: a. Vacate b. Replace with Existing c. Replace with New a. Vacate Use this if a staff person has left a position and there is no replacement staff yet. This feature can be used during the quarter as well as at the beginning. Enter the date the staff person vacated the position. Enter any other identifying information about the position in the job title field such as school building, room number, etc. Click the check box indicating assurance of creating a vacancy and select Save Changes. Page 34
35 b. Replace with Existing Search for the staff person by entering specific criteria in the search fields All staff, both inactive and active, will appear in the search results based on the criteria selected. Yes under the column header inactive means the participant is inactive and can be selected to fill the position. No in the inactive column means the staff is active in the district. Only a participant that is not assigned to a current position (having a yes in the column, inactive ) can be selected. Select the Back button to redo search criteria or to return to the adding participant screen. Click the Fill button once the desired staff is located to populate the job position. Enter the start date that the existing staff person is beginning the new position. The system will default to the first day of the quarter. Then select Create New Job Position to save it. Page 35
36 c. Replace with New Complete the new staff person information by entering: Start Date (will default to the first day of the quarter): Enter the employment start date. Employment Type: Select District Payroll Staff or Contracted address o If the LEA receives paper notifications for this job position and no electronic notifications, select the check box No . This will prompt the LEA to enter an employee ID instead. This must be a unique entry and should not be the social security number of the employee. Note: This box should only be checked if no electronic notification is sent. If the district receives both, please enter an address and do not select the check box. First Name Middle Name (optional) Last Name Suffix (optional) Phone (optional but recommended) CC person: select from the dropdown the contact that will receive this participant s RMTS late notifications Click Create New Job Position or cancel to abort new job position and return to the SPL Page 36
37 Long-Term Subs A long-term sub must meet the long-term sub criteria. Per the MDCH Medicaid Provider Manual: A long-term substitute staff must be employed by the ISD/Local Educational Agency (LEA) for at least 30 calendar days within the quarter. The ISD/LEA may report the name of the long-term substitute staff any time after the sampling moments are distributed. The long-term substitute staff must meet all of the program requirements and provider qualifications necessary to participate in the Medicaid school based services program staff pool. The substitute's name must be listed in parentheses behind the name of the regular staff person on the staff pool list. If listed on the staff pool list, the substitute staff must complete the time study moment. Financial worksheets must reflect the name of the regular staff and the substitute in parentheses. The cost reflected should be the sum of the cost of the regular staff on leave and the long-term substitute staff. All audit liability for the financial data reported and the tracking of the moments is the responsibility of the ISD/LEA reporting entity. All staff whose costs are included in the cost pool, including long-term substitutes, must be included in the sample universe for the time study. To indicate that a long-term sub is in place for a staff member, follow these steps: 1. Select the link of the name of the participant that is on leave. 2. Update the following fields: a. address: enter the sub s address b. First name: enter the sub s first name in parenthesis c. Last name: enter the sub s last name in parenthesis Editing a Staff Person If information needs to be updated for a staff person, such as address, name, or job title, follow the following steps: 1. From the Staff Pool screen, job position information may be edited by selecting the link on the desired participant s name Page 37
38 2. The selected participant position s information will appear and can be edited. 3. Make all necessary modifications to the individual job position s screen by clicking in the text boxes or by using the drop down menus. Users are able to make updates to the job position s Job Category, Shift Type, Employment Type, Job Title, address, employee ID, name and cc person in this section. 4. Once all the necessary changes have been made, click the Save Changes button at the bottom of the screen to save the updated information. Exporting and importing the SPL Additions and deletions to the staff pool list can be done through an export/import process. To export the file go to the People tab and choose Staff Pool Positions, Export is located on the top of the screen. The file will open with the following fields: Agency Name (LEA name) Cost Pool Name Job Category Name Shift Type Name (Name given to the selected shift) Employment Stauts (Salaried or Contracted) Employee ID First Name Last Name Begin Date End Date Inactivate The export is used to inactivate staff, by entering an employment end date in the end date field and by entering yes in the inactive field. Staff can be added to the system through the import as well. Fields must have the exact entries from the drop down menus in the system. For example, the name of the LEA must be entered exactly as it is in the system. Cost pool, job category, shift type, and employment status all must be entered in exactly how they appear in the system. Edits and vacancies cannot be completed through the import, they must be completed in the system. Page 38
39 Once all additional and inactive staff are complete (and the file is saved as an Excel document) import the file back into the site by clicking Import from the Staff Pool Positions screen. If there are any errors in the file the coordinator making the updates will receive a message on the screen as well as an detailing which sections will need to be revised. If no errors are found within the file, all updates will be added to the Staff Pool List. Page 39

40 VII. Certifying the Staff Pool List After all updates have been completed, the LEA must certify the Staff Pool List. Before certifying the SPL, please be sure the list is accurate and complete. Please note that each LEA must be certified in order for the staff pool list to be included in the time study for the quarter. An ISD can certify the ISD and then all LEAs will be included in the certification rather than one by one. 1. Click on the Staff Pool Positions link from the People dropdown on the Home screen. 2. The staff pool will display. Select the Certify Staff Pool box to certify the staff pool. The system will display the message that the list has been certified successfully. The final step is for the ISD to review the SPLs of all the LEAs and click Certify Staff Pool List. ISDs need to be sure to do this at the ISD level and not just the LEA levels. If an LEA or ISD make a mistake, ISDs can unlock a staff pool list for further editing. ISD View of Staff Pool List ISDs can view the Staff Pool List for the whole ISD by selecting Staff Pool Participants from the People menu while having the ISD level selected. The list shows all participants by LEA and can be exported for easy viewing. ISD Certification of Staff Pool List The ISDs can reset a district s Staff Pool List if they need the LEA to make updates prior to submitting to PCG. From the LEA s Staff Pool Positions link under People, the ISD should select the Unlock Staff Pool. This will allow edits to be made to the LEA s staff pool list. Once all edits are made, the staff pool list must be certified again. Then the ISD should certify the whole staff pool list. This will indicate to PCG that the ISD s staff pool list is finalized and ready for PCG review. Page 40


41 An LEA can quickly view which of their LEAs have certified their SPLs by selecting the arrow in the dropdown menu next to the ISD name while in the Staff Pool Participants section in the People tab. The list of LEAs for the ISD will then display in two sections: Ready for certification: This group of LEAs has not certified yet. Certified, Ready for PCG approval: This group of LEAs has certified their SPL. Page 41
42 IX. Financials The AOP quarterly financial process begins in the Financials tab in the claiming system. After logging in, click Financials. Then choose the proper date range from the dropdown menu in the top right corner, corresponding to the desired quarter. The following menu items are available under the Financials tab: 1. District Payroll Staff: LEAs will enter costs for their payroll staff included in the staff pool list for the corresponding quarter. 2. Contracted Staff: LEAs will enter costs for their contracted staff included in the staff pool list for the corresponding quarter. 3. Payroll Support Staff: LEAs will enter costs for the direct support staff on their payroll 4. Contracted Support Staff: LEAs will enter costs for the direct support staff that are contracted 5. Quarterly Summary: LEAs will review their edits and summary cost data, then certify. Payroll Staff vs Contracted At the time of job position creation, a coordinator selects employment status for every participant. The selections are district payroll staff or contracted. If a staff person was categorized incorrectly in the system as payroll when it should be contracted or vice versa, the change must be made in the People menu under staff pool participants. Edit the participant to select the correct employment status. Once updated, the financial pages are immediately populated with the change. District Payroll Staff Select District Payroll Staff from the Financials tab on the Green Menu Bar to enter costs for payroll staff. The following field is updated as the LEA updates the financial submission. 1. Status: The status field notifies the user if edit checks are triggered. The following icon will appear: Page 42
43 A green check will appear if no edits were triggered and no further action is needed. A yellow yield sign will appear if edit checks were triggered which exceed the statewide threshold by one deviation of the average and an explanation will need to be entered before certifying the financials. An orange yield sign will appear if edit checks were triggered which exceed the statewide threshold by two deviations of the average which exceed the statewide threshold and an explanation will need to be entered before certifying. The following fields are pre-populated from the People tab in the system: 1. LEA 2. Emp Id 3. Name 4. Job Category 5. Cost Pool 6. Job Title 7. Job Span (This is shown via a graph to represent if the participant was in the position for the whole quarter, or a smaller percentage of time) The top graph represents employment for part of the year, a hover over with the curser will bring up the dates of the partial employment. The bottom graph represents employment for the whole quarter. The fields that will be entered by LEA financial contacts include: 1. Paid Hours (optional field): Enter the number of hours the staff person worked during the quarter 2. Salary: Enter payroll costs 3. Benefits: Enter benefits costs incurred by the district 4. Other Costs (only AOP and Direct Service Cost Pools): a. Staff Professional Dues & Fees b. Staff Travel & Training c. Materials & Supplies 5. Offsets: Enter any federal or other excludable costs if not removed from salary and other costs for each participant Page 43
44 These fields are all available to edit by selecting the link of the participant s name. Enter costs in each of the fields, if there are no costs to report for a specific field then enter 0 (zero). The system will calculate the gross costs and net costs automatically and display. There is a notes field provided to enter any information that may be useful in the event of an audit. This is an optional field. Select save changes to save the data. The data will save only if all edit checks have been resolved. Edit Checks and Warnings The PCG Claiming System analyzes the data as soon as it is entered into the system, reviewing it for common errors. Examples of common errors include: reporting no salaries; reporting benefits with no salaries; reporting compensation greater than one (1) standard deviation from the mean, as determined based on previous years reported expenditures; and reporting costs paid from federal funds that exceed total costs reported for a specific cost category. If a common error is identified, the provider either must make necessary revisions to eliminate the audit/edit or provide a written explanation as to why the reported information is accurate. Once the edits/reviews have been resolved or explained, the web-based system allows the data to be saved. Page 44
45 Resolving Edit Checks If a common edit is identified, the provider must resolve the issue. An edit check can be resolved either by changing the entry amount in question or by entering an explanation stating why the data is accurate. To do this, review the warnings that have appeared as financial data was entered. Make any data corrections. If the user changed the expenditure amount where the error occurred, and the expenditure reported no longer meets the flag criteria, the warning will be eliminated from the screen. Alternatively, if the data is indeed accurate the user can enter an Explanation in the field below the warnings. If an explanation is recorded, the edit will remain for future reference as part of the LEA s financial submission, a yellow yield sign is shown in the status bar of the participant for easy identifying. PCG may follow up with the LEA if the explanation does not clearly describe why the edit was triggered. Until all warnings are corrected or an explanation is entered, the data cannot be saved. The screen shot below shows the edit checks (warnings) that were triggered and the Explanation box that appears to address the warnings. In order to certify the Quarterly Financial Submission, all edit checks must be resolved by either correcting the entry or proving an explanation. Page 45

46 Contracted Staff Staff that are designated in the People menu under staff pool participants with the employment status contracted are displayed in the Financial menu under Contracted Staff. The employment status can be updated at any time if a change is necessary. The following fields are pre-populated from the People tab in the system: 8. LEA 9. Emp Id 10. Name 11. Job Category 12. Cost Pool 13. Job Title 14. Job Span (This is shown via a graph to represent if the participant was in the position for the whole quarter, or a smaller percentage of time) The top graph represents employment for part of the year, a hover over with the curser will bring up the dates of the partial employment. The bottom graph represents employment for the whole quarter. The fields that will be entered by LEA financial contacts include: 6. Paid Hours (optional field): Enter the number of hours the staff person worked during the quarter 7. Contracted Costs: Enter all contracted costs 8. Other Costs (only AOP and Direct Service Cost Pools): a. Staff Professional Dues & Fees b. Staff Travel & Training c. Materials & Supplies 9. Offsets: Enter any federal or other excludable costs if not removed from salary and other costs for each participant These fields are all available to edit by selecting the link of the participant s name. Page 46
47 Enter costs in each of the fields, if there are no costs to report for a specific field then enter 0 (zero). The system will calculate the gross costs and net costs automatically and display. There is a notes field provided to enter any information that may be useful in the event of an audit. This is an optional field. Select save changes to save the data. The data will save only if all edit checks have been resolved. Edit Checks The PCG Claiming System analyzes the data as soon as it is entered into the system, reviewing it for common errors. Examples of common errors include: reporting no contracted costs; reporting reporting compensation greater than one (1) standard deviation from the mean, as determined based on previous years reported expenditures; and reporting costs paid from federal funds that exceed total costs reported for a specific cost category. If a common error is identified, the provider either must make necessary revisions to eliminate the audit/edit or provide a written explanation as to why the reported information is accurate. Once the edits/reviews have been resolved or explained, the web-based system allows the data to be saved. Page 47
48 Resolving Edit Checks If a common edit is identified, the provider must resolve the issue. An edit check can be resolved either by changing the entry amount in question or by entering an explanation stating why the data is accurate. To do this, review the warnings that have appeared as financial data was entered. Make any data corrections. If the user changed the expenditure amount where the error occurred, and the expenditure reported no longer meets the flag criteria, the warning will be eliminated from the screen. Alternatively, if the data is indeed accurate the user can enter an Explanation in the field below the warnings. If an explanation is recorded, the edit will remain for future reference as part of the LEA s financial submission, a yellow yield sign is shown in the status bar of the participant for easy identifying. PCG may follow up with the LEA if the explanation does not clearly describe why the edit was triggered. Until all warnings are corrected or an explanation is entered, the data cannot be saved. The screen shot below shows the edit checks (warnings) that were triggered and the Explanation box that appears to address the warnings. In order to certify the Quarterly Financial Submission, all edit checks must be resolved by either correcting the entry or proving an explanation. Page 48

49 Import/Export LEAs have the ability to edit financial information by using the import/export functionality in the system. Click the Export button in the top left corner of the payroll page to start the export/import process. After you click Export you will then be prompted to open or save the file. The file will export as a comma separated values (csv) file format. The user must save the document in an Excel format before it can be imported back into the system (as shown below). The original exported file will contain all of the data from the system. Users should not update any of the data that is already populated in the system. Users can only update the paid hours, financial information, notes, and edit explanation fields. The system will not accept any changes to the headers in the top row of the document or any other original information regarding the staff names, job information, and ID information. The system requires that values be entered in every field for costs. You cannot leave any field blank if the desired value is zero dollars. All financial fields must contain 0 even if there are no costs to report. The system does not allow any currency symbols to be entered. After the updates have been made and saved to your file, click Import to upload the data back into the system and you will see the screen below. Click Browse to select the location of your file and click Upload to upload it into the system. Page 49

50 You will then receive a message indicating a summary of your file. This message does not mean that the data has been uploaded yet. If you have no errors and the system accepts your data, you can then click I have reviewed and verified the log and click Commit. The changes will not be made in the system unless users click Commit. Users will receive an notification from the system every time files are uploaded and committed. After you have committed your file. You will receive the message below and the updates will be reflected in the system. The upload file messages will also display the edit checks that need to be resolved. Users can either enter the edit check explanations in the financial data import or manually in the system. Page 50
.")
51 Adding Support Staff Positions Before entering costs for direct support staff, the names and positions of these personnel must be added in the claiming system (reminder: these personnel are not included on the SPL and do not participate in the Random Moment Time Study). Please note the following: Once added, direct support staff information will remain in the system from quarter to quarterusers will not need to re-enter this information every quarter. Users can delete Direct Support Staff information as appropriate. To add direct support staff positions, click on the People tab from the green menu bar. Then select Direct Support Positions from the menu. Click Add New Job Position. Enter the following information about each position/individual: Job Category (select Direct Support Staff) Shift Type Job Title (e.g., secretary, administrative assistant, etc.) Action (select Fill with New) Start Date (enter the first day of the quarter for which they are being added. For example, enter 7/1/2014 for the July-September financial reporting period.) Employment Type (select either District Payroll or Contracted) First Name Last Name CC Person (Leave Blank) After entering the required information, click Create New Job Position. Repeat this process to enter additional Direct Support Staff positions as appropriate. Page 51
52 After Direct Support Staff Positions have been added under Direct Support Positions, the financial contacts can enter direct support staff costs for positions that support staff on the staff pool list. Reporting Costs for Direct Support Staff From the menu bar, choose Financials and click Payroll Support Staff (if staff is an employee of the district) or Contracted Support Staff (if staff is a contractor). Click on the name of the person in the Direct Support Staff position to begin reporting costs for that position. The cost reporting process is very similar to entering payroll information for employees and contracted staff, with one key exception: users must also enter the % Cost Pool Allocation to identify the percentage of time this position spent supporting employees who are included on the Staff Pool List (SPL): Page 52
53 Under % Cost Pool Allocation enter the percentage of time this position supports a person or persons who are included on the SPL and what cost pool that person is in. This does not need to total 100%. Only the AOP and DS cost pools can have support staff time allocated to them. You must enter a 0 (zero) for the personal care and case management cost pools. Please note: you are NOT being asked to indicate the % of time this positions spends on AOP activities. Examples of Direct Support Staff % Cost Pool Allocation John Doe is a secretary who spends all of his time supporting a principal who is employed by the school corporation and included on the AOP staff pool list (SPL). The user should enter 100 in the AOP field to show that John spends all his time supporting an LEA staff member (the principal) who is included on the SPL. Mary Sue is an administrative assistant who spends all of her time supporting four speech pathologists who are employees of the school. Three of the speech pathologists are included on the SPL and one is not. Because Mary devotes equal time in support of all four speech pathologists, the user should enter 75 in the DS field to show that 75% of Mary s time is spent supporting three LEA staff members (the three SLPs) who are included on the SPL. Page 53

54 After entering all costs and % Cost Pool Allocation data for the Direct Support Staff position, enter an explanation for any warnings that appear and then click Save Changes. Repeat this process to enter costs for all positions that fall under Direct Support Staff payroll or contracted. Quarterly Summary and Certification After reporting and carefully reviewing all costs, the financial liaison must then certify the costs in order to submit the Quarterly Financials, which PCG will use to calculate the quarterly claim. To access the certification area, choose Financials and then Quarterly Summary. The Certify Financials button is located at the top left of the Quarterly Summary page. Users should not click the Certify Financials button unless they have finished entering and reviewing their quarterly financial submission. Below the Certify Financials button, users will see quarterly financial summary tables. The tables displayed will vary based on the financial information entered. Users may see one or all of the following tables: Status Summary This table shows how many warnings were triggered while entering costs. The warning counts are broken down for each quarterly financial area: The columns has warnings and has severe warnings indicate that the user triggered warnings, but that the warnings are accompanied by explanations. In other words, these warnings have been addressed and will not prevent the user from certifying quarterly financials. The far right column requires explanation indicates if there are any warnings that do not have an accompanying explanation. All warnings must be accompanied by an explanation- users will not be able to certify their financials if there are warnings that still require explanation. The count in the requires explanation column must be 0 in order to certify costs. Page 54

 all costs are reported accurately using cash basis accounting and")
55 Salaried Staff Users will see this table if they have entered salaries or benefits for LEA employees. It displays salary, benefits, and federal fund totals for each job category: Contracted Staff Users will see this table if they have entered salaries or benefits for LEA employees. This table provides an overview of the costs entered for contracted employees. It displays total contracted staff costs for each job category: After carefully reviewing all data to verify that (1) all costs are reported accurately using cash basis accounting and (2) all federally funded amounts are accurately identified, click Certify Financials. Upon clicking Certify Financials the MAC Financial Liaison will be asked to confirm the following: Page 55
ReadySub for Administrators. Administrator User Guide Version 2.0. ReadySub
 ReadySub for Administrators Administrator User Guide Version 2.0 ReadySub Page 1 of 15 ReadySub ReadySub is a state of the art employee absence management and substitute placement system. Organization
PCG: SPL Overview and Best Practices
 PCG: SPL Overview and Best Practices 2018 School-Based Services Conference August 16-17, 2018 Agenda SPL Driving Factors A look into the inner workings of what goes in to the SPL Informative Checklist
PCG POST. Public Consulting Group, Inc. Important Dates and Reminders RMTS
 June 2015 Volume 7, Issue 4 Brought Brought to to you you by: by: Public Focus. Proven Results. Important Dates and Reminders RMTS Random Moment Time Study (RMTS) updates for the 2015-16 school year! A
TIM MANUAL FOR TIM MANAGERS AND TIM ADMINISTRATORS
 TIM MANUAL FOR TIM MANAGERS AND TIM ADMINISTRATORS November, 2016 INTRODUCTION TO TIM... 1 TIM Manager... 1 TIM Administrator... 1 LOGGING IN & SIGNING OUT... 3 NAVIGATING TIM... 6 A Few Tips for Displaying
SMART er GUIDE June 2016
 SMART er GUIDE June 2016 0 Table of Contents Introduction...2 Logging into SMART er...2 Changing Password and Security Questions...5 Announcements and District Forms...5 SMART er Menu Items Defined...7
Manager Dashboard User Manual
 Manager Dashboard User Manual Manager User Guide The Manager User Guide is designed to provide a supervisor or a manager with step-by-step instructions for their daily tasks. Although every database will
Employer Self Service Portal. Employer Self-Service Handbook AASIS Employer Users Version
 Employer Self Service Portal Employer Self-Service Handbook AASIS Employer Users Version June 2017 Blank Page Contents OVERVIEW... 5 How to Use This Manual...7 ESS Roles and Tasks...8 Accessing COMPASS
Frontline Education s Absence Management Solution Reference Guide for Administrators Table of Contents
 Frontline Education s Absence Management Solution Reference Guide for Administrators Table of Contents Internet Feature Section A: Section B: Section C: Section D: Section E: Section F: Section G: Section
SMART er and Employee Self Service
 SMART er and Employee Self Service Region V Spring Conference April 2014 Contents Logging into SMART er...3 SMART er Menu Items Defined...6 Announcements and District Forms...6 Pay and Personal Information...6
Time, Attendance and Leave (TAL) Training Guide For Supervisors and Payroll Coordinators
 Training Guide For Supervisors and Payroll Coordinators") Time, Attendance and Leave (TAL) Training Guide For Supervisors and Payroll Coordinators Last Updated 5/8/2015 Page 1 Table of Contents 1 Overview... 3 2 Supervisor s Responsibility... 3 3 Payroll Coordinator
Time, Attendance and Leave (TAL) Training Guide For Supervisors and Payroll Coordinators Last Updated 5/8/2015 Page 1 Table of Contents 1 Overview... 3 2 Supervisor s Responsibility... 3 3 Payroll Coordinator
Employer Guide to CONNECT
 to CONNECT . TABLE OF CONTENTS Table of Contents.... Introduction... 4. Guide Instructions... 4. CONNECT System Overview... 4.. What is CONNECT?... 5.. Where can I access CONNECT?... 5.. What are the benefits
Ball State University HR-TMS Training Guide: FACULTY
 PeopleAdmin Ball State University HR-TMS Training Guide: FACULTY Human Resource s Talent Management System Updated September 2017 Human Resource s Talent Management System (HR-TMS) and PeopleAdmin As we
Taleo Enterprise. Taleo Compensation Manager Guide
 Taleo Enterprise Taleo Compensation Feature Pack 12B August 31, 2012 Confidential Information and Notices Confidential Information The recipient of this document (hereafter referred to as "the recipient")
E-Time Reporting Guide for Non-Exempt (Salaried and Hourly) Employees
 Employees") E-Time Reporting Guide for Non-Exempt (Salaried and Hourly) Employees CONTENTS Click on topic below to go directly to that page. LOG INTO THE ORACLE BUSINESS APPLICATIONS 1.1 How to Access, Log In and
E-Time Reporting Guide for Non-Exempt (Salaried and Hourly) Employees CONTENTS Click on topic below to go directly to that page. LOG INTO THE ORACLE BUSINESS APPLICATIONS 1.1 How to Access, Log In and
Workforce One Time & Labor Management
 Workforce One Time & Labor Management Web Based Time & Labor Management is a web-based time and attendance system used for a variety of labor tracking needs such as: attendance management, project tracking,
INSTRUCTION GUIDE FOR RMTS CALENDARS AND WORK SCHEDULES for the Commonwealth of Massachusetts. School-Based Medicaid Program
 INSTRUCTION GUIDE FOR RMTS CALENDARS AND WORK SCHEDULES for the Commonwealth of Massachusetts School-Based Medicaid Program Effective FY 2018 Massachusetts Calendar Entry Contents A. RMTS Calendars: Overview
SECURITY SETUP. Version 5.5
 SECURITY SETUP Version 5.5 User Accounts This document offers step-by-step instructions to create and maintain user accounts for SmartLinx. It also contains a complete list of the permissions and definitions
CCI Online Management System (OMS) Documentation Section: HR
 Documentation Section: HR") CCI Online Management System (OMS) Documentation Section: HR 1.1.Getting Started...2 1.2.Adding a New Employee...2 1.3.Editing & Submitting Employees...5 1.3.1 Editing Employee Information...7 7 1.3.2
CCI Online Management System (OMS) Documentation Section: HR 1.1.Getting Started...2 1.2.Adding a New Employee...2 1.3.Editing & Submitting Employees...5 1.3.1 Editing Employee Information...7 7 1.3.2
Aesop QuickStart Guide for Employees
 Aesop QuickStart Guide for Employees This guide will show you how to: -Log on to the Aesop system -Navigate your Aesop home page -Create an absence online -Assign a substitute to an absence* -Attach a
User Guide. Introduction. What s in this guide
 User Guide TimeForce Advanced Scheduling is the affordable employee scheduling system that lets you schedule your employees via the Internet. It also gives your employees the ability to view and print
Aesop Reference Guide for Administrators Table of Contents
 Aesop Reference Guide for Administrators Table of Contents Internet Feature Section A: Section B: Section C: Section D: Section E: Section F: Section G: Section H: Section I: Section J: Section K: Section
Unanet User Guide: Timesheets & Expenses Getting Started Submitting Timesheets Submitting Expenses Contacts & Support
 Unanet User Guide: Timesheets & Expenses Getting Started Submitting Timesheets Submitting Expenses Contacts & Support 395 West Passaic Street Rochelle Park New Jersey 07662 www.luxoft.com/insys Getting
UCSB. Kronos 6.3. Manager Manual
 UCSB Kronos 6.3 Manager Manual TABLE OF CONTENTS i. Introduction 1 I. Non Exempt Employees 3 II. Exempt Employees 13 III. Managers 19 Definition of a Kronos Manager 20 General Navigation 21 Managing Timecards
PlatinumPay Xpress. User Manual. Created: Thursday, November 01, Copyright Execupay Software, LLC.. All Rights Reserved.
 PlatinumPay Xpress User Manual Created: Thursday, November 01, 2012 Copyright Execupay Software, LLC.. All Rights Reserved. 1 Contents Getting Started... 4 System Requirements... 5 Signing In... 5 The
ERS Coordinator Manual Version UNIVERSITY OF CALIFORNIA. Santa Barbara. Effort Reporting System Guide
 ERS Coordinator Manual Version 10.10 UNIVERSITY OF CALIFORNIA Santa Barbara Effort Reporting System Guide B U S I N E S S & F I N A N C I A L S E R V I C E S Extramural Funds Accounting Contacts Rudy Moreno,
EMPCENTER 9.6 USER GUIDE
 January 2016 Oregon State University EMPCENTER 9.6 USER GUIDE Policy Profile Students/Temps Hourly Table of Contents EmpCenter Overview... 3 Accessing EmpCenter... 3 Employee Dashboard... 3 Employee Timesheet
Kronos Timesheet & Workforce Management Guide for Employees
 Kronos Timesheet & Workforce Management Guide for Employees Version 1.0 05/27/2015 Table of Contents I. Introduction..1 II. Getting Started 2 Logging On Changing Your Password Common Icons and Screen Functions
WEB TIME EMPLOYEE GUIDE
 Revised 10/27/2017 WEB TIME EMPLOYEE GUIDE CLIENT RESOURCE PAYLOCITY.COM TABLE OF CONTENTS Web Time... 3 Web Kiosk... 10 Home... 29 My Timesheet... 43 My Pay Adjustments... 57 Employee Time Off Calendar...
Off-Campus Work-Study Employer JobX Training Guide
 Off-Campus Work-Study Employer JobX Training Guide Student Employment Services Training Topics: 1. Introduction 2. Login 3. Add a job 4. Edit a job 5. Review on-line applications 6. Send Hiring Correspondence
USER GUIDE STAFF JOB POSTINGS STAFF POSITION DESCRIPTIONS
 USER GUIDE STAFF JOB POSTINGS STAFF POSITION DESCRIPTIONS TABLE OF CONTENTS LOGIN... 3 HOME PAGE... 4 STEPS TO FILL A VACANCY... 6 STEP 1: CREATE OR MODIFY THE POSITION DESCRIPTION... 7 STEP 2: HUMAN RESOURCES
EmpowerTime Supervisor User Guide Table of Contents
 EmpowerTime Supervisor User Guide Table of Contents Supervisor Quick Guide. 1-2 Timecard Edits...3 Daily Tasks - Dashboard...4 Absences 5-6 Time Off Requests. 7-8 Approving Employee Timecards.9-10 Exceptions...
BAYPORT BUSINESS ONLINE BANKING USER GUIDE TABLE OF CONTENTS
 BAYPORT BUSINESS ONLINE BANKING USER GUIDE TABLE OF CONTENTS ADD/MANAGE BUSINESS USERS Add a user 3 Modify account specific access 4 Set access for all accounts 7 Steps to approve a user 8 Set transaction
12: Unemployment Services
 12: Chapter Contents Menu... 12-2 Unemployment Benefit Overview... 12-4 File a Claim... 12-4 File for Weekly Benefits... 12-4 Claim Summary... 12-5 Benefit Rights Information... 12-5 Claimant Details...
Program Updates Spring 2014
 Program Updates Spring 2014 What's New in EPAS 2014? Increased speed Self-service password reset now available for all employees Printable blank evaluations (for information only may not be submitted as
Employer Self Service Portal. Employer Self-Service Handbook
 Employer Self Service Portal Employer Self-Service Handbook March 17, 2017 APERS Employer Self-Service Handbook Table of Contents Overview How to Use This Manual 7 ESS Roles and Tasks 8 Accessing COMPASS
People Inc. Managing Timesheets P&A Software Solutions Page 1 of 12 Version 1.2, November 2012
 Managing Timesheets Page 1 of 12 Version 1.2, November 2012 Introduction Functionality provided by People Inc. enables you to register timesheets electronically. This is done via the web browser on your
Create a requisition. View a job posting. Review applications. Access certification list. Track candidate interviews. Process job offers and accepts
 Create a requisition View a job posting Review applications Access certification list Track candidate interviews Process job offers and accepts Submit a hire request The City of Minneapolis utilizes the
HealthEquity Employer Portal Guide HealthEquity All rights reserved.
 HealthEquity Employer Portal Guide 2013-2015 HealthEquity All rights reserved. INTRODUCTION 09 ACCESSING PENDING PAYMENTS 01 LOGIN PROCESS 09 MODIFYING EMPLOYER INFORMATION 01 ADDING INSURANCE INFORMATION
HealthRoster Managers User Guide
 Email: e-rostering@bfwhospitals.nhs.uk Website: http://www.bfwh.nhs.uk/working-for-the-trust/e-rostering-and-corporate-bench Phone: 01253 953690 HealthRoster Managers User Guide People Centred Positive
Quick Reference for Project View Managers
 Time & Attendance Version 8.0 Quick Reference for Project View Managers Overview ADP Enhanced Time and Attendance (etime) simplifies the task of collecting your employees time and attendance information
Employee Training Guide. Workday V 26.3
 Employee Training Guide Workday V 26.3 Table of Contents Basic Workday Navigation Welcome to Workday 3 Accessing Workday. 4 Workday Icon Glossary. 5 Workday Terms Glossary. 7 Sign Out of Workday. 9 Navigate
INSTRUCTIONAL GUIDE. Timekeeping For Non-Exempt AnyTime Employees MARCH 7, UNIVERSITY OF CALIFORNIA, BERKELEY Kronos Version 8
 INSTRUCTIONAL GUIDE Timekeeping For Non-Exempt AnyTime Employees MARCH 7, 2017 UNIVERSITY OF CALIFORNIA, BERKELEY Kronos Version 8 TABLE OF CONTENTS INTRODUCTION... 2 TRAINING... 2 ROLES AND RESPONSIBILITIES...
University Human Resource Services TMS Talent Management Training Guide for STAFF
 University Human Resource Services TMS Talent Management Training Guide for STAFF February 2019 University Human Resource Services Talent Management System (HR-TMS) and PeopleAdmin HR-TMS enhances the
Managing Loblaw Vendor Portal Users. Reference Guide for Vendor Portal Administrators
 Managing Loblaw Vendor Portal Users Reference Guide for Vendor Portal Administrators Copyright 2018 The content of this training program is copyrighted. Loblaw Companies Limited (LCL) prohibits any form
Manual. evoclock Manual Page 1
 Manual evoclock Manual Page 1 Table of Contents Main Menu... 4 Adding a New Employee... 4 Assign Employee to a Supervisor... 4 Auto Lunch Deduction... 5 Employee List... 6 Employee Self Service (ESS) Portal...
KRONOS TRAINING MANUAL
 KRONOS TRAINING MANUAL CSS Non-Exempt Employees PILOT (TEST) GROUP Department of Human Resources 210 East First Street Greenville, NC 27853-4353 Table of Contents Introduction to Kronos... 2 Logging On
Alberta Prorate IRP System. Online Services User Guide
 Alberta Prorate IRP System Online Services User Guide Document Version: 1.1 Status: Final Date: February 7, 2012 Amendment History - Document Status (e.g. Draft, Final, Release #): Version Modified Date
UNIVERSITY OF NORTH FLORIDA. Office of Human Resources & Office of the Controller. Employee Self Service Part I
 UNIVERSITY OF NORTH FLORIDA Office of Human Resources & Office of the Controller Employee Self Service Part I OFFICE OF HUMAN RESOURCES & OFFICE OF THE CONTROLLER Employee Self Service Part I University
E-Time Reporting Guide for Non-Exempt (Salaried and Hourly) Employees
 Employees") E-Time Reporting Guide for Non-Exempt (Salaried and Hourly) Employees CONTENTS Click on topic below to go directly to that page. LOG INTO THE ORACLE BUSINESS APPLICATIONS 1.1 How to Access, Log In and
E-Time Reporting Guide for Non-Exempt (Salaried and Hourly) Employees CONTENTS Click on topic below to go directly to that page. LOG INTO THE ORACLE BUSINESS APPLICATIONS 1.1 How to Access, Log In and
User Manual for cstock Version 1.0 Oct 2012
 User Manual for cstock Version 1.0 Oct 2012 Contents I. Overview of cstock... 3 A. Vision... 4 B. Objectives of cstock... 4 Purpose of the User Manual... 4 Target Users... 4 Acronyms:... 3 Navigation tips...
E-Time Reporting Guide for Exempt Employees
 E-Time Reporting Guide for Exempt Employees CONTENTS Click on topic below to go directly to that page. OTHER LINKS IN THIS GUIDE LOG INTO THE ORACLE BUSINESS APPLICATIONS 1.1 How to Access, Log In and
EMPCENTER 9.6 USER GUIDE
 October 2014 Oregon State University EMPCENTER 9.6 USER GUIDE Policy Profile Classified Hourly Table of Contents EmpCenter Overview... 3 Accessing EmpCenter... 3 Employee Dashboard... 3 Employee Timesheet
BUSINESS PROCESS GUIDE. PEOPLESOFT HUMAN CAPITAL MANAGEMENT Release 9.2. Department Time Administrator. For Department Managers and DTAs
 BUSINESS PROCESS GUIDE PEOPLESOFT HUMAN CAPITAL MANAGEMENT Release 9.2 For Department Managers and DTAs July 2015 TABLE OF CONTENTS PROCESS OVERVIEW... 3 Accessing Time and Labor Screens Via My ASU...
Supervisor and Time Approver Guide to Kronos Time and Attendance
 Supervisor and Time Approver Guide to Kronos Time and Attendance For questions regarding HMC students, please contact: Chi Herrington, SHRM-CP, FPC Human Resources Associate 909.607.79 cherrington@hmc.edu
TRUST. Technology Reporting Using Structured Templates for the FCH JU. User Manual for data providers. Version 1.00
 TRUST Technology Reporting Using Structured Templates for the FCH JU User Manual for data providers Version 1.00 Table of contents TRUST ----------------------------------------------------------------------------------------------------------------------------
Log into my JPSO and sign in as you would normally sign on to view pay stubs, etc.
 Accessing NOVAtime You can access NOVAtime from any computer. You will however need a standard Internet browser (preferably Windows Internet Explorer or Mozilla Firefox ). Log into my JPSO and sign in
Employer Quick Guide
 CONTENTS TO ADD A NEW EMPLOYEE S RECORD... 3 TO ADD A NEW EMPLOYEE S DEPENDENT RECORD... 6 TO ADD A NEW EMPLOYEE S BENEFITS... 8 TO ADD AN EMPLOYEE S EMERGENCY CONTACTS... 12 TO FIND EXISTING EMPLOYEES...
Version No: 3.0, Build No: 3. Portal Release Notes V3B3
 Version No: 3.0, Build No: 3 Portal Release Notes V3B3 Table of Contents Important Note: The current version of V3B3 is supported with Compatibility View Settings OFF for IE (Internet Explorer) browsers....
TABLE OF CONTENTS. Introduction... 18
 SAP Fieldglass Supplier Administrator Guide Updated: November 2017 TABLE OF CONTENTS GUIDE OVERVIEW... 5 Learning Objectives/Agenda... 5 INTRODUCTION TO SAP FIELDGLASS... 6 Terminology... 6 SAP FIELDGLASS
Chapter Contents. Manage Employers Option Screen
 16: Manage Employers Chapter Contents Create an Employer Account (Registration)... 16-2 Add Employer Locations... 16-6 Assign a Case Manager... 16-8 Add Contacts... 16-9 Assist an Employer... 16-13 Search
MUNIS Employee Self Service User Guide - v. 11.1
 MUNIS Employee Self Service User Guide - v. 11.1 Employee Self Service: Overview p. 1 Employee Self Service (ESS) is a Self Service application created specifically for current employees. ESS accesses
DATABASICS Time User s Guide v3.1
 DATABASICS Time User s Guide v3.1 A Guide to CALIBRE s Time Reporting Website July 2016 CALIBRE 6354 Walker Lane, Suite 300 Alexandria VA 22310 1 Table of Contents Before You Get Started... 3 Accessing
DHL IMPORT EXPRESS ONLINE USER GUIDE FOR IMPORTERS WE COORDINATE EFFECTIVE COMMUNICATION BETWEEN YOUR SHIPPERS AND YOU FOR YOU. dhl-usa.
 DHL IMPORT EXPRESS ONLINE USER GUIDE FOR IMPORTERS WE COORDINATE EFFECTIVE COMMUNICATION BETWEEN YOUR SHIPPERS AND YOU FOR YOU. dhl-usa.com/ieo CONTENTS Importer Manage Your Imports 3 Helpful Guide Information
Welcome to the ICM Service Provider Portal
 Welcome to the ICM Service Provider Portal Table of Contents Welcome!... 3 What is the Portal?... 3 Visibility and Privacy... 3 Getting Started... 4 Computer System Requirements... 4 BCeID Requirements
Editing an Existing Account on an Invoice Payment Creating a New Account on an Invoice Payment... 47
 ebilling User Guide Table of Contents About This Guide Chapter 1 ebilling Basics... 6 Getting Started with ebilling... 6 Logging into ebilling... 6 Working with the ebilling Home Page... 8 Updating Your
Table of Contents. Field Experience
 Table of Contents Introduction 3 Resources Available on the Conference Visitors Pass 3 Overview 4 Core Functionality 4 Enhanced Features 4 Module Vocabulary 5 Basic Definitions 5 User Roles 5 FEM Administrator
FM Payroll Calendar Year-End Procedures
 FINANCE MANAGER FM Payroll Calendar Year-End Procedures 2013 Finance Manager Table of Contents Calendar Year-End Processing Checklist...1 Calendar Year-End Procedures...2 Common Errors...7 Commonly Asked
Table of Contents. 2 P a g e
 Skilldex Training Manual October 2012 Table of Contents Introduction to Skilldex... 3 Skilldex Access... 4 Sections of Skilldex... 5 Current Program... 6 Toolbox... 7 Employers... 8 New Employer... 9 All
1 etime Questions? Please contact the Employee Hotline at or
 1. If I am locked out of my account, how do I reset my password?... 1 2. I am an approver, and the Data Validation QuickNav does not appear correctly. What do I do?... 2 3. How do I make changes for prior
Ball State University HR-TMS Training Guide: Staff
 PeopleAdmin Ball State University HR-TMS Training Guide: Staff Human Resource s Talent Management System March 16, 2017 Human Resource s Talent Management System (HR-TMS) and PeopleAdmin As we embrace
Deltek Electronic Timekeeping Manual
 Deltek Electronic Timekeeping EMPLOYEE TRAINING MANUAL ELECTRONIC TIMEKEEPING 1 Electronic Time Collection & Expense Table of Contents Table of Contents WELCOME:... 3 ACTIVATING YOUR ACCOUNT:... 4 ACCESSING
SUBMITTING TIMESHEETS AND EXPENSES
 SUBMITTING TIMESHEETS AND EXPENSES CANDIDATE GUIDE Quick links: 01. Logging in to Track >> 02. Navigating Track >> 03. Submitting timesheets >> 04. Submitting expenses >> 05. FAQs >> 06. Contact/help/feedback
Ariba Network Online Invoice Guide
 Ariba Network Online Invoice Guide Introduction Regions Financial Corporation Specifications Your Ariba Network Account Invoices Accessing Your Account Account Navigation Account Configuration Settlement/Remit-To
Peoples Bank Benefit Manager. Employer User Guide. Member FDIC
 Peoples Bank Benefit Manager Employer User Guide www.peoplesbank-wa.com/benefitmanager Member FDIC Contents Welcome... 3 Login to the Employer Portal... 4 First-time Use... 4 Login... 4 Forgot Your Password?...
ADVANTAGE 3.10 EMPLOYEE SELF SERVICE (ESS) USER GUIDE HUMAN RESOURCES AND PAYROLL DEPARTMENTS
 USER GUIDE HUMAN RESOURCES AND PAYROLL DEPARTMENTS") ADVANTAGE 3.10 EMPLOYEE SELF SERVICE (ESS) USER GUIDE HUMAN RESOURCES AND PAYROLL DEPARTMENTS Course No. Effective Date: 3/01/2018 Revision Date: Contact: Human Resources HRIS and Payroll Document Status:
ADVANTAGE 3.10 EMPLOYEE SELF SERVICE (ESS) USER GUIDE HUMAN RESOURCES AND PAYROLL DEPARTMENTS Course No. Effective Date: 3/01/2018 Revision Date: Contact: Human Resources HRIS and Payroll Document Status:
Table of Contents. Hire (Companies Using Hiring + Onboarding) Hire (Companies Using Onboarding Only)
 Hire (Companies Using Onboarding Only)") Table of Contents Hire (Companies Using Hiring + Onboarding) Hire (Companies Using Onboarding Only) Starting the Onboarding Process Complete at Home What If the Employee Can t Locate the Welcome Email?
Table of Contents Hire (Companies Using Hiring + Onboarding) Hire (Companies Using Onboarding Only) Starting the Onboarding Process Complete at Home What If the Employee Can t Locate the Welcome Email?
Time, Attendance and Leave (TAL) Training Guide For Supervisors and Payroll Coordinators
 Training Guide For Supervisors and Payroll Coordinators") Time, Attendance and Leave (TAL) Training Guide For Supervisors and Payroll Coordinators Last Updated 10/11/2016 Page 1 Table of Contents 1 Overview... 3 2 Supervisor s Responsibility... 3 3 Payroll Coordinator
Time, Attendance and Leave (TAL) Training Guide For Supervisors and Payroll Coordinators Last Updated 10/11/2016 Page 1 Table of Contents 1 Overview... 3 2 Supervisor s Responsibility... 3 3 Payroll Coordinator
Human Resources Applicants Handbook
 Human Resources Applicants Handbook 2017-18 1 P age Thank you for submitting your application to Texans Can Academies (TCA). Texans Can Academies is a progressive, dynamic school district immersed in a
Kronos Workforce Central v8.0 Upgrade Guide for Timecard Approvers
 Kronos Workforce Central v8.0 Upgrade Guide for Timecard Approvers March 2017 Getting Started... 2 Logging On... 2 Logging Off and Timing Out... 2 Navigating in Workforce Central... 3 Alerts and Notifications...
Your Guide to the CARS System
 CERF COUNTY EMPLOYEES RETIREMENT FUND Your Guide to the CARS System CERF Contact Information: Toll-Free: 877-632-2373 Tel: 573-632-9203 Fax: 573-761-4404 E-mail: IT@mocerf.org www.mocerf.org 1 Table of
Then enter your PIN, also created during the enrollment process. After entering this data, select Submit.
 The screens you will see in this guide were made for demo purposes, and may contain unrealistic payment or payee information. If you have questions not addressed in the tutorial, contact your Bill Pay
Army Billing Official
 Access Online Army Billing Official User Guide Version 1.3 Contents Introduction...3 Confirm and Pay Payment Model... 4 Get Started...5 Login/Logoff... 5 Basic Navigation... 7 My Personal Information...
Manager Training Package. Goal: To accurately and efficiently manage employees time
 Goal: To accurately and efficiently manage employees time Manager Training Package Table of Contents Pre-Payroll Processing Checklist... 2 Reviewing Time:...3 Viewing Employee Time:... 3 ManagingTime:...
Department of Management Services People First. People First! New Employee Orientation. Working together to put People First! Last Updated
 ! New Employee Orientation Last Updated 09-19-08 Working together to put! Table of Contents Click on the topic to jump to that section. Service Center EEO-Veterans-AAP How to Log in to Emergency Contact
T U T O R I A L Creating a Temporary Stipend Job Description using OACIS
 T U T O R I A L Creating a Temporary Stipend Job Description using OACIS Getting Started 1. First, log on using your employee ID and personal password. If you don t yet have an account, contact HR at x3166.
Contents 1 Welcome to BTOE 1 Getting started 2 Finding your way around 2 Functions available 3 Employer details 3 Pay Centre details 4 Employee detail
 BT Online Employer Easy User Guide BT Business Super Contents 1 Welcome to BTOE 1 Getting started 2 Finding your way around 2 Functions available 3 Employer details 3 Pay Centre details 4 Employee details
REFERENCE GUIDE. January, 2018
 REFERENCE GUIDE January, 2018 1 Contents Introductory Evaluation for New Hires and Transfers... 3 Adding Goals After Introductory Eval... 5 Re-Evaluation: Introductory & Annual... 7 Focus Review 1 and
Time, Attendance and Leave (TAL) Users Guide for Supervisors of Salaried Employees
 Users Guide for Supervisors of Salaried Employees") Time, Attendance and Leave (TAL) Users Guide for Supervisors of Salaried Employees 1. Overview The TAL system establishes and communicates procedures to ensure employees time and attendance are recorded
Time, Attendance and Leave (TAL) Users Guide for Supervisors of Salaried Employees 1. Overview The TAL system establishes and communicates procedures to ensure employees time and attendance are recorded
INSTRUCTIONAL GUIDE. Timekeeping For Non-Exempt RealTime Employees who use a computer to record time MARCH 7, 2017
 INSTRUCTIONAL GUIDE Timekeeping For Non-Exempt RealTime Employees who use a computer to record time MARCH 7, 2017 UNIVERSITY OF CALIFORNIA, BERKELEY Kronos Version 8 TABLE OF CONTENTS INTRODUCTION...2
Contents Create a New Cost Center in Student Employment Application... 2 Access the Software Applications... 2 Main Application Page Hire & Manage
 Contents Create a New Cost Center in Student Employment Application... 2 Access the Software Applications... 2 Main Application Page Hire & Manage Student Employees... 4 Hire a student... 5 Student Help
Welcome to the Service Provider Portal
 Welcome to the Service Provider Portal Table of Contents Welcome!... 3 What is the Portal?... 3 Visibility and Privacy... 3 Getting Started... 5 Computer System Requirements... 5 BCeID Requirements and
CBRE PAYMODE-X USER GUIDE FOR ELECTRONIC INVOICING SYSTEM
 Project Name: CBRE PAYMODE-X USER GUIDE FOR ELECTRONIC INVOICING SYSTEM Version: 1.5 Last Revision Date: May 22 nd, 2017 Original Release Date: January 20 th, 2017 pg. 1 TABLE OF CONTENTSE: Paymode-X Overview
DCC Kronos Supervisor Handbook
 Logging in You can log into Kronos through MYDCC. Select the Working @ DCC tab and then click on the Kronos link located in the upper left hand corner of the screen. If you use the MYDCC portal, you will
Engine Oil Licensing and Certification System (EOLCS) Online System User Guide
 Online System User Guide") Engine Oil Licensing and Certification System (EOLCS) Online System User Guide Managing Contact and Company Information o Contact Registration o Company Registration o Add Contacts To Company o Password
Engine Oil Licensing and Certification System (EOLCS) Online System User Guide Managing Contact and Company Information o Contact Registration o Company Registration o Add Contacts To Company o Password
STRS Ohio Employer Self Service (ESS) Instructions Table of Contents
 Instructions Table of Contents") STRS Ohio Employer Self Service (ESS) Instructions Table of Contents Log in to ESS... 1 Account Settings... 2 Navigating ESS... 3 Additional Tips and Suggestions... 4 New Hire Information... 6 Reemployed
STRS Ohio Employer Self Service (ESS) Instructions Table of Contents Log in to ESS... 1 Account Settings... 2 Navigating ESS... 3 Additional Tips and Suggestions... 4 New Hire Information... 6 Reemployed
Consignee Guide. Version 1.8
 Consignee Guide Version 1.8 TABLE OF CONTENTS 1 Welcome to FlashConsign.com...6 2 Your Consignee Account...7 2.1 Creating a Consignee Account...7 3 Creating a Consignment Sale...10 3.1.1 Consignment Sale
Juniper Newsletter. User Manual Booking Engine - Update April st of March, Juniper Innovating Travel Technology
 Juniper Newsletter User Manual Booking Engine - Update April 2017 31st of March, 2017 www.ejuniper.com Juniper Innovating Travel Technology Content 1. Accommodation 4 1.1. New field to enter the information
Supervisor Overview for Staffing and Scheduling Log In and Home Screen
 Supervisor Overview for Staffing and Scheduling Log In and Home Screen On the login screen, enter your Active Directory User Name and Password, and click the Sign-in button. You will then be taken to your
Payroll Guide Guru Guide Version
 Payroll Guide Guru Guide Version 2017.01.13 Copyright 2017 PeopleGuru, Inc. All rights reserved. Information in this document is subject to change without notice. The software described in this document
ASL Electronic TimeSheet System Employee s User Guide
 1 LOGGING ON TO THE SYSTEM The following link will take you to the system: ASL Electronic TimeSheet System Employee s User Guide https://sdes0412.aslyvr.aslconsulting.net/ess_pineqw/announcements.aspx