Purchase Requisitions and Receiving
|
|
|
- Kelly Wade
- 6 years ago
- Views:
Transcription


1 Purchase Requisitions and Receiving VERSION: February 2018
2
3 Table of Contents About the Purchasing Process 3 Working With Requester Preferences 5 Creating a New Purchase Requisition 9 Reporting a Misuse 17 Indicating that the Order is Associated with a State Contract or University Term Contract (UTC) 18 Attaching Documents to a Requisition 19 Adding Asset Information 21 Naming a Requisition 23 Entering Line Comments in a Requisition 23 Changing the Default Information for a Requisition Line 25 Entering a Contract or Grant Chartfield String with a SpeedChart 28 Deleting Items from the Requisition 29 Entering Comments Applicable to the Entire Requisition 30 Budget Error Notification 31 Time-saving Features 32 Entering a Contract or Grant Chartfield String with a SpeedChart 32 Define Requisition Tab 33 Splitting Funds for a Line of the Requisition 37 Modifying Line, Shipping, or Chartfield Information and Applying it to the Entire Requisition 39 Requesting a Multi-Year Contract 43 Budget Error Notification 46 Managing a Requisition 47 Copying a Requisition 49 Printing a Requisition 51 Viewing the Reason a Requisition was Rejected 53 1
4 Budget Error Notification 54 Modifying a Requisition 55 Canceling a Requisition 56 Creating Receipts and Submitting Invoices 60 Processing a Change Order Request 69 Processing a Return 73 InfoPorte Finance Transactions 76 2
5 About the Purchasing Process Overview Departmental requesters create a non-vendor catalog purchase requisition if: The total amount of goods or services purchased is greater than $5,000. The total amount of goods or services purchased is less than $5,000, but the vendor is not in the vendor catalog and requires a purchase order. Note: When considering a purchase of more than $5,000, it is helpful to first discuss your plans with a purchasing agent in order to receive guidance and help manage costs. You can use the Purchasing Engagement Tool to find the contact information for the appropriate agent. Depending on the circumstances, the requisition is routed to the department, central office, or both for approval. If the requisition is denied, the departmental requester can make changes to the document and resubmit it. Once approved, all requisitions route to a purchasing agent. Purchasing agents do one of the following: If the requisition can be purchased on a State/University Term Contract (UTC), the purchasing agent creates a purchase order, with reference to a State/UTC contract. If a State/UTC contract does not apply and the requisition total does not exceed $5,000, the purchasing agent creates a purchase order with reference to the requisition and sends the purchase order to the vendor. If a State/UTC contract does not apply, the requisition total exceeds $5,000, and a sole source is not provided, the purchasing agent creates a bid document to competively bid out the request. When the vendor responses come in, they are evaluated by the purchasing agent and the department, who jointly decide which vendor to purchase from. If the order exceeds $5,000 and a sole source is provided, the purchasing agent sends the bid to the vendor to complete. The bid is not a competitive bid. When the response comes in, the bid is awarded and a purchase order is sent to the vendor. If the requisition is over $5,000 and the department has already received the goods, the purchasing agent reviews the misuse information and then processes a confirming purchase order to pay the vendor. The department or the Central Receiving Department denotes the receipt in the system. If the goods required inspection, the purchasing agent will let the department know once they have passed inspection, so they can enter the receipt. The system then creates a receipt 3
6 with reference to the purchase order, and when the vendor submits an invoice, a PO voucher entry is created to pay the vendor. For additional information about making purchases at the University, refer to the Finance Division's Basic Spending Guidelines by Fund Source guide. 4
7 Working With Requester Preferences Overview Purchase requesters can set defaults for their purchase requests. These default values are established on the Requester Setup page. Once the default values are set up, they are used on all vendor catalog and non-vendor catalog requisitions, and can be changed from requisition to requisition. Related Reference For information on creating a new requisition, see Creating a New Purchase Requisition, page 9. For information on canceling, copying, printing, editing, or finding an existing requisition, see Managing a Requisition, page 47. Menu Path Main Menu > Finance Menu> Set Up Financials / Supply Chain > Product Related > Procurement Options > Purchasing > Requester Setup Steps - Working With Requester Preferences Follow these steps to set up or change existing requester preferences: 1. Choose this menu option: Main Menu > Finance Menu> Set Up Financials / Supply Chain > Product Related > Procurement Options > Purchasing > Requester Setup 2. On the Find an Existing Value tab of the Requester Setup Page, complete either of the fields: In this field: Requester Description Do the following: Look up, or enter, your username. Enter your first and last name. 3. Click the Search button. 5
8 Result: The system displays the Requester Setup page. 4. Complete the fields for any default values you want to create for your requisitions. You must enter a default for the following chartfields: Location Set ID (enter this field first) Location Phone GL Unit (Business Unit) Department Note: If you don't want to create a default value for any of the other fields, leave those fields blank. In this field: Location Set ID Do the following: Before entering any default information, enter either UNCCH or UNCGA in this field. 6
9 In this field: Ship To Do the following: Enter the ship to address or follow the steps below to search for the appropriate address: a. Click the Lookup (magnifying glass) icon. Result: The system displays the first 300 ship to addresses. b. In the Description field, change begins with to contains. Type a word or two to describe your location and click Look Up. c. Click the link for the ship to address you need. Location Enter your location or follow the steps below to search for your location: a. Click the Lookup (magnifying glass) icon. Result: The system displays the first 300 addresses. b. In the Description field, change begins with to contains. Type a word or two to describe your location and click Look Up. c. Click the link for the location you need. Phone GL Unit Fund Source Account Dept PC Business Unit Project ID Activity Program Enter your phone number. Look up, or enter, the business unit. Look up, or enter, the fund. Look up, or enter, the source. Leave this field blank. The account value defaults based on the category code chosen on the requisition, or from the vendor's website, though you can change it. Look up, or enter, the department. Look up, or enter, the PC business unit. Note: Only enter this field if you also enter a default Project ID. Look up, or enter, the Project ID. Look up, or enter, the activity. Note: Only enter this field if you are also entering a Project ID. If used, this value will always be 1 unless it is for a capital project. Look up, or enter, the program. 7

10 In this field: Do the following: Cost Code 1 Look up, or enter, cost code 1. Cost Code 2 Look up, or enter, cost code 2. Cost Code 3 Look up, or enter, cost code 3. Affiliation Fund Affiliation Look up, or enter, the affiliation. Look up, or enter, the fund affiliation. 5. Click the Save button. Result: The system saves the default values, which fill in automatically when you create a vendor catalog or non-vendor catalog requisition. 8
11 Creating a New Purchase Requisition Overview Departmental requesters create purchase requisitions to request goods or services. Purchase requisitions are required for any order over $5,000, whether or not the purchase is made from a vendor in the vendor catalog. For orders less than $5,000: If the vendor is listed in the vendor catalog do not create a purchase requisition. Use eprocurement instead. If the vendor is not listed in the catalog purchase, requisitions are optional unless the vendor requires a purchase order. If you need to make several purchases, you need to create separate purchase requests for each vendor you need to buy from. For example, you can purchase as many items as needed from a single vendor, but if the items come from different vendors, you need to create separate purchase requests. If you don't know which vendor the purchase needs to be made from (for example, if the purchase will go out for bid), still list a vendor on the requisition. Save Money by Planning Ahead When considering a purchase of more than $5,000, reach out to a purchasing agent as early as possible so they have time to find you the best price possible. To identify an agent to contact: 1. Go > Procurement button > Purchasing Services 2. Click the blue Purchasing Engagement Tool button. 3. Narrow the results by selecting an option from either one of the two filters. Related Reference For information on canceling, copying, printing, editing, or finding an existing requisition, see Managing a Requisition, page 47. Menu Path Main Menu > Finance Menu> eprocurement> Create Requisition Steps - Creating a New Purchase Requisition Follow these steps to create a new purchase requisition: 9
12 1. Choose this menu option: Main Menu > Finance Menu> eprocurement> Create Requisition Result: The system displays the Procurement Services page, showing the vendors that are listed in the catalog. Note:: If you haven't set up your required default values, the system displaysthe Requester Setup page. If you have already entered these default values, skip to step If prompted, you must enter some default values on this page before you can create a purchase requisition. Refer to steps 4 and 5 of the Working With Requester Preferences, page 5 instructions for more information. Procurement Service 3. Click the Purchase Requisition tab. 10

13 Create Requisition 1. Click the Special Request tab. Special Request Tab 1. Click the Special Item link. Result: The system displays the special item section. 2. In the Special Item section, complete the fields: 11
14 In this field: Item Description Price Currency Quantity Unit of Measure Category Do the following: Enter a brief description of the item you want to add to the requisition. Note: You can also enter the part number information here,if you know it. Enter the price of the item. Confirm that the currency is USD. US Dollars is the only option the system allows. Enter the quantity you want to order. Search for and choose, or enter, the unit of measure that matches the price you entered. Enter the eight-digit category code, if you know it, or follow these steps below to search for it.. a. Click the Lookup (magnifying glass) icon. b. Choose Description, Containsfrom the Search By list box. c. Enter one or more words that describe what you are ordering. d. Click the Find button. Result: The system displays a list of category codes that meet the search criteria. e. Select the appropriate category code number. Result: The system displays the Add Items and Services tab. Due Date If you want to specify the date you need the item by, enter that date. 12
15 In this field: Vendor Do the following: Search for and choose, or enter, the vendor number. To search for the vendor number: a. Click the Lookup (magnifying glass) icon. b. Enter the vendor name. c. If you want, enter the vendor's city, postal code, and state. d. Click the Find button. Result: The system displays a list of vendors that match the criteria you specified. e. Choose the Vendor ID line that has the appropriate location information. f. If the vendor is not listed in the system, refer to the Requesting a New Campus Vendor, page 1 training documentation. Caution: Do not select a vendor that has the letters EDX in the Default Location column. These vendors can only be used when purchasing from the vendor catalog. Note: Only one vendor per requisition is allowed. Note: If you want, you can leave the vendor blank on every line, enter the vendor once on the Review and Submit tab, and apply it to all lines. Refer to Creating a New Purchase Requisition, page 9 for more information. Result: The system returns you to the Add Items and Services tab with the vendor you chose filled in. Mfg ID Mfg Item ID If you want to, enter the manufacturer identification number. If you want to, enter the manufacturer's item identification number. 3. Click the Add Item button. 13


16 Result: The system updates the Requisition Summary on the top right corner of the page, showing the number of items on the purchase request and the total amount. Notes: 14
17 To add more items to this requisition, repeat steps 4 and 5. If you list a vendor, make sure to choose the same vendor for each requisition line. 4. Click the Review and Submit tab. Review and Submit Tab 1. In limited cases, additional steps are required before you can save and submit your requisition. Once you have entered all of the requisition's line items, complete the steps for any or all of the following, as applicable to your situation: Reporting a Misuse, page 17, if the requisition is being created after ordering and receiving goods valued at more than $5,000 without first requesting a purchase order Indicating that the Order is Associated with a State Contract or University Term Contract (UTC), page 18 Attaching Documents to a Requisition, page 19 if the requisition is valued at more than $5,000 and not part of a State Contract or UTC Adding Asset Information, page 21, if you are buying equipment that costs at least $5, Perform additional edits or add detail to your requisition prior to saving it by completing any or all of the following: Naming a Requisition, page 23 Entering Line Comments in a Requisition, page 23 Changing the Default Information for a Requisition Line, page 25 Creating a New Purchase Requisition, page 9 Creating a New Purchase Requisition, page 9 Deleting Items from the Requisition, page 29 Entering Comments Applicable to the Entire Requisition, page 30 When you have finished editing your requisition, or if you don't need to edit or add comments to the requisition, click the Pre-Check Budget button. If you receive an error message you will need to select a new chartfield string or wait until funds have been added to that string.. 15

18 Result: The system checks to see if enough budget is available on the chartfield string to cover the purchase amount. If there enough budget, the system doesn't display an error message. If the system displays an error message, work with your business manager to move budget to the chartfield string or to use different chartfield values. 3. Do one of the following: If you want to save the requisition to work on later, click the Save and Preview approvals button. When you are ready to finish the requisition, refer to the Managing a Requisition, page 47 for information about finding and completing it. If you are ready to submit the requisition, click the Save & submit button. Caution: You must check the budget before you click the Save & submit button. Results: The system kicks off the approvals process by routing the document to the first approval level. If the requisition includes account and category codes that indicate equipment is involved, the requisition also routes to the Asset Management team for approval. If there are problems with the requisition, the system displays an error message with a link to the policies for purchases greater than $5,
19 Reporting a Misuse If the requisition is created after a department placed an order and received goods or services more than $5,000 without first going through the Create a Requisition process or having a purchase order, a misuse situation has occurred and will be reported. 1. To report a misuse, complete this field on the Review and Submit tab: In this field: Goods/Service over $5,000 have been received Do the following: Mark the checkbox to indicate the items have already been received and the Create a Requisition process wasn't followed. 2. Supporting documentation is required in misuse situations. Click the Attachments link to search for and choose an attachment that indicates and documents why the misuse occurred. Also attach the invoice, if you have received it from the vendor. 17
 If the requisition is related to a State Contract or UTC, it still goes through the Department and")
20 Note: See Attaching Documents to a Requisition, page 19 for instructions about attaching documents. Indicating that the Order is Associated with a State Contract or University Term Contract (UTC) If the requisition is related to a State Contract or UTC, it still goes through the Department and Central Office approval process. Once approved, it is transferred directly into a purchase order. Attachments are not necessary for requisitions related to a State Contract or UTC, unless the vendor has sent you a quote. 1. Complete this field on the Review and Submit tab: In this field: State/UTC Contract Do the following: Mark the checkbox to identify that this order is associated with a State Contract or UTC contract. 18


21 Attaching Documents to a Requisition Attachments are required for any order greater than $5,000. Attachments are required for a State Contract or UTC Contract only if the vendor provided a quote. Examples of attachments include: signed contracts quotes that you have already received from a vendor a sole source justification form and any backup documentation, if there is only one specific vendor that you can use 1. To attach a document, click the Attachments link on the Review and Submit tab. Result: The system displays the Attachments page. 2. Click the Add Attachment button. 19


22 Result: The system displays the File Attachment box. 3. Click the Browse button. 4. Choose the file you want to attach by finding the file on a local or network computer drive, and double-clicking on the file name. 5. Click the Upload button. Result: They system displays the attached file's name and attachment ID. 6. To view the attachment and verify that it was uploaded correctly, click the View button. 20

23 Result: The file opens in a new window. 7. Close the window displaying the image. Note: If the file isn't correct and you need to delete it, click the Minus button to the right of the row, and then click OK to confirm that you want to delete the attachment. 8. To attach more files, repeat steps 1 through 7. When you are finished attaching documents, click OK. Result: The system returns to the Review and Submit tab. Adding Asset Information Asset information is used to track assets that the University owns for reporting and depreciation purposes. These items are usually at least $5,000 and some type of equipment. 21

24 1. To add asset information for any line, click the down arrow to the left of the line you want to add the information to. Result: The system expands to show the chartfields. 2. Click the Asset Information tab. 3. Complete the fields: In this field: AM Business Unit Profile ID Do the following: Enter UNCCH. Note: You must complete this field prior to entering the Profile ID. Search for and choose 1 of the 50 profile IDs that represent the high level asset category of the line item. To search for the profile ID. a. Click the Lookup (magnifying glass) icon. b. Click the category that matches the line item you are requesting. Result: The system displays the profile ID you selected. 4. Click the Asset Information 2 tab. 5. Check the box under Capitalize. 22


25 Note: You must add asset information for the piece of equipment, as well as any associated costs, including freight, installation fees, discounts, and trade-in values. Naming a Requisition 1. If you want to be able to search for and locate this requisition by name in the future, complete the field: In this field: Requisition Name Do the following: Enter a name to help you identify the requisition later. Note: If you are creating this requisition as a changeorder, use this field along with the header comments to list the PO number and to indicate that it is a change order. Refer to the Managing a Requisition, page 47 page for more information about change order. Entering Line Comments in a Requisition You can add comments to any or every line on your requisition.these comments are visible to departmental approvers, Purchasing Services, and anyone who opens the document from the Manage Requisitions page. 1. Click the Comment icon to the right of the line item you want to comment on. 23

26 Result: The system displays the Line Comments page. 2. Enter the line level comment and mark the checkboxes to indicate where you want the comment to be visible. You can mark as many checkboxes as necessary. In this field: Send to Vendor Show at Receipt Show at Voucher Do the following: Mark this checkbox if you want the comment to appear on the purchase order that is dispatched to the vendor. Mark this checkbox if you want the comment to appear on the receipt documentation. Mark this checkbox if you want the comment to appear on the voucher. 3. Click OK. 24
27 Result: The system returns to the Review and Submit tab. Changing the Default Information for a Requisition Line The requisition line section displays information about each requisition line. The information defaults from the selections you made on the Add New Items tab, but you may need to make a change. For example, you may want one specific line shipped to a different location than the other lines. Or you may have accidentally entered the wrong quantity for a certain line item. 1. On the Review and Submit tab, change the requisition information for any line, click the down arrow to the left of the line you want to change and complete any or all of the following fields: In this field: Due Date Quantity Ship To Do the following: Enter the date you want the item by. Enter the quantity you want to order. Enter the ship to location or follow the steps below to search for the appropriate ship to location: a. Click the Lookup (magnifying glass) icon. Result: The system displays the first 300 ship to addresses. b. In the Description field, change begins with to contains. Type a word or two to describe your location and click Look Up. c. Click the link for the ship to location you need. Result: The system sends this line to the selected location. Attention Enter the name of the person to whose attention the shipment needs to be sent. Note: If you work in Auxiliary Services, enter the shop, job, and phase code here, if applicable. 25


28 Note: If a line needs to be received by Amount instead of Quantity, complete steps 2 through 4. Otherwise skip to step To mark a line as Amount Only, click the Line Details button. Result: The system displays the Line Details page. 3. Complete this step: In this field: Amount Only Do the following: Check this checkbox. 4. Then click OK. 26

29 5. To modify chartfield information, click the Chartfields2 tab. Note: For information about chartfields, refer to the Chartfield Structure quick reference card. Result: The system displays any default chartfields. You can change them and enter other chartfields as necessary. 27

30 Entering a Contract or Grant Chartfield String with a SpeedChart You can always use the instructions above to manually enter a chartfield string for a contract or grant, but a quicker way is to just enter the Project ID into the SpeedChart field. When you do, the system will fill in the rest of the chartfield string for you automatically. 1. In the Accounting Lines section, click the Chartfields2 tab. Result: The system displays your default chartfield string or one that you've manually entered. 2. Enter the Project ID for the contract or grant in the SpeedChart field. Note: You may need to click into another field on the requisition to get the chartfields to update. 28

31 Result: The chartfield string is updated based on the Project ID you chose. 3. If necessary, update the Account field. Note: The SpeedChart does not update the Account field and keeps the default value. You can change the Account manually if you need to. Deleting Items from the Requisition If you need to remove one or more lines from your requisition, you can delete them before saving and submitting the requisition. 1. Mark the checkbox in the row that you want to delete. 2. Click the Delete button. 3. When prompted, click the Yes button to confirm that you want to delete the selected lines. 29
32 Result: The system removes that line and, if all lines are deleted before the requisition has been saved, displays the Add Items and Services tab. Note: If the requisition has already been saved, the system shows an error message if you try to delete every line. You must leave at least one line or start a new requisition from scratch. Entering Comments Applicable to the Entire Requisition If you need to, you can enter comments that apply to the entire requisition, rather than individual lines on the requisition. If this is a change order for an existing purchase order, you must enter "Change Order for PO = 2XXXXXXXXX" in the header comments. 1. Enter general information about the requisition in the Comments field. 2. Under the Comments field, mark the checkboxes to indicate where you want the comment to be visible. You can mark as many checkboxes as necessary. In this field: Send to Vendor Use Standard Comments Do the following: Mark this checkbox if you want the comment to appear on the purchase order that is dispatched to the vendor. Click this link if you want to choose a pre-defined standard comment, such as Change Order, Check with Order, and so on. Result: The system displays the Standard Comments page. a. Search for and choose, or enter, the appropriate Comment Type. b. Click OK. Result: The system returns you to the RFQ Header Comments page. Show at Receipt Shown at Voucher Approval Justification Mark this checkbox if you want the comment to appear on the receipt documentation. Mark this checkbox if you want the comment to appear on the voucher. Mark this checkbox if you want the comment to appear in the Requisition Approval page. 30

33 Budget Error Notification Procurement document creators will receive alerts when the chartfield strings used in existing purchase requisitions and purchase orders contain budget errors. The alert includes: document type, document number, a link to a training video of how to correct the budget error, and a link to the transaction detail. A sample of the alert is below: 31
34 Time-saving Features Entering a Contract or Grant Chartfield String with a SpeedChart You can always manually enter a chartfield string for a contract or grant, but a quicker way is to just enter the Project ID into the SpeedChart field. When you do, the system will fill in the rest of the chartfield string for you automatically. 1. In the Accounting Lines section, click the Chartfields2 tab. Result: The system displays your default chartfield string or one that you've manually entered. 2. Enter the Project ID for the contract or grant in the SpeedChart field. Note: You may need to click into another field on the requisition to get the chartfields to update. Result: The chartfield string is updated based on the Project ID you chose. 32
35 3. If necessary, update the Account field. Note: The SpeedChart does not update the Account field and keeps the default value. You can change the Account manually if you need to. Define Requisition Tab Overview For purchase requisitions that will include multiple items, the Define Requisition tab allows you to save time by first entering information into certain fields that will not be cleared out each time that you click Add Item. Using the Define Requisition tab is optional and is intended to save you time when entering lengthy purchase requisitions. Steps - Using Define Requisition Tab Follow these steps to use the Define Requisition Tab 1. Choose this menu option: Main Menu > Finance Menu > eprocurement > Create Requisition The Create Requisition Page will automatically display the Add Items and Services tab. 2. Click the Define Requisition tab. 33

 icon to search for the vendor Leave blank.")
36 3. Click the expand section arrow to the left of Line Defaults. 4. Select Override and then complete any of the remaining fields that you want to remain in the form after each time you add an item to the requisition. Note: You can leave as many of the fields blank as you want but will want to complete each of the fields that will be the same for all of the items that you will add to the purchase requisition. In this field: Vendor Buyer Vendor Location Category Unit of Measure Do the following: Click the Lookup (magnifying glass) icon to search for the vendor Leave blank. Leave blank. Leave blank as most of the items on the purchase requisition will fall under different categories. Select a Unit of Measure if one unit of measure can be applied to all of the items that will be included on the Purchase Requisition. Note: "EA" (Each) will work for most items. 34
37 In this field: Ship To Due Date Attention Pct Location GL Unit Fund Source Account Dept PC Business Unit Do the following: You do not need to change the default information that appears in this field unless you want all of the items to be shipped to an alternate location. Click the Lookup (magnifying glass) icon to change locations if needed. If you want to specify a date that you need all of the items by, enter that date. If all items will need to be sent to the same person, enter that person's name here. Leave blank. If you want the Location for all of your items to be different from your default location, enter it here. If you want the GL Unit for all of your items to be different from your default, enter it here. If you want the Fund for all of your items to be different from your default, enter it here. If you want the Source for all of your items to be different from your default, enter it here. Leave blank. This field is automatically updated based on the Category you select for each item. If you want the Dept for all of your items to be different from your default, enter it here. If you want the PC Business Unit for all of your items to be different from your default, enter it here. Note: Only enter this field if you also enter a Project ID. Project ID Activity If you want the Project ID for all of your items to be different from your default, enter it here. If you want the Activity for all of your items to be different from your default, enter it here. Note: Only enter this field if you also enter a Project ID. Program Cost Code 1 If you want the Program for all of your items to be different from your default, enter it here. If you want the Cost Code 1 for all of your items to be different from your default, enter it here. 35

38 In this field: Cost Code 2 Cost Code 3 Affiliate Fund Affiliation Do the following: If you want the Cost Code 2 for all of your items to be different from your default, enter it here. If you want the Cost Code 3 for all of your items to be different from your default, enter it here. If you want the Affiliate for all of your items to be different from your default, enter it here. If you want the Fund Affiliation for all of your items to be different from your default, enter it here. 5. After completing any of the fields that you want to remain in the form after each time you add an item to the requisition, click Continue. 6. Click Special Item to start creating purchase requisition. 36


39 Result: The fields that were completed on the Define Requisition tab are already entered in the Special Item form and will remain in the form each time that you click Add Item to add another item. Splitting Funds for a Line of the Requisition 1. To use multiple chartfield strings on any line, click the down arrow to the left of the line you would like to split fund. 2. Click the + icon. 37

40 Result: The system displays a second line. 3. Complete the fields, if necessary: In this field: Distribute By Do the following: Choose the option you want: Quantity if you want to split the funding by quantity. Amt if you want to split the funding by amount. Always choose this option for services, so you can create a receipt by amount. Liquidate By Choose the option you want in the event that you end up recapturing some or all of the money: Quantity if you want to liquidate by quantity. Amt if you want to liquidate by amount. Note: If you chose to distribute by amount, you must liquidate by amount. If you chose to distribute by quantity, you can liquidate by amount or quantity. Location Enter the location you are ordering from. 38


41 In this field: Quantity Percent Do the following: If you chose to distribute by Quantity, enter the quantity for each line. If you chose to distribute by Amt, the system doesn't display this field. If you chose to distribute by Amt, enter the percentage to assign to each line. If you chose to distribute by Quantity, leave this field blank. Note: For information about chartfields, refer to the Chartfield Structure quick reference card. Modifying Line, Shipping, or Chartfield Information and Applying it to the Entire Requisition If you want to make the same change to every line item, use the Modify Line/Shipping/Accounting button to do so. Use this option to modify any of the following: vendor buyer category code 39

42 shipping information accounting information 1. In the Requisition Lines section of the Review and Submit tab, complete the field: In this field: Select All /Deselect All Do the following: Mark the checkbox. 2. Click the Modify Line/Shipping/Accounting button. Result: The system displays the Modify Line / Shipping / Accounting page. All fields will come in blank, even if they have values associated with them. 3. Enter new information in any field. Leaving a field blank does not affect the original value of that field. Remember that the information you enter affects every line item on this requisition. Note: For information about chartfields, refer to the Chartfield Structure quick reference card. 4. Click the Apply button. 40

43 Result: The system displays the Distribution Change Options page. 5. Choose the appropriate option: In this field: All Distribution Lines Matching Distribution Lines Replace Distribution Lines Do the following: Mark this checkbox to apply changes to all distribution lines. Mark this checkbox to apply changes to each existing distribution line by matching the distribution line numbers. Mark this checkbox to remove the existing distribution lines and replace them with changed distribution lines. 6. Click OK. 41
44 42 Result: The system changes to the requisition header information and displays the Review and Submit tab.
45 Requesting a Multi-Year Contract Overview When entering a requisition for a multi-year contract, it's important that you structure your requisition correctly. This will greatly aid the buyer who is tasked with creating purchase orders from your requisition and will help avoid potential errors. Here, we highlight the key things you need to do to enter the requisition correctly. For general information about creating a purchase requisition, see the Creating a Purchase Requisition section in this guide. Menu Path Main Menu > Finance Menu > eprocurement > Create Requisition Steps - Requesting a Multi-Year Contract Follow these steps: 1. Choose this menu option: Main Menu > Finance Menu > eprocurement > Create Requisition 2. Click the Purchase Requisition tab. 3. Click the Special Item link. 4. Complete the fields: In this field: Item Description Price Quantity Unit of Measure Category Due Date Vendor ID Vendor Name Do the following: Enter a clear description for the contract. Enter the total cost for all years of the contract, not the amount per year. Enter "1" in this field. Enter EA for each. Choose the appropriate category for your service. Enter the date you need your goods or services. This field is optional. Choose the Vendor ID from the lookup icon. This will fill in automatically after you've chosen the Vendor ID. 43


46 In this field: Do the following: Additional Information Enter information that specifies the amount and length of the contract. Make sure to enter when the contract will begin, end, and when it may be time to renew the contract. 5. Click the Add Item button. 6. Click the Review and Submit tab. 7. If needed, make any necessary adjustments to the options on this screen, such as the chartfield string. If You Want To Receive by Amount Instead of Quantity: a. Click the Line Details icon. 44
47 b. Click the Amount Only box and then click OK. 8. Click the Attachments and Comments link and attach supporting documentation. Note: It's very important to include adequate documentation and comments so the buyer knows exactly how to structure the contract. 9. Click the Pre-Check Budget button. Note: Pre-checking the budget only checks that there is enough budget on a chartfield string at the time you check it. The system does not pre-encumber, or hold the money out of the budget. Pre-encumbrances happen once the purchase requisition is approved, so it is possible that there won't be enough budget to cover the request once it's approved if another transaction uses the budgeted money on the chartfield string first. 10. Click the Save and Submit button. Once the buyer processes your requisition, a separate purchase order will be created for each year of the contract. The amount on each purchase order will only be the portion that will be used for that particular year of the contract. In the example we used in the steps 45
48 above, we asked for a three year contract for $30,000. The buyer will create three $10,000 purchase orders, one for each year of the contract. Note: Be aware that future year POs with non-project-related chartfield strings for future budget years will show budget a budget error of Budget is Closed or Budget is On Hold. This is to be expected and will be rectified when the next budget year is opened. Projectrelated chartfield strings don t necessarily follow the fiscal year and therefore can have multiple budget years open. Any budget errors on project-related POs will either be because the chartfield string is over budget or the budget period for the project has ended. Budget Error Notification Procurement document creators will receive alerts when the chartfield strings used in existing purchase requisitions and purchase orders contain budget errors. The alert includes: document type, document number, a link to a training video of how to correct the budget error, and a link to the transaction detail. A sample of the alert is below: 46
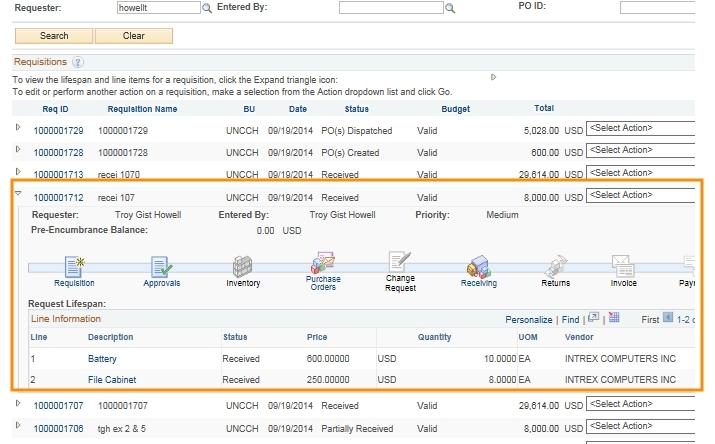
49 Managing a Requisition Overview Use the Manage Requisitions page to search for a vendor catalog order or non-vendor catalog requisition that has already been created. Once you have found the requisition you can: copy the requisition print the requisition view the reason the requisition was rejected modify the requisition cancel the requisition view the requisition life cycle Specific instructions for each of these actions is provided in the sections that follow. Related Reference For information on creating a new requisition, see Creating a New Purchase Requisition, page 9 Menu Path Main Menu > Finance Menu> eprocurement > Manage Requisitions Steps - Managing a Requisition Follow these steps to manage a requisition: 1. Choose this menu option: Main Menu > Finance Menu> eprocurement > Manage Requisitions Before you can perform any of the Manage Requisition functions, you must search for and select the requisition you would like to cancel, copy, print, or edit. 2. On the Manage Requisitions page, complete one or more of the fields: 47
50 In this field: Business Unit Requisition Name Requisition ID Request Status Date From Date To Requester Entered By PO ID Do the following: Enter the business unit associated with the requisition you are searching for. If the requisition was given a name, enter the name of the requisition you are searching for. Enter the requisition ID of the document you are searching for. Choose the appropriate status from the list box of the requisition you are searching for. Use the Date From and Date To fields to search for requisitions created within a specific date range. Use the Date From and Date To fields to search for requisitions created within a specific date range. Enter the Requester ID of the person listed as the requester on the requisition you are searching for. Note: The requester is the department contact for the requisition. Enter the ID of the person who entered the requisition you are searching for. Enter the purchase order ID associated with the requisition you are searching for. 3. Click the Search button. Result: The system displays the first 50 results that meet the criteria you specified. If you don't see the requisition you are searching for within those results, enter more criteria in the search fields and try again. 48
51 4. Once you see the requisition you are looking for in your search results, refer to the steps below to copy, print, edit or cancel that requisition. Copying a Requisition Use the Copy Requisition feature to copy any existing non-vendor catalog requisition instead of creating a new one from scratch. This can be helpful if a new requisition will be similar to one that was already created. The requisition you are copying can be in any status. When you copy an existing requisition, the system: copies the information from the previously created requisition assigns a new Req ID to the new requisition displays the Review and Submit tab of the Create Requisitions page You can modify your new, copied requisition before submitting it for approval. 1. Once you find the requisition you want to copy, complete the field: In this field: Select Action Do the following: Chose Copy Requisition. 2. Click the Go button. 49
52 Result: The system copies the requisition and displays the Review and Submit tab of the Create Requisitions page. 3. Make any changes to the requisition, including updating the chartfield information, if necessary. Note: The attachments are not copied from the original requisition to the new requisition. You will need to attach documentation if the requisition's business rules require it. 4. Click the Save & preview approvals button. 5. Click the Pre-Check Budget button. 6. Click the Save & submit button. 50

53 Printing a Requisition Any printed requisition can display one of these levels of detail: Detailed chartfield information High-level summary information 1. Once you find the requisition you want to print, complete the field: In this field: Select Action Do the following: Choose View Printable Version. 2. Click the Go button. 51

54 3. When the system asks if you want to print distribution details with the requisition, choose one of the following: Yes to print all of the chartfield information for every line No to print only a high-level summary of the requisition Result: The system opens a new window with a printer-friendly report. 52

55 4. Use your browser's print functionality to print the requisition. 5. Close the new window your browser opened which displayed the printer-friendly requisition. Viewing the Reason a Requisition was Rejected Before modifying a requisition that has been rejected, it is helpful to view the comments from the approver to find out why it was rejected. 1. Once you find the rejected requisition, complete the field: In this field: Select Action Do the following: Choose View Approvals. 2. Click the Go button. 53

56 Result: The system displays the Approval Status page. 3. Click the arrow to the left of Comments and view the comments. Budget Error Notification Procurement document creators will receive alerts when the chartfield strings used in existing purchase requisitions and purchase orders contain budget errors. The alert includes: document type, document number, a link to a training video of how to correct the budget error, and a link to the transaction detail. A sample of the alert is below: 54

57 Modifying a Requisition After submitting a requisition, circumstances may require you to change the requisition. Using the Edit Requisition option,you can change the original requisition, such as to update the quantity ordered, price, scheduled delivery date, or ship to location. If the approval process has been started for this requisition, regardless of how complete the process is, the system may require the approval process to be started again. If any line of a non-vendor catalog requisition has been transferred to a purchase order, you need to create a new requisition from scratch instead of modifying the existing requisition. Use the Requisition Name field and the Header Comments field to list the purchase order number and to indicate that the requisition is being created as a change order. In the header comments you must enter "Change Order for PO = 2XXXXXXXXX." The change order is subject to the same budget checking and workflow as the original requisition. If you need to liquidate part or all of the encumbrance, notify the buyer and submit a change order request to Purchasing Services (see Processing a Change Order Request). 1. Once you find the requisition you want to modify, complete the field: In this field: Select Action Do the following: Choose Edit Requisition. 2. Click the Go button. Result: The system displays the Edit Requisition page. 55

58 3. If the requisition is pending approval you receive a message telling you that editing the requisition may reinitialize the approval process. Click OK. Otherwise, skip this step. 4. Make the appropriate changes to your requisition. 5. Click the Save & preview approvals button. 6. Click the Pre-Check Budget button. 7. Click the Save & submit button. Result: The system restarts the approvals process by routing the document and sending a notification to the first approval level. Canceling a Requisition You can cancel a requisition if its purchase order has not yet been created. Vendor catalog orders can be canceled before they are submitted or before they are approved. If you cancel a requisition that is in Approved status, it is important to notify the buyer. If you need to liquidate part or all of the encumbrance, notify the buyer and submit a change order request to Purchasing Services (see Processing a Change Order Request). 56

59 1. Once you find the requisition you want to cancel, complete the field: In this field: Select Action Do the following: Choose Cancel Requisition. 2. Click the Go button. Result: The system displays the Requisition Details page. 3. Click the Cancel Requisition button. Result: The system changes to the status to Canceled and returns to the Manage Requisitions page. 57

60 Viewing a Requisition's Life Cycle 1. To see all the other documents associated with a particular requisition, click the arrow to the left of the requisition line. Result: The system displays all documents associated with the requisition. 2. Click on any document that is in color to view it. 58
61 59
62 Creating Receipts and Submitting Invoices Overview When shipments from a purchase order arrive, the purchased products must be reviewed and inventoried to make sure they are the right item, in the right quantity, and in the right quality. The invoice must also be submitted on the Vendor Invoice Submission page. Receiving and the Vendor Invoice Submission page are only done against purchase orders. Do not create a receipt or submit an invoice for vendor catalog, voucher, or P-Card transactions. The vendor listed on the purchase order does not receive payment until you create the receipt in the system and submit the invoice using the Vendor Invoice Submission page. There is now a receiving functionality that reminds end users to create receipts for orders which will allow the system to pay the invoice received from the vendor. The reminder process will run twice weekly on Monday and Thursday at 7 a.m. and will generate an to users. Sample reminder: If the goods are damaged or a return is necessary, contact the vendor directly and ask for a Return Merchandise Authorization (RMA) number, or some other identifier that proves that your area authorized to return the products. Creating Receipts Use the following procedure to create a receipt for a purchase order. When creating the receipt, please be aware of whether your PO is set up by quantity or by amount. Menu Path Main Menu > Finance Menu > eprocurement > Add/Update Receipts by PO Steps - Creating Receipts Follow these steps to create a receipt: 1. On the Add a New Value tab, click Add. 60
63 2. To search by PO number, enter the PO number in the ID field. Note: Although searching by PO number is preferred, you can also search by Vendor Name. To do so, click the Lookup icon on the right side of the Vendor Name field and select the Vendor Name. Be careful when searching by vendor. Be sure to select and receive the correct items from the correct PO. While it is not required, it may sometimes be helpful to also include a range of dates using the Start Date and End Date fields. 4. Click Search. 5. Select the items to receive and click OK. 61


64 6. Enter the date the goods or services were received in the Received Date field. 7. Enter the quantity received in the Received Quantity field. Or, if the line item was set up on the PO to be received by dollar amount, enter Received Amount in dollars. Note: While it is not required, you can also click Add Header Comments to add comments and/or attachments at the header level or click Line Comments to add comments and/or attachments at the line level. 8. Click Save Receipt. 62

65 Adjusting or Canceling a Receipt You can change or cancel an existing receipt for goods or services that have not yet been invoiced. You cannot cancel a receipt that has already been matched to a voucher. Always remember to click Save Receipt after making any changes. Once the system saves your changes, you should receive a confirmation of the change. Menu Path Main Menu > Finance Menu > eprocurement > Add/Update Receipts by PO 1. Click Find an Existing Value. 2. Search for the receipt you want to change or cancel. The most common ways to search are by Receipt Number or by PO number. 3. Click Search. Result: The system displays the search results in a list or goes directly to the Receive Items page. If the search results are displayed in a list, click the receipt you want to change. Then the system will display the Receive Items page. 63
66 Canceling a Line of a Receipt 1. If you want to remove an item/line that was previously received in error, click the X in the Cancel Line column of the row assigned to the item. 2. A pop-up message window will appear. Click Yes. 3. Click Save Receipt. 64
67 Changing the Quantity or Amount Received 1. If you want to adjust the received quantity or amount, select the previously received value and change it to the correct value. 2. Then, click Save. Canceling a Receipt Completely 1. To cancel a receipt completely, click the Cancel Receipt button. 65

68 2. Click Yes. 3. Click Save Receipt. Submitting an Invoice After receiving your items, you must also submit the invoice using the Vendor Invoice Submission page in order for payment to be released to the vendor. Steps - Submitting an Invoice Using the Vendor Invoice Submission Page 1. To access the Vendor Invoice Submission page do one of the following: Go to In ConnectCarolina, click the Finance tab on the left side of the screen and select Vendor Invoice Submission Page. 66

69 2. Using the information provided on both the purchase order and the invoice provided by the vendor, enter information into each field on the page and click Validate. Note: When you click Validate, the system verifies that there is a valid PO associated with the Vendor ID. It also checks that the invoice you are submitting hasn't already been processed. If you receive an error, double-check the information you entered and click Validate again. 3. After the system recognizes the PO ID that you entered, the Vendor Invoice File Upload screen will appear. Click the Browse button to select the file name that you assigned to the invoice and click Open. 67
70 4. Click Upload. 5. If you need to attach more files, repeat steps 3 and When you are done attaching files, click the Invoice Complete button. 68
71 Processing a Change Order Request Overview When you need to make changes to a purchase order, you will need to submit a new purchase requisition to communicate to the buyer the changes you want. On the purchase requisition, you will reference the PO you need changed and specifically which lines need to be adjusted. The requisition for the change order is not intended to become a new purchase order and it is used simply to notify the buyer of what to change on your existing PO. It is important to reference each line from the PO that you want changed and to put in $0.00 for the amount for each line. The buyer will adjust the purchase units and amounts and will run a budget check before updating the PO. Important: It is highly recommended that you contact the buyer associated with the purchase order to ensure that PO and any related documents are updated properly. Menu Path Main Menu > Finance Menu > eprocurement > Create Requisition Steps - Processing a Change Order Request Follow these steps: 1. Choose this menu option: Main Menu > Finance Menu > eprocurement > Create Requisition 2. Click the Purchase Requisition tab. 3. Click the Special Item link. 4. Complete the fields: In this field: Item Description Do the following: Enter the description of the item that needs to be changed as it reads on the PO. Price Enter $0.00. Quantity Enter a "1." Note: You must enter a "1" when entering a price of $0.00. This isn't related to the actual quantity you want changed on the PO. Information about the quantity should be described in the Item Description field. Unit of Measure Enter the unit of measure, often EA for each. 69

72 In this field: Category Vendor ID Vendor Name Do the following: Choose the category that most accurately describes the item. Enter the vendor number. Enter the vendor's name. Additional Information Enter the PO number, the line number, and details on the specific changes that you are requesting for the item. For example: On PO# , line 2, please increase the quantity of electron microscopes from 4 to Click the Add Item button. 6. Click the Yes button. Caution: The system sets the Zero Price Indicator for you which allows you to process the requisition with a price of zero. Make sure to enter zero for the price, otherwise the requisition will encumber funds for whatever amount is entered on the chartfield string entered for the item. 70

73 Note: You must repeat steps 1-6 for each line item on the PO that needs to be changed. 7. Click the Review and Submit tab. 8. In both the Requisition Name field and the Comments box, enter "Change Order for PO#XXXXXXXXXX." 9. Click the Pre-Check Budget button. 71
74 Click the Save & Submit button.
75 Processing a Return Overview Returns of materials or equipment acquired with a purchase order require authorization from the vendor and documentation in the purchase order system to receive credit for the return. Returns of materials or equipment acquired with a purchase order require a return material authorization (RMA) number from the vendor. Once the RMA is received, a new requisition must be created in ConnectCarolina. All data entry fields must be completed and the requisition must be specified as a change order. The RMA number and the original purchase order number must be referenced in the requisition header. The change order requisition notifies the appropriate purchasing agent to contact the department about the details of the return. Important: It is highly recommended that you contact the buyer associated with the purchase order to ensure that PO and any related documents are updated properly. Menu Path Main Menu > Finance Menu > eprocurement > Create Requisition Steps - Processing a Return Follow these steps: 1. Choose this menu option: Main Menu > Finance Menu > eprocurement > Create Requisition 2. Click the Purchase Requisition tab. 3. Click the Special Item link. 4. Complete the fields: In this field: Item Description Do the following: Enter the description of the item you are returning. Price Enter $0.00. Quantity Unit of Measure Enter the number of items you are returning. Enter the unit of measure, often EA for each. 73

76 In this field: Category Vendor ID Vendor Name Do the following: Choose the category that most accurately describes the item. Enter the vendor number. Enter the vendor's name. Additional Information Enter the line number from the PO for the item you are returning. 5. Click the Add Item button. 6. Click the Yes button. Caution: The system sets the Zero Price Indicator for you which allows you to process the requisition with a price of zero. Make sure to enter zero for the price, otherwise the requisition will encumber funds for whatever amount is entered on the chartfield string entered for the item. 74

77 7. Click the Review and Submit tab. 8. In the Comments box, enter the PO number and the RMA number for the return you are processing. 9. Click the Check Budget button. 10. Click the Save & Submit button. Note: It is recommended that you inform the buyer of the return and reference the PO number as well as the requisition number for the return. 75
78 InfoPorte Finance Transactions Overview InfoPorte is the principal reporting tool for finding balances, individual transactions, and various other information. The purpose of this document is to show you how to sign on to InfoPorte and find finance transactions. This document is not intended to be the complete training on InfoPorte. To attain the necessary understanding of InfoPorte, you need to attend the Financial Reporting with InfoPorte class. Access to InfoPorte is controlled by your InfoPorte Administrator. Generally, you are granted access to the pages and departments within the purview of your job. New users need to request access through their InfoPorte Administrator. To access the request form and to see the list of InfoPorte Access Administrators, go to: In the first column, look for Infoporte Admin/Access Request Coordinator list. In the column to the far right, click Download to view the list in Excel. Accessing InfoPorte and Finding Finance Transactions Follow these steps to access InfoPorte and find finance transactions: There are two ways to access InfoPorte. Choose either Step 1 or From the Home page, click Enterprise Reporting > InfoPorte from the left menu. 2. Enter the InfoPorte URL in your browser: 76


79 3. Click the Login button. Result: The buttons that you have access to appear in the top toolbar. A useful button is the Tools button. This button contains the following tabs: Data Dictionary > Account Mapping tab. This tab allows you to look up the translation from an FRS account to the equivalent chartfield string in ConnectCarolina. Data Dictionary > Chartfield Lookup tab. This tab allows you to search for ConnectCarolina chartfields by an alpha or numeric search. Data Dictionary > General Info tab. This tab contains a list of forms and files, such as the Access Request Form for InfoPorte and a list of the InfoPorte Administrators 4. Click the Finance button. 77

80 Result: The system displays the landing page for the Finance tab, which is the Dept Accounting tab. 5. Click the Transactions tab. Result: The system displays the basic search fields. There is also an Advanced search field section beneath the Basic search section, which allows you to search at an additional level of detail. 6. Click the Advanced link to open the Advanced search section. 7. The Fiscal Year, Budget Year, and Acct Period fields default to the current period. Change these fields if you are looking for a transaction in a different accounting period. Note: For each accounting period you select, you will see transactions for just those accounting periods, rather than transactions life-to-date up to the period selected. 8. Complete the search fields per the table below. Keep in mind the following: The list in the table below focuses on finding each transaction type, but it is not an exhaustive list of ways you can search. For example, you could search by a specific cost code, but that is not listed in this table. Your complete set of search fields impacts your overall search results. For example, if you select STAT_EX_EX ledger in the Basic search section, and then enter a journal ID in the Advanced section that does not have a State fund, you will get no results. There is an optimal set of chartfield combinations for reconciling. Those combinations are listed in the table at the end of this document. 78
81 To find this transaction: purchase requisitions vendor catalog orders Note: These requisitions will have an associated voucher if they have been invoiced to the vendor. vouchers Note: This includes travel vouchers, and purchase requisitions and vendor catalog orders that have been invoiced to the vendor. From the Basic search section, enter: one or a combination of pre-encumbrance ledgers: o o o o F&A_PRE OSR_PRE STAT_EX_PR TRST_EX_PR your department one or a combination of expense ledgers: o o o o F&A_EXP OSR_EXP STAT_EX_EX TRST_EX_EX your department From the Advanced section, enter: REQ_PREENC in the Trans Type field - to see all reqs for your dept Requisition ID in the Trans ID field - to see one specific requisition Acct Date From and Acct Date To - to see requisitions within a date range AP_VOUCHER in the Trans Type field - to see all vouchers for your department Voucher ID in the Trans ID field - to see one specific voucher Campus journals leave blank Journal ID in the Trans ID field - to search for a single journal expenses from data collect batches, such as FEDEX, medical insurance, and core data fees one or a combination of expense ledgers: o o o o F&A_EXP OSR_EXP STAT_EX_EX TRST_EX_EX your department GL_JOURNAL in the Trans Type field deposits your department AR_MISCPAY in the Trans type field - to see all deposits Deposit ID in the Trans ID field - to see a specific deposit 79

82 To find this transaction: From the Basic search section, enter: From the Advanced section, enter: budget journals or transfers one or a combination of budget ledgers: o o o o STAT_EX_BD STAT_RV_BD TRST_EX_BD TRST_RV_BD your department GL_BD_JRNL in the Trans type field - to see all budget journals Budget Journal ID in the Trans ID field - to see a specific budget journal 9. Click the Search button. Result: The system displays the journals based on your search criteria. The table below shows the information in key fields by transaction type. 80
PeopleSoft Requisition Manual Using the PeopleSoft Requisition System
 PeopleSoft Requisition Manual Using the PeopleSoft Requisition System V8.9 September 2014 Table of Contents OBJECTIVES... 3 OVERVIEW... 3 CUSTOMIZING SCREEN... 4 MODULE 1: ENTERING A REQUISITION... 5 Navigating
Work Instructions for using the Specials Requests functionality in eprocurement
 Work Instructions for using the Specials Requests functionality in eprocurement All purchase requisitions can be entered using the epro system. If the vendor that you are trying to place a requisition
Table of Contents 9.0 Training Materials For New Users. Table of Contents 1
 HSC - Requisitions Purchasing Contact: 405-325-2811 Website: www.ou.edu/purchaing Table of Contents 9.0 Training Materials For New Users Table of Contents 1 Create Requisitions Maintain Requisition Page
MUNIS REQUISITION ENTRY
 MUNIS REQUISITION ENTRY MUNIS Purchasing meets the needs of multi-departmental organizations by providing a central focus for all external purchases. Individual departments or schools enter requisitions
Below is a diagram that outlines the steps from beginning to end on processing PS Catalog Orders.
 ~ Sourced to Stores and Vendor The University maintains several Inventory Business Units (also known as Stores or Warehouses) throughout campus that offer commonly used supplies. Over 70,000 items are
Campus Vouchers NEW VERSION: 8/28/2014
 Campus Vouchers NEW VERSION: 8/28/2014 Table of Contents 1 Campus Vouchers 3 Understanding Campus Vouchers 5 Creating a Campus Voucher 7 Running a Voucher Inquiry 21 1 1 Campus Vouchers 1 Campus Vouchers
Working with Voucher Templates
 Working with Voucher Templates VERSION: March 2018 Creating a Template for Vouchers What Is a Voucher Template? You have the option to create templates for vouchers you create on a regular basis, such
Table of Contents. 3. Sending a Requisition for Approval... 9
 Table of Contents 1. Create a New Requisition... 2 Step A: Navigate to Add/Update Requisition... 2 Step B: Create a New Requisition... 2 Step C: Basic Information... 3 Step D: Requisition Defaults... 3
REQUISITIONS, PURCHASE ORDERS, AND REVIEWING PAYMENT INFORMATION
 REQUISITIONS, PURCHASE ORDERS, AND REVIEWING PAYMENT INFORMATION TABLE OF CONTENTS OVERVIEW... 2 CREATE A REQUISITION... 2 CREATE A BLANKET REQUISITION... 15 CREATE A REQUISITION FOR THE COMPUTER DEPOT...
Payment Processing How to Use the Payment Request Tool for Suppliers
 Payment Processing How to Use the Purpose: The Payment Request Tool can be used to pay low dollar invoices
REQUISITIONS, PURCHASE ORDERS, AND REVIEWING PAYMENT INFORMATION USER GUIDE
 REQUISITIONS, PURCHASE ORDERS, AND REVIEWING PAYMENT INFORMATION USER GUIDE Please note: This user guide is intended for online use, and has a number of embedded links. Printing of these documents is discouraged,
Purchase Requisitions & Receiving
 University of North Carolina at Chapel Hill Purchase Requisitions & Receiving Exercise Workbook PeopleSoft Human Resources and Finance Implementation This Exercise Workbook has been customized for the
State of Connecticut Core-CT. Telecommunications Requisitioning
 State of Connecticut Core-CT Telecommunications Requisitioning 1 Agenda Overview TSR Requester Responsibilities Creating Requisitions Core-10 TSRs Favorites Templates Special Requests Copy Requisitions
CFS 9.2 User Guide Requisition Data Entry
 Requisition Data Entry CSUDH, TABLE OF CONTENTS Before You Get Started... 4 Campus-Wide ID + 50... 4 Create a New Requisition... 5 Navigation... 5 Requisition Header... 6 Requisition Details... 13 Saving
Key Changes: Add/Update Purchase Order
 Key Changes: Add/Update Purchase Order The purpose of this job aid is to provide a visual overview of the Add/Update Purchase Order pages in PeopleSoft version 9.2. The numbers on the images are associated
Table of Contents 9.2 Training Materials For New Users. Table of Contents 1
 HSC - Requisitions Purchasing Contact: 405-325-2811 Website: www.ou.edu/purchasing Table of Contents 9.2 Training Materials For New Users Table of Contents 1 Create Requisitions Maintain Requisition Page
Table of Contents 9.2 Training Materials For New Users. Table of Contents 1
 HSC - Requisitions Purchasing Contact: 405-325-2811 Website: www.ou.edu/purchasing Table of Contents 9.2 Training Materials For New Users Table of Contents 1 Create Requisitions Maintain Requisition Page
Purchasing. Section 10 Purchase Orders. Purchase Orders can be entered directly into the PO Entry pages without using LDS emarket.
 Purchasing Section 10 Purchase Orders Purchase Orders can be entered directly into the PO Entry pages without using LDS emarket. Creating a Purchase Order This section contains information on how to enter
PURCHASING INQUIRY 8.9 TABLE OF CONTENTS
 PURCHASING INQUIRY 8.9 TABLE OF CONTENTS CONTENTS: PAGE: Review Requisition 3 Document Status 11 Approval Status 17 Receipt Inquire 22 Change Order History 27 Updated 8/01/2007 Purchasing -- Inquiry Page
Escape Basics. Getting Help. Viewing Accounts. Butte Site Training. Login/Logout. Activity Tree. Search/List/Form. Workspace Tools How Tos
 Escape Basics Login/Logout Activity Tree Search/List/Form Getting Help Workspace Tools How Tos o Link to Escape Online Documentation Online Resources Newsletter Join Our Email List Online Resources Tutorials
Volume 7.2 UNIVERSITY OF NEVADA, LAS VEGAS. Purchasing & Contracts Department. MUNIS User Manual
 Volume 7.2 UNIVERSITY OF NEVADA, LAS VEGAS Purchasing & Contracts Department MUNIS User Manual MUNIS V7.2 PURCHASING & CONTRACTS DEPARTMENT MUNIS Volume 7.2 User Manual University of Nevada, Las Vegas
Purchasing 101 and Requisition Training Manual
 Purchasing 101 and Requisition Training Manual Department Department of Procurement & Contract Services Document filename Purchasing 101 and Requisition Training Manual.docx Document Version 2.0 Last Modified
PeopleSoft Financials epro Process Guide
 epro Process Guide General Stores Requisitions Information Management Client Support Services DCATS 210 567 7777 / Option 5 epro Process Guide Version 2 May 2011 Introduction to the PeopleSoft Financials
PeopleSoft Requisition Creation
 Purchasing > Requisitions > Add/Update Requisitions PeopleSoft Finance version 8 vs. version 9 Top Menu Features p. 1 Removing the Top Menu Features p. 1 Description page Put the Main Menu back on the
University of Wisconsin System SFS Business Process epro.1.03 Buyer Role Documentation. eprocurement Buyer Role... 2
 CONTENTS eprocurement Buyer Role... 2 Buyer WorkCenter (New feature in 9.2)... 3 Options to Review Requisition for Approval... 4 Email... 4 Worklist... 5 Manage Requisition Approvals Page... 6 Buyer WorkCenter...
Accounts Payable Enter a non-po voucher
 Business Process 1. To enter vouchers for invoices not associated with a Purchase Order (PO). (Invoices matched to Purchase Orders should be sent to the Business Office for entry.) 2. To add Asset information
Copyright Basware Corporation. All rights reserved.. Vendor Portal User Guide Basware P2P 17.3
 Copyright 1999-2017 Basware Corporation. All rights reserved.. Vendor Portal User Guide Basware P2P 17.3 Table of Contents 1 Vendor Portal Registration... 4 1.1 Register for Vendor Portal...4 2 Vendor
Creating Early Entry Requisitions Job Aid
 State of Wisconsin Department of Administration Creating Early Entry Requisitions Job Aid Version 1.0 Version History Version Date Editor Description 1.0 5/5/16 Will Kammerait Initial Release 2.0 5/11/16
PeopleSoft Purchasing Internal Vendor (IV) Requisition
 Requisition") PeopleSoft Purchasing Internal Vendor (IV) Requisition Purchasing Internal Vendor (IV) Requisition (Rev. 2-14-2018) Table of Contents Purchasing Overview. 3 Requisition Workflow Terminology. 4 Components
PeopleSoft Purchasing Internal Vendor (IV) Requisition Purchasing Internal Vendor (IV) Requisition (Rev. 2-14-2018) Table of Contents Purchasing Overview. 3 Requisition Workflow Terminology. 4 Components
Prepare a Requisition Shopping from Hosted Supplier in BearBuy
 Enterprise Systems Solutions Quick Reference Guide Prepare a Requisition Shopping from Hosted Supplier in BearBuy 1. Your BFSv9 Home page might look different, depending on your user access. Click the
How to Enter a Purchase Requisition. On the Cal Poly Portal click CSU Portal- Financial Administration
 How to Enter a Purchase Requisition On the Cal Poly Portal click CSU Portal- Financial Administration Pro Tip: Internet Explorer is the recommended web browser for optimal system function. 1 Click on the
eprocurement Requisitions
 UNIVERSITY OF LOUISVILLE TRAINING MANUAL eprocurement Requisitions The University of Louisville Updated 1/23/13 This document will walk you through how to create non catalog and catalog orders, save Requestor
Manage Employee Access
 University of Maine System PeopleSoft Financials 8.4 Manage Employee Access General Ledger Page 1 of 33 GL Inquiry Pages TABLE OF CONTENTS 1. OVERVIEW...3 2. EMPLOYEE ACCESS TO FINANCIALS...3 3. SETTING
PeopleSoft Purchasing College Requisition (CR)
") FOR USE BY THE OFFICE CAPITAL PROJECTS ONLY PeopleSoft Purchasing College Requisition (CR) CAPITAL PROJECTS (NON OCP FUNDS) Purchasing College Requisition (CR) Capital Projects (Non OCP Funds) 12-19-2017
FOR USE BY THE OFFICE CAPITAL PROJECTS ONLY PeopleSoft Purchasing College Requisition (CR) CAPITAL PROJECTS (NON OCP FUNDS) Purchasing College Requisition (CR) Capital Projects (Non OCP Funds) 12-19-2017
Procurement Services Training Manual. An Introduction to eprocurement and GeorgiaFIRST Marketplace
 Procurement Services Training Manual An Introduction to eprocurement and GeorgiaFIRST Marketplace 1 TABLE OF CONTENT Chapter 1: eprocurement and GeorgiaFIRST Marketplace Overview... 3 Benefits of epro
efinance Plus Instructions
 FORT SMITH PUBLIC SCHOOLS efinance Plus Instructions Cash Receipts (Pgs. 1-6) Purchase Requisitions (7-13) Warehouse Requisitions (14-17) Next Year Warehouse Requisitions (18-22) Reports (23-24) Imprest
PSFIN V8.9 Upgrade Training
 PSFIN V8.9 Upgrade Training eprocurement Participant Guide Athens, August 29, 2008 Fort Valley, September 12, 2008 Office of Information and Instructional Technology Version 1.1 08/20/2008 Table of Contents
PeopleSoft Financials epro Process Guide
 epro Process Guide Basic Requisitions Information Management Client Support Services DCATS 210 567 7777 / Option 5 epro Process Guide Version 2 May 2011 Introduction to the PeopleSoft Financials Web Requisition
Requesting Vendors and Independent Contractors
 Requesting Vendors and Independent Contractors VERSION: 10/26/2016 Table of Contents Understanding Campus Vendors 3 Choosing a Vendor Class 6 Reviewing Vendors 9 Requesting a New Campus Vendor 13 Requesting
MSI Purchase Orders Version 4.0
 MSI Purchase Orders Version 4.0 User s Guide Municipal Software, Inc. 1850 W. Winchester Road, Ste 209 Libertyville, IL 60048 Phone: (847) 362-2803 Fax: (847) 362-3347 Contents are the exclusive property
Creating an External Requisition through the Requisition and Number Generator in My UW
 Creating an External Requisition through the Requisition and Number Generator in My UW 1. This section of the application allows you to use the requisition generator to create and print an external requisition
Creating Requisitions
 Creating Requisitions Users Guide REVISED 1/27/10 DEL MAR COLLEGE, PURCHASING DEPARTMENT TABLE OF CONTENTS TABLE OF CONTENTS... 2 LOGGING INTO DATATEL - COLLEAGUE... 3 PROCESS FLOW... 5 CREATING A NEW
EXPRESS VOUCHER USER MANUAL Chapter 4
 EXPRESS VOUCHER USER MANUAL Chapter 4 The Spectrum System PeopleSoft Financials Version 7.5 1. INTRODUCTION... 3 1.1. USE OF THE EXPRESS VOUCHER... 3 2. HOW TO ENTER AN EXPRESS VOUCHER... 4 2.1. SELECTING
Requisitioning Method of Inventory Control
 Requisitioning Method of Requisitioning Method of Course description: Learn how to use emaint Online for inventory tracking, from establishing your inventory records and generating reorder lists through
END-USER GUIDE. The Procure-to-Pay Process
 END-USER GUIDE The Procure-to-Pay Process Version 1.1 June 30, 2016 Contents 1 The E-Procurement Process... 2 2 Creating Requests... 4 2.1 Shopping Catalogs... 4 2.2 Shop Off-Catalog... 7 2.3 Shopping
TEAMS User Guide. Requisitions. First Edition
 TEAMS User Guide Requisitions First Edition 2014 Prologic Technology Systems, Inc. All rights reserved. Prologic, the Prologic logo, TEAMS, TEAMS Business Administration, TEAMS Student Accounting, TEAMS
OMNI - Auxiliary AR / Billing - Parking & Transportation
 OMNI - Auxiliary AR / Billing - Parking & Transportation Placing an Order To place an order with Parking & Transportation Services, utilize the order forms found on the Transportation & Parking Services
How to Receive Against a Xerox Blanket Purchase Order (BPO) in eprocurement
 in eprocurement") How to Receive Against a Xerox Blanket Purchase Order (BPO) in eprocurement BEFORE YOU START - Important related information Do s and Don ts! Use the Invoice Tab DO click on the Invoice tab to review your
How to Receive Against a Xerox Blanket Purchase Order (BPO) in eprocurement BEFORE YOU START - Important related information Do s and Don ts! Use the Invoice Tab DO click on the Invoice tab to review your
eprocurement and GeorgiaFIRST Marketplace
 eprocurement and GeorgiaFIRST Marketplace User s Guide for Accounts Payable Information Technology Services Version 1.1 Last Updated: 10/16/2012 Table of Contents Table of Contents Table of Contents...
Requisitions REQ_300. Requisitions Requisitions
 Requisitions REQ_300 Requisitions 2-8-06 1 Requisitions 10-16-06 1 Prerequisites and Roles Prerequisites SAP R/3 Awareness and Navigation UK100 Roles Departmental Requisitioners Requisitions 2-8-06 2 Requisitions
Or, from the View and Manage RFx(s) page, click the Create RFx button. Create New RFx - Use this button to create an RFQ from scratch.
 page, click the Create RFx button. Create New RFx - Use this button to create an RFQ from scratch.") Request for Quote How to Create Create an RFQ To create any RFx (RFI, RFQ, RFP, Auction or Buyer Survey), from the View and Manage RFx(s) page, click on the Create RFx button. Follow the steps below to
Request for Quote How to Create Create an RFQ To create any RFx (RFI, RFQ, RFP, Auction or Buyer Survey), from the View and Manage RFx(s) page, click on the Create RFx button. Follow the steps below to
University of Massachusetts Amherst * Boston * Dartmouth * Lowell * President s Office * Worcester
 Create a Requisition through the UMASS Marketplace This job aid provides the steps required for entering a basic eprocurement requisition using the UMass Marketplace. Step 1. Log into the Finance system
SUBJECT: Additional Information Related to Requisitions Page 1 of 29 TABLE OF CONTENTS. Overview of the Requisition Structure... 2
 SUBJECT: Additional Information Related to Requisitions Page 1 of 29 TABLE OF CONTENTS Overview of the Requisition Structure... 2 Supporting Documentation Required for Requisitions... 3 Signatures Required
MUNIS Financials Quick Reference Guide
 MUNIS Financials Quick Reference Guide January 16, 2015 TABLE OF CONTENTS I. Adding Programs to My Favorites Page 3 How do I add frequently-used programs to My Favorites? II. Vendor Inquiry Page 4 How
THE UNIVERSITY O K L A H O M A
 PeopleSoft Financials Version 9.0 THE UNIVERSITY OF O K L A H O M A Norman Campus PeopleSoft Upgrade 9.0 Requisition Entry & Approver Training Page 1 of 26 University of Oklahoma Purchasing Department
PeopleSoft Purchasing Internal Vendor (IV) Requisition
 Requisition") PeopleSoft Purchasing Internal Vendor (IV) Requisition Purchasing Internal Vendor (IV) Requisition (Rev. 2-15-12) Purchasing Overview Purchase Orders/Change Orders are generated from on-line requisitions.
PeopleSoft Purchasing Internal Vendor (IV) Requisition Purchasing Internal Vendor (IV) Requisition (Rev. 2-15-12) Purchasing Overview Purchase Orders/Change Orders are generated from on-line requisitions.
Online Payment Requests
 Table of Contents Requesting a Payment... 2 Additional Features... 5 Modifying a Saved or Denied Request... 6 Payment Request Notifications and Approvals... 7 Stopping a Payment Request... 8 Approving
MyDU ONLINE REQUISITION TRAINING
 MyDU Requisition Training pg. 1 MyDU ONLINE REQUISITION TRAINING Director: Ann Kirklin, MBA x4170 Reqs & PO s: Leonora Byrd x4384 May 2013 Log on to the internet, DU homepage. Go to a click on mydu. MyDU
Requisitions Training
 Requisitions Training Agenda Overview Creation & Setup On-Contract Items & Vendors Addresses Accounting Attachments Internal Communication Approval Vendor Notification Change Orders Off-Contract Items
On Line Requisition Create/Edit/Track
 Login at airs.okstate.edu On Line Requisition Create/Edit/Track AIRS Menu will appear; click on Online Requisitions On Line Requisition Menu will appear create a new Requisition edit, view, and track Requisitions
Banking for GL VERSION: 9/22/2014
 Banking for GL VERSION: 9/22/2014 Table of Contents 1 Bank Reconciliation 3 Overview of Bank Reconciliation 4 Entering Bank Statement Information 7 Running the Automated Reconciliation Process 11 Running
Travel and Expense System Manual
 System Manual 1 Contents Overview... 4 Terminology... 4 The Travel Process... 6 Preparing to Create a Travel Authorization... 6 Assigning a Proxy... 7 Create a Travel Authorization... 8 Errors... 14 Using
How to Enter a Requisition
 Module: Purchasing Topic: Requisition Processing How to Enter a Requisition Munis Version 11.1 Objective How to Enter a Requisition This document provides step-by-step instruction on how to enter a requisition
Buy A&M Requisitions Training Version 14 Upgrade PRAIRIE VIEW A&M UNIVERSITY
 Buy A&M Requisitions Training Version 14 Upgrade PRAIRIE VIEW A&M UNIVERSITY What is a Requisition? Requisition documents in Buy A&M allow users to place requests for goods and services. The type of purchase
Table of Contents TopShop Buyer s Guide
 Table of Contents TopShop Buyer s Guide TopShop Buyer s Guide... 2 Logging into TopShop... 2 Key Concepts... 2 Supplier Icons... 3 Searching... 3 Product Searching... 3 Supplier Searching... 4 Request
OMNI - Auxiliary AR / Billing - Copier Services
 OMNI - Auxiliary AR / Billing - Copier Services Placing an Order To place an order with Copier Services, complete the applicable order form on the Departmental Copier Services website. All new rental and
COUPA SUPPLIER PORTAL
 COUPA SUPPLIER PORTAL PO Backed Invoice Supplier Guide Copyright 2016 Coupa Software Inc. All Rights Reserved. v.01.20180417 Table of Contents (CSP)... 2 Registering for CSP... 2 Updating Your Company
Requisition Processing Guide
 Requisition Processing Step by Step May 2004 Requisition Processing Guide Contents CREATE A REQUISITION WITHOUT A MATERIAL MASTER (ME51) 4 CREATE A REQUISITION WITH THE MATERIAL MASTER (ME51) 15 COPY A
etendering User Training Guide
 United Nations Development Programme etendering User Training Guide TABLE OF CONTENTS: etendering User Training Guide... 0 Common Definitions:... 2 Business Process... 3 Bidder Registration... 5 Entering
BANNER SELF SERVICE Requisition Manual (updated April 23, 2010)
") BANNER SELF SERVICE Requisition Manual (updated April 23, 2010) This manual guides you step by step through the process of creating a purchase requisition for an order you that you would like to place.
BANNER SELF SERVICE Requisition Manual (updated April 23, 2010) This manual guides you step by step through the process of creating a purchase requisition for an order you that you would like to place.
REQUISITIONS REQUESTS FOR PURCHASE
 REQUISITIONS REQUESTS FOR PURCHASE OVERVIEW This section outlines the steps necessary to enter a Requisition into the FAST Financials System. Departmental Users (a.k.a. Initiators, Requesters) will initiate
OMNI - Auxiliary AR / Billing College of Music
 OMNI - Auxiliary AR / Billing College of Music Placing an Order To book space with the College of Music, please review the information located on the College of Music s facilities website. All orders for
TRAINING GUIDE ORACLE ISUPPLIER PORTAL ISUPPLIER PORTAL FUNCTIONS
 TRAINING GUIDE ORACLE ISUPPLIER PORTAL ISUPPLIER PORTAL FUNCTIONS TABLE OF CONTENTS Table of Contents...2 Log In Page...4 isupplier Portal Homepage...4 Navigation and Searching...5 Page 2 of 31 Homepage
How to Enter a Blanket Purchase Requisition for Goods (Multiple Lines)
") How to Enter a Blanket Purchase Requisition for Goods (Multiple Lines) 1. Go to Finance-Purchasing-Requisitions and select Add/Update Requisition 2. Click on the Add a New Value tab and select Add. You
How to Enter a Blanket Purchase Requisition for Goods (Multiple Lines) 1. Go to Finance-Purchasing-Requisitions and select Add/Update Requisition 2. Click on the Add a New Value tab and select Add. You
Ver Software Training and Technological Services
 Table of Contents Chapter 1 : Contact Information... 1-1 PeopleSoft Contacts... 1-1 PeopleSoft Web Sites... 1-1 Purchasing Contacts... 1-2 Chapter 2 : Requisition Overview... 2-1 Methods of Purchasing...
eprocurement and GeorgiaFIRST Marketplace User s Guide for Buyers
 eprocurement and GeorgiaFIRST Marketplace User s Guide for Buyers Table of Contents Table of Contents Table of Contents... 2 Introduction... 5 Chapter 1: eprocurement and GeorgiaFIRST Marketplace Overview...
SUBJECT: Requisition Workflow Page 1 of 29
 SUBJECT: Requisition Workflow Page 1 of 29 You will be completing your Requisition Workflow training in the FSTST environment. To access FSTST, click the FSTST Training Logon hyperlink located at the top
Grant Subcontract Requisition
 System Grant Subcontract Requisition Table of Contents Grant Subcontract Requisition- Getting Started... 2 Step 1: Create a Grant Subcontract Requisition... 6 Step 2: Enter Grant Subcontract Information
eprocurement and GeorgiaFIRST Marketplace User s Guide for Local Security Administrator
 eprocurement and GeorgiaFIRST Marketplace User s Guide for Local Security Administrator This page left blank for printing purposes. Table of Contents Table of Contents Table of Contents... 3 Introduction...
Purchase Order, Requisitions, Inventory Hands On. Workshop: Purchase Order, Requisitions, Inventory Hands On
 Workshop: Purchase Order, Requisitions, Inventory Hands In this follow up session to the Operations Changes in Purchase Order, Requisition, and Inventory Theory course, this hands on session will look
tyuiopasdfghjklzxcvbnmqwertyuiopas
 qwertyuiopasdfghjklzxcvbnmqwertyui opasdfghjklzxcvbnmqwertyuiopasdfgh jklzxcvbnmqwertyuiopasdfghjklzxcvb nmqwertyuiopasdfghjklzxcvbnmqwer QuickBooks Instructional Manual MiraCosta College tyuiopasdfghjklzxcvbnmqwertyuiopas
Consider the duties involved when assigning the type of 3G form to submit teaching, research, or other.
 The purpose of this presentation is to provide a full training of the 3G process for department and SSC staff who have either not used the system before or have used the system but would like a refresher.
eprocurement (epro) Overview
 Overview") eprocurement (epro) Overview Purpose: PeopleSoft eprocurement (epro) is designed to make it easier for a casual user to requisition items. This ease-of-use method helps reduce out-of-system purchasing,
eprocurement (epro) Overview Purpose: PeopleSoft eprocurement (epro) is designed to make it easier for a casual user to requisition items. This ease-of-use method helps reduce out-of-system purchasing,
Buy A&M. Departmental Access Training. Direct Open Market. The new E-Procurement System. Requisition Type:
 Buy A&M The new E-Procurement System Departmental Access Training Requisition Type: Direct Open Market Your Event Here Direct Open Market Equivalent to FAMIS Limited Document (L-Doc). Purchases under $5,000
CENTRAL SUSQUEHANNA INTERMEDIATE UNIT Application: Fund Accounting
 CENTRAL SUSQUEHANNA INTERMEDIATE UNIT Application: Fund Accounting PO & Requisition Entry Learning Guide Copyright 2011 Central Susquehanna Intermediate Unit, USA Table of Contents Introduction...1 PO
Domestic Vendor Training Guide
 2014 Domestic Vendor Training Guide Copyright 2013, PetEdge Inc. TABLE OF CONTENTS (click on any of the topics below to jump to that section) INTRODUCTION TO EZSUPPLIER & XCARRIER... 2 I. Getting Started...
BGSU/ PeopleSoft Financial Management Solutions (FMS) Principal Investigator s Training Guide
 Principal Investigator s Training Guide") BGSU/ PeopleSoft Financial Management Solutions (FMS) Principal Investigator s Training Guide Principal Investigator s Training Guide 1 Financial Management Solutions Requisition Approval Workflow for
BGSU/ PeopleSoft Financial Management Solutions (FMS) Principal Investigator s Training Guide Principal Investigator s Training Guide 1 Financial Management Solutions Requisition Approval Workflow for
Munis (v 10.5) Dashboard (v 6.1)
 Dashboard (v 6.1)") Munis (v 10.5) Dashboard (v 6.1) Procedure 1. From the left-hand menu, click on the Favorites arrow to view the Munis Menu. Figure 1 Home screen of Munis 2. Click Requisition Entry to open the program.
Munis (v 10.5) Dashboard (v 6.1) Procedure 1. From the left-hand menu, click on the Favorites arrow to view the Munis Menu. Figure 1 Home screen of Munis 2. Click Requisition Entry to open the program.
3M Ariba Light Account Network Collaboration for Suppliers
 SAP Training Source To Pay 3M Ariba Light Account Network Collaboration for Suppliers External User Training Version: 1.0 Last Updated: 31-Aug-2017 3M Business Transformation & Information Technology Progress
Reading Sample. Banking. Contents. Index. The Authors. First-hand knowledge.
 First-hand knowledge. Reading Sample In this sample chapter, learn how to conduct your routine banking transactions such as incoming payments, deposits, outgoing payments, bank statements, and reconciliations
Buy A&M. Departmental Access Training RPA. (Request for Payment Authorization) The new E-Procurement System
 The new E-Procurement System") Buy A&M The new E-Procurement System Departmental Access Training RPA (Request for Payment Authorization) Buy A&M Terminology Reqisitioner Overview - Terminology PVAMU Terminology Definition Creates requisition
Buy A&M The new E-Procurement System Departmental Access Training RPA (Request for Payment Authorization) Buy A&M Terminology Reqisitioner Overview - Terminology PVAMU Terminology Definition Creates requisition
Rowdy Exchange Training Overview
 Rowdy Exchange Training Overview Spring/Summer 2017 1 Course Objectives 2 Transition & Application Overview 3 New Purchasing Terminology 4 Navigation & User Profile 5 Shopping Catalogs and Forms 6 7 Requisition
FREQUENTLY ASKED QUESTIONS (FAQ)
") FREQUENTLY ASKED QUESTIONS (FAQ) Am I responsible to enter Receipts on PeopleSoft? If you take delivery of goods from a vendor, you may be required to enter the receipt on PeopleSoft. If you certify performance
FREQUENTLY ASKED QUESTIONS (FAQ) Am I responsible to enter Receipts on PeopleSoft? If you take delivery of goods from a vendor, you may be required to enter the receipt on PeopleSoft. If you certify performance
/PeopleSoft. Financial Management Solutions (FMS) 8.9 Requester User Guide April 2009
 8.9 Requester User Guide April 2009") /PeopleSoft Financial Management Solutions (FMS) 8.9 Requester User Guide Table of Contents Introduction - 1 - Helpful Web Sites - 3 - Helpful Phone Numbers - 4 - Signing in to PeopleSoft Applications
/PeopleSoft Financial Management Solutions (FMS) 8.9 Requester User Guide Table of Contents Introduction - 1 - Helpful Web Sites - 3 - Helpful Phone Numbers - 4 - Signing in to PeopleSoft Applications
Financial System Procurement. Reference Guide
 Financial System Procurement Table of Contents How to use this... 4 Introduction to Procurement... 5 Module Objectives... 5 Unit I: General System Process... 6 Unit Objectives... 6 Chapter 1: General System
CUBuyplus. Approver s Guide
 CUBuyplus Approver s Guide This guide will outline the procedures involved in approving or declining requisitions as well as explaining the approval process in CUBuyplus. Logging into CUBuyplus 1. Open
Online. Purchase Requisition. FAQ Guide
 Online Purchase Requisition FAQ Guide FOR QUESTIONS, CONTACT THE CWU PURCHASING OFFICE Contents MyCWU Online Purchase Requisition Data Entry FAQs... 2 Q1: How do I attach documents to a requisition?...
Entering Purchasing 2000 Requisitions
 SAN MATEO COUNTY OFFICE OF EDUCATION CECC Financial System This documentation provides an overview of the steps to enter a Purchasing 2000 requisition. More detailed information is available in the Financial
IPROCUREMENT USER GUIDE
 ipro IPROCUREMENT USER GUIDE UAB Administrative Systems Training instructeam@uab.edu Contents *If you are viewing this documentation online, click on the topic name to for more information. Welcome to
MyFloridaMarketPlace Contracts Seminar
 MyFloridaMarketPlace Contracts Seminar AGENDA MyFloridaMarketPlace Overview Contracts Overview Contract Requests and Creating Contracts Changing a Contract Adjusting a Contract Amount Creating Invoices